1
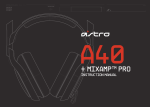
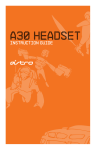
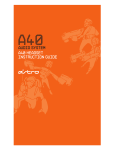
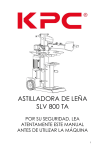
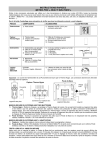
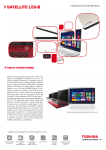
Page 1 Astro A40 +MixAmp™ Pro Instructional Manual Manuel d’instructions Page 2 ASTRO Designed for professionals but fit for any gamer, ASTRO Gaming's A40 +MixAmp™ Pro provides long-‐lasting comfort and complete audio control, so you can play your way. Most importantly, the A40 delivers unparalleled sound with incredible clarity, allowing you to hear even the subtlest aspects of your game’s soundscape. The unidirectional microphone may be worn on either side of the headset, and offers superior vocal communication, clearly capturing your voice without picking up any background noise. You can even decorate your A40 headset by taking advantage of the customizable magnetic speaker tags. The MixAmp™ Pro gives you the power to adjust your game-‐to-‐voice balance, choose an EQ mode, or adjust your volume. Conçu pour les joueurs professionnels mais adapté à tous les gamers, le casque ASTRO A40 + MixAmp™ Pro procure un vrai confort sur la durée ainsi qu’un contrôle audio complet, pour que vous puissiez jouer en toute sérénité. Important, le A40 délivre un son d’une clarté incroyable, vous permettant d’entendre absolument tous les aspects de votre jeu. Le microphone unidirectionnel peut être placé à droite ou à gauche du casque et offre une qualité supérieure des communications vocales, sans bruits de fond. Vous pouvez également personnaliser votre A40 en choisissant dans notre collection de Speaker Tags magnétiques ou en le customisant vous-‐même avec notre outil dédié en ligne. Le MixAmp™ Pro vous permet de maitriser l’équilibre entre le son du jeu et des communications vocales, choisir un mode EQ ou encore ajuster le volume général. Congratulations on your sound investment. Félicitations pour votre investissement audio ! A40 Headset Casque A40 +MixAmp™ Pro Page 3 Package Contents Contenu du Package Contents Contenu A40 Headset Casque A40 Detachable Microphone Microphone amovible MixAmp™ Pro MixAmp™ Pro Speaker Tags Speaker Tags 3.0m TOSLINK OPTICAL Cable Câble OPTIQUE TOSLINK 3.0M Connect to console or PC for audio A connecter à la console ou au PC pour l’audio USB Power Cable Câble d’alimentation USB Connect to any USB port for power A connecter à n’importe quel port USB pour la mise sous tension Connect to PS4 or PC for chat and power A connecter à la PS4 ou au PC pour la mise sous tension et le chat A40 Inline Mute Cable Câble Mute A40 Connect A40 to MixAmp™ Pro A connecter du A40 au MixAmp™ Pro PC Headset Y-‐Adapter Adaptateur Y CASQUE PC Connect to A40 Console Cable for PC use A connecter au Câble Console A40 pour un usage sur PC Daisy Chain Cable Câble Daisy Chain Connect to AUX Input or Daisy Chain A connecter au port AUX ou Réseau en Série (Daisy Chain) Quick Start Guide Guide de démarrage rapide Page 4 System Configuration (PS4) Configuration Système (PS4) 1. Plug the micro-‐USB cable into the MixAmp™ Pro and the front USB port of the PS4 for power. 1. Branchez le câble Micro-‐USB du MixAmp™ Pro au port USB avant de la PS4 pour le mettre sous tension. 2. Plug the mini-‐optical cable into the MixAmp™ Pro and back optical port of the PS4 for Dolby® Digital 7.1 Surround Sound (Be sure to remove the caps on the cable tips). 2. Branchez le mini câble optique du MixAmp™ Pro au port optique arrière de la PS4 pour un son Dolby 7.1 Surround (Pensez à retirer les caches de protection). 3. Plug the Inline Mute Cable into the headset and the front of the MixAmp™ Pro. Ensure that the mute switch is in the off position (no orange should be showing). 3. Branchez le câble Mute dans le casque et à l'avant du MixAmp™ Pro. Assurez-‐vous que le switch mute est en position off (Pas de voyant orange visible). 4. Plug the microphone into either side of the headset. 4. Branchez votre microphone sur l’un des côtés du casque. 5. Power on the PS4, then the MixAmp™ Pro. The PS4 will automatically detect it. 5. Allumez d'abord votre PS4, puis votre MixAmp™ Pro. La PS4 le détectera automatiquement. 6. Sign into a user profile when prompted. 6. Connectez-‐vous à votre profil quand vous y serez invité. 7. Go to settings and select “Sound and Screen,” then select “Primary Output Port” and choose “Digital Out (Optical).” 7. Depuis le menu, sélectionnez 'Son et Écran', puis sélectionnez 'Sortie port Principal'. Sélectionnez 'Sortie Numérique (optique)'. 8. Go back to “Audio Output Settings” and select “Audio Format (Priority),” then select “Bit Stream (Dolby).” 8. Retournez dans 'Paramètres de sortie audio' et sélectionnez 'Format Audio (priorité)', sélectionnez ensuite 'Bit Stream (Dolby)'. 9. Under the "Audio Output Settings" menu select "Output to Headphones" and make sure "Chat Audio" is selected and not "All Audio.” 9. Sous le menu « Paramètres de sortie audio », sélectionnez « Sortie Casque » et vérifiez que « Chat Audio » soit sélectionné et non pas « Tout l’Audio ». 10. The MixAmp™ Pro and PS4 are set up and ready to go. Game on! 10. Ca y est ! Votre MixAmp™ Pro et votre PS4 sont prêts. Game on ! Page 5 System Configuration (PS3) Configuration Système PS3 1. Plug the micro-‐USB cable into the MixAmp™ Pro and the front USB port of the PS3 for power. 1. Branchez le câble Micro-‐USB du MixAmp™ Pro au port USB avant de la PS3 pour le mettre sous tension. 2. Plug the mini-‐optical cable into the MixAmp™ Pro and back optical port of the PS3 for Dolby® 7.1 Digital Surround Sound (Be sure to remove the caps on the cable tips). 2. Branchez le mini câble optique du MixAmp™ Pro au port optique arrière de la PS3 pour un son Dolby 7.1 Surround (Pensez à retirer les caches de protection). 3. Plug the Inline Mute Cable into the headset and the front of the MixAmp™ Pro. Ensure that the mute switch is in the off position (no orange should be showing). 3. Branchez le câble Mute dans le casque et à l'avant du MixAmp™ Pro. Assurez-‐vous que le switch mute est en position off (Pas de voyant orange visible). 4. Plug the microphone into either side of the headset. 4. Branchez votre microphone sur l’un des côtés du casque. 5. Power on the PS3, then the MixAmp™ Pro. The PS3 will automatically detect it. 5. Allumez d'abord votre PS3, puis votre MixAmp™ Pro. La PS3 le détectera automatiquement. 6. Sign into a user profile when prompted. 6. Connectez-‐vous à votre profil quand vous y serez invité. 7. To enable Game Audio, select “Sound Settings,” then select “Audio Output Settings.” Choose “Optical Digital,” and only activate “Dolby Digital 5.1 Ch.” (Make sure that “DTS 5.1 Ch” is NOT selected.) 7. Depuis le menu, sélectionnez 'Paramètres Son', puis « Paramètres Sortie Audio ». Choisissez ‘Numérique Optique’ et activez seulement ‘Dolby Digital 5.1Ch' (Vérifiez que ‘DTS 5.1 Ch.’ n'est PAS sélectionné). 8. To enable Voice Chat, go to “Settings,” select “Accessory Settings,” and then “Audio Device Settings.” Under both “Input Device” and “Output Device,” select “ASTRO MixAmp Pro.” 8. Pour autoriser le Chat Vocal, allez dans ‘Paramètres’, sélectionnez ‘Paramètres Accessoires’, puis ‘Paramètres périphériques audio’. Sous ‘Périphérique d'entrée’ et ‘Périphérique de sortie’, sélectionnez ‘ASTRO MixAmp™ Pro’. 9. The MixAmp™ Pro and PS3 are set up and ready to go. Game on! 9. Ca y est ! Votre MixAmp™ Pro et votre PS3 sont prêts. Game on ! System Configuration (Xbox 360) 1. Plug the micro-‐USB cable into the MixAmp™ Pro and the USB port of the Xbox 360 for power. 1. Branchez le câble Micro-‐USB du MixAmp™ Pro au port USB de la XBOX 360 pour le mettre sous tension. 2. Plug the mini-‐optical cable into the MixAmp™ Pro and optical port of the Xbox 360 for Dolby® 7.1 Digital Surround Sound (Be sure to remove the caps on the cable tips). 2. Branchez le câble mini optique du MixAmp™ Pro au port optique de la XBOX 360 pour un son Dolby 7.1 Surround (Pensez à retirer les caches de protection). 3. Plug the Inline Mute Cable into the headset and the front of the MixAmp™ Pro. Ensure that the mute switch is in the off position (no orange should be showing). 3. Branchez le câble Mute dans le casque et à l'avant du MixAmp™ Pro. Assurez-‐vous que le switch mute est en position off (Pas de voyant orange visible). 4. Plug the microphone into either side of the headset. 4. Branchez votre microphone sur l’un des côtés du casque. 5. Power on the Xbox 360, then the MixAmp™ Pro. The Xbox 360 will automatically detect it. 5. Allumez d'abord votre XBOX 360, puis votre MixAmp™ Pro. La XBOX 360 le détectera automatiquement. 6. Sign into a user profile when prompted. 6. Connectez-‐vous à votre profil quand vous y serez invité. 7. To use Xbox 360 Live Chat: Connect the Xbox Live Cable from your Xbox 360 controller to the Xbox Live Cable Port on your Mixamp Pro™. **Cable not included 7. Pour utiliser le XBOX 360 Live Chat : Connectez le câble XBOX Live de la manette XBOX 360 au port XBOX Live de votre MixAmp™ Pro. ** Câble non inclus 8. The A40 Headset + MixAmp™ Pro and Xbox 360 are set up and ready to go. Game on! 8. Ca y est ! Votre casque A40, votre MixAmp™ Pro et votre XBOX 360 sont prêts. Game on ! Page 6 System Configuration (Windows PC) Configuration Système PC Windows 1. Plug the micro-‐USB cable into the MixAmp™ Pro and a USB port on PC for power. 1. Branchez le câble Micro-‐USB du MixAmp™ Pro au PC pour le mettre sous tension. 2. Plug the mini-‐optical cable into the MixAmp™ Pro and PC for Dolby® Digital 7.1 Surround Sound (Be sure to remove the caps on the cable tips). 2. Branchez le câble Optique du MixAmp™ Pro au PC pour un son Dolby 7.1 Surround (Pensez à retirer les caches de protection). 3. Plug the Inline Mute cable into the headset and the front of the MixAmp™ Pro. Ensure that the mute switch is in the off position (no orange should be showing). 3. Branchez le câble Mute dans le casque et à l'avant du MixAmp™ Pro. Assurez-‐vous que le switch mute est en position off (Pas de voyant orange visible). 4. Plug the microphone into either side of the headset. 4. Branchez votre microphone sur l’un des côtés du casque. 5. Power on the PC, then the MixAmp™ Pro. The PC will automatically detect it. 5. Allumez d'abord votre PC, puis votre MixAmp™ Pro. Le PC le détectera automatiquement. 6. To enable Game Audio on a PC using Windows 7; go to “Control Panel,” select “Sound,” then “Playback.” Select “SPDIF Out” as the digital output, then “Set as Default Device.” 6. Pour autoriser le son en Jeu sur un PC sous Windows 7 Pro, allez dans ‘Panneau de configuration’, sélectionnez ‘Son’, puis ‘Lecture’. Choisissez ‘Sortie SPDIF’ puis "Sélectionner en tant que périphérique par défaut". 7. To enable Voice Chat; go to “Control Panel,” select “Sound,” then “Recording.” Select “ASTRO MixAmp™ Pro,” then “Set as Default Device.” 7. Pour autoriser le Chat Vocal, allez dans ‘Panneau de configuration’, sélectionnez ‘Son’, puis ‘Enregistrement’. Sélectionnez ‘ASTRO MixAmp Pro’, puis ‘Sélectionner en tant que périphérique par défaut'. 8. The MixAmp™ Pro and PC are set up and ready to go. Game on! 8. Ca y est ! Votre MixAmp™ Pro et votre PC sont prêts. Game on ! Page 6 System Configuration (MAC) Configuration Système MAC 1. Plug the micro-‐USB cable into the MixAmp™ Pro and a USB port on the Mac for power. 1. Branchez le câble Micro-‐USB du MixAmp™ au port USB du Mac pour le mettre sous tension. 2. Attach the 3.5mm optical adapter to the mini-‐optical cable, then plug into the MixAmp™ Pro and Mac 3.5mm optical port. 2. Mettez votre adaptateur 3.5mm Optique* sur le câble optique fourni, branchez-‐le dans le MixAmp™ et le port optique 3.5mm du Mac. 3. Plug the Inline Mute cable into the headset and the front of the MixAmp™ Pro. Ensure that the mute switch is in the off position (no orange should be showing). 3. Branchez le câble Mute dans le casque et à l'avant du MixAmp™ Pro. Assurez-‐vous que le switch mute est en position off (Pas de voyant orange visible). 4. Plug the microphone into either side of the headset. 4. Branchez votre microphone sur l’un des côtés du casque. 5. Power on the Mac, then the MixAmp™ Pro. 5. Allumez le Mac en premier, puis le transmetteur MixAmp™ Pro. 6. To enable Game Audio, go to “Settings,” select “Sound,” then “Output” and choose “Digital Out.” 6. Pour activer l'audio en jeu, allez dans "Préférences système", sélectionnez "Son" puis "Sortie" et choisissez "Sortie Numérique". 7. To enable Voice Chat; go to “Settings,” select “Sound,” then “Input.” Select “ASTRO MixAmp™ Pro.” 7. Pour activer le chat vocal, allez dans "Préférences système", sélectionnez "Son", puis "Entrée" et choisissez "ASTRO MixAmp™ Pro" 8. The MixAmp™ Pro and Mac are set up and ready to go. Game on! 8. Ca y est ! Votre MixAmp Pro et votre MAC sont prêts. Game on ! Page 7 A40 +MixAmp™ Pro User Interface (Diagram) Interface Utilisateur A40+MixAmp™ Pro Page 7 A40 User Interface Interface Utilisateur A40 Headset: Casque : Headband: Gently pull on earpieces to adjust size. Bandeau : Tirez doucement sur les oreillettes pour ajuster la taille. Speaker Tags: Magnetic and interchangeable. Speaker Tags : Magnétiques et interchangeables. Microphone: Detachable unidirectional microphone. Place the speaker-‐tag with the cut-‐out on the preferred side and plug in the microphone. Microphone : Unidirectionnel et détachable. Placez le Speaker Tag dans la découpe prévue à cet effet sur le côté du casque, puis banchez le microphone. Page 8 MixAmp™ Pro User Interface Interface Utilisateur MixAmp™ Pro MixAmp™ Pro Controls Contrôles du MixAmp™ Pro Power: Press the Power button to get out of “standby” mode to fully power on the MixAmp™ Pro. Power : Appuyez sur le bouton Power pour sortir du mode veille. Master Volume: The largest wheel on the MixAmp™ Pro adjusts overall volume. Use the Master Volume in conjunction with Game/Voice Balance for total audio domination. Volume Principal : La plus grosse molette sur le MixAmp™ Pro sert à ajuster le volume global. A utiliser avec la balance Jeu/Voix pour un contrôle total du son. Game/Voice Balance: The MixAmp™ below the master volume dial. To adjust, turn the smaller dial to the left to amplify the game audio and quiet the voice chat, and turn it to the right to amplify the voice and quiet the game audio. Balance Jeu/Voix : Sous la molette du volume principal. Pour l’ajuster, tournez la petite molette vers la gauche pour amplifier le son du jeu et vers la droite pour amplifier le son des communications vocales. Dolby® Digital Surround Sound: This button is located to the bottom right of the Master Volume and Dolby® Digital Surround Sound processing is on by default. Press the Dolby® button again to turn it off. Son Surround Dolby® Digital : Ce bouton (sur ON par défaut) se trouve en dessous à droite du Volume Principal. Appuyez dessus pour désactiver le Dolby®. Equalizer (EQ) Modes: EQ modes are controlled by a button to the bottom left of the Master Volume and pressing it will cycle through four different audio presets: Modes Égaliseur (EQ) : Les modes EQ sont contrôlés par le bouton qui se trouve en dessous à gauche du Volume Principal. A chaque pression du bouton correspond un mode différent : 1.Media: Enhanced bass, for movies and music 1. Media: Basses améliorées, pour les films et la musique 2. Core: Balanced for single player gaming 2. Core : Juste équilibre pour les jeux en solo 3. Pro: Boosted high frequencies for competitive gameplay 3. Pro : Fréquences hautes boostées pour les jeux compétitifs 4. ASTRO: Boosted high frequencies for competitive gameplay and especially designed for LAN environments. 4. ASTRO : Fréquences hautes boostées pour les jeux compétitifs, plus spécialement en LAN. Kiri Callaghan 9/14/2014 11:19 PM Deleted: Page 8 FEDERAL COMMUNICATION COMMISSION INTERFERENCE STATEMENT Déclaration de la Commission Fédérale des Communications NOTE: This equipment has been tested and found to comply with the limits for a Class B digital device, pursuant to part 15 of the FCC Rules. These limits are designed to provide reasonable protection against harmful interference in a residential installation. This equipment generates, uses and can radiate radio frequency energy and, if not installed and used in accordance with the instructions, may cause harmful interference to radio communications. However, there is no guarantee that interference will not occur in a particular installation. If this equipment does cause harmful interference to radio or television reception, which can be determined by turning the equipment off and on, the user is encouraged to try to correct the interference by one or more of the following measures: Cet équipement a été testé et est conforme avec les limites des matériels numériques de Classe B, correspondant aux règle partie 15 de la FCC. Ces limites sont destinées à offrir une protection raisonnable contre les interférences nuisibles dans une installation résidentielle. Cet équipement génère, utilise et irradie des fréquences radio, qui s’il n’est pas installé et utilisé selon les instructions, peut causer des interférences nuisibles dans les communications radio. Pourtant, il n’existe aucune garantie que ces interférences n’apparaîtront pas dans une installation donnée. Si cet équipement case des interférences nuisibles à la réception radio ou télévisée, qui peut être vérifié en allumant et éteignant l’équipement, l’utilisateur est encouragé à essayer de corriger l’interférence en suivant les mesures suivante une par une : • • • Reorient or relocate the receiving antenna. • Augmenter la distance entre l’équipement et le récepteur • Connect the equipment into an outlet on a circuit different from that to which the receiver is connected. • Connecter l’équipement sur un circuit électrique différent de celui sur lequel le récepteur est branché: • • Consult the dealer or an experienced radio/TV technician for help. Consulter un revendeur ou un technicien radio/TV expérimenté Réorienter ou replacer les antennes de réception Increase the separation between the equipment and receiver. The ASTRO A40 Headset is exempt from FCC compliance standards under CFR Title 47, Part 15, Subpart B, para 15.103(g). Le casque ASTRO A40 est exonéré des normes de conformité FCC suivant la CFR Titre 47, Section 15, Sous-‐Section B, Paragraphe 15.103(g). INDUSTRY CANADA CONFORMITY STATEMENT DÉCLARATION DE CONFORMITÉ D’INDUSTRIE CANADA This Class B digital apparatus complies with Canadian ICES-‐003. Cet appareil numérique de la classe B est conforme à la norme NMB-‐003 du Canada. CE DECLARATION OF CONFORMITY DÉCLARATION DE CONFORMITÉ CE Noah Han 9/11/2014 9:33 AM Deleted: ... [1] Skullcandy, Inc. declares that this product is in compliance with the essential requirements and other relevant provisions of Directives 2004/108/EC. A copy of the Declaration of Conformity for this product may be obtained by contacting Skullcandy, Inc. Skullcandy, Inc. déclare que ce produit est conforme aux exigences essentielles et aux autres clauses pertinentes des directives 2004/108/CE. Une copie de la Déclaration de Conformité de ce produit peut être obtenue en contactant Skullcandy, Inc. Note on environmental protection: Remarque sur la protection de l'environnement: After the implementation of the European Directive 2012/19/EU in the national legal system, the following applies: Electrical and electronic devices may not be disposed of with domestic waste. Consumers are obliged by law to return electrical and electronic devices at the end of their service lives to the public collecting points set up for this purpose or point of sale. Details to this are defined by the national law of the respective country. Failure to dispose of electronic devices properly may have harmful effects on the environment and human health as a result of the presence of hazardous substances in the products. This symbol on the product, the instruction manual or the package indicates that a product is subject to these regulations. By recycling, reusing the materials or other forms of utilizing old devices, you are making an important contribution to protecting our environment. Après la mise en application de la Directive Européenne 2012/19/EU dans le système juridique nationale, les dispositions suivantes s’appliquent : Les appareils électriques et électroniques ne doivent pas être jetés avec les ordures ménagères. Les consommateurs sont tenus par la loi de rapporter les appareils électriques et électroniques en fin de vie aux points de collecte prévus à cet effet ou au point de vente. Les détails de cette règle sont définis par le droit national du pays concerné. Le non-‐respect du procédé d’élimination d’appareils électriques et électroniques peut avoir des effets néfastes sur l'environnement et la santé humaine en raison de la présence de substances dangereuses dans les produits. Le symbole sur le produit, le manuel d’instruction ou l’emballage indique si le produit est soumis à cette réglementation. En recyclant, en réutilisant les matériaux ou en ayant toute autre forme d’utilisation des vieux appareils, vous apportez une contribution importante à la protection de notre environnement. Page 9 Support Support http://www.astrogaming.com/support //// It is the correct link for French customers ? /// Firmware Updating: MàJ du Firmware : Keep your MixAmp™ Pro updated and running the latest firmware version by visiting: Gardez votre MixAmp™ Pro à jour avec la dernière version du firmware en visitant : http://www.astrogaming.com/firmware //// It is the correct link for French customers ? /// Troubleshooting Dépannage See the ASTRO Knowledge Base: Visitez notre Foire aux Questions ASTRO : http://www.astrogaming.com/faq //// It is the correct link for French customers ? /// All ASTRO Gaming products come with an automatic 1-‐year warranty. Registration is not required. If you purchased ASTRO products from a 3rd party retailer, you don’t need to register it, but you will need to provide proof of purchase for any warranty claims. Tous les produits ASTRO Gaming bénéficient d’une garantie automatique de 1 an. L’enregistrement du produit n’est pas obligatoire. Si vous avez acheté votre produit ASTRO chez un vendeur tiers, vous n’avez pas besoin de l’enregistrer mais vous devrez fournir une preuve d’achat pour toute de demande de prise en charge par le service de garantie.