1
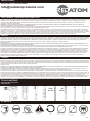
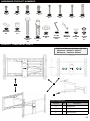
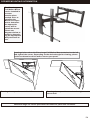
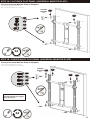
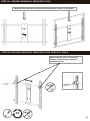
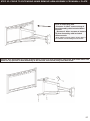
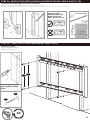
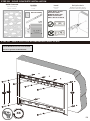
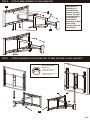
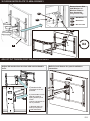
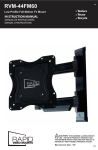
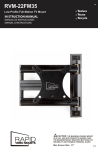
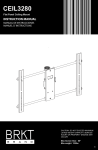
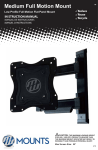
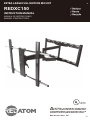
V4
EXTRA LARGE FULL MOTION MOUNT
V1
REDXC150
INSTRUCTION MANUAL
MANUAL DE INSTRUCCIONES
MANUEL D’INSTRUCTIONS
CAUTION: DO NOT EXCEED MAXIMUM
LISTED WEIGHT CAPACITY. SERIOUS
! CAUTION:
INJURY OR
DAMAGE MAY
THEPROPERTY
MAXIMUM LOADING
WEIGHT
OCCUR!
IS 150 LBS.
USE WITH PRODUCTS HEAVIER THAN
THE MAXIMUM WEIGHT INDICATED MAY RESULT IN
INSTABILITY
ANDFull
POSSIBLE
PERSONAL
Large
Motion
Mount INJURY.
Max Scree
Size: 70”
Max Screen
Size:n 80”
Max weight: 125lbs
P1
QUESTIONS?
NEED HELP? PLEASE EMAIL
[email protected]
DISCLAIMER – WARNING INFORMATION
Disclaimer –. RED ATOM has extended every effort to ensure to accuracy and completeness of this manual. However, RED ATOM does not claim that the information covers all
installation and or operational variables. The information contained in this document is subject to change without notice or obligation of any kind. Regarding the information
contained herein, RED ATOM makes no representation of warranty, expressed or implied, and assumes no responsibility for accuracy, sufficiency, or completeness of the
information contained in this document.
WARNING: FAILURE TO READ, THOROUGHLY UNDERSTAND, AND FOLLOW ALL INSTRUCTIONS CAN RESULT IN SERIOUS PERSONAL INJURY, DAMAGE TO
PERSONAL PROPERTY, OR VOIDING OF FACTORY WARRANTY!
It is the responsibility of the installer to ensure all components are properly assembled and installed using the instructions provided. If you do not understand these instructions or
have any questions or concerns, please contact customer service at [email protected]
Do not attempt to install or assemble this product if the product or hardware is damaged or missing. The included hardware is designed for use on vertical walls constructed of
wood studs or solid concrete. A wood stud wall is defined as consisting of a minimum of 2x4 wooden studs (2” wide by 4” deep) with a maximum of 5/8” drywall. The included
hardware is not designed for use with metal studs or cinderblock walls. If you’re uncertain about the construction of your wall, then please consult a qualified contractor or installer
for assistance. For a safe installation, the wall you are mounting to must support 4 times the weight of the total load. If not, then the surface must be reinforced to meet this
standard. The installer is responsible for verifying that the wall structure and hardware used in any installation method will safely support the total load.
ESPAÑOL
Descargo de responsabilidad. RED ATOM procura que este manual sea preciso y completo. No obstante, no garantiza que la información aquí incluida cubra todos los detalles,
condiciones o variantes. Tampoco prevé todas las posibles contingencias relacionadas con la instalación o el uso de este producto. La información que contiene este documento
queda sujeta a cambio sin aviso previo o compromiso alguno. RED ATOM no ofrece ninguna garantía, ni expresa ni implícita, respecto de la información aquí incluida. RED
ATOM no se responsabiliza de la precisión de la información provista en este documento, ni tampoco de que sea completa o suficiente.
Soportes de pared
ADVERTENCIA: NO LEER, ENTENDER CABALMENTE Y SEGUIR TODAS LAS INSTRUCCIONES PUEDE DERIVAR EN LESIONES GRAVES, DAÑOS MATERIALES O LA
NULIDAD DE LA GARANTÍA OTORGADA POR EL FABRICANTE.
Es responsabilidad del instalador comprobar que todos los componentes estén correctamente ensamblados e instalados según las instrucciones provistas. Si usted no entiende
estas instrucciones o si tiene dudas o preguntas, comuníquese con Atención al Cliente por teléfono al por escrito a [email protected].
No instale ni ensamble el producto si éste o las piezas suministradas presentaran daños o si faltara algún elemento. Las piezas incluidas están diseñadas para ser instaladas
en paredes con paneles de madera o en paredes de hormigón. Se define como pared con montantes de madera aquélla conformada por montantes de madera de 51 mm (2
pulgadas) de ancho por 102 mm (4 pulgadas) de profundidad como mínimo y por paneles de yeso de 16 mm (5/8 pulgada) de espesor como máximo. Las piezas incluidas no
están diseñadas para instalarse en paredes con montantes de metal ni en paredes de bloques de hormigón. Si tiene dudas acerca del tipo de pared que tiene usted, consulte a
un contratista o a un instalador calificado. Para realizar una instalación segura, la pared elegida debe poder soportar cuatro veces el peso de la carga total. De lo contrario,
deberá reforzar la superficie para que cumpla con este requisito. El instalador es el responsable de comprobar que la estructura de la pared y las piezas utilizadas en la
instalación soporten la carga total de manera segura.
FRANÇAIS
Dénégation de responsabilité – RED ATOM vise l’exactitude et la complétude du présent manuel, toutefois, ne prétend en aucun cas que les informations contenues dans le
présent document couvrent tous les détails, conditions ou variations. L’entreprise ne prévoit pas non plus tous les cas de figures possibles liés à l’installation ou à l’utilisation de ce
produit. Les informations contenues dans le présent document sont sujettes à modification sans préavis, ni obligation quelconque. RED ATOM ne fait aucune déclaration quant à
une garantie expresse ou implicite concernant les informations contenues dans le présent document. RED ATOM n’est en aucun cas responsable de l’exactitude, de l’exhaustivité,
ni de la suffisance des informations contenues dans le présent document.
Supports muraux
ATTENTION : SI VOUS NE LISEZ, NI NE COMPRENEZ, NI NE SUIVEZ SOIGNEUSEMENT TOUTES CES INSTRUCTIONS, IL POURRAIT S’ENSUIVRE DES BLESSURES
GRAVES, DES DOMMAGES MATÉRIELS OU L’ANNULATION DE LA GARANTIE!
L'installateur est responsable de s’assurer de l’exactitude de l’assemblage et de l’installation de toutes les composantes, conformément aux instructions fournies. Si vous ne
comprenez pas ces instructions ou pour toute question ou problème, veuillez contacter le service à la clientèle au [email protected].
Si le produit est endommagé ou que des fixations sont manquantes ou endommagées, n'installez pas le produit. Si vous avez besoin de pièces ou de quincaillerie de rechange,
veuillez contacter le Service à la clientèle au [email protected]. La quincaillerie fournie est conçue pour servir sur des parois verticales en bois ou en béton massif. Un
mur à poteau en bois est défini comme constitué au minimum de poteaux de 2x4 (51 mm ou 2 po de large par 102 mm ou 4 po de profondeur) avec un maximum de 16 mm (5/8
po) de cloison sèche. La quincaillerie incluse n’est pas conçue pour servir sur des poteaux métalliques, ni des murs en briques de mâchefer. Si vous n’êtes pas sûr de la
construction de votre mur, veuillez consulter un maître d’œuvre ou installateur qualifié pour obtenir de l'aide. Pour que l'installation soit sécuritaire, le mur d'installation doit pouvoir
supporter 4 fois le poids de la charge appliquée. Si tel n'est pas le cas, la surface doit être renforcée en conséquence. L'installateur doit s'assurer que la structure du mur et la
quincaillerie utilisée pour n’importe quelle méthode de fixation peuvent supporter sans danger le poids de tous les équipements.
TOOLS NEEDED
Herramientas Necesarias
Outils Requis
7/32”
5.5 mm
3/8”
10 mm
SYMBOLS
Drill
Agujerear
Percer
Level
Nivel
Niveau
Socket Wrench
150lbs Caution
Llave española
Precaución
MW150F64
Clé ouverte
Attention
Tighten
Ajustar
Serrer
Pencil Mark
Marque con lápiz
Marque de crayon
Screwdriver
Destornillador
Tournevis
Heavy!
Tres Lourd!
!Pesado!
P2
HARDWARE PRODUCT NUMBERS
1
M4 x 12
X4
2
M5 x 12
X4
9
10
SQUARE
WASHER
X4
5mm
SPACER
X8
3
M6 x 15
X4
4
M8 x 15
X4
5
M4 x 25
X4
6
M5 x 25
X4
A1
13
11
8 mm LAG
BOLT
X6
12
ANCHOR
X6
STEEL
WASHER
X6
7
M6 x 25
X4
ALLEN
WRENCH
5 mm
A2
M6 X 5/8”
WRENCH
X1
8
M8 x 25
X4
A3
A4
M6
WASHER
X2
M6
ACORN
NUT
X2
PRODUCT COMPONENT PARTS
Flat Panel Mounting Pattern (W x H)
Minimum: 200mm x 100mm
Maximum: 700mm x 500mm
A
B
C
Product Components
Contents
Qty
A
1
Wall Bracket
B
1
Universal Monitor Bracket
C
1
Arm Assembly
Description
P3
CORNER MOUNTING INFORMATION
The Extra Large
Full Motion Mount
can be installed in
a corner
location when
needed. Prior to
installing the
Mount it is important to determine
the approprite
corner wall to
install the mount.
Please see
diagrams below to
assist in determining the appropriate
wall placement to
use.
Drawings below show the Extra Large Full Motion Mount attached to the left
and right of the corner. Depending on the desired angle for viewing, please
review to determine which wall to mount your panel.
Drawing shows panel mounted to left corner wall
Drawing shows panel mounted to the right
corner wall
Maximum angle for corner placement decreases as panel size increases.
P4
STEP 1A- FLAT BACK FLAT PANEL (UNIVERSAL MONITOR PLATE)
Connect Universal Monitor Plate to flat panel
Conecte el adaptador al monitor
Connectez l'adaptateur au moniteur
SQUARE
WASHER
X4
9
9
1
1
2
3
2
3
4
4
X4
STEP 1B- CURVED BACK FLAT PANEL (UNIVERSAL MONITOR PLATE)
Connect Universal Monitor Plate to flat panel
Conecte el adaptador al monitor
Connectez l'adaptateur au moniteur
5
SQUARE
WASHER
X4
9
10
9
6
10
7
8
Spacers can also be used to
provide clearance for cables
and connectors.
10
X4
B
P5
STEP 2A- CENTER UNIVERSAL MONITOR PLATE
Monitor Plate must be centered (horizontal plane) on back of flat panel
STEP 2B- SECURE UNIVERSAL MONITOR PLATE VERTICAL RAILS
Adjust vertical rails on horizontal
chrome rod and secure with preinstalled screws.
X2
P6
STEP 2C- PRIOR TO EXTENDING ARMS REMOVE ARM ASSEMBLY FROM WALL PLATE
Prior to extending arm:
Remove 2 Allen screws at top of
Arm Assembly with included Allen
wrench.
Remove 2 Allen screws at bottom
of Arm Assembly with included
Allen wrench.
Note- 4 Allen screws will be used in Step 4
to reattach arm assembly to wall mount.
Remove Arm Assembly by gently pulling lower section of Arm Assembly away from Wall Plate which will
allow for top portion of Arm Assembly to be lowered and moved away from Wall Plate.
A1
P7
STEP 3A- WOOD STUD INSTALLATION (CONCRETE INSTALLATION SKIP TO 3B)
Find stud and mark edge and center locations
Ubique el panel y marque las ubicaciones de los bordes y el centro.
Repérez l'emplacement d'une poutre, puis marquez l'emplacement des bords et du centre de cette poutre.
LEVEL WALL PLATE
WITH INCLUDED
BUBBLE LEVEL AND
MARK HOLES FOR
DRILL BIT PILOT HOLE
DRILL BIT
NOT INCLUDED
STEP 3A –DRILL PILOT HOLE AND MOUNT WALL PLATE
Mount wall plate
Coloque la placa de pared
Montez la plaque murale
11
13
Secure lag bolts with
steel washer to Wall
Plate
13
11
X4
P8
STEP 3B –SOLID CONCRETE INSTALLATION
Solid Concrete
Concreto sólido
Béton massif
Drill Bit
S. broca
Foret
DRILL BIT
NOT INCLUDED
Level
Nivelado
Level
Drill pilot hole
Realice el agujero piloto
Percez le trou de guidage
LEVEL WALL PLATE
WITH INCLUDED
BUBBLE LEVEL AND
MARK HOLES FOR
DRILL BIT PILOT HOLE
STEP 3B –DRILL PILOT HOLES AND MOUNT WALL PLATE
Insert Wall Anchors into Cnocrete Wall
Secure Lag Bolts to Wall Bracket
11
13
12
X6
P9
STEP 4 - ATTACH ARM ASSEMBLY TO WALL BRACKET
A
Position Arm
Assembly to
desired lateral
position on wall
bracket for optimum placement
of Flat Panel.
Secure Arm
Assembly to Wall
plate using
screws removed
from Step 2.
C
STEP 5 - ATTACH UNIVERSAL MOUNT BRACKET TO ARM ASSEMBLY & WALL BRACKET
Heavy, Assistance
Required
TRES LOURD ! Cette etape
requiert deux personnes
!PESADO! Necesitara ayuda para
realizar esta operacion
A
B
C
B
C
P 10
SECURE MONITOR PLATE TO ARM ASSEMBLY
Secure Acorn Nut
and Washer on
Monitor Plate to
Arm Assembly
A3
(snug tension only)
A4
A2
M6 Wrench
A3
M6 Washer
A4
M6 Acorn Nut
A2
X2
B
ADJUST TILT TENSION/ POST INSTALLATION LEVEL
Adjust tilt mechanism tension with ratchet handle
lever
Built-in level feature for post installation
correction
a)
Rotateratchet
handle
Rotate
clockwise
as far as
handle lever
possible.
clockwise for
tensioning tilt
b) Pull handle to side
mechanism.
laterally (against
For additional
spring tension) and
tension pull
rotate
lever laterally, as
counter-clockwise
rotate
counter
far
as possible.
clock wise and
c)
Repeatand
steps a)
repeat
and
b) until
panel
repeat
tension
holds desired tilt.
P 11
WARRANTY INFORMATION
This warranty applies to US Residents who purchase from an authorized RED ATOM Dealer. RED ATOM products are covered against defects in materials and workmanship
for 5 years. RED ATOM will repair or replace the defective component or product, at its sole discretion. Failure to follow product care instructions from RED ATOM will result in
void of warranty.
To obtain warranty service, contact RED ATOM customer service at [email protected]. You must supply a copy of your original receipt. If your product must be
shipped to RED ATOM for inspection, you will be responsible for the shipping charges. Replacement product shipped to you will be returned freight pre-paid.
RED ATOM disclaims any liability for modifications, improper installations, installations over the specified weight range, or failure to follow care instructions provided by RED
ATOM. To the maximum extent permitted by law, RED ATOM disclaims any other warranties, expressed or implied, including warranties of fitness for a particular purpose and
warranties of merchantability. RED ATOM will not be liable for any damages arising out of the use of, or inability to use, RED ATOM products.
This warranty gives you specific legal rights, and you may also have other rights which vary from state to state.
Specifications are subject to change without prior notice.
ESPAÑOL
Esta garantía se aplica a los residentes de los Estados Unidos que realizaron la compra en un distribuidor autorizado de RED ATOM . Esta garantía cubre los productos RED
ATOM de los defectos de materiales y de mano de obra por un periodo de 5 años. RED ATOM, a su exclusivo criterio, reparará o reemplazará el producto o componente
defectuoso. En caso de que no se sigan las instrucciones de RED ATOM para el cuidado del producto la garantía quedará anulada.
Para obtener el servicio de garantía, comuníquese con el servicio de Atención al cliente de RED ATOM. Escribanos an [email protected]. Deberá proporcionar el
recibo original. Si fuera necesario enviar el producto a RED ATOM para revisarlo, los gastos de envío correrán por su cuenta. El producto de reemplazo que se le envíe se le
devolverá con los gastos de envío pagos.
RED ATOM no se hace responsable de modificaciones, instalaciones inadecuadas o instalaciones que superen el rango de peso especificado ni se hace responsable en casos
en los que no se hayan seguido las instrucciones proporcionadas por RED ATOM. En la medida en que la ley lo permita, RED ATOM no se hace responsable de ninguna otra
garantía, expresa o implícita, incluso las garantías de aptitud para un fin determinado o de comercialización. RED ATOM no se hace responsable de ningún tipo de daños
causados por el uso de los productos RED ATOM o por el uso inapropiado de dichos productos. RED ATOM no es responsable de los daños incidentales o emergentes. Dentro
de éstos se incluyen todo tipo de gastos que pudieran surgir de las reparaciones de productos RED ATOM que no se hayan realizado en RED ATOM.
Esta garantía le otorga derechos legales específicos. Es posible que además tenga otros derechos que varían según el estado.
Las especificaciones están sujetas a cambios sin previo aviso.
FRANÇAIS
Cette garantie s'applique aux résidents des États-Unis qui achètent un produit RED ATOM auprès d'un détaillant RED ATOM autorisé. Les produits RED ATOM sont garantis
5 ans contre les défauts de matériaux et de fabrication. RED ATOM se chargera de réparer ou remplacer, à son entière discrétion, tout produit qui s'avérera défectueux. Le
non-respect des directives d’entretien fournies par RED ATOM annulera la garantie.
Pour obtenir une réparation sous garantie, contactez le service à la clientèle RED ATOM à [email protected]. Vous devrez fournir une copie de votre reçu d'achat
original. Si votre produit doit être expédié à un centre de réparation RED ATOM pour y être inspecté, vous devrez payer les frais de port. Le produit de remplacement vous sera
envoyé en port payé.
RED ATOM rejette toute responsabilité relativement à quelque problème pouvant être associé à une modification d'un produit, à une mauvaise installation ou à une installation
ne respectant pas les limites de charge, ou du non-respect des directives d’entretien fournies par RED ATOM. Sous réserve des lois en vigueur, RED ATOM réfute toute autre
garantie expresse ou implicite, notamment toute garantie de commercialisation ou de convenance à un usage quelconque. RED ATOM réfute toute responsabilité pour des
dommages résultants de l'utilisation ou de l'impossibilité d'utiliser des produits RED ATOM. RED ATOM réfute également toute responsabilité pour quelque dommage
accessoire ou indirect. Ceci s'applique notamment aux frais de main d'œuvre pour la réparation de produits RED ATOM par une personne ne travaillant pas pour RED ATOM.
Cette garantie vous accorde des droits juridiques spécifiques, mais il est possible que vous ayez également d'autres droits selon votre lieu de résidence.
Les spécifications sont susceptibles d’être modifiées sans préavis.
NEED HELP? PLEASE EMAIL
[email protected]
P 12