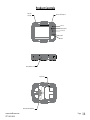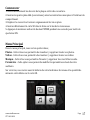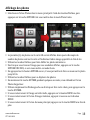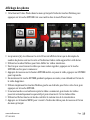
1
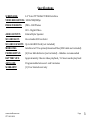
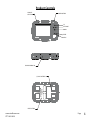
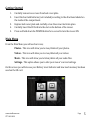
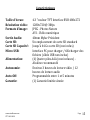
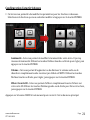
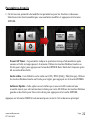
INSTRUCTION MANUAL SD Card Reader/Viewer Model: STC-CRV43 V.01 **IMPORTANT NOTE** To ensure the product is being utilized to its full potential, we recommend checking our website for new product updates. If your unit is having trouble, please check the website to determine you are using the latest firmware or software version. TECHNICAL SUPPORT CUSTOMER SERVICE EMAIL: [email protected] Please allow 48 hours for email response. STEALTHCAM LLC P.O. Box 535189 Grand Prairie, TX 75053-‐9504 www.stealthcam.com 877-‐269-‐8490 CONTACT & HOURS Toll Free: 877-‐269-‐8490 CALL CENTER HOURS Mon – Fri / 8 AM – 5 PM (CST) Page 2 Specifications SCREEN SIZE: 4.3” Color TFT 480x272 RGB Interface VIDEO RESOLUTION: 1280x720@30fps IMAGE FORMATS: JPEG – Still Photos AVI – Digital Video AUDIO OUTPUT: 40mm Mylar Speaker SD CARD SLOT: One standard SD card slot SD CARD CAPACITY: Up to 64GB SD Card (not included) MICRO USB: Interface to PC to upload/download files (USB cable not included) POWER SUPPLY: (4) Four AAA batteries (not included) – Alkaline recommended BATTERY LIFE: Approximately 3 hours video playback / 12 hours audio play back AUTO-OFF: Programmable between 1 and 5 minutes WARRANTY: (1) Year limited warranty www.stealthcam.com 877-‐269-‐8490 Page 3 Product Controls AUDIO/TV JACK FLAP POWER BUTTON UP LEFT/RIGHT DOWN ENTER MENU SD CARD/ MICRO USB (4) "AAA" BATTERIES RESET RESET BUTTON www.stealthcam.com 877-‐269-‐8490 Page 4 Getting Started 1. 2. 3. 4. 5. Carefully remove two screws from back cover plate. Insert the four AAA batteries (not included) according to the directions labeled on the inside of the compartment. Replace back cover plate and carefully screw the screws back into place. Carefully insert the SD Card into the slot on the bottom of the viewer. Press and hold down the POWER button for a second to turn the viewer ON. Main Menu From the Main Menu you will see four icons; Photos – This icon will allow you to view/delete all your photos. Videos – This icon will allow you to view/delete all your videos Music – This icon will allow you to listen/delete all your audio files. Settings – This option allows you to alter your viewer’s current settings. On this screen you will also see your Battery Level Indicator and how much memory has been used on the SD card. www.stealthcam.com 877-‐269-‐8490 Page 5 Viewing Photos ! Select the Photos icon from the Main Menu using the arrow keys and then press the ENTER button this will put you in the Picture Index mode. ! ! ! ! ! ! ! ! ! ! The first (6) six photos on the SD card will be displayed. As well as a count of how many photos are on the card and the Picture Index indicator will appear next to it. Use the arrow keys to scroll through the thumbnail photos. Once you find the image you want to view, press the ENTER button ONCE, this will put you in Zoom mode. By pressing the ENTER button again it will allow you to Zoom in on the photo up to 10x. Use the arrow keys to move around the photos By holding down the ENTER button for a few seconds you will get the Delete Photos screen. Simply use the left or right arrow keys to make your choice, then press the ENTER button. If you want to return to the full size image, press the MENU button once. If you want to return to the Picture Index screen, press the MENU button again. If you want to return to the Main Menu screen, press the MENU button one more time. www.stealthcam.com 877-‐269-‐8490 Page 6 Viewing Videos ! Select the Video icon from the Main Menu using the arrow keys and then press the ENTER button this will put you in the Video Index mode. ! ! ! ! ! ! ! ! ! The first (6) six videos on the SD card will be displayed. As well as a count of how many photos are on the card and the Video Index indicator will appear next to it. Use the arrow keys to scroll through the thumbnail videos. Once you find the video you want to watch, press the ENTER button ONCE to start. Pressing the ENTER button again will pause the video, press ENTER again to resume. By holding down the ENTER button for a few seconds you will get the Delete Video screen. Simply use the Left or Right arrow keys to make your choice, then press the ENTER button. If no buttons are pressed after video has started, then all videos will automatically play sequencially and then return back to the Video Index screen. Using the Up or Down arrows will control the volume while viewing. Press the MENU button to return to the Video Index then again to the Main Menu screen. www.stealthcam.com 877-‐269-‐8490 Page 7 Audio Playback ! Select the Audio icon from the Main Menu using the arrow keys and then press the ENTER button this will put you in the Audio Index mode. ! ! ! ! ! ! ! ! ! ! ! The first (4) four audio files on the SD card will be displayed. As well as a count of how many photos are on the card and the Audio Index indicator will appear next to it. Use the Up or Down arrow keys to scroll through the files. Once you find the audio file you want to hear, press the ENTER button ONCE, to play. The screen will display: Artist Name / Song Title / Album Info. The timebar will be displayed at the bottom of the screen. To pause the song press the ENTER button, then again to resume play. Holding down the ENTER button for a few seconds you will get the Delete Audio screen. Simply use the left or right arrow keys to make your choice, then press the ENTER button. While music is playing, pressing the Up or Down keys will adjust volume. Use the Left or Right arrow keys to go to the Previous or Next audio file. If you want to return to the Audio Index screen, press the MENU button. If you want to return to the Main Menu screen, press the MENU button one more time. www.stealthcam.com 877-‐269-‐8490 Page 8 Setting Features ! This screen will allow you to change the settings for the features below. Highlight the feature you want to change and press the ENTER button. Brightness – This allows you to change the brightness of your screen. There are 5 levels of brightness. Use the Left or Right arrow keys to adjust, then press the ENTER button. Volume – This allows you to increase or decrease your audio volume or to disable audio completely. The factory default is MUTE. Use the Left or Right arrow keys to adjust, then press the ENTER button. Erase SD Card – This allows you to completely erase all files on your SD card. Use the Left or Right arrow keys to make your choice, then press the ENTER button. Press the MENU button at any point to return to the Main Menu screen. www.stealthcam.com 877-‐269-‐8490 Page 9 Advanced Settings ! This screen will allow you to change the settings for the features below. Highlight the features you want to change and press the ENTER button. Power Off Timer – This setting tells the viewer when to power off after no activity. The time goes from 1 – 5 mins. Use the Left or Right arrow keys to adjust, then press the ENTER button. Note: Unit always sleeps after 60 secs of inactivity. Video Output – This sets the video output to OFF / NTSC (USA) / PAL (Europe). Use the Left or Right arrow keys to adjust, then press the ENTER button. Update Software – This option is only visible when an SD card containing a new update is inserted into the SD Card slot. Use the Left or Right arrow keys to make your choice, then press the ENTER button. Press the MENU button at any point to return to the Main Menu screen. www.stealthcam.com 877-‐269-‐8490 Page 10 FCC COMPLIANCE GSM STC-‐CRV43 NOTE: This equipment has been tested and found to comply with the limits for Class B digital device, pursuant to part 15 of the FCC Rules. These limits are designed to provide reasonable protection against harmful interference in a residential installation. This equipment generates uses and can radiate radio frequency energy and, if not installed and used in accordance with the instructions, may cause harmful interference to radio or television receptions, which can be determined by turning the equipment off and on, the user is encouraged to try to correct the interference by one or more of the following measure: " " " Reorient or relocate the receiving antenna. Increase the separation between the equipment and the receiver. Connect the equipment into an outlet on a circuit different from that to which the receiver is connected. Consult the dealer or an experienced radio/TV technician for help. " Caution: Changes or Modifications not expressly approved by the party responsible could void the user’s authority to operate this device. Product specifications are subject to change. Stealth Cam is not responsible for any photographic or typographical errors. www.stealthcam.com 877-‐269-‐8490 Page 11 LIMITED WARRANTY INFORMATION Your Stealth Cam product is covered by a 365 Day Limited Warranty on parts and labor from the date of original purchase, and purchases must be made through an authorized dealer. The warranty covers defects in workmanship and materials. The warranty does not apply to units, which have been damaged or abused intentionally or unintentionally. A purchase from individuals or unauthorized Internet sites such as eBay voids the warranty. Tampering with or altering the unit will void the warranty. Any unauthorized service will void warranty. A copy of your original sales receipt must be produced for any warranty service and a Return Authorization (RA) number must be obtained from customer service at 877-‐269-‐8490 prior to returning product. Stealth Cam is not responsible for any lost untraceable packages or those without a Return Authorization at the time of return. www.stealthcam.com 877-‐269-‐8490 Page 12 MANUEL D'INSTRUCTIONS Lecteur de cartes SD / Viewer Modèle: STC-CRV43 V.01 www.stealthcam.com 877-‐269-‐8490 Page 13 **NOTE IMPORTANTE** Pour vous assurer que le produit soit utilisé à son plein potentiel, nous vous recommandons de vérifier notre site Web pour obtenir les nouvelles mises à jour du produit. Si votre appareil a des problèmes, veuillez consulter le site pour déterminer si vous utilisez le dernier micrologiciel ou la toute dernière version du logiciel. SOUTIEN TECHNIQUE SERVICE À LA CLIENTÈLE COURRIEL : [email protected] Veuillez allouer un délai de 48 heures avant d'obtenir une réponse par courriel. STEALTH CAM LLC P.O. Box 535189 Grand Prairie, TX 75053-‐9504 CONTACT & HEURES Sans frais : 1-‐877-‐269-‐8490 HEURES DU CENTRE D'APPEL Lun – Vend/8 h – 17 h (HCN) www.stealthcam.com 877-‐269-‐8490 Page 14 Caractéristiques Taille d'écran: Résolution vidéo: Formats d'image: Sortie Audio: Carte SD: Carte SD Capacité: Micro USB: Alimentation: Autonomie: Auto-Off: Garantie: www.stealthcam.com 877-‐269-‐8490 4.3 "couleur TFT Interface RVB 480x272 1280x720 @ 30fps JPEG -‐ Photos Nature AVI -‐ Vidéo numérique 40mm Mylar Président Un emplacement de carte SD standard Jusqu'à 64 Go carte SD (non inclus) Interface PC pour charger / télécharger des fichiers (câble USB non inclus) (4) Quatre piles AAA (non incluses) -‐ Alcaline recommandé Environ 3 heures de lecture vidéo / 12 heures de lecture audio Programmable entre 1 et 5 minutes (1) Garantie limitée Année Page 15 Product Controls Audio/TV Jack Flap Bouton d’alimentation en haut Gauche Droite vers le bas Entrer Menu Carte SD/ Micro USB 4 piles ‘AAA’ RESET Bouton De Réinitialisation www.stealthcam.com 877-‐269-‐8490 Page 16 Commencer 1. Retirez délicatement les deux vis de la plaque arrière de couverture. 2. Insérez les quatre piles AAA (non incluses) selon les instructions marquées à l'intérieur du compartiment. 3. Replacer le couvercle et revisser soigneusement les vis en place. 4. Insérez délicatement la carte SD dans la fente sur le bas de la visionneuse. 5. Appuyez et maintenez enfoncé le bouton POWER pendant une seconde pour mettre le spectateur ON. Menu Principal Dans le menu principal, vous verrez quatre icônes; Photos -‐ Cette icône vous permettra de visualiser / supprimer toutes vos photos. Vidéos -‐ Cette icône vous permettra de visualiser / supprimer toutes vos vidéos Musique -‐ Cette icône vous permettra d'écouter / supprimer tous vos fichiers audio. Paramètres -‐ Cette option vous permet de modifier les paramètres actuels de votre auditoire. Sur cet écran, vous verrez aussi la batterie de votre Indicateur de niveau et la quantité de mémoire a été utilisée sur la carte SD. www.stealthcam.com 877-‐269-‐8490 Page 17 Affichage des photos ! Sélectionnez l'icône Photos dans le menu principal à l'aide des touches fléchées, puis appuyez sur la touche ENTRER Cela vous mettra dans le mode Photo Index. ! La première (6) six photos sur la carte SD seront affichés. Ainsi que le décompte du nombre de photos sont sur la carte et l'indicateur Indice image apparaîtra à côté de lui. ! Utilisez les touches fléchées pour faire défiler les photos miniatures. ! Une fois que vous trouvez l'image que vous souhaitez afficher, appuyez sur la touche ENTRER UNE FOIS, ce sera vous mettre en mode Zoom. ! En appuyant sur le bouton ENTRER encore, il vous permettra de faire un zoom sur la photo jusqu'à 10x. ! Utilisez les touches fléchées pour se déplacer des photos ! En maintenant la touche ENTRER pendant quelques secondes, vous obtiendrez l'écran Photos Supprimer. ! Utilisez simplement les flèches gauche ou droite pour faire votre choix, puis appuyez sur la touche ENTRER. ! Si vous voulez revenir à l'image en taille réelle, appuyez sur le bouton MENU une fois. ! Si vous voulez revenir à l'écran d'images indexées, appuyez à nouveau sur le bouton MENU. ! Si vous voulez revenir à l'écran du menu principal, appuyez sur la touche MENU une fois de plus. www.stealthcam.com 877-‐269-‐8490 Page 18 Affichage des photos ! Sélectionnez l'icône Photos dans le menu principal à l'aide des touches fléchées, puis appuyez sur la touche ENTRER Cela vous mettra dans le mode Photo Index. ! Les premiers (6) six vidéos sur la carte SD seront affichés. Ainsi que le décompte du nombre de photos sont sur la carte et l'indicateur Indice vidéo apparaîtra à côté de lui. ! Utilisez les touches fléchées pour faire défiler les vidéos miniatures. ! Une fois que vous trouvez la vidéo que vous voulez regarder, appuyez sur la touche ENTRER une fois pour commencer. ! Appuyez de nouveau sur le bouton ENTRER mettra en pause la vidéo, appuyez sur ENTREE pour reprendre. ! En maintenant la touche ENTRER pendant quelques secondes, vous obtiendrez l'écran de la vidéo Supprimer. ! Utilisez simplement les touches fléchées gauche ou de droite pour faire votre choix, puis appuyez sur la touche ENTRER. ! Si aucune touche ne est enfoncée après la vidéo a commencé, puis toutes les vidéos joueront automatiquement sequencially et puis retourner à l'écran Index vidéo. ! Utilisez les flèches haut ou le bas de contrôler le volume lors de la visualisation. ! Appuyez sur le bouton MENU pour revenir à l'index des vidéos puis de nouveau à l'écran du menu principal. www.stealthcam.com 877-‐269-‐8490 Page 19 Lecture audio ! Sélectionnez l'icône Audio dans le menu principal à l'aide des touches fléchées, puis appuyez sur la touche ENTRER Cela vous mettra dans le mode Index Audio. ! ! ! ! ! ! ! ! ! ! ! Les quatre (4) premiers fichiers audio sur la carte SD seront affichés. Ainsi que le décompte du nombre de photos sont sur la carte et l'indicateur Indice Audio apparaîtra à côté de lui. Utilisez les touches fléchées Haut ou Bas pour faire défiler les fichiers. Une fois que vous trouvez le fichier audio que vous voulez entendre, appuyez sur la touche ENTRER UNE FOIS, à jouer. L'affichage de la volonté de l'écran: Nom de l'artiste / Titre / informations sur l'album. La barre temporelle sera affichée au bas de l'écran. Pour interrompre la presse de la chanson sur le bouton ENTER, puis de nouveau pour reprendre la lecture. Maintenez la touche ENTRER pendant quelques secondes, vous obtiendrez l'écran Audio Supprimer. Utilisez simplement les flèches gauche ou droite pour faire votre choix, puis appuyez sur la touche ENTRER. Bien que la musique joue, en appuyant sur les touches haut ou le bas régler le volume. Utilisez les touches fléchées gauche ou de droite pour aller au fichier audio précédent ou suivant. Si vous voulez revenir à l'écran Index Audio, appuyez sur le bouton MENU. Si vous voulez revenir à l'écran du menu principal, appuyez sur la touche MENU une fois de plus. www.stealthcam.com 877-‐269-‐8490 Page 20 Configuration Caractéristiques ! Cet écran vous permettra de modifier les paramètres pour les fonctions ci-‐dessous. Sélectionnez la fonction que vous souhaitez modifier et appuyez sur la touche ENTRER. Luminosité - Cela vous permet de modifier la luminosité de votre écran. Il ya cinq niveaux de luminosité. Utilisez les touches fléchées Gauche ou Droite pour régler, puis appuyez sur la touche ENTRER. Volume - Cela vous permet d'augmenter ou de diminuer le volume audio ou de désactiver complètement audio. La valeur par défaut est MUTE. Utilisez les touches fléchées Gauche ou Droite pour régler, puis appuyez sur la touche ENTRER. Effacer la carte SD - Cela vous permet d'effacer complètement tous les fichiers sur votre carte SD. Utilisez les touches fléchées gauche ou de droite pour faire votre choix, puis appuyez sur la touche ENTRER. Appuyez sur le bouton MENU à tout moment pour revenir à l'écran du menu principal. www.stealthcam.com 877-‐269-‐8490 Page 21 Paramètres Avancés ! Cet écran vous permettra de modifier les paramètres pour les fonctions ci-‐dessous. Sélectionnez les fonctionnalités que vous souhaitez modifier et appuyez sur le bouton ENTRER. Power Off Timer - Ce paramètre indique le spectateur lorsque l'alimentation après aucune activité. Le temps passe 1-‐5 minutes. Utilisez les touches fléchées Gauche ou Droite pour régler, puis appuyez sur la touche ENTRER. Note: Unité dort toujours après 60 secondes d'inactivité. Sortie vidéo - Ceci définit la sortie vidéo sur OFF / NTSC (USA) / PAL (Europe). Utilisez les touches fléchées Gauche ou Droite pour régler, puis appuyez sur la touche ENTRER. Software Update - Cette option ne est visible que si une carte SD contenant une nouvelle mise à jour est insérée dans la fente pour carte SD. Utilisez les touches fléchées gauche ou de droite pour faire votre choix, puis appuyez sur la touche ENTRER. Appuyez sur le bouton MENU à tout moment pour revenir à l'écran du menu principal. www.stealthcam.com 877-‐269-‐8490 Page 22 CONFORMITÉ FCC GSM STC-‐CRV43 Cet équipement a été testé et se conforme aux exigences des appareils numériques de classe B, conformément à la partie 15 des Règles FCC. Ces limites sont conçues pour fournir une protection raisonnable contre les interférences nuisibles présentes dans une installation résidentielle. Cet équipement génère les utilisations et peut émettre de l'énergie radio électrique et, s'il n'est pas installé et utilisé conformément aux instructions, il peut causer des interférences nuisibles aux réceptions radio ou télévision, ce qui peut être déterminé en éteignant l'appareil en marche, l'utilisateur est encouragé à essayer de corriger l'interférence selon une ou plusieurs des mesures suivantes : " " " " Réorienter ou déplacer l'antenne réceptrice. Augmenter la séparation entre l'équipement et le récepteur. Brancher l'appareil dans une prise sur un circuit différent de celui sur lequel le récepteur est branché. Consulter le revendeur ou un technicien radio/TV expérimenté. Les spécifications du produit sont sujettes à modification. Stealth Cam n'est pas responsable des erreurs photographiques ou typographiques. www.stealthcam.com 877-‐269-‐8490 Page 23 RENSEIGNEMENTS SUR LA GARANTIE LIMITÉE Votre appareil photo d'exploration Stealth Cam est couverte par une garantie limitée de 365 jours sur les pièces et la main-‐d'œuvre à partir de la date d'achat initial, et les achats doivent être effectués auprès d'un revendeur autorisé. La garantie couvre les défauts de fabrication et les matériaux. La garantie ne s'applique pas aux appareils ayant été endommagés ou mal utilisés, intentionnellement ou non. Un achat effectué auprès d'une personne ou sur des sites Internet non autorisés, tels qu'eBay, annule la garantie. Falsifier ou modifier l'appareil annulera la garantie. Toute réparation non autorisée annulera la garantie. Une copie de votre facture originale doit être produite pour tout service de garantie et un numéro d'autorisation de retour (AR) doit être obtenu du service à la clientèle au 877-‐269-‐8490 avant de retourner le produit. Stealth Cam n'est pas responsable de toute perte de colis introuvable ou de ceux ne possédant pas de numéro d'autorisation de retour au moment du retour. www.stealthcam.com 877-‐269-‐8490 Page 24