1
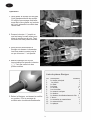
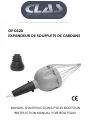
OP 0620
EXPANDEUR DE SOUFFLETS DE CARDANS
MANUEL D’INSTRUCTIONS POUR BOOTGUN
INSTRUCTION MANUAL FOR BOOTGUN
F
Introduction
Le Bootgun ne doit être utilisé que pour le montage des soufflets extensibles sur les joints
homocinétiques automobiles. La plaque du fabricant se trouve au bout de la poignée.
Spécifications
Pression d’air de fonction:
Poids:
Dimensions:
Niveau de bruit:
Diamètre maximum du joint:
4–8 Bar
2 Kg
465mm x 148 x 148mm
<70dB (A)
115 mm
Bootgun est garanti deux ans dès l’achat. Cette garantie n’est pas valable si le produit a été
modifié ou employé abusivement. Vos droits statuaires ne sont pas affectés.
Sécurité
Lire et suivre attentivement les instructions d’opération et de sécurité.
Pression maximum d’opération 8 BAR (115 psi). Garder les mains hors de contact des pièces mobiles.
Ne pas utiliser le Bootgun près du visage ou du corps. Ne pas utiliser sauf pour le montage des soufflets
homocinétiques. Si la pression du réseau excède 8 bar, utiliser un régulateur. Après chaque utilisation,
débrancher le bootgun du réseau.
Mise en service
Avant l’utilisation, vérifier que les écrous soient présent et serrés. Le Bootgun ne doit
être utilisé QUE par les personnes ayant les compétences requises.
Entretien
Ne pas essayer de nettoyer ou réparer le Bootgun alors que celui-ci est connecté au réseau d’air.
Aucun entretien spécifique n’est requis. N’utiliser que des pièces de rechange
obtenues via votre fournisseur.
Montage / Démontage
Aucun montage ou démontage n’est nécessaire. Le raccord d’air peut être changé si
nécessaire.(ø1/4")
2
F
Opération
1. Faire glisser le soufflet sur les bras,
Coté grande extrémité du soufflet.
S’il s’agit d’un montage côté boîte,
avant de le faire glisser sur les bras
de l’outil, présenter le soufflet dans
l’autre sens.
2. Presser le bouton “+” jusqu’à ce
que les bras s’ouvrent assez pour
poser le soufflet sur le joint. Tenir
les mains loin des pièces mobiles.
3. Vous pouvez déconnecter le
Bootgun du réseau si nécessaire.
Les bras restent ouverts jusqu’à
ce que le bouton “-” soit pressé.
4. Mettre le Bootgun sur le joint
homocinétique et presser le bouton
(“_”). Tenir les mains loin des
pièces mobiles.
Liste de pièces Bootgun
Art.
1
2
3
4
5
6
7
8
9
10
11
12
13
5. Retirer le Bootgun, en laissant le soufflet
en position. Finir le montage du
soufflet selon la méthode traditionelle.
3
Description
Quantité
Le corps principal
1
Le piston
1
Le haut
1
Les bras
8
Le sceau
1
Les chevilles
8
Le ressort conique
1
Le boulon
8
Le bouton de déclenchement d’air 1
L’écrou
8
La manche en caoutchouc
1
Le raccord d’air
1
La plaque
1
uk
Introduction
The Bootgun is to be used solely for the stretching of flexible CV boots onto drive-shaft assemblies
of automotive vehicles. The nameplate is on the base of the main body
Specifications
Operating air pressure:
Weight:
Dimensions:
Noise level:
Maximum joint diameter
4 – 8 bar
2 Kg
465 x 148 x 148mm
< 70dB(A)
115 mm
Bootgun is guaranteed for two years from purchase date. This guarantee is invalid if the
product has been misused or modified. Your statutory rights are not affected.
Safety First
Read the operating and safety instructions. Follow them carefully.
Maximum safe operating pressure 8 bar 110 (psi). Air lines are dangerous – use them
correctly
Keep hands away from moving parts. Never operate the Bootgun near the face or body.
Only use Bootgun to fit CV boots. If air line pressure exceeds 8 bar, fit a regulator.
Disconnect the Bootgun from the air supply after use.
Putting into service
Before use, check cap-retaining screws are secure. If the Bootgun is dropped, check for cracked
components. Check air line pressure before connecting the Bootgun. The Bootgun should be used
only by people trained in the use of pneumatically operated tools.
Maintenance
Do not attempt to clean or repair the Bootgun whilst air line is connected. There is no routine
maintenance on Bootgun. Only use genuine spare parts obtainable from your supplier.
Assembly / dismantling
No assembly or dismantling is required. The air adaptor may be exchanged if necessary.
The body is threaded to accept 1/4 inch BSP connector.
4
uk
Operation
1. Slide boot onto arms, large end
first. The arms should just protrude
from the small end of the boot. To
fit a boot to an inner joint, turn the
boot inside out before sliding it onto
the Bootgun’s arms.
2. Press “+” button until arms open
enough to pass over the joint.
Keep hands clear of moving parts.
3. The air line can now be
disconnected. The arms will
remain open until the “-” button is
pressed.
4. Place Bootgun over CV joint and
press release button (“-”). Keep
hands away from moving parts.
Bootgun Parts List
Item
1
2
3
4
5
6
7
8
9
10
11
12
13
5. Slide the boot from the Bootgun onto the
axle and withdraw the Bootgun over the
joint, leaving the boot in position.
Complete the installation in the normal
way.
5
Description
Main Body
Piston
Top
Arms
U-Seal
Dowel Pins
Conical Spring
Bolt
Air control switch
Nut
Rubber Handle
Air Adaptor
Nameplate
Quantity
1
1
1
8
1
8
1
8
1
8
1
1
1
Construction du Bootgun
Construction of the Bootgun