1
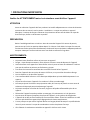
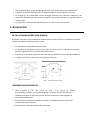
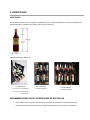
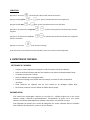
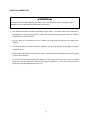
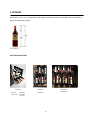
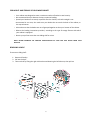
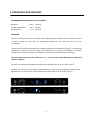
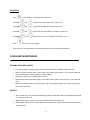
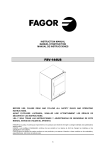
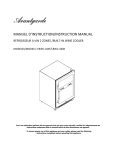
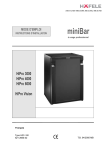
Mondovino Plus
Manuel d’instructions/Instruction Manual
Modèles/Models: MVP27S/ MVP27SL
MVP48DS/MVP48DSL
MVPD45DS
Pour une utilisation optimale de cet appareil ainsi que pour votre sécurité, veuillez lire attentivement les
instructions contenues dans ce manuel avant de faire fonctionner cet appareil.
To ensure proper use of this appliance and your safety, please read the following
instructions completely before operating this appliance.
100714
TABLE DES MATIÈRES
1. Précautions importantes………………………………………………..…............3-4
2. Installation ………………………………………………….………………………….4-5
3. Entreposage ………..…………………………………………………..………….….6-7
4. Mode d’emploi.……………………………………..………………………..……….8-9
5. Entretien ……………………..…………………………….……………..……..…...9-10
6. Guide de dépannage…………………………………….……………..……….……11
2
1. PRÉCAUTIONS IMPORTANTES
Veuillez lire ATTENTIVEMENT toutes les instructions avant d’utiliser l’appareil.
ATTENTION
Avant son utilisation l’appareil doit être positionné et installé adéquatement en suivant les directives
contenues dans ce manuel, sous la section « installation ». Lorsque vous utilisez un appareil
électrique, il convient de toujours d’observer les précautions de base afin de réduire le risque de
choc électrique, de feu ou de blessure corporelle.
PRÉPARATION
Retirez l‘emballage extérieur et intérieur. Avant de raccorder l'appareil à la source de pouvoir,
assurez-vous qu’il a été en position debout depuis 3 à 4 heures. Cela réduira le risque d'un mauvais
fonctionnement du système de refroidissement résultant d’une manipulation inadéquate pendant le
transport. Nettoyez la surface intérieure avec l'eau tiède en utilisant un linge doux.
AVERTISSEMENTS :
•
•
•
•
•
•
•
•
•
•
•
•
•
•
•
Ne jamais laisser d’enfants utiliser ou jouer avec cet appareil.
Danger : risque d'emprisonnement; retirer, détruire la barrure avant de disposer de l’appareil
Avant de mettre votre appareil au rebut veuillez retirer la porte et laisser les tablettes à l’intérieur
pour que les enfants ne puissent pas facilement y grimper.
Lire toutes les instructions contenues dans ce manuel avant d'utiliser l'appareil.
Brancher l’appareil dans une prise de courant à 3 fiches, et ne pas utiliser de cordon rallonge.
Ne rien déposer sur le dessus de l’appareil.
Il est recommandé d’utiliser un circuit électrique indépendant qui serait dédié uniquement à cet
appareil.
Ne pas faire fonctionner l’appareil si le cordon ou la fiche est endommagé.
Ne nettoyez jamais l'unité avec une préparation acide, de l’essence, du pétrole ou autre sorte de
substance chimique qui pourrait endommager l’appareil.
Ne jamais entreposer ou utiliser de l’essence, de gaz ou de liquides inflammables près de cet
appareil.
Débrancher l’appareil avant de procéder au nettoyage, à la maintenance ou à la réparation.
Ne pas tenter de réparer/remplacer des pièces de l’appareil, ou du système de réfrigération.
L’appareil de ne doit pas être installé près d’une source de chaleur. Évitez les installations au soleil
direct ou près de d’autres appareils qui dégagent de très hautes températures.
Si vous prévoyez ne pas utiliser l‘appareil durant une longue période de temps il est préférable de
laisser la porte ouverte. Si un peu de condensation se créer simplement l’essuyer.
Afin d’obtenir le rendement maximal de cet appareil il doit être mis à niveau.
3
•
•
•
•
Ne pas utiliser d’autre moyen de dégivrage autre que celui recommandé par le manufacturier.
L’appareil ne peut être utilisé que pour un usage domestique, ce pour lequel il a été conçu.
Le fabricant ne sera responsable d’aucun dommage résultant d’une utilisation inadaptée ou de
réparations effectuées par du personnel non qualifié. Une utilisation de type commerciale annulera
toute garantie.
Les réparations ne doivent être effectuées que par les centres de service autorisés.
2. INSTALLATION
INSTALLATION ENCASTRÉE (VOIR DESSINS)
Cet appareil est prévu pour une installation autoportante ou encastrée. Pour une installation encastrée,
veuillez-vous référer au dessin présenté ci-contre.
•
La profondeur du cabinet doit être de 24 pouces
•
Si l'installation se fait entre des armoires sans cadre, une fourrure d’un ¼ " de large ou une bande
panneau latérale pourra être nécessaire du côté charnière.
•
La bande agira comme un espacement entre le boitier de l'appareil et la porte du cabinet adjacent.
•
La largeur de l’ouverture doit inclure le panneau ou la fourrure.
15 ½ "
Modèles MVP27S/ MVP27SL
24"
Modèles
MVP48DS/MVP48DSL/MVPD45DS
INFORMATIONS ADDITIONELLES
Placez l’appareil à l’abri des rayons du soleil et de sources de chaleur
(four, chauffage, radiateur ) Une exposition directe à la lumière du soleil peut affecter le
revêtement acrylique de l’appareil et sources de chaleur peuvent en faire augmenter la
consommation d’électricité.
• Des températures ambiantes extrêmement froides ou chaudes peuvent aussi causer des
problèmes de fonctionnement.
•
• Évitez d’installer l’appareil dans des endroits humides.
4
• Pour assurer une ventilation adéquate le devant de l’appareil doit être libre.
• Choisir un endroit bien ventilé, ou la température se situe au-dessus de 15 ºC et en dessous de
25º C.
• Cet appareil ne convient pas pour un usage extérieur, ni dans un véhicule récréatif.
• L’appareil est muni de pattes ajustables qui permettront la mise à niveau de l’appareil.
MISE À LA TERRE
•
Pour votre sécurité cet appareil devrait être correctement mis à la terre.
•
Cet appareil est équipé d’une fiche de courant à trois tiges pour réduire le risque de choc électrique.
Si la fiche ne s’insère pas facilement ou à fond dans la prise de courant, consulter un électricien.
•
Ne pas modifier la fiche et ne pas utiliser d’adaptateur.
•
Cet appareil n'est pas conçu pour être utilisé avec un convertisseur.
•
Le cordon d’alimentation devrait être rangé derrière l'appareil et ne devrait ne pas être exposé.
•
Ne débranchez jamais l'appareil en tirant sur le cordon d’alimentation.
•
N'utilisez pas de cordon rallonge. Si le cordon est trop court, consultez un électricien qualifié ou un
technicien de service et faites installer une prise plus près de l'appareil. L'utilisation d'un cordon
d'extension peut affecter la performance de l'unité.
5
3. ENTREPOSAGE
ENTREPOSAGE
Les bouteilles peuvent varier en taille et en dimension. Ainsi, la capacité est basée sur un format de bouteille
standard de type « bordeaux » de 750 ML. (Voir format ci-dessous)
CONFIGURATION DES TABLETTES
Unité MVPD45DS
Unités MVP27FS/L
Tiroir du haut : 3 x 8 bouteilles
4 bouteilles /tablette
Unités MVP48DFS/L
8 bouteilles /tablette
Tiroir du bas : 2 X 8 bouteilles
1 X 5 bouteilles
RECOMMENDATIONS POUR L’ENTREPOSAGE DE BOUTEILLES
•
Votre cabinet a été conçu pour entreposer un maximum de bouteilles en toute sécurité. Nous
recommandons que vous observiez les consignes mentionnées pour optimiser son utilisation.
6
•
•
Répartissez les bouteilles le plus équitablement possible de façon à ce que le poids ne soit pas
concentré à un seul endroit.
Assurez-vous que les bouteilles ne touchent pas l’arrière du cabinet.
•
Bien observer les instructions fournies, en tenant compte du type de tablette inclus dans votre
unité.
•
Ne pas retirer plus d’une tablette à la fois.
NOTE : AVANT DE MODIFIER LA CONFIGURATION ORIGINALE DE VOTRE UNITÉ DEMANDER CONSEIL À VOTRE
DÉTAILLANT.
COMMENT RETIRER UNE TABLETTE
1. Enlever les bouteilles
2. Tirer la tablette vers l’extérieur
3. Détacher en soulevant l’attache de côté gauche et en baissant celle de droite, puis tirer.
7
4. MODE D’EMPLOI
RECOMMANDATIONS RELATIVES À LA TEMPÉRATURE
CONSERVATION DU VIN
Vins rouge
Vins secs et blancs
Vins rosés
Vins mousseux
de
de
de
de
15 à 18°C
9 à 15°C
9 à 15°C
5 à 9°C
(58° à 64°F)
(48° à 58°F)
(48° à 58°F)
(40° à 48°F)
UTILISATION
Brancher la fiche d'alimentation et ensuite et appuyez sur bouton marche/arrêt pour démarrer l’appareil.
Au cours de la période de démarrage initial l'affichage de la température reflétera la température ambiante.
Il est recommandé de placer l’appareil dans un endroit où la température ambiante se situe entre 15°
et 25 °C. Si la température ambiante est supérieure ou inférieure à la température recommandée,
il se peut que le fonctionnement de l’appareil en soit affecté. Par exemple, exposer votre
appareil à un froid extrême ou à de fortes chaleurs peut faire fluctuer les températures intérieures.
La température zonale peut avoir une différence de +/- 3°C selon le chargement et les conditions
ambiantes.
Pour les cabinets à une seule zone la température peut être réglée de 5 à 18° C.
Pour les cabinets à 2 zones ; la zone supérieure et inférieure fonctionnent séparément. La zone supérieure
est réglable entre 5-10°C tandis que la zone inférieure peut être réglée entre 10-18 °C.
PANNEAU DE CONTRÔLE
8
FONCTIONS
Appuyer sur la touche
3 secondes pour déverrouiller toutes les fonctions
Appuyer du côté gauche
Appuyer du côté droit
ou
ou
pour ajuster la température de la zone supérieure
pour ajuster la température de la zone inférieure
Appuyer sur les touches du côté gauche
en même temps pendant 3 secondes pour éteindre
l’appareil.
Appuyer sur les touches du côté droit
en même temps pendant 3 secondes pour changer de
Celsius à Fahrenheit
Appuyer sur la touche
pour allumer l’éclairage
Si aucune touche n'est enfoncée durant 6 secondes, l’écran se verrouillera automatiquement
5. ENTRETIEN DE L’APPAREIL
NETTOYAGE DE L’APPAREIL
•
•
•
•
•
•
•
Coupez le courant, débranchez l’appareil et videz le contenu incluant les tablettes.
Lavez les surfaces intérieures avec de l’eau chaude et une solution au bicarbonate de soude
(2 cuillères à soupe pour ¼ d’eau).
Lavez les tablettes avec un détergent doux.
Essorez bien l’éponge ou le chiffon avant de nettoyer le contrôle ou toute composante
électrique.
Lavez l’extérieur de l’appareil avec de l’eau chaude et du détergent liquide doux.
Rincez bien et essuyez le tout à l’aide d’un chiffon doux et propre.
DECONGÉLATION
Il est inutile pour le décongeler l'appareil, et ce même s’il y a dépôt de glace sur le mur arrière
intérieur puisqu’il s’éliminera automatiquement. L’accumulation de glace sur le mur arrière
intérieure s’éliminera automatiquement quand le compresseur aura terminé son cycle.
L'eau s'égouttera en passant par le sortie de vidange du mur arrière intérieure dans un contenant
situé au-dessus du compresseur, à partir d’ où elle s'évapore.
9
La formation de glace peut être due à l’un des éléments suivants:
Le joint de porte ne scelle pas bien (nettoyer le joint si nécessaire, ou le remplacer s'il est endommagé);
• la porte est souvent ouverte ou laissé trop longtemps ouverte
• le contenu de l'appareil est chaud
• le contenu (bouteille) touche à l'évaporateur
PANNE DE COURANT
La plupart des coupures de courant se rétablissent en quelques heures et ne devraient pas affecter
température de votre unité si vous ouvrez la porte le moins possible
Si le courant ne se rétablit pas après une longue période de temps, voyez à protéger le contenu de
votre appareil.
DÉPLACEMENT DE L’APPAREIL
• Videz l’appareil.
• Prenez la précaution de fixer avec du ruban adhésif toutes les pièces libres (tablettes) à l’intérieur
de l’appareil.
• Vissez les pieds ajustables au maximum.
• Fermez la porte à l’aide de ruban adhésif.
• Assurez-vous que l’appareil soit positionné verticalement pendant le transport. Protégez
l’extérieur à l’aide d’une couverture, d’une toile ou autre chose du genre.
VACANCES
Courte durée : Laisser l’appareil fonctionner si vous quitter pour moins de 3 semaines
Longue durée : Si l’appareil ne sera pas utiliser pendant plusieurs mois retirer tout le contenu et
arrêter l’appareil. Nettoyer et essuyer entièrement l’intérieur du cabinet. Pour empêcher la moisissure,
laisser la porte partiellement ouverte, en la bloquant si nécessaire.
GARANTIE
Usage résidentiel : garantie limitée d’un (1) an sur les pièces et la main-d’œuvre
Usage commercial : garantie limitée d’un (1) an sur les pièces seulement.
10
6. DÉPANNAGE
Vous pouvez facilement résoudre plusieurs des problèmes courants et vous épargner ainsi
des frais de service. Essayez les suggestions ci-dessous qui s’appliquent à votre situation avant de faire
appel à un centre de service.
L’appareil n’est pas assez froid.
L’appareil vibre.
•
•
•
•
•
•
•
•
•
•
•
•
•
•
•
•
•
•
•
•
•
•
Vérifiez le réglage de contrôle de la
température.
L’environnement extérieur nécessite un
réglage plus élevé.
La porte est ouverte trop souvent.
La porte est mal fermée.
Le joint d’étanchéité de la porte n’est pas
suffisamment étanche.
La température de la pièce est plus élevée
que la normale.
Un nombre élevé de produits a été ajouté.
La porte est ouverte trop souvent.
La porte est mal fermée.
Le contrôle de la température est mal réglé.
Le joint d’étanchéité de la porte n’est pas
suffisamment étanche.
L’appareil est débranché.
Le disjoncteur est éteint ou le fusible grillé.
L’ampoule est brûlée.
L’interrupteur de la lumière est en position
d’arrêt.
Vérifiez que l’appareil est bien à niveau.
L’appareil semble faire trop de bruit.
•
•
•
Le son peut provenir du fluide réfrigérant, ce qui est
normal.
À la fin de chaque cycle, vous pourriez entendre des
bruits provenant du fluide
qui circule dans les conduits
La contraction et la dilatation des murs intérieurs
peuvent produire des craquements.
L’appareil n’est pas à niveau.
L’appareil n’est pas à niveau.
•
La porte a été mal installée après avoir été inversée.
•
Le joint d’étanchéité est sale.
•
Les tablettes ne sont pas bien installées.
Le moteur s’allume et s’éteint fréquemment.
La lumière ne fonctionne pas.
•
•
La porte ne se ferme pas bien.
POUR CONTACTER NOTRE CENTRE DE SERVICE AUTORISÉ :
AGI SERVICE
450.963.1303 / 1.888.651.2534
WWW.AGISERVICE.CA
11
CONTENTS
1. Safety Precautions…………………………………………….…..……………….13
2. Installation instructions…………………………………..…………………..14-15
3. Storage……………..………………………………………………………….…16-17
4. Operating the unit……………………………………………………….…….18-19
5. Care and maintenance.………….…………………………………………....19-20
6. Troubleshooting………………………………………………………….………...21
12
1. IMPORTANT SAFETY INSTRUCTIONS
WARNING
To reduce the risk of fire, electrical shocks, or injury when using your appliance, follow these basic precautions. This
appliance is not intended for use by persons (including children) with reduced physical, sensory or mental
capabilities, or lack of experience and knowledge, unless they have been given supervision or instruction concerning
use of the appliance by a person responsible for their safety.
BEFORE USING YOUR WINE COOLER
•
•
•
Remove the exterior and interior packaging.
Before connecting the unit to the power source, let it stand upright for approximately 4 hours. This
will reduce the possibility of a malfunction in the cooling system from handling during
transportation.
Clean the interior surface with lukewarm water using a soft cloth
DANGER AND WARNINGS
•
•
•
•
•
•
•
•
•
•
•
•
•
•
•
•
•
Danger: Risk of child entrapment. Children should not be allowed to operate, play with, or crawl inside
the unit.
Before throwing away your unit, you must: a) Take off the door; b) Leave the shelves in place, so that
children may not easily climb inside.
Read all instructions before using the appliance.
An individual properly grounded branch circuit or circuit breaker is recommended.
Do not use extension cords.
Do not place or store anything on top of the unit.
Never clean appliance parts with flammable fluids. The fumes can create a fire hazard or explosion.
Make sure the unit is unplugged before cleaning, or repairing.
Do not store or use gasoline or any other flammable vapors in the vicinity or any other appliance. The
fumes can help create a fire or explosion.
It is important that the appliance be leveled to work properly.
If you do not plan on using the appliance for an extended period of time, unplug it and leave the door
open.
Be sure the front of the appliance is unobstructed for air circulation and proper access to the door. Do
not install where it will be subject to direct sunlight, heat or moisture.
If you do not plan on using the appliance for an extended period of time, unplug it and leave the door
open.
Repair should only be made by authorized Service Centers only.
If the supply cord is damaged it must be replaced by the manufacturer, it’s Service Agent or similarly
qualified persons in order to avoid a hazard.
In order to function at its highest potential, this wine cooler needs to be placed on flat floor and the
front of the unit completely unobstructed.
This unit should only be used as specified. The manufacturer will not be held responsible for any damage
13
due to improper use or repairs made by unqualified personnel. A commercial use will void warranty.
Locate the appliance away from direct sunlight and sources of heat (stove, heater, radiator, etc.).
Direct sunlight may affect the acrylic coating and heat sources may increase electrical consumption.
Ambient temperature below 59°F (15°C) or above 77°F (25°C) will hinder the performance of this
appliance. This unit is not designed for use in a garage or any other outside installation.
•
Plug the appliance into dedicated, properly installed-grounded wall outlet. Do not under any
circumstances cut or remove the third (ground) prong from the power cord. Any questions
concerning power and/or grounding should be directed toward a certified electrician or an
authorized Service Center. This unit is not designed to be installed in an RV or used with an inverter.
2. INSTALLATION INSTRUCTIONS
INSTALLATION SPECIFICATIONS
。
•
This appliance requires a standard 115 Volt A.C. /50Hz electrical outlet with three-prong ground
•
This appliance is designed to be installed built-in or free standing.
•
Avoid locating the appliance in moist areas.
•
After plugging the appliance into a wall outlet, allow the unit to cool down for 3 ~ 4 hours before placing
wine bottles in the appliance.
•
This wine cooler come with adjustable legs to help level the unit
BUILT-IN INSTALLATION
•
•
•
•
The depth of the cabinet (opening) should be 24”
The cutout dimension illustrated (see below) allows for door swing and access to the pull-out shelves
when installed as a built-in appliance.
If installing between frameless cabinets, a ¼” wide filler strip or side panel may be needed on the hinge
side. The filler strip will act as a spacer between the appliance case and adjacent cabinet door swing.
The width of the opening must include the filter panels.
The door should protrude at least 1” beyond the surrounding cabinets.
15 ½ "
Model MVP27S/MVP27SL
24"
Model MVP48DS/MVP48DSL/MVPD45DS
14
ELECTRICAL CONNECTION
WARNING
Improper use of the grounded plug can result in the risk of electrical shock. If the power cord is
damaged, have it replaced by an authorized service center.
•
This appliance should be properly grounded for your safety. The power cord of this appliance is
equipped with a three-prong plug which mates with standard three prong wall outlets to minimize
the possibility of electrical shock.
•
Do not, under any circumstances, cut or remove the third ground prong from the power cord
supplied.
•
The cord should be secured behind the appliance and not left exposed or dangling to prevent
accidental injury.
•
Never unplug the appliance by pulling the power cord. Always grip the plug firmly and pull straight
out from the receptacle.
•
Do not use an extension cord with this appliance. If the power cord is too short, have a qualified
Electrician or Service Technician install an outlet near the appliance. Use of an extension cord can
negatively affect the performance of the unit.
15
3. STORAGE
Wine bottles vary in size and dimension. The capacity specified is based on a standard 750 ml «Bordeaux»
bottle. (See dimensions below).
SHELF CONFIGURATIONS:
MVPD45DS
Top drawer:
3 x 8 bottles
MVP27FS/L
MVP48DFS/L
4 bottle/shelf
8 bottle/shelf
Lower drawer: 2 x 8 bottles
1 x 5 bottles
RECOMMENDATIONS
16
FOR LAYOUT AND STORAGE OF YOUR WINE CABINET
• Your cabinet was designed to store a maximum number of bottles in total security.
• We recommend that you observe the tips to optimize loading.
• Spread your bottles out as evenly as possible over the shelves, so that the weight is not
concentrated in one area; also make sure your bottles do not touch the back of the cabinet, or
the step at bottom.
• Also make sure that the bottles are not all grouped together at the top or bottom of the cabinet.
• Observe the loading instructions provided , according to the type of storage fixtures with which
your cabinet is equipped
• Never try to pull out more than one sliding shelf at a time.
NOTE: BEFORE CHANGING THE ORIGINAL CONFIGURATION OF YOUR UNIT SEEK ADVICE FROM YOUR
RETAILER.
REMOVING A SHELF
To remove a sliding shelf:
1. Remove all bottles
2. Pull out the shelf
3. Take out shelf by lifting the right side bracket and lowering the left side one, then pull out
17
4. OPERATING YOUR APPLIANCE
RECOMMENDED TEMPERATURES FOR CHILLING WINE
Red Wines:
Dry/White Wines/Rosé
Sparkling Wines
15-18°C (58-64°F)
9-15°C (48-58°F)
5-9°C (40-48°F)
OPERATION
Press the on/off button to start the cabinet. Please delay loading your bottles into the cabinet for at least
3-4 hours. During the initial start, the temperature displayed on the board will be of the outer
environment.
The wine cooler should be placed where the ambient temperature is between 15°C to 25°C. If the ambient
temperature is above or below this range, the performance of the unit may be affected. For example,
placing your unit in extreme cold or hot conditions may cause interior temperatures to fluctuate.
The zone temperature may have a difference of +/- 3 °C from the setting depending on loading and
ambient conditions.
For the 1 zone cabinets the temperature setting can be adjusted from 5°C to 18°C (40°F to 65°F).
For the 2 zone cabinets: the 2 zones work independently, the upper zone the temperature setting can be
adjusted from 5°C to 10°C (40°F to 50°F) and the lower zone from 10°C to 18°C (50°F to 65°F).
CONTROL BOARD
18
FUNCTIONS:
Press
for 3 seconds to unlock/lock all the functions
Press left
and
to adjust the temperature of the upper zone
Press right
and
to adjust the temperature of the lower zone
Press left
and
Press right
Press
at the same time and hold for 3 seconds to power off
and
C
at the same time for 3 seconds to switch from ° to °F
to turn on or off the lights
If no function is activated within 6 seconds, the touch screen will locked automatically.
5.CARE AND MAINTENANCE
CLEANING YOUR WINE COOLER
•
•
•
•
•
Turn off the power, unplug the appliance, and remove all items including shelves and rack.
Wash the inside surfaces with a warm water and baking soda solution. The solution should be
about 2 tablespoons of baking soda per a liter of water.
Wash the shelves with a mild detergent solution.
Wring excess water out of the sponge or cloth when cleaning area of the controls, or any electrical
parts.
Wash the outside cabinet with warm water and mild liquid detergent. Rinse well and wipe dry
with a clean soft cloth.
DEFROST
•
•
•
The ice build-up on the inner back wall during compressor operation will be automatically defrosted
in a compressor off cycle.
When defrosting is in process, only the circulation fans for both zones run.
Defrost water will drain into the drip dish(on the compressor) .and the water will be evaporated by
the compressor
19
POWER FAILURE
Most power failures are corrected within a few hours and should not affect the temperature of your
appliance if you minimize the number of times the door is opened. If the power is going to be off for a
longer period of time, you need to take the proper steps to protect the content.
VACATION TIME
•
•
Short vacations: Leave the Wine Cooler operating during vacations of less than three weeks.
Long vacations: If the appliance will not be used for several months, remove all items and turn off
the appliance. Clean and dry the interior thoroughly. To prevent door and mold growth, leave the
door open slightly: blocking it open if necessary.
MOVING YOUR UNIT
•
•
•
•
•
Remove all items.
Securely tape down all loose items (shelves) inside your appliance.
Turn the adjustable leg up to the base to avoid damage.
Tape the door shut.
Be sure the appliance stays secure in the upright position during transportation. Also protect the
outside of appliance with a blanket, or similar item.
WARRANTY
Residential use: limited warranty of 1 year, parts and labor.
Commercial use: limited warranty of 1 year on parts only.
20
6.TROUBLESHOOTING
You can solve many common appliance problems easily, saving you the cost of a possible Service Call.
Try the suggestions below to see if you can solve the problem before calling for service.
Appliance does not operate.
Not plugged in. The circuit breaker has tripped or there
is a blown fuse.
Temperature inside the appliance is too warm.
Temperature control is set too warm. Turn the
control to a cooler setting and allow several hours for
the temperature to stabilize.
Door is kept open too long or is opened too frequently.
Warm air enters the appliance every time the door is
opened. Open the door less often.
The door is not closed completely.
The door gasket does not seal properly.
The appliance has recently been disconnected for a
period of time. 4 hours are required for the appliance
to cool down completely.
Temperature inside the appliance is too cold.
Temperature control is set too cold. Turn the control
to a warmer setting and allow several hours for the
temperature to stabilize.
Vibrations
Check to assure that the appliance is on a level surface.
The appliance is touching the wall. Re-level the
appliance and move it from the wall.
If continued vibration occurs, turn off the appliance and
unplug the power plug. Contact Customer Service
Dept. for further assistance.
Moisture forms on inside appliance walls.
Door is slightly open.
Door is kept open too long, or is opened too frequently.
Open the door less often.
The door is not sealed properly.
Moisture forms on outside of appliance.
Door is slightly open, causing cold air from inside the
appliance to meet warm moist air from outside.
The door will not close properly.
The appliance is not on a level surface.
The gasket is dirty.
TO CONTACT THE AUTHORIZED SERVICE CENTER:
A.G.I SERVICE
450.963.1303/1.888.651.2534
WWW.AGISERVCE.CA
21