1
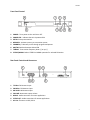
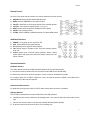
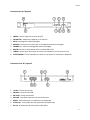
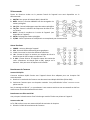
TU-508
Digital Stereo Tuner
Syntoniseur numérique stéréophonique
User Guide
Guide d’utilisation
TECHNI-CONTACT CANADA LTD./LTÉE
Pointe-Claire, QC H9R 1A3 Calgary, AB T2C 4X7
TU-508
TU-508 Digital Stereo Tuner
Important Safety Information
WARNING: To reduce the risk of fire or electric shock, do not expose this apparatus to rain or
moisture.
1.
2.
3.
4.
5.
6.
7.
8.
9.
10.
11.
12.
13.
Read these instructions.
Keep these instructions.
Read all warnings.
Follow all instructions.
Do not use this apparatus near water.
Clean only with dry cloth.
DO NOT block any ventilation openings. Install in accordance with the manufacturer’s instructions.
Do not install near any heat sources such as radiators, heat registers, stoves, or other apparatus
(including amplifiers) that produce heat.
Do not defeat the safety purpose of the polarized or grounding-type plug. A polarized plug has two
blades with one wider than the other. A grounding-type plug has two blades and a third grounding
prong. The wide blade, or the third prong, is provided for your safety. If the provided plug does not
fit into your outlet, consult an electrician for replacement of the obsolete outlet.
Protect the power cord from being walked on or pinched, particularly at plugs.
Only use attachments/accessories specified by the manufacturer.
Unplug this apparatus during lightning storms or when unused for long periods of the time.
Refer all servicing to qualified service personnel. Servicing is required when the apparatus has been
damaged or is not operating properly (damaged power-supply cord or plug, liquid spilled onto the
unit or fallen objects into the apparatus, unit exposed to rain or dropped).
CAUTION: TO PREVENT RISK OF ELECTRIC SHOCK, DO NOT REMOVE COVER (OR BACK). THERE ARE NO
USER-SERVICESABLE PARTS INSIDE. REFER SERVICING TO QUALIFIED PERSONNEL.
The lightning flash with arrowhead symbol, within an equilateral triangle, is intended to alert
the user of a risk of the electric shock to persons.
The exclamation point within an equilateral triangle is intended to alert the user to the
presence of important operating and maintenance (servicing) instructions in the literature
accompanying the appliance.
FCC Statement (Part 15) – Radio Frequency Interference
The TU-508 Digital Stereo Tuner generates and uses radio frequency energy and if not installed and used
in strict accordance with the manufacturer’s instructions, may cause interference to radio and television
reception. Testing is being conducted for compliance with the limits for a Class B device in accordance
with the specifications in Part 15 of the FCC Rules and Canadian D.O.C regulations in order to provide
reasonable protection against such interference. However, there is no guarantee that interference will
not occur in a particular installation. If this equipment does cause interference to radio or television
2
TU-508
reception, which can be determined by turning the TU-508 unit off and on, the user is encouraged to try
to correct the interference by one or more of the following measures:
- Reorient the radio or TV receiving antenna.
- Relocate the TU-508 unit with respect to the radio or TV receiver or vice-versa.
- Plug the TU-508 unit into a different outlet (tuner and radio or TV receiver on different circuits)
If necessary, the user should consult the dealer or an experienced radio/television technician for
additional suggestions. The user may find the following flyer “Interference: Defining the Source,”
helpful. This flyer was prepared by the Federal Communications Commissions (FCC) and is available on
the website located at http://www.fcc.gov/cgb/consumerfacts/interference.html
Before You Begin
Your AMX TU-508 Digital Stereo Tuner incorporates the latest in PLL digital circuitry for reliable
performance for years to come. To get the maximum benefit from your AMX product, please read all
instructions provided with the unit.
Package Contents
(1)
(1)
(1)
(1)
(1)
(1)
(1)
TU-508 Digital Stereo Tuner
Remote Control
Set of Rack Ears
AM Radio Antenna (Loop)
FM radio Antenna (Dipole)
Stereo Patch Cable (RCA)
User’s Manual
19” Rack Ears Installation
A pair of rack ears are included to rack mount the TU-508 in a standard
19” audio/electronics rack.
1. Remove three screws from the side panel of the TU-508 toward the
front.
2. Place rack ear in proper position, paying attention to correct
alignment.
3. Reattach screws.
4. Repeat procedure for second rack ear, located on the other side of
the unit.
Important : Before installing the TU-508 in a rack, the four attached feet must be unscrewed and
removed from the bottom of the unit.
3
TU-508
Front Panel Control
1.
2.
3.
4.
5.
6.
7.
8.
POWER: Turns power to the unit ON or OFF
POWER LED: Indicates that unit is powered ON
INTRO: Scans preset stations
MEMORY: Activates memory to save station preset
CHANNEL+/-: Manually scrolls through programmed presets
AM/FM: Switches between AM and FM
TUNING: Tunes station frequency down (-) or up (+)
STEREO/MONO: Selects STEREO or MONO operation for selected FM station
Rear Panel Controls and Connectors
1.
2.
3.
4.
5.
6.
7.
75-Ohm: FM Antenna input
300-Ohm: FM Antenna input
AM LOOP: AM Antenna input
VOLUME: Attenuates output volume
MONO: Audio connection for mono applications
STEREO R/L: Audio connections for stereo applications
AC Line: Connects to 120V, 60 Hz
4
TU-508
Remote Control
All of the front panel control functions can also be adjusted by remote control
1.
2.
3.
4.
5.
6.
7.
AM/FM: Switches between AM and FM operation
MEM: Activates MEMORY to save station preset
CH+/CH-: Manually scrolls through stations from available presets
TU-/TU+: Tunes station frequency down (-) or up (+)
MUTE: Mutes audio output (not available on front panel)
INTRO: Scans preset stations
ST/MO: Selects STEREO or MONO operation for selected FM station
Additional functions:
1.
2.
3.
4.
POWER: Turns power to the unit ON or OFF
VFD: Selects different bar graph displays
0-9: Manually enter digits for desired preset
10+: Selects range in multiples of ten, for preset stations greater
than “10”
5. P.CALL: Allows entry of actual station numbers. Select a band
(either AM or FM), then press the P.CALL button. Next, enter the
station number
Antenna Connection
FM Dipole Antenna
The indoor dipole antenna provided should be adequate for normal FM reception.
1. Connect the antenna leads to the two terminals marked 300 Ohms (FM and GND).
2. Position the antenna for the best reception. Tack it to a wall or baseboard if possible.
For reception when the TU-508 is installed in a rack, an external antenna installed in accordance with
National Electric Codes may be required.
FM Coaxial Cable Connector
For applications using coaxial cable, an FM 75-Ohm coaxial cable connector is provided.
AM Loop Antenna
The TU-508 is provided with an external AM antenna for AM reception.
1. Carefully pull the antenna lead from the holding notch in the antenna and unwind the lead from the
loop.
2. Connect the antenna leads to the terminals marked AM LOOP (AM and GND).
3. Snap the antenna into the base to form a free-standing unit.
5
TU-508
4. Position the antenna for best reception. If desired, the antenna may be permanently mounted using
screws through the two holes in the base.
Audio Connections
An audio patch cable is provided.
1. Connect the two RCA plugs from one end of the cable to the R and L STEREO terminals on the TU508 (for mono applications, connect one end of cable to the MONO terminal.)
2. Connect the other end of the cable to an amplifier or mixer.
OPERATION
Note: These functions are the same whether accessed from the front panel of the TU-508 or from the
Remote Control.
Power
Press the front panel POWER button to turn the TU-508.
Turn the rear-mounted VOLUME control counterclockwise to attenuate audio output and clockwise for
full output.
To Select a Band
Press the button marked AM/FM. The current band selected (AM or FM) appears on the display.
You can preset up to a total of 60 stations for both AM and FM bands combined. FM stations may be
played in either stereo or mono; press the STEREO/MONO button to change mode.
To Tune a Station
Pressing the TUNING + or TUNING- button advances to the next frequency. Pressing and holding the
TUNING+ or TUNING- button will activate the auto search feature. The word AUTO appears on the
display, and the search will continue to the next clear station signal. To stop the auto search at any
frequency, press either the TUNING+ or TUNING- button again.
To Preset Stations
1. Select a band and tune the first desired station.
2. Press the MEMORY button and then one of the CHANNEL+/-buttons to select the preset number.
The two-digit preset number appears on the display. The display flashes twice and then the preset is
stored.
3. Repeat the procedure for each desired preset.
To Scan Preset Stations
1. Press the INTRO button. Each preset station will play for a few seconds in turn while scanning.
2. To select a station during scanning, press the INTRO button again.
6
TU-508
To Select Preset stations Using Remote Control
The number buttons can be used to select a specific preset station. For presets greater than 10, press
10+ for each multiple of 10 (for example, 10, 20, 30, etc.), then select the preset in that multiple.
Example: To select preset 52, press 10+ five times, then press 2.
Pressing P.CALL allows actual station numbers to be entered.
1. Select a band.
2. Press the P.CALL button.
3. Enter the station numbers.
SPECIFICATIONS
Band coverage : FM : 87.00 to 108.5MHz
AM : 530 to 1710KHz
Tuning : PLL Synthesizer
Channel Indicator : LCD Panel
Station Tuning : Push-button
Preset Memory : 60 Total stations (AM and FM)
Antenna Connectors : FM : 75 Ohms, coax: 300 Ohms, push-release. AM : Push-release
Output : Stereo/Mono via RCA jacks, AUX
Program Selection : Push-button via front panel or remote control
Output Terminals : RCA
Accessories Included : AM Loop and FM Dipole antennas
Remote Control (uses two AA batteries)
RCA Stereo Cable
Operating Voltage : 120v. AC, 60Hz, 0.15A max
Dimensions : 16 7/8’’ L x 1 ¾’’ H x 10’’ P (without feet)
16 7/8’’ L x 2’’ H x 10’’ P (with feet)
Weight : 4.75 lb
7
TU-508
TU-508 Syntoniseur numérique stéréophonique
Information sur les précautions à suivre
AVERTISSEMENT : Afin de réduire le risque de feu ou de chocs électriques, ne jamais exposer cet
appareil à l’eau ou l’humidité.
1.
2.
3.
4.
5.
6.
7.
8.
9.
10.
11.
12.
13.
Lire les instructions attentivement.
Conserver ces instructions.
Prendre note des avertissements.
Suivre les instructions.
Ne pas utiliser cet appareil près de l’eau.
Nettoyer seulement avec un linge sec.
NE PAS bloquer les ouvertures de ventilation. Installer selon les recommandations du fabricant.
Ne pas installer l’appareil près d’un radiateur, d’une sortie d’air chaud, d’un poêle ou toute autre
source de chaleur.
Ne pas éliminer la polarisation de la fiche du secteur 117V. Ce type de fiche avec mise à la terre est
conçu pour ajouter une meilleure protection à votre appareil. Dans l’impossibilité de brancher ce
type de fiche, consulter un électricien afin qu’il puisse remplacer la prise murale.
Protéger la corde d’alimentation contre les écrasements et les pincements particulièrement autour
de la fiche ou de l’appareil.
Utiliser seulement des périphériques recommandés par le manufacturier.
Débrancher cet appareil durant les orages électriques ou si l’appareil n’a pas à être utilisé durant de
longues périodes.
Confier la réparation à un technicien qualifié en cas de défaut ou de dommage (si l’appareil entre en
contact avec un liquide, s’il subit un choc, s’il ne fonctionne pas adéquatement, etc.).
PRÉCAUTIONS : AFIN DE PRÉVENIR LES RISQUES DE CHOCS ÉLECTRIQUES, NE PAS ENLEVER LE
COUVERCLE OU L’ARRIÈRE. AUCUNE PIÈCE NE PEUT ÊTRE REMPLACÉE À L’INTÉRIEUR.
CONFIER L’APPAREIL À UN TECHNICIEN QUALIFIÉ.
Le symbole de l’éclair dans un triangle indique à l’utilisateur la présence de voltage
dangereux à l’intérieur qui constitue une menace évidente pour toute personne.
Le symbole de point d’exclamation dans un triangle indique au consommateur que des
informations sur l’entretien et l’opération de l’appareil sont incluses avec l’appareil.
Déclaration de la FCC (partie 15)- Interférence de radiofréquences
Le syntoniseur stéréophonique TU-508 génère et utilise de l’énergie générée par des radiofréquences
qui peuvent causer de l’interférence aux appareils de radio et de télévision s’il n’est pas installé
correctement. Des tests sont effectués pour assurer la conformité des normes et spécifications
de la Classe B (FCC Partie 15) et du code canadien D.O.C. afin d’assurer une efficacité raisonnable contre
les interférences. Néanmoins, il n’existe pas de garantie que ce type d’interférence ne sera pas présent
8
TU-508
dans certaines installations spécifiques. Si cet équipement cause de l’interférence à des radios ou
téléviseurs en allumant ou éteignant le TU-508, l’utilisateur est encouragé à corriger l’interférence en
suivant les recommandations suivantes :
- Rediriger l’antenne de l’appareil radio ou du téléviseur.
- Relocaliser le TU-508 par rapport aux appareils affectés.
- Brancher le TU-508 dans une prise différente de façon à ce que la radio ou le téléviseur ne soit pas
sur le même circuit.
Si nécessaire, l’utilisateur devrait consulter le revendeur ou un technicien expérimenté en
radio/télévision pour des suggestions supplémentaires. L’utilisateur peut consulter la brochure suivante,
‘’Interférence : Définir la source’’ (en anglais seulement) disponible sur le site de la Commission
Fédérale des Communications (FCC) au www.fcc.gov/cgb/consumerfacts/interference.html
Avant de débuter l’installation
Votre syntoniseur numérique stéréophonique TU-508 incorpore les technologies PLL numériques les
plus récentes de façon à fournir un rendement maximal pour plusieurs années à venir. Afin de profiter
des nombreuses caractéristiques de votre appareil AMX, assurez-vous de lire toutes les instructions
incluses avec l’unité.
Contenu de l’emballage
(1)
(1)
(1)
(1)
(1)
(1)
(1)
Syntoniseur digital TU-508 stéréophonique
Une télécommande
Ensemble de fixation pour montage sur bâti
Antenne cadre AM
Antenne dipôle FM
Câble de raccordement fiches RCA
Manuel d’instructions
Installation des supports pour montage sur bâti 19’’
Une paire d’adaptateurs pour montage sur bâti 19’’ est incluse avec
l’appareil.
1. Retirer trois vis du côté de l’appareil (vers l’avant)
2. Installer un des supports dans la position recommandée en s’assurant
d’avoir la bonne position
3. Réinstaller les trois vis originales
4. Répéter la même procédure pour le côté opposé de l’appareil
IMPORTANT : Les pieds de caoutchouc doivent être retirés du dessous de l’appareil avant une installation
de ce type.
9
TU-508
Panneau avant de l’appareil
1.
2.
3.
4.
5.
6.
7.
8.
POWER : Active l’appareil en position On/Off
VOYANT DEL : Indique que l’appareil est en fonction
INTRO : Balayage des stations préréglées
MEMORY : Enclenche la mémoire pour la sauvegarde des stations préréglées
CHANNEL +/- : Permet le balayage des stations préréglées
AM/FM : Permet la commutation entre les bandes AM et FM
TUNING : Bouton pour sélectionner les stations par fréquences vers le bas ou le haut.
STEREO/MONO : Choisit l’opération en stéréo ou mono pour les stations de la bande FM
Panneau arrière de l’appareil
1.
2.
3.
4.
5.
6.
7.
75-Ohm : Entrée antenne FM
300-Ohm : Entrée antenne FM
AM LOOP : Entrée antenne AM
VOLUME : Contrôle d’atténuation du volume de sortie
MONO : Sortie audio pour une application monophonique
STEREO R/L : Sortie audio pour une application stéréophonique
AC Line : Branchement de l’alimentation 120V, 60Hz
10
TU-508
Télécommande
Toutes les fonctions situées sur le panneau frontal de l’appareil sont aussi disponibles sur la
télécommande.
1. AM/FM : Pour passer de la bande AM à la bande FM
2. MEM : Activer la fonction MEMORY afin de sauvegarder les
stations préréglées
3. CH +/CH- : Permet le balayage manuel des stations préréglées
4. TU-/TU+ : Permet la sélection des fréquences de haut en bas
ou l’inverse
5. MUTE : Permet la sourdine sur la sortie de l’appareil (non
disponible sur l’appareil)
6. INTRO : Balayage des stations préréglées
7. ST/MO : Choisit l’opération en stéréophonie ou monophonie pour les stations FM
Autres fonctions:
1. POWER : Active ou désactive l’appareil
2. VFD : Permet d’afficher différentes barres graphiques
3. 0 à 9 : Pour entrer les choix des différentes mémoires
4. 10+ : Permet de choisir les stations par multiples de 10 sur la
bande lorsque le chiffre requis est supérieur à 10
5. P. CALL : Permet d’entrer la fréquence exacte des stations de
radio : sélectionner une bande (AM ou FM), appuyer sur le
bouton P. CALL puis entrer la fréquence de la station
Branchement de l’antenne
Antenne FM Dipôle
L’antenne intérieure dipôle fournie avec l’appareil devrait être adéquate pour une réception FM
conventionnelle.
1. Brancher les extrémités de l’antenne aux deux terminaux indiqués 300 Ohms (FM et GND).
2. Positionner l’antenne pour une réception maximale. Il est préférable de la fixer à un mur ou une
plainte murale.
Pour le montage sur bâti 19’’, un raccordement à une antenne extérieure est recommandé et doit être
conforme aux normes du National Electric Codes.
Branchement sur câble coaxial FM
Une prise pour le branchement d’une fiche de type coaxiale 75 ohms est prévue sur l’appareil.
Antenne cadre AM
Le TU-508 est fourni avec une antenne AM afin de maximiser la réception.
1. Dérouler le câble de branchement de l’antenne.
11
TU-508
2. Brancher l’antenne aux terminaux indiqués AM LOOP (AM et GND).
3. Enclencher l’antenne dans sa base pour l’attacher au socle.
4. Diriger l’antenne pour une réception maximale. Vous pouvez aussi choisir de fixer l’antenne d’une
façon permanente en utilisant les deux trous situés à la base.
Branchements Audio
Un câble audio est fourni à cet effet.
1. Relier les fiches de type RCA aux prises R et L STEREO sur le TU-508 (pour une installation
monophonique, brancher seulement un câble à la prise MONO).
2. Brancher l’autre extrémité à l’entrée AUX d’un amplificateur ou d’un mélangeur.
UTILISATION
Note : Les fonctions décrites ci-dessous sont les mêmes peu importe si elles sont sélectionnées sur le
panneau avant de l’appareil ou avec la télécommande.
Alimentation
Pousser le bouton POWER sur l’appareil afin de placer l’appareil en fonction.
Tourner le bouton du volume de sortie situé à l’arrière dans le sens opposé des aiguilles d’un montre
afin d’atténuer la sortie et dans le sens opposé pour obtenir le niveau de sortie maximal de l’appareil.
Sélection des bandes
Appuyer sur le bouton indiqué AM/FM. La bande choisie apparaît sur l’afficheur.
60 Stations préréglées sur les bandes AM et FM combinées peuvent être enregistrées au total. Les
stations FM peuvent être jouées en stéréophonie ou monophonie; appuyez sur le bouton
STEREO/MONO afin de changer d’option.
Pour syntoniser une station
Appuyer sur le bouton TUNING+ ou TUNING- pour atteindre la station suivante ou précédente. Appuyer
et maintenir enfoncé TUNING+ ou TUNING- pour activer la fonction auto-recherche. A ce moment,
l’indicateur AUTO recherche apparaîtra sur l’afficheur et l’appareil continuera à rechercher une station
émettrice. Pour mettre fin à la recherche AUTO, appuyer de nouveau sur un des deux boutons TUNING+
et TUNING-.
Mettre en mémoire des stations préréglées
1. Choisissez la bande et la station à prérégler en mémoire.
2. Appuyer sur le bouton MEMORY et en même temps le bouton CHANNEL+/- afin de choisir le
numéro de position. Le numéro de préréglage à deux chiffres apparaîtra à l’afficheur puis clignotera
deux fois indiquant ainsi que le la station est gardée en mémoire.
3. Répéter la même procédure pour chacune des stations à sauvegarder en mémoire.
12
TU-508
Balayage des stations sauvegardées en mémoire
1. Appuyer sur le bouton indiqué INTRO. Chacune des stations préréglées joueront, tour à tour,
pendant un court moment durant le balayage de toutes les stations.
2. Pour arrêter sur une station, appuyer de nouveau sur le bouton INTRO.
Choisir les stations préréglées en utilisant la télécommande
Les boutons chiffrés peuvent être utilisés pour faire le choix de la station préréglée. Pour les sélections
supérieures au chiffre 10, appuyer sur 10+ pour chaque multiple de 10 (par exemple, 10, 20, 30 etc.)
puis le chiffre unitaire.
Exemple : Pour choisir 52, appuyer sur 10+ cinq fois et puis sur le chiffre 2.
Appuyer sur le bouton P. CALL pour obtenir la station préréglée directement en entrant son numéro.
1. Choisir une bande (AM ou FM)
2. Appuyer sur le bouton P. CALL
3. Entrer le numéro de préréglage assigné à la station
SPÉCIFICATIONS
Bande de réception : FM : 87.00 à 108.5MHz
AM : 530 à 1710KHz
Syntonisation : PLL Synthétiseur
Indicateur de canaux : Panneau ACL
Choix des stations : Bouton-poussoir
Mémoires préréglées : 60 stations au total (AM et FM)
Fiches de branchement de l’antenne : FM : 75 Ohms, coaxiale : 300 Ohms, à pression. AM : à pression
Sorties : Stéréo/Mono via fiche RCA, niveau AUX
Sélection des programmes : Bouton-poussoir par le panneau frontal ou la télécommande
Bornes de sortie : Prises RCA
Accessoires inclus : Antenne AM de type cadre et FM de type dipôle
Télécommande (utilise deux piles AA)
Cordon audio avec fiches RCA
Voltage de l’appareil : 120v. AC, 60Hz, 0.15A max
Dimensions : 16 7/8’’ L x 1 ¾’’ H x 10’’ P (sans les pieds)
16 7/8’’ L x 2’’ H x 10’’ P (avec les pieds)
Poids : 4.75 lb
13


![3T11131A [COVER]](http://vs1.manualzilla.com/store/data/006164578_1-b091c799fbe2f54ad080b700a0e61ea1-150x150.png)
![3T30631A [COVER]](http://vs1.manualzilla.com/store/data/006334567_1-569f92049c2ac3665fee2b2debb524ca-150x150.png)