1
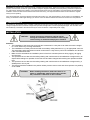
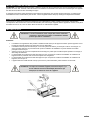
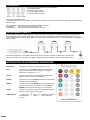
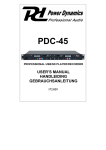
FlatPAR 7x15W RGBAW DMX IR Ref. nr.: 151.276 INSTRUCTION MANUAL MANUEL D'INSTRUCTIONS V1.1 ENGLISH Congratulations to the purchase of this Beamz light effect. Please read this manual thoroughly prior to using the unit in order to benefit fully from all features. Read the manual prior to using the unit. Follow the instructions in order not to invalidate the warranty. Take all precautions to avoid fire and/or electrical shock. Repairs must only be carried out by a qualified technician in order to avoid electrical shock. Keep the manual for future reference. - Prior to using the unit, please ask advice from a specialist. When the unit is switched on for the first time, some smell may occur. This is normal and will disappear after a while. - The unit contains voltage carrying parts. Therefore do NOT open the housing. - Do not place metal objects or pour liquids into the unit This may cause electrical shock and malfunction. - Do not place the unit near heat sources such as radiators, etc. Do not place the unit on a vibrating surface. Do not cover the ventilation holes. - The unit is not suitable for continuous use. - Be careful with the mains lead and do not damage it. A faulty or damaged mains lead can cause electrical shock and malfunction. - When unplugging the unit from a mains outlet, always pull the plug, never the lead. - Do not plug or unplug the unit with wet hands. - If the plug and/or the mains lead are damaged, they need to be replaced by a qualified technician. - If the unit is damaged to such an extent that internal parts are visible, do NOT plug the unit into a mains outlet and DO NOT switch the unit on. Contact your dealer. Do NOT connect the unit to a rheostat or dimmer. - To avoid fire and shock hazard, do not expose the unit to rain and moisture. - All repairs should be carried out by a qualified technician only. - Connect the unit to an earthed mains outlet (220240Vac/50Hz) protected by a 10-16A fuse. - During a thunderstorm or if the unit will not be used for a longer period of time, unplug it from the mains. The rule is: Unplug it from the mains when not in use. - If the unit has not been used for a longer period of time, condensation may occur. Let the unit reach room temperature before you switch it on. Never use the unit in humid rooms or outdoors. - During operation, the housing becomes very hot. Do not touch it during operation and immediately after. - To prevent accidents in companies, you must follow the applicable guide lines and follow the instructions. - Secure the unit with an extra safety chain if the unit is ceiling mount. Use a truss system with clamps. Make sure nobody stands in the mounting area. Mount the effect at least 50cm away from inflammable material and leave at least 1 meter space on every side to ensure sufficient cooling. - This unit contains high intensity LEDs. Do not look into the LED light to prevent damage to your eyes. - Do not repeatedly switch the fixture on and off. This shortens the life time. - Keep the unit out of the reach of children. Do not leave the unit unattended. - Do not use cleaning sprays to clean switches. The residues of these sprays cause deposits of dust and grease. In case of malfunction, always seek advice from a specialist. - Only operate the unit with clean hands. - Do not force the controls. - If the unit has fallen, always have it checked by a qualified technician before you switch the unit on again. - Do not use chemicals to clean the unit. They damage the varnish. Only clean the unit with a dry cloth. - Keep away from electronic equipment that may cause interference. - Only use original spares for repairs, otherwise serious damage and/or dangerous radiation may occur. - Switch the unit off prior to unplugging it from the mains and/or other equipment. Unplug all leads and cables prior to moving the unit. - Make sure that the mains lead cannot be damaged when people walk on it. Check the mains lead before every use for damages and faults! - The mains voltage is 220-240Vac/50Hz. Check if power outlet match. If you travel, make sure that the mains voltage of the country is suitable for this unit. - Keep the original packing material so that you can transport the unit in safe conditions This mark attracts the attention of the user to high voltages that are present inside the housing and that are of sufficient magnitude to cause a shock hazard. This mark attracts the attention of the user to important instructions that are contained in the manual and that he should read and adhere to. DO NOT LOOK DIRECTLY INTO THE LENS. This can damage your eyes. Persons who are subject to epileptic attacks should be aware of the effects that this light effect may have on them. The unit has been certified CE. It is prohibited to make any changes to the unit. They would invalidate the CE certificate and their guarantee! NOTE: To make sure that the unit will function normally, it must be used in rooms with a temperature between 5°C/41°F and 35°C/95°F. Electric products must not be put into household waste. Please bring them to a recycling centre. Ask your local authorities or your dealer about the way to proceed. The specifications are typical. The actual values can slightly change from one unit to the other. Specifications can be changed without prior notice. 2 UNPACKING INSTRUCTION CAUTION! Immediately upon receiving a fixture, carefully unpack the carton, check the contents to ensure that all parts are present, and have been received in good condition. Notify the shipper immediately and retain packing material for inspection if any parts appear damage from shipping or the package itself shows signs of mishandling. Save the package and all packing materials. In the event that a fixture must be returned to the factory, it is important that the fixture be returned in the original factory box and packing. If the device has been exposed to drastic temperature fluctuation (e.g. after transportation), do not switch it on immediately. The arising condensation water might damage your device. Leave the device switched off until it has reached room temperature. POWERSUPPLY On the label on the backside of the controller is indicated on this type of power supply must be connected. Check that the mains voltage corresponds to this, all other voltages than specified, the light effect can be irreparably damaged. The controller must also be directly connected to the mains and may be used. No dimmer or adjustable power supply. INSTALLATION CAUTION: Please consider the respective national norms during the installation! The installation must only be carried out by an authorized employee or dealers! Attention: The installation of the fixture has to be built and constructed in a way that it can hold 10 times the weight for 1 hour without any harming deformation. The installation must always be secured with a secondary safety attachment, e.g. an appropriate catch net. This secondary safety attachment must be constructed in a way that no part of the installation can fall down if the main attachment fails. Make sure the area below the installation place is free from unwanted persons during rigging, de-rigging and servicing. The operator has to make sure that safety-relating and machine-technical installations are approved by an expert before taking into operation for the first time and after changes before taking into operation another time. The operator has to make sure that safety-relating and machine-technical installations are approved by a skilled person once a year. The fixture should be installed in the position where persons cannot reach and where persons may walk by or be seated. CAUTION: When installing the device, make sure there is no highly in inflammable material (decoration articles, etc.) in between a distance of min 0.5 meter. 3 HOW TO CONTROL THE UNIT Four ways to operation: A. Master/Slave operation B. Easy sound active and Auto mode C. Universal DMX controller D.IR remote control Master/Slave operation The unit can be linked together in daisy chain as many as you need in master/slave mode to perform the great built-in preprogrammed lighting shows triggered by music. In Master/Slave mode refer to the DMX settings below: Master unit : when working at Auto-run or Sound Control mode operation Slave units : DMX start address MUST be set to d001. DMX-512 CONNECTION If you are using a standard DMX controller, you can connect the DMX output of the controller directly to the DMX input of the first unit in a DMX chain. Always connect the output of one unit with the input of the next unit until all units are connected. If you use a controller with 5 pin DMX connection you will need to use a 5-pin to 3-pin adapter. At the last fixture, the DMX cable has to be terminated. Solder a 120 Ohm resistor between signal (-) and signal (+) into a 3-pin XLR connector and plug this into the DMX output of the last fixture in the chain. IR REMOTE CONTROLLER INTRODUCTION BLACK OUT DMX COLOR SOUND SPEED FLASH DIMING MODE 4 : setting On / Off (return the present program) : Press DMX mode, setting DMX address from the digits button. Example setting adress 017, press DMX, press 0, press 1 and press 7. : Press color setting mode, setting different color from the COLOR button. : Press SOUND mode, setting different sound mode from the digits button. : Press SPEED mode, setting different speed mode from the digits button mode only uses under AUTO or SOUND mode. And no fit for the other mode. : Press FLASH mode, setting different FLASH mode from the digits button 1 to 10 digits. : Press = Up or = Down setting brightness With 255 different levels for all color. REPLACING THE FUSE If the fuse is defective, replace the fuse with a fuse of the same type and value. Before replacing the fuse, unplug mains lead. Procedure: Step 1: Open the fuse holder on the rear panel with a fitting screwdriver. Step 2: Remove the old fuse from the fuse holder. Step 3: Install the new fuse in the fuse holder. Step 4: Replace the fuse holder in the housing. FIXTURE CLEANING The cleaning of internal and external optical lenses and/or mirrors must be carried out periodically to optimize light output. Cleaning frequency depends on the environment in which the fixture operates: damp, smoky or particularly dirty surrounding can cause greater accumulation of dirt on the unit’s optics. Make sure the area below the installation place is free from unwanted persons during servicing Housings, fixations and installations spots( ceiling, truss, suspensions) should be totally free from any deformation The mains cables must be in impeccable condition and should be replaced immediately when even a small problem is detected In order to protect the fixture from overheat the cooling fans (if any) and ventilation openings should be cleaned monthly. The interior of the fixture should be cleaned annually using a vacuum cleaner or air-jet. Clean with soft cloth using normal glass cleaning fluid. Always dry the parts carefully. Clean the external optics at least every month. Clean the internal optics at least every 30/60 days. ATTENTION: We strongly recommend internal cleaning to be carried out by qualified worker! 5 FRANÇAIS Nous vous remercions d’avoir acheté un appareil Beamz. Veuillez lire la présente notice avant l’utilisation afin de pouvoir en profiter pleinement. Veuillez lire la notice avant utilisation. Respectez impérativement les instructions afin de continuer à bénéficier de la garantie. Prenez toutes les précautions nécessaires pour éviter tout incendie ou décharge électrique. Seul un technicien spécialisé peut effectuer les réparations. Nous vous conseillons de conserver la présente notice pour pouvoir vous y reporter ultérieurement. - Avant d’utiliser l’appareil, prenez conseil auprès d’un spécialiste. Lors de la première mise sous tension, il est possible qu’une odeur soit perceptible. C’est normal, l’odeur disparaîtra peu de temps après. - L’appareil contient des composants porteurs de tension. N’OUVREZ JAMAIS le boîtier. - Ne placez pas des objets métalliques ou du liquide sur l’appareil, cela pourrait causer des décharges électriques et dysfonctionnements. - Ne placez pas l’appareil à proximité de sources de chaleur, par exemple radiateur. Ne positionnez pas l’appareil sur une surface vibrante. N’obturez pas les ouïes de ventilation. - L’appareil n’est pas conçu pour une utilisation en continu. - Faites attention au cordon secteur, il ne doit pas être endommagé. - Lorsque vous débranchez l’appareil de la prise secteur, tenez-le par la prise, ne tirez jamais sur le cordon. - Ne branchez pas et ne débranchez pas l’appareil avec les mains mouillées. - Seul un technicien spécialisé peut remplacer la fiche secteur et / ou le cordon secteur. - Si l’appareil est endommagé et donc les éléments internes sont visibles, ne branchez pas l’appareil, NE L’ALLUMEZ PAS. Contactez votre revendeur. NE BRANCHEZ PAS l’appareil à un rhéostat ou un dimmer. - Pour éviter tout risque d’incendie ou de décharge électrique, n’exposez pas l’appareil à la pluie ou à l’humidité. - Seul un technicien habilité et spécialisé peut effectuer les réparations - Branchez l’appareil à une prise 220-240 V/50 Hz avec terre, avec un fusible 10-16 A. - Pendant un orage ou en cas de non utilisation prolongée de l’appareil, débranchez l’appareil du secteur. - En cas de non utilisation prolongée de l’appareil, de la condensation peut être créée. Avant de l’allumer, laissez l’appareil atteindre la température ambiante. Ne l’utilisez jamais dans des pièces humides ou en extérieur. - Pendant le fonctionnement, le boîtier est très chaud. Ne le touchez pas pendant le fonctionnement et juste après. - Afin d’éviter tout accident en entreprise, vous devez respecter les conseils et instructions. - Assurez l’appareil avec une élingue de sécurité s’il doit être monté au plafond. Utilisez un système de crochets. Assurezvous que personne ne puisse se trouver sous l’appareil. Il doit être monté à 50 cm au moins de tout matériau inflammable et à un mètre au moins de toute surface pour garantir son bon refroidissement. - Cet appareil contient des LEDs de grande intensité. Ne regardez pas directement les LEDs pour éviter tout troubles de la vision. - N’allumez pas et n’éteignez pas l’appareil de manière répétée. Cela réduit sa durée de vie. - Conservez l’appareil hors de la portée des enfants. Ne laissez pas l’appareil sans surveillance. - N’utilisez pas d’aérosols pour nettoyer les interrupteurs. Les résidus créent des dépôts et de la graisse. En cas de dysfonctionnement, demandez conseil à un spécialiste. - Ayez toujours les mains propres pour utiliser l’appareil. - Ne forcez pas les réglages. - Si l’appareil est tombé, faites-le toujours vérifier par un technicien avant de le rallumer. - Pour nettoyer l’appareil, n’utilisez pas de produits chimiques qui abîment le revêtement, utilisez uniquement un tissu sec. - Tenez toujours l’appareil éloigné de tout équipement électrique pouvant causer des interférences. - Pour toute réparation, il faut impérativement utiliser des pièces d’origine, sinon il y a risque de dommages graves et / ou de radiations dangereuses. - Eteignez toujours l’appareil avant de le débrancher du secteur et de tout autre appareil. Débranchez tous les cordons avant de déplacer l’appareil. - Assurez-vous que le cordon secteur n’est pas abîmé si des personnes viennent à marcher dessus. Avant toute utilisation, vérifiez son état. - La tension d’alimentation est de 220-240 V~/50 Hz. Vérifiez la compatibilité. Si vous voyagez, vérifiez que la tension d’alimentation du pays est compatible avec l’appareil. - Conservez l’emballage d’origine pour pouvoir transporter l’appareil en toute sécurité. Ce symbole doit attirer l’attention de l’utilisateur sur les tensions élevées présentes dans le boîtier de l’appareil, pouvant engendrer une décharge électrique. Ce symbole doit attirer l’attention de l’utilisateur sur des instructions importantes détaillées dans la notice, elles doivent être lues et respectées. NE REGARDEZ PAS DIRECTEMENT LA LENTILLE. Cela peut créer des troubles de la vision. Les personnes photosensibles et épileptiques doivent prendre en compte les effets que ce jeu de lumière peut causer. Cet appareil porte le symbole CE. Il est interdit d’effectuer toute modification sur l’appareil. La certification CE et la garantie deviendraient caduques ! NOTE: Pour un fonctionnement normal de l’appareil, il doit être utilisé en intérieur avec une plage de température maximale autorisée entre 5°C/41°F et 35°C/95°F. Ne jetez pas les produits électriques dans la poubelle domestique. Déposez-les dans une déchetterie. Demandez conseil aux autorités locales ou à votre revendeur. Données spécifiques. Les valeurs actuelles peuvent légèrement varier d’un appareil à l’autre. Tout droit de modification réservé sans notification préalable. 6 INSTRUCTIONS DE DEBALLAGE ATTENTION ! Immédiatement après réception, vérifiez le contenu du carton et assurez-vous que tous les éléments sont bien présents et en bon état. Si besoin, faites les réserves nécessaires si le matériel ou les cartons sont endommagés. SI l’appareil doit être retourné, faites-le dans l’emballage d’origine. Si l’appareil a été exposé à des fluctuations importantes de températures (par exemple après le transport), ne l’allumez pas immédiatement. De la condensation peut survenir. Laissez l’appareil éteint le temps qu’il atteigne la température ambiante. ALIMENTATION Vous trouvez sur l’étiquette à l’arrière de l’appareil, le type d’alimentation à utiliser. Vérifiez que la tension d’alimentation corresponde à celle mentionnée. Toute autre alimentation peut endommager l’appareil. Reliez l’appareil au secteur, il est prêt à être utilisé. En aucun cas, vous ne devez utiliser de dimmer ou d’alimentation réglable. INSTALLATION ATTENTION : Lors de l’installation, tenez compte des normes nationales respectives ! Seuls des revendeurs et installateurs habilités peuvent procéder à l’installation. Attention: L’installation de l’appareil doit être pensée et réalisée de telle sorte que le support de fixation puisse supporter 10 fois le poids de l’appareil pendant une heure sans aucune déformation. L’installation doit toujours être assurée par un second système de fixation, par exemple un filet ou une élingue. Ce second système doit être conçu de telle sorte que aucun élément de l’installation ne puisse tomber si la fixation principale venait à rompre. Assurez-vous que la zone sous l’emplacement de montage ne puisse pas accueillir de public pendant le montage, le démontage et l’utilisation. Le responsable du fonctionnement doit faire approuver par un expert les conditions d’installation et d’utilisation de l’appareil avant la première mise en service et après tout changement. Le responsable du fonctionnement doit faire approuver par un expert les conditions d’installation et d’utilisation de l’appareil, une fois par an. L’appareil doit être installé de telle sorte que personne ne puisse l’atteindre, passer dessous ou être assis. ATTENTION : Lorsque vous installez l’appareil, assurez-vous qu’il n’y a aucun matériau fortement inflammable (décorations par exemple) à 0,5 mètres au moins de l’appareil. 7 UTILISATION Quatre modes de fonctionnement sont disponibles : A. Mode Master/Slave B. Mode son et mode auto C. Contrôleur DMX universel D. Télécommande infrarouge Fonctionnement Master / Slave L'appareil peut être relié en une chaîne en mode master / salve pour créer des shows de lumière préprogrammés déclenchés par la musique. En mode Master / Slave, reportez-vous aux réglages DMX ci-dessous : Mode Master : si fonctionnement en mode auto ou son Appareils Slave : l'adresse de démarrage DMX DOIT être d001. BRANCHEMENT DMX-512 Si vous utilisez un contrôleur DMX classique, vous pouvez relier la sortie DMX du contrôleur directement à l’entrée DMX du premier appareil dans une chaîne DMX. Reliez toujours la sortie d’un appareil à l’entrée de l’appareil suivant jusqu’à ce que tous les appareils soient reliés. Si vous utilisez un contrôleur avec connexion DMX 5 pôles, vous devez utiliser un adaptateur 5 pôles / 3 pôles. Sur le dernier appareil, le cordon DMX doit être terminé par un bouchon. Soudez une résistance 120 ohms entre signal (-) et signal (+) sur une prise XLR 3 pôles et branchez-la à la sortie DMX du dernier appareil de la chaîne. INTRODUCTION TÉLÉCOMMANDE INFRAROUGE 8 BLACK OUT : Réglage On / Off (retour au programme en cours) DMX : appuyez sur la touche DMX, réglage de l’adresse DMX avec les touches numériques. Exemple : pour régler l’adresse 017, appuyez sur 0, 1, 7. COLOR : Appuyez sur le bouton de mode de réglage de couleur, réglez la couleur avec la touche COLOR. SOUND : appuyez sur la touche SOUND pour régler le mode Sound avec les touches numériques. SPEED : appuyez sur la touche SPEED pour régler la vitesse avec les touches numériques. Uniquement en mode AUTO ou SOUND mode. Ne fonctionne pas pour un autre mode. FLASH : appuyez sur la touche FLASH pour régler le mode Flash avec les touches numériques de 1 à 10. DIMING MODE : appuyez sur = Up ou = Down pour régler la luminosité.Avec 255 niveaux différents pour toutes les couleurs. REMPLACEMENT DU FUSIBLE Si le fusible est défectueux, il faut le remplacer par un fusible de même type et de même valeur. Avant de le remplacer, veillez à débrancher l’appareil. Procédure: Etape 1: Ouvrez le porte-fusible sur le panneau arrière avec un petit tournevis. Etape 2: Retirez l’ancien fusible. Etape 3: Placez le nouveau fusible dans le porte-fusible. Etape 4: Remettez le porte-fusible dans le boîtier. NETTOYAGE Le nettoyage des lentilles optiques internes et externes et / ou miroirs doit être fait régulièrement pour un rendu lumineux optimal. La fréquence de nettoyage dépend de l’environnement d’utilisation : de la poussière, fumée ou un environnement très sale peuvent générer une accumulation importante de salissures sur les optiques. Assurez-vous que personne ne se trouve sous l’emplacement d’installation pendant le nettoyage. Les boîtiers, fixations et éléments d’installation (plafond, structures, suspensions) ne doivent présenter aucune déformation. Le cordon secteur ne doit pas présenter de dommage ; si un problème est détecté, il doit être immédiatement être remplacé. Pour protéger l’appareil de toute surchauffe, les ventilateurs et ouïes d’aération doivent être nettoyés tous les mois. L’intérieur de l’appareil doit être nettoyé tous les ans avec un compresseur. Pour le nettoyage, utilisez un tissu doux et du liquide de nettoyage pour vitres usuel. Séchez correctement tous les éléments. Nettoyez les optiques externes tous les mois au moins. Nettoyez les optiques internes tous les 30 à 60 jours au moins. ATTENTION : Nous recommandons fortement que le nettoyage intérieur soit fait par un technicien qualifié. 9 DMX CHANNELS / CANAUX DMX 5 Channel modes / Modes 5 canaux Channel 1 2 3 4 5 Function Value Description Colour 000-255 000-255 000-255 000-255 000-255 Red Green Blue White Amber 9 Channel modes / Modes 9 canaux Channel 1 2 3 4 5 6 Function Colour Dimming 7 Strobe 8 Auto / Sound Mode 9 Speed Value Description 000-255 000-255 000-255 000-255 000-255 000-255 000-010 011-255 011-100 101-150 151-200 201-255 000-255 Red Green Blue White Amber Dimming 100% No function Strobe from slow to fast Auto colour switching Auto colour fading Sound colour switching Sound colour fading Auto / Sound Mode from Slow to fast MANUAL SETTING MODE / MANUEL RÉGLAGES Mode Auto Sound Speed Color Addr InFr 10 Programming Steps Au-1 Au-2 Au-3 Au-4 Au-5 Au-6 Au-7 Au-8 So-1 So-2 So-3 So-4 So-5 So-6 So-7 So-8 SP01—SP10 OFF r000—r255 G000—G255 b000—b255 u000—u255 A000—A255 FLoF FLSH FLon 5CH 9CH Ir-0 Ir-1 Description Switching 1 Switching 2 Switching 3 Switching 4 Fading 1 Fading 2 Fading 3 Fading 4 Switching Fading Strobe Strobe Red Strobe Green Strobe Blue Strobe White Strobe Amber From fast to slow All light Off Red Green Blue White Amber OFF Flash On Flash 5-channel DMX mode (RGBWA) 9-channel DMX mode OFF receive IR remote signal. ON receive IR remote signal. TECHNICAL SPECIFICATION / SPÉCIFICATIONS TECHNIQUES Rated voltage Rated power LED Fuse Control Signal DMX Channel Function Dimensions per unit Weight (per unit) : AC220~240V 50/60Hz : 100W : 7x15W LED 5-in1 RGBAW : T3A : DMX signal : 5 / 9Channels : DMX, Auto, Sound active and Master-Slave. : 198 x 198 x 228mm : 1.8kg The specifications are typical. The actual values can slightly change from one unit to the other. Specifications can be changed without prior notice. Raadpleeg eventueel www.wecycle.nl en/of www.vrom.nl v.w.b. het afdanken van elektronische apparaten in het kader van de WEEE-regeling. Vele artikelen kunnen worden gerecycled, gooi ze daarom niet bij het huisvuil maar lever ze in bij een gemeentelijk depot of uw dealer. Lever ook afgedankte batterijen in bij uw gemeentelijk depot of bij de dealer, zie www.stibat.nl Tronios BV Registrierungsnummer : DE51181017 (ElektroG). Dieses Produkt darf am Ende seiner Lebensdauer nicht über den normalen Haushaltsabfall entsorgt werden, sondern muss an einem sammelpunkt für das Recycling abgegeben werden. Hiermit leisten Sie einen wichtigen Beitrag zum Schutze unserer Umwelt. Tronios BV Registrierungsnummer : 21003000 (BatterieG). (Lithium)Batterien und Akkupacks sollten nur im entladenen Zustand in die Altbatteriesammelgefäße bei Handel und bei öffentlich-rechtlichen Entsorgungsträgern gegeben werden. Bei nicht vollständig entladenen Batterien Vorsorge gegen Kurzschlüß treffen durch Isolieren der Pole mit Klebestreifen. Der Entnutzer ist zur Rückgabe von Altbatterien gesetzlich verpflichtet. Los productos electrónicos no pueden tirarse a la basura normal. Por favor lleve este producto a un centro de reciclaje. Pregunte a la autoridad local en caso de duda. Las especificaciones son generales. Los valores actuales pueden variar de una unidad a otra. Las especificaciones pueden variar sin previo aviso. Specifications and design are subject to change without prior notice.. www.tronios.com Copyright © 2015 by TRONIOS the Netherlands 11 Declaration of Conformity Manufacturer: TRONIOS BV Bedrijvenpark Twente 415 7602 KM – ALMELO +31(0)546589299 +31(0)546589298 The Netherlands Product number: 153.276 Product Description: FlatPAR 7x15W RGBAW DMX IR Trade Name: BEAMZ Regulatory Requirement: EN 60598-1/2-17 EN 61000-3-2/-3-3 EN 55015 EN 61547 The product meets the requirements stated in Directives 2006/95 and 2004/108/EC and conforms to the above mentioned Declarations. Almelo, 14-07-2015 Name : B. Kosters Controller regulations Signature 12 :