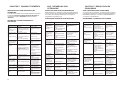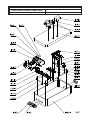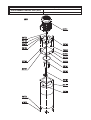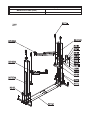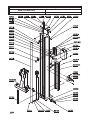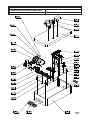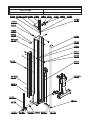
1
I
209I/B
GB
F
D
E
SOLLEVATORE ELETTROIDRAULICO A 2 COLONNE
2-POST ELECTRO-HYDRAULIC LIFT
ÉLÉVATEUR ÉLECTRO-HYDRAULIQUE À 2 COLONNES
ELEKTROHYDRAULISCHEN HEBEBÜHNE MIT 2 SÄULEN
ELEVADOR ELECTRO-HIDRAULICO DE 2 COLUMNAS
Manuale di istruzioni per l’uso e la manutenzione del
Instructions and maintenance manual for
Manuel d’instructions pour l’utilisation et l’entretien du:
Bedienungs- und Wartungsanleitung für
Manual de instrucciones para uso y mantenimiento de los
SOLLEVATORE ELETTROIDRAULICO A 2 COLONNE
2-POST ELECTRO-HYDRAULIC LIFT
ÉLÉVATEUR ÉLECTRO-HYDRAULIQUE À 2 COLONNES
ELEKTROHYDRAULISCHEN HEBEBÜHNE MIT 2 SÄULEN
ELEVADOR ELECTRO-HIDRAULICO DE 2 COLUMNAS
Modello - Model - Modèle - Modell - Modelos
209I/B
COSTRUTTORE: - MANUFACTURER: - CONSTRUCTEUR: - HERSTELLER: - FABRICANTE:
WERTHER INTERNATIONAL S.p.A.
Via F. BRUNELLESCHI, 12
42124 CADE’ (RE) - ITALY
Telefono ++ / +522 / 9431 (r.a.) - Telefax ++ / +522 / 941997
WEB http://www.wertherint.com - E-mail [email protected]
1a Emissione - 1st Edition 1a Édition -1. Ausgabe - 1ª Edición : 19/03/2001
CENTRO DI ASSISTENZA AUTORIZZATO:
AUTHORISED SERVICE CENTRE:
SERVICE APRÈS-VENTE AGRÉÉ:
KUNDENDIENSTCENTER
CENTRO DE ASISTENCIA AUTORIZADO:
Rev.2..............................26/03/2010
1
IINDICE
2
CONTENTS
IMBALLAGGIO, TRASPORTO E DEPOSITO .............4
PACKING, TRANSPORT AND STORAGE ............4
CAPITOLO 1 DESCRIZIONE DELLA MACCHINA ....10
CHAPTER 1 DESCRIPTION OF THE MACHINE.......10
CAPITOLO 2 SPECIFICHE TECNICHE................14
CHAPTER 2 TECHNICAL SPECIFICATIONS .....14
CAPITOLO 3 SICUREZZA....................................21
CHAPTER 3 SAFETY...........................................21
CAPITOLO 4 INSTALLAZIONE............................33
CHAPTER 4 INSTALLATION...............................33
CAPITOLI 5 FUNZIONAMENTO E USO..............43
CHAPTER 5 OPERATIONS AND USE.................43
CAPITOLO 6. MANUTENZIONE.........................45
CHAPTER 6. MAINTENANCE...............................45
CAPITOLO 7 RISOLUZIONE DEI PROBLEMI..........53
CHAPTER 7 TROUBLESHOOTING......................53
CAPITOLO 8 INFORMAZIONI SULLE
REGOLAMENTAZIONI..................................................55
CHAPTER8 REGULATORY INFORMATION.......55
APPENDICE A-NOTE SPECIALI..........................55
APPENDIX A-SPECIAL NOTES...........................55
APPENDICE B PARTI DI RICAMBIO...................55
APPENDIX B SPARE PARTS...............................55
TABLE DES MATIÈRES
EMBALLAGE, TRANSPORT ET DÉPÔT...............4
CHAPITRE 1 DESCRIPTION DE LA MACHINE...10
ÍNDICE
INHALTSVERZEICHNIS
VERPACKUNG, TRANSPORT UND
LAGERUNG.......4
EMBALAJE, TRANSPORTE Y DEPÓSITO...........4
KAPITEL 1 MASCHINENBESCHREIBUNG........10
CAPÍTULO 1 DECRIPCIÓN DE LA MÁQUINA.........10
CAPÍTULO 2 ESPECIFICACIONES TÉCNICAS........14
CHAPITRE 2 CARACTÉRISTIQUESTECHNIQUES..14
KAPITEL 2 TECHNISCH SPEZIFIKATIONEN......14
CHAPITRE 3 SÉCURITÉ.......................................21
KAPITEL 3 SICHERHEIT......................................21
CHAPITRE 4 INSTALLATION...............................33
KAPITEL 4 INSTALLATION..................................33
CHAPITRE 5 FONCTIONNEMENT ET
UTILISATION..................................................................43
5. HAUPTSCHALTER (IG)...............................43
CAPÍTULO 5 FUNCIONAMIENTO Y USO
KAPITEL 6. WARTUNG........................................45
CAPÍTULO 6. MANTENIMIENTO
KAPITEL 7 BEHEBUNG VON STÖRUNGEN.......53
CAPÍTULO 7 RESOLUCIÓN DE PROBLEMAS
KAPITEL 8 INFORMATIONEN ZU DEN
EINSTELLUNGEN 55
CAPÍTULO 8 INFORMACIONES SOBRE LAS
REGLAMENTACIONES
ANHANG A - BESONDERE HINWEISE 55
APÉNDICE A-NOTAS ESPECIALES
CHAPITRE 6 ENTRETIEN....................................45
CHAPITRE 7 ANOMALIES, CAUSES PROBABLES
ET SOLUTIONS.....................................................53
CHAPITRE 8 INFORMATIONS SUR LA
RÉGLEMENTATION..............................................55
APPENDICE A - NOTES SPÉCIALES..................55
ANHANG B ERSATZTEILE
55
CAPÍTULO 3 SEGURIDAD
CAPÍTULO 4 INSTALACIÓN
APÉNDICE B PIEZAS DE REPUESTO
APPENDICE B PIÈCES DÉTACHÉES..................55
3
IMBALLAGGIO, TRASPORTO E
DEPOSITO
TUTTE LE OPERAZIONI DI IMBALLAGGIO,
MOVIMENTAZIONE, TRASPORTO E
DISIMBALLAGGIO DEVONO ESSERE EFFETTUATE
ESCLUSIVAMENTE DA PERSONALE ESPERTO
CHE CONOSCE IL SOLLEVATORE E IL
CONTENUTO DI QUESTO MANUALE.
ALL PACKING, LIFTING, HANDLING, TRANSPORT
AND UNPACKING ORERATIONS ARE
TO BE PERFORMED EXCLUSIVELY BY EXPERT
PERSONNEL WITH KNOWLEDGE OF THE LIFT
AND THE CONTENTS OF THIS MANUAL
IMBALLAGGIO
PACKING
Il sollevatore viene spedito smontato nelle seguenti parti:
Fig.1 Abb.1
Peso (kg)
Colonna di comando, completa di carrello, catena,
cilindri idraulici e pannello di comando.............................. 240kg
Colonna laterale di servizio, completa di carrello,
catena e cilindro idraulico ..................................................220kg
Telaio, piastra stampata, telaio fisso ....................................80kg
Bracci lunghi muniti di estensione e piastra.......................... 35kg
Bracci corti muniti di estensione e piastra .............................30kg
Unità di potenza completa di motore e supporto ...................20kg
Pacchetto accessori, dadi e bulloni .........................................7kg
Salvapiedi ................................................................................3kg
Scatola contenente 4 kit per bloccaggio bracci
Il sollevatore viene spedito in una cassa di legno (fig.1) che pesa
circa 700kg.
SOLLEVAMENTO E MANIPOLAZIONE
Fig.21 Abb.2
Le casse di ferro possono essere sollevate e spostate con un
carrello elevatore (fig.1). Se viene usato uno di questi, le casse
devono essere sollevate con almeno 2 imbracature.
L'apparecchiatura scelta deve essere adatta a un sollevamento e una movimentazione sicura tenendo conto delle dimensioni e del peso.
4
PACKING, TRANSPORT AND
STORAGE
The lift is shipped disassembled into following parts:
Weight (kg)
Command post, complete with carriage, chain,
hydraulic cylinders and control panel ................................240kg
Service side post, complete with carriage,
chain and hydraulic cylinder ...............................................220kg
Chassis, Figured plate, fixed frame ......................................80kg
Long arms complete with extension and plate .....................35kg
Short arms complete with extension and plate.................... 30kg
Power unit complete with motor and support........................ 20kg
Accessory package, nuts and bolts .......................................7kg
Foot guards ............................................................................3kg
Box containing 4 arm-blocking kits
The lift is dispatched in a wooden crate (Fig.1), weighing approx
700kg.
LIFTING AND HANDLING
The iron crates may be lifted and moved with a lift truck (Fig.1).If
either of the latter two is used, crates
must be harnessed with at least 2 slings.
The equipment chosen must be suitable for safe lifting and
moving, bearing in mind the dimensions
and weight.
EMBALLAGE, TRANSPORT ET
DÉPÔT
VERPACKUNG, TRANSPORT UND
LAGERUNG
EMBALAJE, TRANSPORTE Y
DEPÓSITO
TOUTES LES OPÉRATIONS D'EMBALLAGE, DE
DÉPLACEMENT, DE TRANSPORT ET DE
DÉBALLAGE DOIVENT ÊTRE EFFECTUÉES
EXCLUSIVEMENT PAR UN PERSONNEL QUALIFIÉ
CONNAISSANT L'ÉLÉVATEUR ET LE CONTENU DE
PRÉSENT MANUEL.
ALLE VORGÄNGE BEZÜGLICH VERPACKUNG,
HANDLING, TRANSPORT UND AUSPACKEN
DÜRFEN NUR VON FACHPERSONAL
AUSGEFÜHRT WERDEN, DAS MIT DER
HEBEBÜHNE UND DEM INHALT DIESES
HANDBUCHS VERTRAUT IST.
TODAS LAS OPERACIONES DE EMBALAJE,
MOVIMIENTO, DESPLAZAMIENTO, TRANSPORTE
Y DESEMBALAJE, DEBEN SER REALIZADAS
EXCLUSIVAMENTE POR PERSONAL
ESPECIALIZADO QUE CONOZCA EL ELEVADOR Y
EL CONTENIDO DE ESTE MANUAL.
EMBALLAGE
VERPACKUNG
EMBALAJE
Colonne de commande, avec chariot, chaîne,
vérins hydrauliques et panneau de commande .................240 kg
Colonne latérale de service, avec de chariot,
chaîne et vérin hydraulique............................................... 220 kg
Châssis, plaque moulée et châssis fixe............................... 80 kg
Bras longs avec extension et plaque ...................................35 kg
Bras courts avec extension et plaque.................................. 30 kg
Unité de puissance avec moteur et support .........................20 kg
Accessoires, écrous et boulons............................................. 7 kg
Protection pieds .....................................................................3 kg
Boîte contenant 4 kits de blocage des bras
Die Hebebühne wird in folgende Teile zerlegt geliefert:
Gewicht (kg)
Steuersäule, komplett mit Schlitten, Kette, Hydraulikzylinder und
Steuertafel ........................................................................240 kg
Seitliche Betriebssäule, komplett mit Schlitten, Kette und Hydraulikzylinder...........................................................................220 kg
Rahmen, Trittbrett, feststehender Rahmen .......................80 kg
Lange Schwenkarme mit Verlängerung und Teller ...........35 kg
Kurze Schwenkarme mit Verlängerung und Teller ............30kg
Leistungseinheit komplett mit Motor und Halterung ..........20 kg
Zubehörpaket, Muttern und Schraubbolzen ........................7 kg
Fußschutz ...........................................................................3 kg
Schachtel mit 4 Schwenkarmarrettier-Kits
El elevador se envía desmontado en las siguientes piezas: Peso
(kg)
Columna de mando con carro, cadena, cilindros hidráulicos y panel de mando .....................................................................240 kg.
Columna lateral de servicio con carro, cadena y cilindro hidráulico....................................................................................... 220 kg.
Armazón, chapa perfilada (plataforma), armazón fijo .........80 kg.
Brazos largos con extensión y placa................................... 35 kg.
Brazos cortos con extensión y placa................................... 30 kg.
Unidad de potencia con motor y soporte .............................20 kg.
Paquete de accesorios, tuercas y pernos .............................7 kg.
Salvapies 3 kg.
Caja con 4 kits para bloqueo de brazos.
L'élévateur est expédié dans une caisse métallique (Fig. 1) d'un
poids d'environ 700 kg.
Die Hebebühne wird in einer Holzkiste (Abb. 1) mit einem Gewicht von ca. 700 kg versandt.
El elevador se envía en una caja de madera (fig. 1) que pesa
aproximadamente 700 kg.
LEVAGE ET MANIPULATION
HEBEN UND HANDLING
ELEVACIÓN Y MANIPULACIÓN
Les caisses en fer peuvent être soulevées et déplacées avec un
chariot élévateur (Fig. 1). Dans ce cas, les caisses doivent être
soulevées avec au moins 2 sangles.
Die Eisenkisten können mit einem Hubwagen gehoben und transportiert werden (Abb. 1). Wenn ein Hubwagen verwendet wird,
müssen die Kisten mit mindestens 2 Anschlagschlingen gehoben
werden.
Las cajas de hierro se pueden elevar y desplazar mediante una
carretilla elevadora (fig. 1). Si se usa uno de éstos, las cajas deben elevarse por lo menos con 2 eslingas.
L'appareillage utilisé doit garantir un levage et un déplacement gage de sécurité et il est nécessaire de tenir compte
des dimensions et du poids.
Das gewählte Hubmittel muss für die Größe und das Gewicht der gehobenen Last geeignet sein und deren sicheres
Heben gewährleisten.
El equipo seleccionado debe ser adecuado para elevar y mover
los vehículos de modo seguro, teniendo en cuenta las dimensiones y el peso.
L'élévateur est expédié démonté comme suit :
Poids (kg)
DEPÓSITO
La maquinaria embalada siempre debe conservarse en un lugar
cubierto, protegido y con una temperatura de -10° a +40° y no
debe exponerse directamente a la luz del sol.
5
DEPOSITO
STORAGE
Il macchinario imballato deve essere sempre conservato in un luogo
coperto, protetto e ad una temperatura che va da -10° a +40° e non
deve essere esposto direttamente alla luce del sole.
Packed machinery nut always be kept in a covered, protected
place, at a temperature between -10. and +40. and must not be
exposed to direct sunlight.
COME IMPILARE LE CASSE
The type of packing allows the possibility of stacking up to 3 crates.
Up to 3 crates may be stacked one upon the other on lorry or in containers if property positioned and provided they are restrained to prevent falling.
APERTURA DELLE CASSE
OPENING THE CRATES
All'arrivo delle casse, verificare che la macchina non si sia danneggiata durante il trasporto e che ci siano tutte le parti elencate.
Le casse devono essere aperte facendo uso di tutte le possibili
misure precauzionali onde evitare di danneggiare la macchina o
le sue parti. Accertarsi che alcune delle parti non cadano dalla
cassa durante l'apertura.
When the crates arrive, check that the machine has not been damaged during transport and that all parts listed are present. The crates
must be opened using all possible precautionary measure to avoid
damaging the machine or its parts. Make sure that parts do not fall
from the crate during opening.
SMALTIMENTO DELLE CASSE
DISPOSAL OF CRATES
Le casse possono essere riutilizzate o riciclate.
The crates may be reused or recycled.
INTRODUZIONE
INTRODUCTION
IAVVERTIMENTO
Questo manuale è stato preparato per il personale dell'officina che è esperto nell'uso del sollevatore (operatore) e per i
tecnici responsabili della manutenzione di routine (meccanico riparatore): leggere il manuale prima di effettuare qualsiasi operazione con il sollevatore e/o l'imballaggio. Questo manuale contiene informazioni importanti per quanto riguarda:
LA SICUREZZA PERSONALE DI operatori e meccanici riparatori
LA SICUREZZA DEL SOLLEVATORE
LA SICUREZZA DEI VEICOLI SOLLEVATI
4000 kg
Indica che la portata è 4000 kg. Non superate i
4000 kg per quanto riguarda il peso delle vetture
sollevate
Questo simbolo indica che bisogna prestare attenzione ai
rischi elettrici
6
CRATE STACKING
Il tipo di imballaggio permette di impilare fino a 3 casse.
Se appropriatamente collocate e fissate per impedirne la caduta, si
possono impilare un massimo di 3 casse, una sopra l'altra, su autocarri o container.
IWARNING
This manual has been prepared for workshop personnel expert
in the use of the lift (operator) and technicians responsible for
routine maintenance (maintenance fitter): read the manual before carrying out any operation with the lift and /or the packing.
This manual contains important informationregarding:
-the PERSONAL SAFETY of operators and maintenance workers
-LIFT SATETY
-the SAFETY of LIFTED VEHICLES
4000 kg
Express the rated load is 4000kg,don’t allow the lift
load weigh excess 4000kg.
This symbol express attention should be taken for electrical hazards
CONSERVAZIONE DEL MANUALE
CONSERVING THE MANUAL
Il manuale è parte integrante del sollevatore e deve sempre accompagnarlo, anche in caso di vendita. Il manuale deve essere
conservato nei pressi del sollevatore, in un luogo facilmente accessibile di modo che l'operatore e il personale addetto alla manutenzione possano sempre trovarlo e consultarlo velocemente
e in qualsiasi momento.
The manual is an integral part of the lift, which it should always
accompany even if the unit issold .The manual must be kept in
the vicinity of the lift in an easily accessible place so that the operator and maintenance staff must be able to locate and consult
the manual quickly at any time.
DÉPÔT
LAGERUNG
DEPÓSITO
La machine emballée doit toujours être conservée sur un lieu couvert
et protégé et à une température comprise entre -10°C et +40°C. Par
ailleurs, elle ne doit pas être exposée directement à la lumière du soleil.
Die verpackte Maschine muss immer an einem überdachten,
geschützten Ort bei einer Temperatur zwischen -10° und +40°C
gelagert werden und darf keinen direkten Sonnenstrahlen ausgesetzt werden.
La maquinaria embalada siempre debe conservarse en un lugar
cubierto, protegido y con una temperatura de -10° a +40° y no
debe exponerse directamente a la luz del sol.El equipo seleccionado debe ser adecuado para elevar y mover los vehículos de
modo seguro, teniendo en cuenta las dimensiones y el peso.
COMMENT EMPILER LES CAISSES
STAPELN DER KISTEN
Le type d'emballage permet d'empiler un maximum de 3 caisses.
À condition qu'elles soient correctement placées et fixées, il est
possible d'empiler un maximum de 3 caisses, l'une sur l'autre,
sur un camion ou dans un container.
Der Verpackungstyp erlaubt das Stapeln von bis zu 3 Kisten.
Wenn korrekt angeordnet und abgesichert, um ein Umstürzen zu
verhindern, können in LKW oder Containern maximal 3 Kisten
aufeinander gestapelt werden.
OUVERTURE DES CAISSES
ÖFFNEN DER KISTEN
A l'arrivée des caisses, s'assurer que la machine n'a pas été endommagée durant le transport et que rien ne manque. Les caisses doivent être ouvertes en prenant toutes les précautions pour ne pas endommager la machine ni aucune de ses parties. Veiller à ce qu'aucune des parties de la machine ne tombe de la caisse durant l'ouverture.
Bei Ankunft der Kisten kontrollieren, dass die Maschine keine Transportschäden aufweist und dass alle aufgelisteten Teile vorhanden
sind. Beim Öffnen der Kisten müssen alle Vorsichtsmaßnahmen getroffen werden, die notwendig sind, um eine Beschädigung der Maschine oder deren Bauteile zu vermeiden. Sicherstellen, dass einige
der Teile beim Öffnen der Kisten nicht herausfallen.
ÉLIMINATION DES CAISSES
ENTSORGEN DER KISTEN
Les caisses peuvent être réutilisées ou recyclées.
Die Kisten können wiederverwendet oder recycelt werden.
IAVERTISSEMENT
Le présent manuel est destiné au personnel du garage possédant les compétences nécessaires pour utiliser l'élévateur (opérateurs) et aux techniciens responsables de l'entretien courant
(mécaniciens réparateurs) : veiller à lire le manuel avant d'effectuer toute opération sur l'élévateur et/ou sur l'emballage. Le présent manuel contient des informations importantes pour :
LA SÉCURITÉ DES OPÉRATEURS ET DES MÉCANICIENS
RÉPARATEURS
LA SÉCURITÉ DE L'ÉLÉVATEUR
LA SÉCURITÉ DES VÉHICULES SOULEVÉS
4000 kg
Indique que la portée de 4000 kg. Ne pas soulever de véhicule d'un poids supérieur à 4000 kg.
Ce symbole indique qu'il est nécessaire de tenir compte des risques électriques.
IWICHTIGER HINWEIS
APERTURA DE LAS CAJAS
Cuando lleguen las cajas, controlar que la máquina no haya sido
dañada durante el transporte y que estén todas las piezas de la
lista. Las cajas deben abrirse tomando todas las medidas de
precaución posibles para evitar dañar la máquina o sus piezas.
Asegurarse de que ninguna pieza caiga de la caja al abrirla.
ELIMINACIÓN DE LAS CAJAS
Las cajas pueden ser reutilizadas o recicladas.
IADVERTENCIA
Dieses Handbuch wurde für das Werkstattpersonal, das mit
dem Gebrauch der Hebebühne vertraut ist (Bediener), und
für das für die regelmäßige Wartung zuständige technische
Personal zusammengestellt: Vor der Durchführung jeglicher
Arbeiten mit der Hebebühne und/oder Eingriffen an der Verpackung ist das Handbuch zu lesen. Dieses Handbuch
enthält wichtige Informationen für:
DIE PERSÖNLICHE SICHERHEIT DER Bediener und Mechaniker
DIE SICHERHEIT DER HEBEBÜHNE
DIE SICHERHEIT DER GEHOBENEN FAHRZEUGE
Este manual ha sido preparado por el personal del taller, experto
en usar el elevador (operador) y por los técnicos responsables
del mantenimiento de rutina (mecánico reparador): leer el manual antes de realizar cualquier operación con el elevador y/o
con el embalaje. Este manual contiene información importante
por lo que se refiere a:
LA SEGURIDAD PERSONAL DE operadores y mecánicos reparadores
LA SEGURIDAD DEL ELEVADOR
LA SEGURIDAD DE LOS VEHÍCULOS ELEVADOS
Gibt an, dass die Tragfähigkeit 4000 kg beträgt.
Es dürfen keine Fahrzeuge gehoben werden, deren Gewicht über 4000 kg liegt.
Indica que la capacidad es de 4.000 kg. No superar los 4.000 Kg. por lo que se refiere al peso de
los vehículos elevados
4000 kg
Dieses Zeichen weist darauf hin, dass auf
Stromschlaggefahr zu achten ist.
CONSERVATION DU MANUEL
AUFBEWAHRUNG DES HANDBUCHS
Le manuel fait partie intégrante de l'élévateur et doit être conservé
avec celui-ci y compris en cas de revente. Le manuel doit être conservé à proximité de l'élévateur, à un endroit facile d'accès de telle
sorte que l'opérateur et le personnel responsable de l'entretien puissent en disposer et le consulter rapidement à tout moment.
Das Handbuch ist ergänzendes Teil der Hebebühne und muss
diese immer begleiten, auch beim Verkauf. Das Handbuch muss
in der Nähe der Hebebühne an einem leicht zugänglichen Ort
aufbewahrt werden, damit der Bediener und das Wartungspersonal es immer leicht finden und nachschlagen können.
4000 kg
Este símbolo indica que se debe prestar atención a
los riesgos eléctricos.
CONSERVACIÓN DEL MANUAL
El manual es parte integrante del elevador y debe acompañarlo siempre, también en caso de venta. El manual debe conservarse cerca
del elevador, en un lugar fácilmente accesible, de modo que el operador y el personal encargado del mantenimiento siempre pueda encontrarlo y consultarlo rápidamente y en cualquier momento.
7
SI RACCOMANDA IN MODO PARTICOLARE UN'ATTENTA E
RIPETUTA LETTURA DEL CAPITOLO 3 CHE CONTIENE
IMPORTANTI INFORMAZIONI E AVVERTIMENTI DI SICUREZZA.
ATTENTIVE AND REPEATED READING OF CHAPTER 3, WHICH
CONTAINS IMPORTANT INFORMATION AND SAFETY
WARNINGS, IS PARTICULARLY RECOMMENDED.
La struttura del sollevatore è stata progettata e costruita secondo le seguenti Direttive:
Lift rack has been designed and built in compliance with the following:
Directives:
2004/108/CE - 2006/42/CE - 2006/95/CE
8
2004/108/CE - 2006/42/CE - 2006/95/CE
Il sollevamento, trasporto, disimballaggio, montaggio, installazione,
avviamento, regolazione e verifica iniziali, manutenzione
STRAORDINARIA, riparazione, revisione, trasporto e smontaggio
del sollevatore devono essere effettuati da personale specializzato
di un RIVENDITORE AUTORIZZATO o di un CENTRO
ASSISTENZA autorizzato dal produttore (vedere i rivenditori autorizzati sul frontespizio).
The lifting, transport, unpacking, assembling, installation, starting
up, initial adjustment and testing,EXTRAORDINARY maintenance, repair, overhauls, transport and dismantling of the lift must be
performed by specialist personnel from the LICENSED DEALER
or an SEVICE CENTRE authorized by the manufacturer (see authorized dealer on frontispiece).
Il produttore declina qualsiasi responsabilità per lesioni a
persone, danni a veicoli o oggetti nel caso in cui una delle
operazioni suddette sia stata effettuata da personale non
autorizzato o la struttura sia stata trattata nel modo scorretto.
The manufacturer declines all responsibility for injury to persons
or damage to vehicles or objectsm when any of the above mentioned operations have been performed by unauthorized personnel
or when the rack has been subject to abuse.
Questo manuale indica esclusivamente gli aspetti operativi e funzionali che permettono all'operatore e a coloro che effettuano i lavori di
manutenzione di avere una migliore comprensione della struttura e
del funzionamento del sollevatore e di usarlo nel modo più corretto.
Per comprendere la terminologia usata in questo manuale, l'operatore deve avere alle spalle esperienza di lavoro in officina e
in attività di assistenza, manutenzione e riparazione; deve saper interpretare correttamente i disegni e le descrizioni contenute nel manuale ed avere familiarità con le norme di sicurezza
generali del paese in cui sta venendo installata la macchina.
This manual indicates only the operative and safety aspects that may
prove useful to the operator and maintenance works better understanding the structure and operation of the lift and for best use of the lift.
In order to understand the terminology used in this manual, the
operator must have specific experience in workshop, service, maintenance and repair activities, the ability to interpret correctly
the drawings and descriptions contained in the manual and be acquainted with the general and specific safety rules relevant to the country
in which the machine has been installed.
Lo stesso vale per il meccanico riparatore il quale, a sua volta,
deve avere una conoscenza specifica e specialistica (meccanica, ingegneristica) necessaria per effettuare in assoluta sicurezza le operazioni descritte nel manuale.
The same applies to the maintenance fitter, who must also possess
specific and specialized knowledge (mechanical, engineering) needed to perform the operations described in the manual in complete
safety.
Le parole "Operatore" e "Manutentore" usate nel manuale significano quanto segue:
The words “operator” and “maintenance fitter” used in this manual
are construed as follows:ù
OPERATORE: persona autorizzata a usare il sollevatore.
OPERATOR: person authorized to use the lift.
MANUTENTORE: persona autorizzata ad effettuare la manutenzione di routine del sollevatore.
MAINTENANCE FITTER: person authorized for routine maintenance of the lift.
IL EST RECOMMANDÉ DE LIRE ATTENTIVEMENT LE
CHAPITRE 3 QUI CONTIENT DES INFORMATIONS
IMPORTANTES ET DES RECOMMANDATIONS DE SÉCURITÉ.
WAS WIRD DRINGEND EMPFOHLEN, KAPITEL 3 DES
HANDBUCHS SORGFÄLTIG UND MEHRMALS ZU LESEN, DENN
DIESES KAPITEL ENTHÄLT WICHTIGE INFORMATIONEN UND
HINWEISE FÜR DIE SICHERHEIT
SE RECOMIENDA ESPECIALMENTE LEER ATENTA Y
REPETIDAMENTE EL CAPÍTULO 3, QUE CONTIENE
INFORMACIÓN IMPORTANTE Y ADVERTENCIAS DE
SEGURIDAD
La structure de l'élévateur est conçue dans le respect de la réglementation suivante directives:
Die Struktur der Hebebühne wurde nach folgenden Richtlinien
entwickelt und gebaut:
La estructura del elevador ha sido proyectada y fabricada según
las siguientes Directivas:
2004/108/EG - 2006/42/EG - 2006/95/EG
2004/108/CE - 2006/42/CE - 2006/95/CE
Heben, Transport, Auspacken, Montage, Installation, Inbetriebnahme, Einregulierung und initiale Kontrollen,
AUSSERORDENTLICHE Wartung, Reparatur, Überholung,
Transport und Montage der Hebebühne müssen von Fachpersonal eines VERTRAGSHÄNDLERS oder eines vom Hersteller zugelassenen KUNDENDIENSTCENTERS durchgeführt werden
(siehe Vertragshändler auf der Titelseite).
La elevación, el transporte, el desembalaje, el montaje, la instalación, la puesta en marcha, la regulación y el control inicial, el
mantenimiento EXTRAORDINARIO, la reparación, revisión, el
transporte y desmontaje del elevador, deben ser realizados por
personal especializado de un REVENDEDOR AUTORIZADO o
de un CENTRO DE ASISTENCIA autorizado por el fabricante
(ver los revendedores autorizados en la portada).
Der Hersteller haftet nicht für Personenschäden oder die
Beschädigung von Fahrzeugen oder Gegenständen, wenn eine
der o.g. Arbeiten von nicht autorisiertem Personal ausgeführt
wurde oder wenn die Struktur nicht korrekt behandelt wurde.
El fabricante declina toda responsabilidad por lesiones a personas,
daños a vehículos u objetos, en caso de que alguna de las operaciones antes mencionadas haya sido realizada por personal no autorizado, o si la estructura ha sido tratada de modo incorrecto.
Este manual indica exclusivamente los aspectos operativos y funcionales que permiten al operador y a aquellos que realicen los trabajos
de mantenimiento, tener una mejor comprensión de la estructura y
del funcionamiento del elevador y usarlo de modo correcto.
Para comprender la terminología usada en este manual, el operador debe tener experiencia de trabajo en taller y en actividades
de asistencia, mantenimiento y reparación; debe saber interpretar correctamente los dibujos y las descripciones contenidas en
el manual y estar familiarizado con las normas de seguridad generales del país en el cual se instalará la máquina.
Ces recommandations valent également pour le technicien d'entretien qui doit posséder les connaissances générales et spécifiques
(mécaniques et techniques) nécessaires pour effectuer en conditions
de sécurité totales les opérations décrites dans le manuel.
Dieses Handbuch beschreibt ausschließlich die Betriebs- und Funktionsaspekte, die dem Bediener und Wartungspersonal behilflich
sind, sich besser mit der Struktur und dem Betrieb der Hebebühne
vertraut zu machen, damit diese korrekt verwendet werden kann.
Zum Verstehen der in diesem Handbuch verwendeten Begriffe muss
der Bediener über Erfahrung in der Werkstatt und im Kundendienst,
in der Wartung und der Reparatur verfügen und muss in der Lage
sein, die in diesem Handbuch enthaltenen Zeichnungen und
Beschreibungen korrekt zu deuten. Ferner muss er mit den allgemeinen Sicherheitsvorschriften des Landes, in dem die Maschine installiert ist, vertraut sein.
Das Gleiche gilt für den Reparaturmechaniker, der seinerseits
über spezifische Kenntnisse (Mechanik, Engineering) verfügen
muss, die notwendig sind, um die in diesem Handbuch beschriebenen Arbeiten unter sicheren Bedingungen durchzuführen.
Les termes "opérateur" et "technicien d'entretien" utilisés dans le
manuel ont les significations suivantes :
Die in diesem Handbuch verwendeten Begriffe "Bediener" und
"Wartungsfachmann" haben folgende Bedeutung:
Las palabras "Operador" y "Responsable de mantenimiento"
usadas en este manual, significan lo siguiente:
OPÉRATEUR: personne autorisée à utiliser l'élévateur.
TECHNICIEN D'ENTRETIEN: personne autorisée à effectuer
l'entretien courant de l'élévateur
BEDIENER: Für den Gebrauch der Hebebühne zugelassene
Person.
WARTUNGSMECHANIKER: Für die routinemäßige Wartung der
Hebebühne zugelassene Person.
OPERADOR: persona autorizada para usar el elevador.
2004/108/CE - 2006/42/CE - 2006/95/CE
Le levage, le transport, le déballage, le montage, l'installation, la mise
en marche, les réglages et les contrôles initiaux, l'entretien
EXCEPTIONNEL, la réparation, la révision et le démontage de l'élévateur doivent être effectués par le personnel qualifié d'un
REVENDEUR AGRÉÉ ou d'un CENTRE D'ASSISTANCE AGRÉÉ
du fabricant (voir la liste des revendeurs agréés sur la couverture).
Le fabricant décline toute responsabilité en cas de blessures causées aux personnes et de dommages causés aux véhicules ou
autres dans le cas où une des opérations susmentionnées aurait
été effectuée par un personnel non autorisé ou dans le cas où la
structure n'aurait pas été traitée correctement.
Le présent manuel indique exclusivement les aspects techniques et
fonctionnels qui permettent à l'opérateur et toute personne effectuant
des opérations d'entretien de bien connaître la structure et le fonctionnement de l'élévateur ainsi que de l'utiliser correctement.
Pour comprendre la terminologie utilisée dans le présent manuel, l'opérateur doit posséder une expérience professionnelle acquise dans
un garage et à travers des activités d'assistance, d'entretien et de réparation ; il doit savoir interpréter les dessins et les descriptions contenus dans le manuel et doit connaître les normes de sécurité en vigueur dans le pays où la machine est installée.
Lo mismo vale para el mecánico reparador, el cual, a su vez,
debe tener el conocimiento específico y especializado (mecánica, ingeniería), necesario para realizar con absoluta seguridad
las operaciones descritas en el manual.
RESPONSABLE DE MANTENIMIENTO: persona autorizada
para realizar el mantenimiento de rutina del elevador.
9
CAPITOLO 1
DESCRIZIONE
DELLA MACCHINA
CHAPTER 1 DESCRIPTION OF THE
MACHINE
Il sollevatore elettroidraulico a 2 colonne è un'installazione fissa.
Questo significa che è fissato a terra e costruito per sollevare e
posizionare automobili e furgoni a una certa altezza dal suolo.
Il sollevatore è costituito dalle seguenti parti principali:
-Struttura fissa (colonne + telaio);
-Unità mobili (carrelli + bracci);
-Unità di sollevamento (2 cilindri idraulici + unità di potenza);
-Pannello di comando;
-Dispositivi di sicurezza.
The 2-post electro-hydraulic lift is a fixed installation. This means
that it is anchored to the ground and built for lifting and positioning automobiles and vans at a certain height off the ground.
The lift consists of the following main parts:
- Fixed structure (posts + chassis)
- Mobile units (carriages + arms);
- Lift units (2 hydraulic cylinders + power unit);
-Control box;
-Safety devices;
Le fig.3 e 4 illustrano le varie parti del sollevatore e le aree di lavoro intorno ad esso riservate all'uso da parte dell'operatore.
Figures 3 and 4 illustrate the various parts of the lift and the work
areas reserved for use by operators around the lift.
Lato di comando: questo lato del sollevatore include le aree riservate all'operatore per accedere al pannello di comando.
Lato di servizio: è il lato opposto a quello di comando.
Lato anteriore: il lato con i bracci corti.
Lato posteriore: il lato con i bracci lunghi.
Command side: this side of the lift includes the area reserved
for the operator to access the control box.
Service side: this is the opposite side of the command side.
Front side: the side with the short arms.
Rear side: the side with the long arms.
Fig.3 Abb.3
STRUTTURA FISSA (FIG.4)
Questa struttura consiste in:
· 2 colonne (colonna di servizio 15 e di comando 2) costruite in lamiera d'acciaio sagomata. La base è saldata a una piastra preforata che deve essere fissata a terra. Il pannello di comando elettrico
3 e l'unità di potenza idraulica 1 sono attaccati alla colonna di comando. All'interno di ogni colonna si trovano le parti in movimento
per il sollevamento dei veicoli. Il pannello di comando e le unità
idrauliche sono fissati alla colonna di comando.
· La colonna è fissata alla base che include la struttura fissa 4, il telaio 5 e la piastra di copertura 12.
a
Fig.4 Abb.4
10
FIXED STRUCTURE (FIG.4)
This structure consists of:
2 posts, (service 15 and command 2 side post) built with bent
steel plate. The base is welded to a drilled plate to be anchored to the floor. The electric control box 3 and the hydraulic power unit 1 are attached to the command post. Inside each post
are the moving parts to lift the vehicles. The control panel and
the hydraulic units are fixed to the command post.
· The column set on the base which including foxed frame 4,
chassis 5 and cover plate 12.
·
CHAPITRE 1 DESCRIPTION DE LA
MACHINE
CAPÍTULO 1
LA MÁQUINA
KAPITEL 1
MASCHINENBESCHREIBUNG
DECRIPCIÓN DE
L'élévateur électro-hydraulique à 2 colonnes est une installation fixe.
À savoir qu'elle est fixée au sol et conçue pour soulever des automobiles et des camionnettes jusqu'à une certaine hauteur du sol.
Die elektrohydraulische 2-Säulen-Hebebühne ist eine feststehende Installation. Das bedeutet, dass sie am Boden verankert ist
und zum Heben und Positionieren von Personenkraftwagen und
Lieferwagen auf eine gewisse Höhe vom Boden gebaut wurde.
El elevador electrohidráulico de 2 columnas es una instalación fija.
Esto significa que está fijado al piso y que ha sido fabricado para elevar y colocar automóviles y furgones a cierta altura del suelo.
L'élévateur est constitué des parties principales suivantes :
-Structure fixe (colonnes + châssis) ;
-Unités mobiles (chariots + bras) ;
-Unité de levage (2 vérins hydrauliques + unité de puissance) ;
-Panneau de commande ;
-Dispositifs de sécurité.
Die Hebebühne setzt sich aus folgenden Hauptbauteilen zusammen:
-Feststehende Struktur (Säulen + Rahmen);
-Bewegliche Einheiten (Schlitten und Schwenkarme);
-Hebeeinheit (2 Hydraulikzylinder + eine Leistungseinheit);
-Steuertafel;
-Sicherheitsvorrichtungen.
El elevador está constituido por las siguientes partes principales:
-Estructura fija (columnas + armazón);
-Unidades móviles (carros + brazos);
-Unidad de elevación (2 cilindros hidráulicos + unidad de potencia);
-Panel de mando;
-Dispositivos de seguridad.
Les Fig. 3 et 4 montrent les différentes parties de l'élévateur et les zones de travail autour de ce dernier, réservées à l'utilisation par l'opérateur.
Auf Abb. 3 und 4 sind die verschiedenen Bauteile der Hebebühne und die dem Bediener vorbehaltenen Arbeitsbereiche
an derselben dargestellt.
Las figuras 3 y 4 ilustran las diferentes partes del elevador y las áreas
de trabajo alrededor del mismo reservadas para uso del operador.
Côté de commande : ce côté de l'élévateur inclut les zones réservées à l'opérateur pour accéder au panneau de commande.
Côté de service: côté opposé au côté de commande.
Côté antérieur: côté des bras courts.
Côté postérieur: côté des bras des longs.
Steuerseite: Diese Seite der Hebebühne schließt die dem Bediener vorbehaltenen Bereiche ein, über die dieser Zugang zur Steuertafel erhält.
Betriebsseite: Ist die der Steuerseite gegenüberliegende Seite.
Vorderseite: Die Seite mit den kurzen Schwenkarmen.
Rückseite: Die Seite mit den langen Schwenkarmen.
Lado de mando: este lado del elevador incluye las áreas reservadas al operador para acceder al panel de mando.
Lado de servicio: es el lado opuesto al de mando.
Lado delantero: el lado con los brazos cortos.
Lado trasero: el lado con los brazos largos.
STRUCTURE FIXE (FIG. 4)
Cette structure est constituée des éléments suivants :
· 2 colonnes (colonne de service 15 et de commande 2) construite
en tôle d'acier profilé. La base est soudée à une plaque pré-percée
qui doit être fixée au sol. Le panneau de commande électrique 3 et
l'unité de puissance hydraulique 1 sont fixés à la colonne de commande. À l'intérieur de chaque colonne, sont présentes les parties
en mouvement de levage des véhicules. Le panneau de commande et l'unité hydraulique sont fixés à la colonne de commande.
· La colonne est fixée à la base qui inclut la structure fixe 4, le
châssis 5 et la plaque de couverture 12.
FESTSTEHENDE STRUKTUR (ABB. 4)
Diese Struktur besteht aus:
· 2 Säulen (Betriebssäule 15 und Steuersäule 2), gefertigt aus geformtem Stahlblech. Der Sockel ist an eine vorgelochte Platte festgeschweißt, die am Boden befestigt werden muss. Die elektrische Steuertafel 3 und die hydraulische Leistungseinheit 1 sind an
der Steuersäule befestigt. In der Säule sind die sich bewegenden
Teile zum Heben der Fahrzeuge untergebracht. Die Steuertafel
und die Hydraulikeinheiten sind an der Steuersäule angebracht.
· "Die Säule ist am Sockel befestigt und schließt die feststehende Struktur 4, den Rahmen 5 und die Deckplatte 12 ein.
ESTRUCTURA FIJA (FIG.4)
Esta estructura consiste en:
"2 columnas (columna de servicio 15 y de mando 2) fabricadas con perfiles de chapa de acero. La base está soldada a
una placa previamente perforada que se fija al piso. El panel
de mando eléctrico 3 y la unidad de potencia hidráulica 1
están ensamblados en la columna de mando. Dentro de cada
columna se encuentran las piezas móviles para elevar los
vehículos. El panel de mando y las unidades hidráulicas están
fijados a la columna de mando.
· "La columna está fijada a la base que incluye la estructura fija
4, el armazón 5 y la placa de cobertura 12.
·
11
UNITÀ MOBILI (VEDERE FIG.4)
Ogni unità è costituita da:
· Entrambi i carrelli (10 e 14) costruiti con lamiere d'acciaio saldate.
Essi si collegano tramite la catena 8 e il cavo 6 e ,alla base, ai
bracci di sollevamento tramite perni. Il carrello si muove lungo la
colonna, guidato da cuscinetti scorrevoli in plastica situati all'interno
della colonna stessa.
· Due bracci telescopici, uno lungo (11) e uno corto (13), in acciaio
tubolare con un supporto ad ognuna delle estremità la cui altezza
può essere regolata per sostenere la macchina e, al lato opposto, il
foro di connessione al carrello.
UNITÀ DI SOLLEVAMENTO (VEDERE FIG.4)
Consiste in:
· 2 cilindri idraulici (7), i carrelli azionati da catene; entrambi i carrelli
sono tenuti alla stessa altezza mediante un collegamento a fune..
· 1 unità idraulica (1), sul lato di comando, per far funzionare i
cilindri.
UNITÀ DI POTENZA IDRAULICA (FIG.5)
L'unità di potenza idraulica è costituita da:
· Un motore elettrico
· Una pompa idraulica a ingranaggi
· Valvola manuale di discesa equipaggiata con una valvola manuale
di drenaggio dell'olio (vedere il capitolo sull'uso e la manutenzione)
· .Una valvola di pressione massima
· Un serbatoio d'olio
· .Un tubo flessibile di fornitura e ritorno dell'olio al circuito che rifornisce i cilindri
Fig.5 Abb.5
HYDRAULIC POWER UNIT (FIG.5)
The hydraulic power unit consists of:
· An electric motor
· A geared hydraulic pump
· Descent hand-valve equipped with a manual oil drain valve
(see the use and maintenance chapter)
· A maximum pressure valve
· Oil tank
· An oil delivery and return flexible pipe to the cylinders feeding circuit
Note: The oil delivery pipe may be under pressure
PANNELLO DI COMANDO (FIG.6)
CONTROL BOX (FIG.6)
Il pannello in cui si trova il pannello di comando elettrico contiene
quanto segue:
· 1nterruttore principale
· Pulsante salita
· Pulsante discesa
· Pulsante blocco
·
·
·
·
Fig.6 Pannello di comando
DISPOSITIVI DI SICUREZZA
12
LIFT UNIT (SEE FIG.4)
It consists of:
· 2 hydraulic cylinders (7), the carriages run by chains, both
carriages are kept in balance by the cable.
· 1 hydraulic unit (1), on the command side, to set the cylinders run.
Nota: Il tubo di fornitura dell'olio potrebbe essere
sotto pressione
Fig.5 Unità di potenza idraulica
Fig.6 Abb.6
MOVING UNITS (SEE FIG.4)
Each unit consists of:
· Both carriages (10 and 14) built with welded steel plate. It joints by chain 8 and the cable 6, and at the bottom to the lift
arms by means of pins.The carriage moves along the post,
guided by plastic sliding pads, located inside the post itself.
· Two telescopic arms, one long (11) and one short (13), built
with tubular steel with a pad at each end that can be height adjusted to hold the car and on the opposite side the carriage
connection hole.
I dispositivi di sicurezza includono:
· Dispositivo meccanico di sicurezza per il carrello
· Sistema blocca bracci
· 4 salvapiedi sui bracci
· Un dispositivo sincrono per controllare il movimento dei carrelli
Finecorsa di estremità nelle colonne
· Dispositivi di sicurezza elettrica
· Dispositivi di sicurezza idraulica
· Dispositivo con cavo anti-cedimento
· Dispositivo per proteggere i piedi
Questi dispositivi di sicurezza saranno descritti più dettagliatamente nei capitoli seguenti
The panel that houses the electric control box contains the following:
Main switch
Rise push button
Down push button
Lock push button
Fig.5 Hydraulic power unit Fig.6 Control panel
SAFETY DEVICE
The safety devices include:
Mechanical safety device for carriage
Arms locking system
4 foot guards on the arms
A synchronous device to control the carriages movement.
Post end limit switches
General electric safety devices
General hydraulic safety devices
Rope anti-loosen device
Foot protection device
These safety devices will be described in further detail in the following chapters
·
·
·
·
·
·
·
·
·
UNITÉS MOBILES (VOIR FIG. 4)
BEWEGLICHE EINHEITEN (SIEHE ABB. 4)
Chaque unité est constituée des éléments suivants :
· .Les deux chariots (10 et 14) constitués de tôles d'acier soudées.
Ils sont reliés par l'intermédiaire de la chaîne 8 et du câble 6 et, à la
base, aux bras de levage par l'intermédiaire d'axes. Le chariot se
délace le long de la colonne, guidé par des roulements coulissants
en plastique situés à l'intérieur de la colonne.
· .Deux bras télescopiques, un long (11) et un court (13), en acier tubulaire avec un support à chaque extrémité dont la hauteur peut
être réglée pour soutenir la machine et, du côté opposé, le trou de
connexion au chariot.
Jede Einheit besteht aus:
· Beiden Schlitten (10 und 14) aus geschweißtem Stahlblech. Diese
Schlitten sind mittels der Ketten 8 und des Kabels 6 mit dem Sockel und mittels Zapfen mit den Hebearmen verbunden. Der Schlitten bewegt sich längs der Säule und wird dabei von Gleitlagern
aus Kunststoff geführt, die in der Säule selbst untergebracht sind.
· "Zwei Teleskoparmen, ein langer (11) und ein kurzer (13) aus
Rohrstahl mit einer Halterung an jedem Ende, deren Höhe zum
Abstützen der Maschine eingestellt werden kann, und - an der gegenüberliegenden Seite - die Anschlussbohrung für den Schlitten.
Cada unidad está constituida por:
· "Ambos carros (10 y 14), fabricados con chapas de acero soldadas. Los mismos están vinculados por la cadena 8 y el cable 6 y,
mediante pernos, a la base y a los brazos de elevación. El carro se
mueve a lo largo de la columna, guiado por los cojinetes deslizantes de plástico situados dentro de la columna.
· "Dos brazos telescópicos, uno largo (11) y uno corto (13), de
tubo de acero con un soporte en cada uno de los extremos,
cuya altura puede regularse para sostener la máquina y, en el
lado opuesto, el orificio para conectar el carro.
UNITÉ DE LEVAGE (VOIR FIG. 4)
HEBEEINHEITEN (SIEHE ABB. 4)
UNIDAD DE ELEVACIÓN (VER FIG. 4)
Elle est constituée des éléments suivants :
· .2 vérins hydrauliques (7) et les chariots actionnés par des
chaînes - les deux chariots sont maintenus à la même hauteur
par un raccordement assuré par un câble.
· 1 unité hydraulique (1), sur le côté de commande, pour faire
fonctionner les vérins.
UNITÉ DE PUISSANCE HYDRAULIQUE (FIG. 5)
L'unité de puissance hydraulique est constituée de :
· Un moteur électrique
· Une pompe hydraulique à engrenages
· Vanne manuelle de descente dotée d'une vanne manuelle de
drainage de l'huile (voir le chapitre sur l'utilisation et l'entretien)
· Une vanne de pression maximum
· Un réservoir d'huile
· Un tuyau flexible d'alimentation et de retour d'huile au circuit d'alimentation des vérins
Besteht aus:
· 2 Zwei Hydraulikzylindern (7), die Schlitten werden durch Ketten angetrieben; beide Schlitten werden mittels einer Seilverbindung auf der gleichen Höhe gehalten.
· 1 Hydraulikeinheit (1) an der Steuerseite, für den Betrieb der Zylinder.
HYDRAULISCHE LEISTUNGSEINHEIT (ABB. 5)
Die hydraulische Leistungseinheit besteht aus:
· .Elektromotor.
· Hydraulische Zahnradpumpe
· Handbetätigtes Absenkventil mit handbetätigtem Ölablassventil (siehe Kapitel bezüglich Gebrauch und Wartung).
· Druckbegrenzungsventil
· Öltank
· Ein Ölversorgungs- und Ölrückführungsschlauch zum Kreislauf, der die Zylinder versorgt
UNIDADES MÓVILES (VER FIG. 4)
Consta de:
2 cilindros hidráulicos (7), los carros accionados por cadenas;
ambos carros se mantienen a la misma altura mediante una
conexión de cable.
· 1 unidad hidráulica (1), en el lado del mando, para hacer funcionar los cilindros.
·
UNIDAD DE POTENCIA HIDRÁULICA (FIG. 5)
La unidad de potencia hidráulica está constituida por:
1.Un motor eléctrico
2.Una bomba hidráulica de engranajes
3.Válvula manual de descenso equipada con una válvula manual
de drenaje de aceite (ver el capítulo sobre uso y mantenimiento)
4.Una válvula de presión máxima
5.Un depósito de aceite
6.Un tubo flexible de suministro y retorno de aceite al circuito
que alimenta los cilindros
Nota: El tubo de suministro de aceite puede estar con presión
Note : le tuyau d'alimentation d'huile peut se trouver
sous pression.
ANMERKUNG: Der Ölversorgungsschlauch könnte unter Druck stehen
PANNEAU DE COMMANDE (FIG. 6)
STEUERTAFEL (Abb.6)
1.5 PANEL DE MANDO (FIG. 6)
Der Kasten, in dem sich die elektrische Steuertafel befindet,
enthält folgende Elemente:
· 1Hauptschalter
· 2Taste Heben
· 3Taste Absenken
· 4Sperrtaste
Abb. 5 Hydraulische Leistungseinheit
Abb. 6 Steuertafel
El panel en el cual se encuentra el panel de mando eléctrico
contiene:
1Interruptor principal
2Pulsador de subida
3Pulsador de bajada
4Pulsador de bloqueo
Fig.5 Unidad de potencia hidráulica
SICHERHEITSVORRICHTUNGEN
Los dispositivos de seguridad incluyen:
1Dispositivo mecánico de seguridad para el carro
2Sistema de bloqueo de brazos
34 salvapies en los brazos
4Un dispositivo sincrónico para controlar el movimiento de los
carros
5Fin de carrera de los extremos en las columnas
6Dispositivos de seguridad eléctrica
7Dispositivos de seguridad hidráulica
8Dispositivo con cable anti-fallo (de seguridad)
9Dispositivo para proteger los pies
Estos dispositivos de seguridad serán descritos más detalladamente en los capítulos siguientes
Le panneau de commande électrique rassemble :
· Interrupteur principal
· Bouton de montée
· Bouton de descente
· Bouton de blocage
Fig. 5 Unité de puissance hydraulique
Fig. 6 Panneau de commande
DISPOSITIFS DE SÉCURITÉ
Les dispositifs de sécurité incluent :
· Dispositif mécanique de sécurité du chariot
· Système de blocage des bras
· 4 protections des pieds sur les bras
· Un dispositif synchrone de contrôle du mouvement des chariots
· Fins de course à l'extrémité des colonnes
· Dispositifs généraux de sécurité électrique
· Dispositifs généraux de sécurité hydraulique
· Dispositif à câble anti-chute
· Dispositif de protection des pieds
Ces dispositifs de sécurité sont en détail dans les chapitres qui suivent.
Die Sicherheitsvorrichtungen umfassen:
· 1Mechanische Sicherheitsvorrichtung für den Schlitten
· 2Schwenkarmarretiersystem
· 34 Fußschutze an den Armen
· 4Synchronvorrichtung zum Steuern der Schlittenbewegung
· 5Endanschlag an den Säulenenden
· 6Sicherheitsvorrichtungen gegen Stromschlag
· 7Hydraulik-Sicherheitsvorrichtungen
· 8Vorrichtung mit Sicherheitskabel
· 9Fußschutzvorrichtung
Diese Sicherheitsvorrichtungen werden in den folgenden Kapiteln genauer beschrieben
Fig. 6 Panel de mando
1.6 DISPOSITIVOS DE SEGURIDAD
13
CAP.2 SPECIFICHE
TECNICHE
CHAPTER 2
SPECIFICATIONS
Chap.2
CARACTÉRISTIQUES
KAP. 2
SPEZIFIKATIONEN
CAP.2
DATOS TECNICOS
PORTATA:
CAPACITY:
PORTÉE
TRAGFÄHIGKEIT
CAPACIDAD
4000 Kg (39200 N)
Tempo di salita
Lifting time with three phase
motor
Temps de montée
Aufstiegzeit
Tiempo de elevación
£60sec
Tempo di salita
Lifting time with single phase
motor
Temps de montée
Aufstiegzeit
Tiempo de elevación
£75sec
Tempo di discesa
Descent time
Temps de descente
Abstiegzeit
Tiempo de bajada
18£t£40sec
Peso totale del sollevatore
Total weight of rack approx.
Poids total de l’élévateur
Gesamtgewicht der Hebebühne
Peso total aprox. del elevador
circa/about-environ 770 kg
Rumorosità
Noise level
Niveau sonore
Geräuschpegel
Nivel de ruido
£70dB(A)/1m
Temperatura di funzionamento
Operating temperature:
Température de fonctionnement
Betriebstemperatur
Temperatura de funcionamiento
5 / 40°C
Ambiente di lavoro: locale chiuso.
Working environment: indoor.
Environnement de travail: local
fermé.
Aufstellung: In einem
geschlossenen Raum.
Ambiente de trabajo: local cerrado
Fig.7 Abb.7
14
MOTORE ELETTRICO: ELECTRIC MOTOR
MOTEUR ÉLECTRIQUE:
ELEKTRO-MOTOR:
MOTOR ELÉCTRICO: Three phase
Single phase
Potenza del motore elettrico
Electric motor power rating
Puissance du moteur électrique
Elektromotor-Leistung
Potencia del motor eléctrico
Tensione
Voltage
Tension
Spannung
Voltaje
230-400V3ph.+/-5%
230V1ph.+/-5%
Frequenza
Frequency
Fréquence
Frequenz
Frecuencia
50Hz
50Hz
Assorbimento
Absorption:
Intensité absorbée:
Entnahme
Consumo
230V.11A 400v.6.4A
13A
N° poli
N° poles:
Nombre de pôles
Polanzahl
N° polos
4
Velocità
Speed
Vitesse de rotation
Geschwindigkeit
Velocidad
1400RPM
Forma costruttiva
Construction
Type de montage
Bauausführung
Forma constructiva
B14
Classe di isolamento
Insulation class
Classe d’isolation
Isolierungsklasse
Clase de aislamiento
IP54
IP54
90L4
90L4
type
type
Il motore deve essere collegato
in base agli schemi di cablaggio
riportati sotto.Il verso di rotazione del motore deve essere quello mostrato dalla freccia sulla
pompa; se così non fosse, modificare le connessioni elettriche
(vedere cap. 4
INSTALLAZIONE- connessioni
impianto elettrico).
The motor must be connected with reference to the attached wiring diagrams.The motor rotation wise must be
the same as shown by the arrow on the
pump: if not, modify the electrical connections (see
ch.4.INSTALLATION-electric plant connection)
POMPA UNITA'
IDRAULICA
HYDRAULIC UNIT
PUMP
Le moteur doit être branché dans le respect des schémas de branchement
(voir plus bas).
Le sens de rotation du moteur doit correspondre à celui indiqué par la flèche
sur la pompe : si tel n'est pas le cas,
modifier les branchements électriques
(voir chap. 4 INSTALLATION - branchement électrique).
POMPE UNITÉ
HYDRAULIQUE
Der Motor muss auf der Grundlage der unten abgebildeten
Schaltpläne angeschlossen
werden.
Die Drehrichtung des Motors
muss mit der durch den Pfeil
auf der Pumpe angezeigten
Richtung übereinstimmen.
Wenn dem nicht so sein sollte,
den Stromanschluss ändern
(siehe Kap. 4 INSTALLATION Anschlüsse elektrische Anlage).
1.8KW
1.8KW
1380RPM
El motor debe conectarse
según los esquemas de
cableado indicados a
continuación.
El sentido de rotación del
motor debe ser el que
muestra la flecha en la
bomba; si no fuese así,
modificar las conexiones
eléctricas (ver cap. 4
INSTALACIÓN- conexiones de la instalación
eléctrica).
MOTORE-MOTOR-MOTEUR
PUMPE ELEKTRISCHE
EINHEIT
Trifase-Three phase
Monofase-Single phase
Tipo
Type
Type
Typ
Tipo
R
T
Modello
Model
Modèle
Modell
Modelo
PHC
PHC
Dimensione
Size
Dimensions
Abmessung
Tamaño
7.8cm3/g
6.0cm3/g
Trasmissione a giunto
Transmission:coupling type
Transmission à joint
Antrieb: über Anschluss
Transmisión: por cardán
E32
E32
Pressione continua di funzionamento
Continuous operating pressure
Pression constante de fonctionnement
Dauerhafter Betriebsdruck
Presión continua de
funcionamiento
160bar
150bar
Pressione massima di funzionamento (picco)
Maximum operaing pressure(peak)
Pression maximum de fonctionnement (pic)
Höchster Betriebsdruck
(Spitze)
Presión máxima de
funcionamiento (pico)
180bar
170bar
15
OLIO
OIL
Il serbatoio di olio contiene olio minerale idraulico
in ottemperanza con l’ISO/DIN 6743/4 con un livello di contaminazione che non eccede la classe 18/15 in base all’ISO 4406, per esempio IP
HYDRUS OIL 32; SHELL TELLUS OIL T32 o
equivalente.
DIAGRAMMA
HYDRAULIC SYSTEM
CIRCUITO IDRAULICO DIAGRAM
Fig.8 Principio della parte idraulica
HUILE
The oil reservoir contains hydraulic mineral oil in accordance with ISO/DIN
6743/4 with a level of contamination that
does not exceed class 18/15 according
to ISO 4406, for example IP HYDRUS
OIL 32; SHELL TELLUS OIL T32 or
equivalent.
DIAGRAMME HUILE
HYDRAULIQUE
Fig.8 Principle of hydraulic part
ÖL
Le réservoir d'huile contient de l'huile
minérale hydraulique conforme au standard ISO/DIN 6743/4 dont le niveau de
contamination ne dépasse pas la classe
18/15 sur la base de la norme ISO
4406, par exemple IP HYDRUS OLE
32, SHELL TELLUS OLE T32 ou équivalente.
Fig.8 Principle of hydraulic part
Der Öltank enthält wie von ISO/DIN
6743/4 vorgeschrieben Hydraulik-Mineralöl mit einem Verunreinigungsgrad nicht über Klasse 18/15
gemäß ISO 4406, zum Beispiel IP
HYDRUS OIL 32; SHELL TELLUS
OIL T32 oder ein gleichwertiges Öl.
HYDRAULIKÖLDIAGRAMM
Abb.8 Prinzip der Hydraulik
1
Valvola di chiusura
Lock valve
Vanne de fermeture
2
Cilindro di manovra con effetto semplice
Operating Cylinder with simple effect
Vérin de commande à simple effet
Einfachwirkender Antriebszylinder
3
Valvola direzionale a solenoide
Solenoid directional valve
Vanne directionnelle à solénoïde
Solenoid-Richtungsventile
Schließventil
4
Valvola regolatrice di pressione
Check valve
Vanne régulatrice de pression
Druckregelventil
5
Motore
Motor
Moteur
Motor
6
Pompa
Pump
Pompe
Pumpe
7
Filtro
Filter
Filtre
Filter
8
Valvola rilascio pressione
Pressure relief valve
Vanne évacuation pression
Druckentlastungsventil
9
Valvola controllo flusso
Flow control valve
Vanne contrôle flux
Flusskontrollventil
10
Serbatoio
Tank
Réservoir
Tank
16
ACEITE
El depósito de aceite contiene aceite
mineral hidráulico conforme con la
ISO/DIN 6743/4 con un nivel de contaminación que no excede la clase
18/15 según la ISO 4406, por ejemplo IP HYDRUS OIL 32; SHELL
TELLUS OIL T32 o equivalente.
Descrizione
TRIFASE - THREE-PHASE TRIPHASÉ - SCHALTPLAN - TRIFASICO
ELENCO COMPONENTI ELETTRICI - ELECTRICAL COMPONENTS LIST
NOMENCLATURE DES COMPOSANTS ÉLECTRIQUES - ELEKTRO STÜCKLISTE - LISTA PARTES ELECTRICAS
Description
Description
Bezeichnung
Descripcion
Rif.
Ref.
SA
Q
KM
M
interruttore principale
interruttore
contatore CA
motore
POWER SWITCH
CIRCUIT BREAKER
AC CONTACTOR
MOTOR
Interrupteur principal
Interrupteur
Contacteur CA
Moteur
Hauptschalter
Schalter
Kontaktgeber CA
Motor
KT
SQ1
SQ3/SQ4
SBL
SBU
SBD
YA1-YA4
YV
FU1/FU2
T
U1
relè temporizzato
fine corsa
interruttore di sicurezza
pulsante d'arresto
pulsante di salita
pulsante di discesa
elettromagnete
solenoide
fusibile
trasformatore di controllo
raddrizzatore
TIME RELAY
LIMIT SWITCH
SAFETY SWITCH
LOCKPUSH BUTTON
UP PUSH BUTTON
DOWN PUSH BUTTON
ELECTROMAGNET
SOLENOID
FUSE
CONTROL TRANSFORMER
RECTIFIER
Relais temporisé
Interrupteur de fin de course
Interrupteur de sécurité
Bouton d'arrêt
Bouton de levage
Bouton de descente
Électro-aimant
Solénoïde
Fusible
Transformateur de contrôle
Redresseur
Zeitgesteuertes Relais
Endanschlagschalter
Sicherheitsschalter
Stopp-Druckknopf
Hebetaste
Taste Absenken
Elektromagnet
Solenoid
Sicherungen
Steuertransformator
Gleichrichter
Fig.9 Diagrammi cablaggio trifase
Fig.9 Three phase wiring diagrams
Articolo
Article
LW39-16RE04/2
DZX2-60L 10/3
CJX2-1210
90L4 3
PHASE/400V/1.8kW
Relé de tiempo
ST3PA-C
Interruptor de fin de carrera ME 8108
Interruptor de seguridad
LXW6-11
Pulsador de parada
Pulsador de elevación
Pulsador de descenso
Electroimán
DC 24V
Solenoide
AC 24V
Fusible
RF1-32(X) 1A/6A
Transformador de control
JBK3-160 400V/24V
Enderezador
+KBPC10-10-
Interruptor principal
Interruptor
Contactor CA
Motor
Q.nty
1
1
1
1
1
1
1
2
1
1
1
4
1
3
1
1
Fig. 9 Diagrammes branchement triphasé
17
SA
Q
KM
M
KT
SQ1
SQ3/SQ4
SBL
SBU
SBD
YA1-YA4
YV
FU1/FU2
T
U1
interruttore principale
interruttore
contatore CA
motore
relè temporizzato
fine corsa
interruttore di sicurezza
pulsante d'arresto
pulsante di salita
pulsante di discesa
elettromagnete
solenoide
fusibile
trasformatore di controllo
raddrizzatore
Fig.9a Diagrammi cablaggio monofase
18
MONOFASE- SINGLE PHASE
ELENCO COMPONENTI ELETTRICI - ELECTRICAL COMPONENTS LIST
NOMENCLATURE DES COMPOSANTS ÉLECTRIQUES - ELEKTRO STÜCKLISTE - LISTA PARTES ELECTRICAS
POWER SWITCH
Interrupteur principal
Hauptschalter
Interruptor principal
CIRCUIT BREAKER
Interrupteur
Schalter
Interruptor
AC CONTACTOR
Contacteur CA
Kontaktgeber CA
Contactor CA
MOTOR
Moteur
Motor
Motor
TIME RELAY
Relais temporisé
Zeitgesteuertes Relais
Relé de tiempo
LIMIT SWITCH
Interrupteur de fin de course
Endanschlagschalter
Interruptor de fin de carrera
SAFETY SWITCH
Interrupteur de sécurité
Sicherheitsschalter
Interruptor de seguridad
LOCKPUSH BUTTON
Bouton d'arrêt
Stopp-Druckknopf
Pulsador de parada
UP PUSH BUTTON
Bouton de levage
Taste Heben
Pulsador de elevación
DOWN PUSH BUTTON
Bouton de descente
Taste Absenken
Pulsador de descenso
ELECTROMAGNET
Électro-aimant
Elektromagnet
Electroimán
SOLENOID
Solénoïde
Solenoid
Solenoide
FUSE
Fusible
Sicherung
Fusible
CONTROL TRANSFORMER
Transformateur de contrôle
Steuertransformator
Transformador de control
RECTIFIER
Redresseur
Gleichrichter
Enderezador
Fig.9a Single phase wiring diagrams
Fig. 9 a Diagrammes branchement monophasé
Abb.9 Diagramme Drehstromverkabelung
LW39-16RE04/1
DZX2-60L 15/1
CJX2-1210
90L4 1 phase/220V/1,8kW
ST3PA-C
ME 8108
LXW6-11
CC 24V
CA 24V
RF1-32 (X) 1A/6A
JBK3-160.220V/24V
+KBPC10-10-
1
1
1
1
1
1
2
1
1
1
4
1
2
1
1
PESO E DIMENSIONI DEL VEICOLO
VEHICLE WEIGHT AND SIZE
L'intelaiatura di sollevamento può essere adattata praticamente a
tutti i veicoli che non superino il peso di 4000kg, le cui misure
non eccedano le seguenti.
Lift rack can be adapted to virtually all vehicles no heavier than
4000kg, the dimensions of which do not exceed the following.
DIMENSIONI MASSIME DEI VEICOLI DA
SOLLEVARE
MAXIMUM DIMENSIONS OF VEHICLES TO BE
LIFTED
Massima larghezza: 2.400 mm
Massimo interasse: 3.000 mm
Max width: 2400 mm
Max wheelbase: 3000 mm
La sottoscocca di auto con scarsa distanza dal suolo può interferire con la struttura del sollevatore. Fare particolare attenzione
nel caso di auto sportive ribassate.
The underbody of cars with low ground clearance may interfere
with the structure of the lift .Pay particular attention in the case of
low body sports cars.
IATTENZIONE
Fig.10 Abb.10
IWARNING
Non superare i 4000 kg anche nel caso di veicoli con particolari
caratteristiche.
I diagrammi che seguono includono criteri di definizione dei limiti
di utilizzo del sollevatore.
The diagrams below include the criteria for defining the limits of
use of the carrack.
Fig.10 Dimensioni minime e massime
Fig.10 Minimum and maximum dimensions
VERIFICARE LA PORTATA DI CARICO MASSIMA E LA
DISTRIBUZIONE DEL CARICO IN CASO DI VEICOLI DI
MAGGIORI DIMENSIONI. PESO MASSIMO DEL VEICOLO DA
SOLLEVARE.
CHECK MAXIMUM LOAD CAPACITY AND LOAD
DISTRIBUTION IN CASE OF LARGER VEHICLES. MAXIMUM
WEIGHT OF THE VEHICLE TO BE LIFT
Fig.11 Distribuzione dei pesi
Fig.11Weight distribution
Fig.11 Abb.11
19
POIDS ET DIMENSIONS DU VÉHICULE
La structure de levage est adaptée à la presque totalité des véhicules dont le poids ne dépasse pas 4000 kg et dont les dimensions ne dépassent celles indiquées ci-dessous.
DIMENSIONS MAXIMUM DES VÉHICULES A
SOULEVER
Largeur maximum: 2.400 mm
Entraxe maximum:3.000 mm
Les véhicules caractérisés par une faible hauteur au sol peuvent
interférer avec la structure de l'élévateur. Faire preuve de prudence dans le cas des voitures sportives surbaissées.
IATTENTION
GEWICHT UND ABMESSUNGEN DES FAHRZEUGS
PESO Y DIMENSIONES DEL VEHÍCULO
Der Heberahmen kann praktisch an alle Fahrzeuge angepasst
werden, die das Gewicht von 4000 kg und die folgenden Abmessungen nicht überschreiten.
La armadura para elevación puede adaptarse prácticamente a
todos los vehículos que no superen los 4.000 kg de peso, cuyas
medidas no excedan las siguientes.
HÖCHSTABMESSUNGEN DER ZU HEBENDEN FAHRZEUGE
DIMENSIONES MÁXIMAS DE VEHÍCULOS A ELEVAR
Höchstbreite: 2.400 mm
Höchster Achsabstand: 3.000 mm
Máxima anchura: 2.400 mm
Máxima distancia entre ejes: 3.000 mm
Der Unterboden von Fahrzeug mit geringem Bodenabstand kann
mit der Struktur der Hebebühne interferieren. Darauf ist besonders bei tiefer gelegten Sportwagen zu achten.
Si la distancia entre la parte inferior de la carrocería del auto y el
suelo es escasa puede interferir con la estructura del elevador.
Prestar especial atención en caso de autos deportivos bajos.
ACHTUNG
Auch im Falle von Fahrzeugen mit besonderen Eigenschaften
das Höchstgewicht von 4000 kg nicht überschreiten.
Die nachfolgenden Diagramme schließen Kriterien zur Bestimmung der Einsatzgrenzen der Hebebühne ein.
ATENCIÓN
No superar los 4.000 kg incluso en caso de vehículos con características especiales.
Los diagramas a continuación incluyen criterios de definición de
los límites de uso del elevador.
Abb.10 Mindest- und Höchstabmessungen
BEI FAHRZEUGEN GRÖSSERER ABMESSUNGEN DIE
HÖCHSTE TRAGFÄHIGKEIT UND DIE VERTEILUNG DES
GEWICHTS KONTROLLIEREN. HÖCHSTGEWICHT DES ZU
HEBENDEN FAHRZEUGS.
Fig.10 Dimensiones mínimas y máximas
CONTROLAR LA CAPACIDAD MÁXIMA DE CARGA Y LA
DISTRIBUCIÓN DE LA MISMA EN EL CASO DE VEHÍCULOS
DE DIMENSIONES MAYORES. PESO MÁXIMO DEL
VEHÍCULO A ELEVAR.
Dans le cas des véhicules ayant des caractéristiques particulières, ne pas dépasser 4000 kg.
Les diagrammes qui suivent incluent les critères de définition des
limites d'utilisation de l'élévateur.
Fig. 10 Dimensions minimum et maximum
CONTRÔLER LA PORTÉE MAXIMUM ET LA DISTRIBUTION
DE LA CHARGE DANS LE CAS DES VÉHICULES DE
DIMENSIONS SUPÉRIEURES. POIDS MAXIMUM DU
VÉHICULE À SOULEVER :
Fig. 11 Répartition des poids
20
CAPITOLO 3 SICUREZZA
È importante leggere attentamente e dall'inizio alla fine questo
capitolo del manuale in quanto contiene informazioni importanti
riguardanti i rischi a cui possono essere esposti l'operatore e il
meccanico riparatore nell'eventualità che il sollevatore venga
utilizzato scorrettamente.
Il testo seguente contiene spiegazioni chiare riguardo a certe situazioni di rischio o pericolo che potrebbero verificarsi durante il
funzionamento o la manutenzione del sollevatore, i sistemi di sicurezza installati e l'uso corretto di tali sistemi, i rischi residui e le
procedure operative da usare (precauzioni generali e specifiche
per eliminare potenziali pericoli).
IATTENZIONE
Fig.12 Abb.12
CHAPTER 3 SAFETY
It is vital to read this chapter of the manual carefully and from beginning to end as it contains important information regarding the
risks that the operator and the maintenance fitter may be exposed to in the eventuality that the lift is used incorrectly.
The following text contains clear explanations regarding certain
situations of risk or danger that may arise during the operation or
maintenance of the lift, the safety devices installed and the correct use of such systems, residual risks and operative procedures to use (general and specific precautions to eliminate potential
hazards).
IWARNING
Il sollevatore è progettato e costruito per sollevare veicoli e mantenerli
in posizione elevata in un'officina al chiuso. Qualsiasi altro uso non è
autorizzato; in particolare, il sollevatore non è adatto per:
-Opera di lavaggio e aspirazione;
-Creazione di piattaforme rialzate o sollevamento di personale;
-Utilizzo come pressa di ripiego a scopo di pigiatura;
-Utilizzo come sollevatore di merce;
-Utilizzo come martinetto per sollevamento di veicoli o cambio ruote.
Lift is designed and built to lift vehicles and hold them in the elevated position in a closed workshop.
All other uses are unauthorized; in particular, the lift is not suitable for:
-Washing and respire work;
-Creating raised platforms or lifting personnel;
-Use as a makeshift press for crushing purpose;
-Use as goods lift
-Use as a jack for lifting vehicles or changing wheels.
IL PRODUTTORE DECLINA QUALSIASI RESPONSABILITÀ
PER LESIONI A PERSONE O DANNI A VEICOLI E ALTRE
PROPRIETÀ CAUSATI DA UN USO SCORRETTO O NON
AUTORIZZATO DEL SOLLEVATORE.
THE MANUFACTURE DISCLAIMS ALL LIABILITY FOR
INJURY TO PERSONS OR DAMAGE TO VEHICLES AND
OTHER PROBLEMS CAUSED BY THE INCORRECT AND
UNAUTHORISED USE OF THE LIFT.
Durante il sollevamento e la discesa, l'operatore deve rimanere
nella postazione di comando definita nella fig.15. La presenza di
persone all'interno della zona di pericolo indicata nella stessa figura è severamente proibita. La presenza di persone nella zona
sottostante al veicolo è permessa solo nel caso in cui il veicolo
stazioni in posizione elevata.
During lift and descent movements, the operator must remain in
the command station as defined in Figure 15. The presence of
persons inside the danger zone indicated in the same Figure is
strictly prohibited. The presence of persons beneath the vehicle
during operations is permitted only when the vehicle is parked in
the elevated position.
NON UTILIZZARE IL SOLLEVATORE SENZA I SISTEMI DI
PROTEZIONE O CON I SISTEMI DI PROTEZIONE
DISABILITATI.
IL NON ADEMPIMENTO DI QUESTE NORME PUÒ CAUSARE
SERI DANNI ALLE PERSONE E DANNI AL SOLLEVATORE E
AL VEICOLO CHE VIENE SOLLEVATO.
DO NOT USE THE LIFT WITHOUT PROTECTION DEVICES
OR WITH THE PROTECTION
DEVICES INHIBITED. FAILURE TO COMPLY WITH THESE
REGULATIONS CAN CAUSE SERIOUS INJURY TO
PERSONS, AND IRREPERABLE DAMAGE TO THE LIFT AND
THE VEHICLE BEING LIFTED.
21
CHAPITRE 3 SÉCURITÉ
Il est important de lire attentivement et intégralement le présent
chapitre du manuel dans la mesure où il contient des informations importantes relatives aux risques auxquels peuvent être exposés l'opérateur et le technicien d'entretien dans le cas le cas
où l'élévateur ne serait pas utilisé correctement.
Le texte qui suit contient des explications claires relatives à certaines
situations de risque ou de danger qui peuvent se présenter durant le
fonctionnement ou l'entretien de l'élévateur, aux systèmes de sécurité
installés et à la bonne utilisation de ces systèmes, aux risques résiduels et aux procédures opératives à appliquer (précautions générales
et spécifiques pour prévenir de tels risques).
IAVIS
KAPITEL 3 SICHERHEIT
Es ist wichtig, dieses Kapitel aufmerksam vom Anfang bis zum Ende
zu lesen, denn es enthält wichtige Informationen bezüglich der Risiken, denen der Bediener und der Reparaturmechaniker ausgesetzt
sein können, wenn die Hebebühne unsachgemäß verwendet wird.
Der folgende Text enthält klare Informationen bezüglich gewisser
Risiko- oder Gefahrsituationen, zu denen es während des Betriebs oder der Wartung der Hebebühne kommen kann, sowie
bezüglich der installierten Sicherheitssysteme und des korrekten
Gebrauchs dieser Systeme, bezüglich des Restrisikos und der
zu treffenden Maßnahmen (allgemeine und spezifische Vorsichtsmaßnahmen zum Ausschalten potentieller Gefahren).
IHINWEIS
L'élévateur est conçu pour soulever des véhicules et les maintenir en
position surélevée dans un garage en un lieu couvert. Toute autre utilisation est interdite ; en particulier, l'élévateur n'est pas prévu pour :
- Opération de lavage et de peinture ;
- Utilisation comme plate-forme rehaussée ou pour le levage de personnes ;
- Utilisation comme presse de cintrage ;
- Utilisation comme élévateur de marchandises ;
- Utilisation comme vérin pour le levage de véhicules ou pour le
changement de roues.
Die Hebebühne wurde zum Heben von Fahrzeugen und zum Aufrechterhalten der gehobenen Position in einer geschlossenen
Werkstatt entwickelt und gebaut. Jeder andere Gebrauch ist unzulässig. Insbesondere ist die Hebebühne nicht geeignet für:
- Wasch- und Absaugarbeiten;
- Bildung erhöhter Plattformen oder Heben von Personal;
- Gebrauch als Behelfspresse zum Biegen von Materialien;
- Heben von Ware;
- Gebrauch als Wagenheber oder zum Wechseln von Rädern.
LE CONSTRUCTEUR DÉCLINE TOUTE RESPONSABILITÉ
EN CAS DE BLESSURES CAUSÉES À DES PERSONNES OU
DE DOMMAGES CAUSÉS À DES VÉHICULES ET AUTRES
BIEN MATÉRIELS SUITE À UNE UTILISATION IMPROPRE
OU NON AUTORISÉ DE L'ÉLÉVATEUR.
DER HERSTELLER HAFTET NICHT FÜR PERSONENUND/ODER SACHSCHÄDEN AN FAHRZEUGEN ODER
ANDEREN GEGENSTÄNDEN, DIE AUF EINEN FALSCHEN
ODER NICHT ZUGELASSENEN GEBRAUCH DER
HEBEBÜHNE ZURÜCKZUFÜHREN SIND.
Durant le levage et la descente, l'opérateur doit rester à hauteur
du poste de commande indiqué sur la figure 15. La présence de
personnes à l'intérieur de la zone de danger indiquée sur cette
même figure est rigoureusement interdite. La présence de personnes sous le véhicule est admise uniquement quand le
véhicule est en position élevée.
Beim Heben und Absenken muss der Bediener sich an dem auf
Abb. 15 dargestellten Steuerposten aufhalten. Die Anwesenheit
von Personen innerhalb des auf der gleichen Abbildung gekennzeichneten gefährlichen Bereichs ist strikt verboten. Die Anwesenheit von Personen im Bereich unter dem Fahrzeug ist nur erlaubt, wenn das Fahrzeug sich in einer hohen Position befindet.
NE PAS UTILISER L'ÉLÉVATEUR SANS LES SYSTÈMES DE
PROTECTION NI AVEC LES SYSTÈMES DE PROTECTION
DÉSACTIVÉS. LE NON-RESPECT DE CETTE
RECOMMANDATION PEUT CAUSER DE GRAVES DOMMAGES
AUX PERSONNES, DES DOMMAGES IRRÉPARABLES À
L'ÉLÉVATEUR ET AU VÉHICULE SOULEVÉ.
DIE HEBEBÜHNE NICHT OHNE SCHUTZSYSTEME ODER BEI
DEAKTIVIERTEN SCHUTZSYSTEMEN VERWENDEN. DAS
NICHTBEACHTEN DIESER VORSCHRIFTEN KANN ZU
SCHWEREN PERSONENSCHÄDEN UND ZU EINER
BESCHÄDIGUNG DER HEBEBÜHNE UND DES GEHOBENEN
FAHRZEUGS FÜHREN.
22
CAPÍTULO 3 SEGURIDAD
Es importante leer atentamente desde el principio hasta el final
este capítulo del manual, ya que contiene información importante respecto de los riesgos a los cuales podrían estar expuestos
el operador y el mecánico reparador si, eventualmente, el elevador fuera utilizado de manera incorrecta.
El siguiente texto contiene explicaciones claras respecto de ciertas situaciones de riesgo o peligro que podrían presentarse durante el funcionamiento o mantenimiento del elevador, los sistemas de seguridad instalados y el uso correcto de dichos sistemas, los riesgos residuales y los procedimientos operativos a
aplicarse (precauciones generales y específicas para eliminar
peligros potenciales).
IAVISO
El elevador está proyectado y fabricado para elevar vehículos y mantenerlos en posición elevada en un taller cerrado. No está autorizado
cualquier otro uso y especialmente, el elevador no es apto para:
-Operaciones de lavado y aspiración;
-Armar plataformas elevadas o elevar personas;
-Utilizarlo como prensa improvisada para apisonar;
-Utilizarlo para elevar mercadería;
-Utilizarlo como gato para elevar vehículos o cambiar ruedas.
EL FABRICANTE DECLINA TODA RESPONSABILIDAD POR
LESIONES A PERSONAS O DAÑOS A VEHÍCULOS Y OTRAS
PROPIEDADES CAUSADOS POR UN USO INCORRECTO O
NO AUTORIZADO DEL ELEVADOR.
Durante la elevación o el descenso, el operador debe permanecer en el puesto de mando definido en la fig.15. La presencia de
personas dentro de la zona de peligro indicada en la misma figura está terminantemente prohibida. La presencia de personas en
la zona debajo del vehículo está permitida únicamente en caso
de que el mismo esté quieto en posición elevada.
NO UTILIZAR EL ELEVADOR SIN LOS SISTEMAS DE
PROTECCIÓN O CON LOS SISTEMAS
DE PROTECCIÓN INHABILITADOS. EL INCUMPLIMIENTO DE
ESTAS NORMAS PUEDE CAUSAR SERIOS DAÑOS A LAS
PERSONAS, DAÑOS AL ELEVADOR Y AL VEHÍCULO QUE
ESTÁ ELEVADO.
PRECAUZIONI GENERALI
GENERAL PRECAUTIONS
L'operatore e il meccanico riparatore devono attenersi alle prescrizioni della legislazione relativa alla prevenzione degli inciden ti, in vigore nel paese di installazione del sollevatore.
The operator and the maintenance fitter are required to observe the
prescriptions of accident prevention legislation in force in the country
of installation of the lift.
Inoltre, l'operatore e il meccanico riparatore devono:
Furthermore, the operator and the maintenance fitter must:
1.Lavorare sempre nell'area di lavoro programmata come mostrato sul manuale.
2.In nessun caso rimuovere o disattivare le protezioni e i dispositivi di sicurezza meccanici, elettrici o di altro tipo.
3.Leggere gli avvisi di sicurezza affissi sulla macchina e le informazioni sulla sicurezza in questo manuale.
Nel manuale tutti gli avvisi di sicurezza vengono indicatii come segue:
1. Always work in the scheduled working area as shown in the manual
2. Never remove deactivate the guards and mechanical, electrical, or other types of safety devices.
3. Read the safety notices affixed to the machine and the safety
information in this manual.
In the manual all safety notices are shown as follows:
PERICOLO: indica pericolo imminente che può causare seri
danni o morte.
AVVISO: indica situazioni e/o tipi di manovre non sicuri e che
possono causare lesioni di varie entità o morte.
ATTENZIONE: indica situazioni e/o tipi di manovre non sicuri e
che possono causare lesioni minori alle persone e/o danneggiare
il sollevatore, il veicolo o altre proprietà.
DANGER: indicates imminent danger that can result in serious
injury or death.
WARNING: indicates situations and /or types of maneuvers that
are unsafe and can cause injuries of various degrees or death.
CAUTION: indicates situations and /or types of maneuvers that
are unsafe and can cause minor injury to persons and /or damage the lift, the vehicle or other psaltery.
RISCHI DI FOLGORAZIONE
Avvisi di sicurezza specifici devono essere affissi al sollevatore nelle
aree in cui il rischio di folgorazione è particolarmente elevato.
RISCHI E DISPOSITIVI DI PROTEZIONE
Esamineremo ora i rischi a cui l'operatore e il meccanico riparatore possono essere esposti con il veicolo immobilizzato in posizione elevata e insieme ai dispositivi di protezione adottati dal
costruttore per ridurre tali rischi al minimo.
MOVIMENTO LONGITUDINALE E LATERALE
Per movimento longitudinale si intende lo spostamento in avanti
e indietro del carico.
Il movimento laterale implica lo spostamento verso destra e verso sinistra del veicolo, specialmente durante la fase di sollevamento.
Tali movimenti possono essere evitati posizionando correttamente il veicolo sui piattelli in gomma posti sui bracci i quali devono
essere precedentemente regolate alla stessa altezza del veicolo.
Non spostare il veicolo dai bracci né regolare i bracci e i piattelli fino a
che il sollevatore non è posizionato all'altezza minima ; in tale posizione i bracci e i piattelli non hanno alcun contatto con il veicolo.
RISKS OF ELECTRIC SHOCK:
Specific safety notice affixed to the lift in areas where the risk of
electric shock is particularly high.
RISKS AND PROTECTION DEVICES
We shall now examine the risks to which the operator and the maintenance fitters may be exposed when the vehicle is immobilized in the
raised position, together with the protection devices and adopted by
the manufacture to reduce all such hazards to the minimum.
LONGITUDINAL AND LATERAL MOVEMENT
Longitudinal movement is considered the backward and forward
shifting of the load.
Lateral movement implies the shifting to the left or right of the vehicle, especially during the lifting phase on the rack.
These movements can be avoided by positioning the vehicle correctly
on the arm disk support plates, which must be previously adjusted to
the same height (by loosening or tightening) as the vehicle.
Do not move the vehicle in relation to the arms or adjust arms and
disk support plates until the arms have been totally lowered, i.e. the
disk support plates must be free from all contact with the vehicle.
Fig.13 Abb.13
23
.PRÉCAUTIONS GÉNÉRALES
ALLGEMEINE VORSICHTSMASSNAHMEN
L'opérateur et le technicien d'entretien doivent respecter les normes en vigueur pour la prévention des accidents dams le pays
où l'élévateur est installé.
Der Bediener und der Reparaturmechaniker müssen die
Vorschriften der im Installationsland der Hebebühne geltenden
Unfallverhütungsgesetze befolgen.
El operador y el mecánico reparador deben atenerse a las prescripciones de la legislación referente a la prevención de accidentes vigente en el país donde se instala el elevador.
Par ailleurs, l'opérateur et le technicien d'entretien :
Ferner müssen der Bediener und der Wartungsmechaniker:
Además, el operador y el mecánico reparador deben:
1.doivent toujours opérer sur la zone prévue à cet effet et indiquée dans le manuel.
2.ne doivent jamais retirer ni désactiver les protections et les dispositifs de sécurité mécaniques, électriques ou de tout autre type.
3.doivent lire les avis de sécurité apposés sur la machine et les
informations de sécurité dans le présent manuel.
Dans le manuel, tous les avis de sécurité sont indiqués comme suit :
DANGER : indique un danger imminente qui peut causer de graves dommages voire entraîner la mort.
AVIS : indique des situations et/ou des manœuvres peu sûres
qui peuvent causer des blessures plus ou moins graves et dans
certains cas entraîner la mort.
ATTENTION : indique des situations et/ou des manœuvres peu
sûres qui peuvent causer des blessures non graves aux personnes et/ou endommager l'élévateur, le véhicule ou autre bien.
RISQUES D'ÉLECTROCUTION
Des avis de sécurité spécifiques doivent être apposés sur l'élévateur sur les zones à hauteur desquelles le risque d'électrocution est particulièrement élevé.
RISQUES ET DISPOSITIFS DE PROTECTION
Ci-après sont indiqués les risques auxquels l'opérateur et le technicien d'entretien peuvent être exposés quand le véhicule est immobilisé en position d'élévation et sont décrits les dispositifs de protection
adoptés par le constructeur pour prévenir de tels risques.
MOUVEMENT LONGITUDINAL ET LATÉRAL
Par mouvement longitudinal, il faut entendre le déplacement vers
l'avant et vers l'arrière de la charge.
Le mouvement latéral implique le déplacement vers la droite et vers
la gauche du véhicule, en particulier durant la phase de levage.
Ces mouvements peuvent être évités en positionnant correctement le
véhicule sur les plaques de soutien en caoutchouc présentes sur les
bras, lesquelles doivent être préalablement réglées (en les desserrant
ou en les serrant) à la même hauteur que véhicule.
Ne pas déplacer le véhicule des bras ni régler les bras et les plaques
de soutien tant que l'élévateur n'est pas à la hauteur minimum (dans
cette position, les bras et les plaques de soutien ne sont plus au contact du véhicule).
24
1.Immer im programmierten Arbeitsbereich arbeiten, wie im Handbuch dargestellt.
2.Auf keinen Fall die mechanischen oder elektrischen oder andersartigen Schutz- und Sicherheitsvorrichtungen entfernen oder unwirksam machen.
3.Die an der Maschine angebrachten Sicherheitshinweise und die in
diesem Handbuch enthaltenen Sicherheitsinformationen lesen.Im
Handbuch werden alle Sicherheitshinweise folgendermaßen gekennzeichnet:
GEFAHR: weist auf eine unmittelbare Gefahr hin, die schwere
und auch tödliche Verletzungen verursachen kann.
HINWEIS: weist auf nicht sichere Situationen und/oder Eingriffe hin,
die zu Verletzungen unterschiedlichen Schweregrads und auch zum
Tode führen können.
ACHTUNG: weist auf nicht sichere Situationen und/oder Eingriffe hin,
die zu geringfügigeren Verletzungen und zu einer Beschädigung der
Hebebühne, des Fahrzeugs oder anderer Gegenstände führen können.
STROMSCHLAGGEFAHR
Spezifische Sicherheitshinweise müssen in den Bereichen an
der Hebebühne angebracht werden, in denen die Stromschlaggefahr besonders hoch ist.
PRECAUCIONES GENERALES
1.Trabajar siempre en el área de trabajo programada como se
muestra en el manual.
2.En ningún caso quitar o desactivar las protecciones y los dispositivos de seguridad, mecánicos, eléctricos o de otro tipo.
3.Leer los avisos de seguridad adheridos a la máquina y las informaciones sobre la seguridad en este manual.
En el manual, todos los avisos de seguridad están indicados de
la siguiente manera:
PELIGRO: indica peligro inminente que puede causar daños graves
o la muerte.
AVISO: indica situaciones y/o tipo de maniobras no seguras que
pueden causar lesiones de distinta gravedad o la muerte.
ATENCIÓN: indica situaciones y/o tipo de maniobras no seguras
que pueden causar lesiones menores a las personas y/o dañar e
elevador, el vehículo u otras propiedades.
RIESGOS DE ELECTROCUCIÓN
Los avisos de seguridad específicos deben estar adheridos al
elevador en áreas en las cuales el riesgo de electrocución sea
especialmente alto.
RIESGOS Y DISPOSITIVOS DE PROTECCIÓN
Untersuchen wir nun die Risiken, denen der Bediener und der Reparaturmechaniker bei gehobenem Fahrzeug ausgesetzt sind und die
Gesamtheit der Schutzvorrichtungen, die der Hersteller angewandt
hat, um diese Risiken auf ein Mindestmaß zu begrenzen.
Examinaremos ahora los riesgos a los cuales podrían estar expuestos el operador y el mecánico reparador con el vehículo inmovilizado en posición elevada junto a los dispositivos de protección adoptados por el fabricante para reducir dichos riesgos
al mínimo.
LÄNGSBEWEGUNG UND SEITLICHE BEWEGUNG
MOVIMIENTO LONGITUDINAL Y LATERAL
Unter Längsbewegung versteht man die Verschiebung der Last nach
vorne und nach hinten.Die seitliche Bewegung ist eine Verschiebung
des Fahrzeugs nach rechts und nach links, insbesondere während
des Hebevorgangs.
Diese Bewegungen können vermieden werden, indem das Fahrzeug
korrekt auf die Gummiteller an den Schwenkarmen, die zuvor auf die
gleiche Höhe des Fahrzeugs eingestellt werden müssen, positioniert
wird.Das Fahrzeug nicht von den Schwenkarmen verschieben und
die Arme und Teller nicht einstellen, so lange die Hebebühne sich auf
Mindesthöhe befindet. In dieser Position haben die Arme und Teller
keinen Kontakt mit dem Fahrzeug.
Por movimiento longitudinal se entiende al desplazamiento de la carga hacia delante y hacia atrás.
El movimiento lateral implica el desplazamiento del vehículo hacia la
derecha y hacia la izquierda, especialmente en la fase de elevación.
Estos movimientos se pueden evitar ubicando correctamente el vehículo sobre platillos de goma colocados en los brazos, los cuales tienen que ser regulados previamente a la misma altura del vehículo.
No desplazar el vehículo de los brazos ni regular los mismos ni los
platillos hasta que el elevador esté colocado a la altura mínima; en
esa posición los brazos y platillos no tienen ningún contacto con el
vehículo.
RISIKEN UND SCHUTZVORRICHTUNGEN
IATTENZIONE
Fig.14- Abb.14
IWARNING
NON TENTARE DI SPOSTARE IL VEICOLO
QUANDO QUESTO POGGIA SUI PIATTELLI.
DO NOT ATTEMPT TO MOVE THE VEHICLE WHEN
IT IS RESTING ON THE DISK SUPPORT PLATES.
È importante posizionare il veicolo sul sollevatore in modo che il
peso sia distribuito correttamente sui bracci (fig.14).Per la sicurezza delle persone e dell'attrezzatura è importante che:
1.Le persone si mantengano all'interno dell'area di sicurezza
mentre il veicolo sta salendo (fig.12).
2.Il motore sia spento, la marcia sia inserita e il freno di stazionamento sia tirato.
3.Il veicolo sia posizionato correttamente (Fig.14).
4.Vengono sollevati solo i veicoli autorizzati (fig.10-11) senza superare la portata e le dimensioni idonee di sollevamento
It is important to position the vehicle on the lift so that the weight
is correctly distributed on the arms (Fig.14) for person and equipment safety, it is important that:
1. People rest inside the safety area while the vehicle raising (Fig.12)
2. The engine is off, the clutch engaged and the parking brake pulled.
3. The vehicle is correctly positioned. (Fig.14).
4. Only authorized vehicle (Fig.10-11) are raised without exceeding
the rate capacity and overall dimensions.
Fig.14 Veicolo caricato correttamente
Fig.15 - Abb.15
Fig.16 Abb.16
Fig.17 - Abb.17
Fig.18 - Abb.18
Fig.19- Abb.19
Fig.20 - Abb.20
RISCHI DURANTE IL SOLLEVAMENTO DEL
VEICOLO
RISKS WHILE THE VEHICLE IS BEING RAISED
I seguenti dispositivi di sicurezza sono stati installati per proteggere da condizioni di sovraccarico e guasti dell'apparecchiatura:
· relè termico :scatta quando il motore è sovraccarico.
· valvola di max pressione (fig.15)(posta sull'unità di potenza
idraulica):scatta quando il sollevatore è sovraccarico.
· In caso di perdita importante e improvvisa nel circuito idraulico
(un tubo rotto), le valvole di bloccaggio, nella parte bassa di
ogni cilindro, scatteranno (fig.16).
· Quando il sollevatore raggiunge l'altezza massima, un micro fa
fermare lo stesso (fig.17).
· Tenere entrambi i cavi bilanciati durante il sollevamento o la
discesa. (Fig.18).
· Se il cilindro idraulico si rompe, scatteranno i cunei di sicurezza (fig.19) che si trovano all'interno delle colonne. I cunei vengono spinti dalla molla e fermano istantaneamente il carrello
impedendone la discesa.
· In caso di rottura totale degli interruttori di finecorsa, il carrello
si fermerà alcuni mm più in alto, in quanto i cilindri idraulici arrivando a finecorsa faranno scattare la valvola di pressione
massima (nell'unità idraulica)
· Se il cavo non è bilanciato, entra in funzione il dispositivo con
cavo anti-cedimento (far riferimento alla fig.20). Accertarsi che
tale sistema funzioni correttamente (far riferimento alla fig.19).
The following safety devices have been installed to protect against overweight conditions and equipment failure:
· The thermal relay in the electric box will trip if the motor is
overloaded.
· The maximum pressure valve (Fig.15), located on the hydraulic oil power unit, will trip if the lift is overloaded.
· In case of a sudden, great leakage in the hydraulic circuit (a
broken pipe), the blocking valves, at the bottom of each Cylinder, will trip (Fig.16).
· If the lift reaches to the maximum height, push the button to stop
it(Fig.17).
· Keep both cables in balance during raising or lowering. (Fig.18).
· If the hydraulic cylinder breaks, the safety wedges will trip (Fig.19),
located inside the posts. The wedges are pushed by the spring and
immediately stop the carriage preventing their descent.
· If the moving part exceed its travel distance, on the upper part
of the command post there is a limit switches connected in series and are usually set working by the “actuator”(Fig.17) on
the command side carriage. If the first limit switch did not work,
the second one would trip after 3sec of carriage run.
· In case of total breakdown of the limit swatches, the carriage will
stop a few mm higher, because the hydraulic cylinders come to
end stroke, will cause the maximum pressure valve (on hydraulic
unit) to trip.
· If the cable is not balance, the rope anti-loosen device function (refer Fig.20). Make sure that this system works well (refer Fig.19).
25
IAVIS
IACHTUNG
IAVISO
NE PAS TENTER DE DÉPLACER LE VÉHICULE
ALORS QU'IL EST EN APPUI SUR LES
PLAQUES DE SOUTIEN À DISQUE.
NICHT versuchen, das Fahrzeug, da es auf der
Festplatte Stützplatten ruhenden MOVE.
NO MUEVA EL VEHÍCULO CUANDO ESTA stand
'en el plato.
Il est important de positionner le véhicule sur l'élévateur de telle sorte
que le poids soit bien réparti sur les bras (Fig. 14) ; pour la sécurité
des personnes et des équipements, il est important que :
Es ist wichtig, das Fahrzeug derart auf der Hebebühne zu positionieren, dass das Gewicht korrekt auf den Schwenkarmen verteilt ist (Abb. 14). Für die Sicherheit der Personen und der
Ausrüstung ist Folgendes wichtig:
Es importante colocar el vehículo en el elevador de manera que
el peso se distribuya correctamente en los brazos (fig.14). Por la
seguridad de las personas y del equipo es importante que:
1.les personnes restent à l'intérieur de la zone de sécurité alors
que le véhicule est en phase d'élévation (Fig. 12).
2.le moteur soit éteint, qu'une vitesse soit enclenchée et que le
frein à main soit tiré.
3.le véhicule soit positionné correctement (Fig. 14).
4.seuls des véhicules autorisés soient soulevés (Fig. 10-11) en
veillant à ne pas dépasser la portée et les dimensions prévues
pour le levage.
1.Die Personen müssen sich während des Hebens des Fahrzeugs innerhalb des Sicherheitsbereichs aufhalten (Abb. 12).
2.Der Motor muss abgestellt, der Gang eingelegt und die
Handbremse gezogen sein.
3.Das Fahrzeug muss korrekt positioniert sein (Abb. 14).
4.Es dürfen nur zulässige Fahrzeuge (Abb. 10-11) gehoben werden und die Tragfähigkeit der Hebebühne sowie die zulässigen
Abmessungen des Fahrzeugs dürfen nicht überschritten werden
1.Las personas se mantengan dentro del área de seguridad
mientras el vehículo está subiendo (fig. 12).
2.El motor esté apagado, la marcha esté colocada y el freno de
estacionamiento accionado.
3.El vehículo esté colocado correctamente (fig. 14).
4.Se levanten solamente vehículos autorizados (fig.10-11) sin
superar la capacidad ni las dimensiones de elevación correspondientes.
Fig. 14 Véhicule chargé correctement
Abb. 14 Korrekt positioniertes Fahrzeug
RISQUES DURANT LE LEVAGE DU VÉHICULE
GEFAHREN WÄHREND DES HEBENS DES
FAHRZEUGS
RIESGOS DURANTE LA ELEVACIÓN DEL
VEHÍCULO
Folgende Sicherheitsvorrichtungen sind installiert, um vor Überlastung und Störungen der Hebebühne zu schützen:
· Thermorelais: Spricht bei Überlastung des Motors an.
· .Druckbegrenzungsventil (Abb. 15) (an der Hydraulikeinheit
angebracht): Spricht bei einer Überlastung der Hebebühne an.
· Bei einem bedeutenden und plötzlichen Druckabfall im Hydraulikkreis (gebrochene Leitung) sprechen die Sperrventile im
unteren Bereich jedes Zylinders an.
· Sobald die Hebebühne die maximale Höhe erreicht, wird sie
durch einen Mikroschalter angehalten (Abb. 17).
· Darauf achten, dass beide Kabel beim Heben oder Absenken
ausgeglichen sind. (Abb.18).
· Wenn der Hydraulikzylinder bricht, sprechen die sich in den
Säulen befindenden Sicherheitskeile (Abb. 19) an. Die Keile
werden von der Feder gedrückt und halten den Schlitten umgehend an und verhindern dadurch das Absinken derselben.
· Bei einem vollständigen Bruch der Endschalter wird der Schlitten einige Millimeter weiter oben angehalten, da die Hydraulikzylinder bei Erreichen des Endschalters das Druckbegrenzungsventil (in der Hydraulikeinheit) auslösen .
· Wenn das Kabel nicht ausgeglichen ist, wird die Vorrichtung
mit Sicherungskabel in Betrieb gesetzt (Bezug auf Abb. 20
nehmen). Sicherstellen, dass dieses System einwandfrei funktioniert (Bezug auf Abb. 19 nehmen).
Los siguientes dispositivos de seguridad han sido instalados
para proteger al equipo de situaciones de sobrecarga y averías:
· .relé térmico: interviene cuando el motor tiene sobrecarga.
· válvula de máx. presión (fig.15) (situada en la unidad de potencia hidráulica): interviene cuando el elevador está sobrecargado.
· En caso de pérdida importante e imprevista en el circuito hidráulico (un tubo roto), intervendrán las válvulas de bloqueo
en la parte baja de cada cilindro (fig.16).
· Cuando el elevador alcance la altura máxima, un micro lo hará
frenar (fig. 17).
· Tener ambos cables equilibrados durante la elevación o el descenso. (Fig.18).
· Si se rompe el cilindro hidráulico intervienen las cuñas de seguridad (fig. 19) que se encuentran dentro de las columnas. El
muelle empuja las cuñas y frenan instantáneamente el carro
impidiendo el decenso.
· En caso de rotura total de los interruptores de fin de carrera, el
carro se frenará unos mm más arriba, cuando los cilindros hidráulicos se acerquen al fin de carrera permitirán que intervenga la válvula de presión máxima (en la unidad hidráulica)
· Si el cable está desequilibrado, entra en funcionamiento el dispositivo con cable anti-fallo (véase fig. en pág. 20). Asegurarse de que dicho sistema funcione correctamente (ver fig. 19).
Les dispositifs de sécurité ci-dessous ont été installés pour prévenir les risques de surcharge et de dommages de l'élévateur :
· Relais thermique : il se déclenche quand le moteur est en surcharge.
· Vanne de pression maximum (Fig. 15), installée sur l'unité de
puissance hydraulique : elle intervient quand l'élévateur est en
surcharge.
· En cas de fuite importante et subite sur le circuit hydraulique
(en cas de rupture d'un tuyau), les vannes de blocage, sur la
partie basse de chaque vérin, interviennent (Fig. 16).
· Quand l'élévateur atteint la hauteur maximale, un micro-contact l'arrête (Fig. 17).
· Maintenir les deux câbles équilibrés durant le levage ou la descente (Fig. 18).
· En cas de rupture du vérin hydraulique, les cales de sécurité
(Fig. 19) interviennent ; elles sont situées à l'intérieur des colonnes. Les cales sont poussées par le ressort et stoppent instantanément le chariot pour en empêcher la descente.
· En cas de rupture totale des interrupteurs de fin de course, le
chariot s'arrête quelques millimètres plus haut puisque les vérins hydrauliques, une fois arrivés en fin de course, font intervenir la vanne de pression maximale (sur l'unité hydraulique).
· Si le câble n'est pas équilibré, le dispositif à câble anti-chute
intervient (faire référence à la fig. 20). S'assurer que ce système fonctionne correctement (faire référence à la fig. 19).
26
RISCHI ALLE PERSONE
Questo paragrafo illustra i rischi a cui sono esposti l'operatore, il
meccanico riparatore o qualsiasi persona nelle vicinanze dell'area di funzionamento del sollevatore in caso di uso non corretto
dell'apparecchiatura.
RISCHIO SCHIACCIAMENTO (OPERATORE)
RISKS OF PERSONS
This paragraph illustrates risks to which the operator, maintenance worker, or any person near the
operating area of the lift may be exposed in the case of impeccable use of equipment.
RISK OF CRUSHING (OPEARATOR)
Possibile se l'operatore che controlla il sollevatore non si trova
nella posizione specificata presso il pannello di comando. Quando la piattaforma e il veicolo stanno scendendo, l'operatore non
deve mai trovarsi parzialmente o completamente al di sotto della
struttura in movimento. Durante questa fase, l'operatore deve
rimanere nella zona di comando (fig.21).
Possible if the operator controlling the lift is not in the
specified position at the command panel.When the
platform and the vehicle are descending, the
operator must never be partly or Completely
underneath the moving structure. During this phase
the operator must remain in the command zone
RISCHIO SCHIACCIAMENTO (PERSONALE)
RISK OF CRUSHING (PERSONNEL)
Quando la piattaforma e il veicolo stanno scendendo, è proibito al
personale entrare nell'area al di sotto delle parti in movimento del sollevatore (fig.22). L'operatore deve manovrare solo dopo essersi accertato che nessuna persona sia in posizioni pericolose..
When the platform and the vehicle are descending
personnel are prohibited from entering the area
beneath the moving parts of the lift.(Fig.22) .the lift
operator must not start the manoeuvre until it has
been clearly established that there are no persons in potentially
dangerous positions.
Fig.21 Abb.21
Fig.22 Abb.22
RISCHIO DI IMPATTO
Dovuto alle parti del sollevatore o del veicolo posizionate ad altezza
d'uomo.Quando, a causa di ragioni di funzionamento, il sollevatore è immobilizzato ad altezze relativamente basse (meno di
1,75m da terra), il personale deve prestare attenzione a evitare
l'impatto con parti della macchina che non siano contrassegnate
con speciali colorazioni di segnalazione del pericolo (fig.23)
RISK OF IMPACT
Caused by the parts of the lift or the vehicle that are positioned at
head height. When, due to operational reasons, the lift is immobilized at relatively low elevations (less than 1.75m from the ground) personnel must be careful to avoid impact with parts of the
machine not marked with special hazard coloring (Fig.23).
Fig.23 Abb.23
RISCHIO DI SPOSTAMENTO DEL VEICOLO
Dovuto ad operazioni da compiere e che generano spinte sul veicolo (fig.24).Se il veicolo è di notevoli dimensioni o peso, il movimento potrebbe portare a sovraccarico o sbilanciamento; mettere in atto tutte le misure necessarie per evitare una simile
eventualità..
RISK DUE TO VEHICLE MOVEMENT
Movement may be caused during operations, which involve force
sufficient to move the vehicle (Fig.24).
If the vehicle is of considerable dimensions or weight.
Movement may lead to overload or unbalancing; all measures
must be taking to avoid such an occurrence.
Fig.24 Abb.24
27
RISQUES POUR LES PERSONNES
RISIKEN FÜR PERSONEN
RIESGOS PARA LAS PERSONAS
Ce chapitre décrit les risques auxquels sont exposés l'opérateur,
le technicien d'entretien et toute personne présente près de la
zone de fonctionnement de l'élévateur en cas d'utilisation
correcte.
In diesem Abschnitt sind die Risiken beschrieben, denen der Bediener, der Reparaturmechaniker und alle anderen Personen ausgesetzt sind, die sich bei nicht korrektem Gebrauch der Hebebühne in deren Wirkungskreis befinden.
Este párrafo ilustra los riesgos a los cuales están expuestos el
operador, el mecánico reparador o cualquier persona cerca del
área de funcionamiento del elevador en caso de que el equipo
se use incorrectamente.
RISQUE D'ÉCRASEMENT (OPÉRATEUR)
QUETSCHGEFAHR (BEDIENER)
RIESGO DE APLASTAMIENTO (OPERADOR)
Présent si l'opérateur qui contrôle l'élévateur ne se trouve pas
dans la position indiquée près du panneau de commande.
Quand la plate-forme et le véhicule sont en phase de descente,
l'opérateur ne doit jamais se trouver, pas même partiellement,
sous la structure en mouvement. Durant cette phase, l'opérateur
doit rester sur la zone de commande (fig. 21).
Zu einer solchen Gefahr kann es kommen, wenn die Hebebühne
sich nicht in der auf der Steuertafel spezifizierten Position befindet. Bei Absinken der Plattform und des Fahrzeugs darf der Bediener sich niemals teilweise oder vollständig unter der sich bewegenden Struktur befinden. Während dieser Phase muss der
Bediener sich am Steuerposten aufhalten (Abb. 20).
Puede ocurrir si el operador que controla el elevador no se encuentra en la posición especificada junto al panel de mando. Cuando la plataforma y el vehículo estén bajando, el operador nunca
debe encontrarse parcial o completamente debajo de la estructura en movimiento. Durante esta fase, el operador debe permanecer en la zona de mando (fig. 21).
RISQUE D'ÉCRASEMENT (PERSONNEL)
QUETSCHGEFAHR (PERSONAL)
RIESGO DE APLASTAMIENTO (PERSONAL)
Quand la plate-forme et le véhicule sont en phase de descente, il
est interdit d'accéder à la zone située sous les parties en mouvement de l'élévateur (fig. 22). L'opérateur ne doit entamer aucune
manœuvre s'il n'est pas certain qu'aucune personne ne se trouve
dans une position potentiellement dangereuse.
Bei Absinken der Plattform und des Fahrzeugs darf das Personal sich
niemals teilweise oder vollständig unter den sich bewegenden Teilen
der Hebebühne befinden (Abb. 21). Der Bediener darf die Hebebühne erst dann bewegen, nachdem er sichergestellt hat, dass
sich keine Personen in gefährlichen Bereichen aufhalten.
Cuando la plataforma y el vehículo estén bajando, el personal
tiene prohibido entrar al área debajo de las partes del elevador
que están en movimiento (fig. 22). El operador debe maniobrar
únicamente luego de haberse asegurado de que ninguna persona esté en posiciones peligrosas.
RISQUE D'IMPACT
STOSSGEFAHR
RIESGO DE IMPACTO
Exposent à ce risque, les parties de l'élévateur ou du véhicule situées à hauteur d'homme. Quand, pour des raisons de fonctionnement, l'élévateur est immobilisé à une hauteur relativement
basse (moins de 1,75 m du sol), le personnel doit veiller à éviter
les risques d'impact avec des parties de la machine sur lesquelles ne seraient présents aucun signal de danger (fig. 23).
Stoßgefahr geht von den Maschinenteilen oder den Fahrzeugteilen
aus, die sich auf Körperhöhe befinden. Wenn die Hebebühne aufgrund von Betriebsbedingungen in ziemlich niedriger Höhe gesperrt
ist (unter 1,75 m vom Boden), muss das Personal aufpassen, um
nicht gegen Maschinenteile zu stoßen, die nicht durch spezielle Warnfarben gekennzeichnet sind (Abb. 22).
Debido a partes del elevador o del vehículo situadas a la altura
de hombre. Cuando, por razones de funcionamiento, el elevador
quede inmovilizado a alturas relativamente bajas (menos de 1,75
m del suelo), el personal debe prestar atención para evitar golpearse con partes de la máquina que carezcan de marcas con
colores especiales que señalen el peligro (fig. 23).
GEFAHR DURCH VERRUTSCHEN DES
FAHRZEUGS
RIESGO DE DESPLAZAMIENTO DEL
VEHÍCULO
RISQUE INDUIT PAR LE MOUVEMENT DU
VÉHICULE
Exposent à ce risque, les opérations à effectuer qui exercent des
poussées sur le véhicule (fig. 22). Si le véhicule est de grandes
dimensions ou d'un grand poids, le mouvement peut conduire à
une surcharge ou à un déséquilibrage ; prendre toutes les mesures nécessaires pour éviter une telle éventualité.
28
Diese Gefahr entsteht durch Eingriffe, die einen Druck auf das
Fahrzeug ausüben (Abb. 23).
Wenn es sich um ein großes oder schweres Fahrzeug handelt.
könnte die Bewegung zu einer Überlastung oder zu einem
Ungleichgewicht führen. Alle Maßnahmen treffen, um solche
Probleme zu vermeiden.
Debido a operaciones que impliquen empujar el vehículo (fig.
22). Si el mismo tiene peso y dimensiones importantes, el movimiento podría implicar sobrecarga o desequilibrio; tomar todas
las medidas necesarias para evitar esta eventualidad.
RISCHIO DI CADUTA DEL VEICOLO DAL
SOLLEVATORE
RISK OF VEHICLE FALLING FROM LIFT
Che può essere causato dal posizionamento non corretto del veicolo
sui piattelli dei bracci, da un posizionamento non corretto del veicolo rispetto al sollevatore (fig.25) o da dimensioni del veicolo
non compatibili con lo stesso sollevatore..
This risk could be caused by the incorrect positioning on the arm
disk support plates (Fig.25) or in incorrect position of the arm
disk support plates in relation to the lift.
NON SALIRE MAI A BORDO DEL VEICOLO E/O ACCENDERE
IL MOTORE QUANDO IL SOLLEVATORE È ALZATO (FIG.26)
NEVER BOARD THE VEHICLE AND/OR TURN
THE ENGINE ON WHEN LIFT IS RAISED (FIG.26)
NON APPOGGIARE MAI OGGETTI ALLE COLONNE
O LASCIARLI NELL'AREA IN CUI VENGONO
ABBASSATE LE PARTI IN MOVIMENTO.
NEVER LEAN OBJECTS AGAINST THE POSTS
OR LEAVE THEM IN THE AREA WHERE
MOVING PARTS ARE LOWERED.
Questo potrebbe ostacolare l'abbassamento o causare la caduta
del veicolo (fig.27).
This could hamper lowering or cause the vehicle to fall from the
rack(Fig.27)
Fig.25 Abb.25
Fig.26 Abb.26
Fig.27 Abb.27
SCIVOLAMENTO
Tale rischio potrebbe presentarsi in caso di fuoriuscita di lubrificanti nell'area circostante.
MANTENERE PULITA L'AREA INTORNO AL SOLLEVATORE
RIMUOVENDO TUTTE LE FUORIUSCITE D'OLIO.
Per evitare il rischio di scivolamento, indossare la protezione personale raccomandata (calzature antinfortunistiche).
SLIPPING
This risk may arise due to spillage of lubricants in the surrounding area (Fig.28).
ALWAYS KEEP THE AREA SURROUNDING THE LIFT CLEAN
BY REMOVING ALL OIL SPILLS.
To avoid the risk of slipping, make use of the
recommended personal protection (anti-slip footwear)
Fig.28 Abb.28
29
RISQUE DE CHUTE DU VÉHICULE DE
L'ÉLÉVATEUR
GEFAHR DURCH ABSTÜRZEN DES FAHRZEUGS
VON DER HEBEBÜHNE
RIESGO DE CAÍDA DEL VEHÍCULO DESDE EL
ELEVADOR
Un tel risque peut être induit par un mauvais positionnement sur
les plaques de soutien des bras, par un mauvais positionnement
du véhicule par rapport à l'élévateur (fig. 25) ou par des dimensions du véhicule incompatibles avec l'élévateur.
Kann durch ein falsches Positionieren des Fahrzeugs auf den
Schwenkarmtellern, durch eine falsche Positionierung des Fahrzeugs bezüglich der Hebebühne (Abb. 24) oder durch nicht mit
der Hebebühne kompatible Abmessungen des Fahrzeugs verursacht sein.
Puede ser causado por la colocación incorrecta del vehículo
sobre los platillos de los brazos, por una colocación incorrecta
del vehículo con respecto al elevador (fig. 23) o porque las dimensiones del vehículo son incompatibles con el elevador.
NE JAMAIS MONTER À BORD DU VÉHICULE NI ALLUMER
LE MOTEUR QUAND L'ÉLÉVATEUR EST EN POSITION
D'ÉLÉVATION (FIG. 26)
BEI HOCHGEFAHRENER HEBEBÜHNE NIEMALS IN DAS
FAHRZEUG STEIGEN ODER DEN MOTOR ANLASSEN (ABB. 25)
NUNCA SUBIR AL VEHÍCULO Y/O ENCENDER EL MOTOR
CUANDO EL ELEVADOR ESTÉ ELEVADO (FIG. 26)
NE JAMAIS POSER D'OBJETS CONTRE LES
COLONNES NI LES LAISSER À HAUTEUR DE
LA ZONE VERS LAQUELLE LES PARTIES EN
MOUVEMENT S'ABAISSENT.
NIEMALS GEGENSTÄNDE AUF DIE SÄULEN
LEGEN ODER SOLCHE IN BEREICHEN
ZURÜCKLASSEN, IN DENEN DIE SICH
BEWEGENDEN MASCHINENTEILE ABGESENKT
WERDEN.
NUNCA APOYAR OBJETOS EN LAS
COLUMNAS NI DEJARLOS EN EL ÁREA DONDE
DESCIENDAN LAS PARTES EN MOVIMIENTO.
Ceci pourrait entraver l'abaissement ou causer la chute du véhicule (fig. 27).
Diese Gegenstände können den Absenkvorgang behindern oder
das Abstürzen des Fahrzeugs verursachen.
GLISSADE
AUSRUTSCHGEFAHR
e risque peut se présenter en cas de fuite de lubrifiants sur la
zone de travail.
Diese Gefahr kann bei Auslaufen von Schmierstoffen auftreten.
VEILLER À CE QUE LA ZONE AUTOUR DE L'ÉLÉVATEUR
RESTE PROPRE ET ÉLIMINER TOUTE TRACE D'HUILE.
DEN BEREICH UM DIE HEBEBÜHNE SAUBER HALTEN UND
AUSGELAUFENES ÖL SOFORT ENTFERNEN.
Pour éviter le risque de glissage, le personnel doit veiller au port
de chaussures de sécurité.
Zum Verhindern der Ausrutschgefahr die persönliche Schutzausrüstung verwenden (Unfallverhütungsschuhe).
30
Esto podría obstaculizar el descenso o causar la caída del vehículo (fig. 27).
RESBALAMIENTO
Este riesgo podría presentarse en caso de derrame de lubricantes en el área circundante.
MANTENER LIMPIA EL ÁREA ALREDEDOR DEL ELEVADOR
QUITANDO TODOS LOS DERRAMES DE ACEITE.
Para evitar el riesgo de resbalamiento, usar la protección personal recomendada (calzado de seguridad)
Fig.29 Abb.29
RISCHIO DI SHOCK ELETTRICO
RISK OF ELECTRIC SHOCK
Non usare getti d'acqua, vapore (unità di lavaggio ad alta pressione) e solventi o vernici nelle immediate vicinanze del sollevatore e prestare particolare attenzione a mantenere tali sostanze lontano sul pannello di comando elettrico.
Risk of electric shock in areas of the lift housing electric wiring. Do not
use jets of water, steam (high pressure wash units), and solvents Or
paint in the immediate vicinity of the lift, and take special care to keep
such substances clear off the electrical command panel (Fig.29).
RISCHIO DI GUASTO DI UN COMPONENTE
DURANTE IL FUNZIONAMENTO
RISK OF COMPONENT FAILURE DURING
OPERATION.
Il produttore ha fatto uso degli idonei materiali e tecniche di costruzione relative all'uso specificato della macchina al fine di
produrre un sollevatore affidabile e sicuro. Va tuttavia sottolineato che il sollevatore deve essere usato in conformità alle prescrizioni dei produttori e ci si deve attenere alla frequenza delle
ispezioni e dei lavori di manutenzione raccomandata nel
capitolo 6 "MANUTENZIONE".
The manufacturer has used appropriate materials and construction
techniques in relation to the specified use of the machine in order
to manufacture a reliable and safe lift. Note however, that the lift
must be used in conformity with the manufacturers prescriptions
and the frequency of inspections and maintenance work recommended in chapter 6 “MAINTENANCE” must be observed.
RISCHI CORRELATI AD UN USO IMPROPRIO
Fig.30Abb.30
RISK RELATED TO IMPROPER USE
Le persone non possono stare in piedi o sedute sulle piattaforme
durante la manovra del sollevatore o quando il veicolo è già sollevato (fig.30). Ogni utilizzo del sollevatore diverso da quelli per cui è
stato progettato potrebbe provocare seri incidenti alle persone che
lavorano nelle immediate vicinanze dell'unità. Pertanto è essenziale
attenersi scrupolosamente a tutte le norme che trattano l'uso, la manutenzione e la sicurezza contenute in questo manuale.
Persons are not permitted to stand or sit on the platforms during
the lift maneuver or when the vehicle is already lifted (Fig.30). All
uses of the lift other than the uses for which it was designed are
liable to give rise to serious accidents involving the persons working in the immediate vicinity of the unit.
It is therefore essential to adhere scrupulously to all regulations regarding use, maintenance and safety contained in this manual.
ISTRUZIONI DI SICUREZZA PER LA
MANUTENZIONE
SAFETY INSTRUCTIONS FOR SERVICING
1. I lavori di manutenzione o riparazione devono essere effettuati solo da personale autorizzato.
2. Spegnere e chiudere con un lucchetto l'interruttore principale prima di effettuare qualsiasi lavoro di manutenzione o riparazione.
3. Il lavoro su componenti elettrici o interruttori di prossimità deve
essere effettuato esclusivamente da personale autorizzato.
4. I lavori sulle apparecchiature elettriche devono essere effettuati esclusivamente da elettricisti qualificati
5. Non sostituire o bypassare i dispositivi di sicurezza.
6. Accertarsi che lo smaltimento delle sostanze pericolose per l'ambiente sia effettuato in modo conforme alle norme appropriate.
1. Maintenance or repair work by authorized service personnel only.
2.Turn off and padlock the main switch before doing any maintenance,or repair work.
3. Work on pulse generators or proximity switches by authorized
service personnel only.
4. Work on the electrical equipment by certified electricians only.
5. Do not replace or override the safety devices.
6. Ensure that ecologically harmful substances are disposed of
only in accordance with the appropriate regulations.
31
RISQUE D'ÉLECTROCUTION
STROMSCHLAGGEFAHR
RIESGO DE CHOQUE ELÉCTRICO
Les risques d'électrocution sont présents sur les zones de l'élévateur à hauteur desquelles se trouvent les câbles électriques.
Ne pas utiliser de jets d'eau, de vapeur (nettoyeur à haute pression), de solvants ni de peintures à proximité de l'élévateur et veiller à ce que ces substances restent à bonne distance du
panneau de commande électrique.
. Kein Wasser, Dampf (Hochdruckwascheinheit) und Lösemittel
oder Lacke in unmittelbarer Nähe der Hebebühne verwenden
und darauf achten, dass diese Stoffe nicht in die Nähe der elektrischen Steuertafel geraten.
. No usar chorros de agua, vapor (unidad de lavado a alta presión) ni solventes o pinturas en las inmediaciones del elevador y
prestar especial atención a mantener esas sustancias lejos del
panel de mando eléctrico.
RISQUE DE DOMMAGES CAUSÉS AUX
COMPOSANTS DURANT LE FONCTIONNEMENT
BRUCHGEFAHR EINES BAUTEILS WÄHREND DES
BETRIEBS
RIESGO DE AVERÍA DE UN COMPONENTE
DURANTE EL FUNCIONAMIENTO
L'élévateur est construit à l'aide de matériaux appropriés et dans le
respect de standards techniques conforme à l'utilisation prévue pour
garantir sécurité et fiabilité. Toutefois, l'élévateur doit être utilisé dans
le respect des instructions du constructeur, sans compter que doivent
être respectées les fréquences et les opérations d'entretien recommandées dans le chapitre 6 "ENTRETIEN".
Der Hersteller hat ausschließlich für den spezifischen Gebrauch
der Maschine geeignete Materialien und Bauverfahren verwendet, um eine sichere und zuverlässige Hebebühne zu fertigen.
Es muss jedoch unterstrichen werden, dass die Hebebühne in
Übereinstimmung mit den Vorschriften der Hersteller verwendet
werden muss und dass die in Kapitel 6 "WARTUNG" vorgeschriebene Häufigkeit der Inspektionen und Wartungsarbeiten
eingehalten werden muss.
El fabricante ha usado materiales idóneos y técnicas de fabricación correspondientes al uso especificado en la máquina para
producir un elevador confiable y seguro. Sin embargo, hay que
destacar que el elevador debe usarse conforme con las prescripciones de los fabricantes y que debe someterse a la frecuencia
de las inspecciones y de los trabajos de mantenimiento recomendados en el capítulo 6 "MANTENIMIENTO".
MIT EINEM UNSACHGEMÄSSEN GEBRAUCH
VERBUNDENE GEFAHREN
RIESGOS RELACIONADOS CON USOS
INAPROPIADOS
Die Personen dürfen nicht bei sich bewegender Hebebühne oder
bei bereits gehobenem Fahrzeug auf der Plattform stehen oder
sitzen (Abb. 30). Jeder von dem vorgesehenen Gebrauch abweichender Gebrauch der Hebebühne kann zu schweren Unfällen
und zur Verletzung der in unmittelbarer Nähe der Maschine arbeitenden Personen führen. Daher ist es von wesentlicher Bedeutung, alle in diesem Handbuch aufgeführten Vorschriften
bezüglich Gebrauch, Wartung und Sicherheit strikt zu befolgen.
Las personas no pueden estar paradas o sentadas en las plataformas durante la maniobra del elevador o cuando el vehículo ya
esté elevado (fig. 30). Todo uso del elevador distinto al que fuera
proyectado podría provocar serios accidentes a las personas
que trabajan cerca de la unidad. Por lo tanto, es esencial atenerse escrupulosamente a todas las normas contenidas en este
manual referentes al uso, al mantenimiento y a la segur
RISQUES INDUITS PAR UNE UTILISATION
IMPROPRE
Aucune personne ne doit rester debout ou assise sur les plates-formes durant l'actionnement l'élévateur ni quand le véhicule est déjà
soulevé (fig. 30). Toute utilisation de l'élévateur autre que celle pour
laquelle il a été conçu peut causer des accidents graves aux personnes présentes à proximité de l'unité. Il est par conséquent essentiel
de veiller au respect de toutes les instructions d'utilisation, d'entretien
et de sécurité indiquées dans le présent manuel.
INSTRUCTIONS DE SÉCURITÉ POUR
L'ENTRETIEN
1. Les interventions d'entretien ou de réparation doivent être effectuées uniquement par un personnel autorisé à cet effet.
2. Placer sur la position OFF et verrouiller l'interrupteur principal
avant d'effectuer toute intervention d'entretien ou de réparation.
3. Les interventions effectuées sur des composants électriques
ou des interrupteurs de proximité doivent être confiées uniquement à un personnel autorisé à cet effet.
4. Les interventions sur les appareillages électriques doivent être
effectués uniquement par des électriciens qualifiés.
5. Ne pas changer ni mettre en by-pass les dispositifs de sécurité.
6. S'assurer que l'élimination des substances dangereuses pour l'environnement est effectuée dans le respect des normes en vigueur.
32
SICHERHEITSANWEISUNGEN FÜR DIE WARTUNG
1. Die Wartungs- und Reparaturarbeiten dürfen nur von zugelassenem Fachpersonal durchgeführt werden:
2. Den Hauptschalter vor der Durchführung jeglicher Wartungs- und
Reparaturarbeiten ausschalten und mit einem Vorhängeschloss absichern.
3. Arbeiten an den elektrischen Bauteilen oder an Näherungsschaltern dürfen nur von autorisiertem Personal durchgeführt werden.
4. Die Arbeiten an den elektrischen Geräten dürfen nur von qualifizierten Elektrikern durchgeführt werden.
5. Keine Sicherheitsvorrichtung ausschließen oder unwirksam machen.
6. Sicherstellen, dass die Entsorgung umweltschädlicher Stoffe
vorschriftsgemäß erfolgt.
INSTRUCCIONES DE SEGURIDAD PARA EL
MANTENIMIENTO
1. Los trabajos de mantenimiento o de reparación deben ser realizados sólo por personal autorizado.
2. Apagar y cerrar con un candado el interruptor principal antes
de realizar cualquier trabajo de mantenimiento o reparación.
3. El trabajo en componentes eléctricos o interruptores de proximidad debe ser realizado exclusivamente por personal autorizado.
4. Los trabajos en los equipos eléctricos deben ser realizados
exclusivamente por electricistas calificados
5. No sustituir ni eludir los dispositivos de seguridad.
6. Asegurarse de que las sustancias peligrosas para el ambiente
sean eliminadas conforme con las normas correspondientes.
CAPITOLO 4 INSTALLAZIONE
LE SEGUENTI OPERAZIONI DEVONO ESSERE EFFETTUATE
ESCLUSIVAMENTE DA PERSONALE TECNICO SPECIALIZZATO
MUNITO DI AUTORIZZAZIONE DA PARTE DEL PRODUTTORE O
DEL RIVENDITORE AUTORIZZATO. NEL CASO IN CUI QUESTE
OPERAZIONI VENGANO EFFETTUATE DA ALTRE PERSONE,
POSSONO RISULTARNE LESIONI PERSONALI E/O DANNI
IRREPARABILI AL SOLLEVATORE.
LISTA DI VERIFICA DEI REQUISITI DI
INSTALLAZIONE
Fig.31 Abb.31
CHAPTER 4 INSTALLATION
THE FOLLOWING OPERATIONS MUST BE PERFORMED
EXCLUSIVELY BY SPECIALISED TECHNICAL STAFF WITH
AUTHORISATION FROM THE MANUFACTURER OR LICENSED
DEALER. IF THESE OPREATIONS ARE PERFORMED BY
OTHER PERSONS, SERIOUS PERSONAL INJURY AND/OR
IRREPERABLE DAMAGE TO THE LIFT UNIT MAY RESULT.
INSTALLATION REQUISITE CHECKLIST
Il sollevatore è progettato per essere installato in aree chiuse e adeguatamente protette dalle intemperie. Il luogo di installazione deve essere ben
lontano dalle aree destinate al lavaggio o alla verniciatura e lontano dalle
aree di deposito di solventi o vernici o dalle aree in cui ci sia un rischio di
atmosfere potenzialmente esplosive.
The lift is designed for installation in enclosed areas suitably protected
from the weather. The place of installation must be well clear of areas destined to washing or painting, and away from solvent or paint storage areas or areas where there is a risk of potentially explosive atmosphere.
ADEGUATEZZA DELLE DIMENSIONI DELLO
SPAZIO DI INSTALLAZIONE E DISTANZE DI
SICUREZZA
SUITABILITY OF THE DIMENSIONS OF THE
PLACE OF INSTALLATION AND SAFETY
CLEARANCE.
Il sollevatore deve essere installato in osservanza delle distanze da muri,
colonne, altre macchine, ecc. indicate nella fig.31 e in ottemperanza a
qualsiasi requisito legislativo del paese d'installazione.
The lift must be installed in observance of the clearances between walls,
pillars, other machines, etc. indicated in Figure 31 and incompliance with
any legislative requirements in the county of installation.
Verificare particolarmente:
1.Altezza minima: 5000mm inclusa l'altezza del veicolo, altezza
massima dei bracci (ovvero 1900mm) e altezza superiore della
colonna (ovvero 2828mm)
2.distanza minima dai muri: 600mm
3.Area di lavoro minima: 700mm
4.Area della postazione di comando
5.Area per manutenzione, vie di accesso e di evacuazione di
emergenza
6.Posizione in relazione ad altre macchine
7.Vicinanza alla linea di corrente per un allacciamento corretto
Check in particular:
1. Minimum height: 5000mm inclusive of height of vehicle, maximum height of arms,( i.e. 1900mm),
and upper post height (i.e.2828mm)
2. minimum distance from walls: 600mm
3. Minimum working area: 700mm
4. Area for command station
5. Area for maintenance, access and emergency escape routes.
6. Position in relation to other machines
7. Proximity to power supply for trouble-free hook-up
Fig.32 Abb.32
ILLUMINAZIONE
Tutte le parti della macchina devono essere illuminate con luce sufficiente per
garantire che le operazioni di regolazione e manutenzione specificate nel manuale possano essere eseguite, e senza zone d'ombra, luce riflessa, bagliore
ed evitando ogni situazione che potrebbe provocare affaticamento degli occhi.
L'illuminazione deve essere installata in ottemperanza alle leggi in vigore
nella località dell'installazione (la responsabilità viene assunta dall'installatore di equipaggiamento elettrico).
PAVIMENTO
Il sollevatore deve essere installato su un piano orizzontale di cemento con uno
spessore minimo di 200mm e una resistenza =30N/mm2.
Il pavimento deve anche essere piano e livellato (10mm di tolleranza per il livellamento). Consultare il produttore per quanto riguarda applicazioni speciali.
LIGHTNING
All parts of the machine must be uniformly lit with sufficient light to assure
that the adjustment and maintenance operations specified in the manual
can be performed, and without areas of shadow reflected light, glare and
avoiding all situations that could give rise to eye fatigue.
The lighting must be installed in accordance with the laws in force in the
place of installation (responsibility lies with the lighting equipment fitter)
FLOOR
The lift must be installed on a horizontal concrete bed with a minimum
thickness of 200mm built and a resistance 30N/mm2
The floor must also be flat and level (10mm of tolerance for leveling). Consult
the manufacturer with regard to special applications
Fig.32aAbb.32a
33
CHAPITRE 4 INSTALLATION
KAPITEL 4 INSTALLATION
CAPÍTULO 4 INSTALACIÓN
LES OPÉRATIONS DÉCRITES PLUS BAS DOIVENT ÊTRE
EFFECTUÉES EXCLUSIVEMENT PAR UN PERSONNEL
TECHNIQUE QUALIFIÉ ET AUTORISÉ À CET EFFET PAR LE
CONSTRUCTEUR OU PAR LE REVENDEUR AGRÉÉ.
EFFECTUÉES PAR TOUTE AUTRE PERSONNE, CES
OPÉRATIONS PEUVENT CAUSER DES BLESSURES ET/OU
DES DOMMAGES IRRÉPARABLES À L'ÉLÉVATEUR.
FOLGENDE ARBEITEN DÜRFEN NUR VON TECHNISCHEM
FACHPERSONAL DURCHGEFÜHRT WERDEN, DAS VOM
HERSTELLER ODER VERTRAGSHÄNDLER AUTORISIERT
WURDE. WENN DIESE ARBEITEN VON ANDEREN
PERSONEN DURCHGEFÜHRT WERDEN, KANN ES ZU
PERSONENSCHÄDEN UND/ODER ZU IRREPARABLEN
SCHÄDEN AN DER HEBEBÜHNE KOMMEN.
LAS SIGUIENTES OPERACIONES DEBEN SER REALIZADAS
EXCLUSIVAMENTE POR PERSONAL TÉCNICO
ESPECIALIZADO PROVISTO DE AUTORIZACIÓN DEL
FABRICANTE O DEL REVENDEDOR AUTORIZADO. EN CASO
DE QUE ESTAS OPERACIONES FUERAN REALIZADAS POR
OTRAS PERSONAS, PODRÍAN RESULTAR COMO
CONSECUENCIA LESIONES PERSONALES Y/O DAÑOS
IRREPARABLES AL ELEVADOR.
LISTE DE CONTRÔLE DES STANDARDS
D'INSTALLATION
KONTROLLLISTE DER
INSTALLATIONSANFORDERUNGEN
4.1 LISTA DE CONTROL DE LOS REQUISITOS
DE INSTALACIÓN
L'élévateur est conçu pour être installé à un endroit clos à l'abri
des intempéries. Le lieu d'installation doit être distant des zones
de lavage et de peinture ainsi que des zones de stockage de solvants et de peintures et des zones dont l'atmosphère est
potentiellement explosive.
Die Hebebühne wurde für die Installation in geschlossenen Räumen, die vor Witterungseinflüssen geschützt sind, entwickelt und
gebaut. Der Aufstellort darf sich nicht in der Nähe von Waschund Lackieranlagen oder Lagerbereichen für Lösemittel oder
Lacke befinden. Ferner darf er nicht in der Nähe von Bereichen
mit potentiell explosionsgefährdeter Atmosphäre liegen.
El elevador está proyectado para ser instalado en áreas cerradas y convenientemente protegidas de la intemperie. El lugar de
instalación debe estar lejos de las áreas destinadas al lavado o a
la pintura y alejado de las áreas de depósito de solventes o pinturas o de áreas en las cuales exista riesgo de atmósferas
potencialmente explosivas.
EIGNUNG DER GRÖSSE DES AUFSTELLORTES
UND SICHERHEITSABSTÄNDE
ADAPTACIÓN DE LAS DIMENSIONES DEL
ESPACIO DE INSTALACIÓN Y LAS DISTANCIAS DE
SEGURIDAD
DIMENSIONS DE LA ZONE D'INSTALLATION ET
DISTANCES DE SÉCURITÉ
L'élévateur doit être installé dans le respect de distances par rapport aux murs, colonnes, autres machines, etc., indiquées sur la
figure 31 et dans le respect de toutes les prescriptions en vigueur dans le pays d'installation.
Contrôler en particulier :
1.Hauteur minimum : 5000 mm en incluant hauteur du véhicule,
hauteur maximum des bras (1900 mm) et hauteur supérieure de
la colonne (2828 mm)
2.distance minimum par rapport aux murs : 600 mm
3.Zone de travail minimum: 700 mm
4.Zone du poste de commande
5.Zone pour entretien, voies d'accès et issue de secours
6.Position par rapport à d'autres machines
7.Proximité de ligne de courant pour garantir un bon branchement
ÉCLAIRAGE
Beim Aufstellen der Hebebühne ist der auf Abb. 31 angegebene
Abstand zu Mauern, Säulen, anderen Maschinen usw. einzuhalten.
Außerdem sind die einschlägigen Gesetze im Aufstellland zu befolgen.
Insbesondere ist zu überprüfen:
1.Mindesthöhe: 5000mm einschließlich Fahrzeughöhe, max.
Schwenkarmhöhe (d.h. 1900mm) und obere Höhe der Säule
(d.h. 2828mm)
2.Mindestabstand von den Wänden: 600mm
3.Mindestgröße des Arbeitsbereichs: 700mm
4.Bedienerposten
5.Wartungsbereich, Zugangswege und Fluchtwege
6.Position zu anderen Maschinen
7.Nähe zum Stromnetz zwecks korrekten Anschlusses
El elevador debe instalarse acatando las distancias a las paredes, columnas, otras máquinas, etc., indicadas en la fig. 31 y
cumpliendo cualquier requisito legislativo del país de instalación.
Controlar especialmente:
1.Altura mínima: 5.000 mm incluyendo la altura del vehículo, altura máxima de los brazos (o sea 1.900 mm.) y altura superior
de la columna (o sea 2.828 mm.)
2.distancia mínima a las paredes: 600 mm
3.Área de trabajo mínima: 700 mm
4.Área del puesto de mando
5.Área para mantenimiento, vías de acceso y de evacuación de
emergencia
6.Posición con relación a otras máquinas
7Cercanía a la línea de corriente para una conexión correcta
Toutes les parties de la machine doivent être correctement éclairées
de telle sorte qu'il soit possible d'effectuer dans de bonnes conditions
les opérations de réglage et d'entretien indiquées dans le manuel ; il
est nécessaire d'éviter les zones d'ombre, les reflets et les éblouissements et autres susceptibles de fatiguer les yeux.
L'éclairage doit être conforme à la réglementation en vigueur sur
le lieu d'installation (l'installateur est responsable des équipements électriques).
BELEUCHTUNG
Alle Maschinenteile müssen ausreichend beleuchtet sein, damit
die im Handbuch beschriebenen Einstell- und Wartungsarbeiten
ohne dunkle Bereiche, blendendes Licht und die Augen
ermüdende Umstände durchgeführt werden können.
Die Beleuchtung muss den im Aufstellland geltenden gesetzlichen Vorschriften entsprechen (die Verantwortung trägt der
Installateur der elektrischen Ausrüstung).
ILUMINACIÓN
SOL
BODEN
L'élévateur doit être installé sur un sol plat en ciment d'une épaisseur
minimum de 200 mm et d'une résistance =30N/mm2.Le sol doit également être plat et nivelé (10 mm de tolérance pour le nivellement).
Consulter le constructeur pour toute application spéciale.
Die Hebebühne muss auf einer horizontalen Ebene aus Beton mit einer Mindestdicke von 200 mm und einem Widerstand von ³30N/mm2
aufgestellt werden.Der Boden muss auch eben und nivelliert sein (10
mm Nivellierungstoleranz). Den Hersteller bezüglich Spezialanwendungen kontaktieren.
PISO
34
Todas las partes de la máquina deben tener suficiente iluminación para
garantizar que las operaciones de regulación y mantenimiento especificadas en el manual puedan realizarse, no deben tener zonas en sombra, luz
reflejada, resplandor, evitando toda situación que pueda provocar cansancio ocular. La iluminación debe instalarse cumpliendo todas las leyes vigentes en la localidad de instalación (la responsabilidad debe ser asumida
por el instalador del equipamiento eléctrico).
El elevador debe ser instalado en un plano horizontal de cemento con un
espesor mínimo de 200 mm y una resistencia =30 N/mm2.
El piso también debe ser plano y nivelado (10 mm de tolerancia en la nivelación). Consultar con el fabricante respecto de las aplicaciones especiales.
ASSEMBLING
ASSEMBLAGGIO
IWARNING
IATTENZIONE
DURANTE L'INSTALLAZIONE È PERMESSO L'ACCESSO
SOLO A PERSONALE AUTORIZZATO
DURING INSTALLATION ONLY AUTHORISED PERSONNEL
IS ALLOWED
Per assemblare il sollevatore, deve essere tenuto in considerazione il peso delle varie parti, al fine di fornire una macchina sollevatrice con la portata minima di 500kg.
Altezza di sollevamento massima 2900mm.
Prima di iniziare ad assemblare il sollevatore, verificare che la
cassa contenga tutto il materiale necessario.
To assemble the lift, the weight of the various parts is to be considered, in order to provide a lifting machine with the minimum
capacity 500kg
Max. Lifting height 2900mm
Before starting to assemble the lift, check the crate contains all
the needed material.
Fig.33 Abb.33
COLLOCARE IL TELAIO
PUT CHASSIS
1. Put the chassis and fixed plate according to Fig.32 (see Fig. 33).
2. Install both boards on the bases, keep the main column upright,
and put the stiffs which are no less than 100mm on the upside for the
convenience of installing the safety device, cable, hose and wire.
3. Install the safety devices including electromagnet, automatic locking board and hock board inner both columns. (refer to Fig.34) The
first step should install the safety devices under both columns.
4. Install the balance cable according to Fig.35. The cable also can be
crossed from the hole on the board before the fixing of both columns.
5. Connect the high-pressure hose according to Fig.36. First connect
the hose with tri-joint under the main column and the bend under the
sub-column. Fix them after upright the columns.
Fig.34 Abb.34
1.Collocare il telaio e la piastra fissa in base alla fig.32 (vedere fig.33).
2.Installare entrambi i pannelli sulle basi, mantenere la colonna
principale in posizione verticale e collocare le parti rigide non inferiori a 100mm sulla parte superiore per rendere più semplice
l'installazione del dispositivo di sicurezza, cavo, tubo e filo.
3.Installare i dispositivi di sicurezza incluso l'elettromagnete, il pannello di blocco automatico e il pannello di attacco all'interno di entrambe
le colonne. (far riferimento alla fig.34). La prima fase è l'installazione
dei dispositivi di sicurezza sotto entrambe le colonne.
4.Installare il cavo di equilibratura in base alla fig.35. Il cavo può essere incrociato anche dal foro sul pannello prima di fissare entrambe le
colonne.
5.Connettere il tubo ad alta pressione in base alla fig.36. Per prima
cosa connettere il tubo con il giunto triplo sotto la colonna principale e
la parte curva sotto la sottocolonna. Fissarli dopo aver raddrizzato le
colonne
.
Fig.35 Abb.35
35
ASSEMBLAGE
IAVIS
ZUSAMMENBAU
IHINWEIS
ENSAMBLAJE
IAVISO
DURANT L'INSTALLATION, SEUL L'ACCÈS DU PERSONNEL
AUTORISÉ EST ADMIS
BEI DER MONTAGE IST DER ZUGANG NUR
AUTORISIERTEM PERSONAL ERLAUBT
DURANTE LA INSTALACIÓN SÓLO SE PERMITE EL
ACCESO AL PERSONAL AUTORIZADO
Pour assembler l'élévateur, il est nécessaire de tenir compte du
poids des différentes parties et d'utiliser un chariot élévateur d'une portée minimum de 500 kg.
Hauteur maximum de levage 2900 mm.
Avant d'entamer l'assemblage de l'élévateur, s'assurer que la caisse contient tout le matériel nécessaire.
Beim Zusammenbau der Hebebühne ist das Gewicht der verschiedenen Bauteile zu berücksichtigen, um eine Hebemaschine
mit Mindesttragfähigkeit von 500 kg zu erhalten.
Maximale Hebehöhe 2900mm.
Bevor mit dem Zusammenbau der Hebebühne begonnen wird,
ist sicherzustellen, dass die Kiste das gesamte erforderliche Material enthält.
Para ensamblar el elevador, debe considerarse el peso de las diferentes piezas, y disponer de una máquina elevadora con capacidad mínima de 500 kg.
Altura máxima de elevación 2.900 mm.
Antes de comenzar a ensamblar el elevador, controlar que la
caja contenga todo el material necesario.
POSITIONNEMENT DU CHÂSSIS
1.Positionner le châssis et la plaque fixe en faisant référence à la fig.
32 (voir fig. 33).
2.Installer les deux panneaux sur les bases, maintenir la colonne
principale en position verticale et placer les parties rigides non
inférieures à 100 mm sur la partie supérieure pour faciliter l'installation du dispositif de sécurité, du câble, du tuyau et du fil.
3.Installer les dispositifs de sécurité, électro-aimant compris, le panneau de blocage automatique et le panneau de fixation à l'intérieur
des deux colonnes (faire référence à la fig. 34). La première phase
est celle de l'installation des dispositifs de sécurité sous les deux colonnes.
4.Installer le câble d'équilibrage en faisant référence à la fig.
35. Le câble être croisé sur le trou du panneau avant de fixer
les deux colonnes.
5.Raccorder en premier le tuyau à haute pression en faisant référence à la fig. 36. Raccorder en premier le tuyau à joint triple
sous la colonne principale et la partie courbe sous l'élément inférieur de la colonne. Les fixer après avoir redressé les colonnes.
ANORDNEN DES RAHMENS
COLOCAR EL ARMAZÓN
1.Colocar el armazón y la placa fija según la fig. 32 (ver fig. 33).
2.Instalar ambos paneles en las bases, mantener la columna
principal en posición vertical y colocar las partes rígidas no menores de 100 mm. en la parte superior para instalar más fácilmente el dispositivo de seguridad, el cable, el tubo y el cableado.
3.Instalar los dispositivos de seguridad incluido el electroimán, el
panel de bloqueo automático y el panel de unión dentro de ambas columnas. (ver fig. 34). La primera fase es la instalación de
los dispositivos de seguridad debajo de ambas columnas.
4.Instalar el cable de equilibrio según la fig. 35. El cable puede
estar cruzado también por el orificio en el panel antes de fijar
ambas columnas.
5.Conectar el tubo de alta presión según la fig. 36. Conectar primero el tubo con la rótula triple debajo de la columna principal y
la parte curva debajo de la parte inferior de la columna. Fijarlos
después de haber enderezado las columnas.
CONEXIÓN DE LA INSTALACIÓN ELÉCTRICA
36
6.Far passare i cavi usati per collegare gli elettromagneti al tubolare del basamento.
7.Reggere entrambe le colonne (mantenere il carrello bloccato
allo stesso livello) e, quindi, fissare i bulloni sulla base.
8.Installare i dispositivi di sicurezza.
9.Regolare entrambi i cavi e mantenere il carrello equilibrato.
10.Avvitare il giunto del tubo ad alta pressione e fissarlo sulla base.
6. Cross the wires which are using to connect the electromagnet
on the sub-column from the hole on both bases.
7. Hold up both columns (keep the carriage lock and in the same
level), and then fix the bolts on the base.
8. Install the safety devices.
9. Adjust both cables and keep the carriage in balance.
10. Screw the joint of the high-pressure hose and fix it on the base.
IMPIANTO IDRAULICO
Fig.36 Abb.36
1.Fissare supporto centralina alla colonna motore e installare la
centralina su tale supporto(fig.37).
2.Connettere l'unità idraulica al circuito tramite un tubo flessibile
(fig.38).
3.Serrare molto bene tutti i raccordi, anche quelli già montati dal costruttore.
4.Riempire il serbatoio dell'unità idraulica con 8 litri di olio idraulico ISO 32 come IP HYDRUS OIL 32, SHELL TELLUS OIL T32 o
simile (vedere capitolo 2, Specifiche tecniche).
5.Rimuovere il tappo d'introduzione dell'olio e sostituirlo con il
tappo di drenaggio fornito.
HYDRAULIC PLANT
1. Install the pump on the hock board according to Fig.37 and fix
it on the bottom of main column.
2. Connect the hydraulic unit to the circuit crossing with a flexible pipe
(Fig.38).
3. Tight all the fittings very well, even the one already mounted by the
manufacturer.
4. Full the hydraulic unit tank with 8 liters of hydraulic oil ISO 32
as IP HYDRUS OIL 32, SHELL TELLUS OIL T32 or similar (See
Ch.2, Technical specifications).
5. Remove the oil filling cap and substitute it with the given drain cap.
.
Fig.37 Abb.37
Fig.38 Abb.38
36
6.Hacer pasar los cables usados para conectar los electroimanes al tubo de la base.
7.Sostener ambas columnas (mantener el carro bloqueado al mismo nivel) y luego fijar los pernos en la base.
8.Instalar los dispositivos de seguridad.
9.Regular ambos cables y mantener el carro equilibrado.
10.Enroscar el acoplamiento del tubo de alta presión y fijarlo en
la base.
6.Faire passer les cables utilisés pour brancher les électro-aimants à l'élément tubulaire de la base.
7.Soutenir les deux colonnes (et maintenir le chariot bloqué au
même niveau) puis fixer les boulons sur la base.
8.Installer les dispositifs de sécurité.
9.Régler les deux câbles et maintenir le chariot équilibré.
10.Visser le joint du tuyau à haute pression et le fixer à la base.
CIRCUIT HYDRAULIQUE
HYDRAULIKANLAGE
1.Fixer le support du groupe à la colonne du moteur et installer le
groupe sur ce support (Fig. 37).
2.Brancher l'unité hydraulique au circuit par l'intermédiaire d'un
tuyau flexible (Fig. 38).
3.Bien serrer tous les raccords, y compris ceux déjà montés par
le constructeur.
4.Remplir le réservoir de l'unité hydraulique avec 8 litres d'huile
hydraulique ISO 32 de type IP HYDRUS OLE 32, SHELL
TELLUS OLE T32 ou équivalente (voir chap. 2, Caractéristiques
techniques).
5.Retirer le bouchon d'introduction d'huile et le remplacer par le
bouchon de drainage fourni à cet effet.
1.Die Steuereinheitshalterung an der Antriebssäule befestigen
und die Steuereinheit an dieser Halterung installieren (Abb. 41).
2.Die Hydraulikeinheit mittels eines Schlauchs mit dem Kreislauf
verbinden (Abb. 40).
3.Alle Anschlussstücke gut festziehen, auch die bereits vom Hersteller montierten Anschlüsse.
4.Den Tank der Hydraulikeinheit mit 8 Liter Hydrauliköl ISO 32
wie IP HYDRUS OIL 32, SHELL TELLUS OIL T32 oder gleichwertig (siehe Kapitel 2, Technische Spezifikationen).
5.Den Öleinfüllstopfen entfernen und durch den beigestellten
Ablassstopfen ersetzen
37
INSTALACIÓN HIDRÁULICA
1.Fijar el soporte de la centralita a la columna motor e instalar la
centralita en ese soporte (fig. 37).
2.Conectar la unidad hidráulica al circuito mediante un tubo flexible (fig. 38).
3.Ajustar muy bien todos los racores, aún los que ya fueron montados por el fabricante.
4.Llenar el depósito de la unidad hidráulica con 8 litros de aceite
hidráulico ISO 32 como IP HYDRUS OIL 32, SHELL TELLUS
OIL T32 o similar (ver capítulo 2, Especificaciones técnicas).
5.Sacar la tapa de introducción del aceite y sustituirla por la tapa
de drenaje suministrada.
CONNESSIONE DELL'IMPIANTO ELETTRICO
IAVVISO
Fig.39 Abb.39
ELECTRIC PLANT CONNECTION
IWARNING
Le operazioni elencate qui di seguito devono essere effettuate
da personale esperto.
The operations listed below must be performed by skilled personnel
1)Prima di connettere il sistema elettrico, assicurarsi che:
1.L'impianto elettrico fornito con il sollevatore sia equipaggiato
con il dispositivo di protezione richiesto dagli standard correnti
del paese dove la macchina viene installata.
2.La linea di alimentazione elettrica ha le seguenti sezioni trasversali:
Voltaggio del sollevatore 400V, trifase….........…minimo 2,5mm2
Voltaggio del sollevatore 230V, trifase……………minimo 4mm2
Voltaggio del sollevatore 230V, monofase………..minimo 6mm2
3.Le oscillazioni del voltaggio rientrano nella gamma di tolleranza
fornita dalle specifiche.
Il produttore fornisce il sollevatore per funzionare a 400V con
una configurazione trifase; se il voltaggio della linea è differente,
il motore e la connessione a trasformatore vanno cambiati
(fig.39); è inoltre necessario sostituire il relè termico richiedendo
tale parte al costruttore e/o al centro assistenza.
1) Before connecting the electric system, make sure that:
1. The power supply plant to the lift is equipped with the protection device required by current standards in the country where
the machinery is installed.
2. The power supply line has the following cross-section:
Lift voltage 400V, three-phase………............…minimum 2.5mm2
Lift voltage 230V, three-phase……………………minimum 4mm2
Lift voltage 230V, single-phase……………………minimum 6mm2
3. The voltage oscillations are within the tolerance range set forth
by the specifications.
The manufacturer supplies the rack to operate at 400V with a
three-phase configuration; if the line voltage is different, the motor and transformer connection must be changed (Fig.39) it is
also necessary to replace the thermal relay requesting that part
from the manufacture and/or service center.
2)Connettere l'alimentazione e il sistema di controllo alla morsettiera
sul quadro di controllo (fig.40) inserendo il cavo nella struttura passando per il foro predisposto e seguendo lo schema del cablaggio a
pagina 13.
1.Installare il quadro elettrico sulla colonna principale.
2.Connettere gli interruttori di fine corsa.
3.Completare la connessione della valvola a solenoide (sull'unità
idraulica).
4.Connettere gli elettromagneti.
5.Connettere il motore elettrico.
6.Completare le connessioni di alimentazione alla morsettiera
del pannello di comando.
2) Connect the power and control system to the terminal strip on the
control box(Fig.40), inserting the cable into the rack passing through
the prepared hole and following the wiring diagram on pages 13.
1. Install the electric box on the main column.
2. Connection the limit switches.
3. Complete the solenoid valve (on the hydraulic unit) connection.
4. Connection the electromagnets.
5. Connect the electric motor.
6. Complete the voltage and command connections to the control panel clamp box.
3)Chiudere il coperchio del quadro elettrico, ruotare l'interruttore
principale nella posizione 1, premere il pulsante di sollevamento
(fig.40); il verso di rotazione del motore dovrebbe essere quello
mostrato dalla freccia sulla pompa.
3) Close the cover of the electric box, turn the main switch to position 1, press the up push button (Fig.40) ,The motor rotation
wise should be the one shown by the arrow on the pump
IATTENZIONE: Se la pompa ruota
a lungo nel verso sbagliato può
subire seri danni.
4)Accertarsi che i finecorsa di estremità nelle colonne funzionino
appropriatamente premendoli manualmente
IBEWARE: The pump rotating for a
long time in the wrong sense may
cause itself serious damages.
4) Make sure that the post end limit switches work properly by
pressing them manually..
Fig.40 Abb.40
38
BRANCHEMENT DU CIRCUIT ÉLECTRIQUE
IAVIS
ANSCHLUSS DER ELEKTRISCHEN ANLAGE
IHINWEIS
Les opérations décrites ci-dessous doivent être
effectuées par un personnel qualifié.
Die hier aufgeführten Arbeiten müssen von Fachpersonal ausgeführt werden.
1)Avant de brancher le circuit électrique, s'assurer que:
1.le circuit électrique d'alimentation de l'élévateur est équipé du dispositif de protection requis par les standards en vigueur dans le pays où
l'élévateur est installé.
2.la ligne d'alimentation électrique doit présenter les sections suivantes :
Voltage de l'élévateur 400V, triphasé................minimum 2,5 mm²
Voltage de l'élévateur 230V, triphasé.................minimum 4 mm²
Voltage de l'élévateur 230V, monophasé............minimum 6 mm²
3.les oscillations du voltage respectent les tolérances indiquées dans
les caractéristiques.
L'élévateur est fourni pour fonctionner avec une alimentation de 400V
triphasée ; si le voltage de la ligne est différent, le moteur et le branchement au transformateur doivent être modifiés (Fig. 39) ; il est par
ailleurs nécessaire de changer le relais thermique en faisant la demande de cette partie au constructeur et/ou au centre d'assistance.
1)Vor dem Anschluss der elektrischen Anlage kontrollieren,
dass:
1.Die mit der Hebebühne gelieferte elektrische Anlage mit der
von den Gesetzen des Landes, in dem die Maschine aufgestellt
wird, vorgeschriebenen Schutzvorrichtung ausgestattet ist.
2.Die Stromversorgungsleitung hat folgende Querschnitte:
Hebebühnenspannung 400V, Drehstrom…..mindestens 2,5mm2
Hebebühnenspannung 230V, Drehstrom…....mindestens 4mm2
Hebebühnenspannung 230V, Einphasenstro.......mindestens 6mm2
3.Die Spannungsschwankungen fallen unter die in den Spezifikationen angegebenen Toleranzwerte.
Der Hersteller liefert die Hebebühne für den Betrieb bei 400V mit
einer Drehstromkonfiguration. Bei einer abweichenden Leitungsspannung müssen der Motor und der Transformatoranschluss ausgewechselt werden (Abb. 39). Es ist ferner notwendig, das Thermorelais auszuwechseln. Das neue Thermorelais kann über den Hersteller und/oder das Kundendienstcenter
bezogen werden.
2)Die Stromversorgung und das Kontrollsystem an das Klemmenbrett
der Steuertafel anschließen (Abb. 40), indem das Kabel in durch den
entsprechenden Kabeldurchgang in die Struktur eingeführt wird. Dabei den Verkabelungsplan auf Seite 13 befolgen.
1.Den Schaltschrank an der Hauptsäule installieren.
2.Die Endanschlagschalter anschließen.
3.Den Anschluss des Solenoidventils (an der Hydraulikeinheit)
fertigstellen.
4.Die Elektromagneten anschließen.
5.Den Elektromotor anschließen.
6.Die Anschlüsse an das Klemmenbrett der Steuertafel fertigstellen.
3)Die Abdeckung des Schaltschranks schließen, den Hauptschalter auf 1 drehen, die Hebetaste drücken (Abb. 40); die
Drehrichtung des Motors muss mit der durch den Pfeil auf der
Pumpe angezeigten Richtung übereinstimmen.
2)Brancher l'alimentation et le système de contrôle au bornier du tableau de contrôle (Fig. 40), en introduisant le câble dans la structure
en le faisant passer par le trou prévu à cet effet en suivant le schéma
du câblage de la page 13.
1.Installer le tableau électrique sur la colonne principale.
2.Brancher les interrupteurs de fin de course.
3.Compléter le raccordement de la vanne à solénoïde (sur l'unité
hydraulique).
4.Brancher les électroaimants.
5.Brancher le moteur électrique.
6.Compléter les branchements d'alimentation et de commande
sur le bornier du panneau de commande.
3)Fermer le couvercle du tableau électrique, placer l'interrupteur
principal sur la position 1, appuyer sur le bouton de levage (Fig.
40) ; le sens de rotation du moteur doit correspondre à celui indiqué par la flèche présente sur la pompe.
IATTENTION : faire tourner longuement la pompe dans le mauvais
sens peut l'endommager gravement.
4)S'assurer que les fins de course présentes dans les colonnes
fonctionnent correctement en faisant pression dessus manuellement.
IACHTUNG: Wenn die Pumpe sich
länger in die falsche Richtung
dreht, kann sie Schaden nehmen.
4)Sicherstellen, dass die Endschalter an den Säulenenden einwandfrei funktionieren, indem sie von hand betätigt werden.
CONEXIÓN DE LA INSTALACIÓN ELÉCTRICA
IAVISO
Las operaciones listadas a continuación deben ser realizadas
por personal experto.
1)Antes de conectar el sistema eléctrico asegurarse de que:
1.La instalación eléctrica suministrada con el elevador esté equipada con el dispositivo de protección requerido por los estándares vigentes del país donde se instala la máquina.
2.La línea de alimentación eléctrica tenga las siguientes secciones transversales:
Voltaje del elevador 400 V, trifásico……………mínimo 2,5 mm2
Voltaje del elevador 230 V, trifásico……………mínimo 4 mm2
Voltaje del elevador 230 V, monofásico……………mínimo 6
mm2
3.Las oscilaciones del voltaje estén comprendidas dentro de la
gama de tolerancia correspondiente a las especificaciones.
El fabricante suministra el elevador para que funcione con 400V
y con configuración trifásica; si el voltaje de la línea es distinto, el
motor y la conexión al transformador se cambian (fig. 39); es necesario, además, sustituir el relé térmico, pieza que debe pedirse
al fabricante y/o al centro de asistencia.
2)Conectar la alimentación y el sistema de control al tablero de
bornes en el tablero de control (fig.40) introduciendo el cable en
la estructura pasando por el orificio ya predispuesto y siguiendo
el esquema de cableado de la página 13.
1.Instalar el tablero eléctrico en la columna principal.
2.Conectar los interruptores de fin de carrera.
3.Completar la conexión de la válvula a solenoide (en la unidad
hidráulica).
4.Conectar los electroimanes.
5.Conectar el motor eléctrico.
6.Completar las conexiones de alimentación en el tablero de bornes del panel de mando.
3)Cerrar la tapa del tablero eléctrico, girar el interruptor principal
a la posición 1, presionar el pulsador de elevación (fig. 40); el
sentido de rotación del motor deberá ser el que muestra la flecha
en la bomba.
IATENCIÓN: Si la bomba gira largo tiempo en sentido erróneo,
puede sufrir serios daños.
4)Asegurarse de que los fines de carrera de los extremos en las
columnas funcionen correctamente presionándolos
manualmente.
ASSEMBLAGGIO DEI BRACCI
1.Premere il pulsante di sollevamento, sollevare i carrelli all'altezza di
circa 70cm da terra, quindi premere il pulsante di blocco,
REGOLARE L'INTERRUTTORE PRINCIPALE (IG) NELLA
POSIZIONE 0 E TOGLIERE L'ALIMENTAZIONE AL
SOLLEVATORE.
2.Lubrificare i fori Ø40 sulle estremità dei bracci.
3.Montare i bracci nei supporti del carrello e inserire le spine fisse nei fori del supporto come mostrato in fig.32 e fig.41
4.È importante installare la vite all'interno del blocco braccio.
1. Press the up push button, raise the carriages to a height of about
70cm off the ground, then press the lock push button, SET THE
MAIN SWITCH (IG) TO POSITION 0 AND CUT OFF THE POWER
SUPPLY TO THE LIFT.
2. Grease the holes f40 on the arms ends.
3. Mount the arms into the carriage supports and inset the dowel pins
into the support holes as shown in Fig.32a and Fig.41, notice the
entry of both arms is the same with the entry of the vehicle.
4. It is important to install the screw inside the arm locking.
INSTALLAZIONE DELLA PIASTRA DI
COPERTURA BASAMENTO
INSTALL THE COVER PLATE
Sono state installate due piastre al telaio con 8 bulloni M8×16.
INSTALLAZIONE DEI TASSELLI
Fig.41 Abb.41
1.Fare 14 fori sul basamento con la punta elicoidale per cemento
con un diametro di 18mm fino alla profondità di 130mm. Usare la
piattaforma della base come sagoma per i fori.
2.Installare il tassello in base alla fig.32a.
TEST E VERIFICHE DA ESEGUIRE PRIMA
DELL'AVVIAMENTO
TEST MECCANICI
1.Serraggio di bulloni, raccordi e connessioni
2.Salita e discesa a vuoto del sollevatore
3.Stato di pulizia delle varie parti della macchina
4.Funzionamento dei dispositivi di protezione
5.Funzionamento del dispositivo di blocco bracci
TEST ELETTRICI
1.Connessione conforme agli schemi
2.Messa a terra della macchina
FUNZIONAMENTO DEI SEGUENTI DISPOSITIVI
Fig.41a Abb.41a
ARM ASSEMBLING
1.Interruttore di finecorsa salita
2.Elettromagneti dei dispositivi di sicurezza
3.Elettrovalvola discesa dell'impianto oleoidraulico
Two plates have been installed at the chassis by 8 pieces
M8×16 bolts.
INSTALL SPRING SCREW
1. Make 14 drills on the basement with a helical concrete bit with
a diameter of 18mm to a depth to 130mm. Use the basis pad as
a drilling template.
2. Install the screw according to Fig.32a.
TESTING AND CHECKS TO PERFORM BEFORE
START-UP
MECHANIAL TESTS
1. Attachment and tightness of bolts, fittings and connections
2. Free sliding of moving parts
3. Clean state of various parts of the machine
4. Position of the protection device
5. Arms blocking device
ELECTRIC TESTS
1. Connection comply with diagrams
2. Machine earth connections
OPERATING OF THE FOLLOWING DEVICES
1. Rise limit switch
2. Security device electromagnets
3. Hydraulic oil plant solenoid-valve
39
ASSEMBLAGE DES BRAS
MONTAGE DER SCHWENKARME
ENSAMBLAJE DE LOS BRAZOS
1.Appuyer sur le bouton de levage, soulever les chariots à une
hauteur d'environ 70 cm du sol puis appuyer sur le bouton de
blocage. Placer L'INTERRUPTEUR PRINCIPAL (IG) SUR LA
POSITION 0 ET COUPER L'ALIMENTATION DE
L'ÉLÉVATEUR.
2.Lubrifier les trous ø 40 sur les extrémités des bras.
3.Monter les bras sur les supports du chariot et introduire les goupilles fixes dans les trous du support comme indiqué sur les
Fig. 32a et 41.
4.Il est important d'installer la vis à l'intérieur du blocage bras.
1.Die Hebetaste drücken und die Schlitten bis auf einen Bodenabstand von 70 cm hochfahren. Dann die Sperrtaste drücken,
DEN HAUPTSCHALTER (IG) AUF 0 STELLEN UND DIE
STROMVERSORGUNG DER HEBEBÜHNE UNTERBRECHEN.
2.Die Löcher Ø40 an den Schwenkarmenden schmieren.
3.Die Schwenkarme an den Halterungen des Schlittens befestigen und die Stifte in die Löcher der Halterungen einsetzen, wie
auf Abb. 32 und Abb. 41 dargestellt ist.
4.Es ist wichtig, die Schraube in die Armsperre einzusetzen.
1.Presionar el pulsador de elevación, levantar los carros aproximadamente a 70 cm de altura del suelo, presionar luego el pulsador de
bloqueo, REGULAR EL INTERRUPTOR PRINCIPAL (IG) EN LA
POSICIÓN 0 Y CORTAR LA ALIMENTACIÓN DEL ELEVADOR.
2.Lubricar los orificios de Ø40 en los extremos de los brazos.
3.Montar los brazos en los soportes del carro e introducir las clavijas
fijas en los orificios de soporte como se muestra en las figuras 32 y
41
4.Es importante colocar el tornillo dentro del bloque del brazo.
INSTALLATION DE LA PLAQUE DE
COUVERTURE BASE
MONTAGE DES ABDECKPLATTE DES
UNTERBAUS
Deux plaques sont installées sur la colonne à l'aide de 8 boulons
M8x16.
Am Rahmen sind zwei Platten mit 8 Schrauben M8×16 angebracht.
INSTALACIÓN DE LA PLACA DE COBERTURA
DE LA BASE
Se instalaron en el armazón dos placas con 8 pernos M8 ×16.
INSTALLATION DES CHEVILLES
EINSETZEN DER DÜBEL
PRUEBAS Y CONTROLES A REALIZAR ANTES
DE LA PUESTA EN MARCHA
MECHANISCHE KONTROLLEN
PRUEBAS MECÁNICAS
1.Réaliser 14 trous sur la base avec un foret hélicoïdal à ciment
d'un diamètre de 18 mm d'une profondeur de 130 mm. Utiliser la
plate-forme de la base comme profil pour les trous.
2.Installer la cheville en faisant référence à la fig. 32a.
TESTS ET CONTRÔLES A EFFECTUER AVANT
LA MISE EN MARCHE
TESTS MÉCANIQUES
1.Serrage des boulons, des raccords et des branchements
2.Montée et descente à vide de l'élévateur
3.Propreté des différentes parties de la machine
4.Fonctionnement du dispositif de protection
5.Fonctionnement de blocage bras
TESTS ÉLECTRIQUES
1.Branchements conformes aux schémas
2.Mise à la terre de la machine
FONCTIONNEMENT DES DISPOSITIFS
SUIVANTS
1.Interrupteur de fin de course montée
2.Électroaimants des dispositifs de sécurité
3.Électrovanne de descente du circuit hydraulique
40
1.Anzugsmoment der Schrauben, Anschlüsse und Verbindungen
2.Auf- und Abstieg der Hebebühne ohne Last
3.Reinigungszustand der verschiedenen Maschinenteile
4.Funktionstüchtigkeit der Schutzvorrichtungen
5.Funktionstüchtigkeit der Armsperrvorrichtung
ELEKTRISCHE KONTROLLEN
1.Ajuste de pernos, racores y conexiones
2.Ascenso y descenso del elevador vacío
3.Estado de limpieza de las diferentes partes de la máquina
4.Funcionamiento de los dispositivos de protección
5.Funcionamiento del dispositivo de bloqueo de brazos
PRUEBAS ELÉCTRICAS
1.Verbindungen und Anschlüsse gemäß Schaltplänen
2.Erdung der Maschine
1.Conexión conforme con los esquemas
2.Puesta a tierra de la máquina
FUNKTIONSTÜCHTIGKEIT FOLGENDER
VORRICHTUNGEN
FUNCIONAMIENTO DE LOS SIGUIENTES
DISPOSITIVOS
1.Endanschlagschalter Aufstieg
2.Elektromagneten der Sicherheitsvorrichtungen
3.Absenk-Magnetventil der ölhydraulischen Anlage
1.Interruptor de fin de carrera de ascenso
2.Electroimanes de los dispositivos de seguridad
3.Electroválvula de descenso de la instalación oleohidráulica
TEST OLEOIDRAULICO
1.Olio sufficiente nel serbatoio
2.Nessuna perdita
3.Funzionamento dei cilindri sul circuito
INOTA: Se non c'è olio, riempire
HYDRAULIC OIL TEST
1. Sufficient oil in the tank
2. No leaks
3. Cylinder operation
INOTE: If oil is not present, fill
il serbatoio dell'unità di potenza
con la quantità d'olio necessaria.
Vedere la procedura nel capitolo
6: MANUTENZIONE
TEST ROTAZIONE MOTORE
Il motore deve girare nella direzione della freccia situata sulla
pompa dell'unità di potenza; verificare avviando brevemente
(ogni avviamento deve durare al massimo due secondi). Se
emergono problemi nell'impianto oleoidraulico consultare la tabella "Risoluzione dei problemi" nel capitolo 7.
PREPARAZIONE
IATTENZIONE
QUESTE OPERAZIONI DEVONO ESSERE SEMPRE
EFFETTUATE DA TECNICI DEL CENTRO ASSISTENZA
AUTORIZZATO INDICATO SUL FRONTESPIZIO DI QUESTO
MANUALE.
TEST SOTTO VUOTO (senza veicoli caricati)
In questa fase verificare quanto segue:
. Che i pulsanti di sollevamento, discesa e blocco funzionino nel
modo corretto;
. Che il sollevatore raggiunga l'altezza massima;
. Che non ci siano vibrazioni anomale nelle colonne e nei bracci;
. Che i cunei di sicurezza si inseriscano nei supporti sotto il carrello;
. Che gli interruttori di finecorsa di salita scattino;
. Che l'elettromagnete scatti;
. Dopo aver eseguito completamente quanto precedentemente raccomandato, la differenza d'altezza fra i bracci dei due carrelli deve essere inferiore a 1cm. In caso contrario, regolare il loro livello agendo
sui controdadi sui cavi di acciaio di sincronizzazione.
Per effettuare i test elencati, portare a termine due o tre cicli completi
di sollevamento e discesa. Questo deve essere fatto anche per far sì
che l'aria presente nel circuito idraulico fuoriesca.
TEST DI CARICO
Ripetere i test precedenti con un veicolo sul sollevatore.
Dopo i test di carico, ispezionare visivamente la macchina e verificare di nuovo che tutti i bulloni siano serrati.
the reservoir of the power unit
with the necessary amount of oil
.See the procedure in chapter 6:
MAINTENANCE
ROTATION DIRECTION TEST
The motor should turn in the direction of the arrow located on the
power unit pump; check using brief start-ups (each start-up must
last a maximum of two seconds). If problems arise in the hydraulic oil plant, see the “Trouble-shooting” table in chapter 7
SET UP
IWARNING
THESE OPERATIONS MUST ALWAYS BE PERFORMED BY
TECHNICIONS OF THE AUTORIZED SERVICE CENTRE
INDICATED IN THE FRONT OF THIS MANUAL
VACUUM TEST (without vehicles loaded)
In this phase check the following:
. That the up, down and lock push buttons operate correctly;
. That the rack reaches the maximum height;
. That there are no abnormal vibrations in the posts and in the arms;
. That the safety wedges enter the iron pads under the carriage
. That the rise limit switches trip
. That the electromagnet trips
. After having done all as previously recommended, the height difference between the arms of the two carriages is less than 1cm. On the
contrary, adjust their level by working on the counter nuts on the
synchronous steel cables To perform the tests listed about, complete
two or three complete up and down cycles. This is also to be done in
order to make the air in the hydraulic circuit going out.
LOAD TESTS
Repeat the previous tests with the vehicle on the rack
After the load tests, visually inspect the machinery and check
again that all bolts are tightened.
41
TEST HYDRAULIQUE
ÖLHYDRAULIK-KONTROLLE
PRUEBA OLEOHIDRÁULICA
1.Quantité d'huile suffisante dans le réservoir
2.Absence de fuite
3.Fonctionnement des vérins du circuit
1.Ausreichend Öl im Tank
2.Keine Leckagen
3.Betrieb der Zylinder am Kreislauf
1.Suficiente aceite en el depósito
2.Ninguna pérdida
3.Funcionamiento de los cilindros en el circuito
INOTE : en l'absence d'huile, remplir
le réservoir de l'unité de puissance
de la quantité d'huile nécessaire.
Voir la procédure au chapitre 6 :
ENTRETIEN.
TEST DE ROTATION MOTEUR
Le moteur doit tourner dans le sens de la flèche présente sur la
pompe de l'unité de puissance ; vérifier le sens de rotation en
mettant en marche brièvement le moteur (deux secondes tout au
plus). En présence de problèmes sur le circuit hydraulique, consulter le tableau "Anomalies et solutions" au chapitre 7.
PRÉPARATION
IAVIS
CES OPÉRATIONS DOIVENT TOUJOURS ÊTRE EFFECTUÉES
PAR DES TECHNICIENS DU CENTRE D'ASSISTANCE
AUTORISÉ (VOIR COUVERTURE DU PRÉSENT MANUEL).
TEST A VIDE (en l'absence de véhicule)
IANMERKUNG: Wenn kein Öl vorhanden ist, den Tank der Leistungseinheit mit der erforderlichen
Ölmenge befüllen. Siehe Vorgehensweise in Kapitel 6: WARTUNG
KONTROLLE DER MOTORDREHRICHTUNG
Der Motor muss sich in die durch den Pfeil auf der Pumpe der Leistungseinheit angezeigte Richtung drehen. Die Drehrichtung durch
kurzes Einschalten kontrollieren (bei jeder Kontrolle darf die Pumpe
nicht länger als zwei Sekunden laufen). Wenn Probleme an der
ölhydraulischen Anlage auftreten, die Tabelle "Behebung von Störungen" in Kapitel 7 nachschlagen.
VORBEREITUNG
IHINWEIS
INOTA: Si no hay aceite, llenar el depósito de la unidad de potencia con
la cantidad de aceite necesaria. Ver
el procedimiento en el capítulo 6:
MANTENIMIENTO
PRUEBA DE ROTACIÓN DEL MOTOR
El motor debe girar en la dirección de la flecha situada en la bomba
de la unidad de potencia; controlar poniéndolo en marcha brevemente (cada puesta en marcha debe durar como máximo dos segundos).
Si surgen problemas en la instalación oleohidráulica, consultar la tabla "Resolución de problemas" en el capítulo 7.
PREPARACIÓN
IAVISO
DIESE ARBEITEN MÜSSEN IMMER VON TECHNIKERN DES
AUF DER TITELSEITE DIESES HANDBUCHS ANGEGEBENEN
ZUGELASSENEN KUNDENDIENSTCENTERS DURCHGEFÜHRT
WERDEN.
ESTAS OPERACIONES DEBEN SER REALIZADAS SIEMPRE
POR TÉCNICOS DEL CENTRO DE ASISTENCIA AUTORIZADO
INDICADO EN LA PORTADA DE ESTE MANUAL.
KONTROLLE BEI LEERBETRIEB (ohne geladene
Fahrzeuge)
PRUEBA EN VACÍO (sin vehículos cargados)
Durant cette phase, s'assurer :
. que les boutons de levage, de descente et de blocage fonctionnent correctement ;
. que l'élévateur atteint la hauteur maximum ;
. de l'absence de vibrations anormales dans les colonnes et
dans les bras ;
. que les cales de sécurité s'engagent dans les supports de fer
sous le chariot ;
. que les interrupteurs de fin de course de montée interviennent ;
. que l'électroaimant intervient ;
. Après avoir effectué les contrôles ci-dessus, la différence de
hauteur entre les bras des deux chariots doit être inférieure à 1
cm. Si tel n'est pas le cas, en régler le niveau en intervenant sur
les contre-écrous des câbles d'acier de synchronisation.
Pour effectuer les tests, effectuer deux ou trois cycles intégraux
de levage et de descente. Ces opérations permettent également
d'évacuer l'air présent dans le circuit hydraulique.
In dieser Phase kontrollieren, dass
. die Hebe-, Absenk- und Sperrtasten einwandfrei funktionieren
. die Hebebühne die maximale Höhe erreicht
. keine anormalen Vibrationen an den Säulen und Armen auftreten
. die Sicherheitskeile in die Halterungen unter dem Schlitten einrasten
. die Aufstiegsendanschlagschalter ansprechen
. der Elektromagnet anspricht.
. Nach Durchführung aller empfohlenen Kontrollen muss der Höhenunterschied zwischen den Armen der beiden Schlitten unter 1 cm
liegen. Andernfalls deren Höhe durch Einwirken auf die Gegenmuttern der Synchronisierungsstahlkabel korrigieren.
Zur Ausführung der angegebenen Kontrollen müssen zwei oder drei
vollständige Hebe- und Absenkzyklen durchgeführt werden. Das ist
auch erforderlich, damit die im Hydraulikkreislauf enthaltene Luft austritt.
En esta fase controlar lo siguiente:
. Que los pulsadores de elevación, descenso y bloqueo funcionen del modo correcto;
. Que el elevador alcance la altura máxima;
. Que no existan vibraciones anormales en las columnas ni en
los brazos;
. Que las cuñas de seguridad se inserten en los soportes debajo del
carro;
. Que intervengan los interruptores de fin de carrera de ascenso;
. Que los electroimanes intervengan;
. Después de haber realizado completamente lo recomendado anteriormente, la diferencia de altura entre los brazos de los dos carros
debe ser inferior a 1 cm. En caso contrario, regular sus niveles con
las contratuercas de los cables de acero de sincronización.
Para realizar las pruebas detalladas, llevar a cabo dos o tres ciclos completos de elevación y descenso. Esto debe realizarse
también para hacer salir el aire presente en el circuito hidráulico.
TEST DE CHARGE
KONTROLLE UNTER BELASTUNG
PRUEBA DE CARGA
Répéter les tests ci-dessus avec un véhicule sur l'élévateur.
Après les tests de charge, contrôler visuellement la machine et
s'assurer à nouveau que tous les boulons sont bien serrés.
42
Die eben beschriebenen Kontrollen bei auf der Hebebühne stehendem Fahrzeug wiederholen.
Nach der Kontrolle bei gehobener Last eine Sichtkontrolle der Maschine vornehmen und erneut kontrollieren, dass alle Schrauben festgezogen sind
Repetir las pruebas anteriores con un vehículo en el elevador.
Después de las pruebas de carga, inspeccionar visualmente la máquina y controlar otra vez que todos los pernos estén ajustados.
CAPITOLO 5 FUNZIONAMENTO E USO
CHAPTER 5 OPERATIONS AND USE
In Fig.40 sono indicati i comandi del sollevatore (dispositivi
di controllo)
The lift Commands (control devices) is shown as Fig.40.
COMANDI
INTERRUTTORE PRINCIPALE (IG)
POSIZIONE 0:
COMMANDS
MAIN SWITCH (IG)
POSITION 0:
Il sollevatore non riceve alimentazione. È possibile accedere all'interno del quadro e chiudere l'interruttore per impedire l'uso del sollevatore.
POSIZIONE 1:
Questa posizione dà corrente al sollevatore e chiude la portella del
quadro in modo da prevenirne l'apertura accidentale.
PULSANTE DI SOLLEVAMENTO
Di tipo "uomo presente", opera a 24V e se viene premuto, attiva il
motore elettrico e i meccanismi che sollevano il carrello.
PULSANTE DI DISCESA
Di tipo "uomo presente", opera a 24V e se viene premuto, attiva gli
elettromagneti dei cunei di sicurezza e la valvola di scarico dell'unità
di potenza.
PULSANTE DI BLOCCO
Di tipo "uomo presente", opera a 24V e se viene premuto, attiva l'elettrovalvola di scarico nell'unità di potenza idraulica e disattiva gli
elettromagneti, mettendo il carico in posizione di stazionamento sui
cunei di sicurezza.
SEQUENZA DI FUNZIONAMENTO
Posizionare i bracci di sollevamento nei punti di tenuta prescritti per il veicolo, aggiustando i piattelli alla stessa altezza.
Ogni volta che i carrelli vengono portati fino a terra, verificare la posizione
dei piattelli sotto il telaio del veicolo prima di sollevare di nuovo i carrelli.
SOLLEVAMENTO
Girare l'interruttore principale (IG) nella posizione 1 e premere il pulsante di sollevamento fino a raggiungere l'altezza richiesta. Quando i carrelli vengono sollevati i cunei di sicurezza si inseriscono automaticamente in ogni supporto di
ferro sotto il carrello. Per quanto riguarda limiti di sollevamento e dispositivi di
sicurezza, leggere le pagine 17 e 18 "RISCHI MENTRE IL VEICOLO VIENE
SOLLEVATO".
POSIZIONAMENTO
Quando viene raggiunta l'altezza richiesta, premere il pulsante di blocco. Il movimento viene fermato automaticamente quando il cuneo di sicurezza si ferma
sul livello del primo incavo con cui viene in contatto mentre i carrelli stanno
scendendo.
DISCESA
Prima di far scendere i carrelli, i cunei di sicurezza devono essere tolti. Premendo il pulsante di discesa il carrello viene sollevato di circa 3cm, poi vengono automaticamente rilasciati i cunei di sicurezza e viene attivata l'elettrovalvola
di discesa. La velocità di discesa viene regolata dalla "valvola di regolazione
del flusso" nella pompa. La discesa si ferma quando i cilindri idraulici sono
completamente scarichi. Quando i carrelli sono scesi completamente, il dispositivo automatico di blocco bracci si apre e permette ai carrelli di ruotare.
The lift is not energized. It is possible to access the interior of the
box and lock the switch to prevent use of the lift.
POSITION 1:
This energizes the lift and lock the door of the box to prevent it
from being opened accidentally.
UP BUSH BUTTON
“Man present” type, it operates under 24V and if pressed, activates the electric motor and mechanisms that lift the carriage.
DOWN BUSH BUTTON
“Man present” type, it operates under 24V and if pressed, activates
the safety wedge electromagnets and the power unit exhaust valve.
LOCK BUSH BUTTON
“Man present” type, it operates under 24V and if pressed, activates
the oil discharge electro-valve in the hydraulic power unit and it deactivates the electromagnets, placing the load in the parking position on
the safety wedges.
OPERATING SEQUENCE
Position the lift arms in the hold points prescribed for the vehicle, adjusting
the disks to the same height.
Each time the carriages are brought down to the ground, check the position of the disks under the chassis of the vehicle before raising the carria ges again.
LIFTING
Turn the main switch (IG) to the position 1 and press the up push button
until reaching the required height. As the carriages are raised the safety
wedges are inserted automatically into each the iron pad under the carriage. Regarding lift limits and safety devices, see pages 17,18 “RISKS
WHILE THE VEHICLE IS BEING RAISED”.
PARKING
Once the required height has been reached, press the lock push button.
The movement is stopped automatically when the safety wedge rests on
the level of the first slot that they come in contact with while the carriages
are coming down.
LOWERING
Before lowering the carriages, the safety wedges must be disconnected.
Press the down push button that the carriage will be lift about 3-cm, then
automatically releases the safety wedges and activates the down electro-valve. Lowering speed is regulated by the “flow regulating valve” in the
pump.Lowering stops when the hydraulic cylinders are completely unloaded. When the carriages are totally lowered, the automatic arm-blocking
device opens and lets the carriages rotate.
43
CHAPITRE 5 FONCTIONNEMENT ET
UTILISATION
KAPITEL 5 FUNKTIONSWEISE UND
GEBRAUCH
CAPÍTULO 5 FUNCIONAMIENTO Y USO
En la fig. 40 se indican los mandos del elevador (dispositivos de control).
Les commandes de l'élévateur (dispositifs de contrôle) sont représentées
sur la Fig. 40.
Auf Abb. 40 sind die Steuerungen der Hebebühne (Steuerelemente) dargestellt.
STEUERUNGEN
HAUPTSCHALTER (IG)
COMMANDES
INTERRUPTEUR PRINCIPAL (IG)
POSITION 0 :
L'élévateur n'est pas alimenté. Il est possible d'accéder à l'intérieur du tableau et de fermer l'interrupteur pour empêcher l'utilisation de l'élévateur.
POSITION 1 :
Dans cette position, l'élévateur est alimenté et le volet du tableau est fermé de telle sorte qu'il ne puisse pas être ouvert accidentellement.
BOUTON DE LEVAGE
De type "homme mort", ce bouton est alimenté sur 24V et, enfoncé, il active le
moteur électrique et les mécanismes qui soulèvent le chariot.
BOUTON DE DESCENTE
De type "homme mort", ce bouton est alimenté sur 24V et, enfoncé, il active les électroaimants des cales de sécurité et la vanne d'évacuation de
l'unité de puissance.
BOUTON DE BLOCAGE
De type "homme mort", ce bouton est alimenté sur 24V et, enfoncé, il active l'électrovanne d'évacuation de l'unité de puissance hydraulique et désactive les électroaimants, en plaçant la charge en position de stationnement sur les cales de sécurité.
SÉQUENCE DE FONCTIONNEMENT
Positionner les bras de levage à hauteur des points de soutien du véhicule, en
ajustant les plaques de soutien à la même hauteur.À chaque fois que les chariots sont ramenés à terre, contrôler la position des plaques de soutien sous le
châssis du véhicule avant de soulever à nouveau les chariots.
LEVAGE
Placer l'interrupteur principal (IG) sur la position 1 et appuyer sur le bouton
de levage jusqu'à ce que la hauteur voulue soit atteinte. Quand les chariots sont soulevés les cales de sécurité s'enclenchent automatiquement
dans chaque support en fer sous le chariot. Pour les limites de levage et
les dispositifs de sécurité, lire, pages 17 et 18, "RISQUES ALORS QUE
LE VÉHICULE EST SOULEVÉ".
POSITIONNEMENT
Quand la hauteur requise est atteinte, appuyer sur le bouton de blocage.
Le mouvement est stoppé automatiquement quand la cale de sécurité
s'arrête sur le niveau du premier logement avec lequel elle est en contact
alors que les chariots descendent.
DESCENTE
Avant de faire descendre les chariots, les cales de sécurité doivent être
retirées. En appuyant sur le bouton de descente, le chariot est soulevé
d'environ 3 cm ; ensuite les cales de sécurité sont automatiquement débloquées et l'électrovanne de descente est activée. La vitesse de descente est réglée par la "vanne de réglage du flux" de la pompe. La descente
est stoppée quand les vérins hydrauliques sont complètement déchargés.
Quand les chariots sont complètement abaissés, le dispositif automatique
de blocage des bras s'ouvre et permet aux chariots de pivoter.
2
POSITION 0:
Die Hebebühne wird nicht mit Strom versorgt. Der Zugriff auf den Innenraum
des Schaltschranks ist möglich und der Schalter kann ausgeschaltet werden,
um den Betrieb der Hebebühne zu sperren.
POSITION 1:
Diese Position versorgt die Hebebühne mit Strom und verriegelt die
Schaltschranktür, die somit nicht unabsichtlich geöffnet werden kann.
HEBETASTE
Typ Totmann-Taste, funktioniert mit 24V und aktiviert den Elektromotor
und die den Schlitten hebenden Mechanismen.
ABSENKTASTE
Typ Totmann-Taste, funktioniert mit 24V und aktiviert den Elektromagneten der Sicherheitskeile und das Ablassventil der Leistungseinheit.
SPERRTASTE
Typ Totmann-Taste, funktioniert mit 24V und aktiviert das Ablassventil der
hydraulischen Leistungseinheit und deaktiviert die Elektromagneten, wobei die gehobene Last auf den Sicherheitskeilen blockiert wird.
BETRIEBSSEQUENZ
Die Hebearme an den für das jeweilige Fahrzeug vorgeschriebenen Hebepunkten positionieren und die Teller auf die gleiche Höhe bringen.
Jedesmal, wenn die Schlitten bis auf den Boden abgesenkt werden, die
Position der Teller unter dem Fahrzeugrahmen kontrollieren, bevor die
Schlitten wieder hochgefahren werden.
HEBEN
Den Hauptschalter (IG) auf 1 drehen und die Hebetaste drücken, bis die
erforderliche Höhe erreicht ist. Beim Hochfahren der Schlitten rasten die
Sicherheitskeile automatisch in jede Eisenraste unter dem Schlitten ein.
Für die Hebegrenzen und die Sicherheitsvorrichtungen wird auf die Seiten
17 und 18 "RISIKEN WÄHREND DES HEBENS DES FAHRZEUGS" verwiesen.
POSITIONIERUNG
Sobald die gewünschte Höhe erreicht wird, die Sperrtaste drücken. Die
Bewegung wird automatisch angehalten, sobald der Sicherheitskeil in die
erste Aushöhlung einrastet, mit der er beim Absinken der Schlitten in
Berührung kommt.
ABSENKEN
Vor dem Absenken der Schlitten müssen die Sicherheitskeile entfernt werden. Bei Drücken der Absenktaste wird der Schlitten um ca. 3 cm hochgefahren. Dabei werden die Sicherheitskeile automatisch gelöst und das
Absenkmagnetventil wird aktiviert. Die Absenkgeschwindigkeit wird durch
das Flussregelventil in der Pumpe gesteuert. Das Absenken wird gestoppt, sobald die Hydraulikzylinder vollständig leer sind. Sobald die
Schlitten vollständig abgesenkt wurden, öffnet sich die automatische
Armsperrvorrichtung und erlaubt das Drehen der Schlitten.
MANDOS
INTERRUPTOR PRINCIPAL (IG)
POSICIÓN 0:
El elevador no recibe alimentación. Se puede acceder al tablero y cerrar
el interruptor para impedir el uso del elevador.
POSICIÓN 1:
Esta posición da corriente al elevador y cierra la puerta del tablero para
prevenir que se abra accidentalmente.
PULSADOR DE ELEVACIÓN
De tipo "hombre presente", opera con 24 V y, si está presionado, activa
el motor eléctrico y los mecanismos que elevan el carro.
PULSADOR DE DESCENSO
De tipo "hombre presente", opera con 24 V y, si está presionado, activa
los electroimanes de las cuñas de seguridad y la válvula de descarga de
la unidad de potencia.
PULSADOR DE BLOQUEO
De tipo "hombre presente", opera con 24 V y, si está presionado, activa
la electroválvula de descarga en la unidad de potencia hidráulica y desactiva los electroimanes, colocando la carga en posición estacionaria en las
cuñas de seguridad.
SECUENCIA DE FUNCIONAMIENTO
Colocar los brazos de elevación en los puntos de sujeción prescritos para
el vehículo, ajustando los platillos a la misma altura.
Cada vez que los carros sean llevados al suelo, controlar la posición de los
platillos debajo del chasis del vehículo antes de elevar de nuevo los carros.
ELEVACIÓN
Girar el interruptor principal (IG) a la posición 1 y presionar el pulsador de elevación hasta alcanzar la altura requerida. Cuando los carros se elevan, las cuñas de seguridad se introducen automáticamente en cada soporte de hierro
debajo del carro. Respecto de los límites de elevación y dispositivos de seguridad, leer las páginas 17 y 18 "RIESGOS DURANTE LA ELEVACIÓN DEL
VEHÍCULO".
COLOCACIÓN
Cuando se haya alcanzado la altura requerida, presionar el pulsador de
bloqueo. El movimiento se detiene automáticamente cuando la cuña de
seguridad se frena en el nivel de la primera ranura con la cual entra en
contacto mientras los carros están bajando.
DESCENSO
Antes de hacer que bajen los carros deben sacarse las cuñas de seguridad. Presionando el pulsador de descenso se eleva el carro aproximadamente 3 cm, luego automáticamente se sueltan las cuñas de seguridad y
se activa la electroválvula de descenso. La velocidad de descenso se regula mediante la "válvula de regulación de flujo" en la bomba. El descenso
se detiene cuando los cilindros hidráulicos están completamente descargados. Cuando los carros han bajado por completo, el dispositivo automático de bloqueo de brazos se abre para permitir que los carros giren.
44
CAPITOLO 6. MANUTENZIONE
PRECAUZIONI
IAVVISO
La manutenzione deve essere eseguita SOLO DA
PERSONALE ESPERTO DEL SOLLEVATORE.
Nel fare la manutenzione del sollevatore, prendere tutte le precauzioni necessarie PER EVITARE CHE IL SOLLEVATORE
VENGA AZIONATO ACCIDENTALMENTE:
CHAPTER 6. MAINTENANCE
PRECAUTIONS
IWARNING
Maintenance must be carried out ONLY BY
SKILLEDPERSONNEL WHO ARE VERY FAMILIAR
WITH THE LIFT.
When performing maintenance on the lift, follow all the necessary precautions to PREVENT THE LIFT FROM BEING
STARTED ACCIDENTALLY:
1.L'interruttore principale sul pannello di controllo deve essere
chiuso in POSIZIONE 0 usando un LUCCHETTO.
2.LA CHIAVE del lucchetto deve essere tenuta dal MANUTENTORE.
3.Si esegue la manutenzione sulla macchina,considerando sempre
tutti i possibili rischi e la istruzioni di sicurezza indicate al CAP.3
1. The main switch on the control box must be locked in
POSITION 0 by using a LOCK.
2. THE KEY for the lock must be kept by the MAINTENANCE
FITTER.
3. While maintenance is being performed on the machine, always
keep in mind all the main possible risks and the safety instructions indicated in chapter 3 “.
È PROIBITO ESEGUIRE LA MANUTENZIONE E
LUBRIFICARE PARTI IN MOVIMENTO.
IT IS PROHIBITED TO PERFORM MAINTENANCE
ON AND LUBRICATES MOVING PARTS.
I IMPORTANTE
I IMPORTANT
1.Utilizzare solo parti di ricambio originali e strumenti che siano
adatti al lavoro e in buone condizioni.
2.Seguire la tabella di manutenzione indicata nel manuale: tali intervalli sono indicati e devono sempre essere considerati quali
regole generali da rispettare.
3.Una buona manutenzione preventiva richiede attenzione costante e supervisione continua sulla macchina. Trovare velocemente la causa di qualsiasi anomalia come rumore eccessivo,
surriscaldamento, perdita di fluidi, ecc.
To ensure cable maintenance.
1. Only use original spare parts and tools that are suitable for the
job and in good condition;
2. Follow the maintenance schedule indicated in the manual: these
frequencies are indicative and must always be considered as general
rules to be respected.
3. Good preventive maintenance requires constant attention and continuous supervision on the machine. Quickly find the cause of any abnormalities such as excessive noise, overheating, leaking fluids, etc.
È richiesta attenzione speciale per:
1.Le condizioni delle parti addette al sollevamento (cilindro, unità
di potenza)
2.Dispositivi di sicurezza (micro interruttori, elettromagneti e cunei di sicurezza)
3 le condizioni delle funi.
Per eseguire correttamente la manutenzione, fare riferimento ai
seguenti documenti forniti dal costruttore del sollevatore:
1.Diagramma funzionale completo dell'equipaggiamento elettrico e
dell'equipaggiamento ausiliario che indichi le connessioni dell'alimentazione
2.Diagramma idraulico con elenchi di parti e valori di pressione massima
3.Disegni esplosi con i dati necessari per ordinare le parti di ricambio
4.Lista delle possibili cause di malfunzionamento e soluzioni raccomandate (capitolo 7 del manuale)
Special attention is required for:
1. The condition of lifting parts (cylinders, power unit);
2. Safety devices (micro switches, electromagnets and safety
wedges)
To perform maintenance correctly, refer to the following documents supplied by the rack manufacturer:
1. Complete functional diagram of the electric equipment and auxiliary equipment indicating the power supply connections
2. Hydraulic diagram with lists of parts and max. pressure values
3. Exploded drawings with the data needed to order spare parts
4. List of the possible causes of malfunctions and recommended
solutions (chapter 7 of the manual)
45
CHAPITRE 6 ENTRETIEN
PRÉCAUTIONS
IAVIS
L'entretien doit être confié EXCLUSIVEMENT À UN
PERSONNEL QUALIFIÉ CONNAISSANT
PARFAITEMENT LE FONCTIONNEMENT DE
L'ÉLÉVATEUR.
Pour l'entretien de l'élévateur, prendre toutes les précautions nécessaires pour ÉVITER QUE L'ÉLÉVATEUR NE SOIT
ACTIONNÉ INVOLONTAIREMENT :
1.L'interrupteur principal du panneau de contrôle doit se trouver
en POSITION 0 et verrouiller à l'aide d'un CADENAS.
2.LA CLÉ du cadenas doit être conservé par le TECHNICIEN
D'ENTRETIEN.
3.Durant l'entretien de la machine, veiller à tenir compte de tous
les risques principaux et respecter les instructions de sécurité indiquées dans le chapitre 3.
IL EST INTERDIT D'EFFECTUER L'ENTRETIEN ET
DE LUBRIFIER DES PARTIES EN MOUVEMENT.
IIMPORTANT
Pour effectuer l'entretien des câbles
1.Utiliser uniquement des pièces détachées d'origine et des instruments et outils en bon état et adaptés aux opérations à effectuer ;
2.Suivre les indications du tableau d'entretien figurant dans le manuel : les
fréquences indiquées doivent être considérées comme des règles générales à respecter ;
3.Un bon entretien préventif nécessite une attention et une supervision constantes de la machine. En cas d'anomalie telle qu'un bruit excessif, une surchauffe, une fuite de liquide, etc., veiller à en établir rapidement la cause.
Il est nécessaire d'accorder une attention toute particulière aux aspects suivants :
1.État des éléments de levage (vérin, unité de puissance, etc.) ;
2.Dispositifs de sécurité (micro-interrupteurs, électroaimants et cales de sécurité)
3.État des câbles.
Pour effectuer correctement l'entretien, faire référence aux documents suivants
fournis par le constructeur de l'élévateur :
1.Diagramme fonctionnel complet du circuit électrique et des équipements
auxiliaires sur lequel figurent les connexions l'alimentation ;
2.Diagramme hydraulique avec liste des composants et des valeurs de pression maximum ;
3.Éclatés fournissant les données nécessaires pour la commande de pièces
détachées ;
4.Liste des causes possibles de mauvais fonctionnement et solutions recommandées (chapitre 7 du manuel)
46
KAPITEL 6. WARTUNG
VORSICHTSMASSNAHMEN
IHINWEIS
CAPÍTULO 6. MANTENIMIENTO
PRECAUCIONES
IAVISO
Die Wartung muss AUSSCHLIESSLICH VON
PERSONAL DURCHGEFÜHRT WERDEN, DAS
MIT DER HEBEBÜHNE VERTRAUT IST.
El mantenimiento debe ser realizado ÚNICAMENTE
POR PERSONAL EXPERTO EN EL ELEVADOR.
Bei der Wartung der Hebebühne sind alle Vorsichtsmaßnahmen
zu treffen, die notwendig sind, UM ZU VERHINDERN, DASS DIE
HEBEBÜHNE UNABSICHTLICH BETÄTIGT WIRD:
Cuando se realice el mantenimiento del elevador, tomar todas
las precauciones necesarias PARA EVITAR QUE EL MISMO SE
ACCIONE ACCIDENTALMENTE:
1.Der Hauptschalter an der Steuertafel muss mit einem
VORHÄNGESCHLOSS in POSITION 0 abgeschlossen werden.
2.DER SCHLÜSSEL des Vorhängeschlosses muss vom
REPARATURMECHANIKER verwahrt werden.
3. Bei der Durchführung der Wartungsarbeiten sind immer alle
möglichen Risiken zu berücksichtigen und es sind die in KAP. 3
enthaltenen Anweisungen zu befolgen.
1.El interruptor principal del panel de control debe cerrarse en
POSICIÓN 0 usando un CANDADO.
2.LA LLAVE del candado debe ser conservada por el
MECÁNICO REPARADOR.
3. Debe realizarse el mantenimiento de la máquina, teniendo
siempre en cuenta todos los riesgos posibles y las instrucciones
de seguridad indicadas en el CAP. 3
ES IST VERBOTEN, SICH BEWEGENDE
BAUTEILE ZU WARTEN UND ZU SCHMIEREN
.
ESTÁ PROHIBIDO REALIZAR EL
MANTENIMIENTO Y LA LUBRICACIÓN DE
PIEZAS EN MOVIMIENTO.
IWichtig
IIMPORTANTE
1.Ausschließlich Originalersatzteile und Werkzeuge verwenden, die für die
Arbeit geeignet und in einwandfreiem Zustand sind.
2.Die in diesem Handbuch enthaltene Wartungstabelle befolgen: Die angegebene Häufigkeit der Wartungsarbeiten ist immer einzuhalten.
3.Eine korrekte vorbeugende Wartung erfordert eine konstante Aufmerksamkeit und Kontrolle der Maschine. Es ist immer sofort nach der Ursache von Störungen wie zum Beispiel zu starker Lärm, Überhitzung,
Flüssigkeitsleckagen usw. zu suchen.
1.Utilizar únicamente piezas de repuesto originales y herramientas aptas para
el trabajo y en buen estado.
2.Seguir la tabla de mantenimiento indicada en el manual: dichos intervalos
están indicados y deben considerarse siempre como reglas generales a respetar.
3.Un buen mantenimiento preventivo requiere atención constante y supervisión
continua de la máquina. Encontrar rápidamente la causa de cualquier anomalía como ruido excesivo, sobrecalentamiento, pérdida de líquidos, etc.
Besondere Aufmerksamkeit ist folgenden Teilen zu schenken:
1.Zustand der Hebeorgane (Zylinder, Leistungseinheit)
2.Sicherheitsvorrichtungen (Mikroschalter, Elektromagnete und Sicherheitskeile)
3Zustand der Seile
Für die korrekte Durchführung der Wartung ist Bezug auf folgende Unterlagen
zu nehmen, die der Hersteller der Hebebühne mitliefert:
1.Komplettes Funktionsdiagramm der elektrischen Ausstattung und der
Hilfsausstattung, auf dem die Versorgungsanschlüsse angegeben sind.
2.Hydraulikdiagramm, auf dem die Bauteile und die Höchstdruckwerte aufgeführt sind.
3.Explosionszeichnungen mit den notwendigen Angaben für die Ersatzteilbestellung.
4.Liste der möglichen Ursachen der Betriebsstörungen und der empfohlenen Abhilfen (Kapitel 7 des Handbuchs).
Se requiere especial atención para:
1.Las condiciones de las partes encargadas de la elevación (cilindro, unidad
de potencia)
2.Dispositivos de seguridad (micro interruptores, electroimanes y cuñas de seguridad)
3El estado de los cables.
Para realizar correctamente el mantenimiento, ver los siguientes documentos
suministrados por el fabricante del elevador:
1.Diagrama funcional completo del equipamiento eléctrico y del equipamiento
auxiliar que indica las conexiones de la alimentación
2.Diagrama hidráulico con listas de piezas y valores de presión máxima
3.Dibujos del despiece con los datos necesarios para ordenar las piezas de repuesto
4.Lista de posibles causas de mal funcionamiento y soluciones recomendadas
(capítulo 7 del manual)
MANUTENZIONE PERIODICA
PERIODIC MAINTENANCE
FREQUENZA DELL'OPERAZIONE
OPERATION FREQUENCY
Per mantenere il sollevatore funzionante a piena potenza, seguire la tabella di manutenzione indicata. Il costruttore non sarà responsabile e non onorerà la garanzia a risultato di inadempienza
alle istruzioni indicate sopra.
INOTA
To keep the lift working at full efficiency, follow the indicated maintenance schedule. The manufacturer will not be responsible
and will not honor the warranty as a result of non-compliance
with the instructions indicated above.
INOTE
La frequenza indicata si riferisce a normali condizioni di esercizio; si applicheranno frequenze
differenti a condizioni particolarmente severe.
The frequency indicated refers to normal operating
conditions; different frequencies will apply to particularly server conditions.
TUTTE LE OPERAZIONI DI MANUTENZIONE
DEVONO ESSERE ESEGUITE MENTRE IL
SOLLEVATORE È FERMO E LA SERRATURA
DELL'INTERRUTTORE PRINCIPALE È CHIUSA.
ALL MAINTENANCE OPERATIONS MUST BE
PERFORMED WITH THE LIFT STOPPED AND
THE MAIN SWITCH KEY LOCKED.
Dopo che la macchina è stata installata, verificare:
1.Che i bulloni di ancoraggio delle connessioni di basamento delle colonne siano serrati
2.La tenuta delle viti di connessione della traversa alle colonne
3.Che i bracci del carrello opposto siano allo stesso livello
4.Il livello dell'olio dell'unità di potenza. Aggiungere olio fino al livello
corretto, ove necessario.
When after the machine has been installed, check:
1 The tightness of the posts bases connection anchor bolts
2 The tightness of the beam to posts attachment screws
3 That the opposite carriages arms are at the same level
4 The power unit oil level. Add oil up to the right level, if necessary
OGNI MESE
EVERY MONTH
UNITÀ DI POTENZA IDRAULICA
HYDAULIC POWER UNIT
1.Verificare il livello dell'olio, usando la speciale asta di livello,
che è annessa al tappo di riempimento. Se necessario, aggiungere olio attraverso il tappo per raggiungere il livello richiesto.
Per il tipo di olio, vedere pag.12 "SPECIFICHE TECNICHE".
2.Dopo le prime 40 ore di funzionamento, verificare se le condotte o il
filtro siano intasati e il livello di contaminazione dell'olio. (Pulire il filtro
e rimpiazzare l'olio se c'è un alto livello di contaminazione).
CIRCUITO IDRAULICO
Verificare che non vi siano perdite di olio nel circuito tra l'unità di
potenza e il cilindro e nel cilindro stesso. In questo caso, verificare le condizioni delle guarnizioni e rimpiazzarle, se necessario.
OGNI 3 MESI
POMPA IDRAULICA
In condizioni normali di funzionamento, verificare che non ci siano cambiamenti nella pompa dell'unità di potenza e verificare
che i relativi bulloni siano serrati appropriatamente.
1 Check the oil level, using the special dipstick, which is attached to
the filler cap. If necessary, add oil through the cap to reach the required level. For the type of oil, see page 12 “TECHNICAL
SPECIFICATIONS”.
2 After the first 40 hours of operation, check if the conveys or filter is clogged and the oil contamination level. (Clean the filter
and replace the oil if there is a high contamination level).
HYDAULIC CIRCUIT
Check that there are no oil leaks in the circuit between the power
unit and cylinder and in the cylinder itself. In this case, check the
condition of the gaskets and replace them, if necessary.
EVERY 3-MONTH…
HYDAULIC PUMP
Under normal operating conditions, check that there is no changes in the noise in the power unit pump and check that the relative bolts are properly tightened.
47
ENTRETIEN COURANT
FRÉQUENCE DES OPÉRATIONS
Pour garantir le bon fonctionnement de l'élévateur à pleine puissance, suivre les indications du tableau d'entretien. Le constructeur décline toute responsabilité en cas de non-respect des recommandations ci-dessus qui a
par ailleurs pour effet de rendre inapplicable la garantie.
INOTE
La fréquence indiquée se réfère aux conditions normales d'utilisation ; dans le cas de conditions exposant à de fortes sollicitations, des fréquences différentes doivent être appliquées.
TOUTES LES OPÉRATIONS D'ENTRETIEN
DOIVENT ÊTRE EFFECTUÉES ALORS QUE
L'ÉLÉVATEUR EST À L'ARRÊT ET QUE
L'INTERRUPTEUR PRINCIPAL EST VERROUILLÉ.
Après installation de la machine, contrôler :
1.Les boulons de fixation des colonnes : ils doivent être bien serrés ;
2.La tenue des vis d'assemblage de la traverse aux colonnes ;
3.Les bras du chariot opposé : ils doivent se trouver au même niveau
4.Le niveau d'huile de l'unité de puissance : ravitailler au besoin.
UNE FOIS PAR MOIS
UNITÉ DE PUISSANCE HYDRAULIQUE
1Contrôler le niveau d'huile à l'aide de la jauge de niveau présente sur le bouchon du point de remplissage. Au besoin, ajouter de l'huile pour atteindre le niveau requis. Pour le type d'huile, voir page 12, "CARACTÉRISTIQUES
TECHNIQUES".
2Au bout des 40 premières heures de fonctionnement, s'assurer que les tuyaux et le filtre ne sont pas encrassés et contrôler le degré de contamination de
l'huile (nettoyer le filtre et effectuer une vidange dans le cas où l'huile serait très
sale).
CIRCUIT HYDRAULIQUE
S'assurer de l'absence de fuites d'huile sur le circuit entre l'unité de puissance et le vérin et sur le vérin lui-même. Contrôler l'état des joints et au
besoin les changer.
TOUS LES 3 MOIS
POMPE HYDRAULIQUE
En conditions normales de fonctionnement, s'assurer du bon état de la
pompe de l'unité de puissance et s'assurer que les boulons correspondants sont bien serrés.
48
REGELMÄSSIGE WARTUNG
MANTENIMIENTO PERIÓDICO
HÄUFIGKEIT DER WARTUNGSARBEITEN
FRECUENCIA DE LA OPERACIÓN
Für einen optimalen Betrieb der Hebebühne ist die in der Wartungstabelle angegebene Häufigkeit einzuhalten. Die Garantie verfällt und der Hersteller haftet
nicht, wenn die oben angegebenen Anweisungen nicht befolgt werden.
Para mantener el elevador funcionando con plena potencia, seguir la tabla de
mantenimiento indicada. El fabricante no será responsable ni reconocerá la
garantía si no se respetan las instrucciones anteriormente indicadas
.
IANMERKUNG:
INOTA:
Die angegebene Häufigkeit bezieht sich auf normale Betriebsbedingungen. Unter besonders schweren Einsatzbedingungen ist eine andere Häufigkeit erforderlich.
La frecuencia indicada se refiere a condiciones normales de
funcionamiento; se aplican frecuencias distintas para condiciones especialmente rigurosas.
ALLE WARTUNGSARBEITEN MÜSSEN BEI
STILLSTEHENDER HEBEBÜHNE UND MIT DEM
VORHÄNGESCHLOSS ABGESICHERTEM
HAUPTSCHALTER DURCHGEFÜHRT WERDEN.
TODAS LAS OPERACIONES DE MANTENIMIENTO
DEBEN REALIZARSE MIENTRAS EL ELEVADOR
ESTÁ DETENIDO Y LA CERRADURA DEL
INTERRUPTOR PRINCIPAL CERRADA.
Nach der Montage der Maschine kontrollieren:
1Dass die Verankerungsschrauben der Anschlüsse am Säulensockel korrekt festgezogen sind
2Das Halten der die Querträger an den Säulen befestigenden Schrauben.3Dass die Schwenkarme des gegenüberliegenden Schlittens
auf der gleichen Höhesind.
4Den Ölstand in der Leistungseinheit. Gegebenenfalls Öl bis zu
korrekten Ölstand nachfüllen.
Después de que la máquina ha sido instalada, controlar:
1Que los pernos de anclaje de las conexiones de la base de las
columnas estén ajustados
2La sujeción de los tornillos de conexión del travesaño a las columnas
3Que los brazos del carro opuesto estén al mismo nivel
4El nivel del aceite de la unidad de potencia. Si fuera necesario,
agregar aceite hasta el nivel correcto.
MONATLICH
HYDRAULISCHE LEISTUNGSEINHEIT
MENSUALMENTE
UNIDAD DE POTENCIA HIDRÁULICA
1Den Ölstand mit dem speziellen Ölstab kontrollieren, der dem Füllstopfen
beigestellt ist. Gegebenenfalls Öl durch den Stopfen nachfüllen, bis der erforderliche Stand erreicht ist. Für den benötigten Öltyp ist Seite 12
"TECHNISCHE SPEZIFIKATIONEN" nachzuschlagen.Nach den ersten 40
Betriebsstunden kontrollieren, ob die Leitungen oder der Filter verstopft
sind; den Verunreinigungsgrad des Öls kontrollieren. (Den Filter reinigen
und das Öl wechseln, wenn es stark verschmutzt ist).
1Controlar el nivel de aceite, usando la varilla especial de nivel, anexa al tapón
de llenado. Si es necesario, agregar aceite por el tapón hasta alcanzar el nivel
requerido. Por el tipo de aceite, ver la pág.12 "ESPECIFICACIONES
TÉCNICAS".
2Después de las primeras 40 horas de funcionamiento, controlar si los conductos o el filtro están obstruidos y el nivel de contaminación del aceite. (Limpiar el filtro y reemplazar el aceite si su nivel de contaminación fuera alto).
HYDRAULIKKREISLAUF
CIRCUITO HIDRÁULICO
Kontrollieren, dass keine Ölleckagen am Hydraulikkreislauf zwischen der Leistungseinheit und Zylinder und im Zylinder selbst vorhanden sind. In diesem
Fall empfiehlt es sich, den Zustand der Dichtungen zu überprüfen und diese
gegebenenfalls auszuwechseln..
ALLE 3 MONATE
HYDRAULIKPUMPE
Bei normalen Betriebsbedingungen kontrollieren, dass keine Veränderungen in der Pumpe der Leistungseinheit aufgetreten sind und überprüfen,
dass die entsprechenden Schrauben korrekt festgezogen sind.
Controlar que no haya pérdidas de aceite en el circuito entre la unidad de
potencia y el cilindro ni en el cilindro mismo. En ese caso, controlar las
condiciones de las juntas y reemplazarlas, si fuera necesario.
CADA 3 MESES
BOMBA HIDRÁULICA
En condiciones normales de funcionamiento, controlar que no haya cambios en la bomba de la unidad de potencia y controlar que los respectivos
pernos estén ajustados adecuadamente.
SISTEMI DI SINCRONIZZAZIONE
1.Verificare le condizioni di funzionamento e l'efficienza dei dispositivi di sicurezza (come descritto alle pagine 17 e 18) e l'usura dei cunei di sicurezza e dei relativi perni girevoli. Lubrificare i
perni nei cunei di sicurezza. Nel caso di usura eccessiva,
rimpiazzare i cunei di sicurezza e/o i perni.
2.Usare una chiave dinamometrica per verificare che le viti di ancoraggio dei basamenti delle colonne come pure i bulloni siano
appropriatamente serrati al suolo.
3.Pulire e lubrificare le rotelle e le guide del carrello.
4.Verificare che tutte le viti siano serrate.
5.Verificare che il sistema di blocco dei bracci funzioni appropriatamente.
6.Ingrassare tutte le parti in movimento.
SYNCRONOUS SYSTEMS
1 .Check the operating condition and efficiency of the safety devices
(as described at pages 17,18) and the wear on the safety wedges
and relative hinge pins. Oil the pins on the safety wedges. In case of
excessive wear, replace the safety wedges and/or pins.
2 .Use a torque wrench to check that the post bases anchor bolts
screws are properly tightened to
the ground as well as the connection bolts.
3 Clean and lubricate the carriage side runners and guides.
4 Check that all screws are tightened
5 Check that the arm locking system works properly.
6 Grease all the moving parts.
OGNI 6 MESI
EVERY 6-MONTH
IDRAULICA
HYDRAULIC
Verificare il livello di contaminazione o invecchiamento dell'olio.
L'olio contaminato è la causa principale di malfunzionamento
delle valvole e porta a una vita breve delle pompe a ingranaggi.
Check the contamination or aging level of the oil. Contaminated
oil is the main cause of malfunctions of the valves and leads to a
brief service life of the gear pumps.
FUNE DI SINCRONIZZAZIONE
SYNCHRONOUS CABLE
Verificare le condizioni delle carrucole e delle scanalature delle carrucole. Verificare l'usura del la fune in base al diametro, possibili fili rotti,
altri danni o cambiamenti rilevanti. Ingrassare tramite un pennello il
cavo al fine di evitare corrosione o rottura dovuta all'ossidazione.
Check the pulleys and pulley races conditions. Control the cable
wear by checking diameter, possible broken wires, other damages or relevant changes. With a paintbrush grease the cable in
order to avoid corrosion or breakage due to oxidation.
OGNI 12 MESI
EVERY 12-MONTH
Verifica generale: ispezione visiva di tutte le parti strutturali e meccanismi per assicurarsi che non vi siano problemi o anomalie.
Impianto elettrico: elettricisti esperti (contattare il centro assistenza)
dovrebbero verificare l'impianto elettrico, incluso il motore dell'unità di
potenza, cavi, interruttori di finecorsa e quadro di controllo.
General check: visual inspection of all structural parts and mechanisms to guarantee that there are no problems or anomalies.
Electric plant: skilled electricians (contact the service center)
should test the electric plant, including the motor of the power
unit, cables, and limit switch and control box.
OLIO DELL'IMPIANTO IDRAULICO
HYDRULIC PLANT OIL
Sostituire l'olio, seguendo le istruzioni elencate di seguito:
1.Far scendere il sollevatore all'altezza minima (al suolo)
2.Assicurarsi che il cilindro idraulico sia alla finecorsa
3.Staccare l'alimentazione al sollevatore
4.Drenare l'olio dal circuito idraulico, svitando il tappo posizionato nella parte inferiore del serbatoio dell'unità di potenza
5.Chiudere il tappo di drenaggio
6.Riempire l'unità di potenza attraverso il tappo posizionato sulla
parte superiore del serbatoio dell'unità di potenza.
Replace the oil, following the instructions listed below:
1. Lower the lift to the minimum height (on the ground)
2. Make sure that the hydraulic cylinder is at the end of its travel
3. Disconnect the power supply to the lift rack.
4. Drain the oil from the hydraulic circuit, unscrewing the plug located at the bottom of the power unit reservoir.
5. Close the drain plug
6. Fill the power unit with oil throng the plug located at the top of
the power unit reservoir.
49
SYSTÈMES DE SYNCHRONISATION
SYNCHRONISIERUNGSSYSTEME
SISTEMAS DE SINCRONIZACIÓN
1Contrôler les conditions de fonctionnement et l'efficacité des dispositifs de sécurité (comme indiqué aux pages 17 et 18) ainsi
que l'usure des cales de sécurité et des axes pivotants correspondants. Lubrifier les axes des cales de sécurité. En cas d'usure excessive, changer les cales de sécurité et/ou les axes.
2Utiliser une clé dynamométrique pour s'assurer que les vis de
fixation des bases des colonnes et que les boulons sont bien
serrés au sol.
3Nettoyer et lubrifier les roulettes et les guides du chariot.
4S'assurer que toutes les vis sont bien serrées.
5S'assurer que le système de blocage des bras fonctionne correctement.
6Graisser toutes les parties en mouvement.
1Die Funktionstüchtigkeit und die Wirksamkeit der Sicherheitsvorrichtungen (wie auf den Seiten 17 und 18 beschrieben) und
den Verschleiß der Sicherheitskeile und der entsprechenden
Drehzapfen kontrollieren. Die Zapfen der Sicherheitskeile
schmieren. Bei zu starkem Verschleiß die Sicherheitskeile
und/oder Zapfen auswechseln.
2Einen Momentenschlüssel verwenden, um zu kontrollieren,
dass die Verankerungsschrauben in den Säulensockeln und die
Schraubbolzen korrekt am Boden festgeschraubt sind.
3 Die Rollen und die Führungen des Schlittens kontrollieren.
4 Kontrollieren, dass alle Schrauben festgezogen sind.
5 Kontrollieren, dass das Sperrsystem der Schwenkarme korrekt
funktioniert.
6Alle sich bewegenden Teile schmieren.
1Controlar las condiciones de funcionamiento y la eficiencia de
los dispositivos de seguridad (según se describe en las páginas
17 y 18) y el desgaste de las cuñas de seguridad y de los respectivos pernos giratorios. Lubricar los pernos en las cuñas de
seguridad. En caso de desgaste excesivo, reemplazar las cuñas
de seguridad y/o los pernos.
2Usar una llave dinamométrica para comprobar que los tornillos
de anclaje de las bases de las columnas, como también los pernos, estén adecuadamente ajustados al suelo.
3Limpiar y lubricar las ruedas y las guías del carro.
4Controlar que todos los tornillos estén ajustados.
5Controlar que el sistema de bloqueo de los brazos funcione
correctamente.
6Engrasar todas las piezas en movimiento.
TOUS LES 6 MOIS
HYDRAULIQUE
ALLE 6 MONATE
HYDRAULIK
CADA 6 MESES
HIDRÁULICA
Contrôler le niveau de contamination ou de vieillissement de l'huile. L'huile contaminée est la cause principale de mauvais fonctionnement des vannes et abrège la durée de vie des pompes à
engrenages.
Den Verunreinigungsgrad und den Alterungsgrad des Öls kontrollieren. Verunreinigtes Öl ist die Hauptursache für Betriebsstörungen der Ventile und führt zu einer kurzen Lebensdauer der
Pumpen und Zahnräder.
Controlar el nivel de contaminación o de envejecimiento del aceite. El
aceite contaminado es la causa principal de mal funcionamiento de
las válvulas y causa una vida corta de las bombas y engranajes.
CÂBLE DE SYNCHRONISATION
SYNCHRONISIERUNGSSEILE
CABLE DE SINCRONIZACIÓN
Contrôler l'état des poulies et des gorges des poulies. Contrôler
l'usure du câble en fonction du diamètre ; s'assurer de l'absence
de ruptures de fils et de tout autre dommage important. À l'aide
d'un pinceau, graisser le câble pour en prévenir la corrosion et la
rupture due à l'oxydation.
Den Zustand der Laufrollen und der Laufrollenrillen kontrollieren.
Den Verschleiß des Seiles hinsichtlich Durchmesser, gerissene
Drähte, anderer Schäden oder größerer Veränderungen kontrollieren. Das Kabel mit einem Pinsel schmieren, um Korrosion und
Reißen infolge Rostens zu verhindern.
Controlar las condiciones de las poleas y de las ranuras de las
mismas. Controlar el desgaste del cable en base al diámetro, posibles filamentos rotos, otros daños o cambios importantes.
Engrasar el cable con un pincel para evitar corrosión o rotura por
oxidación.
TOUS LES 12 MOIS
ALLE 12 MONATE
CADA 12 MESES
Contrôle général : contrôle visuel de toutes les parties structurelles et des mécanismes pour s'assurer de l'absence de problèmes et d'anomalies.
Circuit électrique : un électricien qualifié (contacter à cet effet le
centre d'assistance) doit contrôler le circuit électrique, moteur de
l'unité de puissance, câbles, interrupteurs de fin de course et
tableau de contrôle inclus.
Allgemeine Überholung: Sichtkontrolle aller strukturellen Teile
und Mechanismen zur Gewährleistung, dass keine Anomalien
oder Störungen vorliegen.
Elektrische Anlage: Fachelektriker (Kundendienstcenter kontaktieren) müssen mit der Kontrolle der elektrischen Anlage,
einschließlich Motor der Leistungseinheit, Kabel, Endanschlagschalter und Steuertafel, beauftragt werden.
Control general: Inspección visual de todas las piezas estructurales y mecanismos para asegurarse de que no tienen problemas o anomalías.
Instalación eléctrica: electricistas expertos (contactarse con el
centro de asistencia) deberán controlar la instalación eléctrica,
incluido el motor de la unidad de potencia, cables, interruptores
de fin de carrera y tablero de control.
HUILE DU CIRCUIT HYDRAULIQUE
ÖL DER HYDRAULIKANLAGE
ACEITE DE LA INSTALACIÓN HIDRÁULICA
Effectuer une vidange d'huile en procédant comme suit :
1.Abaisser l'élévateur à la hauteur minimum (au sol)
2.S'assurer que le vérin hydraulique est en fin de course
3.Couper l'alimentation de l'élévateur
4.Vidanger l'huile du circuit hydraulique, en dévissant le bouchon
situé sur la partie inférieure du réservoir de l'unité de puissance
5.Refermer le bouchon de vidange
6.Remplir l'unité de puissance à travers le bouchon situé sur la
partie supérieure du réservoir de l'unité de puissance.
Das Öl wechsel. Dabei die nachfolgenden Anleitungen beachten:
1.Die Hebebühne auf die Mindesthöhe absenken (auf den Boden).
2.Kontrollieren, dss der Hydraulikzylinder am Endanschlag ist.
3.Die Stromversorgung der Hebebühne unterbrechen.
4.Das Öl aus dem Hydraulikkreislauf ablassen, indem der Stopfen am Unterteil des Leistungseinheitstanks abgeschraubt wird.
5.Den Ablassstopfen schließen.
6.Die Leistungseinheit durch den Stopfen am Oberteil des Leistungseinheitstanks mit Öl befüllen.
Sustituir el aceite siguiendo las instrucciones enumeradas a continuación:
1.Descender el elevador a la altura mínima (al suelo)
2.Asegurarse de que el cilindro hidráulico esté en el fin de carrera
3.Desconectar la alimentación del elevador
4.Drenar el aceite del circuito hidráulico, desenroscando el tapón colocado en la parte inferior del depósito de la unidad de potencia
5.Cerrar el tapón de drenaje
6.Llenar la unidad de potencia por el tapón colocado en la parte
superior del depósito de la unidad de potencia
50
Fig.42 Abb.42
L'olio deve essere filtrato
Le caratteristiche e tipi di olio sono riportate nelle specifiche tecniche (capitolo 2, pag.14)
1.Chiudere il tappo di riempimento
2.Dare energia al sollevatore
3.Effettuare due o tre cicli di sollevamento e discesa (per un'altezza di circa 20-30 centimetri) per inserire olio nel circuito.
Nel cambiare l'olio: usare solo olio raccomandato o equivalente;
non usare olio deteriorato che sia stato in magazzino per un lungo periodo di tempo. L'olio dovrebbe essere smaltito come indicato nell'appendice "A", pag.37.
Theoil must befiltered
Oil characteristics and types are reported in the technical specifications (chapter.2, page 14)
1. Close the filler plug
2. Energize the lift rack
3. Go through two or three up-down cycles (for a height about
20-30 centimeters) to insert oil into the circuit.
When changing the oil: use only recommend oil or the equivalent; do
not use deteriorated oil that has been in the warehouse for an extended period of time. Oil should be disposed as indicated in appendix
“A”, page 37.
DOPO OGNI OPERAZIONE DI MANUTENZIONE, LA
MACCHINA DEVE RITORNARE ALLA SUA
CONDIZIONE INIZIALE, INCLUSA LA PROTEZIONE
SMONTATA E I DISPOSITIVI DI SICUREZZA.
AFTER EACH MAINTENANCE OPERATION, THE
MACHINE MUST RETURN TO ITS INITIAL
CONDITIONS, INCLUDING THE DISASSEMBLEED
PROTECTION AND SAFETY DEVICE.
Per assicurare una buona manutenzione, è importante:
1.Utilizzare solo attrezzi che siano adatti per il lavoro e parti di ricambio originali
2.Seguire la tabella minima di manutenzione come indicato
3.Trovare velocemente la causa di qualsiasi anomalia (rumore
eccessivo, surriscaldamento, perdita di fluidi, ecc.)
4.Fare particolare attenzione alle parti connesse con il sollevamento (cilindri) e ai dispositivi di sicurezza
5.Utilizzare tutta la documentazione fornita dal costruttore (diagrammi di cablaggio, ecc.)
To ensure good maintenance, it is important:
1. To use only tools that are suitable for the job and original spare
parts
2. Follow the minimum maintenance schedule as indicated
3. Immediately find the cause of any abnormalities (excessive
noise, overheating, leaking fluids, etc)
4. Pay special attention to lifting parts (cylinders) and safety devices
5. Use all the documentation supplied by the manufacturer (wiring
diagrams, etc)
TABELLA DI LUBRIFICAZIONE PERIODICA
Lubrificare il sollevatore come indicato in fig.42. Il grasso deve essere
preso da recipienti perfettamente chiusi e ben conservati. Grasso
vecchio o rovinato potrebbe danneggiare la parte lubrificata.
PERIODIC LUBRIFICATION CHART
Lubricate the rack as indicated in Fig.42. Grease must be taken
from perfectly closed tins and/or well preserved. Old or damaged
grease may damage the lubricated part.
51
L'huile doit être filtrée.
Das Öl muss gefiltert werden
El aceite debe ser filtrado
Les caractéristiques et les types d'huile sont indiqués dans le
chapitre des caractéristiques techniques (chapitre 2, page 14).
1.Fermer le bouchon de remplissage
2.Mettre l'élévateur sous tension
3.Effectuer deux ou trois cycles de levage et de descente (sur
une hauteur d'environ 20-30 centimètres) pour répartir l'huile
dans le circuit.
Die Öleigenschaften und der Öltyp sind in den technischen Spezifikation (Kapitel 2, Seite 14) angegeben
1.Den Befüllstopfen schließen
2.Die Stromversorgung der Hebebühne einschalten
3.Zwei oder drei Hebe- und Absenkzyklen durchführen (um eine
Höhe von zirka 20-30 Zentimeter), damit das Öl sich in Kreislauf
verteilen kann.
Las características y los tipos de aceite se indican en las especificaciones técnicas (capítulo 2, pág.14)
1.Cerrar el tapón de llenado
2.Suministrar energía al elevador
3.Efectuar dos o tres ciclos de elevación y descenso (20-30
centímetros de altura, aproximadamente) para introducir aceite
en el circuito.
Pour la vidange d'huile, utiliser uniquement une huile recommandée ou équivalente ; ne pas utiliser d'huile usée et stockée pendant une longue durée. L'huile usée doit être éliminée comme indiqué dans l'appendice "A", page 37.
Beim Ölwechsel: Nur das empfohlene Öl oder ein gleichwertiges
Öl verwenden. Niemals altes Öl verwenden, das über einen langen Zeitraum im Lager gestanden hat. Das Öl muss wie in
Anhang "A" auf Seite 37 beschrieben entsorgt werden.
Cuando se cambia el aceite: usar solamente aceite recomendado o equivalente; no usar aceite deteriorado que haya estado almacenado por largo tiempo. El aceite debe ser eliminado como
se indica en el apéndice "A", pág. 37.
À L'ISSUE DE CHAQUE OPÉRATION D'ENTRETIEN,
LA MACHINE DOIT ÊTRE REPLACÉE DANS LES
CONDITIONS INITIALES, EN REMONTANT LA
PROTECTION ET LES DISPOSITIFS DE SÉCURITÉ.
Pour assurer un bon entretien, veiller au respect des recommandations suivantes :
NACH JEDEM WARTUNGSEINGRIFF MUSS DIE
MASCHINE WIEDER IN IHREN URSPRÜNGLICHEN
ZUSTAND VERSETZT WERDEN UND DIE
ABGEBAUTEN SCHUTZVORRICHTUNGEN UND
SICHERHEITSVORRICHTUNGEN MÜSSEN WIEDER
ANGEBRACHT WERDEN.
DESPUÉS DE CADA OPERACIÓN DE
MANTENIMIENTO, LA MÁQUINA DEBE
RECOBRAR SU CONDICIÓN INICIAL,
INCLUSIVE LA PROTECCIÓN DESMONTADA Y
LOS DISPOSITIVOS DE SEGURIDAD.
1.Utiliser uniquement des pièces détachées d'origine et des instruments et outils en bon état et adaptés aux opérations à
effectuer ;
2.Suivre les indications du tableau d'entretien ;
3.En cas d'anomalie telle qu'un bruit excessif, une surchauffe,
une fuite de liquide, etc., veiller à en établir rapidement la cause.
4.Accorder toute l'importance nécessaire aux éléments de levage (vérins) et aux dispositifs de sécurité.
5.Utiliser toute la documentation fournie par le constructeur (diagrammes de branchement, etc.).
Für die Gewährleistung der korrekten Wartung ist Folgendes wichtig:
1.Ausschließlich Werkzeuge, die für die Arbeit geeignet, und Originalersatzteile verwenden.
2.Die in diesem Handbuch enthaltene Wartungstabelle befolgen.
3.Es ist immer sofort nach der Ursache von Störungen wie zum
Beispiel zu starker Lärm, Überhitzung, Flüssigkeitsleckagen usw.
zu suchen.
4.Bauteile, die mit dem Hebevorgang verbunden sind (Zylinder),
nd Sicherheitsvorrichtungen besonders sorgfältig kontrollieren.
5.Alle vom Hersteller gelieferten Unterlagen verwenden (Verkabelungspläne usw.
TABLEAU DE LUBRIFICATION PÉRIODIQUE
Lubrifier l'élévateur comme indiqué sur la Fig. 42. La graisse utilisée doit être conservée dans des récipients parfaitement fermés
et eux-mêmes conservés dans de donnes conditions. Une graisse usée peut endommager les parties lubrifiées.
52
TABELLE REGELMÄSSIGE SCHMIERUNG
Die Hebebühne wie auf Abb. 42 angegeben schmieren. Das
Schmierfett muss perfekt verschlossenen und korrekt gelagerten
Behältern entnommen werden. Altes oder unbrauchbares Schmierfett kann zu einer Beschädigung der geschmierten Bauteile führen.
Para asegurar un buen mantenimiento es importante:
1.Utilizar únicamente herramientas aptas para el trabajo y piezas
de repuesto originales
2.Seguir la tabla mínima de mantenimiento como se indica
3.Encontrar rápidamente la causa de cualquier anomalía (ruido
excesivo, sobrecalentamiento, pérdida de líquidos, etc.)
4.Prestar especial atención a partes vinculadas con la elevación
(cilindros) y a los dispositivos de seguridad
5.Utilizar toda la documentación suministrada por el fabricante
(diagramas de cableado, etc.)
TABLA DE LUBRICACIÓN PERIÓDICA
Lubricar el elevador como indica la fig. 42. La grasa debe tomarse de recipientes perfectamente cerrados y bien conservados.
La grasa vieja o deteriorada podría dañar la pieza lubricada.
CAPITOLO 7 RISOLUZIONE DEI
PROBLEMI
GUIDA ALLA RISOLUZIONE DEI PROBLEMI
La risoluzione dei problemi e la possibile riparazione richiedono
adempimento assoluto a TUTTE LE PRECAUZIONI DI SICUREZZA
indicate nel capitolo 6 "MANUTENZIONE" e nel capitolo 3
"SICUREZZA".
PROBLEMI E SOLUZIONI POSSIBILI
Problema
Il sollevatore non si alza
quando viene premuto il pulsante
(il motore non funziona)
Il sollevatore non si alza
quando viene premuto il pulsante
(il motore funziona)
Possibile causa
Fusibile bruciato
La corrente non arriva
Malfunzionamento nell’impianto elettrico:
-Interruttore di finecorsa rotto
-Motore bruciato
Non c’è abbastanza olio
Valvola solenoide di drenaggio aperta
Valvola di pressione massima funzionante
Perdite nel circuito idraulico
Il sollevatore continua a salire Pulsante guasto
dopo aver rilasciato il pulsante di sollevamento
Il sollevatore non scende
Oggetto che ostacola
Valvola solenoide bloccata
Il sollevatore non sale fino
alla massima altezza
Dopo aver rilasciato il pulsante di sollevamento, il sollevatore si ferma e scende lentamente
Il motore dell’unità di potenza
si surriscalda
La pompa dell’unità di potenza è rumorosa
Perdita di olio dal cilindro
Soluzione
CHAPTER 7 TROUBLESHOOTING
TROUBLESHOOTING GUIDE
Troubleshooting and possible repairs require absolute complian
ce with ALL THE SAFETY PRECAUTIONS indicated in chapter 6
“MAINTENANCE” and chapter 3 “SAFETY”.
POSSIBLE PROBLEMS AND SOLUTIONS
PROBLEM
POSSIBLE CAUSE
Rimpiazzare il fusibile
Connettere di nuovo
Chiamare il centro assistenza
The lift does non rise
when the pushbutton is
pressed (motor does not
run)
Burnt fuse
Replace fuse
Line current does not arrive Connect again
Malfunction in the electric
Call Service Center
plant:
-Broken limit switch
-burnt motor
Rabboccare il livello di
olio
Verificare le connessioni
elettriche o sostituirle
Abbassare il carico
The lift does non rise
when the pushbutton is
pressed (motor runs)
Not enough oil
Drain solenoid valve opened
Max pressure valve working
Leaks in the hydraulic circuit
Top un oil level
Check electric connections
or change it
Take load down
Repair the hydraulic circuit
Lift continues to rise after having released the
up pushbutton
Faulty pushbutton
Unplug the lift and call Service Center
Lift does not descend
Forging object
Solenoid valve blocked
Malfunction in the electric
plant
Carriages still lean on security devices
Block valves have tripped
Remove object
Change it (call Service Center)
Call Service Center
Make the correct descent
sequence
Repair the hydraulic circuit
damage
Riparare il circuito idraulico
Scollegare il sollevatore
e contattare il centro assistenza
Rimuovere l’oggetto
Cambiarla (contattare il
centro assistenza)
Chiamare il centro assistenza
Malfunzionamento nell’impianto elettrico
Carrelli che poggiano ancora sui dispositivi di sicurezza Svolgere la corretta sequenza di discesa
Le valvole di blocco sono
Riparare danno al circuiscattate
to idraulico
Non c’è sufficiente olio
Aggiungere olio nel serbatoio dell’olio dell’unità
di potenza
La valvola di drenaggio non Selezionare contemposi chiude perché è sporca
raneamente i movimenti
di sollevamento e disceValvola di drenaggio difettosa sa, per pulire la valvola
Cambiarla (contattare il
centro assistenza)
Malfunzionamento del motore Chiamare il centro assistenza
Voltaggio scorretto
Verificare il voltaggio
Olio sporco
Cambiare l’olio
Montaggio scorretto
Chiamare il centro assistenza
Guarnizioni danneggiate
Sostituire le guarnizioni
danneggiate
Pulire tutte le parti
Sporcizia nell’impianto
Verificare che le valvole
non siano danneggiate
SOLUTION
The lift does not rise to the Oil is not enough
maximum height
Add oil into the power unit oil
tank
After having released the Drain valve dose not close
up pushbutton, the lift
because it is dirty
stops and lowers slowly Defective drain valve
At the same time set the
rise and descent movements, to clean the valve
Change (call Service Center)
The power unit motor
overheats
Call Service Center
Check voltage
Motor malfunction
Wrong voltage
Power unit pump is noisy Dirty oil
Wrong assembling
Change oil
Call Service Center
Oil leakage from cylinder Damaged gaskets
Dirt in the plant
Change the damaged gaskets
Clean all parts
Check the valves are not
damaged
53
CHAPITRE 7 PANNES ET REMÈDES
INSTRUCTIONS POUR RÉSOUDRE LES
ANOMALIES
La solution des anomalies et les éventuelles réparations nécessitent
le respect de TOUTES LES PRÉCAUTIONS DE SÉCURITÉ indiquées dans le chapitre 6 “ENTRETIEN” et dans le chapitre 3
“SÉCURITÉ
ANOMALIES, CAUSES PROBABLES ET
SOLUTIONS
Anomalie
Cause probable
Solution
KAP. 7 BEHEBUNG VON
STÖRUNGEN
ANLEITUNG ZUR STÖRUNGSBEHEBUNG
GUÍA PARA RESOLVER PROBLEMAS
Bei der Behebung von Störungen und der eventuellen Reparatur
müssen unbedingt ALLE SICHERHEITSMASSNAHMEN getroffen werden, die in Kapitel 6 "WARTUNG" und in Kapitel 3
"SICHERHEIT" angegeben sind.
La resolución de los problemas y la posible reparación requiere
el cumplimiento absoluto de TODAS LAS PRECAUCIONES DE
SEGURIDAD indicadas en el capítulo 6 "MANTENIMIENTO" y
en el capítulo 3 "SEGURIDAD".
STÖRUNGEN UND MÖGLICHE ABHILFEN
PROBLEMAS Y POSIBLES SOLUCIONES
Störung
Mögliche Ursache
Abhilfe
El elevador no se eleva al presionar el pulsador
(el motor no funciona)
Fusible quemado
Falta de corriente
Mal funcionamiento de la
instalación eléctrica
-Interruptor de fin de carrera
roto
-Motor quemado
Reemplazar el fusible
Conectar de nuevo
Llamar al centro de asistencia
Nicht ausreichend Öl vorhanden
Ablass-Solenoidventil geöffnet
Druckbegrenzungsventil funktioniert
Leckagen am Hydraulikkreislauf
Öl nachfüllen
Stromanschlüsse kontrollieren
oder auswechseln
Last absenken
El elevador no se eleva al presionar el pulsador
(el motor funciona)
No hay aceite suficiente
Válvula solenoide de drenaje abierta
Válvula de presión máxima
funcionando
Pérdida en el circuito hidráulico
Repostar el nivel de aceite
Controlar las conexiones
eléctricas o sustituirlas
Disminuir la carga
El elevador sigue subiendo después de
soltar el pulsador de
elevación
Pulsador averiado
Desconectar el elevador y
contactar al centro de asistencia
El elevador no desciende
Objeto que obstaculiza
Válvula solenoide bloqueada
Mal funcionamiento en la
instalación eléctrica
Los carros se apoyan todavía en los dispositivos de
seguridad
Intervinieron las válvulas de
bloqueo
Quitar el objeto
Cambiarla (contactar al
centro de asistencia)
Llamar al centro de asistencia
El elevador no sube
hasta su máxima altura
No hay aceite suficiente
Agregar aceite al depósito
de aceite de la unidad de
potencia
Después de haber
soltado el pulsador de
elevación, el elevador
se detiene y desciende lentamente
La válvula de drenaje no se
cierra porque está sucia
Válvula de drenaje defectuosa
Seleccionar al mismo tiempo los movimientos de elevación y de descenso para
limpiar la válvula
Cambiarla (contactar al
centro de asistencia)
El motor de la unidad
de potencia se sobrecalienta
Mal funcionamiento del motor
Voltaje incorrecto
Llamar al centro de asistencia
Controlar el voltaje
La bomba de la unidad de potencia hace
ruido
Aceite sucio
Montaje incorrecto
Cambiar el aceite
Llamar al centro de asistencia
Pérdida de aceite del
cilindro
Juntas dañadas
Sustituir las juntas dañadas
Limpiar todas las piezas
Controlar que las válvulas
no estén dañadas
(le moteur fonctionne) Vanne de pression maximum en
état de marche.
Fuite sur le circuit hydraulique.
Abaisser la charge.
Réparer le circuit hydraulique.
Débrancher l’élévateur et
contacter le centre d’assistance.
Die Hebebühne
steigt nach Loslassen der Hebetaste weiter auf
Defekte Taste
Die Stromversorgung der Hebebühne unterbrechen und
das Kundendienstcenter kontaktieren
Die Hebebühne
sinkt nicht ab
Ein Gegenstand behindert
das Absinken
Blockiertes Solenoidventil
Gegenstand entfernen
Auswechseln (Kundendienstcenter kontaktieren)
Kundendienstcenter kontaktieren
Anomalie sur le circuit électrique.
Chariots encore en appui sur les
dispositifs de sécurité.
Intervention des vannes de blocage.
L’élévateur ne s’élève Quantité d’huile insuffisante.
pas jusqu’à la hauteur
maximum.
Le véhicule a heurté la barre de fin
de course.
Après avoir relâché le La vanne de drainage ne se ferbouton de levage, l’é- me pas parce qu’elle est sale.
lévateur s’arrête et
Vanne de drainage défectueuse.
descend lentement.
Le moteur de l’unité de Mauvais fonctionnement du motepuissance surchauffe. ur.
Voltage incorrect.
La pompe de l’unité de Huile sale.
puissance est bruyan- Mauvais montage.
te.
Fuite d’huile au niveau Joints endommagés.
du vérin.
Saletés dans le circuit.
54
Retirer l’objet.
La changer (contacter le
centre d’assistance).
Contacter le centre d’assistance.
Störung der elektrischen
Anlage:
Schlitten liegen noch auf den
Sicherheitskeilen auf
Die Sperrventile haben angesprochen
Effectuer la bonne séquence
de descente.
Réparer le dommage du circuit hydraulique.
Ajouter de l’huile dans le réservoir d’huile de l’unité de
puissance.
Fonctionnement normal.
Sélectionner simultanément les mouvements de
levage et de descente,
pour nettoyer la vanne.
La changer (contacter le
centre d’assistance).
Contacter le centre d’assistance.
Contrôler le voltage.
Effectuer la vidange d’huile.
Contacter le centre d’assistance.
Changer les joints endommagés.
Nettoyer toutes les parties.
S’assurer que les vannes ne
sont pas endommagées.
Solución
Die Sicherung auswechseln
Neu anschließen
Kundendienstcenter kontaktieren
Die Hebebühne
steigt bei Drücken
der Taste nicht
auf
(der Motor funktioniert)
L’élévateur continue
Bouton défectueux.
de s’élever après avoir
relâché le bouton de
levage.
L’élévateur ne deÉléments faisant obstacle.
scend pas.
Vanne solénoïde bloquée.
Causa posible
Durchgebrannte Sicherung
Stromversorgung unterbrochen
Störung der elektrischen
Anlage:
- Endanschlagschalter defekt
- Motor durchgebrannt
Changer le fusible.
Brancher.
Contacter le centre d’assistance.
Rajouter de l’huile.
Contrôler les branchements
électriques ou les modifier.
Problema
Die Hebebühne
steigt bei Drücken
der Taste nicht
auf
(der Motor funktioniert nicht)
Fusible grillé.
Absence d’alimentation électrique.
Anomalie sur le circuit électrique :
- rupture interrupteur de fin de course
- moteur grillé
L’élévateur ne s’élève Quantité d’huile insuffisante.
pas en appuyant sur le Vanne solénoïde de drainage ouverte.
bouton.
L’élévateur ne s’élève
pas en appuyant sur le
bouton.
(le moteur ne se met
pas en marche)
CAPÍTULO 7 RESOLUCIÓN DE
PROBLEMAS
Hydraulikkreis reparieren
Die korrekte Absenkreihenfolge anwenden
Hydraulikkreislauf reparieren
Die Hebebühne
steigt nicht bis an
den oberen
Endanschlag auf
Nicht ausreichend Öl vorhanden
Öl in den Leistungseinheitstank nachfüllen.
Nach dem Loslassen der Hebetaste
hält die Hebebühne an und
sinkt langsam ab
Das Ablassventil schließt
sich nicht, weil es schmutzig
ist
Die Auf- und Abwärtsbewegung gleichzeitig einschalten,
um das Ventil zu reinigen
Auswechseln (Kundendienstcenter kontaktieren)
Der Motor der Leistungseinheit ist
überhitzt
Betriebsstörung des Motors
Falsche Spannung
Kundendienstcenter kontaktieren
Spannung kontrollieren
Die Pumpe der
Leistungseinheit
ist zu heiß
Schmutziges Öl
Falsche Montage
Öl wechseln
Kundendienstcenter kontaktieren
Ölleckage am
Zylinder
Beschädigte Dichtungen.
Die beschädigten Dichtungen
auswechseln
Alle Teile reinigen
Kontrollieren, dass die Ventile
nicht beschädigt sind.
Defektes Ablassventil
Schmutz in der Anlage
Suciedad en la instalación
Reparar el circuito hidráulico
Efectuar la secuencia correcta de descenso
Reparar el daño del circuito
hidráulico
CAPITOLO 8 INFORMAZIONI SULLE
REGOLAMENTAZIONI
CHAPTER 8 REGULATORY
INFORMATION
LEGGI
LAWS
Direttive europee 2004/108/CE - 2006/42/CE - 2006/95/CE
European directives
2004/108/CE - 2006/42/CE - 2006/95/CE
STANDARD TECNICI
Standard europei EN 1493 / EN ISO 12100/1 2005 - EN ISO
12100/2 2005
IMPIANTO ELETTRICO
EN 60204-1
APPENDICE A-NOTE SPECIALI
A.1 SMALTIMENTO DI OLIO USATO
L'olio usato, che viene rimosso dall'unità di potenza e dall'impianto durante
un cambio d'olio, deve essere trattato come un prodotto inquinante, in ottemperanza alle prescrizioni legali del paese in cui il sollevatore è installato.
A.2 DEMOLIZIONE DELLA MACCHINA
DURANTE LA DEMOLIZIONE DELLA MACCHINA, SEGUIRE TUTTE LE
PRECAUZIONI DI SICUREZZA DESCRITTE NEL CAPITOLO 3, CHE
SONO ANCHE VALIDE PER IL MONTAGGIO.
La macchina deve essere demolita da tecnici autorizzati, proprio come per il
montaggio. Le parti metalliche possono essere riciclate come ferro. In ogni caso,
tutti i materiali derivanti dalla demolizione devono essere smaltiti in ottemperanza
agli standard correnti nel paese in cui il sollevatore è installato. In conclusione, si
dovrebbe ricordare che, a scopo fiscale, la demolizione deve essere documentata, sottomettendo richieste e documentazioni in base alle leggi vigenti del paese
in cui il sollevatore è installato nel momento in cui la macchina viene demolita.
TECHNICAL STANDARDS
European standards
EN 1493 / EN ISO 12100/1 2005 - EN ISO 12100/2 2005
ELECTRIC PLANT
EN 60204-
1APPENDIX A-SPECIAL NOTES
A.1 DISPOSAL OF USED OIL
Used oil, which is removed from the power unit and the plant during an oil
change, must be treated as a polluting product, in accordance with the legal
prescriptions of the country in which the lift is installed.
A.2 MACHINE DEMOLITION
DURING MACHINE DEMOLITION, COMPLY WITH ALL THE SAFETY
PRECAUTIONS DESCRIBED IN CHAPTER 3, WHICH ARE ALSO VALID
FOR ASSEMBLING.
The machine must be demolished by authorized technicians, just like for assembling. The metallic parts can be scrapped as iron. In any case, all the materials deriving from the demolition must be disposed of in accordance with
the current standards of the country in which the rack is installed.Finally, it
should be recalled that for tax purposes, demolition must be documented;
submitting claims and documents according to the current laws in the country
in which the rack is installed at the time the machine is demolished.
APPENDICE B PARTI DI RICAMBIO
APPENDIX B SPARE PARTS
B.1 PARTI DI RICAMBIO
B.1 SPARE PARTS
Nel sostituire parti o svolgere riparazioni, adempiere a TUTTE LE
PRECAUZIONI DI SICUREZZA descritte nel capitolo 6 MANUTENZIONE e
nel capitolo 3 SICUREZZA.
Prendere tutte le precauzioni necessarie per EVITARE UN AVVIAMENTO
ACCIDENTALE DEL SOLLEVATORE:
1.L'interruttore nel quadro di controllo deve essere bloccato nella posizione
0 con un lucchetto.
2.La chiave del lucchetto deve essere in possesso del meccanico riparatore
durante l'operazione di manutenzione.
When replacing parts and making repairs, comply with ALL THE SAFETY
PRECAUTIONS described in chapter 6 MAINTENANCE and in chapter 3
SAFETY
Take all the necessary precautions to AVOID ACCIDENTAL START-UP OF
THE LIFT
1. The switch on the control box must be blocked in position 0 with a lock
2. The key of the lock must be kept by the maintenance fitter during the maintenance operation.
B.2 PROCEDURA PER ORDINAZIONE DI PARTI DI
RICAMBIO
B.2 PROCEDURE FOR ORDERING SPARE
PARTS
Per ordinare parti di ricambio:
1.Indicare il numero di serie del sollevatore e l'anno di costruzione
2.Indicare il codice del pezzo richiesto (vedere le colonne del CODICE nelle tabelle)
3.Indicare la quantità richiesta.
La richiesta deve essere sottoposta al rivenditore autorizzato come indicato
nel frontespizio del manuale.
To order spare parts:
1. Indicate the serial number of the lift and the year built
2. Indicate the code of the piece requested (see the CODE” columns in the
tables)
3. Indicate the quantity required.
The request must be submitted to the authorized reseller as indicated in the
front of the manual.
55
CHAPITRE 8 INFORMATIONS SUR LA
RÉGLEMENTATION
KAPITEL 8 INFORMATIONEN ZU DEN
EINSTELLUNGEN
LOIS
GESETZE
Directives européennes 2004/108/CE - 2006/42/CE 2006/95/CE
Europäische Richtlinien 2004/108/EG - 2006/42/EG 2006/95/EG
STANDARDS TECHNIQUES
TECHNISCHE NORMEN
Standards européens EN 1493 / EN ISO 12100/1 2005 - EN ISO
12100/2 2005
Europäische Normen EN 1493 / EN ISO 12100/1 2005 - EN ISO
12100/2 2005
CIRCUIT ÉLECTRIQUE
ELEKTRISCHE ANLAGE
EN 60204-1
EN 60204-1
APPENDICE A - NOTES SPÉCIALES
A.1 ÉLIMINATION DE L'HUILE USÉE
ANHANG A - BESONDERE HINWEISE
A.1 ALTÖLENTSORGUNG
CAPÍTULO 8 INFORMACIÓN SOBRE
LAS REGLAMENTACIONES
LEYES
Directivas europeas 2004/108/CE - 2006/42/CE - 2006/95/CE
ESTÁNDARES TÉCNICOS
Estándares europeos EN 1493 / EN ISO 12100/1 2005 - EN ISO
12100/2 2005
INSTALACIÓN ELÉCTRICA
EN 60204-1
APÉNDICE A - NOTAS ESPECIALES
A.1 ELIMINACIÓN DE ACEITE USADO
L'huile usée, provenant de l'unité de puissance et du circuit après vidange, doit être traitée comme une substance polluante, dans le respect de la réglementation en vigueur dans le pays où l'élévateur est
installé.
Das aus der Leistungseinheit und der Anlage beim Ölwechsel abgelassene Altöl muss entsprechend den gesetzlichen Vorschriften des
Landes, in dem die Hebebühne betrieben wird, entsorgt werden.
El aceite usado, extraído de la unidad de potencia y de la instalación
durante el cambio de aceite, debe ser tratado como un producto contaminante, de acuerdo con las prescripciones legales del país en el
cual se instala el elevador.
A.2 DÉMOLITION DE LA MACHINE
A.2 VERSCHROTTUNG DER MASCHINE
A.2 DESGUACE DE LA MÁQUINA
POUR LA DÉMOLITION DE LA MACHINE, VEILLER À RESPECTER
TOUTES LES PRÉCAUTIONS DE SÉCURITÉ INDIQUÉES DANS LE
CHAPITRE 3 (VALABLES ÉGALEMENT POUR LE MONTAGE).
La machine doit être démolie par des techniciens autorisés à cet effet,
comme pour le montage. Les parties métalliques (en fer par exemple) peuvent être recyclées. Dans tous les cas, tous les matériaux issus de la démolition doivent être éliminés dans le respect de la réglementation en vigueur dans le pays où l'élévateur est installé. Par ailleurs, aux fins fiscales, la démolition doit être documentée, en établissant, au moment de la
démolition, les demandes et les documents nécessaires conformément à
la réglementation en vigueur dans le pays où l'élévateur est installé.
APPENDICE B PIÈCES DÉTACHÉES
B.1 PIÈCES DÉTACHÉES
Pour le changement de pièces et pour les éventuelles réparations, veiller au respect de TOUTES LES RECOMMANDATIONS DE SÉCURITÉ indiquées
dans le chapitre 6 ENTRETIEN et dans le chapitre 3 SÉCURITÉ.
Prendre toutes les précautions nécessaires pour ÉVITER UNE MISE EN
MARCHE INVOLONTAIRE DE L'ÉLÉVATEUR :
1.L'interrupteur du tableau de contrôle doit être bloqué sur la position 0 à l'aide
d'un cadenas.
2.La clé du cadenas doit être conservée par le technicien d'entretien durant l'opération d'entretien.
B.2 PROCÉDURE DE COMMANDE DES PIÈCES
DÉTACHÉES
Pour la commande de pièces détachées :
1.Indiquer le numéro de série de l'élévateur et l'année de construction ;
2.Indiquer le code de la pièce nécessaire (voir les colonnes du CODE
dans les tableaux) ;
3.Indiquer la quantité nécessaire.
La demande doit être présentée au revendeur agréé indiqué sur la couverture du manuel.
56
BEI DER DEMONTAGE DER MASCHINE SIND ALLE
VORSICHTSMASSNAHMEN ZU TREFFEN, DIE IN KAPITEL 3 DIESES
HANDBUCHS AUFGEFÜHRT SIND UND AUCH FÜR DIE MONTAGE
GELTEN.Die Maschine muss von autorisierten Technikern verschrottet werden, so wie auch die Montage. Die Metallteile können als Eisen recycelt werden. Auf jeden Fall müssen alle bei der Demontage anfallenden Materialien
entsprechend den gesetzlichen Vorschriften des Landes, in dem die Maschine
betrieben wird, entsorgt werden. Abschließend wird darauf hingewiesen, dass
die Demontage zu steuerlichen Zwecken belegt werden muss und dann die
entsprechenden Anfragen und Unterlagen auf der Grundlage der Gesetze zusammengestellt werden müssen, die im Aufstellland zum Zeitpunkt der Demontage gelten.
DURANTE EL DESGUACE DE LA MÁQUINA SEGUIR TODAS
LAS PRECAUCIONES DE SEGURIDAD DESCRITAS EN EL
CAPÍTULO 3, QUE TAMBIÉN VALEN PARA EL MONTAJE.
La máquina debe ser desguazada por técnicos autorizados, tal como para
el montaje. Las piezas metálicas pueden reciclarse como hierro. En todo
caso, todos los materiales derivados del desguace deben eliminarse de
acuerdo a los estándares corrientes del país en el cual está instalado el
elevador. En conclusión, debe recordarse que, a los fines fiscales, el desguace debe ser documentado, sometiéndose a los requisitos y documentación de las leyes vigentes en el país en el cual el elevador está instalado en el momento del desguace.
ANHANG B ERSATZTEILE
B.1 ERSATZTEILE
APÉNDICE B PIEZAS DE REPUESTO
B.1 PIEZAS DE REPUESTO
Beim Auswechseln von Bauteilen und bei der eventuellen Reparatur müssen
unbedingt ALLE SICHERHEITSMASSNAHMEN getroffen werden, die in Kapitel 6 "WARTUNG" und in Kapitel 3 "SICHERHEIT" angegeben sind.
Alle notwendigen Vorsichtsmaßnahmen treffen, die notwendig sind, um DAS
UNBEABSICHTIGTE EINSCHALTEN DER HEBEBÜHNE ZU VERMEIDEN.
Cuando se sustituyan piezas o se realicen reparaciones, cumplir TODAS
LAS PRECAUCIONES DE SEGURIDAD descritas en el capítulo 6
MANTENIMIENTO y en el capítulo 3 SEGURIDAD.
1.Der Hauptschalter an der Steuertafel muss mit einem
Vorhängeschloss in Position 0 gesperrt werden.
2.Der Schlüssel des Vorhängeschlosses muss während der Wartungsarbeiten vom Reparaturmechaniker verwahrt werden.
B.2 ERSATZTEILBESTELLUNG
Bei der Bestellung von Ersatzteilen ist anzugeben:
1.Seriennummer der Hebebühne und Baujahr
2.Code des gewünschten Bauteils (siehe CODE-Spalte in den Tabellen)
3.Gewünschte Menge
Die Bestellung ist an den auf der Titelseite dieses Handbuchs angegebenen Vertragshändler zu richten.
Tomar todas las precauciones necesarias para EVITAR UNA
PUESTA EN MARCHA ACCIDENTAL DEL ELEVADOR:
1.El interruptor en el tablero de control debe ser bloqueado en la posición 0 con un candado.
2.La llave del candado debe estar en posesión del mecánico reparador durante la operación de mantenimiento.
B.2 PROCEDIMIENTO PARA ORDENAR PIEZAS
DE REPUESTO
Para ordenar piezas de repuesto:
1.Indicar el número de serie del elevador y el año de fabricación
2.Indicar el código de la pieza solicitada (ver las columnas del CÓDIGO
en las tablas)
3.Indicar la cantidad solicitada.El pedido debe estar sujeto al revendedor
autorizado como se indica en la portada del manual.
STRUTTURA PRINCICPALE (380)
MAIN STRUCTURE (380V)
COLONNA COMANDO (380)
MAIN COLUMN (380V)
QUADRO ELETTRICO TRIFASE(380V)
THREE-PHASE CONTROL PANEL (380V)
CENTRALINA OLEODINAMICA (380V)
OLEODYNAMIC CONTROL UNIT (380V)
STRUTTURA PRINCICPALE (220)
MAIN STRUCTURE (220V)
COLONNA COMANDO (220)
MAIN COLUMN (220V)
QUADRO ELETTRICO MONOFASE (220V)
MONO-PHASE CONTROL PANEL (220V)
CENTRALINA OLEODINAMICA (220V)
OLEODYNAMIC CONTROL UNIT (220V)
BASAMENTO
CHASSIS
CILINDRO
CYLINDER
CARRELLO PRINCIPALE
MAIN CARRIAGE
CARRELLO SECONDARIO
SUB CARRIAGE
BRACCIO LUNGO
LONG ARM
BRACCIO CORTO
SHORT ARM
BLOCCAGGIO BRACCI
ARM LOCKING DEVICE
BLOCAGE DES BRAS
ARMSPERRVORRICHTUNG
DISPOSITIVO BLOCAJE DE BRAZOS
COLONNA SERVIZIO
SUB COLUMN
Part Code
A0444
Descrizione
Description
Beschreibung
Description
Denominacion
SEEGER E25 UNI 7435
SEEGER E25 UNI 7435
SEEGER E25 UNI 7435
ANNEAU ÉLASTIQUE ØE 25
ARO ELÁSTICO ØE 25
VITE TCEI M6X12 UNI 5931 ZB
HEX. SOCKET HEAD SCREW M6X12
UNI 5931 ZB
VERZINKT ZYLINDERSCHRAUBE MIT
INNENSECHSKANT M6X12
A0745
VIS TCEI M6X12 GALVANISÉE
TORNILLO TCEI M6X12 UNI 5931
A1420
VITE TE 6X12 UNI 5739
SCREW 6X12 8.8 UNI 5739
SCHRAUBE 6X12 8.8
VIS TE 6X12 8.8
TORNILLO
B0030
VITE TE M8X16 UNI 5739
SCREW TE M8X16 UNI 5739
SECHSKANTSCHRAUBE M8X16 UNI
5739
VIS TH M8X16 UNI 5739
TORNILLO TE M8X16
B0053
SEEGER E40 UNI 7435
SEEGER E40 UNI 7435
SEEGER E40 UNI 7435
BAGUES E40 UNI 7435
ARO ELÁSTICO ØE 40
B0065
VITE TE M10X50 UNI 5739
SCREW TE M10X50 UNI 5739
SCHRAUBE TE M10X50 UNI 5739
VIS TE M10X50 UNI 5739
TORNILLO M10X50 UNI 5739
FUSIBILE 2A 10X38
FUSE 10X38 2A
SCHMELZSICHERUNG 10X38 2A
FUSIBLE 10X38 2A
FUSIBILE 10X38 2A
ECROU DE SÉCURITÉ GAUCHE
COMPLET
TORNILLO M10X10 UNI 5739
B0091
Sugg.
*
B0111
VITE TE M10X10 UNI 5739
SCREW TE M10X10 UNI 5739
SECHSKANTSCHRAUBE M10X10 UNI
5739
B0121
VITE TE M10X12 UNI 5739
SCREW TE M10X12 UNI 5739
SECHSKANTSCHRAUBE M10X12 UNI
5739
VIS TH M 10X12 UNI 5739
TORNILLO M10X12 UNI 5739
B0216
VITE TE M8X12 UNI 5739 ZB
SCREW TE M8X12 UNI 5739
SCHRAUBE M8X12 UNI 5739
VIS TH M8X12 UNI 5739
TORNILLO TE M8X12 UNI5739
B0600
SEEGER E28 UNI 7435
SEEGER E28 UNI 7435
SEEGER E28 UNI 7435
BAGUES E285 UNI 7435
ARO ELÁSTICO ØE 28
SCHRAUBE
VIS
TORNILLO
SOLENOID
SOLÉNOÏDE
SOLENOIDE
B0923
VITE TCCR M4X30 UNI7687
SCREW
B2723XX
CARTER COL.COM.INF.209I/B
COVER PLATE OF MAIN COLUMN
B2725
SOLENOIDE 209I/B
SOLENOID
B2726
CAPPELLOTTO BLOCC.BRACCI 209IB
LOCKING COVER
B2727
FUNE 209I/B
B2733
B2734
*
PATTINO GUIDA CAVO NYL.209I/B
NYLON SPACER
INTERRUT.GEN.209I/ *
TRANSFORM SWITCH
B2735
VALVOLA MAX 170BAR 209I/
B2736
VALVOLA REG.DISCESA 209I/
B2737
VALVOLA DI RITEGNO 209I/
B2739
RONDELLA D.14 INT GOMMA 209I/
COPPER WASHER
B2740
PROLUNGA M-F 1/4X1,5 209I/
CONNECTING JOINT
VALVE
B2743
*
ELETTROVALVOLA 2NCP 209I/
B2744
*
TRASFORM.160VA 230-400/50 209I
TRANSFORMER
B2745
*
TENDINA 209I/B
CANVUS
B2746
PATTINO POSTERIORE NYLON 209I/
BACKBLOCK
B2747
PATTINO ANTERIORE NYLON 209I/
FRONT BLOCK
B2748
*
PULSANTE SAL/DIS.209I/
BUTTON
B2749
*
MICROINT.SALITA 209I/
LIMIT SWITCH
B2752
*
MICROINT.FUNE 209I/B
LIMIT SWITCH
B2753
*
PULSANTE STAZIONAMENTO 209I/
UNLOCKING BUTTON
B2756
B2758
CILINDRO IDRAULICO 209I/
*
B2759
QUADRO EL.220/50MN 209I/B
B2760
CENTRALINA IDRAULICA 209I/
B2761
MOT.400/50TR 209I/
B2762
CYLINDER
QUADRO EL.400/50TR 209I/B
MOT.220/60MN 209I/
B2763
*
DISCO GOMMA 209I/
RUBBER DISK
B2764
*
RADDRIZZATORE QUADRO 209I/
RECTIFIER
B2765
*
TELERUT.QUADRO 209I/
AC CONTACTOR
B2766
*
TIMER QUADRO 209I/
TIME RELAY
B2767
*
RELÔ TERMICO QUADRO 209I/
CIRCUIT BREAKER
B2768
TASSELLO SIC.MECCANICA 209I/
B2769
SUPP.TENDINA SUPERIORE 209I/B
B2770
SUPP.TENDINA INFERIORE 209I/B
B2771
SICUREZZA MECCANICA 209I/
B2772
VITE TE M18X40 UNI 5739 ZB
B2773
RONDELLA GROWER 19 UNI1751 ZB
B2774
KIT BLOCC.BRACC.209I/
ARM LOCKING SYSTEM
B2775
SUPP.PATTINO GUIDA CAVO 209I/B
CONTACT PLATE
B2776
MOLLA SUPP.PATTINO GUIDA 209I/
SPRING
B2777
VITE ROTAZ.SUPP.PATTINO 209I/B
ORIENTATION AXLE
B2778
PIASTRINA FERMA PATTINI 209I/
PRESSING BOARD
B2779
FINECORSA CARRELLO 209I/
LIMIT SWITCH BOARD
B2780
PARAURTI CARRELLO 209I/
PROTECTION BOARD
B2781
PROLUNGA BLOC.BRACCI 209I/B
EXTENSION SLEEVE
B2782
PERNO SPINGI MOLLA 209I/ ZB
LOCKING ROD
B2783
SPINA DENTATA 209I/
AXLE OF ARM LOCKING
B2784
MOLLA BLOCC.BRACCI 209I/ ZB
SPRING
B2785
PERNO GUIDA RONDELLA 209I/
PIN AXLE
B2786
RONDELLA CALETTATA BLOCC.209I/
LOCKING ROD
B2787
PRIGIONIERO BLOC.BRACC.209I/
BOLT DUAL-HEAD BOLT M8X60
B2788
MOLLA BLOCC.BRACCI 209I/ ZB
SPRING
B2789
SALVAP.LUNGO 209I/ ZG
LONG FEET GUARD
HANGING BOARD
HOOK
B2790
PIATTELLO PORTADISCO 209I/
BEARING
B2791XX
BRACC.CORTO INTERNO 209I/
SHORT FEET GUARD
B2792
CATENA CARRELLO 209I/
CHAIN
B2793XX
CARTER COLON.LO 209I/B
COVER OF SUB-COLUMN
B2794
PIASTRINA SUP.FERMA CAVO 209I/
BLOCKING BOARD OF CABLE
B2795
RULLO CATENA 209I/
CHAIN ROLLER
B2796
BOCCOLA RULLO CATENA 209I/
COMPOSITE BUSH 3018
B2797
PERNO RULLO INF.CATENA 209I/
SHORT AXLE
B2798
O’RING 53X5,3 CILINDRO 209I/
O-RING GB/T3452.1 53X5.3
B2799
PISTONE CILINDRO 209I/
PISTON
B2824
VITE TE M6X50 8.8 PF UNI 5737 ZB
SCREW 6X50 8.8
B3125
*
O’RING 25X2,65 CILINDRO 209I/
O-RING GB/T3452.1 25X2.65
B3126
*
PERNO RULLO CATENA 209I/
AXLE OF CHAIN ROLLER
B3127
SUPPOR.RULLO X CATENA 209I/
CHAIN SEAT
B3128
TESTATA CILINDRO 209I/
ORIENTATION SLEEVE
B3129XX
CARTER COL.COM.SUP.209I/B
COVER PLATE OF MAIN COLUMN
PIASTRA QUADRO 209I/
INSTALLING BOARD OF ELECTRICAL
BOX
QUADRO COM.CASSETTA EL.209I/
COVER OF ELECTRICAL BOX
B3132
SPESSORE BLOCC.BRACCI 209I/B
SPACER
B3133XX
PIASTRA SUP.COLON.209I/B
B3130
B3131
B3134
*
*
SUPPORTO SUP.QUADRO EL.209I/
B3137
RELÔ TERMICO QUADRO 204I/
B3138
INTERRUT.GEN.204I/ *
B3143
VITE TCCE M5X16 UNI 5931 ZB
*
VIS TH M 6X50 UNI 5737
TORNILLO
TRASFORM.160VA 220/50 209I
B3136
B3144
SCHRAUBE 6X50 8.8
SERBAT.CENTR.209I/
B3145
STELO CILINDO 204I/-209I/
B3146
CANNA CIL.204I/ 209I/
B3147
RULLO CATENA PISTONE 204I 209I
B3148
BARRA OMEGA CASSETTA 204I 209I
B3149
MORSETTO QUADRO 204I 209I
B3150
MORSETTIERA QUADRO 204I 209I
B3152
TASSELLO 140XM16 209I/
KOMPLETTER
TABLERO DE BORNES
B3153
GRANO M12X40 UNI 5925
B3195XX
BRACCIO CORTO COMP.209I/B 9005
B3196XX
BRACCIO LUNGO COMP.209I/B 9005
B3198
VITE FORATA LUNGA TUBI 209I/B
B3199
VITE FORATA CORTA TUBI 209I/B
B4839
DADO MEDIO M5 UNI 5588 ZB
NUT M5 UNI 5588
MITTLERE MUTTER M5 UNI 5588
ÉCROU M5 UNI 5588
TUERCA MEDIANA M5 UNI 5588
B5005
VITE TE M10X25 UNI 5739
SCREW TE M10 X 25
SCHRAUBE TE M10 X 25
VIS TH M10 X 25
TORNILLO TE M10X25
FUSIBILE 10X38 6A AM
FUSE 10X38 6A AM
FUSE 10X38 6A AM
FUSIBLE 10X38 6A AM
FUSIBILE 10X38 6A AM
B5290
*
B5428
RONDELLA GROWER 8,4 UNI1751 ZB
B6394
VITE TBCE M6X8 UNI 7380 8.8NE
B6700
TUBO IDRA.AP UNICO BASE 209I/B
B6701XX
BASAMENTO 209I/B
B6703
TUBO IDRA.AP COLEG.BASE 209I/B
B6704XX
GAMBA BASAMENTO 209I/B
B6705XX
PEDANA 209I/B
B6706
VITE TS90ØCR M4X8 UNI 7688 ZB
B6707XX
CARRELLO LC COMPL.209I/B
B6708XX
CARRELLO LC 209I/B
B6709XX
CARRELLO LO COMPL.209I/B
B6710XX
CARRELLO LO 209I/B
B6711XX
BRACCIO ESTER.LUNGO 209I
B6715
PROLUNGA CENT.PIAT.209I/B /AUS
B6717XX
BRACC.INTER.CORT.209I/A US9005
B6718
SALVAP.CORTO 209I/ ZG
B6719
BOCCOLA PORTA PIATTELLO 209I
B6720
PROLUNGA INFER.PIAT.209I/A US
B6721
PIATTELLO PORTADISC.COM.209/US
B6722XX
COLON.LO 209I/B
B6723XX
COLON.LO COMPL.209I/B
B6724XX
COLON.LC 209I/B
B6725XX
COLON.LC COMPL.209I/B
B6726XX
SUPPORTO CENTRAL.209I/B
B6727
SUPPORTO INF.QUADRO EL.209I/
B6728
DISTAN.RULLO INF.COL.209I/B
B6729
*
O’RING D1 48 CILINDRO 209I/
B6730
BARRA OMEGA CORTA QUADRO 209I
B6731
VITE TCCR M5X8 UNI 7687 ZB
B6732
VITE KTC TCTC 3,5X6,5 UNI 6954
B6733
PASSACAVO PG7 209I/
B6734
CASSETTA EL.209I/
B6735
PASSACAVO PG25 209I/
B6736
PASSACAVO PG13,5 209I/
B6737
TUBO IDRA.AP CENTR.209I/B NEW
B6738
PIASTRINA SERRAG.SERB.PVC 209/
B6739
GIUNTO COLLETTORE-MOTORE 209I/
WASHER
SCHEIBE
RONDELLE
ARANDELA
B6740
FLANGIA COL.POMPA-MOTORE 209I/
B6741
GUARNIZ.POMPA CENTRAL.209I/
B6742
POMPA 7,8CC 209I/
B6743
FILTRO ASPIRAZIONE CENTR.209I/
B6744
TAPPO OLIO SERBAT.CENTR.209I/
B6850XX
BRACCIO INTER.LUNG.204FFB
B6879
PORTAFUSIB.209/
C0039
RONDELLA Ø5 ZINCATA
WASHER Ø5X10 UNI 6592
SCHEIBE Ø5X10 UNI 6592
RONDELLE PLATE Ø5X10 UNI 6592
ARANDELA Ø5 ZINCADA
VIS TH M8X10 UNI 5739
TORNILLO M8X10 UNI 5739
C0061
VITE TE M8X10 UNI 5739
SCREW TE M8X10 UNI 5739
SECHSKANTSCHRAUBE M8X10 UNI
5739
C0062
RONDELLA Ø10,5X21 UNI 6592
WASHER Ø10,5X21 UNI 6592
SCHEIBE Ø10,5X21
RONDELLE Ø10,5X21
ARANDELA PLANA Ø10 5X21
C0096
DADO BASSO M6 UNI 5589 ZB
NUT M6 UNI 5587
MUTTER M6 UNI 5587
ECROU M6 UNI 5587
TUERCA BAJA M6 UNI 5587
SCREW M8X20 UNI 5739
SECHSKANTSCHRAUBE M8X20 UNI
5739
VIS TH M8X20 UNI 5739
TORNILLO TE M8X20 ZINCADO
C0098
VITE TE M8X20 UNI 5739
C0100
RONDELLA Ø8,4X17 UNI 6592
WASHER Ø8,4X17 UNI 6592
SCHEIBE Ø8,4X17 UNI 6592
RONDELLE Ø8,4X17 UNI 6592
ARANDELA Ø8 ZINCADA
C0300
VITE TCTC M4X16 UNI 6107 ZB
SCREW
SCHRAUBE
VIS
TORNILLO
C0362
VITE TCTCROCE M4X10 UNI 7687 ZB
SCREW TCTCR M4X10 UNI 7687
SCHRAUBE M4X10 UNI 7687
VIS M4X10 UNI 7687
TORNILLO
C0535
VITE TE M10X20 UNI 5739
HH SCREW M10X20 UNI 5739
SCHRAUBE TE M10X20 UNI 5739
VIS TE M10X20 UNI 5739
TORNILLO M10X20 UNI 5739
C0630
RONDELLA IN RAME Ø14X20
COPPER WASHER Ø14X20
MUTTER M10 UNI 5588
ECROU M10 UNI 5588
TUERCA
C0941
VITE TCTCROCE M4X8 UNI 7687 ZB
SCREW
SCHRAUBE
VIS
TORNILLO
C1064
RONDELLA GROWER 6,4 UNI 1751 ZB
WASHER
SCHEIBE
RONDELLE
ARANDELA
R0046
DADO MEDIO M12 UNI 5588
NUT M12
MUTTER M12 UNI 5588
ECROU M12 UNI 5588
TUERCA M12 UNI 5588
R0068
SEEGER E30 UNI 7435
SNAP RING E30 UNI 7435
SEEGER E30 UNI 7435
ANNEAU DE FIXAGE E30 UNI 7435
SEEGER E30 UNI 7435
HH SCREW M8X25 UNI 5739
SECHSKANTSCHRAUBE M8X25 UNI
5739
VIS TH M8X25 UNI 5739
TORNILLO TE M6X25 UNI5739
TUERCA M8 UNI 5588
R0153
VITE TE M8X25 UNI 5739
R0158
DADO MEDIO M 8 6S UNI 5588 ZB
NUT M8
MUTTER M8
ECROU M8
R0510
VITE TCEI M8X50 UNI 5931 ZB
SCREW TCEI M8X50 UNI 5931 ZB
SCHRAUBE TCEI M8X50 UNI 5931
VIS TCEI M8X50 UNI 5931
TORNILLO TCEI M8X50 UNI 5931
R1058
VITE TCCE M8X16 UNI 5931 ZB
SCREW
SCHRAUBE
VIS
TORNILLO
S3008
DADO MEDIO M4 UNI 5588 ZB
NUT M4 UNI 5588 ZB
MITTLERE MUTTER M4 UNI 5588 ZB
ÉCROU M4 UNI 5588 ZB
TUERCA MEDIANA M4 UNI 5588 ZB
* = EMPFOHLENE E-TEILE
* = PIECES DE RECHANGE
CONSEILLEES
* = REPUESTOS ACONSEJAIOS
Z_RICAMBI
* = RICAMBI CONSIGLIATI
* = RECOMMENDED SPARE PARTS
Dichiarazione di conformità - Déclaration de conformité
Declaration of Conformity - Konformitätserklärung
Declaración de conformidad - Overensstemmelseserklæring
Överensstämmande intyg - EG-Conformiteitsverklaring
WERTHER INTERNATIONAL S.p.A.
Via F.Brunelleschi, 12 42124 CADE’ (Reggio Emilia) Italy
Tel.++/+522/9431 (r.a.) Fax ++/+522/941997
dichiariamo che il ponte sollevatore modello
declara, que l’elevador modelo
déclare que le pont elevateur modèle
Vi erklærer hermed, at autoløfter model
hereby we declare that the lift model
Vi förklarer härmed att billyft model
hiermit erklären wir, daß die Hebebühne Type
verklaren hiermee, dat
209I/B
Matricola N° - N° de série Serial N° - Maschinennummer
Fascicolo tecnico - Dossier technique
Technical file - Techn. Dokumentation
WERTHER INTERNATIONAL S.p.A.
Via F.Brunelleschi,12
42124 CADE’ (Reggio Emilia) Italy
Ente certificatore - Organisme certificateur
Notified body - Prüfsinstitut
Registrazione Nr. - Enregistrement N°
Registered No. - Zertifikatnummer
CEM INTERNATIONAL LTD
The Atrium Business Centre Curtis
Road Dorking Surrey RH4 1XA UK
Cadè, 01/10/2010
Vice president Iori Werter
C-0801-10-01-M