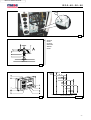
1
mase
GENERATORS
Return To Table Of Contents
IS 3.5
IS 4.0
IS 5.0
IS 6.0
MANUALE USO E MANUTENZIONE
USAGE AND MAINTANCE MANUAL
MANUEL D'INSTRUCTIONS ET D'ENTRETIEN
GEBRAUCHSANWEISUNG UND WARTUNGSVORSCHRIFTEN
MANUAL USO Y MANTENIMENTO
INSTALLATIEHANDLEIDING
REV.1 MC del 18-10-01
Cod. 41963
Return To Table Of Contents
IS 3.5 - 4.5 - 5.0 - 6.0
NR.000000
MASE GENERATORS S.p.A.
Tel.0547/354311
Fax 0547/317555 (commercial dept.)
Fax 0547/354314 (service dept.)
Fax 0547/317888 -Tlx 550397
GENERATORS
DICHIARAZIONE CE DI CONFORMITA'
EC DECLARATION OF CONFORMITY
Fabbricante/Manufacturer: MASE GENERATORS S.p.A.
Indirizzo /Address : Via Tortona 345, Pievesestina (FO)
Il sottoscritto Luigi Foresti in qualità di direttore generale della MASE GENERATORS S.p.A., dichiara sotto la
propria responsabilità che il gruppo elettrogeno modello ......... :
The undersigned Luigi Foresti as MASE GENERATORS S.p.A. general manager declares, under his sole
responsability, that the generators model is..................:
Codice / Code
Descrizione / Model
Matricola / Serial N.
E' conforme alle disposizioni delle Direttive di seguito elencate :
CEE 89/392 (come emendata delle Direttive CEE 91/368 e CEE 93/44)
CEE 89/336 (come emendata delle Direttive CEE 92/31)
CEE 73/23 modificata da CEE 93/68.
Corresponds to the requirements of the following EEC Directives :
89/392/EEC (as amended by the Directive 91/368/EEC and 93/44/EEC)
89/336/EEC (as amended by the Directive 92/31/EEC )
73/23//EEC as amended by 93/68/EEC.
Cesena,
/
/
......................................................
Direttore Tecnico
Technical Director
MASE GENERATORS S.p.A. Sede legale ed Amm.: 47023 CESENA (FO) ITALY - Via Tortona, 345 - C.F./P.I. 00687150409 Cap. Soc. milioni
1250 interamente versato - Registro Società Tribunale Forl' n. 6818 - CCIAA Forl' n.164063 - c.c.p. n. 11541471 - EXPORT FO n. 006368
-2-
Return To Table Of Contents
IS 3.5 - 4.5 - 5.0 - 6.0
1
1
A
APERTO
OPEN
OUVERT
GEÖFNET
ABIERO
OPEN
2
S.A.E
Service
Grade
5W
5W30
10W
10W30
20W
20W40
20
30
-30
3
-20
-10
40
0
10
20
30
o
Ambient temperature ( C)
40
TAB "A"
-3-
Return To Table Of Contents
IS 3.5 - 4.5 - 5.0 - 6.0
1
1
2
4
5
C
6
A
B
7
-4-
Return To Table Of Contents
IS 3.5 - 4.5 - 5.0 - 6.0
SCHEMA ELETTRICO - WIRING DIAGRAM - SCHEMA ELECTRIQUE - SCHALTPLAN - ESQUEMA ELE'CTRICO
4
4
1
2
3
3
0
20
10
50(60)
21
P1
F2
P1
P2
F1
F2
11
19
18
17
8
5
5(6)
5(6)
1
2
3
4
5
6
7
8
9
12
+
7
16
15
14
13
12
11
10
9
+
50 30
T
T
19
18
P
17
P
EV
16
12V
15
13
M
14
-
8
-5-
Return To Table Of Contents
I
INDICE
Dichiarazione di conformità ................................ 2
Figure ................................................................ 3
Schema elettrico ................................................ 5
1
NORME DI SICUREZZA ..................................... 8
2
CONTROLLI PRELIMINARI ................................ 8
3
UTILIZZO DEL GENERATORE ........................... 8
Avviamento
Arresto
4
PROTEZIONI ...................................................... 9
Protezione a bassa pressione olio
Attenzione
Protezione alta temperatura
Protezione sovratemperatura
Sovraccarico alternatore
Importante
5
MANUTENZIONE ............................................. 10
Importante
Manutenzione ordinaria del motore
Importante
6
PERIODO INATTIVITA' ..................................... 10
7
CRUSCOTTO COMANDI .................................. 10
8
FUSIBILI DI PROTEZIONE ............................... 11
9
DIMENSIONI E PESO ..................................... 11
10 DESCRIZIONE SCHEMA ELETTRICO ............. 11
11 TABELLA MANUTENZIONI .............................. 12
12 TABELLA GUASTI ........................................... 12
13 CARATTERISTICHE TECNICHE ...................... 12
-6-
IS 3.5 - 4.0 - 5.0 - 6.0
Return To Table Of Contents
I
IS 3.5 - 4.0 - 5.0 - 6.0
INTRODUZIONE
Consultare attentamente questo manuale prima di procedere a qualsiasi intervento sulla macchina.
Scopo e campo di applicazione del manuale
Grazie per aver scelto un prodotto mase.
Questo manuale è stato redatto dal Costruttore allo scopo di fornire le informazioni e le istruzioni essenziali per effettuare,
correttamente e in condizioni di sicurezza, costituisce parte integrante del corredo del gruppo elettrogeno, deve essere
conservato con cura e protetto da qualsiasi agente che potrebbe deteriorarlo per tutto il ciclo di vita del gruppo
elettrogeno. Esso deve seguire il gruppo elettrogeno qualora questo sia trasferito ad un nuovo utente o proprietario.
Le informazioni contenute in questo manuale sono dirette a tutte le persone coinvolte nel ciclo di vita operativa del gruppo
elettrogeno e sono necessarie per informare sia chi materialmente effetuerà le diverse attività, sia chi dovrà coordinare
le attività, predisporre la necessaria loggistica e regolamentare gli accessi al luogo dove sarà installato ed opererà il
gruppo elettrogeno.
Il manuale definisce lo scopo per cui la macchina è stata costruita contiene tutte le informazioni necessarie per
garantirne un uso sicuro e corretto.
La costante osservanza delle indicazioni, in esso contenute, garantisce la sicurezza dell’uomo della macchina,
l’economia d’esercizio ed una maggiore durata della macchina stessa.
Per facilitare la consultazione esso è stato suddiviso in sezioni che ne identificano i concetti principali;
per una consultazione rapida degli argomenti consultare l’indice descrittivo.
Le parti di testo da non trascurare sono state evidenziate in grassetto e precedute da simboli qui di seguito illustrati e
definiti.
Il gruppo elettrogeno non è una macchina destinata ad essere manovrata da parte di utilizzatori non professionali e tutte
le attività legate alla parte operativa del suo ciclo di vita devono essere effettuate da personale specializzato ed
opportunamente addestrato.
Si consiglia vivamente di leggere attentamente quanto contenuto in questo manuale e nei documenti di riferimento; solo
così viene assicurato il regolare funzionamento nel tempo del gruppo elettrogeno, la sua affidabilità e la salvaguardia
dai danni a persone e cose.
Nota: le informazioni contenute in questa pubblicazione sono corrette al momento della stampa, ma possono essere
modoficate senza preavviso
Indica che è necessario prestare attenzione al fine di non incorrere in serie conseguenze che
potrebbero provocare la morte del personale o possibili danni alla salute.
Situazione che potrebbe verificarsi durante il periodo di vita di un prodotto, sistema o impianto
considerato a rischio in materia di danni alle persone, alle proprietà, all’ambiente o di perdite economiche.
Indica che è necessario prestare attenzione al fine di non incorrere in serie conseguenze che
potrebbero portare al danneggiamento di beni materiali quali le risorse o il prodotto
Indicazioni di particolare importanza.
I disegni sono forniti a scopo esemplificativo. Anche se la macchina in vostro possesso si differenzia sensibilmente dalle
illustrazioni contenute in questo manuale la sicurezza e le informazioni sulla stessa sono garantite.
Il costruttore, nel perseguire una politica di costante sviluppo ed aggiornamento del prodotto, può apportare modifiche
senza preavviso.
-7-
Return To Table Of Contents
I
GRAZIE PER AVERE SCELTO UN PRODOTTO MASE.
Il presente libretto contiene le più importanti informazioni
per un corretto uso del generatore. Per la sicurezza e
soddisfazione del Cliente e per l’affidabilità del gruppo
elettrogeno sono essenziali una corretta installazione e
verifica prima della consegna. Un controllo non accurato
o un errore di montaggio possono compromettere I’
efficienza del generatore e pregiudicare la sicurezza dell’
utente. Tutte le informazioni e illustrazioni di questo
manuale si riferiscono al modello esistente al momento
della pubblicazione. er eventuali ulteriori informazioni La
preghiamo di rivolgersi al più vicino centro di assistenza
MASE che sarà lieto di assisterla.
La MASE si riserva il diritto di apportare modifiche senza
dame alcun preavviso. Nessuna parte o illustrazione di
questo manuale può essere riportata senza autorizzazione
ne.
MASEGENERATORS S.p.A.
1 NORME DI SICUREZZA
- Leggere attentamente tutte le informazioni contenute
in questo opuscolo e nel manuale di installazione;
esse sono fondamentali per una corretta installazione
ed utilizzo del gruppo e per essere in grado di intervenire tempestivamente in caso di necessità.
- Non consentire l’uso del gruppo a persone non
competenti o senza una adeguata istruzione.
- Non consentire a bambini od animali di avvicinarsi al
gruppo elettrogeno in funzione.
- Non accedere al generatore o al cruscotto di comando a distanza con mani bagnate, essendo il generatore
una potenziale fonte di shock elettrici se male utilizzato.
- Eventuali controlli sul gruppo elettrogeno vanno
eseguiti a motore spento; controlli sul gruppo in
funzione vanno effettuati solo da personale specializzato.
2 CONTROLLI PRELIMINARI
Al primo avviamento del gruppo, o dopo aver eseguito un
qualsiasi intervento di manutenzione, è buona norma
accertarsi sempre:
- Che l’olio sia a livello tramite I’astina (rif. 1 fig. 1)vedi
tabella oli consigliati
- Che tutti i punti di ancoraggio del gruppo siano adeguatamente serrati.
- Che tutte le utenze elettriche siano disinserite per evitare
di avviare il gruppo sotto carico.
- Che le linee acqua e combustibile siano correttamente
collegate
- Che tutti i collegamenti elettrici siano stati eseguiti in
maniera corretta e non vi siano connessioni in cattivo
stato.
- Che il rubinetto dell’acqua sia aperto (rif. 2 fig. 2)
- Che sia stato riempito manualmente il tratto del
circuito acqua dalla pompa alla valvola nel caso sia
montata una valvola di non-ritomo sulla presa a mare
(come consigliato) (rif. 1 fig. 2).
-8-
IS 3.5 - 4.0 - 5.0 - 6.0
3 UTILIZZO DEL GENERATORE
Prima di avviare II gruppo accertarsi che i controlli
preliminari descritti al capitolo 1 siano stati eseguiti.
Avviamento
Procedere all’avviamento premendo il tasto “ON” (rif. 4fìg.
3), si noterà I’ accensione di tutti i LED in funzione di
autocontrollo per circa 5 sec. in seguito rimarrà acceso il
LED di pannello alimentato (rif. 5 fig. 3) quindi, avviare il
gruppo premendo il tasto “START” (rif. 3 fig. 3) e rilasciare
solo ad avviamento avvenuto facendo attenzione a non
superare i 5 sec. per ogni tentativo. Il corretto funzionamento del gruppo sarà segnalato dall’accensione del LED
di spia funzionamento generatore (rif. 6 fig. 3). Con le
operazioni sopra descritte si attivano automaticamente le
protezioni del gruppo (Vedi cap. 4).
Arresto del gruppo
II gruppo si arresta premendo il pulsante “OFF” sul
cruscotto comandi (rif. 2 fig.3).
4 PROTEZIONI
II gruppo è dotato di una serie di protezioni che lo
salvaguardano da un utilizzo non corretto e da inconvenienti nel funzionamento. Esse sono :
- Protezione bassa pressione olio :
interviene spegnendo il gruppo quando la pressione
dell’olio nel carter è insufficiente; il suo intervento è
segnalato dall’accensione del LED (rif. 7 Fig. 3).’
generalmente sufficiente reintegrare la quantità di olio
mancante per poter riavviare il gruppo.
La protezione bassa pressione olio non da necessariamente una indicazione sul livello dell’olio. Un
controllo periodico di questo livello è quindi indispensabile.
- Protezione alta temperatura :
interviene spegnendo il gruppo qualora la temperatura del
motore sia troppo elevata.
Il suo intervento è segnalato dall’accensione del LED (rif.
8 Fig. 3).Il gruppo deve essere avviato solo dopo aver
individuato ed eliminato la causa dell’intervento.
- Protezione sovratemperatura/sovraccarico alternatore.
Interviene spegnendo il gruppo quando si verifica un
sovraccarico termico od elettrico dell’alternatore; il suo
intervento è segnalato dall’accensione del LED (rif. 9 fig.
3).Il gruppo può essere riavviato dopo qualche minuto,
quando la temperatura degli avvolgimenti dell’alternatore
si riporta ai valori normali. Si raccomanda comunque di
ricercare ed eliminare le cause che ne hanno provocato
l’intervento.
N.B. Nel caso di intervento di una delle protezioni
sopraindicate, dopo aver accertato ed eliminato la causa
dell’intervento, è necessario eseguire l’operazione di
“STOP” (il segnale rimarrebbe altrimenti in memoria).
Return To Table Of Contents
I
IS 3.5 - 4.0 - 5.0 - 6.0
6 PERIODO DI INATTIVITÀ
Qualora il fusibile (rif. 1 fig.4) dovesse bruciarsi, interviene una proezione che non fa partire il gruppo.
5 MANUTENZIONE
Qualsiasi intervento di manutenzione al gruppo elettrogeno va effettuato a motore spento, dopo averlo lasciato
raffreddare a sufficienza, e va eseguito solo da personale
specializzato.
Manutenzione ordinaria del motore
Gli interventi periodici da effettuare sul motore sono
riportati in tabella
Per informazioni più dettagliate consultare il manuale
fornito dal costruttore del motore che accompagna ogni
gruppo.
Controllare il livello dell’olio tramite I’ apposita astina
graduata (rif. 1 fig. 1). Il livello deve sempre essere
compreso fra le tacche MAX e MIN riportate su//’ astina.
Capacità carter motore è:
IS 3.5-4.0 lt.1,1
Se il gruppo deve rimanere inutilizzato per un lungo
periodo, è necessario procedere alle seguenti operazioni:
- Sostituzione olio carter.
- Sostituzione filtro olio
- Sostituzione filtro combustibile
- Sostituzione delle pastiglie di zinco (rif. 1 fig. 6)
- Con temperature inferiori o prossime a 0°C, è necessario svuotare il circuito di raffreddamento tramite il
rubinetto (rif. 3 fig. 2)
- Lubrificare la girante della pompa acqua.
7 CRUSCOTTO COMANDI ( fig. 3 )
1) CONTAORE
2) PULSANTE OFF
3) PULSANTE START
4) PULSANTE ON
5) LED PANNELLO ON (VERDE)
6) LED USCITA GENERATORE (VERDE)
7) LED PRESSIONE OLIO (ROSSO)
8) LED TEMPERATURA MOTORE (ROSSO)
9) LED TEMPERATURA GENERATORE (ROSSO)
Quando il gruppo si arresta, per l’intervento di una protezione, sul display del pannello comandi scompare l’indicazione delle ore di funzionamento e compare un codice
ad indicare la causa dell’arresto del gruppo elettrogeno.
Nella tabella sono riportati tutti i codici e il loro significato
IS 5.0-6.0 lt.1,65
I rabbocchi e i caricamenti vanno eseguiti attraverso il foro
(rif. 1 fig. 1 )
Per sostituire l’olio nel carter motore, utilizzare l'apposita
pompa manuale (Fig.5, Rif.2) dopo aver svitato il dado di
chiusura (Fig.5, rif.1).
Si consiglia di eseguire lo svuotamento con olio ancora
sufficientemente caldo in modo da consentire un agevole
deflusso.
TABELLA CODICI DI ALLARME
CODICE
E-80
E-81
E-82
E-83
E-85
E-87
BATT
CAUSA INTERVENTO PROTEZIONE
Mancanza tensione gruppo
Bassa pressione olio
Alta temperatura motore
Alta temperatura alternatore
Sovraccarico gruppo elettrogeno
A 30 “ dall’avvio il gruppo non raggiunge
80% della tensione nominale
Bassa tensione di batteria
Cod. E - 80 Tale codice indica che il gruppo si è arrestato
per mancanza completa di tensione = O volt. La comparsa di tale codice sta ad indicare:
- che il pannello di comando non è in grado di leggere la
tensione del l’alternatore per l’interruzione di una connessione elettrica;
- che l’alternatore è danneggiato.
Cod. E - 81 Tale codice indica che il gruppo si è arrestato
per pressione dell’impianto di lubrificazione del motore è
insufficiente.
Cod. E - 82 Tale codice indica che il gruppo si è arrestato
perché il motore ha raggiunto temperature troppo elevate.
Cod. E - 83 Tale codice indica che il gruppo si è arrestato
perché l’alternatore ha raggiunto temperature troppo elevate.
Cod. E - 85 Tale codice indica che il gruppo si è arrestato
perché la tensione è scesa sotto il 70 % del valore
nominale per un tempo superiore a 15".
-9-
Return To Table Of Contents
I
Cod. E - 87 Tale codice indica che il gruppo si è arrestato
perché la tensione del gruppo elettrogeno, dopo 30"
dall’avviamento non ha raggiunto 80% del valore nominale. Tale inconveniente può essere causato da un
numero di giri del motore insufficiente o un guasto all’alternatore.
Cod. bat Tale codice indica che la tensione di batteria è
insufficiente. La comparsa di questo codice non arresta il
gruppo elettrogeno.
Dopo l’intervento di una protezione, con conseguente
arresto del gruppo, per poter nuovamente riavviare il
gruppo è necessario resettare il pannello premendo il
pulsante “OFF”
Se si avvia il gruppo e l’alternatore non eroga tensione;
oppure il pannello di comando non legge tensione questo,
dopo un minuto, si spegno completamente arrestando il
gruppo.
8 FUSIBILI DI PROTEZIONE ( fig. 4 )
1) FUSIBILECIRCUITO RELAY
2) FUSIBILE CARICA BATTERIA
3) INTERRUTTORE TERMICO
9 DIMENSIONI E PESO ( fig.7 )
IS 3.5 - 4.0
a) Lunghezza (mm-inch)
b) Larghezza (mm-inch)
c) Altezza (mm-inch)
Peso (kg-lb)
- 10 -
IS 5.0 - 6.0
590-23
675-26.6
406-15.9
515-20.2
96-213
468-18.4
565-22.2
130-289
IS 3.5 - 4.0 - 5.0 - 6.0
10 DESCRIZIONE SCHEMA ELETTRICO ( fig. 8 )
1)
2)
3)
4)
5)
6)
7)
8)
9)
10)
11)
12)
13)
14)
15)
16)
17)
18)
19)
20)
21)
ROTORE
STATORE
DIODO 3A
VARISTORE
SCHEDA RELAY
MORSETTIERA DI POTENZA
MORSETTIERA CIRCUITO RELAY
MOSETTIERA PANNELLO COMANDI
FUSIBILE 1A
CONDENSATORE
REGOLATORE CARICA BATTERIA
FUSIBILE
MOTORINO AWIAMENTO
BATTERIA
POMPA COMBUSTIBILE
ELETTROVALVOLA STOP
PRESSOSTATO OLIO
TERMOSTATO TESTATA MOTORE
TERMOSTATO ACQUA
TERMOSTATO ALTERNATORE
INTERRUTTORE TERMICO
Return To Table Of Contents
I
IS 3.5 - 4.0 - 5.0 - 6.0
12 TABELLA GUASTI
z
Batteria difettosa
cavi insufficente
Sezione
FUMO BIANCO
z
Elettrovalvola difettosa
REGIME
INSTABILE
Pulsanti di avviamento difettosi
PARTE E SI
FERMA
CAUSA PROBABILE
NON PARTE
ANOMALIE
z
z
FUMO NERO
11 TABELLA MANUTENZIONE
z
z
Motorino d'avviamento difettoso
z
Circuito/Filtro combustibile
z
Fusibile circuito 12V
z
Relay avv./ev.
z
z
Eccessiva quantità olio carter
z
Intervento protezioni
z
z
Sovraccarico
z
Leveraggi regolatore
z
Guida volvole usurata
z
Valvole bloccate
z
Cilindro e segmenti usurati
Iniettore difettoso
z
Pompa iniezione
z
z
z
Pompa alimentazione
z
z
z
z
13 CARATTERISTICHE TECNICHE
MOTORE
Modello
Tipo
IS 3.5 - 4.0
IS 5.0 - 6.0
YANMAR
YANMAR
L70AE
L100AE
Monocilindrico a scoppio 4 tempi diesel
raffreddato ad aria
Cilindrata cc
Giri/minuto
Alesaggio x Corsa
Potenza Hp
Consumo g./Hp/h
296
3000
|
406
3600
3000
78 x 62
5,5-6,1
220
|
|
3600
86 x 70
6,0-6,7
7,7-8,8
230
220
Alimentazione
|
|
|
9-10
230
DIESEL
Sistema di avviamento
ELETTRICO
Capacità olio
1,1 lt.
Inclinazione massima
20°
ALTERNATORE
Tipo
Sincrono, monofase, autoeccitato, due poli,
senza spazzole
Potenza continua
2700W
|
2900W
Fattore di potenza
1
Classe isolamento
F
Frequenza Hz
50
|
60
4000W
|
4800W
50
|
60
- 11 -
Return To Table Of Contents
GB
IS 3.5 - 4.0- 5.0 - 6.0
CONTENTS
FIGURES ...................................................... pag.2
TAB."A" TABLE SUGGESTED OILS ............. pag.2
WIRING DIAGRAM ....................................... pag.4
1
SAFETY REGULATIONS .............................. pag.13
2
PRELIMINARY CHECKS .............................. pag.13
3
GENERATOR USE ....................................... pag.13
Starting
Generator Stop
4
SAFETY DEVICES ....................................... pag.13
Low oil pressure device
Warning
High temperature device
Alternator overload/over temperature device
Important
5
MAINTENANCE ............................................ pag.14
Important
Engine maintenance
Important
6
INACTIVE PERIOD ....................................... pag.14
7
CONTROL PANEL ........................................ pag.14
8
PROTECTION FUSE ..................................... pag.8
9
DIMENSION AND WEIGHT ........................... pag.15
10 DESCRIPTION WIRING DIAGRAM ............... pag.15
11 TROUBLE MAINTENANCE ........................... pag.15
12 TROUBLE SHOOTIN ..................................... pag.15
13 TECHNICAL FEATURES .............................. pag.16
DANGER
A statement advising of the need to take care lest there be serious consequences resulting in
death of personnel or in hazard to health.
WARNING
A situation that could occur during the lifetime of a product, system or plant that has the
potential for human injury, damage to property, damage to the environment, or economic loss.
CAUTION
A statement advising of the need to take care lest serious consequences result in harm to
material items such as the asset or the product.
INFORMATION
Important information.
Drawing are provided by way of example. Should your machine be quite different from the illustrations contained in this
manual, the safety regulations and relevant information are always granted.
The manufacturer's policy of constant development and updating may lead to modifications without prior notice.
- 12 -
Return To Table Of Contents
GB
CONGRATULATIONS ON HAVING CHOSEN A MASE
PRODUCT
This manual contains all the necessary information for
proper installation and use of the generator. It’s essential,
either for the customer’s safety and satisfaction or for
good reliability of the generator, to carry out proper
installation and a careful pre-delivery test.
A wrong installation or an oversight on testing may
compromise the efficiency of the generator and even
jeopardize the customer’s safety.
All information and illustrations in this handbook refer to
the latest produced model at the time of printing.
For any further information, please get in touch with the
nearest MASE SERVICE CENTER, they’ll be pleased to
help you at any time.
MASE reserve the right to introduce changes without prior
notice. No part or illustration contained in this handbook
can be reproduced without previous approval by MASE
MASE GENERATORS S.p.A.
IS 3.5 - 4.0- 5.0 - 6.0
3 GENERATOR USE
Before starting the generator, make sure all preliminary
checks, as per item 1 , have been properly carried out
Starting
To start the engine push the button << ON >> (fig. 3 ref.
4), all the pilot and warning lamps will glow for 5 sec. about
in a self control function, later on only the << panel on >>
(fig. 3 ref. 5) and then start the engine pushing the button
<<Start >> (fig. 3 ref.3), for 5 sec. max. Release it only
when the engine runs. A correct generator functioning is
demostrated by the led (fig .3 ref. 6) glowing on. Once
started,the safety devices of the generator are automaticily
activated (see item. 4).
Generator Stop
The generator can be stopped ushing the <<OFF>>
button on the control panel (fig. 3 ref 2).
4 SAFETY DEVICES
1 SAFETY REGULATIONS
- Read carefully all the instructions given in this handbook
and in the installation manual; they are of the utmost
importance for correct installation and use of the unit and
for prompt intervention in case of need.
- Do not allow unskilled or untrained people to use the
unit.
- Do not allow children or animals to get close to the
generator while it is working.
- Do not handle the generator or the remote control panel
with wet hands; any misuse may cause electric shocks.
- Any testing of the unit is to be carried out only when the
engine is stopped. Possible checks on the generator
when it’s running have to be performed only by skilled
workers.
2 PRELIMINARY CHECKS
On starting the generator for the first time and after any
servicing, it is advisable to make sure that:
- The oil is at the right level through the rod ref. 1 Fig. 1
, as per table for suggested oils.
- The generator is well secured to the soundproofing box
by means of the proper bolts.
- The electric loads are disconnected so as to avoid
starting the generator on load.
- Every connection (fuel, exhaust, remote control, A.C.,
battery) has been properly carried out and there are no
connections in bad conditions.
- The water cock is open, as per (ref. 2 fig. 2)
- If anon-return valve is used, the cooling circuit from the
valve up to the pump has been manually filled (ref. 1 fig.
2)
The generator has been equipped with a setof safety
devices in case ot any misuse or running trouble, as
follows:
- Low oil-pressure device:
it causes the generator shut-down in case of insufficient
oil pressure. Its intervention is shown by the warning light
going on (fig. 3 Ref. 7). It is usually enough to top up the
oil before starting the generator again.
WARNING
The low oil-pressure device does not necessarily show
the oil level; a check of the oil level is consequently
necessary at regular intervals.
- High temperature device:
it causes generator shut-down in case of high temperature of the engine. Its intervention is shown by the warning
light going on (fig.3 ref.8).Should this device come in to
operation,look for and eliminate the causes of the
intervention and then start the generator again.
- Alternator overload/over temperature device:
it comes into operation, stopping the generator, in case
of thermic or electric overload of the alternator.
Its intervention is shown bythe relative warning light going
on (fig. 3 ref. 9). Wait until the temperature of the alternator
windings goes back to the normal values. It’s however
recommended to look forand eliminate the causes of the
intervention before starting the generator again.
WARNING
If one of the above safety devices intervenes, look for and
eliminate the causes of the intervention, then push the <<
STOP >>
button to avoid that signal keeps stored.
- 13 -
Return To Table Of Contents
GB
IS 3.5 - 4.0- 5.0 - 6.0
WARNING
7 CONTROL PANEL (fig. 3)
In case of the fuse (ref.1 Fig.4) got burnt,
a protectio inserts and does not allows the generator to
start.
5 MAINTENANCE
CAUTION
Any servicing is to be carried out with the engine stopped
after it has cooled enough, and only by skilled and
licensed staff.
Engine maintenance
The engine has to be serviced at regular intervals, as
shown in the table:
for any further and more detailed information,please
consult the handbook supplied by the engine
manufacturer, accompanying every generator.
1) HOURSMETER
2) OFF BUTTON
3) START BUTTON
4) BUTTON ON
5) PANEL ON LED (GREEN)
6) GENERATOR OUTPUT LED (GREEN)
7) OIL PRESSURE LED (RED)
8) ENGINE TEMPERATURE LED (RED)
9) GENERATOR TEMPERATURE LED (RED)
When the unit stops because a circuit breaker trips, the
operating time indication disappears from the control panel
display and a code appears to indicate the cause of the
generator stop.
In the table below all the codes and their meaning are
listed.
ALARM CODES
CODE
CAUSE OF CIRCUIT-BREAKER TRIP
E - 80
No power on generator
Cheek oil level by means of the proper dipstick (fig. 5 ref.
1) and make sure it is always between the minimum and
maximum levels of the dipstick.
E - 81
Low oil pressure
E - 82
High motor temperature
E - 83
High alternator temperature
Engine carter capacity:
IS 3.5 - 4.0 lt.1.1
IS 5.0 - 6.0 lt 1.65
Oil topping up and replacement can be carried out through
the hole. (fig. 1 ref. 1).
For changing oil, remove the levelstick and replace oil with
the special pipe..
We suggest to carry out the draining when the oil is still
warm enough, to allow an easy flowing out.
E - 85
Generator overload
E - 87
At 30" from start unit does not reach 80%
of nominal voltage
INFORMATION
6 INACTIVE PERIOD
Should the unit remain unused for a long time, it’s
necessary to act as follows:
- Replace sump oil.
- Replace oil filter.
- Replace fuel filter.
- Replace the zinc anodes (ref. 1 fig. 6)
- If the room temperature is near or below 0°C it is
indispensable to drain the engine cooling circuit using the
lever cock (ref. 3 fig. 2)
- Lubrificate the water pump impeller.
batt
Low battery
Code E - 80 This code indicates that the unit has
stopped because of no voltage = 0 Volt. When this code
appears, it means:
- that the control panel is unable to measure the alternator
voltage for cut-off of an electrical connection;
- that the alternator is damaged.
Code E - 81
This code indicates that the unit has
stopped because the motor lubrication system pressure
is insufficient.
Code E - 82
This code indicates that the unit has
stopped because the motor has reached too high
temperatures.
Code E - 83
This code indicates that the unit has
stopped because the alternator has reached too high
temperatures.
Code E - 85
This code indicates that the unit has
stopped because the voltage has dropped to below 70%
of the nominal value for longer than 15 seconds.
- 14 -
Return To Table Of Contents
GB
IS 3.5 - 4.0- 5.0 - 6.0
Code E - 87
This code indicates that the unit has
stopped because the generator voltage has not reached
80% of the nominal value 30 seconds after starting. This
could be caused by insufficient motor RPM or a broken
alternator.
11 TROUBLE MAINTENANCE
batt
This code indicates that the battery
is low. When this code appears, the generator is not
stopped.
WARNING
When a circuit breaker has tripped with a consequent
generator stop, the panel must be reset by pressing the
“OFF” button in order to restart the unit.
INFORMATION
If the unit is started and the alternator does not produce
voltage, or the control panel does not read voltage, the
latter switches off completely after one minute, stopping
the unit.
8 PROTECTION FUSE ( fig. 4 )
1) RELAY CIRCUIT FUSE
2) BATTERY CHARGER FUSE
3) THERMAL SWITCH
675-26.6
468-18.4
565-22.2
130-289
10 DESCRIPTION WIRING DIAGRAM (fig. 8 )
1
2
3
4
5
6
7
8
9
10
11
12
13
14
15
16
17
18
19
20
21
ROTOR
STATOR
DIODE 3A
VARISTOR
PRINTED CIRCUIT RELAY
POWER TERMINAL BOARD
RELAY CIRCUIT TERMINAL BOARD
CONTROL PANEL TERMINAL BOARD
FUSE 1A
CAPACITOR
BATTERY CHARGER REGULATOR
FUSE
STARTER
BATTERY
FUEL PUMP
FUEL SOLENOID
OIL PRESSURE SWITCH
OVERHEAD ENGINE THERMOSTAT
WATER TERMOSTAT
ALTERNATOR THERMOSTAT
THERMAL SWITCH
PROBABLE REASON
z
z
z
Defective starting buttons
Defective fuel solenoid
Defective battery
cable section
BLACK SMOCKE
IS 5.0 - 6.0
WHITE SMOCKE
590-23
406-15.9
515-20.2
96-213
START AND
STOP
IS 3.5 - 4.0
a) Lengh (mm-inch)
b) Width (mm-inch)
c) Height (mm-inch)
Weight (kg-lb)
COMPLAINT
DOES NOT
START
9 DIMENSIONS AND WEIGHT ( fig. 7 )
UNSTABLE
RUNNING
12 TROUBLE SHOOTING
z
Battery
z
z
Defective starting motor
z
Piping fuel filter choked
z
12V circuit fuse
z
Avv./Ev.relay
z
z
Too much oil in crankcase
Safety device intervention
z
z
z
Overload
z
Defective governor linkage
z
Worm valve guides
Blocked valves
z
z
Worm cylinder and position rings
Defective injector
z
z
Defective injector pump
z
z
Defective feeding pump
z
z
z
z
- 15 -
Return To Table Of Contents
GB
IS 3.5 - 4.0- 5.0 - 6.0
13 TECHNICAL FEATURES
ENGINE
Model
1cylinder,4 stroke,internal combustion
air-cooled diesel
Displacement
R.P.M.
Bore for stroke
Power Hp
Fuel consumption g./Hp.h
Fuel
Starting system
Oil capacity
Max inclination
IS 3.5- 4.0
IS 5.0- 6.0
YANMAR
YANMAR
L70AE
L100AE
296cc
406cc
3000
3600
78 X 62
5,5/6,1 6,0/6,7
220
230
DIESEL
ELECTRIC
1,1 lt.
20°
3000
3600
86 X 70
7,7/8,8 9/10
220
230
DIESEL
ELECTRIC
1,65 lt.
20°
ALTERNATOR
Synchronous,self-excited,single
phase, 2 poles, brushless
Continuous output
Power factor
Insulation class
Frequecy Hz
- 16 -
2700W 2900W 4000W 4800W
1
F
60
1
F
60
Return To Table Of Contents
F
IS 3.5 - 4.0 - 5.0 - 6.0
INDEX
FIGURE
pag.2
TAB."A"TABLEAUHUILESCONSEILLEÉS
pag.2
SCHEMA ELECTRIQUE
pag.4
1
NORMES DE SECURITE
pag.18
2
CONTROLES PREIMINARES
pag.18
3
UTILISATION DU GROUPE
Démarrage
Arret du groupe
pag.18
4
PROTECTIONS
La protection basse pression de l'huile
Attention
La protection haute température
La protection surcharge de l'alternateur
Important
pag.18
5
ENTRETIEN
Important
Entretien du moteur
Important
pag.19
6
PERIODES D'INACTIVITE
pag.19
7
PANEAU DE COMANDE
pag.19
8
PROTECTION FUSIBLE
pag.20
9
DIMENSIONS ET POIDS
pag.20
10 DESCRIPTION SCHEMA ELECTRIQUE
pag.20
11 TABLEAU ENTRETIEN
pag.21
12 TABLEAU DES DEGATS
pag.21
13 CARACTERISTIQUES TECHNIQUES
pag.21
Indique qu'il faut bien faire attention à ne pas courir des risques entraìnant de graves
conséquences qui pourraient causer la mort du personell ou endommager la santé.
DANGER
Situation qui pourrait se vérifier pendant la vie utile d'un produit, système ou bien installation
considérés à risque pour les personnes, la propriété, l'environnement ou bien cause de pertes économiques.
ATTENTION
PRECAUTION Indique qu'il est nécessaire de faire la plus grande attention afin de ne pas courir des risques
pouvant entraìner de graves conséquences, ainsi que l'endommagement des biens matériels, tels que les ressources
ou le produit.
INFORMATIONS Indications d'importance particulière .
Les plans ne sont donnés qu'à titre d'example.Meme si votre machine présentait des caractéristiques différente des
illustrations contenues dans le présent livret, la sùreté ainsi que les avertissement sur celle-ciseraient garantis.
Le constructer, suivant une politique de développement et de mise à jour de ses produits continuelles, peut apporter
des modifications dans ce manuel sans préavis.
- 17 -
Return To Table Of Contents
F
NOUS VOUS FELICITONS D’AVOIR
L’ACQUISITION D’UN PRODUIT MASE
FAIT
Ce manuel vous apportera une connaissance de base
des caractéristiques de l’installation et du fonctionnement
pour le meilleur emploi du générateur. Pour garantir la
sécurité la satisfaction du client et la fiabilité du groupe
électrogéne, il est essentiel que l’installation et l’entretien
avant la livraison soient correctement effectués.
Une erreur ou une négligence pendant le montage ou
l’entretien pourraient déterminer un mauvais
fonctionnement du groupe et porter préjudice au client.
Toutes les informations et les illustrations présentées
dans ce manuei se rapportent au modéle existant
aumoment de la publication.
Si vous avez d’autres questions concernant le
fonctionnement ou l’entretien du produit, veuillez consulter
le Centre d’Assistance MASE le plus proche.
MASE se réserve le droit d’apporter de modifications
sans avis préalable.
Aucune partie ou illustration de ce manuel ne peu ètre
reproduite sans autorisation.
MASE GENERATORS S.p.A.
1 NORMES DE SECURITE
- Lire attentivement toutes les instructions contenues
dans ce manuel d’entretien et installation; elles sont
fondamentales pour une installation correcte et un bon
emploi du groupe et permettent en cas de besoin,
d’intervenir en temps utile.
- Ne pas permettre l’emploi du groupe a des personnes
incompetentes.
- Ne pas permettre aux enfants et aux animaux l’approche
au groupe electrogene en marche.
- Etant donne que si le generateur est mal utilise, il
represente une potentielle source de secousses
électriques ne pas utiliser le générateur si l’on a les mains
mouillées.
- Pour d’éventuels controles au groupe électrogéne, il
est necessaire d’arreter le moteur; des controles au
groupe en marche devront etre effectues uniquement par
du personnel spécialisé.
2 CONTROLES PRELIMINAIRES
Au premier demarrage dugroupe et après chaque
intervetion d’entretien, il est de règle de vérifier toujours:
- Si l’huile est à niveau par jauge (rèf. 1 , fig. 1 ) voir
tableau des huiles conseillées.
- Si tous les points d’ancrage du groupe sont bien serrés.
- Si les charges électriques sont bien débranchées pour
ne pas mettre en marche le groupe en charge.
- Si les conduites eau et combustible ont été
convenablement raccordées.
- Si tous les raccordements électriques ont bienété
effectués de facon correcte et si les connexions sont en
bon état.
- Si le robinet de l'eau est ouvert, voir (rèf 2 fig. 2)
- Si le troçon du circuit d'eau qui va de la soupape à la
pompe, au cas ou on aurait installè une soupape de pied
(comme on a conseillé), a bien été rempli manuellement
(réf. 1 fig.2)
- 18 -
IS 3.5 - 4.0 - 5.0 - 6.0
3 UTILISATION DU GROUPE
Avant de mettre en marche le groupe, vérifier si les
controles préliminaires décrits au chap. 1 ont bien été
effctués.
Démarrage
Pour démarrer le moteur, pousser le bouton << 0N >> (fig.
3 réf. 4), tous les voyants et lampes témoins s’allument
pour 5 secondes à titre de controle,ensuite seul les tables
ON (fig.3 réf.5) et demarrer le moteur en poussant le
bouton << START >> (fig.3 réf. 3) pour 5 secondes
maximum, relacher seulement quand le moteur tourne.
Le fonctionnement correct du grupe est indique par le
témoin (fig. 3 réf. 6) qui s’allume.
Une fois démarré, les sécurités du groupe sont
automatiquement en service (voir chapitre 4).
Arret du groupe
Le groupe peut etre stoppè en pousant le bouton <<OFF>>
sur le boitier de commande (fig. 3 réf .2).
4 PROTECTIONS
Le groupe est équipe d’un ensemble de protections qui le
garantissent contre un emploi incorrect et contre des
inconvénients dans son fonctionnement; comme suit:
- La protection basse pression de l’huile:
elle éteintle groupe lorsque la pression de l’huile dans le
carter est insuffisante; le signal est donné par le voyant
lumineux (fig. 3 réf. 7). II suffit généralement d’ajouter la
quantité d’huile manquante (voir chap. 7) pour remettre le
groupe en marche.
ATTENTION
La protection basse pression de l’huile n’indique pas
nécessairement le niveau d’huile: un contròle périodique
de ce niveau est donc indispensable.
- La protection haute température:
elle éteint le groupe lorsque la temperature du moteur est
trop élevée. (fig. 3 réf. 8). Si cette protection entre enjeu
il faut en rechercher la cause et l’éliminer puis
remettre en marche groupe.
- La protection surcharge de l’alternateur:
elle éteint le groupe lorsqu’il se vérifie une surcharge
thermique ou électrique à l’alternateur; le signal est
donné par le voyant lumineux (fig. 3 réf. 9). Le groupe
peut étre remis en marche aprés quelques minutes,
lorsque la température des bobinages de l’alternateur
retourne à une valeur normale: on conseille toutefois de
rechercher et d’éliminer les causes qui provoquent
l’intervention de ca dispositif de protection.
Return To Table Of Contents
F
IS 3.5 - 4.0 - 5.0 - 6.0
6 PERIODES D’INACTIVITE
ATTENTION
Si une des protections susmentionnées intervient,
cherchez et eliminez les causes. Poussez alors le
bouton << STOP >> afin d’éviter que le signal de défaut
reste en memoire.
ATTENTION
Dans lea cas l’un des fusible (réf.1 fig.4) se brule, une
protection intervient et ne parmet pas au groupe de partir.
Lorsque le groupe n’est pas utilisè pedant une longue
pèriode, il est conseillè d’effectuer les opèrations suivantes:
- Changer l’huile du carter
- Changer le filtre huile
- Changer le filtre combustible.
- Remplacer les pasilles de zinc (réf. 1 fig. 6)
- Avec des températures inférieures ou proches de 0°C,
il faut vider le circuit de refroidissement à l'aide du robinet
(réf. 3 fig. 2)
- Lubrifier la couronne de la pompe à eau.
7 PANEAU DE COMANDE (fig. 3)
5 ENTRETIEN
PRECAUTION
Toute intervention d’entretien au groupe électrogene doit
étre effectuée lorsque le moteur est èteint et qu’il a
suffisamment refroidi et ne doit étre faite que par du
personnel autorisé.
Entretien du moteur
Les interventions périodiques à effectuer sur le moteur
sont indiquées dans le tableau:
pour plus de details, consulter le manuel fourni par le
constructeur du moteur.
INFORMATIONS
Contròler le niveau d’huile à l’aide de la jauge graduee (fig.
5 réf. 1); le niveau doit toujours étre compris entre les
erans MAX et MIN indiques sur la jauge.
Capacité carter moteur:
IS 3.5 - 4.0 I. 1,1
IS 5.0 - 6.0 I. 1,65.
Les remplissages et chargements sont effectues a travers
le trou (fig. 5 réf. 2).
Pour la vidange de l’huile dans le carter, enlever la jauge
niveau et vider l’huile avec une séringue (fig. 5 réf. 3).
II est conseillé d’effectuer la vidange lorsque l’huile est
encore suffisamment chaude de facon a permettre un
écoulement facile.
1) COMPTE HEURES
2) BOUTON OFF
3)BOUTONSTART
4) BOUTON ON
5) TABLEAU ON
6) SORTIE GENERATEUR
7) PRESSION HUILE
8) TEMPERATURE MOTEUR
9) TEMPERATURE GENERATEUR
TABLEAU DE COMMANDE
Lorsque le groupe s’arrête suite à l’intervention d’une
protection, l’indication des heures de fonctionnement
disparaît des afficheurs du tableau de commande et un
code apparaît, ce code indique la cause de l’arrêt du
groupe électrogène.
Tous les codes ainsi que leur signification sont indiqués
dans le tableau.
TABLEAU CODES D’ALARME
CODE
CAUSE INTERVENTION PROTECTION
E - 80
Absence de tension groupe
E - 81
Basse pression huile
E - 82
Température moteur élevée
E - 83
Température alternateur élevée
E - 85
Surcharge groupe électrogène
E - 87
A 30" depuis le démarrage, le groupe n’a
pas atteint 80 % de la tension nominale.
batt
Basse tension batterie
Code E-80
Ce code indique que le groupe s’est
arrêté à cause de l’absence totale de tension = 0 volt.
L’apparition de ce code signale :
- que le tableau de commande n’est pas en mesure de
lire la tension de l’alternateur à cause de l’interruptio d’un
branchement électrique;
-que l’alternateur est endommagé.
- 19 -
Return To Table Of Contents
F
IS 3.5 - 4.0 - 5.0 - 6.0
8 PROTECTION FUSIBLE ( fig. 4 )
Code E-81
Ce code indique que le groupe s’est
arrêté à cause d’une pression insuffisante de l’installation
de lubrification du moteur.
1) FUSIBLE CIRCUIT RELAY
2) FUSIBLE CHARGEUR BATTERIE
3) INTERRUPTEUR THERMIQUE
Code E-82 Ce code indique que le groupe s’est arrêté
car le moteur a atteint une température trop élevée.
Code E-83
Ce code indique que le groupe s’est
arrêté car l’alternateur a atteint une température trop
élevée.
Code E-85
Ce code indique que le groupe s’est
arrêté car la tension est descendue en dessous de 70 %
de la valeur nominale pendant une durée supérieure à
15".
Code E-87
Ce code indique que le groupe s’est
arrêté car la tension du groupe électrogène n’a pas atteint
80 % de la valeur nominale 30" après le démarrage. Cet
inconvénient peut être provoqué par un nombre de tours
moteur insuffisant ou une panne de l’alternateur.
Code batt.
Ce code indique que la tension batterie
est insuffisante. L’apparition de ce code provoque l’arrêt
du groupe électrogène.
ATTENTION
Après intervention d’une protection avec arrêt du groupe,
pour démarrer de nouveau le groupe, il est nécessaire
de rétablir le tableau en appuyant sur le bouton-poussoir
“OFF”
INFORMATIONS
Si au moment du démarrage du groupe, l’alternateur ne
distribue pas de tension ou que le tableau de commande
ne lit pas de tension, après un délais d’une minute celuici s’éteint complètement et le groupe s’arrête.
- 20 -
9 DIMENSIONS ET POIDS( fig. 7 )
IS 3.5 - 4.0
a) Loungeur (mm)
b) Largeur (mm)
c) Hauteur (mm)
Poids (kg)
IS 5.0 - 6.0
590
406
515
96
675
468
565
130
10 DESCRIPTION SCHEMA ELECTRIQUE (fig. 8 )
1
2
3
4
5
6
7
8
9
10
11
12
13
14
15
16
17
18
19
20
21
ROTOR
STATOR
DIODES 3A
VARISTOR
CIRCUIT IMPRIME'
BORNIER DE PUISSANCE
BORNIER CIRCUIT RELAIS
BORNIER TABLEAU COMMANDES
FUSIBLE 1A
CONDENSATEUR
REGULATEUR DE CHARGE
FUSIBLE
DÉMARREUR
BATTÉRIE
POMPE COMBUSTIBLE
ELECTRO-SOUPAPE STOP
PRESSOSTAT HUILE
THERMOSTAT TÊTE MOTEUR
THERMOSTAT EAU
THERMOSTAT ALTERNAEUR
INTERRUPTEUR THERMIQUE
Return To Table Of Contents
F
IS 3.5 - 4.0 - 5.0 - 6.0
Electro-aimant défectueux
z
Batterie défectueux
z
De'marreur défectueux
z
Circuit combustible filtre
z
Fusible circuit 12V
z
Relais avv./ev.
z
z
z
z
z
Trop d'huile dans le carter
z
Protections
FUMEE NOIRE
z
FUMEE BLANC
Bouton de de'marrage défecteux
REGIME
INSTABILE
CAUSE PROBABLE
NE PART PAS
ANOMALIE
PART ET
S'ARRETE
12 TABLEAU DES DEGATS
z
z
Surcharge
z
Défectueux regulateur
z
Guides de souapes détériorés
z
Soupapes bloque'
z
Cylindre et segments détériores
Injecteur défectueux
z
z
Pompe à injecteur défectueux
z
z
Pompe d'alimentation défectueux
z
z
z
z
13 TABLEAU DES DEGATS
MOTEUR
Modéle
IS 3.5 - 4.0
IS 5.0 - 6.0
YANMAR
L70AE
YANMAR
L100AE
296cc
3000
3600
78 X 62
5,5/6,1 6,0/6,7
230
240
DIESEL
ELETTRICO
1,1 lt.
20°
406cc
3000
3600
86 X 70
7,7/8,8 9/10
230
240
DIESEL
ELECTRIC
1,65 lt.
20°
Monocylindrique a explosion,
4 temps refroidi à air diesel
Cylindree
T/I
Alesage course
Pulssance Hp
h.Consommation g./Hp.h.
Alimentation
Démarrage
Capacité huile
IncIinaison max
ALTERNATEUR
Synchrone/Monophasé/
autoexcité/2 pòles/
sans balais
Puissance continu
Facteur de puissance
Classe isolement
Fréquence Hz
2700W 2900W 4000W 4800W
1
1
F
F
50
60
50
60
- 21 -
Return To Table Of Contents
D
IS 3.5 - 4.0 - 5.0 - 6.0
VERZEICHNIS
ABBILDUNG
seite.2
TAB."A" TABELLE BERATEN ÖLE
seite.2
SCHALTPLAN
seite.4
1
SCHERHEITSVORSCHRIFTEN
seite.23
2
VORKONTROLLEN
seite.23
3
GEBRAUCHDES
STROMERZEUGERS
Anlassen
Abstellen des Stromerzeugers
seite.23
4
GERÄTESCHUTZ
Öldrucksicherheitsabsteller
Wichtig
Überhitzungsschutz
Generator Überhitzungsschutz
Wichtig
seite.23
5
WARTUNG
Wichtig
Motorwartung
Wichtig
seite.24
6
STILLSTAD
seite.24
7
SCHALTBRETT
seite.24
8
SICHERUNG
seite.25
9
ABMESSUNGEN UND GEWICHT
seite.25
10 SCHATPLAN
seite.25
11 WARTUNG TABELLE
seite.26
12 FEHLER TABELLE
seite.26
13 TECHISCHE MERKMALE
seite.26
WARNUNG
Dieses Symbol verweist auf Gefahrensituationen, die zum Tod oder zu schweren
Gesundheitsschäden führen können
Dieses Symbol verweist auf Gefahrensituationen, die der Lebensdauer eines Produktes, eines
Systems oder einer Anlage auftreten und Personen-, Sachoder Umweltschäden oder wirtschaftliche Verluste zur
Folge haben können.
ACHTUNG
VORSICHT
Dieses Symbol verweist auf Gefahrensituationen, die Sachschäden zur Folge haben können
INFORMATION
Angaben von besonderer Wichtigkeit.
Die Zeichnungen dienen zur Darstellung von Beispielen. auch wenn sich die Maschine im Besitz des Kunden deutlich
von den Abbildungen in diesem Handbuch unterscheidet, sind die Sicherheit und die Informationen zu der Maschine
garantiert.
Der Hersteller kann im Interesse einer ständigen Weiterentwicklung und Verbesserung des Produktes Änderungen
ohne Vorankündigung vornehmen.
- 22 -
Return To Table Of Contents
D
WIR DANKEN IHNEN, DASS SIE EIN MASE PRODUKT
GEWÄHLT HABEN
Das vorliegende Heft enthät die wichtigsten Hinweise für
den korrekten Einbau und Gebrauch des Stromerzeugers.
Korrekter Einbau und sorgfätige Kontrolle vor der Lieferung
sind sehr wichtig, um Betriebssicherheit und
Zuverlässigkeit des Stromerzeugers zu gewährleisten
zur vollen Zufriedenheit des Kunden.
Mangelnde Sorgflat bei der Kontrolle, oder ein
Montagefehler können die Leistungsfähigkeit des
Stromerzeugers und die Sicherheit für den Verbraucher
beeinträchtigen. Alle Angaben und Abbildungen in diesem
Heft beziehen sich auf das zur Zeit der Veröffentlichung
verfugbare Modell. Falls Sie noch Fragen haben sollten,
wenden Sie sich bitte an den nächsten MASE
Kundendienst, wo man Ihnen gerne behilflich sein wird.
MASE behät sich das Recht vor, ohne Voranzeige
Änderungen vorzunehmen.
Nachdruck, auch Auszugsweise nur mit aus drücklicher
Erlaubnis des Herstellers.
MASE GENERATORS S.p.A.
1 SICHERHEITSVORSCHRIFTEN
- Bitte alle Hinweise in diesem Heft aufmerksam lesen,
um den korrekten Einbau und Betrieb des Stromerzeugers
zu gewährleisten und um im Notfall sofort eingreifen zu
können.
- Das Gerät nicht von Unbefugten oder von Personen ohne
entsprechende Kenntnisse betreiben lassen.
- Kinder und Tiere vom laufenden Stromerzeuger fernhalten.
- Den Stromerzeuger oder die Fernbedienungstafel nicht
mit nassen Händen bedienen, wodureh es zu elektrischen
Schlägen kommen kann.
- Eventuelle anfallende Kontrollen und Wartungsarbeiten
immer bei abggestelltem Gerät vornehmen.Nur Fachleute
durfen den Stromerzeruger bei laufendem Motor warten.
2 VORKONTROLLEN
Vor der erstmaligen Inbetriebnahme des Stromerzeugers
und nach jeder Wartungsarbeit mussen folgende Punkte
kontrolliert werden:
- Ölstand mit der Stange(Abb.1,Nr.1),wie Tabelle der
beratenen Öle.
- Sich vergewissern,daß alle Befestigungspunkte des
Gerätes gut angezogen sind.
- Sich vergewissern, daß die Stromabnehmer nicht
angeschlossen sind,umd das Gerät nicht mit angehängter
Last anzulassen.
- Sich vergewissern, daß die Wasser-und
Treibstoffleitungen korrekt angeschlossen sind.
- Sich vergewissern,daß alle elektrischen Anschlüsse
korrekt durchgeführt und alle Verbindungen einwandfrei
sind.
- Sich vergewissern,daß der Wasserha geöffnet ist (abb.
2 nr. 2)
- Sich vergewissern,daß bei montiertem Rückschlagventil
hinter der Ventil und Pumpe Seewasserentnahme (wie
IS 3.5 - 4.0 - 5.0 - 6.0
empfohlen), die Leitung zwischen und Pumpe von Hand
mit Wasser gefüllt worden ist.(abb. 2 nr. 1)
3 GEBRAUCH DES STROMERZEUGERS
Bevor dem Stromerzeuger angelassen wird, sich
vergewissern,daß alle in Kap. 1 beschriebenen
Vorkontrollen durchgeführt worden sind.
Anlassen
Durch Drücken der Taste << ON >> (abb. 3 nr. 4) leuchten
zur Selbstkontrolle alle LED für ca. 5 Sek. auf, danach
bleiben nur die LED auf dem unter Spannung stehenden
Schaltbrett(abb. 3 nr. 5) und die erleuchtet. Dann den
Stromerzeuger mit der <<START>> Taste (abb. 3 nr. 3)
anlassen, die Taste solange drücken bis der
Stromerzeuger läuft, aber auf keinen Fall länger als 5
Sek. drücken. Das korrekte Funktionieren des
Stromerzeugers wird durch Aufleuchten der LED (abb. 3
nr. 6) angezeigt (Betriebsanzeige Stromerzeuger).
Bei dem oben beschriebenen Anlaßvorgang treten die
Schutz vorrichtungen für den Stromerzeuger automatisch
in Funktion (siehe Abs. 4).
Abstellen des Stromerzeugers
Durch Drucken der <<OFF>> Taste auf em Schaltrett
(abb. 3 nr. 2).
4 GERÄTESCHUTZ
Zum Schutz gegen nichtfachgerechten Gebrauch,falsche
Bedienung und Betriebsstörungen ist der Stromerzeuger
mit folgenden Schutzeinrichtungen ausgestattet
- Öldrucksicherheitsabsteller:
Er stellt das Gerät bei zu niedrigem Öldruck ab, gleichzeitig
leuchtet eine LED (abb. 3 nr. 7). Normalerweise braucht
nur Öl nachegfullt zu werden (siehe Kap. 7), um den
Stromerzeuger neu starten zu können.
ACHTUNG
Der Öldrucksicherheitsabsteller gibt nicht unbedingt
Aufschlufß über den Ölstand, es ist deshalb unerlafßlich,
den Ölstand regelmäßig zu kontrollieren.
- Überhitzungsschutz:
Er steIIt das Gerätab,wenn die Temperatur des Motors zu
heiß wird. (abb. 3 nr 8). DasGerät kann erst wieder
angestellt werden,nachdem die Ursache für das
Ansprechen der Schutzeinrichtung gefunden und behoben
ist.
- 23 -
Return To Table Of Contents
D
IS 3.5 - 4.0 - 5.0 - 6.0
6 STILLSTAND
ACHTUNG
- Generator Überlastungsschutz:
Er stellt den Generator bei thermischer oder elektrischer
Überlastung ab; sein Ansprechen wird durch eine LED
(abb.3 nr.9).
Der Stromerzeuger kann erst nach ein paar Minuten
wieder angestellt werden,nämlich dann,wenn die
Temperatur der Generatorwicklungen wieder den
Normalwert erreicht haben. Es wird empfohlen, die Ursache
für das Ansprechen des Überlastungs-schutzes zu suchen
und zu beheben.
ACHTUNG
Bei Ansprechen einer der beschreibenen Schutzeinrichtungen muß die Ursache dafür gesucht und behoben
werden, anschließend muß die << STOP >> Taste
gedrückt werden,weil sonst das Störungsanzeigesignal
gespeichert bleibt.
VORSICHT
wenn ein der Schmelzsicherungen (nr. 1 abb. 3)
durchbrennt, ein Schutz sich einschaltet, der den Erzeuger
nicht anlassen läßt.
5 WARTUNG
INFORMATION
Jede Arbeit am Stromerzeuger darf nur bei
abgeschaltetem Motor und nach ausreiehender Abkühlung
von einer befugten Person durchgefuhrt werden.
Wenn der Stromerzeuger über länger Zeit nicht betriben
wird, müssen folgende Arbeiten betrieben wird, müssen
folgende Arbeiten dürchgefuhrt werden:
- Ölwechsel.
- Ölfilter auswechseln.
- Treibstoffilter auswechseln.
- Zum Auswechseln der Zinkanode den Deckel (abb. 6
nr. 1) aufschrauben.
- Bei temperaturen um order unter 0°C muß der
Kühlkreislauf durch den Hahn (abb. 2 nr. 3) entleert
werden.
- Das Wasserpumpenrad schmieren.
7 SCHALTBRETT (abb. 3)
1) STUNDENZÄHLER
2) OFF KNOPF
3) START KNOPF
4) ON KNOPF
5) ON SCHALTTAFEL
6) STROMERZEUGERS-LEISTUNG
7) ÖL DRUCK
8) MOTOR TEMPERATUR
9) STROMERZEGERS-TEMPERATUR
Wenn das Aggregat durch die Schutzeinrichtung
ausgesetzt wird, erlischt auf dem Bildschirm des
Steuerpultes die Betriebsstunden-Anzeige. Stattdessen
erscheint eine Codenummer, die die Ursache für das
Aussetzen des Elektroaggregats angibt.
In der nachstehenden Tabelle sind alle Codenummern
samt Bedeutung aufgeführt.
Motorwartung
Die regelmaß durchzufuhrenden Wartungsarbeiten am
Motor sind in der Tabelle aufgeführt.
Genauere Informationen sind aus dem Handbueh das
Motorherstellers, das mit jedem Stromerzeuger geliefert
wird, zu entnehmen.
INFORMATION
Den Ölstand mit dem Meßstab (abb. 5 nr. 1) überprüfen,
der Ölstand muß sich immer zwisehen den Strichen
MAX. und MIN. des Meßstabes befinden.
Motorcarterkapazität:
IS 3.5 - 4.0 l. 1,1
IS 5.0 - 6.0 l. 1,6.
ALARMCODE-TABELLE
CODE
URSACHE FÜR DAS
EINTRETENDERSCHUTZEINRICHTUNG
E - 80
am Aggregat liegt keine Spannung an
E - 81
Öldruck zu niedrig
E - 82
Motortemperatur zu hoch
E - 83
Wechselstromgenerator-Temperatur
zuhoch
Die Ausfullen und Laden sind durch das Loch gemacht
(abb. 5 Nr.2). Für einen kompleten Ölwechsel des Carters
nehmen Sie das Niveaustab weg und ziehen
Sie den Öl mit der speziellen ausgerüsteten Spritze.
(abb.5 Nr.3). Für eine bessere Entleerung ist es ratsam,
das Öl abzupumpen solange es noch warm ist.
Bevor Unterhaltungsarbeiten auf dem Wasser-Luft
Austauscher machen (abb. 6 nr. 3), ist es nötig, den
Wasseransaugungsumkreis mit dem speziellen Hahn
absperren (abb. 2 nr. 3)
- 24 -
E - 85
Elektroaggregat überlastet
E - 87
30 Sek. nach Einschalten des Aggregats ist der
Wert von 80% der Nennspannung noch nicht
erreicht
batt
Batteriespannung zu niedrig
Return To Table Of Contents
D
E - 80 Diese Codenummer zeigt an, daß das Aggregat
aufgrund vollständigen Fehlens von Spannung (= 0
Volt) ausgesetzt hat. Das Erscheinen dieser
Codenummer bedeutet
- daß das Steuerpult nicht in der Lage ist, die Spannung
des Wechselstromgenerators zur Unterbrechung einer
Elektroverbindung zu lesen;
- daß der Wechselstromgenerator defekt ist.
IS 3.5 - 4.0 - 5.0 - 6.0
8 SICHERUNG ( abb. 4 )
1) RELAY KREIS-SCHMELZSICHERUNG
2)LADEGERAT-SCHMELZSICHERUNG
3) TEMPERATURSHALTER
9 ABMESSUNGEN UND GEWICHT( abb. 7 )
E - 81 Diese Codenummer zeigt an, daß das Aggregat
aufgrund unzureichenden Drucks im Motorschmiersystem
ausgesetzt hat.
E - 82 Diese Codenummer zeigt an, daß das Aggregat
aufgrund zu hoher Motortemperaturen ausgesetzt hat.
E - 83 Diese Codenummer zeigt an, daß das Aggregat
aufgrund
zu
hoher
Temperaturen
des
Wechselstromgenerators ausgesetzt hat.
E - 85 Diese Codenummer zeigt an, daß das Aggregat
ausgesetzt hat, weil die Spannung für mehr als 15 Sek.
unter 70% des Nennwertes abgesunken ist.
E - 87 Diese Codenummer zeigt an, daß das Aggregat
ausgesetzt hat, weil die Spannung des Elektroaggregats
30 Sek. nach Einschalten noch nicht 80% des
Nennwertes erreicht hat. Dies kann durch unzureichende
Motordrehzahlen oder einen Schaden am
Wechselstromgenerator verursacht werden.
bat
Dieser Code zeigt an, daß die
Batteriespannung unzureichend ist. Bei Erscheinen
dieses Codes wird das Elektraggregat nicht blockiert.
ACHTUNG
Nach Eintreten der Schutzeinrichtungen und dem daraus
folgenden Aussetzen des Aggregats muß vor einer
erneuten Inbetriebnahme das Steuerpult durch Drücken
der “OFF”-Taste zurückgestellt werden.
INFORMATION
Wenn das Aggregat eingeschaltet wird und der
Wechselstromgenerator keine Spannung erzeugt oder
das Steuerpult keine Spannung abliest, schaltet sich
dieses nach 1 Minute vollständig aus und blockiert das
Aggregat.
IS 3.5 - 4.0
a) Länge (mm)
b) Breite (mm)
c) Höhe (mm)
Gewicht (kg)
IS 5.0 - 6.0
590
406
515
96
675
468
565
130
10 SCHALTPLAN (abb. 8 )
1
2
3
4
5
6
7
8
9
10
11
12
13
14
15
16
17
18
19
20
21
ROTOR
STÄNDER
DIODEN 3A
VARISTOR
RELAY KCONTROLLTAFEL
STARKSTROMKLEMMENBRETT
RELAYS KLEMMENBRETT
SCHALTTAFELKLEMMENBRETT
SCHNELZSISCHERUNG 1 A
KONDENSATOR
KONTROLLTAFEL ELEKTRONISHE
REGULIERUNG
SCHNELZSISCHERUNG
STARTMOTOR
BATTERIE
TREIBSTOFFPUMPE
ELEKTROVENTIL GASÖL
OELDRUCKSCHALTER
MOTORKOPFTHERMOSTAT
WASSERTHERMOSTAT
GENERATOR THERMOSTAT
TEMPERATURSHALTER
- 25 -
Return To Table Of Contents
D
IS 3.5 - 4.0 - 5.0 - 6.0
Defekte start Umschalter
z
Defekte elektromagnet
z
Defekte batterie
z
Defekte start motor
z
Verstopfte Leitungen Kraftsoffilter
z
12V sicherung
z
Relay avv./ev.
z
z
z
z
z
Ol im motorgehouse zuvil
z
Gerateschutz
z
z
Ubrmassige belastung
z
Defekte drehzal regler
z
Abgenutzte ventilfuhrugen
z
Ventile
z
Abgenutze Zylinder Kalbenringe
Defekte einspritzduse
z
Defekte einspritzpumpe
z
z
z
Pompe d'alimentation defectuese
z
z
13 TECNISCHE MERKMALE
IS 3.5 - 4.0
MOTOR
Modell
Einzylinder 4-Takt diesel
Verbrennung luftgekuehl
Hubraun
U.P.M.
Bohrungsdur
Leistung Hp
Verbrauch
Treibstotf
Anlassystem
Oellassungs
Maximalneig
YANMAR
L70AE
IS 5.0 - 6.0
YANMAR
L100AE
296cc
406cc
3000
3600 3000
3600
78 X 62
86 X 70
5,5/6,1 6,0/6,7 7,7/8,8 9/10
230
240
230
240
DIESEL
DIESEL
ELEKTRISCH
ELEKTRISCH
1,1 lt.
1,65 lt.
20°
20°
WECHSELSTRO
Synchron, einphasing, mit
Eingenerreg, Zwei Pole/ohne
Pole/ohne Buersten
Leistung Dauerbetrieb
Leistungsfaktor
Isolierungs-Klasse
Frequenz Hz
- 26 -
SCHWARZER
RAUCH
EWISS RAUCH
MOGLICHE URSACHEN
UNSTABIL
REGIME
STORUNG
STARTER UND
STIRBT
12 FEHLER TABELLE
STARTER NICHT
11 WARTUNG TABELLE
2700W 2900W 4000W 4800W
1
1
F
F
50
60
50
60
z
z
Return To Table Of Contents
E
IS 3.5 - 4.0 - 5.0 - 6.0
INDICE
FIGURAS
pàg.2
TAB."A"PANELAACEITESACONSEJADOS
pàg.2
ESQUEMA ELÉCTRICO
pàg.4
1
NORMAS DE SEGURIDAD
pàg.28
2
CONTROLOS PRELIMINARES
pàg.28
3
UTILISACION DEL GENERADOR
Posta en marcha
Aresto del generador
pàg.28
4
PROTECCIONES
Proteccion baja presion aceite
Atencion
Proteccion elevada temperadura
Proteccion sobretemperadura
Sobrecarga alternador
Importante
pàg.28
5
MANUTENCION
Importante
Ordinaria manutenciòn del motor
Importante
pàg.29
6
PERIODES DE INACTIVIDAD
pàg.29
7
PANEL DE MANDOS
pàg.29
8
PROTECCION FUSIBLE
pàg.30
9
DIMENSIONES Y PESO
pàg.30
10 ESQUEMA ELECTRICO
pàg.30
11 PANELA MANUTENCION
pàg.38
12 PANELA AVARIA
pàg.38
13 CARACTERISTICAS TECHNIQUES
pàg.38
PELIGRO
Indica que es necesario presta atención para evitar una serie de consecuencias que pueden
provocar la muerte del personal o psibles daños a la salud
Situación que puede producirse durante el periodo de vida de un producto, sistema o equipo
considerado peligroso porque puede producir daños a las personas, propiedades y medio ambiente o acarrear
ATENCION
pérdidas económicas.
PRECAUCION
Indica que es necesario prestar atención para evitar una serie de conseguencias que
pueden provocar daños a los bienes materiales como, por ejemplo, los materials o el producto.
INFORMACIONES Indicaciones de particular importancia.
Los dibujos se facilitan a titulo de ejemplo. De todas formas, aunque su màquina sea sensiblemente diferente a la
ilustrada en este manual, la seguridad y las instrucciones de la misma son igualmente vàlidas.
El fabricante puede aportar, sin previo aviso y en cualquier momento, toda modificación que crea oportuna, en lìnea
con la polìtica de constante desarrollo y actualización de la màquina.
- 27 -
Return To Table Of Contents
E
IS 3.5 - 4.0 - 5.0 - 6.0
3 UTILISACIO’N DEL GENERADOR
GRACIAS POR ELEGIR UN PRODUCTO MASE.
II presente manual contiene la información necesaria
para un correcto uso dei equipo. Para la seguridad y
satisfacción del cliente son esenciales una correcta
instalación y verificación del grupo antes del envio. Un
control no adecuado o un error de montaje pueden
comprometer la eficiancia del generador y la seguridad
del usuario. Todas las informaciónes y illustraciones de
este manual se refieren al modelo existente en el momento de su publicación. Para cualquier otra información le
rogamos se dirija al centro de asistencia MASE más
cercano. MASE se reserva el derecho de cualquier
modifieación sin previo aviso. Ninguna parte o illustración
de este manual puede ser reproducida sin su autorización.
Mase Generators S.p.A.
1 NORMAS DE SEGURIDAD
- Leer atentamente todas las informaciónes contenida en
este manual y de instalación; es fundamental para una
correcta instalación y utilización del generador y para
intervenir puntualmente en caso necesario.
- No permitir el uso dei generador a personas non
competentes o sin una adecuada preparación.
- No permitir que niños o animales se acerquen al
generador mientras funciona.
- Húmedas, se puede provocar una descarga eléctrica.
- Los controles del equipo han de realizerse con el motor
parado y por personal especializado.
2 CONTROLOS PRELIMINARES
A la primera posta en marcha del generador, y después
aber hecho un cualquier intervención, es bueno asegurarse
que:
- L’aceiteesanivel,conelasta, ref.1,fig.1 de la panela de
los aceites de engrase aconsejados.
- Todas los punctos de ancladero del generador son
senadi.
- Todas las conexiónes eléctricas son desconectados
por no avaiar el generador en carico.
- Las lineas aqua y combustible son corectamente
Juntado.
- Todos los juntos eléctricas son efectuadi corectameente
y non esiston conexiónes en mal estado.
- El grifo para agua as abierto (fig. 2 ref. 2)
- El circuito agua de la pompa a la valvula es rellenado
manualmente en caso una vàlvula de non-retorno es
montada en la prisa mar (como aconsejado).(fig. 2 ref. 1)
- 28 -
Antes de poner en marcha el generador, asegurarse que
los cotrolos preliminares son efectuadi.
Posta en mareha
Proceder a la posta en marcha apretando el boton << ON
>>(fig.3, ref.4),todos los leds seranno en functión de
auto-controlopa- ra ca 5seg. y después sera alumado el
led del panelo alimentado (fig. 3 ref. 5). Poner en marcha el generador apretando
el boton << START >> (fig. 3 ref. 3) y releasar solo
desponés de la posta en marcha avenuda, no superando
5 segundos. El corecto fonctionamento del generador
sera indicado de l’encendimiento del led (fig. 3 ref. 6)
(Espia fonctionamento generador).
Con este operaciones se activano automaticamente les
proteciones del generador (Cap. 4).
Aresto del generador
El generador se aresta apretando el boton << OFF>>
sovra el panelo de interveciòn (fig.3 ref.2)
4 PROTECCIONES
El generador es equipado conprotecciones que lo
protegono de una utilisacion non correcta. Las
protecciones son
-Proteccion baja presion aceite: interviene parando el
generador cuando la presion de l’aceite en el carter en insuficiente;sua intervencion es signalada para
enceindimiento del led (fig. 3, ref. 7).
Es generalmente suficiente restablecer la cuantidad de
aceite faltante para reponer en marcha el generador
ATENCION
La proteccion baja presion aeeite no es necessariamente
una indicacion para el nivel de aceite. Una revision
periodica de este nivel es necesaria.
- Proteccion elevada temperadura:
Interviene parando el generador cuando la temperadura
del motor es muy elevada. Sua intervencion es signalada
para el encedimiento del led (fig. 3, ref. 8)
El generador quiere ser posto en marcha después de aber
asegurado y eliminado las causas de l’intervencion.
- Proteccion sobretemperadura/sobrecarga
alternador:
interviene desconectando el generador cuando se verifica
una sobrecarga termica o eletricade l’alternador; suo
intervento es signalado de l’encedimiento del led (fig. 3,
ref. 9).
EI generador puede ser reposto en marcha después de
unos minudos,cuando la temperadura de los
arrollamientos de l’al-ternador arriba a valores normales:
se recomanda de investigar y ellminar las causas que
causan la intervencion.
Return To Table Of Contents
E
IS 3.5 - 4.0 - 5.0 - 6.0
6 PRIODES DE INACTIVIDAD
ATENCION
En caso de intervencion de una de las protecciones
sobraindicade, después de aber asegurado y eliminado
la causa deintervencion,es necesario hacer la operacion
de << STOP >> (de otro modo el signal resta en
memoria).
ATENCION
Si acaso uno de fusible (ref. 1 Fig. 4) se quiema,
interviene una proteccion que no deja poner en marcha el
generador.
5 MANUTENCION
PRECAUCION
Cuelquiera intervencion de manutención del generador
quiere ser efectuada a motor apagado, después de
aberlo dejado refredardse a suficiencia, y quiere ser
efectuado solo para personal autorizado.
Ordinaria manutenciòn del motor
Las intervenciones periodicales para efectuar en el motor
son el la plana. Para informaciones mas detailades,
consultar el manual fornido para el constructor del motor,
alegado a cada generador.
INFORMACIONES
Si el generador no es utilizado para un lungo periodo, es
necesario proceder a las operaciones qui seignen:
- Remplezar aceite carter.
- Remplezar filtro aceite.
- Remplezar filtro combustible.
- Remplezar pastilla cinicico.
- Con temperaduras inferiores o proxime a 0°C, es
necessario vaciar el circuito enfreimento con el grifo (fig.
2 ref.3)
- Lubrificar la girante de la pompa agua.
7 PANEL DE MANDOS (fig. 3)
1) CONTAHORAS
2) BOTON OFF
3) BOTON START
4) BOTON ON
5) PANELO ON
6) SALIDA GENERADOR
7) PRESION ACEITE
8) TEMPERATURA MOTOR
9) TEMPERATUR GENERADOR
Cuando el grupo se para debido a la intervención de una
protección, en la pantalla del panel de mandos
desaparece la indicación de las horas de funcionamiento
y en su lugar aparece un código que indica la causa de
la parada del grupo electrógeno.
En la siguiente tabla están indicados todos los códigos
con sus respectivos significados.
Examinare el nivel aceite para el adapto asta graduado
(fig. 5 ref. 1 ).
El nivel quiere ser siempre compriso entre los grados
MAX y MIN en el asta.
Capacidad earter motor:
IS 3501 l. 1,1
IS 4501-5501 l. 1,65.
Los rellenos y cargamentos son efectuadi para el agujero
adecuado (fig. 5, ref. 2). Para remplezar el aceite en ei
carter, sacar el asta nivel y extraer el aceite para una
jeringa adecuada (fig. 5, ref. 3). Le aconsellamos de
efectuar el vaciamiento para aceite ancora suficientemente
caliente para aconsentir una facile salida.
TABLA DE LOS CODIGOS DE ALARMA
COD.
CAUSA DE INTERVENCION DE LA PROT.
E - 80
Falta tensión en el grupo
E - 81
Baja presión de aceite
E - 82
Alta temperatura motor
E - 83
Alta temperatura alternador
E - 85
Sobrecarga grupo electrógeno
E - 87
A 30" del arranque el grupo no alcanza
80% de la tensión nominal
bat
Baja tensión de batería
- 29 -
Return To Table Of Contents
E
COD. E- 80: este código indica que el grupo se ha
parado por ausencia total de tensión = 0 voltio. La
aparición de dicho código indica:
- que el panel de mandos no está en condiciones de
leer la tensión del alternador por la interrupción de una
conexión eléctrica;
- que el alternador está averiado.
COD. E- 81: este código indica que el grupo se ha
parado por presión insuficiente en el sistema de
lubricación del motor.
COD. E- 82: este código indica que el grupo se ha
parado porque el motor ha alcanzado una temperatura
excesivamente elevada.
COD. E- 83: este código indica que el grupo se ha
parado porque el alternador ha alcanzado una temperatura excesivamente elevada.
COD. E- 85: este código indica que el grupo se ha
parado porque la tensión ha disminuido por debajo del
70% del valor nominal durante un tiempo superior a
15".
COD. E- 87: este código indica que el grupos se ha
parado porque la tensión del grupo electrógeno,
transcurridos 30" del arranque, aún no ha alcanzado el
80% del valor nominal. Dicho inconveniente puede ser
causado por una cantidad insuficiente de revoluciones
del motor o por un desperfecto en el alternador.
COD. bat: este código indica que la tensión de la
batería es insuficiente. La aparición de este código no
para el grupo electrógeno.
ATENCION
Después de la intervención de una protección con
consiguiente parada del grupo, para poder poner
nuevamente en marcha el grupo se debe resetear el
panel accionando el pulsador “OFF”.
INFORMACIONES
Si se pone en marcha el grupo y el alternador no eroga
tensión o si el panel de mandos no lee tensión, este
último se apaga completamente y para el grupo.
- 30 -
IS 3.5 - 4.0 - 5.0 - 6.0
8 PROTECCION FUSIBLE ( fig. 4 )
1) FUSIBLE CIRCUITO RELAY
2) FUSIBLE CARGA BATERIA
3)INTERRUTTORTERMIC
9 DIMENSIONES Y PESO ( fig. 7 )
IS 3.5 - 4.0
a) Longitud (mm)
b) Anchura (mm)
c) Altura (mm)
Peso (kg)
IS 5.0 - 6.0
590
406
515
96
10 ESQUEMA ELÉCTRICO (fig. 8 )
1) ROTOR
2) STATOR
3) DIODO
4) VAIRISTOR
5) ESQU ELA RÉLAY
6) BORNE DE POTENCIA
7) BORNE CIRCUITO RÉLAY
8) BORNE PANELO CONTROL
9) FUSIBLE 1 A
10) CONDENSADOR
11) REGULADOR CARGA BATERIA
12) FUSIBLE
13) PEQUENO MOTOR DE ARRANQUE
14) BATERIA
15) POMPA COMBUSTIBLE
16) ELÉCTROVALVULA STOP
17) PRESOSTAT ACEITE
18) TERMOSTAT CABEZA MOTOR
19) TERMOSTAT AGUA
20) TERMOSTAT ALTERNADOR
21) INTERRUTTORTERMIC
675
468
565
130
Return To Table Of Contents
E
IS 3.5 - 4.0 - 5.0 - 6.0
11 PANELA MANUTENCIÓN
Botones posta en marcha defectosos
z
Electrovalvula defectosos
z
Bateria defectosa
cables insuficiente
Setion
z
HUMO NEGRO
z
z
z
Paqueno motor posto en marcha
defectoso
z
Circuito/Filtro combustibile
z
Fusible circuito 12V
z
Relay avv./ev.
z
z
Eccessiva coundidad ocaite carter
Intervencion protecciones
HUMO BLANCO
CAUSA PROBABILE
REGMEN
INSTABILE
AVARIA
SE PONE EN
MARCIA Y SE
ARESTA
NO SE PONE EN
MARCIA
12 PANELA AVARIA
z
z
z
Sobrecargo
z
Regolador defectoso
z
Guia valvolas usurados
z
Valvolas bloquades
z
Cilindro y segmentos usurados
Inyector defectoso
z
Pompa inyeccion
z
z
z
Pompa alimentacion
z
z
z
z
13 CARACTERISTICAS TECNICAS
IS 3.5 - 4.0
MOTOR
Modelo
Monocilindrico, 4 tiempos diesel
refrigerado por aire
Cilindrata
R.P.M.
Diametro por carrera
Potencia Hp
Consumo g./Hp.h
Alimentaciòn
Sistema de arranque
Capacitad de aceite
Inclinaciòn maxima
ALTERNADOR
Sincrono, monofasico autoexcitado,
YANMAR
L70AE
IS 5.0 - 6.0
YANMAR
L100AE
296cc
406cc
3000
3600 3000
3600
78 X 62
86 X 70
5,5/6,1 6,0/6,7 7,7/8,8 9/10
230
240
230
240
DIESEL
DIESEL
ELETTRICO
ELETTRICO
1,1 lt.
1,65 lt.
20°
20°
2 poles sin escobillas
Potencia continua
Factore de potencia
Clase aislamiento
Frequencia Hz.
2700W 2900W 4000W 4800W
1
1
F
F
50
60
50
60
- 31 -
Return To Table Of Contents
NL
IS 3.5 - 4.0- 5.0 - 6.0
INHOUD
1
2
3
4
5
6
7
8
9
10
11
12
13
FIGUREN
TAB A; AANBEVOLEN OLIESOORTEN
ELEKTRISCH SCHEMA
VEILIGHEIDSVOORSCHRIFTEN
EERSTE KONTROLES
GEBRUIK
Starten
Stoppen
BEVEILIGINGEN
Lage oliedruk
Waarschuwingen
Hoge temperatuur motor
Overbelasting / overtemperatuur generator
Belangrijk
ONDERHOUD
Belangrijk
Motoronderhoud
Informatie
LANGDURIGE OPSLAG
BEDIENINGSPANEEL
ZEKERING
AFMETINGEN EN GEWICHT
BESCHRIJVING ELEKTRISCH SCHEMA
ONDERHOUDSSCHEMA
STORINGEN
TECHNISCHE SPECIFICATIES
GEVAAR
blz. 2
blz. 2
blz. 4
blz. 33
blz. 33
blz. 33
blz. 33
blz.34
blz. 34
blz. 34
blz. 35
blz. 35
blz. 35
blz. 35
blz. 35
blz. 36
Wijst op een drijgende gevaarlijke situatie die, als u deze omstandigheden niet
vermijdt, (dodelijk) lichamelijk letsel op kan leveren.
WAARSCHUWING
Wijst op een mogelijk gevaarlijke omstandigheid die, als u deze omstandigheden niet
vermijdt, lichamelijk letsel en/of schade aan de apperatuur tot gevolg kan hebben.
VOORZICHTIG
Wijst op een mogelijk gevaarlijke omstandigheid die, als u deze omstandigheden niet
vermijdt, matig lichamelijk letsel en/of schade aan de apperatuur tot gevolg kan
hebben. Waarschuwt ook om veilig te werken.
INFORMATIE
Belangrijke informatie. Als de machine niet conform deze informatie wordt gebruikt
kan de garantie in gevaar komen.
MASE streeft er naar continue haar produkten te verbeteren. Modificaties kunnen zonder mededeling vooraf worden
doorgevoerd.
- 32 -
Return To Table Of Contents
NL
GEFELICITEERD MET UW KEUZE VOOR EEN MASE
GENERATORSET!
Deze handleiding bevat alle informatie nodig voor goed
gebruik en onderhoud. Het is belangrijk voor zowel uw
veiligheid als voor de betrouwbaarheid, dat de generator
op de juiste wijze is ingebouwd en zorgvuldig in bedrijf is
gesteld. Een fout bij installatie of een overgeslagen punt
bij in bedrijfstelling kan de werking van generator nadelig
beïnvloeden of zelfs de veiligheid in gevaar brengen. Alle
informatie en illustraties verwijzen naar het model zoals
in produktie op het moment dat de in deze handleiding
gedrukt werd. Als u verder informatie wenst kunt u kontakt
opnemen met de dichtsbijzijnde Mase Marine Generator
Dealer.
Mase behoud zich het recht voor zonder mededeling
vooraf wijzigingen door te voeren. Niets uit dit boek mag,
op welke wijze dan ook, worden gekopieerd zonder
toestemming vooraf van MASE.
MASE GENERATORS S.p.A.
IS 3.5 - 4.0- 5.0 - 6.0
3 GEBRUIK
Alvorens te starten zorg dat aan alle onder 2. genoemde
punten is voldaan.
Starten
-Druk op “on” (4 fig. 3). Alle waarschuwingslampjes gaan
aan. De elektrische brandstofpomp begint te werken. Na
5 seconden gaan de lampjes uit m.u.v. “panel on” (5 fig.
3".
-Start de generator door (voor max. 5 seconden) op
“start” te drukken. Laat de knop los als de generator
aanslaat.
-De juiste werking wordt aangegeven door een brandende
LED (6 fig. 3).
-De beveiligingen van de generator zijn nu aktief.
Stoppen
De generator wordt gestopt door “off” in te drukken (2 fig.
3).
1 VEILIGHEIDSVOORSCHRIFTEN
4 BEVEILIGINGEN
Lees alle instrukties in zowel de installatiehandleiding als deze gebruikshandleiding zorgvuldig door.
Opvolgen van alle aanbevelingen is uiterst belangrijk.
Sta niet toe dat mensen met onvoldoende kennis
de generator gebruiken of er aan werken.
Sta niet toe dat kinderen of dieren dichtbij de
draaiende generator komen.
Raak de generator of het bedieningspaneel niet
aan als uw handen nat zijn. Elektrische schokken kunnen
het gevolg zijn.
Kontrole van de generator altijd uitvoeren als deze
gestopt is. Testen bij lopende generator alleen door
deskundigen laten uitvoeren.
2 EERSTE KONTROLES
Als de generator voor de eerste keer wordt opgestart, of
na een servicebeurt, is het nodig de volgende zaken te
kontroleren.
Oliepeil. Zie 1 van fig.1 voor de aanbevolen viscociteit.
Goede bevestiging van de generator in zijn
geluiddempende kast en van de kast in het schip.
Elektrische verbruikers zijn afgesloten om starten
onder belasting te voorkomen.
Alle aansluitingen goed vastzitten en van goede
kwaliteit zijn. (brandstof, koelwater, uitlaat,
bedieningspaneel, wisselstroomaansluitingen en 12 V.
aansluitingen)
Huidafsluiter open. Zie 2 fig. 2.
Als een terugslagklep in de koelwaterleiding wordt
gebruikt moet het koelsysteem voor de eerste keer
handmatig worden gevuld.
De generator is uitgerust met diverse beveiligingen ter
bescherming in geval van storingen of foutief gebruik.
- Lage oliedruk alarm
Als de oliedruk te laag wordt zal de generator afslaan. Een
waarschuwingslampje gaat aan (7 fig. 3). Meestal is het
voldoende de olie tot “max.” nivo bij te vullen en de
generator weer te starten.
WAARSCHUWING
Dit alarm mag niet worden gebruikt om het oliepeil
te kontroleren. Kontroleer geregeld het oliepeil en
vul bij als nodig.
- Hoge temperatuur alarm motor
Als de motor temperatuur te hoog wordt zal de generator
afslaan. Een waarschuwings
lampje gaat aan (8 fig. 3). Het is belangrijk eerst het defect
op te sporen en te verhelpen alvorens de generator
opnieuw op te starten.
- Overbelasting / overtemperatuur alarm generator
Als de generator overbelast of te heet wordt zal de
generator afslaan. Een waarschuwingslampje gaat aan (9
fig. 3). Wacht tot de windingen van de generator afgekoeld
zijn. Zoek eerst voor externe oorzaken. Zorg bij verder
gebruik dat de belasting onder maximum blijft.
WAARSCHUWING
Als een van de beveiligingen de generator uitschakelt
zoek dan altijd eerst naar de oorzaak. Druk na het
verhelpen hiervan op “stop”. Dit heft de storingssituatie
op.
- 33 -
Return To Table Of Contents
NL
IS 3.5 - 4.0- 5.0 - 6.0
7 BEDIENINGSPANEEL
WAARSCHUWING
Als een van de zekeringen (1 fig. 4) is doorgebrand kan
de generator niet gestart worden.
5 ONDERHOUD
VOORZICHTIG
Onderhoud dient te worden uitgevoerd terwijl de generator
uit staat en voldoende is afgekoeld. Reparaties dienen te
worden uitgevoerd door uw Mase Marine Generator Dealer.
Motoronderhoud
De motor heeft regelmatig onderhoud nodig zoals
weergegeven in het onderhoudsschema. Meer
gedetailleerdere informatie kunt u dit opzoeken in het
eigenaarshandboek van de Yanmar dieselmotor welke bij
elke generator is bijgeleverd.
1)
2)
3)
4)
5)
6)
7)
8)
9)
urenteller
knop voor stoppen
knop voor starten
knop voor paneel aan en zelfkontrole
LED (groen) voor paneel aan
LED (groen) voor vermogen levering
LED (rood) alarm oliedruk
LED (rood) alarm water temperatuur of motor temperatuur
LED (rood) alarm generator temeratuur
Als de generator stopt omdat een zekering eruit springt
zal er een code op het paneel verschijnen welke de reden
van de stop aangeeft. De codes staan in de tabel
hieronder.
ALARMCODES
INFORMATIE
Kontroleer het oliepeil d.m.v. de peilstok. Houdt deze
altijd tussen “min.” en “max.”.
Carterinhoud:
IS 3.5 - 4.0
IS 5.0 - 6.0
1,1 liter
1,65 liter
Bijvullen en olie verversen kan zoals aangegeven in fig. 5.
Wij raden aan olie te verversen als deze nog warm is,
zodat deze makkelijker af te pompen is.
CODE
E-80
E-81
E-82
E-83
E-85
E-87
batt
OORZAAK TRIPPEN ZEKERING
geen generator spanning
alarm oliedruk
alarm motor- / water temperatuur
alarm generator temperatuur
generator overbelast
onvoldoende generator spanning na
starten
lage accuspanning
E-80 De generator is gestopt op te lage spanning.
Het paneel kan de spanning van de generator
niet meten. Kontroleer elektrische
verbindingen.
Defect generator gedeelte.
6 LANGDURIGE OPSLAG
Volgende punten zijn van belang in geval van langdurige
opslag (winterperiode)
olieverversen
oliefilter vervangen c.q. reinigen
brandstoffilter vervangen
zinkanodes vervangen (1 fig. 6)
aftappen van het koelwater uit het waterlock en de
water-lucht koeler.
smeer de impeller van de waterpomp met zuurvrije
vaseline.
E-81 De generator is gestopt op te lage oliedruk.
Vul olie bij en kontroleer vaker het oliepeil
E-82 De generator is gestopt op te hoge temperatuur
van het water of de motor.
De huidafsluiter staat dicht.
De impeller van de waterpomp is defect.
De kap is van de generator af en de
machinekamer te heet.
E-83 De generator is gestopt op te hoge temperatuur
van de generator.
De generator is overbelast
Zie punten onder E-82
E-85 De generator is gestopt omdat het spanning langer
dan 15 seconden onder de 70% van de nominale waarde
is gezakt.
- 34 -
Return To Table Of Contents
NL
E-87 De generator is gestopt op een te lage
spanning na het starten. Als de spanning
binnen 30 seconden na het starten niet min.
80% van de nominale waarde heeft bereikt
stopt de generator.
Er is niet onbelast gestart
Het motor toerental is gewijzigd
De motor is deffect
De generator is deffect
batt
De accuspanning is laag. De generator stopt
niet op dit alarm, maar kan wel startproblemen
geven.
WAARSCHUWING
Als een zekering eruit is gevlogen met een daarop
volgende stop van de generator, moet het paneel uitgezet
(“off”) worden alvorens opnieuw gestart kan worden.
INFORMATIE
Als het bedieningspaneel onvoldoende spanning
detecteert na het starten stopt de generator na 1 minuut.
12 STORINGEN
KLACHT
START
NIET
SLAAT AF
INSTABIEL
LOPEN
WITTE ROOK ZWARTE
ROOK
MOGELIJKE
OORZAAK
PANEEL
O
BRANDSTOFKLEP
O
ACCU DEFFECT OF
LEEG DUNNE
ACCUKABELS
O
O
STARTMOTOR
O
VERSTOPTE
BRANDSTOFTOEVO
O
ZEKRING
LAADSYSTEEM
O
RELAIS
PRINTPLAAT
O
O
zekering bedieningsgedeelte
zekering laadinrichting accu
thermische schakelaar
9 AFMETINGEN EN GEWICHT (fig. 7)
IS 3.5 - 4.0
a) Lengte (mm)
b) Brredte (mm)
c) Hoogte (mm)
Gewicht (kg)
1)
2)
3)
4)
5)
6)
7)
8)
9)
10)
11)
12)
13)
14)
15)
16)
17)
18)
19)
20)
21)
rotor
stator
diode (3 A)
varistor
relaisboard bedieningsgedeelte
aansluitingen vermogens afname
aansluitingen relais
aansluitingen bedieningspaneel
zekering (1 A)
condensator
laadstroomregelaar
zekering
startmotor
accu
elektrische opvoerpomp brandstof
brandstofklep
oliedrukschakelaar
temperatuurschakelaar motor
temperatuurschakelaar uitlaat
temperatuurschakelaar genarator
thermische schakelaar
O
O
O
O
REINIGEN
KONTROLEREN
O
O
O
O
200 300 500
O
OLIEFILTER
O
OLIEPEIL
KLEPSPELING
O
VERVANGEN
MOTOROLIE
O
O
O
X
O
O
X
O
OLIEFILTER
BRANDSTOFFILTER
REVISIE
1000
O
SLANGENKLEMMEN
BRANDSTOFSLANGEN
O
O
100
VULCANOL BUS ACHTERSTE
LAGER GENERATOR
O
O
50
VERSTUIVER
NIVO ACCUVLOEISTOF
O
ZUIGERVEREN,
CILINDERBUS
UREN
20
SCHOONMAKEN GENERATOR
O
BRANDSTOFPOMP
675
468
565
130
10 BESCHRIJVING ELEKTRISCH SCHEMA (fig. 8)
10
O
VERVUILDE
KLEPPEN
VERSTUIVER
IS 5.0 - 6.0
590
406
515
96
ONDERHOUD
KLEPGELEIDERS
ELEKTRISCHE
OPVOERPOMP
1)
2)
3)
11 ONDERHOUDSSCHEMA
OVERBELASTING
O
8 ZEKERING (fig. 4)
O
HOOG OLIENIVO
REGELATEUR
IS 3.5 - 4.0- 5.0 - 6.0
O
O
KLEPPEN LEPPEN
O
ZUIGERVEREN
O
X Eerste onderhoudsbeurt
- 35 -
Return To Table Of Contents
NL
IS 3.5 - 4.0- 5.0 - 6.0
13 TECHNISCHE SPECIFICATES
MOTOR
Model
IS 3.5 - 4.0
IS 5.0 - 6.0
YANMAR
L70AE
YANMAR
L100AE
1 cilinder, 4-takt, direkte inspuiting, luchtgekoeld
slagvolume [cc]
toerental [tpm]
boring x slag [mm]
vermogen [pk]
brandstofverbruik [gr/pk.h]
brandstof
starten
carterinhoud [liter]
max. gebruikshelling [graden]
296cc
406cc
3600
3000
3600 3000
78 X 62
86 X 70
5,5/6,1 6,0/6,7 7,7/8,8 9/10
230
240
230
240
DIESEL
DIESEL
elektrisch
elektrisch
1,1 l.
1,65 l.
20°
20°
GENERATOR
synchroon, zelfbekrachtigend, 1-fase,
dubbel-polig, geen koolborstels
continue vermogen [Watt]
vermogensfaktor
isolatie klasse
frequentie
- 36 -
2700W 2900W 4000W 4800W
1
1
F
F
50
60
50
60