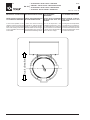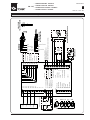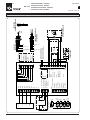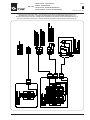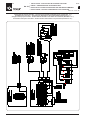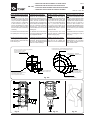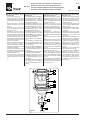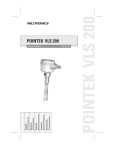
1
MAINTENANCE 2 • LOADING BELLOWS for tanker and open truck ZG - ZH All rights reserved © WAMGROUP S.p.A. INSTALLATION, OPERATION AND MAINTENANCE • VERLADEGARNITUREN für Silofahrzeuge und offene Lkws EINBAU, BETRIEBS - UND WARTUNGSANLEITUNG • CHARGEURS TELESCOPIQUES pour camion citerne et plateau INSTALLATION, UTILISATION ET ENTRETIEN • SCARICATORI TELESCOPICI per camion a cisterna e cassone INSTALLAZIONE USO E MANUTENZIONE CATALOGUE No.TOR.173.--.M.4L ISSUE A6 CIRCULATION 100 LATEST UPDATE 02.13 All the products described in this catalogue are manufactured according to TOREX S.p.A. Quality System procedures. The Company’s Quality System, certified according to ISO 9001-2008 guarantees that the entire production process, from the customer’s order to the after sales service, can fulfil the product quality standard. Alle in diesem Katalog beschriebenen Produkte werden gemäß dem Qualitätssystem der TOREX S.p.A. hergestellt. Das gemäß der internationalen Norm ISO 9001-2008 zertifizierte Qualitätssystem der Firma gewährleistet, dass der gesamte Produktionsprozess von der Auftragsbearbeitung bis zum technischen Kundendienst nach Lieferung den Qualitätsstandard des Produkts erfüllt. Tous les produits décrits dans ce catalogue sont fabriqués selon les procédures du Système de Qualité de TOREX S.p.A., certifié selon les normes ISO 9001-2008. Cela garantit que le processus de production, à partir de la gestion de la commande au service technique après-vente, est effectué de manière contrôlée garantissant la norme de qualité du produit. Tutti i prodotti descritti nel catalogo sono stati realizzati secondo le procedure del Sistema Qualità di TOREX S.p.A. Il Sistema Qualità aziendale, certificato in conformità alle normative internazionali ISO 9001-2008 garantisce che l’intero processo produttivo, dalla formulazione dell’ordine fino all’assistenza tecnica dopo la consegna, si svolga secondo modalità controllate che garantiscono lo standard qualitativo del prodotto. This publication cancels and replaces any previous edition and revision. We reserve the right to implement modifications without notice. This catalogue cannot be reproduced, even partially, without prior consent. Diese Veröffentlichung storniert und ersetzt alle früheren Ausgaben und überarbeiteten Fassungen. Wir behalten uns das Recht vor, Änderungen ohne vorherige Information durchzuführen. Dieser Katalog darf ohne vorherige Genehmigung weder ganz noch teilweise vervielfältigt werden. Cette publication annule et remplace toute édition et révision antérieure. Nous nous réservons le droit de mettre en place des modifications sans préavis. Ce catalogue ne peut être reproduit, même partiellement, sans notre consentement préalable. Questa pubblicazione annulla e sostituisce le edizioni e revisioni precedenti. Ci riserviamo la facoltà di apportare modifiche senza preavviso. Il presente catalogo non può essere riprodotto, nemmeno parzialmente, senza previo consenso. ZG - ZH - 2 MAINTENANCE CATALOGUE 02.13 INDEX INHALTSVERZEICHNIS INDEX INDICE TOR.173.--.M.4L INDEX 2 WARTUNGSKATALOG DESCRIPTION...................................................................................... BESCHREIBUNG..................................................................... M.. 01 LOADING BELLOWS OPERATING LAYOUT..........................................BETRIEBSSCHEMA DER VERLADEGARNITUR....................... . 02 MANUFACTURING DATA...................................................................... KONSTRUKTIONSDATEN.......................................................... . 03 SCOPE AND IMPORTANCE OF THE MANUAL.........................................ZWECK UND BEDEUTUNG DES HANDBUCHS........................ . 04 WARNING.............................................................................................. HINWEISE.................................................................................... . 05→. 09 DECLARATION OF CONFORMITY...................................................... KONFORMITÄTSERKLÄRUNG................................................... . 10→. 13 WARRANTY CONDITIONS.....................................................................GARANTIEBEDINGUNGEN......................................................... . 14 TRANSPORT - PACKAGING - DIMENSIONS - WEIGHTS........................TRANSPORT - VERPAKUNG - PLATZBEDARF - GEWICHTE... . 15 PACKAGING - DIMENSIONS - WEIGHTS.............................................VERPAKUNG - PLATZBEDARF - GEWICHTE............................ . 16 STORAGE............................................................................................. LAGERHALTUNG......................................................................... . 17 LIFTING..................................................................................................HEBEN.......................................................................................... . 18 INSTALLATION....................................................................................... EINBAU......................................................................................... . 19→.20 ACCESSORIES - INSTALLATION - SPREADER...................................ZUBEHÖR – INSTALLATION - STREUVORRICHTUNG............. . 21→.24 INSTALLATION...................................................................................... EINBAU........................................................................................ . 25→.28 WIRING DIAGRAMS - EXAMPLE......................................................... STROMLAUFPLÄNE - BEISPIEL................................................. . 29→.33 INSTALLATION - JUNCTION BOX....................................................... EINBAU - ABZWEIGDOSE........................................................... . 34 INSTALLATION – JUNCTION BOX WITH PUSH BUTT ON PANEL..........EINBAU – ABZWEIGDOSE MIT DRUCKKNOPFTAFEL.............. . 35 START-UP AND STOP PROCEDURES VERFAHREN ZUR INBETRIEBNAHME UND ZUM ............................................................................................................... AUSSCHALTEN........................................................................... . 36→.39 ADJUSTING THE LIMIT STOP..................................................................ENDSCHALTEREINSTELLUNG.................................................. . 40→.41 INSPECTION AND REPLACEMENT OF SPARE PARTS.........................INSPEKTION UND AUSTAUSCH DER ERSATZTEILE............... . 42→.54 LUBRICATION........................................................................................SCHMIERUNG............................................................................. . 55 PERIODIC CHECKS...............................................................................REGELMÄSSIGE KONTROLLEN................................................ . 56 CLEANING..............................................................................................REINIGUNG................................................................................. . 57 RESIDUAL RISKS.................................................................................. RESTRISIKEN.............................................................................. . 58 FAULT FINDING..................................................................................... BETRIEBSSTÖRUNGEN UND ABHILFE.................................... . 59 SCRAPPING THE MACHINE / RETURNING...........................................VERSCHROTTUNG DES GERÄTS / RC..................................... . 60 2 CATALOGUE D’ENTRETIEN 2 CATALOGO DI MANUTENZIONE DESCRIPTION......................................................................................... DESCRIZIONE......................................................................... M. 01 SCHEMA DE FONCTIONNEMENT DU CHARGEUR............................... SCHEMA DI FUNZIONAMENTO DELLO SCARICATORE........... . 02 DONNÉES CONSTRUCTIVES.............................................................. DATI COSTRUZIONE.................................................................. . 03 BUT ET IMPORTANCE DU MANUEL....................................................... SCOPO E IMPORTANZA DEL MANUALE................................... . 04 RECOMMANDATIONS............................................................................ AVVERTENZE.............................................................................. . 05→. 09 DECLARATION DE CONFORMITE....................................................... DICHIARAZIONE DI CONFORMITA’............................................ . 10→. 13 CONDITIONS DE GARANTIE............................................................... CONDIZIONI DI GARANZIA........................................................ . 14 TRANSPORT - EMBALLAGE - ENCOMBREMENT - POIDS................... TRASPORTO - IMBALLO - INGOMBRO - PESI.......................... . 15 EMBALLAGE - ENCOMBREMENT - POIDS............................................. IMBALLO - INGOMBRO - PESI................................................... . 16 EMMAGASINAGE.................................................................................. IMMAGAZZINAGGIO.................................................................... . 17 SOULEVEMENT...................................................................................... SOLLEVAMENTO......................................................................... . 18 INSTALLATION....................................................................................... INSTALLAZIONE.......................................................................... . 19→.20 ACCESSOIRES - INSTALLATION - DEPERDITEUR................................ ACCESSORI - INSTALLAZIONE - SPANDITORE........................ . 21→.24 INSTALLATION........................................................................................ INSTALLAZIONE.......................................................................... . 25→.28 SCHÉMAS ÉLECTRIQUES - EXEMPLE................................................ SCHEMI ELETTRICI - ESEMPIO................................................. . 29→.33 INSTALLATION - BOITER DE DERIVATION............................................. INSTALLAZIONE - SCATOLA DI DERIVAZIONE........................ . 34 INSTALLATION - BOITIER DE DERIVATION AVEC BOITIER DE COM- INSTALLAZIONE - SCATOLA DI DERIVAZIONE MANDE.................................................................................................. CON PULSANTIERA................................................................... . 35 PROCÉDURE DE MISE EN MARCHE ET ARRET.................................... PROCEDURE DI AVVIAMENTO ED ARRESTO.......................... . 36→.39 REGLAGE DU FIN DE COURSE........................................................... REGOLAZIONE FINE CORSA.................................................... . 40→.41 CONTROLE REMPLACEMENT DES PIECES DETACHEES.................. ISPEZIONE SOSTITUZIONE DEI PEZZI DI RICAMBIO............ . 42→.54 LUBRICATION....................................................................................... LUBRIFICAZIONE........................................................................ . 55 CONTROLES PERIODIQUES................................................................ CONTROLLI PERIODICI.............................................................. . 56 NETTOYAGE......................................................................................... PULIZIA......................................................................................... . 57 RISQUES RESIDUELS......................................................................... RISCHI RESIDUI......................................................................... . 58 INCONVENIENTS ET SOLUTIONS........................................................ INCONVENIENTI E SOLUZIONI................................................. . 59 DEMANTELEMENT DE LA MACHINE / RESTITUTION.......................... ROTTAMAZIONE MACCHINA / RESO MACCHINA.................... . 60 ZG - ZH - The LOADING BELLOWS are designed for loading tankers, open trucks, ships and railway wagons, or for storage of materials in heaps, without emitting dusts. It is recommended to follow the instructions and the maintenance procedures given in this manualcarefully, according to the specified schedules, as this will ensure high reliability, especially in terms of safety and higher product durability. 02.13 DESCRIPTION BESCHREIBUNG 2 DESCRIPTION DESCRIZIONE Die VERLADEGARNITUR wurde für das staubfreie Verladen von Schüttgütern in Transportfahrzeuge wie Tankfahrzeuge, offene LKWs, Schiffe und Bahnwaggons konzipiert. Beachten Sie die in diesem Handbuch gelieferten Anweisungen genau und führen Sie die beschriebenen Wartungsarbeiten sorgfältig durch. Dies garantiert eine höhere Zuverlässigkeit, insbesondere verlängert sich die Standzeit des Geräts. TOR.173.--.M.4L 01 Le CHARGEUR TELESCOPIQUE a été étudié pour le chargement sans formation de poussière, des camions-citernes, bateaux et wagons ferroviaires ou pour simplement le stockage de produits en tas. Il est conseillé de suivre attentivement les instructions fournies dans le présent manuel et les procédures de maintenance, selon la cadence indiquée, qui vous permettront d’obtenir un degré de fiabilité élevé, notamment en termes de sécurité, et une plus grande durée de la machine. Lo SCARICATORE TELESCOPICO è stato studiato per il caricamento, senza spargimento di polveri, di autocisterne, camion aperti, navi e vagoni ferroviari o per il solo stoccaggio di materiali in cumuli. Vi consigliamo di seguire attentamente le istruzioni fornite nel presente manuale e le procedure di manutenzione, con le cadenze indicate che vi consentiranno di ottenere un più elevato grado di affidabilità, in particolare in termini di sicurezza, ed una maggiore durata del prodotto. ADDRESS OF LOCAL DEALER ADRESSE DES HÄNDLERS ADRESSE DU REVENDEUR OU INDIRIZZO RIVENDITORE OR LOCAL SERVICE POINT ODER DES KUNDENDIENSTES DU SERVICE APRES-VENTE O PUNTO DI ASSISTENZA VOR ORT LOCAL LOCALE Bulk material Schüttgut Matériau Materiale Tanker - Tank Citerne- Cisterna Air+dust mixture from bottom Luft-Schüttgutmischung vom unteren Boden Mélange air+poussière du fond inférieur Miscela aria+polvere dal fondo inferiore Connexion à l’installation d’aspiration et connexion Connessione all‘impianto di aspirazione e connessione Connexion à l’installation d’aspiration et connexion Connessione all‘impianto di aspirazione e connessione Air+dust mixture from tanker Luft-Schüttgutmischung vom tank Mélange air+poussière du citerne Miscela aria+polvere dalla cisterna Connection to suction and connection system Anschluss an Absauganlage und Anschluss Connection to suction and connection system Anschluss an Absauganlage und Anschluss Material inlet - Schüttguteinlauf Entrée matériau - Entrata materiale Bulk material Materiale Materiale Materiale LOADING BELLOWS OPERATING LAYOUT Fond plateau Fondo cassone SCHEMA DI FUNZIONAMENTO DELLO SCARICATORE Boden der Verladefläche Lorry bottom floor Material inlet - Schüttguteinlauf Entrée matériau - Entrata materiale ZG - ZH 02.13 BETRIEBSSCHEMA DER VERLADEGARNITUR SCHEMA DE FONCTIONNEMENT DU CHARGEUR 2 TOR.173.--.M.4L 02 ZG - ZH - IDENTIFICATION OF THE MACHINE KONSTRUKTIONSDATEN 2 DONNÉES CONSTRUCTIVES DATI COSTRUZIONE IDENTIFIKATION DER MASCHINE Refer to the code on the rating Zur korrekten identifikation auf plate affixed to the machine, to den Bestellcode in der Auftragsidentify equipment. bestätigung, in der Rechnung und auf der Verpackung Bezug nehmen. • 02.13 MANUFACTURING DATA TOR.173.--.M.4L 03 IDENTIFICATION DE LA MACHINE IDENTIFICAZIONE DELLA MACCHINA Pour identifier correctement la machine, vous devez vous référer au code qui se trouve sur la confirmation de commande, sur la facture et sur la plaque qui se trouve sur l’emballage. Per una corretta identificazione della macchina, bisog na fare riferimento al codice che si trova sulla targhetta posta sulla stessa. Via Canaletto, 139/A 41030 San Prospero (MO) - I Tel. ++39 059 80 80 811 Fax. ++39 059 90 82 04 MACCHINA 1 SCARICATORE / LOADING BELLOW • NUMERO/SERIAL N. 06 - 039 2 3 1) Machine code 2) Year of construction 3) Machine serial number 1) Maschinencode 2) Baujahr der Maschine 3) Serien-Nr. Maschine 1) Code machine 1) Codice macchina 2) Année de fabrication machine 2) Anno di costruzione macchina 3) Matricule de la machine 3) Numero matricola ZG - ZH - SCOPE AND IMPORTANCE OF THE MANUAL ZWECK UND BEDEUTUNG DES HANDBUCHS BUT ET IMPORTANCE DU MANUEL SCOPO E IMPORTANZA DEL MANUALE 02.13 2 TOR.173.--.M.4L 04 This Manual, prepared by the manufacturer, forms an integral part of the loading bellows kit. It must therefore accompany the loading bellows right up to its final scrapping, and must be available ready at hand for quick consultation by the operators concerned and those in charge of operations at the work site. If the machine changes hands, this Manual must be handed over to the new owner. Before carrying out any operation on or using the loading bellows, the personnel concerned must have read this manual carefully and completely. If the manual is lost, or in such a condition as to make it illegible, download a new copy from the TOREXÒ web site, and check the date of the last revision. This manual provides warnings and indications concerning the safety regulations for preventing accidents at the work site. However, the operators MUST scrupulously follow the safety regulations meant for them according to the existing legislation. Modifications to the safety regulations made over time must be integrated and implemented. Dieses Handbuch, das vom Hersteller geschrieben wurde, ist integrierender Teil der Verladegarnitur . Als solches muss es unbedingt der Verladegarnitur bis zu ihrer Demolierung folgen und zum schnellen Nachschlagen seitens der betroffenen Bediener und der Baustellenleitung verfügbar sein. Bei einem Eigentumswechsel muss das Handbuch dem neuen Besitzer ausgehändigt werden. Bevor jeder beliebige Vorgang an oder mit der Verladegarnitur ausgeführt wird, muss das Personal es dieses Handbuch unbedingt mit großer Aufmerksamkeit durchgelesen haben. Falls das Handbuch verloren geht oder unleserlich wird, kann man sich eine neue Kopie von den Internetseiten des Herstellers TOREX® herunterladen, um dann das Datum der letzten Aktualisierung des Handbuchs zu prüfen. Dieses Handbuch liefert Hinweise und Angaben zu den Sicherheits- und Unfallverhütungsbestimmungen am Arbeitsplatz. Die Sicherheitsbestimmungen, die laut der geltenden Bestimmungen vom Bedienungspersonal zu beachten sind, müssen auf jeden Fall immer beachtet werden. Etwaige Änderungen der Sicherheitsvorschriften, die im Laufe der Zeit vorgenommen werden, sind immer zu ergänzen und durchzuführen. Le présent manuel, rédigé par le constructeur, fait partie intégrante du chargeur; comme tel il doit absolument suivre le chargeur jusqu’à son démantèlement et être conservé à portée de la main afin d’être consultable par les opérateurs concernés et par la direction des travaux du chantier. En cas de changement de propriété de la machine, le manuel doit être remis au nouveau propriétaire. Avant d’effectuer une quelconque opération avec ou sur le chargeur, le personnel concerné doit absolument et obligatoirement avoir lu très attentivement le présent manuel. Si le manuel est égaré ou abîmé de manière à ne plus être lisible, une copie doit être téléchargée à partir du site internet de TOREX® en vérifiant la date de la dernière mise à jour. Le présent manuel fournit les recommandations et les indications concernant les consignes de sécurité pour la prévention contre les accidents du travail. Dans tous les cas les consignes de sécurité conformément aux normes en vigueur doivent être observées avec la plus grande attention par les différents opérateurs. To u t e s m o d i f i c a t i o n s d e s consignes de sécurité qui seraient apportées au fil du temps, doivent être adoptées et appliquées. Il presente manuale, redatto dal costruttore, è parte integrante del corredo dello scaricatore ; come tale deve assolutamente seguire lo scaricatore fino al suo smantellamento ed essere facilmente reperibile per una rapida consultazione da parte degli operatori interessati e della direzione lavori del cantiere. In caso di cambio di proprietà della macchina il manuale deve essere consegnato alla nuova proprietà. Prima di eseguire qualsiasi operazione con, o sullo scaricatore; il personale interessato deve assolutamente ed obbligatoriamente aver letto con la massima attenzione il presente manuale. Qualora il manuale venga smarrito, sgualcito e tale da non essere completamente leggibile, si deve scaricare una nuova copia dal sito internet della TOREX ® e verificarne la data dell’ultimo aggiornamento. Il presente manuale fornisce avvertenze ed indicazioni relative alle norme di sicurezza per la prevenzione degli infortuni sul lavoro. Vanno comunque, ed in ogni caso, osservate con il massimo scrupolo da parte dei vari operatori le norme di sicurezza poste a loro carico dalle vigenti normative. Eventuali modifiche delle norme di sicurezza che nel tempo dovessero aver luogo dovranno essere recepite ed attuate. With the basic features of the machines as described, the Manufacturer reserves every right to make modifications to parts, details and accessories considered to be necessary for improving the product for design or commercial reasons, at any time without any obligation to update the publication imme-diately. The latest version of the present catalogue is available under www.wamgroup.com Der Hersteller behält sich das Recht vor, unter Beibehaltung der wesentlichen Eigenschaften der beschriebenen Maschinen etwaige Änderungen an Organen, Teilen und Zubehör vorzunehmen, die im Zuge der Produktverbesserung erforderlich sind oder aus konstruktiven oder kommerziellen Erfordernissen heraus ausgeführt werden. Solche Änderungen können jederzeit vorgenommen werden und verpflichten den Hersteller nicht, diese Veröffentlichung gleichzeitig auf den neuesten Stand zu bringen. Die letzte Version dieses Katalogs steht im Internet unter www.wamgroup.com. Les caractéristiques essentielles des machines décrites demeurant inchangées, le constructeur se réserve le droit d’apporter à tout moment des modifications aux organes, pièces et accessoires qu’il estimera avantageuses pour l’amélioration du produit ou pour des exigences de fabrication ou de commercialisation, sans engagement de mettre à jour en temps utile cette publication. La version toujours mise à jour du présent catalogue est disponible sur le site Internet www.wamgroup.com. Ferme restando le caratteristiche essenziali delle macchine descritte, il costruttore si riserva il diritto di apportare le eventuali modifiche di organi, dettagli ed accessori che riterrà convenienti per il miglioramento del prodotto, o per esigenze di carattere costruttivo o commerciale, in qualunque momento e senza impegnarsi ad aggiornare tempestivamente questa pubblicazione. La versione sempre aggiornata del presente catalogo è reperibile sul sito internet www. wamgroup.com TOREX ® will not be held responsible for unproper working of the loading bellows in case of any use which do not comply the indications in the present Manual. Jede bestimmungswidrige Benutzung der Verladegarnitur ohne die Befolgung der in diesem Handbuch stehenden Angaben befreit Firma TOREX® von jeglicher Haftung hinsichtlich des ungeeigneten Betriebs der Verladegarnitur selbst. TOREX® ne sera pas tenu responsable du mauvais fonctionnement du chargeur télescopique dans le cas d’une utilisation qui n’est pas conforme aux indications du présent Manuel. Ogni utilizzo improprio dello scaricatore telescopico senza seguire le indicazioni del presente manuale solleverà la TOREX® da ogni responsabilità inerenti ad un cattivo funzionamento dello scaricatore telescopico stesso. ZG - ZH -The loader must be activated and used only by properly trained, qualified operators, after reading the loading bellows instruction manual. - The foreman and department heads must train the operating personnel for using the equipment. -If you are not familiar with the loader, we recommend you read the instruction manual carefully a second time, with special attention to each of the operations. -Always observe the existing local regulations as regards safety and safeguarding the environment. -Ensure that every one operating the loader is familiar with the position of the emergency stop pushbutton, and that it is used only in an emergency. -Read the warning and hazard notices and labels applied on the machine carefully. Do not remove or hide these plates/ notices. -Do not remove the panels and guards fitted on the loader, while it is in operation. -Illegible, damaged, or worn labels must be cleaned and/or replaced. - Do not start working with these guards open or open them during operations. - Do not remove the guards and safety devices present on the machine -Make sure that the electrical system is earthed. - The customer must fill in the sheet with the features of the powders to be handled and the installer must attach it to the manufacturer’s documentation and hand it over to the customer so that, during each operation on the machine, the safety precautions relevant to the powders handled are indicated.“ WARNING 02.13 HINWEISE 2 RECOMMANDATIONS AVVERTENZE -Die Verladegarnitur darf nur durch qualifiziertes und richtig angeleitetes Personal eingeschaltet und benutzt werden, das zuvor die Betriebsanleitung der Verladegarnitur gelesen hat. - Die Schulung des mit der Bedienung betrauten Personals ist durch den Betriebsleiter und die Abteilungsleiter auszuführen und zu überwachen. -Wenn Sie nicht mit Verladegarnituren vertraut sind, lesen Sie die Betriebsanleitung ein zweites Mal durch und prüfen Sie die verschiedenen Anweisungen Stück für Stück. - Immer die vor Ort geltenden Bestimmungen in Sachen Unfallverhütung und Umweltschutz beachten. -Sicherstellen, daß jede Person, die an der Verladegarnitur arbeitet, die Position der NotAusvorrichtung kennt und daß diese nur dann benutzt ist, wenn es unbedingt erforder-lich ist. - Die Hinweis- und Gefahrenschilder und die Aufkleber auf der Maschine aufmerksam durchlesen. Es ist verboten, diese Schilder zu entfernen oder unsichtbar zu machen. -Entfernen Sie keine Schutzplatten oder Abdeckungen zum Schutz der Verladegarnitur, wenn diese in Betrieb ist. -Falls die Aufkleber undeutlich, beschädigt oder verschlissen sind, müssen sie gereinigt und/ oder ersetzt werden. - Es ist verboten, die Arbeit mit offenen Schutzvorrichtungen zu beginnen oder diese während der Arbeit zu öffnen. - Es ist verboten, die Schutz- und Sicherheitsvorrichtungen, die auf der Maschine vorhanden sind, zu entfernen. -Sicherstellen, daß die elektrische Anlage geerdet ist. - Der Einbauer muss der Dokumentation des Herstellers die vom Kunden zu den Eigenschaften des zu behandelnden Staubes ausgefüllte Karte beifü-gen und alles dem Kunden selbst aushändigen, damit während jedes Eingriffs am Gerät die spezifischen Vorsichtsmaßnahmen der behandelten Stäube angegeben sind. TOR.173.--.M.4L 05 -Le chargeur doit être activé et utilisé exclusivement par du personnel qualifié et correctement formé à son utilisation qui a lu le manuel d’instruction. - Le personnel doit être formé à l’utilisation et vérifié par le chef d’atelier et les contremaîtres. -Pour vous familiariser avec le chargeur nous vous conseillons de lire une deuxième fois le manuel d’instructions, en examinant les différentes opérations une après l’autre. -Respecter toujours les normes locales en vigueur en matière de sécurité pour la préventions des accidents et de protection de l’environnement.. -S’assurer que toute personne qui travaille avec le chargeur connaît la position du bouton d’arrêt d’urgence et qu’il soit utilisé seulement quand cela est indispensable. - Lire attentivement les plaques d’avertissement et de danger ainsi que les étiquettes apposées sur la machine. Il est interdit d’enlever ou de cacher ces plaques signalétiques. -N’enlever pas les panneaux ou protecteurs du chargeur quand il est en marche. -Si les étiquettes sont illisibles, endommagées ou usée, elles devront être nettoyées ou remplacées. - Il est interdit de commencer le travail avec les protections ouvertes ou de les ouvrir pendant le travail. - Il est interdit d’enlever les protections et les sécurités présentes sur la machine. -S’assurer que l’installation électrique est équipée de mise à la terre. -L’installateur devra joindre à la documentation du constructeur, la fiche des caractéristiques des poudres à traiter rédigée par le client et remettre le tout à ce même client. De cette manière les consignes de sécurité spécifiques des poudres traitées seront indiquées à chaque intervention sur la machine. -Lo scaricatore deve essere attivato ed utilizzato esclusivamente da personale qualificato e correttamente addestrato che abbia preventivamente letto il manuale di istruzioni dello scaricatore. -L’istruzione del personale preposto all’uso è da realizzare e verificare a cura del capo officina e dei capi reparto. -Se non avete dimestichezza con lo scaricatore, vi consigliamo di consultare una seconda volta il manuale delle istruzioni, esaminando una ad una le varie operazioni. -Osservate sempre le normative locali vigenti in materia di sicurezza per la prevenzioni di incidenti e di salvaguardia ambientale. -Assicuratevi che ogni persona che lavora con lo scaricatore conosca la posizione del pulsante di arresto d’emergenza e che questo venga usato solo se indispensabile. -Leggere con attenzione le targhe di avvertenza e pericolo e le etichette poste sulla macchina. E’ inoltre vietato rimuovere o occultare tali targhe. -Non rimuovete pannelli o coperture protettive dallo scaricatore mentre è in funzione. -Qualora delle etichette risultino illeggibili, danneggiate o consumate, dovranno essere pulite e/o sostituite, come risulterà opportuno. -E’ vietato iniziare il lavoro con tali protezioni aperte o aprirle durante il lavoro. -E’ vietato rimuovere le protezioni e le sicurezze presenti sulla macchina. -Assicuratevi che l’impianto elettrico sia provvisto di messa a terra. -L’installatore dovrà allegare assieme alla documentazione del costruttore, la scheda compilata dal cliente sulle caratteristiche delle polveri da trattare, e consegnare il tutto al cliente stesso, in modo tale che durante ogni intervento alla macchina siano indicate le precauzioni di sicurezza specifiche delle polveri trattate.” ZG - ZH - WARNING 02.13 HINWEISE 2 RECOMMANDATIONS AVVERTENZE TOR.173.--.M.4L 06 - Before proceeding with installa- -Bevor er mit dem Einbau der - Avant de procéder à l’installa- -Prima di procedere all’installation of the loading bellows, the Verladegarnitur beginnt, muss tion du chargeur télescopique, zione dello scaricatore telescoplant technician/installer must der Monteur/Anlagenbauer ge- l’équipementier/installateur, pico, l’impiantista/installatore, check to ensure that the model prüft haben, ob das gelieferte devra vérifier si le modèle com- dovrà aver cura di verificare se ordered corresponds to the Modell dem entspricht, das mandé, correspond à celui il modello ordinato, corrisponde one in his possession (values bestellt wurde (siehe Daten auf qu’il a dans ses mains (valeurs a quello in possesso (valori indicated on the rating plate), dem Typenschild) und dass es indiquées sur la plaque) et qu’il indicati in targhetta), e che non and that it has not been dam- während des Transports keine n’a pas subi de dégâts pendant abbia subito danni durante il aged during transport and has Schäden erlitten hat oder son- le transport ou présentes des trasporto, o presenti anomalie. no faults. stige Anomalien aufweist. anomalies. -L’installazione dello scarica- Installation of the loading bellows -De Einbau der Verladegarnitur - La mise en place du chargeur tore telescopico deve essere must be done according to the muss unter Befolgung der Anga- télescopique doit être effectuée eseguita seguendo le indicaindications in this Manual, by ben dieses Handbuchs durch en suivant les indications de zioni del seguente manuale, the installer/plant technician den Monteur/Anlagenbauer ce manuel, par l’installateur/ dall’installatore/impiantista che who must carry out a functional erfol-gen, der für folgendes zu équipementier qui doit prévoir : dovrà provvedere: alla verifica check, make the necessary ad- sorgen hat: die Funktionsprü- la vérification fonctionnelle, le funzionale, alla regolazione justments and check the correct fung, die Einstellung und eine réglage et le contrôle du posi- e ad un controllo del corretto positioning. Kontrolle auf korrekte Positio- tionnement correct. posizionamento. Assembly/disassembly opera- nierung. Les opérations éventuelles de Eventuali operazioni di smontions on the loading bellows Etwaige Montage- und De- montage et de démontage de taggio e montaggio di parti dello must only be carried out for montagevorgänge von Tei- pièces du chargeur télescopique scaricatore telescopico sono maintenance and cleaning pur- len der Verladegarnitur dürfen sont effectuées uniquement effettuate soltanto per scopi poses and must be carried nur zur Zwecken der Wartung pour l’entretien ou le nettoyage di manutenzione o di pulizia e out exclusively by personnel oder Reinigung vorgenommen et elles ne peuvent être exé- possono essere eseguiti dal qualified and authorized for the werden, und zwar nur durch cutées que par du personnel solo personale qualificato ed operations: assembly/disassem- qualifiziertes Personal, das zu qualifié et habilité pour ces abilitato per tali operazioni: le bly instructions for the loading diesen Arbeiten befugt ist. Die opérations. Les indications de indicazioni necessarie per il bellows parts are described in für Montage und Demontage montage et de démontage des montaggio e lo smontaggio delle the “Maintenance” chapter. erforderlichen Arbeiten an Tei- pièces du chargeur télescopique parti dello scaricatore telescolen der Verladegarnitur sind im sont décrites dans le chapitre pico sono descritte nel capitolo Kapitel „Wartung“ beschrieben. « Entretien ». “Manutenzione”. -Before carrying out any op- -Bevor irgendein Eingriff an der -Avant d’effectuer une quel- -Prima di effettuare un qualsiasi eration on the loading bellows, Verladegarnitur vorgenommen conque intervention sur le char- intervento sullo scaricatore telemake sure it is set in safety wird, ist sicherzustellen, dass geur télescopique, s’assurer scopico assicurarsi che questo condition. diese sich in gesichertem Zu- qu’il a été mis en sécurité. sia messo in sicurezza. stand befindet. IMPORTANT: «setting the loading bellows and the plant on which it is installed in safety condition» will be referred to in this Manual by means of the following operations: -Make sure the machine is disconnected from all electric power sources. -Make sure the machine is completely stopped. -Make sure the machine is disconnected from the compressed air supply. -Make sure the area around the loading bellows is lighted properly. WICHTIG: Auf den folgenden Seiten dieses Handbuchs sind mit der Aussage “die Verladegarnitur oder die Anlage, in der diese eingebaut ist, in den sicheren Zustand versetzen“ die folgenden Arbeiten angezeigt: -Sicherstellen, dass die Maschine von allen Stromversorgungen getrennt ist. -Sicherstellen, dass die Maschine völlig still steht. -Sicherstellen, dass die Maschine vom Druckluftverteilungsnetz getrennt ist. -Dafür sorgen, dass der Bereich rings um die Verladegarnitur korrekt ausgeleuchtet ist. IMPORTANT : Dans la suite du présent manuel nous indiquons avec la mention «mettre en sécurité le chargeur télescopique et l’appareillage sur lequel il est installé» les opérations suivantes : -S’assurer que la machine est débranchée de toutes les alimentations électriques. -S’assurer que la machine est complètement arrêtée. -S’assurer que la machine est débranchée du réseau de distribution de l’air comprimé. Prévoir un éclairage correct de la zone qui entoure le chargeur télescopique. IMPORTANTE: in seguito nel presente manuale indicheremo con la dicitura “mettere in sicurezza lo scaricatore telescopico e l’impianto sul quale è installato” le seguenti operazioni: -Accertarsi che la macchina sia scollegata da tutte le alimentazioni elettriche. -Accertarsi che la macchina sia completamente ferma. -Accertarsi che la macchina sia scollegata dalla rete di distribuzione d’aria compressa. -Provvedere a illuminare correttamente la zona circostante allo scaricatore telescopico. - WARNING - HINWEISE ZG - ZH - RECOMMANDATIONS - AVVERTENZE -Before acting on the loading bellows, clean it carefully to remove the layer of dust, avoiding formation of dust clouds in the air. -For all operations to be carried out on the loading bellows (maintenance and cleaning), the operators must use the personal protection devices supplied (PPD): -Antistatic safety footwear (certified) -Protective antistatic clothing (certified) -Helmet -Antistatic cut-proof gloves -Safety masks -Safety glasses -The operators must also use all the safety devices specified in the safety sheet of the product handled. -Vor jedem Eingriff an der Verladegarnitur die Staubschichten, die darauf abgelagert sind, sorgfältig entfernen und dafür sorgen, dass keine Staubwolken entstehen. -Bevor irgendeine Arbeit an der Verladegarnitur (Wartung und Reinigung) ausgeführt wird, müssen die Bediener mit den angemessenen persönlichen Schutzausrüstungen (PSA) ausgestattet werden: -unfallsicheres antistatisches Schuhwerk (zertifiziert) -antistatische Schutzkleidung (zertifiziert) -Schutzhelm -antistatische SchnittschutzHandschuhe. -Atemmaske -Schutzbrille -Außerdem sind alle Schutzvorrichtungen zu verwenden, die im Sicherheitsdatenblatt des behandelten Produkts vorgesehen sind. 02.13 2 TOR.173.--.M.4L 07 -Avant d’intervenir sur le chargeur télescopique, éliminer soigneusement les couches de poussière déposée en faisant attention à ne pas disperser des nuages dans l’air. -Pour toute opération à effectuer sur le chargeur télescopique (entretiens et nettoyage) les opérateurs devront être munis des équipements de protection individuelle appropriés (EPI) : -Chaussures de sécurité antistatiques (certifiées) -Vêtements de protection antistatiques (certifiés) -Casque -Gants anti-coupure antistatiques -Masques de protection -Lunettes de protection -En outre il faut utiliser tous les équipements de protection prévus par la fiche de sécurité du produit traité. -Prima di intervenire sullo scaricatore telescopico, rimuovere accuratamente gli strati di povere di deposito avendo cura di non provocare nubi aerodisperse. -Per qualsiasi operazione da effettuarsi sullo scaricatore telescopico (manutenzioni e pulizia), gli operatori dovranno essere muniti degli appositi dispositivi di protezione individuale (DPI): - Scarpe antinfortunistiche antistatiche (certificate) - Indumenti protettivi antistatici (certificati) - Casco - Guanti antitaglio antistatici - Mascherine protettive - Occhiali protettivi -Inoltre occorre utilizzare tutti i dispositivi di protezione previsti dalla scheda di sicurezza del prodotto trattato. N.B.: It is forbidden to act on N.B.: Während des Betriebs N.B.: Il est interdit d’intervenir N.B. Durante il funzionamenthe loading bellows while the der Anlage, in der man die sur le chargeur télescopique to dell’impianto sul quale è plant on which the loading Verladegarnitur eingebaut hat pendant le fonctionnement inserito lo scaricatore telebellows is inserted (loading (Befüllen des Kraftfahrzeugs), de l’installation sur le quel scopico (caricamento dell’autruck) is working. ist es verboten, Eingriffe an il est inséré (chargement du tomezzo), è vietato intervenire If the plant is controlled from der Verladegarnitur selbst véhicule). sullo scaricatore telescopico a main panel, the latter must vorzunehmen. Si l’installation est comman- stesso. Se l’impianto viene be provided with a safety key Wenn die Anlage von einer dée par un tableau général, comandato da un quadro for protection against acci- Hauptschalttafel her gesteu- ce dernier doit être muni generale, quest’ultimo deve dental start-up, and the key ert wird, muss letztere mit d’une clé de sécurité contre essere provvisto di chiave di must be kept in the custody einem Sicherheitsschlüssel le démarrage accidentel, et la sicurezza contro l’avviamento of the person responsible for gegen unbeabsichtigtes Ein- clé doit être entre les mains accidentale, e la chiave deve maintenance operations. schalten versehen sein. Der de la personne qui effectue essere in possesso della perSchlüssel muss sich im Besitz l’opération d’entretien. sona che esegue l’operazione jener Person befinden, die die di manutenzione. Wartung durchführt. ZG - ZH -If the loading bellows is installed at a height, the user/ maintenance personnel must use suitable means for carrying out assembly and maintenance operations: overhead work platforms, personal protection against falling from heights, to carry out the operations in complete safety. -Always use genuine spare parts for replacement. -Do not carry out maintenance operations on the loading bellows, in case of a blackout. -According to the plant control logic, in case of a blackout, the On-Off valve upline of the loading bellows must cut off the product flow. -Prevent heavy objects falling on or knocking against the loading bellows. -The loading bellows is handled using a system of cables wound around the drive unit casing placed beside the gear motor. Do not open the gearbox or access the moving parts of the loading bellows while the machine is in operation. Access to these parts of the machine is only allowed when the loading bellows and the plant on which it is installed are in safe conditions. -Do not use the machine if there are significant operating faults (excessive noise, vibrations, excessive heating of certain points of the machine, incorrect raising/lowering movements, malfunctioning of the filter unit, breakage of bellows, imperfect electrical connections…). - Do not use the machine after maintenance and/or repairs without carrying out the inspections mentioned in the “MAINTENANCE”, “STARTUP AND STOP PROCEDURE”, and PERIODIC CHECKS” sections. WARNING 02.13 HINWEISE 2 RECOMMANDATIONS AVVERTENZE -Wenn die Verladegarnitur nicht am Boden, sondern hoch installiert ist, ist es erforderlich, dass der Bediener/das Wartungspersonal sich für Montage, Wartung und Reinigung mit geeigneten Mitteln bestückt, beispielsweise: Arbeitsbühnen, persönliche Schutzausrüstungen gegen die Absturzgefahr, um die erforderlichen Vorgänge auf der sicheren Seite auszuführen. -Beim Ersetzen von Teilen immer Originalersatzteile verwenden. -Bei einem Stromausfall keine Wartungsarbeiten an der Verladegarnitur vornehmen. -In der Logik der Schalttafel der Anlage ist es erforderlich, dass die Absperrklappe stromauf von der Verladegarnitur bei einer Unterbrechung der Stromversorgung den Produktfluss unterbricht. -Vermeiden, dass Gegenstände mit höherem Gewicht in die Verladegarnitur fallen oder dagegen stoßen. -Die Verladegarnitur wird durch ein System von Seilen bewegt, die rings um das Gehäuse des Hebemotors aufgewickelt sind, das sich an der Seite des Oberkopfs befindet. Es ist verboten, das Gehäuse des Hebemotors zu öffnen oder Zugriff zu den bewegenden Teilen der Verladegarnitur zu erlangen, während die Maschine in Betrieb ist. Der Zugriff zu diesen Teilen der Maschine ist nur dann zulässig, wenn die Verladegarnitur und die Anlage, in der diese installiert ist, sich im sicheren Zustand befinden. -Es ist verboten, die Maschine zu benutzen, falls diese irgendwelche Betriebsstörungen aufweist (lauter Betrieb, Schwingungen, Temperaturerhöhungen einiger Stellen der Maschine, falsche Hebe- oder Senkbewegung, Betriebsstörungen der Filtergruppe, Risse in den Bälgen, nicht perfekte Verankerung der elektrischen Anschlüsse ...). - Es ist verboten, die Maschine nach Wartungseingriffen und/ oder Reparaturen zu benutzen, ohne vorher die Kontrollen angeführt zu haben, die in den Teilen “WARTUNG”, “EIN- UND AUSSCHALTVERFAHREN”, REGELMÄSSIGE KONTROLLEN” stehen. TOR.173.--.M.4L 08 -Si le chargeur télescopique est installé en hauteur, pour les opérations de montage, entretien et nettoyage l’utilisateur/ responsable de l’entretien doit s’équiper des moyens appropriés, par exemple : plate-forme de travail aérienne, équipement de protection individuelle contre la chute pour effectuer les opérations nécessaires en condition de sécurité. -En cas de remplacement de pièces, utiliser toujours des pièces d’origine. - Ne jamais réaliser des travaux d’entretien sur le chargeur télescopique en cas de coupure de courant. -Dans la logique du tableau de commande de l’installation, il faut que dans le cas de coupure de courant, la vanne de coupure en amont du chargeur interrompe l’arrivée de produit. -Eviter que des objets tombent ou heurtent le chargeur télescopique. -Le déchargeur télescopique est animé par un système de câbles enroulés à l’intérieur du boîtier motorisation, placé à côté de la tête. Il est interdit d’ouvrir le boîtier motorisation ou d’accéder aux parties en mouvement du chargeur quand la machine est en marche. L’accès à ces parties est autorisé seulement quand le chargeur et l’installation dans laquelle il est monté ont été mis en sécurité. -Il est interdit d’utiliser la machine quand des anomalies de fonctionnement appréciables se manifestent (machine bruyante, vibrations, augmentation de température de certains points de la machine, mouvement incorrect de soulèvement et descente, mauvais fonctionnement du groupe filtrant, rupture des soufflets, raccordement des connexions électriques imparfait...). - Il est interdit d’utiliser la machine après des interventions d’entretien et/ou de réparation sans avoir effectué les contrôles indiqués dans les sections « ENTRETIEN », « PROCÉDURE DE MISE EN MARCHE ET ARRET », « CONTROLES PERIODIQUES ». -Se lo scaricatore telescopico è installato in quota, per le operazioni di montaggio, manutenzione e pulizia è necessario che l’utilizzatore/manutentore, si attrezzi con idonei mezzi, ad esempio: piattaforme aree di lavoro, dispositivi per la protezione individuale contro le cadute dall’alto, al fine di eseguire in sicurezza le operazioni richieste. -In caso di sostituzione di parti, utilizzare sempre ricambi originali. -Non eseguire lavori di manutenzione allo scaricatore telescopico, in caso di black-out. -Nella logica del quadro di comando dell’impianto, occorre che in caso di black-out, la valvola di intercettazione a monte dello scaricatore, interrompa il flusso di prodotto. -Evitare che oggetti di peso elevato cadano o urtino contro scaricatore telescopico. -Lo scaricatore telescopico è movimentato attraverso un sistema di cavi avvolti all’interno della cassetta motorizzazione, posta di fianco alla testata. E’ vietato aprire la cassetta motorizzazione o comunque accedere alle parti in movimento dello scaricatore mentre la macchina è in funzione. L’accesso a queste parti della macchina è consentito solo quando lo scaricatore e l’impianto all’interno cui è installato sono stati messi in sicurezza. -E’ vietato l’utilizzo della macchina qualora si manifestino apprezzabili anomalie di funzionamento (eccessiva rumorosità, vibrazioni, aumenti di temperatura di alcuni punti della macchina, non corretto movimento di sollevamento o discesa, malfunzionamento del gruppo filtrante, rotture sui soffietti, non perfetto ancoraggio delle connessioni elettriche…). -E’ vietato l’uso della macchina dopo interventi di manutenzione e/o riparazione senza avere effettuato i controlli indicati nelle sezioni “MANUTENZIONE”, “PROCEDURA DI AVVIAMENTO E ARRESTO”, CONTROLLI PERIODICI”. ZG - ZH - WARNING 02.13 HINWEISE 2 RECOMMANDATIONS AVVERTENZE TOR.173.--.M.4L 09 -The loading bellows must be - Die Verladegarnitur muss in - Le chargeur télescopique devra -Lo scaricatore telescopico dovrà installed with sufficient clear- einem Raum installiert werden, être installé avec un espace essere installato con uno spazio ance around it to allow normal der ringsum die Mindestfreiräu- suffisant tout autour pour effec- circostante sufficiente per effetassembly/disassembly, cleaning me vorsieht, um die normalen tuer les opérations ordinaires de tuare le normali operazioni di and maintenance operations. Ein- und Ausbauten, wie die montage/démontage, nettoyage montaggio/smontaggio, pulitura Wartung und die Reinigung et entretien. e manutenzione. ausführen zu können. - If the machine is used with - Bei Verwendung des Geräts mit - Si la machine est employée -In caso di utilizzo della macchina very hot materials for which the sehr heißen Materialien, bei de- avec des matériaux très chaud, con materiali molto caldi, tali surface temperatures exceed nen die Oberflächentemperatur dont la température superficielle che la temperatura superficiale 60°, the installer must make über 60°C liegen kann, muss dépasse 60°, l’installateur devra superi i 60°, l’installatore dovrà provision for mechanical barri- der Monteur dafür sorgen, dass installer des barrières méca- provvedere ad installare barriere ers to prevent contact with the mechanische Barrieren instal- niques interdisant au personnel meccaniche che impediscono al hot parts. liert werden, damit das Personal d’atteindre les parties chaudes. personale di raggiungere le parti The necessary notices and die heiß werdenden Teile nicht Il faut en outre apposer des calde. Ed inoltre dovrà apporre symbols must also be provided. berühren kann. panneaux indicateurs ou picto- la necessaria cartellonistica o Außerdem ist es erforderlich, grammes appropriés. pittogrammi. Hinweisschilder oder Piktogramme anzubringen. The noise level of the machine depends on the nature of the material handled as well as on the operation and installation conditions. The noise level of the loading bellows has been estimated to 78dB(A) during normal operation, measured at 1m distance in the most unfavourable conditions. Der Geräuschpegel der Maschine hängt sowohl von der Beschaffenheit des verarbeiteten Werkstoffs, als auch von den Betriebs- und Einbaubedingungen ab. Der Geräuschpegel der Verladegarnituren wurde um 78 dB(A) geschätzt, gemessen in 1 m Abstand, an der ungünstigsten Stelle. Le niveau sonore de la machine dépend de la nature des matériaux traités et des conditions de fonctionnement et installation. le niveau de bruit est estimé à 78dB (A) en fonctionnement normal, mesuré à une distance de 1 m dans la position la plus défavorable. Il livello di rumorosità delle macchine dipende dalla natura del materiale trattato e dalle condizioni operative e di installazione. La rumorosità dello scaricatore è stimata in 78dB(A) in funzionamento normale,misurati alla distanza di 1 mt. nella posizione più sfavorevole. ZG - ZH - 02.13 DECLARATION OF CONFORMITY KONFORMITÄTSERKLÄRUNG 2 DECLARATION DE CONFORMITE DICHIARAZIONE DI CONFORMITA’ TOR.173.--.M.4L 10 The manufacturer: TOREX S.p.A. located in Via Canaletto, 139/A - 41030 (MO) - Italy under its own responsibility declares that: the Loading Bellows Declaration Of Incorporation Of Partly Completed Machinery Annex II B 2006/42/CE Directive comply with the RES Directive 2006/42/EC of the European Parliament and the Council of 17 May 2006 on machinery 1.1.1. - Definitions 1.1.2. - Principles of safety integration 1.1.3. - Materials and products 1.1.5. - Design of machinery to facilitate its handling 1.3.1. - Risk of loss of stability 1.3.2. - Risk of break-up during operation 1.3.3. - Risks due to falling or ejected objects 1.3.4. - Risks due to surfaces, edges or angles 1.3.7. - Risks related to moving parts 1.3.8. - Choice of protection against risks arising from moving parts 1.3.9. - Risks of uncontrolled movements 1.5.4. - Errors of fitting 1.5.5. - Extreme temperatures 1.5.6. - Fire 1.5.7. - Explosion 1.5.8. - Noise 1.5.9. - Vibrations 1.5.13. - Emissions of hazardous materials and substances 1.5.15. - Risk of slipping, tripping or falling 1.6.1. - Machinery maintenance 1.6.2. - Access to operating positions and servicing points 1.6.4. - Operator intervention 1.6.5. - Cleaning of internal parts 1.7.1. - Information and warnings on the machinery 1.7.2. - Warning of residual risks 1.7.4. - Instructions and, where applicable, the requirements imposed by the following EC Directives Directive 2004/108/EC of the European Parliament and the Council of 15 December 2004 on the approximation of the laws of the Member States relating to electromagnetic compatibility. Directive 2006/95/EC of the European Parliament and the Council of 12 December 2006 on the approximation of the laws of the Member States relating to electrical equipment designed for use within certain voltage limits. The relevant technical documentation is compiled in accordance with Annex VII B of the Machinery Directive 2006/42/EC Harmonized standards, national standards and technical regulations in question: EN ISO 12100 : 2010 The signing company is committed to provide, in response to a reasoned request by national authorities, relevant information on products covered by this declaration, without prejudice to the rights of intellectual property of the manufacturer. The information will be transmitted directly to the national authorities having requested. It’s forbidden to operate all these products before the machine, in which they will be installed, is declared in conformity with 2006/42/EEC AND SUBSEQUENT AMENDMENTS Via Canaletto, 139/A - 41030 - S.Prospero (Mo) - Italy, 9/1/2012 The person authorized to provide the technical documentation: Nino Ratti TOREX S.p.A. - Via Canaletto, 139/A - 41030 - S.Prospero (MO) - Italy The legal representative: Nino Ratti ZG - ZH - 02.13 DECLARATION OF CONFORMITY KONFORMITÄTSERKLÄRUNG 2 DECLARATION DE CONFORMITE DICHIARAZIONE DI CONFORMITA’ TOR.173.--.M.4L 11 Der Hersteller: TOREX S.p.A. mit Sitz in Via Canaletto, 139/A - 41030 (MO) - Italien erklärt unter eigener Verantwortung wie folgt: die Verladegarnituren EINBAUERKLÄRUNG für unvollständige Maschinen gem. Anhang II B der MRL 2006/42/EG Diese Produkte entsprechen den Anforderungen der Maschinenrichtlinie 2006/42/EG des europäischen Parlamentes und des Rates vom 17. Mai 2006 1.1.1. - Begriffsbestimmungen 1.1.2. - Grundsätze für die Integration der Sicherheit 1.1.3. - Materialien und Produkte 1.1.5. - Konstruktion der Maschine im Hinblick auf die Hanhabung 1.3.1. - Risiko des Verlustes der Standsicherheit 1.3.2. - Bruchrisiko beim Betrieb 1.3.3. - Risiken durch herabfallende oder herausgeschleuderte Gegenstände 1.3.4. - Risiken durch Oberflächen, Kanten und Ecken 1.3.7. - Risiken durch bewegliche Teile 1.3.8. - Wahl der Schutzeinrichtungen gegen Risiken durch bewegliche Teile 1.3.9. - Risiko unkontrollierter Bewegungen 1.5.4. - Montagefehler 1.5.5. - Extreme Temperaturen 1.5.6. - Brand 1.5.7. - Explosion 1.5.8. - Lärm 1.5.9. - Vibrationen 1.5.13. - Emission gefährlicher Werkstoffe und Substanzen 1.5.15. - Ausrutsch-, Stolper- und Sturzrisiko 1.6.1. - Wartung der Maschine 1.6.2. - Zugang zu den Bedienungsständen und den Eingriffspunkten für die Instandhaltung 1.6.4. - Eingriffe des Bedienungspersonals 1.6.5. - Reinigen innen liegender Maschinenteile 1.7.1. - Informationen und Warnhinweise an der Maschine 1.7.2. - Warnung vor Restrisiken 1.7.4. - Betriebsanleitung Wo anwendbar wurden die Anforderungen folgender EG Richtlinien erfüllt Richtlinie 2004/108/EG des Europäischen Parlaments und des Rates vom 15. Dezember 2004 zur Angleichung der Rechtsvorschriften der Mitgliedstaaten über die elektromagnetische Verträglichkeit. Richtlinie 2006/95/EG des Europäischen Parlaments und des Rates vom 12. Dezember 2006 zur Angleichung der Rechtsvorschriften der Mitgliedstaaten betreffend elektrische Betriebsmittel zur Verwendung innerhalb bestimmter Spannungsgrenzen. Die speziellen technischen Unterlagen gem. Anhang VII B der MRL 2006/42/EG wurden erstellt. Folgende harmonisierte Normen, nationale Normen und technische Vorschriften fanden Anwendung: EN ISO 12100 : 2010 Das ausstellende Unternehmen ist verpflichtet, die technischen Unterlagen für diese Produkte auf begründetes Verlangen den Marktaufsichtsbehörden, unbeschadet der Rechte am geistigen Eigentum des Herstellers, zur Verfügung zu stellen. Die Unterlagen werden direkt an die anfordernde Behörde gesandt. Es ist verboten diese Produkte in Betrieb zu nehmen, bevor die Maschine, in welche diese eingebaut werden, den Anforderungen der MRL entspricht und die EG Konformitätserklärung gem. MRL 2006/42/EG und nachfolgenden Änderungen vorliegt. Via Canaletto, 139/A - 41030 - S.Prospero (Mo) - Italien , 9/1/2012 Bevollmächtigter für die Zusammenstellung der relevanten Technischen Unterlagen: Nino Ratti TOREX S.p.A. - Via Canaletto, 139/A - 41030 - S.Prospero (MO) - Italien Für den Hersteller: Nino Ratti ZG - ZH - 02.13 DECLARATION OF CONFORMITY KONFORMITÄTSERKLÄRUNG 2 DECLARATION DE CONFORMITE DICHIARAZIONE DI CONFORMITA’ TOR.173.--.M.4L 12 Le fabricant: WAMGROUP S.p.A. son siège social à Via Canaletto, 139/A - 41030 (MO) - Italie déclare sous sa propre responsabilité que les Chargeurs télescopiques Déclaration d’Incorporation des machines partiellement construites - Directive 2006/42/CE Annexe II B sont en conformité avec la Directive RES 2006/42/EC du Parlement Européen et du conseil du 17 mai 2006 sur les machines 1.1.1. - Definitions 1.1.2. - Principes d’intégration en sécurité 1.1.3. – Matériels et produits 1.1.5. – Conception des machines pour faciliter leur manipulation 1.3.1. – Risque de perte de stabilité 1.3.2. – Risque de casse pendant fonctionnement 1.3.3. – Risques causés par la chute ou l’éjection d’objets 1.3.4. – Risques liés aux surfaces, aux bords et aux angles 1.3.7. – Risques liés aux pièces en mouvement 1.3.8. – Choix de protection contre les risques résultant de pièces mobiles 1.3.9. – Risques de mouvements non désirés 1.5.4. – Erreurs de montage 1.5.5. – Températures extrêmes 1.5.6. – Feu 1.5.7. – Explosion 1.5.8. – Bruit 1.5.9. – Vibrations 1.5.13. – Emission de matières et substances dangereuses 1.5.15. – Risque de glisser, trébucher ou tomber 1.6.1. – Maintenance des machines 1.6.2. – Accès aux postes de travail et aux points d’intervention 1.6.4. – Intervention de l’opérateur 1.6.5. – Nettoyage des parties internes 1.7.1. – Informations et avertissements sur la machine 1.7.2. – Avertissements sur les risques résiduels 1.7.4. – Notices de fonctionnement et, quand applicable, avec les exigences imposées par les directives européennes suivantes La Directive 2004/108/CE du Parlement européen et du Conseil du 15 Décembre 2004 sur le rapprochement des législations des États membres concernant la compatibilité électromagnétique. La Directive 2006/95/CE du Parlement européen et du Conseil du 12 Décembre 2006 sur le rapprochement des législations des États membres concernant le matériel électrique destiné à être employé dans certaines limites de tension. La documentation technique appropriée est constituée conformément à l’annexe VII B de la Directive Machines 2006/42/CE Les normes harmonisées, les normes et règles techniques nationales en question: EN ISO 12100 : 2010 La société signataire s’engage à fournir, en réponse à une demande motivée par les autorités nationales, toute information sur les produits couverts par cette déclaration, sans préjudice des droits de propriété intellectuelle du fabricant. Les informations seront transmises directement aux autorités nationales demanderesses. Il est interdit d’utiliser tous ces produits avant que la machine, dans laquelle ils seront installés, soit déclarée conforme à la Directive 2006/42/CEE et ses amendements successifs. Via Canaletto, 139/A - 41030 - S.Prospero (Mo) - Italie, 9/1/2012 La personne autorisée à fournir la documentation technique: Nino Ratti TOREX S.p.A. - Via Canaletto, 139/A - 41030 - S.Prospero (MO) - Italie Le représentant légal: Nino Ratti ZG - ZH - 02.13 DECLARATION OF CONFORMITY KONFORMITÄTSERKLÄRUNG 2 DECLARATION DE CONFORMITE DICHIARAZIONE DI CONFORMITA’ TOR.173.--.M.4L 13 Il sottoscritto fabbricante: WAMGROUP S.p.A. con sede legale in Via Canaletto, 139/A - 41030 (MO) - Italia dichiara sotto la propria responsabilità che: lo Scaricatore Telescopico ai sensi dell’Allegato II B della Direttiva Macchine 2006/42/CE (DICHIARAZIONE DI INCORPORAZIONE) risultano conformi ai RES della Direttiva 2006/42/CE del Parlamento Europeo e del Consiglio del 17 maggio 2006 relativa alle macchine 1.1.1. - Definizioni 1.1.2. - Principi di integrazione della sicurezza 1.1.3. - Materiali e prodotti 1.1.5. - Progettazione della macchina ai fini della movimentazione 1.3.1. - Rischio di perdita di stabilità 1.3.2. - Rischio di rottura durante il funzionamento 1.3.3. - Rischi dovuti alla caduta o alla proiezione di oggetti 1.3.4. - Rischi dovuti a superfici, spigoli ed angoli 1.3.7. - Rischi dovuti agli elementi mobili 1.3.8. - Scelta di una protezione contro i rischi dovuti agli elementi mobili 1.3.9. - Rischi di movimenti incontrollati 1.5.4. - Errori di montaggio 1.5.5. - Temperature estreme 1.5.6. - Incendio 1.5.7. - Esplosione 1.5.8. - Rumore 1.5.9. - Vibrazioni 1.5.13. - Emissioni di materie e sostanze pericolose 1.5.15. - Rischio di scivolamento, inciampo o caduta 1.6.1. - Manutenzione della macchina 1.6.2. - Accesso ai posti di lavoro e ai punti d’intervento utilizzati per la manutenzione 1.6.4. - Intervento dell’operatore 1.6.5. - Pulitura delle parti interne 1.7.1. - Informazioni e avvertenze sulla macchina 1.7.2. - Avvertenze in merito ai rischi residui 1.7.4. - Istruzioni e, qualora applicabili, alle esigenze imposte dalle seguenti Direttive Comunitarie Direttiva 2004/108/CE del Parlamento Europeo e del Consiglio del 15 dicembre 2004 concernente il riavvicinamento delle legislazioni degli Stati membri relative alla compatibilità elettromagnetica. Direttiva 2006/95/CE del Parlamento Europeo e del Consiglio del 12 dicembre 2006 concernente il riavvicinamento delle legislazioni degli Stati membri relative al materiale elettrico destinato ad essere adoperato entro taluni limiti di tensione. La documentazione tecnica pertinente è stata compilata in conformità dell’Allegato VII B della Direttiva Macchine 2006/42/CE Norme armonizzate, norme nazionali e regole tecniche considerate: EN ISO 12100 : 2010 L’azienda firmataria della presente si impegna a trasmettere, in risposta a una richiesta adeguatamente motivata delle autorità nazionali, informazioni pertinenti sui prodotti oggetto della presente dichiarazione, fatti salvi i diritti di proprietà intellettuale del fabbricante. Le informazioni verranno trasmesse direttamente all’autorità nazionale che le ha richieste. AVVERTENZA IMPORTANTE. E’ vietato mettere in servizio la quasi macchina oggetto della presente dichiarazione finché la macchina finale in cui deve essere incorporata non è stata dichiarata conforme, se del caso, alle disposizioni della Direttiva Macchine 2006/42/CE. Via Canaletto, 139/A - 41030 - S.Prospero (Mo) - Italia, 9/1/2012 La persona autorizzata a costituire il fascicolo tecnico: Nino Ratti TOREX S.p.A. - Via Canaletto, 139/A - 41030 - S.Prospero (MO) - Italia Il rappresentante legale: Nino Ratti ZG - ZH - WARRANTY CONDITIONS GARANTIEBEDINGUNGEN CONDITIONS DE GARANTIE CONDIZIONI DI GARANZIA 02.13 2 TOR.173.--.M.4L 14 TOREX® S.p.a. products come with a 12-months warrantee, applicable from the date on the consignment note. The warrantee does not cover breakage and/or defects caused by incorrect installation or use, or incorrect maintenance or modifications made without the manufacturer’s authorization. The warrantee does not cover parts subject to normal wear and tear and electrical parts. Firma TOREX® S.p.a. gewährleistet auf die von ihr hergestellten Produkte eine Garantiezeit von 12 Monaten. Dieser Zeitraum beginnt mit dem Datum des Lieferscheins. Die Garantie ist nicht anwendbar im Anschluss an Bruch und/oder Fehler, die durch falschen Einbau oder falsche Benutzung, sowie durch nicht korrekte Wartung oder Änderungen entstehen, die ohne die Genehmigung des Herstellers vorgenommen werden. Die Garantie gilt nicht für Teile, die infolge normalen Verschleißes unbrauchbar werden, und elektrische Teile. TOREX® S.p.a. garantit les produis de sa fabrication pour une période de 12 mois. La période est valable à compter de la date du bon de livraison. La garantie n’est plus applicable à la suite de ruptures et/ou défauts dus à une mauvaise installation, utilisation et au manque d’entretien ou à des modifications apportées sans autorisation du fabricant. La garantie n’est pas étendue aux parties qui s’usent à la suite d’une utilisation normale et aux parties électriques. La TOREX® S.p.a. riconosce un periodo di 12 mesi di garanzia sui prodotti di propria costruzione. Il periodo decorre dalla data della bolla di consegna. La garanzia non è applicabile a seguito di rotture e/o difetti causati da errata installazione o utilizzo, oppure da manutenzioni non corrette o modifiche apportate senza autorizzazione del costruttore. La garanzia non si estende alle parti che si logorano in seguito al normale uso e alle parti elettriche. In other words, the warrantee becomes invalid if the loading bellows: - has been tampered with or modified; - is used incorrectly; - has been used without respecting the limits indicated in this Manual and/or has been subjected to excessive mechanical stresses; - has not been subjected to the necessary maintenance or these operations have been carried out only partly and/or incorrectly; - has been damaged due to carelessness during transport, installation and use; - spare parts used are not original. Um es genauer zu sagen, verfällt die Garantie auf die Verladegarnitur in den folgenden Fällen: - Die Verladegarnitur ist aufgebrochen oder geändert worden - Sie ist falsch benutzt worden - Sie ist unter Nichtbeachtung der Grenzwerte benutzt worden, die in diesem Handbuch stehen und/oder sie ist zu starken mechanischen Belastungen ausgesetzt worden - Sie ist nicht den erforderlichen Wartungen unterzogen worden oder diese sind nur teilweise und/oder nicht richtig vorgenommen worden - Sie ist aufgrund von Nachlässigkeit während Transport, Einbau und Gebrauch beschädigt worden - Es sind Ersatzteile eingebaut worden, die nicht den Originalteilen entsprechen Pour plus de précisions, la garantie déchoit dans le cas où le chargeur : - a été altéré ou modifié. - n’a pas été utilisé correctement. - a été utilisé sans respecter les limites indiquées dans le présent manuel et/ou il a été soumis à des contraintes mécaniques excessives. - n’a pas été soumis aux entretiens nécessaires ou ceux-ci ont été exécutés seulement en partie et/ou non correctement. - a subi des dommages par négligence pendant le transport, la mise en place et l’utilisation. - monte des pièces détachées qui ne sont pas d’origine. A miglior precisazione la garanzia decade nei casi in cui lo scaricatore: -sia stato manomesso o modificato. -sia stato utilizzato non correttamente. -sia stato utilizzato non rispettando i limiti indicati nel presente manuale e/o sia stato sottoposto ad eccessive sollecitazioni meccaniche. -non sia stato sottoposto alle necessarie manutenzioni o queste siano state eseguite solo in parte e/o non correttamente -abbia subito danni per incuria durante il trasporto, l’installazione e l’utilizzo. -siano state inserite parti di ricambio non originali. On receiving the product, the consignee must check it for defects and damage deriving from transport and/or make sure the supply is complete. Defects, damage or incompleteness of the supply must be immediately reported in writing to the manufacturer, counter-signed by the haulage contractor.» Beim Erhalt des Produkts muss der Empfänger sicherstellen, dass es keine auf dem Transport beruhenden Fehler oder Schäden aufweist und/oder dass die Lieferung vollständig ist. Etwaige Fehler, Schäden oder Fehlmengen sind sofort dem Hersteller zu melden, und zwar durch schriftliche und vom Frachtführer gegengezeichnete Mitteilung. A la réception du produit, le destinataire doit vérifier qu’il n’a pas de défauts ou de dommages dérivant du transport et/ou d’une fourniture incomplète. Les défauts éventuels, les dommages ou la fourniture incomplète doivent être signalés directement au fabricant par communication écrite, signée par le transporteur. Al ricevimento del prodotto, il destinatario deve verificare che lo stesso non presenti difetti o danni derivanti dal trasporto e/o incompletezza della fornitura. Eventuali difetti, danni o incompletezza vanno immediatamente segnalati al costruttore mediante comunicazione scritta e controfirmata dal vettore.” ZG - ZH RECEIPT AND TRANSPORT - The loading bellows must be firmly anchored to the vehicle flatbed for transport to avoid movements or impact, which can damage the parts; there must be no free parts on the flatbed, which can damage the machine by knocking against it - On arrival, prior to unloading, check goods are in compliance with delivery note, invoice and acknowledgement of order. - If any parts are damaged through transport immediately state your claims in writing in the consignment note (waybill). The driver is obliged to accept the claim and to leave you a copy. Send off your claim without hesitation to the supplier if you received the goods free destination. In all other cases send claim to shipping agent. If you fail to state your claims on arrival of the goods it may not be accepted. - Avoid any kind of damage to goods during unloading and handling. - Always handle goods with care. TRANSPORT - PACKAGING - DIMENSIONS - WEIGHTS TRANSPORT - VERPAKUNG - PLATZBEDARF - GEWICHTE TRANSPORT - EMBALLAGE - ENCOMBREMENT - POIDS TRASPORTO - IMBALLO - INGOMBRO - PESI WARENEINGANG UND TRANSPORT - Bezüglich der Transportbefesti-gung muss die Verpackung der Verladegarnitur fest mit der Ladepritsche des Fahrzeugs verankert werden, um Bewegungen und Stöße zu vermeiden, die Teile beschädigen könnten. Außerdem dürfen sich auf der Ladefläche keine frei ligenden Gegenstände befinden, die Beschädigungen verursachen könnten. - Beim Wareneingang vor dem Abladen prüfen, ob die Ware in Beschaffenheit und Menge mit den Angaben auf Lieferschein, Rechnung und Auftragsbestätigung übereinstimmt. - Eventuelle Schäden sofort schriftlich im Frachtbrief reklamieren, da spätere Ansprüche nicht mehr geltend gemacht werden können. Der Fahrer ist dazu verpflichtet, die Reklamation entgegenzunehmen und dem Empfänger eine Kopie dieser zu überlassen. Bei Lieferung frei Haus Reklamation an den Lieferanten schicken, in allen anderen Fällen an den Spediteur. - Beim Abladen Ware nicht be-schädigen. - Berücksichtigen, daß es sich um mechanische Teile handelt, die mit Vorsicht zu behandeln sind. RECEPTION et TRANSPORT - Pendant le transport l’emballage du chargeur télescopique doit être ancré solidement au plateau du moyen de transport pour éviter les mouvements ou les chocs qui pourraient abîmer certaines parties. En outre sur le plateau il ne doit pas y avoir de corps libres qui pourraient l’endommager en le heurtant. - Au moment où vous recevez la marchandise, vérifiez bien que le modèle et la quantité correspondent aux données indiquées sur le bulletin de livraison, sur la facture et sur la confirmation de commande. - Si vous constatez des dommages, vous devez immédiatement le faire savoir en l’écrivant dans l’emplacement prévu à cet effet sur la lettre de voiture. Le chauffeur a l’obligation d’accepter votre réclamation et de vous en laisser une copie. Si la fourniture a été livrée franco destination, envoyez-nous votre réclamation, sinon, envoyez-la directement au transporteur. - Si vous ne réclamez pas les dommages et intérêts immédiatement après avoir reçu la marchandise, votre réclamation risque de ne pas être acceptée. Veillez à ne pas endommager la marchandise durant le déchargement et la manutention. - Faites toujours extrêmement attention quand vous la déplacez. 02.13 2 TOR.173.--.M.4L 15 RICEVIMENTO e TRASPORTO - Come modalità di ancoraggio per il trasporto, l’imballo dello scaricatore telescopico deve essere saldamente ancorato al pianale del mezzo per evitare movimenti e urti che potrebbero lesionare alcune parti; inoltre non devono essere presenti sul pianale corpi liberi che con urti potrebbero danneggiarlo. - Al ricevimento della merce controllare se la tipologia e la quantità corrispondono con i dati di bolla di consegna, fattura e conferma d’ordine. - Eventuali danni devono essere fatti presenti immediatamente per iscritto nell’apposito spazio della lettera di vettura. L’autista è obbligato ad accettare un tale reclamo e lasciarne una copia a Voi. Se la fornitura è franco destino, inviate il Vs. reclamo a noi, altrimenti direttamente allo spedizioniere. - Se non richiederete i danni immediatamente all’arrivo della merce, la vostra richiesta potrebbe non essere accolta. - Evitate ogni tipo di danneggiamento durante lo scarico e le movimentazioni. - Movimentate sempre la merce con cura. IMBALLO (fig.3) PACKAGING (fig.3) VERPACKUNG (Abb.3) EMBALLAGE (fig.3) - The loading bellows is packed inside - Die Verpackung besteht aus einer - L’emballage est constitué d’une - L’imballo è costituito da una cassa in assi di legno posta su di un bancale a wooden crate fixed to a pallet. Kiste aus Holzlatte, die auf einer caisse de planches en bois posée all’interno della quale viene alloggia The latter must be fixed on top with Palette steht und in der die Verladesur un plateau dans laquelle est logé to lo scaricatore. Quest’ultimo viene three planks to prevent the machine garnitur steht. le chargeur. fissato superiormente con tre assi from falling out of the top. The crate Diese wird oben mit drei Leisten Ce dernier est fixé dans la partie che ne impediscono l’uscita dall’alto. is wrapped all around with white befestigt, die verhindern, dass sie supérieure par trois planches qui Attorno alla cassa viene avvolto uno cellophane. The weight and dimenoben austreten kann. Die Kiste wird empêchent sa sortie par le haut. strato di cellofan bianco. Il peso e le sions depend on the model and the mit weißem Zellophan umwickelt. Une pellicule de cellophane blanc dimensioni variano a seconda del distance to be covered. Das Gewicht und die Abmessungen enveloppe la caisse. Le poids et les modello e della corsa. hängen vom Modell und dem jeweidimensions varient suivant le modèle ligen Hub ab. et la course. UNPACKING - Check to make sure the packing is intact and is not damaged. Remove the cellophane wrapping around the crate. Remove the three planks blocking the loading bellows on top. Remove all nails carefully to avoid harm to the operator and damage to the bellows when the loading bellows is removed from the crate. Remove the loading bellows from the top of the crate using the upper flange as the pulling point. Take care to avoid damage to the panel pushbutton panel. Lift the loading bellows and fix it to the utilities piping. Remove the puller screw (if present) from the crate and proceed with its installation. - It is the installer’s responsibility to dispose off the packaging materials in accordance with the regulations applicable in the matter. AUSPACKEN - Sicherstellen, dass die Verpackung unversehrt ist und keine Beschädigungen aufweist. Zunächst das Zellophan entfernen, mit dem die Kiste umwickelt ist. Die drei Leisten entfernen, welche die Verladegarnitur oben blockieren. Darauf achten, dass etwaige Nägel entfernt werden, die den Bediener oder den Balg während des Herausziehen der Verladegarnitur beschädigen könnten. Die Verladegarnitur aus der Kiste nach oben herausziehen, wobei man den oberen Flansch als Anschlagstelle zum Ziehen benutzt. Besonders darauf achten, dass die Druckknopftafel nicht beschädigt wird. Die Verladegarnitur heben und an der Benutzungsleitung befestigen. Den Sauger (soweit vorhanden) aus der Kiste herausnehmen und mit seiner Installation beginnen. - Der Installateur hat für die Entsorgung des Verpackungsmaterials gemäß der einschlägigen geltenden Gesetze zu sorgen. RIMOZIONE IMBALLO ELIMINATION DE L’EMBALLAGE - Vérifier que l’emballage est intact et - Controllare che l’imballo sia intatto e non presenti danneggiamenti. n’a subi de dégâts. Procedere togliendo il cellofan che Enlever d’abord le cellophane qui avvolge la cassa. Togliere le tre assi enveloppe la caisse. che bloccano lo scaricatore supe Enlever les trois planches qui riormente. Aver cura di togliere gli bloquent le chargeur dans la partie eventuali chiodi in modo da evitare supérieure. che arrechino danni all’operatore o Prendre soin d’enlever les clous de al soffietto durante la fase di estramanière à éviter de blesser l’opézione dello scaricatore. Estrarre lo rateur ou d’endommager le soufflet scaricatore sfilandolo dalla cassa pendant la phase d’extraction du verso l’alto usando come punto di chargeur. trazione la flangiatura superiore. Extraire le chargeur en le sortant Porre particolare cura a non dande la caisse par le haut, en utilisant neggiare la pulsantiera del quadro. la bride supérieure comme point Alzare lo scaricatore e fissarlo alla d’attache. conduttura di utilizzo. Togliere dalla Faire particulièrement attention à cassa l’aspiratore (ove presente) e ne pas endommager le boîtier de procedere con l’istallazione. commandes du tableau. Soulever le chargeur et le fixer à la - Deve essere cura dell’installatore smaltire gli imballi in modo adeconduite d’utilisation. guato secondo le leggi vigenti in Sortir l’aspirateur de la caisse (si materia. prévu) et le mettre en place. -L’installateur a l’obligation d’éliminer les emballages de manière adéquate conformément aux lois en vigueur en la matière. ZG - ZH - PACKAGING - DIMENSIONS - WEIGHTS VERPAKUNG - PLATZBEDARF - GEWICHTE EMBALLAGE - ENCOMBREMENT - POIDS IMBALLO - INGOMBRO - PESI 02.13 2 TOR.173.--.M.4L 16 Fig. 3 Packaging dimensions: -length 115 cm -width 125 cm -height variable from 165 cm to 195 cm Verpackungsgröße: - Länge 115 cm - Breite 125 cm -Höhe variabel zwischen 165 cm und 195 cm Dimensions emballage : - longueur 115 cm - largeur 125 cm - hauteur variable de 165 cm à 195 cm Dimensioni imballo: -lunghezza 115 cm -larghezza 125 cm -altezza variabile da 165 cm a 195 cm ZG - ZH - 02.13 STORAGE LAGERHALTUNG 2 EMMAGASINAGE IMMAGAZZINAGGIO TOR.173.--.M.4L 17 STORAGE PRIOR TO INSTALLATION - Storage temperatures below -15°C are not allowed. -Avoid damp, salty environments, if possible. - Place the machine on wooden planks, in a closed place protected from atmospheric agents. - Do not store in the open or in areas where vapours or substances incompatible with the machine construction materials may be present (even weakly corrosive materials). - Do not stack the machine; it must be placed on the ground. EINLAGERUNG VOR DEM EINBAU - Eine Lagerung bei Temperaturen unter -15°C ist verboten. -Feuchte und salzhaltige Luft für die Einlagerung vermeiden. - Die Maschine auf eine Holzpalette stellen und an einem geschlossenen, vor Witterung ge-schützten Ort abstellen. - Die Lagerung im Freien oder in Bereichen, wo Dämpfe oder Sub-stanzen vorhanden sind, die nicht mit den Konstruktionsmaterialien der Maschine verträglich sind (auch schwach korrosiv wirkende Stoffe) ist ausgeschlossen. - Das Stapeln ist verboten, die Lagerung am Boden obligato-risch. EMMAGASINAGE AVANT LA MISE EN PLACE - L’entreposage à des températures inférieures à -15°C est interdit. -Si possible éviter les locaux humides et les saumâtres - Placer la machine sur une plateforme en bois et à l’abri des intempéries dans un local fermé. - Il est interdit de le stocker en plein air ou dans des zones où il y a des vapeurs ou des substances non compatibles avec les matériaux de construction de la machine (substances même faiblement corrosives). - Il est interdit de l’empiler et l’entreposage au sol est obligatoire. IMMAGAZZINAGGIO PRIMA DELL’INSTALLAZIONE -Le condizioni di immagazzinamento al di sotto dei -15°C sono proibite -Evitare possibilmente ambienti umidi e salmastri. -Sistemare la macchina su pedane di legno e riporla in luogo chiuso, protetto dagli agenti atmosferici. -Si esclude immagazzinamento all’aperto o in zone e dove siano presenti vapori o sostanze non compatibili con i materiali di costruzione della macchina (sostanze anche debolmente corrosive). -E’ vietato l’impilamento ed è fatto obbligo l’immagazzinamento a terra. PROLONGED MACHINE SHUTDOWNS AFTER ASSEMBLY -Before starting up the machine, set it in safety status. -Before starting up the machine, check the condition of the electric and pneumatic system and all parts for which long shutdowns may affect working. LÄNGERE BETRIEBSRUHE NACH DEM EINBAU -Vor der Inbetriebnahme ist das Gerät in einen sicheren Zustand zu bringen. -Vor der Inbetriebnahme des Geräts die elektrische und pneumatische Anlage und alle Teile, deren Funktionstüchtigkeit die bei einem längeren Stillstand in Frage gestellt werden könnte, prüfen. ARRÊT MACHINE PROLONGÉ APRÈS LE MONTAGE -Avant la mise en service, mettre la machine en sécurité. -Avant la mise en service de la machine contrôler l’intégrité de l’équipement électrique et de toutes les parties pour lesquelles un arrêt prolongé pourrait compromettre le fonctionnement. FERMO MACCHINA PROLUNGATO DOPO IL MONTAGGIO -Prima della messa in servizio mettere in sicurezza la macchina -Prima della messa in servizio della macchina controllare l’integrità dell’impianto elettrico, pneumatico, e di tutte le parti per le quali un prolungato arresto potrebbe compromettere la funzionalità. POSSIBLE REUSE AFTER PERIODS OF INACTIVITY - Before starting up the machine, check to make sure the electrical system, the pneumatic system and parts for which long shutdowns can affect the working are in perfect working order. - Before starting up the machine, clean it thoroughly by following the instructions on the powder safety sheet. - If the machine operates in conditions or with materials different from those of the previous application, check the compatibility according to the “INDICATION FOR USE” section. MÖGLICHE WIEDERVERWENDUNG NACH EINEM LÄNGEREN STILLSTAND - Vor der Inbetriebnahme der Maschine sind die elektrische und die pneumatische Anlage auf Unversehrtheit zu prüfen sowie die Teile, deren Funktionstüchtigkeit durch einen längeren Stillstand die in Frage gestellt werden könnte. - Vor der Aufnahme des Betriebs der Maschine einen kompletten Abreinigungszyklus durchführen, wobei zu beachten ist, was auf dem Sicherheitsdatenblatt des Staubes steht. - Wenn die Maschine unter Bedingungen und mit Materialien arbeitet, die von der letzten Anwendung abweichen, die Kompatibilität dieses Gebrauchs mit dem prüfen, was im Abschnitt GEBRAUCHSANZEIGE steht. RÉ-UTILISATION APRÈS UNE PÉRIODE D’INACTIVITÉ - Avant la mise en service de la machine, contrôler l’intégrité de l’installation électrique, pneumatique et des parties dont l’arrêt prolongé pourrait compromettre le fonctionnement. - Avant la mise en service de la machine effectuer un cycle complet de nettoyage en respectant les indications figurant sur la fiche de sécurité de la poudre. - si la machine travaille dans des conditions et avec des matières différentes de l’application précédente, vérifier la compatibilité de cette utilisation suivant ce qui est indiqué dans la section « MODE D’EMPLOI ». POSSIBILE REIMPIEGO DOPO PERIODO DI INATTIVITA’ -Prima della messa in servizio della macchina controllare l’integrità dell’impianto elettrico, pneumatico, e delle parti per le quali un prolungato arresto potrebbe compromettere la funzionalità. -Prima della messa in servizio della macchina eseguire un ciclo completo di pulizia rispettando quanto riportato sulla scheda di sicurezza della polvere. -Se la macchina opera in condizioni e con materiali diversi dall’applicazione precedente, verificare la compatibilità di tale utilizzo secondo quanto riportato nella sezione INDICAZIONE PER L’USO. ZG - ZH - 02.13 LIFTING HEBEN 2 SOULEVEMENT SOLLEVAMENTO TOR.173.--.M.4L 18 For lifting the machine, it is advisable to lift the loading bellows still in its packing by lifting the pallet on which it is packed, bring it to the assembly position and fix the flange. It is also possible to lift the loading bellows by means of the eyebolts screwed to the stud bolts of the flange, or use belts wound around the drive unit and the gear motor exhaust duct. Choose the lifting method most suitable for the assembly conditions. Die noch verpackte Verladegarnitur komplett heben, indem man die Palette darunter hebt, sie in Montageposition bringt und dann den Flansch befestigt. Alternativ kann die Verladegarnitur unter Benutzung der Kranösen gehoben werden, die man an den Stift-schrauben des Flansches befe-stigt, oder mittels Gurten, die man um den Antrieb und um die Saug-leitung des Oberteils wickelt. Je nach Montagebedingungen das geeignete Hebeverfahren wählen. Pour effectuer le soulèvement il est conseillé de soulever le chargeur encore emballé en soulevant la palette de dessous, le placer dans la position de montage et fixer la bride. En alternative soulever le chargeur en utilisant les anneaux vissés aux goujons de la bride ou bien utiliser des sangles enroulées au-tour de la motorisation et autour du conduit d’aspiration de la tête. Suivant les conditions de montage choisir la méthode de levage appropriée. Per eseguire il sollevamento è consigliato sollevare lo scaricatore ancora imballato sollevando il pallet sottostante, portarlo in posizione di montaggio e fissare la flangia. In alternativa sollevare lo scaricatore utilizzando golfari avvitati ai prigionieri della flangia, oppure utilizzare fasce da avvolgere attorno alla motorizzazione e attorno al condotto di aspirazione della testata. A seconda delle condizioni di montaggio scegliere il metodo di sollevamento adeguato. - Lift and handle the machine exclusively by means of the grips provided for the purpose. - Use lifting systems suitable for the weights, dimensions and the distances to be covered. - Use shackles and hooks with safety catches for hooking the machine to the lifting handles. - Do not use clamps, rings, open hooks or other systems, which do not guarantee the same extent of safety as hooks with safety fastenings. - Die Maschine nur mittels der vorgesehenen Anschlagstellen heben und bewegen. - Hebevorrichtungen benutzen, die für die Gewichte, die Abmessungen und die vorliegenden Transportstrecken geeignet sind. - Die Befestigung an den Anschlagstellen mittels Schäkeln vornehmen und Haken mit Sicherheitsverschluss benutzen. - Es ist verboten, Klammern, Ringe, offne Haken oder jedes andere System zu benutzen, das nicht die gleiche Sicherheit der Haken mit Sicherheitsverschluss gewährleistet. - Soulever et manutentionner les machines uniquement en utilisant les points de prises prévus. - Utiliser des systèmes de levage appropriés aux poids, aux dimensions et aux déplacements à faire. - Effectuer l’accrochage aux prises de levage prévues à l’aide de manetons et utiliser des crochets avec fermeture de sécurité. - L’utilisation de mors, anneaux, crochets ouverts ou tout autre système ne garantissant pas la même sécurité que les manetons et les crochets de sécurité est interdite. -Sollevare e movimentare le macchine solamente mediante le apposite prese predisposte. -Utilizzare sistemi di sollevamento idonei alle masse, alle dimensioni e agli spostamenti da eseguire. -Eseguire l’aggancio alle prese di sollevamento mediante grilli e utilizzare ganci con chiusure di sicurezza. -È vietato l’utilizzo di morsetti, anelli, ganci aperti o qualsiasi sistema che non garantisca la stessa sicurezza, dei ganci con chiusura di sicurezza. ZG - ZH -Take the loading bellows out of its packing only when it is ready for assembly. -Check to make sure the model ordered corresponds to that in your possession (values indicated on the rating plate). -Make sure the loading bellows has not been damaged during transport and has not faults. -The machine installer is responsible for ensuring uniform lighting in the area according to the indications of the relevant regulation. -It is the installer’s responsibility to check the suitability of the site where the loading bellows is to be installed. -The first installation of the loading bellows must be done by the installer strictly according to the instructions given in the Operation Manual. The installer must carry out a functional check and make the adjustments on the loading bellows. -For working at heights during assembly operations, the installer must use suitable means such as overhead work platforms and Personal protection devices for protection against falling from heights, to carry out the necessary operations in complete safety. -If the loading bellows it must be connected to a dusts extraction and filtration circuit. 02.13 INSTALLATION EINBAU 2 INSTALLATION INSTALLAZIONE - Die Verladegarnitur erst bei der Montage auspacken. - Sicherstellen, dass das gelieferte Modell dem bestellten entspricht (Werte auf Typenschild). - Sicherstellen, dass die Verladegarnitur während des Transports keine Schäden erlitten hat oder Störungen vorliegen. - Der Monteur der Maschine ist auf jeden Fall dafür verantwortlich zu gewährleisten, dass eine gleich-mäßige Beleuchtung im Aufstel-lungsbereich vorhanden ist, so wie es die Angaben des einschlägigen Normenwerks vorse-hen. - Der Monteur muss prüfen, ob der Aufstellort sich für die Verladegarnitur eignet. - Der Ersteinbau der Verladegarnitur wird von dem Monteur vorgenommen, der dazu gewissenhaft die Angaben der Betriebsanleitung befolgt. Der Monteur nimmt die Funktionsprüfung und die Einstellungen der Verladegarnitur. - Je nach der Höhe, in der die Montagearbeiten ausgeführt werden, ist es erforderlich, dass der Monteur angemessene Hilfsmittel, wie beispielsweise Arbeitsbühnen, und PSA gegen die Abstutzgefahr benutzt, um die erforderlichen Arbeiten auf siche-re Weise auszuführen. - Falls die Verladegarnitur ohne eingebautes Filter geliefert wird, muss sie an ein Zentralfilter zur Staubabsaugung und -filtration angeschlossen werden. TOR.173.--.M.4L 19 -Enlever le chargeur télescopique de l’emballage exclusivement au moment du montage. -Vérifier si le modèle commandé correspond à celui en votre possession (valeurs indiquées sur la plaque). -S’assurer que le chargeur télescopique n’a pas subi de dégâts pendant le transport ou présente des anomalies. -L’installateur de la machine est tenu de garantir un éclairage homogène dans la zone conformément aux indications de la norme correspondante. -Il appartient à l’installateur de vérifier la conformité du site d’installation du chargeur télescopique. -La première mise en place du chargeur télescopique est effectuée par l’installateur dans le respect des instructions et des consignes fournies dans le manuel d’utilisation. -L’installateur doit effectuer la vérification fonctionnelle et le réglage du chargeur télescopique. - En fonction de la hauteur, dans les opérations de montage l’installateur doit être équipé des moyens appropriés, par exemple plates-formes de travail aériennes et EPI contre la chute afin d’exécuter les opérations demandés en toute sécurité. - Le chargeur doit être raccordé à un circuit d’aspiration et de filtration des poussières. -Togliere lo scaricatore telescopico dall’imballo esclusivamente nel momento del montaggio. -Verificare se il modello ordinato, corrisponde a quello in possesso (valori indicati in targhetta). -Accertarsi che lo scaricatore telescopico non abbia subito danni durante il trasporto, o presenti anomalie. -L’installatore della macchina è comunque tenuto ad assicurare la presenza di un’omogenea illuminazione nell’area in base alle indicazioni della normativa pertinente. -E’ a carico dell’installatore verificare l’idoneità del sito che ospiterà lo scaricatore telescopico. -La prima installazione dello scaricatore telescopico è effettuata dall’installatore seguendo scrupolosamente le istruzioni indicate nel manuale d’uso. L’installatore deve provvedere alla verifica funzionale e alla regolazione dello scaricatore telescopico. -In funzione dell’altezza, nelle operazioni di montaggio, è necessario che l’installatore si attrezzi con idonei mezzi, ad esempio piattaforme aree di lavoro, e DPI contro le cadute dall’alto, al fine di eseguire in sicurezza le operazioni richieste. -Lo scaricatore deve essere collegato ad un circuito di aspirazione e filtrazione polveri. In any case, check (and up- Auf jeden Fall sicherstellen Vérifier dans tous les cas Verificare comunque (ed adedate the throughput value (und ggf. den Wert von För- (et éventuellement adapter guare eventualmente il valore and suction pressure head if dermenge und Förderhöhe der la valeur du débit et de la della portata e della prevanecessary) the suction circuit Saugvorrichtung anpassen), hauteur d’aspiration) que le lenza di aspirazione) che il to make sure it carries out dass der Absaugkreislauf die circuit d’aspiration effectue circuito di aspirazione realizzi suction and filtration of the Absaugung und Filterung der correctement l’aspiration et le in modo corretto l’aspirazione air+dust mixture rising from Staub-Luft-Mischung, die aus filtrage du mélange air - pous- ed il filtraggio della miscela dem Trank hochsteigt, korrekt sière montant de la citerne. the tank correctly. aria polvere che sale dalla ausführt. cisterna. ZG - ZH - 02.13 INSTALLATION EINBAU 2 INSTALLATION INSTALLAZIONE TOR.173.--.M.4L 20 MECHANICAL CONNECTIONS MECHANISCHE ANSCHLÜSSE RACCORDEMENTS MÉCANIQUES COLLEGAMENTI MECCANICI FIXING THE LOADER -Use lifting equipment suitable for the weight of the loading bellows. -Lift the loader to the required height and position the gasket (Item 4, Fig. 4) by putting it on the pins of the end bearing assembly (Item 5, Fig. 4). -Put the flange of the connecting tube in the pins of the end bearing assembly (Item 3, Fig. 4). -After having put a security spring washer UNI 1751 ø 16 mm (Item 2), screw the nuts (Item 1). -Use only class 8.8 galvanized nuts and bolts for fixing. -Make sure the stud screws project out of the lock nuts on the counter flange on which the loading bellows is fixed. The blocking of nuts must be carried out by a torque wrench (tightening torque 160 Nm). FISSAGGIO SCARICATORE -Utilizzate un dispositivo di sollevamento con portata idonea al peso dello scaricatore. -Sollevate lo scaricatore fino all’altezza voluta e posizionate la guarnizione (pos.4, fig.4) infilandola nei prigionieri della testata (pos.5, fig.4) -Infilare la flangia del tubo di collegamento (pos.3, fig.4) nei prigionieri della testata. -Dopo aver applicato una rondella elastica UNI 1751 ø16 mm di sicurezza (pos. 2) avvitate i dadi (pos. 1). -Per il fissaggio utilizzate soltanto bulloneria zincata della categoria 8.8. -Assicurarsi che i prigionieri sporgano dai dadi di serraggio posti sulla controflangia cui lo scaricatore viene fissato. Il bloccaggio dei dadi deve essere effettuato mediante una chiave torsiometrica (coppia di serraggio 160 Nm). BEFESTIGUNG VERLADEGARNITUR -Hebezeug mit geeignetem Tragvermögen verwenden: siehe technische Spezifikationen. -Die Verladegarnitur bis zur gewünschten Höhe heben und die Dichtung (Pos. 4, Abb. 4) und eintreiben Sie in die Stiftschrauben der Endlagerheinheit (Pos. 5, Abb.4) anordnen. -Setzen Sie den Flansch des anschließenden Schlauches (Pos. 3, Abb.4) in die Stiftschrauben der Endlagerheinheit. -Eine Sicherheit Federscheibe UNI 1751 ø16 mm nachher setzend (Pos. 2), schrauben Sie die Nüsse Pos. 1). -Nur verzinktes Befestigungsmaterial der Beständigkeitsklasse 8.8 verwenden. -Sicherstellen, dass die Stiftschrauben, die aus den Befestigungsmuttern auf dem Gegenflansch, mit denen die Verladegarnitur befestigt wird, überstehen. Die Muttern müssen mit einem Drehmomentschlüssel angezogen werden (Anzugsmoment 160 Nm). FIXATION DU CHARGEUR -Utiliser un dispositif de levage dont la capacité de charge est appropriée au poids du chargeur. -Soulever le chargeur jusqu’à la hauteur voulue et placer le joint (pos. 4 fig. 4) et la infiler dans les goujon du support d’extrémité (pos. 5, fig.4). -Mettez la bride du tube de connexion (pos. 3, fig.4) dans les goujon du support d’extrémité. -Ensuite après avoir mis une rondelle à ressort UNI 1751 ø16 mm de sécurité (pos. 2), vissez les écrous (pos.1). -Pour la fixation utiliser uniquement de la boulonnerie galvanisée classe 8.8. -Vérifier que les goujons dépassent des écrous de serrage placés sur la contre-bride sur laquelle est fixé le chargeur. Le blocage des écrous doit être effectuè vec une clé dynamométrique (couple de serrage de 160 Nm). 1 • 2 • • 3 4 • 5 • fig. 4 ZG - ZH - ACCESSORIES - INSTALLATION - SPREADER ZUBEHÖR – INSTALLATION - STREUVORRICHTUNG ACCESSOIRES - INSTALLATION - DEPERDITEUR ACCESSORI - INSTALLAZIONE - SPANDITORE MECHANICAL CONNECTIONS MECHANISCHE ANSCHLÜSSE RACCORDEMENTS MÉCANIQUES 02.13 2 TOR.173.--.M.4L 21 COLLEGAMENTI MECCANICI INSTALLATION OF TELESCOP- EINBAU VERLADEGARNITUR INSTALLATION CHARGEUR INSTALLAZIONE SCARICAIC LOADER WITH SPREADER MIT STREUVORRICHTUNG TÉLESCOPIQUE AVEC DIS- TORE TELESCOPICO CON PERSEUR SPANDITORE - Wenn eine Streuvorrichtung vorhanden ist, sollte die Verladegarnitur so angeordnet werden, dass die Gabeln des Schwinggabel-Vollmelders längs zu dem zu befüllenden Silofahrzeug stehen. Truck direction In case of the spreader, it is advisable to position the telescopic loader in such a manner that the forks of the vibrating level indicator are longitudinal to the tanker to be loaded. - En cas de disperseur il est -Si consiglia in caso di spanditore, conseillé de positionner le char- di posizionare lo scaricatore tegeur télescopique de manière à lescopico in modo tale da a vere avoir les fourches de l’indicateur le forche dell’indicatore di livello de niveau vibrant longitudinal au vibrante longitudinale al camion camion citerne à charger. a cisterna da caricare. ZG - ZH - 02.13 ACCESSORIES - INSTALLATION - SPREADER ZUBEHÖR – INSTALLATION - STREUVORRICHTUNG 2 ACCESSOIRES - INSTALLATION - DEPERDITEUR ACCESSORI - INSTALLAZIONE - SPANDITORE WORKING OF THE SPREADER BETRIEB DER STREUVORRICHTUNG - The loading bellows provided - Die mit Streuvorrichtung verwith spreader is 128mm longer sehene Verladegarnitur hat im as compared to one with a Vergleich zur Version mit Stanstandard protection cone. dardschutzkegel eine Überlänge -The spreader starts up after the von 128 mm. loading bellows are positioned - Die Streuvorrichtung läuft an, on the tanker and the slack nachdem die Verladegarnitur cable limit stop has given the auf dem Tankfahrzeug aufliegt enable signal to start loading und der Schlaffseilschalter das and the operator has pressed Freiga-besignal für den Beginn the PA button on the pushbutton des Verladevorgangs erteilt und panel. der Bediener die Taste PA auf -The spreader stops when the der Druckknopftafel betätigt hat. material inside the tanker touch- - D ie Streuvorrichtung kommt es the level indicator which, zum Stehen, wenn das Material in addition to sending a signal innerhalb des Tankfahrzeugs to close the flow, stops the den Vollmelder berührt, der nicht spreader motor. nur ein Signal sendet, um den -During the working of the Materialfluss zu unterbrechen, spreader, the solenoid valve sondern auch den Motor der present in the pneumatic panel Streuvorrichtung abstellt. VMX01G sends air for cooling -Während des Betriebs der the electric motor inside the Streuvorrichtung sendet das spreader protection cone. Magnetventil, das sich im pneumatischen Schaltkasten befindet, Kühlluft für den Elektromotor innerhalb des Schutzkegels der Streuvorrichtung selbst. FONCTIONNEMENT DISPERSEUR - Le chargeur télescopique doté de disperseur est plus long de 128 mm par rapport à un dispositif à cône de protection standard. - Le disperseur démarre une fois que le chargeur télescopique est positionné sur la citerne et le fin de course de câble mou a envoyé le signal de début de chargement et que l’opérateur a enfoncé la touche PA sur le panneau de commande. - Le disperseur s’arrête quand le produit à l’intérieur de la citerne touche l’indicateur de niveau, lequel envoie un signal pour arrêter le flux, il arrête le moteur du disperseur. - P endant le fonctionnement du disperseur, l’électrovanne présente sur le tableau pneumatique VMX01G envoie l’air de refroidissement pour le moteur électrique à l’intérieur du cône de protection du disperseur. TOR.173.--.M.4L 22 FUNZIONAMENTO SPANDITORE - Lo scaricatore telescopico provvisto di spanditore è più lungo di 128 mm rispetto ad uno con il cono di protezione standard. - Lo spanditore parte dopo che lo scaricatore telescopico si è posizionato sulla cisterna ed il finecorsa di cavo lento ha dato il consenso di inizio carico e l’operatore ha premuto il tasto PA sulla pulsantiera. -Lo spanditore si arresta quando il materiale all’interno della cisterna tocca l’indicatore di livello, il quale, oltre ad inviare un segnale per chiudere il flusso, arresta il motore dello spanditore. - Durante il funzionamento dello spanditore, l’elettrovalvola presente nel quadro pneumatico VMX01G invia l’aria di raffreddamento per il motore elettrico all’interno del cono di protezione dello spanditore stesso. INSTALLATION OF LOADING INSTALLATION VERLADEGAR- INSTALLATION CHARGEUR INSTALLAZIONE SCARICABELLOWS WITH SPREADER NITUR MIT STREUVORRICH- TÉLESCOPIQUE AVEC DIS- TORE TELESCOPICO CON TUNG PERSEUR SPANDITORE • • • VMX01G Pneumatic Panel Pneumatischer Schaltkasten VMX01G Armoire pneumatique VMX01G Quadro pneumatico VMX01G Spiral tube for motor air supply Spiralschlauch zur Versorgung des Motors mit Luft Tuyau à spirale pour alimentation air moteur Tubo a spirale per alimentazione aria motore Fig. 1 Electric Panel Elektrischer Schaltkasten Panneau électrique Pannello elettrico 1) Connect the Pneumatic Panel 1) Den pneumatischen Schaltka- 1) Brancher l’Armoire Pneuma- 1) Collegare il Quadro PneumaVMX01G to the system’s air sten VMX01G am Drucklufttique VMX01G au réseau de tico VMX01G alla rete dell’aria supply and set the Pressure netz der Anlage anschließen l’air de l’installation, et régler dell’impianto, e regolare il regulator at 3-4 bar und den Druckregler auf 3-4 le Régulateur de Pression à Regolatore di Pressione a 3- 4 2) The cooling air will be sent bar einstellen. 3-4 bars bar into the spreader through the 2) Die Kühlluft wird durch den 2) L’air de refroidissement sera 2) L’aria di raffreddamento sarà Spiral tube. Spiralschlauch in die Streuvorenvoyé à l’intérieur du disinviata all’interno dello span3) Power the Electric Panel with richtung geschickt. perseur à travers le Tuyau à ditore attraverso il Tubo a the mains voltage present on 3) Den elektrischen SchaltkaSpirale. Spirale. the plant. sten mit der Netzspannung 3) Alimenter le Panneau Elec- 3) Alimentare il Pannello Elettrico versorgen, die in der Anlage trique avec la tension de con la tensione di rete presenvorhanden ist. réseau présente sur l’installate sull’impianto. tion. ZG - ZH 4) The Electric Panel is specially constructed for containing also the operating logic of the spreader. 5) In addition to the utilities normally present on the loading bellows, the Electric Panel will also power the following utilities: - The solenoid valve coil at 24 V 50/60 Hz in Pneumatic panel VMX01G - The ILVD01EA310R vibrating level indicator by means of the Level Indicator Cable - The electric motor by means of the Motor Power Cable 6) The spreader cone is bolted to the end of the loading bellows, exactly like the protection cone of the standard level indicator. The difference is that the connecting arms are replaced by tubes to allow passage of electric cables for the electric supply, the tubes for cooling air and air outlet, as shown in Fig. 3. 02.13 ACCESSORIES - INSTALLATION - SPREADER ZUBEHÖR – INSTALLATION - STREUVORRICHTUNG 2 ACCESSOIRES - INSTALLATION - DEPERDITEUR ACCESSORI - INSTALLAZIONE - SPANDITORE 4) Der elektrische Schaltkasten ist so konstruiert worden, dass die Betriebslogik der Streuvorrichtung darin enthalten ist. 5) Neben den Verbrauchern, die in der Regel auf der Verladegarnitur vorhanden sind, speist der elektrische Schaltkasten auch die folgenden Verbraucher: - die Spule des Magnetventils von 24 V 50/60 Hz im pneumatischen Schaltkasten VMX01G - den Schwinggabel-Vollmelder Typ ILVD01EA310R über das Kabel des Vollmelders - den Elektromotor über das Motorspeisekabel. 6) Der Kegel der Streuvorrichtung wird genau wie der Schutzkegel des Standard-Vollmelders am Aufsetzkonus der Verladegarnitur mit Schrauben befestigt. Der Unterschied besteht darin, dass die Verbindungsarme aus Leitungen bestehen, die die Einführung der Stromkabel für die Stromversorgung, der Leitung der Kühlluft und der austretenden Luft ermöglichen, so wie es in der Abb. 3 zu sehen ist. TOR.173.--.M.4L 23 4) Le Panneau Electrique est construit spécialement pour contenir aussi la logique de fonctionnement du disperseur. 5) En plus des utilisations présentes normalement sur le chargeur télescopique, le Panneau Electrique alimentera aussi les utilisations suivantes : - La bobine de l’électrovanne à 24 V 50/60 Hz dans l’Armoire Pneumatique VMX01G - L’indicateur de niveau à vibration type ILVD01EA310R à travers le Câble Indicateur de Niveau - Le moteur électrique à travers le Câble Alimentation Moteur 6) Le cône du disperseur est boulonné au réducteur du chargeur télescopique, exactement comme le cône de protection de l’indicateur de niveau standard. La différence est que les bras de liaison sont remplacés par des tubes qui permettent l’entrée des câbles électriques pour l’alimentation électrique, du tuyau d’air de refroidissement et la sortie de l’air, comme repréSenté dans la fig. 3. 4) Il Pannello Elettrico è costruito appositamente per contenere anche la logica di funzionamento dello spanditore. 5) Oltre alle utenze normalmente presenti sullo scaricatore telescopico, il Pannello Elettrico alimenterà anche le seguenti utenze: - La bobina dell’elettrovalvola a 24 V 50/60 Hz nel Quadro Pneumatico VMX01G -L’indicatore di livello a vibrazione tipo ILVD01EA310R attraverso il Cavo Indicatore di Livello -Il motore elettrico attraverso il Cavo Alimentazione Motore 6) Il cono dello spanditore è imbullonato al terminale dello scaricatore telescopico, esattamente come il cono di protezione dell’indicatore di livello standard. La differenza è che i bracci di collegamento sono sostituiti da tubi che permettono l’ingresso dei cavi elettrici per l’ alimentazione elettrica, del tubo aria di raffreddamento e l’uscita dell’aria, come rappresentato in fig. 3. • • 1 2 • 4 • • 6 3 5 • Fig. 2 1 Motor power cable Motorspeisekabel Câble Alimentation Moteur Cavo alimentazione motore 2 Level indicator cable Kabel des Vollmelders Câble Indicateur de niveau Cavo indicatore livello 3 Level indicator holder Kopf des Vollmelders Tête indicateur de niveau Testa indicatore di livello 4 Motor air supply tube Lufteinfüllschlauch für Motor Tuyau alimentation air moteur Tubo alimentazione aria motore 5 Level indicator forks Gabeln des Vollmelders Fourches indicateur de niveau Forche indicatore di livello 6 Counterweight Gegengewicht Contrepoids Contrappeso ZG - ZH - 2 02.13 ACCESSORIES - INSTALLATION - SPREADER ZUBEHÖR – INSTALLATION - STREUVORRICHTUNG 2 ACCESSOIRES - INSTALLATION - DEPERDITEUR ACCESSORI - INSTALLAZIONE - SPANDITORE 1 TOR.173.--.M.4L 24 4 3 • • • • 5 • • • 6 7 Fig. 3 1 Motor power supply cable input Eingang des Motorspeisekabels Entrée câble alimentation moteur Ingresso cavo alimentazione motore 2 Eingang des Kabels des Vollmelders Entrée câble indicateur de niveau Ingresso cavo indicatore livello Level indicator cable input 3 Motor air inlet Eingang für Motorluft Entrée air moteur Ingresso aria motore 4 Motor air outlet Auslass der Motorluft Sortie air moteur Uscita aria motore 5 Rotor Laufrad Roue Girante 6 Level indicator Vollmelder Indicateur de niveau Indicatore di livello 7 Motor Motor moteur Motore ZG - ZH - 02.13 INSTALLATION EINBAU 2 INSTALLATION INSTALLAZIONE TOR.173.--.M.4L 25 WIRING ELEKTRISCHE ANSCHLÜSSE RACCORDEMENTS ÉLEC- COLLEGAMENTI ELETTRICI - Before carrying out any opera- - Bevor irgendein Eingriff an TRIQUES -Prima di effettuare un qualsiasi tion on the machine, make sure der Maschine vorgenommen - Avant d’effectuer une quel- intervento sulla macchina assiit is set in safety condition! wird, ist sicherzustellen, dass conque intervention sur la ma- curarsi che questa sia messa in diese sich in sicherem Zustand chine, s’assurer qu’elle a été sicurezza! befindet. mise en sécurité ! The installer must provide for interfacing the machine (if necessary) with the necessary commands in accordance with the standards applicable. - The loading bellows wiring must be done by qualified personnel, in conformity with local standards. - When making the connections, make sure the cable lengths are sufficient. - Make the wiring connections according to the wiring diagrams attached to the loading bellows. - The wiring diagram of the control panel or junction box are enclosed with the machine, separate from the Manual. Der Monteur muss die Maschine (wo erforderlich) mit den notwendigen Bedienelementen verbinden, wobei die geltenden Normen zu beachten sind. - Die elektrischen Anschlüsse der Verladegarnitur dürfen nur von qualifiziertem Personal und unter Beachtung der lokalen Bestimmungen vorgenommen werden. - Wenn man die Anschlüsse vornimmt, sicherstellen, dass die Kabel eine ausreichende Länge haben. - Die elektrischen Anschlüsse gemäß der Stromlaufpläne vornehmen, die zum Lieferumfang der Verladegarnitur gehören. - Der Stromlaufplan der Steuerung oder der Abzweigdose liegen der Maschine separat vom Hand-buch bei. L’installateur devra interfacer la machine (où cela est prévu) avec les commandes nécessaires, en respectant les normes en vigueur. - Les raccordements électriques dans le chargeur doivent être effectués par du personnel qualifié, conformément aux normes locales. - Lors des raccordements vérifier que la longueur des câbles est suffisante. - Réaliser les raccordements électriques en suivant les schémas électriques qui sont annexés au chargeur. - Le schéma électrique du tableau de commande ou du boîtier de dérivation sont annexés à la machine séparément du manuel. L’installatore dovrà provvedere a interfacciare la macchina (ove necessario) con i necessari comandi,rispettando le normative vigenti. -I collegamenti elettrici nello scaricatore devono essere effettuati da personale qualificato, in conformità alle norme locali. -Quando effettuate i collegamenti accertatevi che i cavi siano di lunghezza sufficiente. -Effettuate i collegamenti elettrici seguendo gli schemi elettrici che troverete allegati allo scaricatore. -Lo schema elettrico del quadro di comando o della scatola di derivazione, sono allegati alla macchina separatamente dal manuale. ZG - ZH - 02.13 INSTALLATION EINBAU 2 INSTALLATION INSTALLAZIONE TOR.173.--.M.4L 26 CONTROL PANEL AND PUSHBUTTON PANEL The loading bellows may be supplied with a control panel and pushbutton panel. Before starting with installation of the loading bellows, read the instructions below. SCHALTTAFEL UND DRUCKKNOPFTAFEL Die Verladegarnitur kann mit Schalttafel und Druckknopftafel geliefert werden. Bevor man mit der Installation der Verladegarnitur beginnt, sind die folgenden Angaben zu lesen. PANNEAU DE CONTROLE ET BOITIER DE COMMANDE Le chargeur télescopique peut être fourni avec un panneau de contrôle et boîtier de commande. Avant de commencer l’installation du chargeur prendre vision des indications ci-dessous. Pushbutton panel on the front FOR LOADING BELLOWS WITHOUT DUST FILTER (Fig.12) A series of commands are provided for the operator on the front of the panel for carrying out and displaying the primary operations for starting up the plant. Emergency pushbutton panel PEM Pressing this button will deactivate all the field utilities. To re-enable the electric panel, restore the button to the release position by turning it clockwise. Light L Displays correct powering of the electric panel. 2-positions selector SM Used to enable the two different automatic plant sequences. - LH: Enables automatic unloading to tank. - RH: Enables automatic unloading to open truck. 2-positions selector QS1 Used to enable powering of electric panel -OFF: Panel not powered. -ON: Panel powered. Druckknöpfe auf der Frontseite VERLADEGARNITUR OHNE FILTER (Abb. 12) Auf der Frontseite der Schalttafel stehen dem Bediener eine Reihe von Bedienelementen zur Verfügung, die es ihm gestatten, die Hauptvorgänge für die Inbetriebnahme der Anlage vorzunehmen und anzuzeigen. Pilz-Schlagtaste PEM Das Einschalten der Taste gestattet es, die Steuerung aller Stromverbraucher im Feld zu sperren. Um die Schalttafel rückzustellen, ist die Taste in die entriegelte Position zu bringen, indem man den Pilz im Uhrzeigersinn dreht. Lampe L Zeigt die korrekte Stromversorgung der Schalttafel an. 2-Stellungs-Wahlschalter SM Gestattet das Freigeben von zwei unterschiedlichen automatischen Sequenzen der Anlage. - Stellung SX: Freigabe zum Entladen in den Tank. - Stellung DX: Freigabe zum Entladen in offenen Lkw. 2-Stellungs-Wahlschalter SQ1 Gestattet die Freigabe der Stromversorgung der Schalttafel -Stellung OFF: Schalttafel nicht versorgt. -Stellung ON: Schalttafel versorgt. Boîtier frontal de commande du tableau POUR CHARGEUR SANS FILTRE (fig. 12) Sur la partie frontale du tableau, l’opérateur dispose d’une série de commandes qui permettent d’exécuter et de signaler les opérations principales pour la mise en service de l’installation. Bouton d’arrêt d’urgence PEM La pression du bouton permet de désactiver la commande de toutes les utilisations présentes. Pour réactiver le tableau électrique il faut réarmer le bouton en le tournant dans le sens des aiguilles d’une montre. Lampe L Signale l’alimentation correcte du tableau électrique. Sélecteur à 2 positions SM Permet d’activer les deux différentes séquences automatiques de l’installation. - position G.: Activation chargement de la citerne. - position D.: Activation chargement camion ouvert PEM PANNELLO DI CONTROLLO E PULSANTIERA DI COMANDO Lo scaricatore telescopico può venire fornito con pannello di controllo e pulsantiera di comando. Prima di iniziare l’installazione dello scaricatore prendere visione delle indicazioni sottostanti. Pulsanteria a fronte quadro PER SCARICATORE SENZA FILTRO (fig.12) Sulla parte frontale del quadro, l’operatore ha a disposizione una serie di comandi che permettono di effettuare e visualizzare le operazioni primarie per la messa in funzione dell’impianto. Pulsante di emergenza PEM L’inserzione del pulsante permette di disabilitare il comando di tutte le utenze in campo. Per riabilitare il quadro elettrico bisogna riportare il pulsante in posizione di rilascio ruotandolo in senso orario. Lampada L Visualizza la corretta alimentazione del quadro elettrico. Selettore a 2 posizioni SM Permette di abilitare le due differenti sequenze automatiche dell’impianto. -posizione SX: Abilitazione scarico in cisterna. -posizione DX: Abilitazione scarico camion aperto Sezionatore a 2 posizioni QS1 Sélecteur à 2 positions QS1 Permette di abilitare l’alimenta Permet d’activer l’alimentation zione del quadro elettrico du tableau électrique -posizione OFF: -position OFF: Quadro non alimentato. Tableau hors tension. -posizione ON: -position ON: Quadro alimentato. Tableau sous tension. L SM Fig.12 QS1 ZG - ZH - 02.13 INSTALLATION EINBAU 2 INSTALLATION INSTALLAZIONE TOR.173.--.M.4L 27 Wander pendant (fig.13) Hängedruckknopftafel (Abb.13) Boîtier de commandes penden- Pulsantiera pensile (fig.13) tif (fig.13) A wander pendant is connected An der Schalttafel ist eine Hänge- Un boîtier de commande pen- Al quadro è collegata una pulto the panel and is used by the druckknopftafel angeschlossen, dentif est relié au tableau pour santiera pensile da cui l’operaoperator to control the unloading mit welcher der Bediener den permettre à l’opérateur de gérer tore gestisce il ciclo di scarico. cycle. Entladezyklus steuert. le cycle de chargement. PEM1 PS PD PA PC Fig.13 Emergency pushbutton PEM1 Pilz-Schlagtaste PEM1 Bouton d’arrêt d’urgence PEM1 Pulsante di emergenza PEM1 Activating this pushbutton, like Das Einschalten der Taste ge- La pression du bouton, comme L’inserzione del pulsante, come the pushbutton PEM on the front stattet es, wie mit der Taste pour le bouton PEM sur le frontal per il pulsante PEM su fronte of the panel, will make it possible PEM auf der Frontseite der du tableau, permet de désacti- quadro, permette di disabilitare to deactivate all the field utilities. Schalttafel, die Steuerung aller ver la commande de toutes les il comando di tutte le utenze in To re-enable the electric panel, Stromverbraucher im Feld zu utilisations présentes. campo.Per riabilitare il quadro the pushbutton must be restored sperren. Pour réactiver le tableau élec- elettrico bisogna riportare il to the release position by turning Um die Schalttafel rückzustel- trique il faut réarmer le bouton pulsante in posizione di rilascio it clockwise. len, ist die Taste in die entrie- en le tournant dans le sens des ruotandolo in senso orario. gelte Position zu bringen, indem aiguilles d’une montre. man den Pilz im Uhrzeigersinn dreht. Ascent pushbutton PS Taste für Heben PS Bouton De montée PS Pulsante di salita PS Loading bellows ascent com- Befehl zur Aufwärtsbewegung Commande la montée du char- Comanda la salita dello scaricamand. der Verladegarnitur. geur. tore. Descent pushbutton PD Taste für Senken PD Bouton de descente PD Pulsante di discesa PD Loading bellows descent com- Befehl zur Abwärtsbewegung Commande la descente du Comanda la discesa dello scamand. der Verladegarnitur. chargeur. ricatore. Open pushbutton PA Taste für Öffnen PA Bouton d’ouverture PA Pulsante di apertura PA Material unloading valve open- Befehl zum Öffnen der Mate- Commande l’ouverture de la Comanda l’apertura della valvoing command. rialaustragsklappe. vanne déchargement matière. la di scarico materiale. Close button PC Taste für Schließen PC Bouton de fermeture PC Pulsante di chiusura PC Unloading valve close com- Befehl zum Schließen der Ma- Commande la fermeture de la Comanda la chiusura della valmand. terialaustragsklappe. vanne de déchargement. vola di scarico. ZG - ZH REFERENCE WIRING DIAGRAMS Some examples of wiring diagrams for loaders are shown, without dust filter. The diagrams refer to the control panel with pushbutton panel as well as junction boxes (available with or without provision for pushbutton panel). 02.13 INSTALLATION EINBAU 2 INSTALLATION INSTALLAZIONE BEZUGSSTROMLAUFPLÄNE Hier folgen einige Beispiele von Stromlaufplänen für die Verladegarnitur ohne Filter. Die Schaltpläne beziehen sich sowohl auf den Schaltschrank mit Bedientafel als auch auf die Abzweigdose (erhältlich mit und ohne Vorrüstung für Bedientafel). TOR.173.--.M.4L 28 SCHÉMAS ÉLECTRIQUES DE RÉFÉRENCE Vo i r c i - d e s s o u s q u e l q u e s exemples de schéma électriques pour chargeurs sans filtre. Les schémas font référence tant au boîtier de commande à boutonspoussoirs qu’aux boîtiers de dérivation (disponibles avec ou sans prééquipement pour boîtiers à boutons-poussoirs). SCHEMI ELETTRICI DI RIFERIMENTO Si riportano alcuni esempi di schemi elettrici per scaricatori senza filtro. Gli schemi si riferiscono sia al pannello di comando con pulsantiera che alle scatole di derivazione (disponibili con o senza predisposizione per pulsantiera). SA1 PC PA PD PS EM PUSHBUTTON 0-1 14 15 14 10 11 6 30 32 5 6 HL1 FRONT SIDE OF THE PANEL COMMON 24 V AC 110 V AC PUSHBUTTON KA2 KA7 5 EMERGENCY 14 COMMON 15 CLOSED 11 DESCENT 10 OPEN 30 ASCENT 32 ASCENT 6 COMMON 1 AUXILIARIES' LED 2 AUXILIARIES' LED TANKER (LH selector, N.O. contact) TRUCK (RH selector, 19 OPEN N.C. contact) TANKER (LH selector, N.O. contact) TRUCK (RH selector, 5 OPEN N.C. contact) A4 A4 A3 A3 A2 A2 A1 A1 2 2 1 1 KA5 KA4 COM 0V MICRO-DESCENT MICRO-ASCENT LEVEL SLACK ROPE SLACK ROPE LEVEL MICRO-ASCENT MICRO-DESCENT N.C. N.O. COM 17-18 COM 24 VAC KA1 KA6 KA2 DIGITAL INPUTS 2 6 16 17 18 51 52 50 53 1 1 1 1 60 66 61 63 64 62 65 67 1 A1 SEE INDICATORS SLACKEN ROPE LIMIT SWITCH SQ1 LM CONNECT TO OBTAIN THE VOLTAGE SIGNAL 24VAC ON 2 AND 17 (SEE WIRING DIAGRAM ENCLOSED TO THE MACHINE) EMERGENCY (N.C.) SLACK ROPE LEVEL MICRO-ASCENT MICRO-DESCENT EMERGENCY (N.O.) MATERIAL OUTLET A2 , A3 , A4 (depends on the voltage) A1 A2 , A3 , A4 1 DIGITAL OUTPUTS COMMON Not connected 50 LEVEL INDICATOR CONNECTION 220 V AC 50 Not connected ROTARY LEVEL INDICATOR SQ3 50 1 Blue cable CAPACITIVE LEVEL INDICATOR Brown cable EXTENDED-RETRACTED POSITION LIMIT SWITCH SQ2 VIBRATING LEVEL INDICATOR 1 2 3 4 5 1 2 5 6 7 ZG - ZH SCHÉMAS ÉLECTRIQUES - EXEMPLE WIRING DIAGRAMS - EXAMPLE 02.12/ 02.13 STROMLAUFPLÄNE - BEISPIEL 2 SCHEMI ELETTRICI - ESEMPIO TOR.173.--.M.4L 29 Loading bellows - Electric panel with pushbutton control panel SA1 PC PA PD PS EM TASTATUR 0-1 14 15 14 10 11 6 30 32 5 6 HL1 FRONTSEITE SCHALTKASTEN GEMEINSAM 24 V AC TASTATUR 5 NOT-AUS 14 GEMEINSAM 15 SCHLIESSEN 11 SENKEN 10 ÖFFNUNG 30 HEBEN 32 HEBEN 6 GEMEINSAM 1 HILFSEINRICHTUNGEN-LED 2 HILFSEINRICHTUNGEN-LED TANKWAGEN (Wahlschalter links S-Kontakt) LKW 19 OFFENER (Wahlschalter rechts Ö-Kontakt) TANKWAGEN (Wahlschalter links S-Kontakt) OFFENER LKW 5 (Wahlschalter rechts Ö-Kontakt) KA2 KA7 KA4 COM 0V COM 17-18 60 66 61 63 64 62 65 67 DIGITALE EINGÄNGE 2 6 16 SCHLIESSERKONTAKT 17 ÖFFNERKONTAKT 18 MIKROSCH. SENKEN 51 MIKROSCH. HEBEN 52 STAND 50 SCHLAFFSEIL 53 SCHLAFFSEIL 1 STAND 1 MIKROSCH. HEBEN 1 MIKROSCH. SENKEN 1 KA6 COM 24 VAC KA1 KA5 KA2 MATERIALAUSLAUF A1 ANSCHLUSS FÜLLSTANDMELDER SIEHE FÜLLSTANDMELDER SLACKEN ROPE LIMIT SWITCH SQ1 LM SQ2 1 Braunes Kabel ENDSCHALTER AUSGEFAHREN-EINGEFAHREN SQ3 50 KAPAZITIVER FÜLLSTANDMELDER SCHWINGUNGSFÜLLSTANDMELDER 1 2 3 4 5 ANSCHLIESSEN, UM DAS SPANNUNGSSIGNAL 24VAC AM 2 UND 17 ZU ERZIELEN (SIEHE AN DER MASCHINE BEIGEFÜGTES SCHALTSCHEMA) NOT-AUS (Ö) SCHLAFFSEIL STAND MIKROSCH. HEBEN MIKROSCH. SENKEN NOT-AUS (S) A2 , A3 , A4 (hängt von der Spannung ab) A1 A2 , A3 , A4 1 110 V AC A4 A4 A3 A3 A2 A2 A1 A1 2 2 1 1 Nicht angeschlossen 50 DIGITALE AUSGÄNGE GEMEINSAM 1 50 Nicht angeschlossen 220 V AC 1 2 5 6 7 Blaues Kabel DREHFLÜGELVOLLMELDER ZG - ZH SCHÉMAS ÉLECTRIQUES - EXEMPLE WIRING DIAGRAMS - EXAMPLE 02.12/ 02.13 STROMLAUFPLÄNE - BEISPIEL 2 SCHEMI ELETTRICI - ESEMPIO TOR.173.--.M.4L 30 Verladegarnitur - Schaltschrank mit Bedientafel RACCORDEMENT INDICATEUR DE NIVEAU SA1 PC PA PD PS EM BOUTON-POUSSOIR 0-1 14 15 14 10 11 6 30 32 5 6 HL1 COTE AVANT DU PANNEAU COMMUN 24 V AC 5 SITUATION D'URGENCE 14 COMMUN 15 FERME 11 DESCENTE 10 OUVERT 30 MONTEE 32 MONTEE 6 COMMUN BOUTON-POUSSOIR 1 TEMOIN AUXILIAIRES 2 TEMOIN AUXILIAIRES CITERNE(sélecteur gauche, contact N.A.) OUVERTE 19 CITERNE (sélecteur droit, contact N.C.) CITERNE(sélecteur gauche, contact N.A.) OUVERTE 5 CITERNE (sélecteur droit, contact N.C.) KA2 KA7 KA4 COM 0V COM 17-18 60 66 61 63 64 62 65 67 ENTREES NUMERIQUES 2 6 16 N.O. 17 N.C. 18 MICRO-DESCENTE 51 MICRO-CONTACT 52 MONTEE NIVEAU 50 CABLE LACHE 53 CABLE LACHE 1 NIVEAU 1 MICRO-CONTACT 1 MONTEE MICRO-DESCENTE 1 KA5 COM 24 VAC KA1 KA6 KA2 1 A1 VOIR INDICATEURS FIN DE COURSE CABLE LACHE SQ1 LM CONNECTER POUR OBTENIR LE SIGNAL DE TENSION 24 VAC SUR 2 ET 17 (VOIR LE SCHÉMA DE CÂBLAGE JOINT À LA MACHINE) SITUATION D'URGENCE (N.C.) CABLE LACHE SITUATION D'URGENCE (N.O.) MICRO-CONTACT DESCENTE MICRO-CONTACT MONTEE NIVEAU SORTIE MATÉRIAU A2 , A3 , A4 (dépend de la tension) A1 A2 , A3 , A4 1 110 V AC A4 A4 A3 A3 A2 A2 A1 A1 2 2 1 1 Non raccordé 50 SORTIES NUMÉRIQUES COMMUN 50 Non raccordé 220 V AC 1 2 3 4 5 1 2 5 6 7 SQ3 1 Câble marron FIN DE COURSE DÉPLOYÉ-RÉTRACTÉ SQ2 50 Câble bleu INDICATEUR DE NIVEAU CAPACITIF INDICATEUR DE NIVEAU DE VIBRATION INDICATEUR DE NIVEAU ROTATIF ZG - ZH SCHÉMAS ÉLECTRIQUES - EXEMPLE WIRING DIAGRAMS - EXAMPLE 02.12/ 02.13 STROMLAUFPLÄNE - BEISPIEL 2 SCHEMI ELETTRICI - ESEMPIO TOR.173.--.M.4L 31 Chargeur télescopique - Panneau électrique avect boîtier de commande SA1 PC PA PD PS EM PULSANTIERA 0-1 14 15 14 10 11 6 30 32 5 6 HL1 FRONTE QUADRO COMUNE 24 V AC 110 V AC PULSANTIERA KA2 KA7 KA6 COM 24 VAC KA1 KA5 KA2 KA4 5 EMERGENZA 14 COMUNE 15 CHIUSURA 11 DISCESA 10 APERTURA 30 SALITA 32 SALITA 6 COMUNE COM 0V MICRO DISCESA MICRO SALITA LIVELLO FUNE LENTA FUNE LENTA LIVELLO MICRO SALITA 1 SPIA AUSILIARI COM 17-18 2 SPIA AUSILIARI N.O. CISTERNA (selettore SX contatto N.A.) APERTO (selettore DX 19 CAMION N.C. contatto N.C.) CISTERNA (selettore SX contatto N.A.) APERTO (selettore DX 5 CAMION MICRO DISCESA contatto N.C.) A4 A4 A3 A3 A2 A2 A1 A1 2 2 1 1 INGRESSI DIGITALI 2 6 16 17 18 51 52 50 53 1 1 1 1 60 66 61 63 64 62 65 67 SCARICO MATERIALE 1 A1 FINECORSA FUNE-LENTA SQ1 LM VEDI INDICATORI LIVELLO COLLEGARE PER AVERE SEGNALE IN TENSIONE 24VAC SU 2 E 17 (VEDI SCHEMA ELETTRICO ALLEGATO ALLA MACCHINA). EMERGENZA(N.C.) FUNE LENTA LIVELLO MICRO SALITA MICRO DISCESA EMERGENZA(N.O.) A2 , A3 , A4 (dipende dal voltaggio) A1 A2 , A3 , A4 1 220 V AC Non collegato 50 USCITE DIGITALI COMUNE 50 Non collegato 1 2 3 4 5 1 2 5 6 7 SQ2 FINECORSA ESTESO-RETARTTO SQ3 50 Cavo marrone 1 Cavo blu INDICATORE LIVELLO CAPACITIVO INDICATORE LIVELLO VIBRAZIONE INDICATORE LIVELLO ROTATIVO ZG - ZH SCHÉMAS ÉLECTRIQUES - EXEMPLE WIRING DIAGRAMS - EXAMPLE 02.12/ 02.13 STROMLAUFPLÄNE - BEISPIEL 2 SCHEMI ELETTRICI - ESEMPIO TOR.173.--.M.4L 32 Schema scaricatore - Pannello elettrico con pulsantiera COLLEGAMENTO INDICATORE DI LIVELLO ZG - ZH - WIRING DIAGRAMS 02.13 STROMLAUFPLÄNE 2 SCHÉMAS ÉLECTRIQUES SCHEMI ELETTRICI TOR.173.--.M.4L 33 Electric motors connection and distribution board power supply Anschluss Elektromotoren und Speisung Hauptschaltkasten Raccordement moteurs électriques et alimentation générale tableau Collegamento motori elettrici e alimentazione generale quadro Lift motor (use KA or KB) Hubmotor (KA oder KB benutzen) Moteur levage (utiliser KA ou KB) Motore sollevamento (utilizzare KA o KB) Both remote control switches, KA and KB, can be used for con-necting the lift electric motor. Terminal board QS0 will be usedfor the main power supply of theelectric panel. Die Schütze KA und KB können unterschiedslos für den Anschluss des elektrische Hubmotors verwendet werden. Die Klemmenleiste QS0 wird fürdie allgemeine Speisung desSchaltkastens benutzt. Main power supply Hauptspeisung Alimentation générale Alimentazione generale Les télérupteurs KA et KB peuvent être utilisés indifféremment pour le raccordement du moteur électrique de levage. Le bornier QS0 sera utilisé pourl’alimentation générale du tableauélectrique. I teleruttori KA e KB possono essere utilizzati indifferentemente per il collegamento del motore elettrico di sollevamento. La morsettiera QS0 verrà utilizzata per l’alimentazione genera-le del quadro elettrico. ZG - ZH - 02.13 INSTALLATION - JUNCTION BOX EINBAU - ABZWEIGDOSE 2 INSTALLATION - BOITER DE DERIVATION INSTALLAZIONE - SCATOLA DI DERIVAZIONE TOR.173.--.M.4L 34 Loading bellows without dust filter – Junction box layout without pushbutton panel (Junction box “A”) Verladegarnitur ohne Filter – Schaltplan der Abzweigdose ohne Druckknopftafel (Abzweigung „A”) Chargeur télescopique sans filtre - Schéma boîte de dérivation sans boîtier de commande (Dérivation « A »). Scaricatore telescopico senza filtro – Schema scatola di derivazione senza pulsantiera (Derivazione “A”) ZG - ZH - INSTALLATION – JUNCTION BOX WITH PUSHBUTTON PANEL EINBAU – ABZWEIGDOSE MIT DRUCKKNOPFTAFEL INSTALLATION - BOITIER DE DERIVATION AVEC BOITIER DE COMMANDE 02.13 2 INSTALLAZIONE - SCATOLA DI DERIVAZIONE CON PULSANTIERA TOR.173.--.M.4L 35 Loading bellows without dust filter – Junction box layout with pushbutton panel (Junction box “C”) Verladegarnitur ohne Filter – Schaltplan der Abzweigdose mit Druckknopftafel (Abzweigung „C”) Chargeur télescopique sans filtre - Schéma boîte de dérivation avec boîtier de commande (Dérivation « C »). Scaricatore telescopico senza filtro – Schema scatola di derivazione con pulsantiera (Derivazione “C”) ZG - ZH START-UP 02.13 START-UP AND STOP PROCEDURES VERFAHREN ZUR INBETRIEBNAHME UND ZUM AUSSCHALTEN 2 PROCÉDURE DE MISE EN MARCHE ET ARRET PROCEDURE DI AVVIAMENTO ED ARRESTO EINSCHALTUNG MISE EN MARCHE TOR.173.--.M.4L 36 AVVIAMENTO Fig.20 TANKER This electric panel is designed for loading of tankers as well as open trucks. To enable loading of tankers, make sure the two-position selector SM on the front of the panel is in the SX position. There is a timer TMR inside the electric panel. Set a time of 20 – 30 seconds. - After installing the telescopic loader in the plant and having connected the electric panel to the power line, turn on the main switch QS1 on the front of the panel. - The level indicator blade starts rotating (Pos. 6, Fig. 20) - Once the truck has positioned the tank spout exactly lined up with the telescopic loader, the loading phases can begin. - Press the DESCENT pushbutton “PD” on the pushbutton panel -The loading terminal will be lowered (pos. 2, Fig. 20): guide it to rest against the inlet flange on the tanker (pos. 3 Fig. 20). To guide the loading terminal correctly on the tanker spout, an operator must hold the handle (pos. 1, Fig. 20) firmly with both hands while a second operator acts on the pushbutton panel. - K eep the DESCENT button “PD” pressed until the two lifting cables go slack and the slack cable device limit switch stops the loader motor automatically. SILOFAHRZEUGE Dieser Schaltkasten ist entwickelt worden, um die Befüllung sowohl von Silofahrzeugen als auch von offenen Lkws zu gestatten. Für die Freigabe der Befüllung von Silofahrzeugen sicherstellen, dass der Wahlschalter SM mit zwei Stellungen auf der Vorderseite des Schaltkastens auf der Position Links steht. Innerhalb des Schaltkastens befindet sich der Timer TMR. Eine Zeit von 20-30 Sekunden einstellen. - Nach der Installation der Verladegarnitur in der Anlage und dem Anschluss der Schalttafel an der Stromleitung, ist der Hauptschalter einzuschalten: QS1 auf der Frontseite. - Das Drehpaddel des Füllstandmelders beginnt sich zu drehen (Pos. 6, Abb. 20) - Wenn der Lkw so steht, dass der Einlaufstutzen sich genau unter der Verladegarnitur befindet, können die Verladephasen beginnen. - Die Taste SENKEN “PD” auf der Druckknopftafel drücken. - Der Auslaufkonus wird gesenkt (Pos. 2, Abb. 20): Führen Sie in, bis er auf dem Einlaufflansch des Tanks aufzuliegen kommt (Pos. 3, Abb. 20). Um den Auslaufkonus korrekt auf die Tanköffnung zu führen, ist es erforderlich, dass ein Bediener den Handführungsring (Pos. 1, Abb. 20) mit beiden Händen ganz fest hält, während ein zweiter Bediener die Druckknopftafel bedient. - Die Taste SENKEN „PD” gedrückt halten, bis die beiden Führungsseile gelockert sind und der Endschalter des Schlaffseilschalters den Motor der Verladegarnitur automatisch zum Stehen bringt. CAMION CITERNE Ce tableau électrique a été réalisé pour permettre le chargement tant sur camion citerne que sur camion à plateau ouvert. Pour l’activation du chargement du camion citerne, vérifier que le sélecteur à deux positions SM sur la face avant du tableau, soit sur la position G. A l’intérieur du tableau électrique il y a le minuteur TMR. Régler un temps de 20 à 30 secondes. - A près avoir mis en place le chargeur télescopique dans l’installation et avoir branché le panneau électrique à la ligne électrique, allumer l’interrupteur principal QS1 sur la face avant du tableau. - La pale de l’indicateur de niveau commence à tourner (pos. 6, fig. 20). -Une fois que le camion a placé la bouche de la citerne exactement au niveau du chargeur télescopique, les phases de déchargement peuvent commencer. - Appuyer sur le bouton de la DESCENTE „PD” sur le boîtier de commandes -L’ e m b o u t d e c h a r g e m e n t s’abaisse (pos. 2 fig. 20) : guidez-le tant qu’il ne va pas s’appuyer sur la bride d’entrée de la citerne (pos. 3 fig. 20). Pour guider correctement l’embout de chargement sur la bouche de la citerne il faut qu’un opérateur tienne fermement la poignée (pos. 1, fig. 20) avec les deux mains, pendant qu’une deuxième personne intervient sur le boîtier de commandes. - Maintenir le bouton DESCENTE „PD” enfoncé tant que les deux câbles de levage ne se sont pas desserrés et que le dispositif câble mou arrête automatiquement le moteur du chargeur. CAMION A CISTERNA Questo quadro elettrico è stato realizzato per permettere il carico sia di camion a cisterna che di camion a cassone aperto. Per l’abilitazione del carico di camion a cisterna, accertarsi che il selettore a due posizioni SM sul fronte quadro, sia in posizione SX. All’ interno del quadro elettrico c’è il timer TMR . Settare un tempo di 20 - 30 secondi. -Dopo aver installato lo scaricatore telescopico nell’impianto e avere collegato il quadro elettrico alla linea elettrica, accendere l’interruttore principale QS1 sul fronte quadro. -La pala dell’indicatore di livello inizia a ruotare (pos. 6, fig. 20) -Una volta che il camion ha posizionato la bocca della cisterna esattamente in corrispondenza dello scaricatore telescopico, le fasi di scarico possono iniziare. -Premere il pulsante della DISCESA „PD“ sulla pulsantiera -Il terminale di scarico verrà abbassato (pos. 2, fig. 20): guidatelo finché non andrà ad appoggiarsi sulla flangia d’entrata della cisterna (pos. 3 fig. 20). Per guidare correttamente il terminale di scarico sulla bocca della cisterna è necessario che un’operatore tenga saldamente il maniglione (pos. 1, fig. 20) con entrambe le mani, mentre un secondo agisca sulla pulsantiera. -Tenere premuto il pulsante DISCESA „PD“ fino a quando i due cavi di sollevamento si sono allentati ed il finecorsa del dispositivo cavo lento fermerà il motore dello scaricatore automaticamente. ZG - ZH - The loading phase can now be started by pressing the OPEN button “PA” on the pushbutton panel. - Pressing this button will cause a valve upline of the loader to open (for example, Butterfly valve, gate valve, etc...), normally actuated pneumatically, or start up a motor (for example of a screw conveyor or a belt conveyor). - The material will start falling into the tanker. In case of a problem, the loader must be switched off immediately. Have the plant checked by a qualified technician. LOADER FOR OPEN TRUCK This electric panel is designed for loading of tankers as well as open trucks. To enable loading of the open truck, make sure the two-position selector SM on the front of the panel is in the DX position. There is a timer TMR inside the electric panel. Set a time of 3 – -4 seconds. - After installing the telescopic loader in the plant and having connected the electric panel to the power line, turn on the main switch QS1 on the front of the panel. - Once the truck has positioned the load body exactly lined up with the telescopic loader, the loading phases can begin. - Press the DESCENT button, “PD” on the pushbutton panel, to lower the loader so that the feet of the terminal touch the truck bed. - Keep the button pressed until the two lifting cables go slack and the slack cable device limit switch stops the loader motor automatically. - The loading phase can now be started by pressing the OPEN button “PA” on the pushbutton panel. - Pressing this button will cause a valve upline of the loader to open (for example, Butterfly valve, Slide valve, etc...), normally actuated pneumatically, or start up a motor (for example of a screw conveyor or a belt conveyor). - The material will start falling into the truck. In case of a problem, the loader must be switched off immediately. Have the plant checked by a qualified technician. 02.13 START-UP AND STOP PROCEDURES VERFAHREN ZUR INBETRIEBNAHME UND ZUM AUSSCHALTEN PROCÉDURE DE MISE EN MARCHE ET ARRET PROCEDURE DI AVVIAMENTO ED ARRESTO - Nun kann die Verladung beginnen, indem man die Taste ÖFFNEN „PA” auf der Druckknopftafel drückt. - Diese Taste öffnet einen Absperrschieber stromauf von der Verladegarnitur (z.B. Drehklappe, Flachschieber etc.), der in der Regel pneumatisch betätigt wird, oder startet einen Motor (z.B. einer Schnecke oder eines Bands). - Nun beginnt die Schüttgutverladung in das Innere des Silofahrzeugs. Wenn etwas nicht funktioniert, muss die Verladegarnitur sofort abgeschaltet werden. Die Anlage von qualifiziertem Fachpersonal kontrollieren lassen. VERLADEGARNITUR FÜR OFFENE LKW Diese Steuerung dient der Befüllung sowohl von Silofahrzeugen als auch von offenen LKW. Für die Freigabe der Befüllung von offenen LKW sicherstellen, dass der Wahlschalter SM mit zwei Stellungen auf der Vorderseite des Schaltkastens auf der Position Rechts steht. Innerhalb des Schaltkastens befindet sich der Timer TMR. Eine Zeit von 3-4 Sekunden einstellen. - Nach dem Einbau der Verladegarnitur in die Anlage und dem Anschluss der Steuerung an die Stromleitung ist der Hauptschalter QS1 auf der Frontseite des Schaltkastens einzuschalten: - Wenn der LKW so steht, dass die Verladefläche sich genau unter der Verladegarnitur befindet, kann die Verladung beginnen. - Die Taste SENKEN “PD” auf der Druckknopftafel drücken, um die Verladegarnitur auszufahren, bis die Stützfüße den Boden der Verladefläche berühren. - Die Taste gedrückt halten, bis die beiden Führungsseile gelockert sind und der Endschalter des Schlaffseilschalters den Motor der Verladegarnitur automatisch zum Stehen bringt. - Die Verladung kann nun beginnen, indem man die Taste ÖFFNEN „PA” auf der Druckknopftafel drückt. - Diese Taste öffnet einen Absperrschieber stromauf von der Verladegarnitur (z.B. Drehklappe, Flachschieber etc.), der in der Regel pneumatisch betätigt wird, oder startet einen Motor (z.B. einer Schnecke oder eines Förderbands). - Nun beginnt die Schüttgutverladung auf die Ladefläche des LKW. Wenn etwas nicht funktioniert, muss die Verladegarnitur sofort abgeschaltet werden. Die Anlage von qualifiziertem Fachpersonal kontrollieren lassen. 2 TOR.173.--.M.4L 37 - La phase de chargement peut commencer en appuyant sur le bouton OUVERTURE « PA » sur le boîtier de commandes. - Ce bouton fait ouvrir une vanne en amont du chargeur (ex. Vanne papillon, Vanne guillotine etc.), normalement activée manuellement ou fait démarrer un moteur (ex. d’une vis sans fin ou d’une bande). - La matière commencer à tomber à l’intérieur de la citerne. Si quelque chose ne fonctionne pas, le chargeur doit être immédiatement éteint. Faire contrôler l’installation par un technicien qualifié. - Si può iniziare la fase di carico, premendo il pulsante APERTURA „PA“, sulla pulsantiera. - Questo pulsante fa aprire una valvola a monte dello scaricatore (es. Valvola a farfalla, Valvola a ghigliottina ecc…), normalmente attuata pneumaticamente, o far partire un motore (es. di una coclea o di un nastro). - A questo punto il materiale comincia a cadere all’interno della cisterna. Se qualcosa non funziona, lo scaricatore deve essere immediatamente spento. Fare controllare l’impianto da un tecnico qualificato. CHARGEUR POUR CAMION OUVERT Ce tableau électrique a été réalisé pour permettre le chargement tant sur camion citerne que sur camion à plateau ouvert. Pour l’activation du chargement du camion à plateau ouvert, vérifier que le sélecteur à deux positions SM sur la face avant du tableau, soit sur la position D. A l’intérieur du tableau électrique il y a le minuteur TMR. Régler un temps de 3 à -4 secondes. - Après avoir mis en place le chargeur télescopique dans l’installation et avoir branché le panneau électrique à la ligne électrique, allumer l’interrupteur principal QS1 sur la face avant du tableau. - Une fois que le camion a placé le plateau exactement au niveau du chargeur télescopique, les phases de chargement peuvent commencer. - Appuyer sur le bouton DESCENTE „PD”, sur le boîtier de commandes pour placer le chargeur en bas jusqu’à ce que les pieds de l’embout touchent le fond du plateau du camion. - Maintenir le bouton enfoncé tant que les deux câbles de levage ne se sont pas relâchés et que le fin de course du dispositif câble mou arrête automatiquement le moteur du chargeur. - La phase de déchargement peut commencer en appuyant sur le bouton OUVERTURE « PA » sur le boîtier de commandes. - Ce bouton fait ouvrir une vanne en amont du chargeur (ex. Vanne papillon, Vanne guillotine etc.), normalement activée pneumatiquement ou fait démarrer un moteur (ex. d’une vis sans fin ou d’une bande). - La matière commencer à tomber à l’intérieur du plateau du camion. Si quelque chose ne fonctionne pas, le chargeur doit être immédiatement éteint. Faire contrôler l’installation par un technicien qualifié. SCARICATORE PER CAMION APERTO Questo quadro elettrico è stato realizzato per permettere il carico sia di camion a cisterna che di camion a cassone aperto. Per l’abilitazione del carico di camion a cassone aperto, accertarsi che il selettore a due posizioni SM sul fronte quadro, sia in posizione DX. All’ interno del quadro elettrico c’è il timer TMR . Settare un tempo di 3-4 secondi. - Dopo avere installato lo scaricatore telescopico nell’impianto e avere collegato il pannello elettrico alla linea elettrica, accendete l’interruttore principale QS1 sul fronte quadro. - Una volta che il camion ha posizionato il cassone esattamente in corrispondenza dello scaricatore telescopico, le fasi di carico possono iniziare. - Premere il pulsante DISCESA „PD“, sulla pulsantiera, per portare lo scaricatore in basso fino a far toccare i piedi del terminale sul fondo del cassone del camion. - Tenere premuto fino a quando i due cavi di sollevamento si sono allentati ed il finecorsa del dispositivo cavo lento fermerà il motore dello scaricatore automaticamente. - Si può iniziare la fase di scarico, premendo il pulsante APERTURA „PA“, sulla pulsantiera. - Questo pulsante fa aprire una valvola a monte dello scaricatore (es. Valvola a farfalla, Valvola a ghigliottina..ecc..) normalmente attuata pneumaticamente, o fa partire un motore ( es. di una coclea o di un nastro). - A questo punto il materiale comincia a cadere all’interno del cassone del camion. Se qualcosa non funziona, lo scaricatore deve essere immediatamente spento. Fare controllare l’impianto da un tecnico qualificato. ZG - ZH STOPPING THE FLOW LOADERS FOR TANKERS AUTOMATIC SEQUENCE - The material falling into the tank increases in level, to fill the tank completely. - When the tank is full, the material will touch the level indicator placed near the outlet spout of the Telescopic loader. - The indicator sends a signal that can be used for stopping the loading (for example, closing a valve or switching off a motor of a screw conveyor located upline of the telescopic loader). - At this point, the timer TMR will start the countdown equal to the preset time (20-30 seconds). - When the preset time has elapsed, the lift motor will start up, raising the loading terminal. - The ascent delay caused by timer TMR is necessary to allow the material remaining in the loader to flow out. - Once the completely retracted point is reached, the ascent limit switch will switch off the lift motor. - At this point, the Telescopic Loader is ready for loading another truck. MANUAL SEQUENCE - If the loading is to be stopped before the tanker is filled completely, or before the material touches the level indicator, press the CLOSE button “PC” on the pushbutton panel. - This will close a valve or switch off the motor of a screw conveyor or belt conveyor located upline of the loader, stopping the loading. - Wait for about 20-30 seconds to allow the material remaining in the loader to flow out. - Press the ASCENT button “PS” on the pushbutton panel, to start up the lift motor which will raise the loading terminal. - Once the completely retracted point is reached, the ascent limit switch will switch off the lift motor. - At this point, the Telescopic Loader is ready for loading another truck. 02.13 START-UP AND STOP PROCEDURES VERFAHREN ZUR INBETRIEBNAHME UND ZUM AUSSCHALTEN PROCEDURE DE MISE EN MARCHE ET ARRET PROCEDURE DI AVVIAMENTO ED ARRESTO 2 TOR.173.--.M.4L 38 UNTERBRECHUNG DES SCHÜTTGUTFLUSSES VERLADEGARNITUR FÜR SILOFAHRZEUGE AUTOMATISCHE SEQUENZ - Das Schüttgut fällt in das Innere des Silofahrzeugs und der Füllstand nimmt zu, bis der Tank voll ist. - Sobald der Tank gefüllt ist, berührt das Schüttgut den Vollmelder in der Nähe des Verladekonuses der Verladegarnitur. - Der Vollmelder sendet ein Signal, das zum Unterbrechen des Verladevorgangs erforderlich ist (z.B. schließt einen Schieber oder schaltet einen Motor einer stromauf von der Verladegarnitur befindlichen Schnecke ab). - Nun beginnt die rückwärts ablaufende Zeit des Timers TMR, die der zuvor eingestellten Zeit entspricht (20-30 Sekunden). - Wenn diese Zeit abgelaufen ist, läuft der Hubmotor an und die Verladegarnitur wird eingefahren. - Die Verzögerung des Einfahrens wird durch den Timer TMR ausgelöst, wenn noch Schüttgut in der Verladegarnitur vorhanden ist, das ausgetragen werden muss. - Wenn die Verladegarnitur ganz eingefahren ist, schaltet der Endschalter den Hubmotor aus. - Nun ist die Verladegarnitur bereit, ein weiteres Silofahrzeug zu befüllen. ARRET DE L’ECOULEMENT ARRESTO DEL FLUSSO CHARGEURS POUR CAMION SCARICATORI PER CAMION OUVERT CISTERNA SEQUENCE AUTOMATIQUE - La matière qui tombe à l’intérieur de la citerne fait monter le niveau jusqu’au remplissage complet. - Quand la citerne est pleine, la matière touche l’indicateur de niveau placé à proximité de l bouche de déchargement du Chargeur Télescopique. - L’indicateur envoie un signal utilisable pour arrêter le chargement (ex. fermer une vanne ou éteindre un moteur d’une vis sans fin placée en amont du chargeur télescopique). - Le minuteur TMR commence le compte à rebours du temps réglé précédemment (20 à 30 secondes). - Une fois ce temps écoulé, le moteur de levage se mettra en marche pour soulever l’embout de déchargement. - Le retard de la montée provoqué par le minuteur TMR est nécessaire pour permettre à la matière présente dans le chargeur de s’écouler. - Une fois que le point entièrement rentré est atteint, le fin de course de la montée éteindra le moteur de levage. - Le Chargeur Télescopique est maintenant près à charger un autre camion. SEQUENZA AUTOMATICA -Il materiale, cadendo all’interno della cisterna accresce il suo livello, fino al riempimento completo. -Quando la cisterna sarà piena, il materiale toccherà l’indicatore di livello posto in prossimità della bocca di scarico dello Scaricatore Telescopico. -L’indicatore invia un segnale utilizzabile per arrestare il carico (es. chiudere una valvola o spegnere un motore di una coclea posta a monte dello scaricatore telescopico). -A questo punto il timer TMR inizia il suo conto alla rovescia uguale al tempo precedentemente impostato (20-30 secondi). -Una volta passato questo tempo si avvierà il motore di sollevamento che alzerà il terminale di scarico. -Il ritardo della salita provocato dal timer TMR è necessario per permettere al materiale ancora presente nello scaricatore di fuoriuscire. -Una volta raggiunto il punto di tutto retratto, il finecorsa della salita spegnerà il motore di sollevamento. -A questo punto lo Scaricatore Telescopico è pronto per il caricamento di un altro camion. MANUELLE SEQUENZ - Wenn man die Befüllung unterbrechen will, bevor das Silofahrzeug ganz gefüllt ist oder bevor das Schüttgut den Vollmelder berührt, ist die Taste SCHLIESSEN „PC” auf der Druckknopftafel zu drücken. - Dies führt zum Schließen des Schiebers oder zum Abschalten des Motors einer Schnecke oder eines Bands stromauf von der Verladegarnitur, womit die Befüllung unterbrochen wird. - Etwa 20-30 Sekunden abwarten, damit das Schüttgut auslaufen kann, das noch in der Verladegarnitur vorhanden ist. - Zum Starten des Hubmotors die Taste HEBEN „PS” auf der Druckknopftafel drücken. Die Verladegarnitur wird nun eingefahren. - Wenn die Verladegarnitur ganz eingefahren ist, schaltet der Endschalter den Hubmotor aus. - Nun ist die Verladegarnitur bereit, ein weiteres Silofahrzeug zu befüllen. SEQUENCE MANUELLE - Si on désire arrêter le chargement avant que la citerne ne soit complètement pleine, ou avant que la matière arrive à toucher l’indicateur de niveau, appuyer sur le bouton FERMETURE “PC” sur le boîtier de commandes. - Celui-ci fait fermer une vanne ou éteindre le moteur d’une vis sans fin ou d’une bande placé en amont du chargeur, en arrêtant le chargement. - Attendre un délai d’au moins 20 à 30 secondes pour permettre à la matière encore présente dans le chargeur de s’écouler. - Appuyer sur le bouton MONTÉE « PS » sur le boîtier de commandes, pour faire démarrer le moteur qui fait soulever l’embout de déchargement. - Une fois que le point entièrement rentré est atteint, le fin de course de la montée éteindra le moteur de levage. - Le Chargeur Télescopique est maintenant près à charger un autre camion. SEQUENZA MANUALE -Se si desidera arrestare il carico prima che la cisterna sia completamente piena, o prima che il materiale arrivi a toccare l’indicatore di livello, premere il pulsante CHIUSURA “PC” sulla pulsantiera. -Questo farà chiudere una valvola o spegnere il motore di una coclea o di un nastro posto a monte dello scaricatore, fermando il carico. -Aspettare un tempo di circa 2030 secondi per permettere al materiale ancora presente nello scaricatore di fuoriuscire. -Premere il pulsante SALITA “PS” sulla pulsantiera, per fare avviare il motore di sollevamento che alzerà il terminale di scarico. - Una volta raggiunto il punto di tutto retratto, il finecorsa della salita spegnerà il motore di sollevamento. -A questo punto lo Scaricatore Telescopico è pronto per il caricamento di un altro camion. ZG - ZH - 02.13 START-UP AND STOP PROCEDURES VERFAHREN ZUR INBETRIEBNAHME UND ZUM AUSSCHALTEN PROCEDURE DE MISE EN MARCHE ET ARRET PROCEDURE DI AVVIAMENTO ED ARRESTO 2 TOR.173.--.M.4L 39 LOADERS FOR OPEN TRUCKS VERLADEGARNITUR FÜR OF- CHARGEUR POUR CAMIONS SCARICATORI PER CAMION FENE LKW OUVERTS APERTI - When the built up material touches the indicator level present near the outlet spout, a signal is sent to the electric panel which raises the telescopic loader until the sensor is freed of material. -Meanwhile the material continues to fall, increasing its level which again touches the indicator, repeating the operation described above. -The sequence is repeated throughout the loading phase. -Unloading of material stops when the telescopic loader reaches the completely retracted position or if the CLOSE pushbutton “PC” on the pushbutton panel is pressed once the truck is filled. - In the latter case, wait for about 10-30 seconds to allow the material remaining in the loader to flow out. - Then press the ASCENT button “PS” on the pushbutton panel, keeping it pressed until the completely retracted position is reached, where the ascent limit stop will be activated and the electric motor will stop automatically. - Wenn das verladene Schüttgut den Vollmelder berührt, der in der Nähe des Auslaufs eingebaut ist, sendet dieser dem Seilwindenkasten ein Signal, was zum Einfahren der Verladegarnitur führt, bis der Sensor nicht mehr vom Schüttgut berührt wird. - Das Schüttgut läuft dann weiter aus, bis sein Stand so weit zugenommen hat, dass der Vollmelder erneut berührt wird, wonach der gleiche Vorgang sich wiederholt. - Die Sequenz wiederholt sich für den ganzen Befüllvorgang. - Die Befüllung des Schüttguts wird unterbrochen, wenn die Verladegarnitur die komplett eingefahrene Position erreicht hat oder wenn die Taste SCHLIESSEN „PC” auf der Druckknopftafel gedrückt wird, wenn der LKW voll ist, - Im letzteren Fall 10-20 Sekunden warten, damit das Schüttgut auslaufen kann, das noch in der Verladegarnitur vorhanden ist. - Danach die Taste HEBEN “PS” auf der Druckknopftafel gedrückt halten, bis die komplett eingefahrene Position erreicht ist, in der der Endschalter betätigt wird,der den Elektromotor automatisch zum Stehen bringt. - Quand l’accumulation de matière arrive à toucher l’indicateur de niveau présent à proximité de la bouche de déchargement, un signal est transmis au tableau électrique qui soulève le chargeur télescopique tant que le capteur n’est pas libéré de la matière. - Pendant ce temps la matière continue à tomber en augmentant son niveau jusqu’à toucher de nouveau l’indicateur en répétant l’opération précédente. - La séquence se répète pendant toute la phase de chargement. - Le déchargement de matière s’arrête si le chargeur télescopique atteint la position entièrement rentré ou si on enfonce le bouton de FERMETURE “PC”, sur le boîtier de commande une fois le plateau du camion rempli. - Dans ce dernier cas, attendre un délai d’au moins 10 à 20 secondes pour permettre à la matière encore présente dans le chargeur de s’écouler. - Après quoi, appuyer sur le bouton MONTÉE “PS” du boîtier de commande, en le maintenant enfoncé jusqu’à atteindre le point entièrement rentré, où le fin de course de montée s’actionnera et arrêtera automatiquement le moteur électrique. -Quando il cumulo di materiale arriva a toccare l’indicatore di livello presente in prossimità della bocca di scarico, questo manda un segnale al quadro elettrico che fa alzare lo scaricatore telescopico fino a quando il sensore non sia libero dal materiale. -Il materiale continua intanto a cadere incrementando il suo livello fino a toccare nuovamente l’indicatore ripetendo la stessa operazione precedente. -La sequenza si ripete per tutta la fase di carico. -Lo scarico del materiale si arresta se lo scaricatore telescopico raggiunge la posizione di tutto retratto o se viene premuto il pulsante di CHIUSURA “PC”, sulla pulsantiera una volta riempito il cassone del camion. -In quest’ultimo caso, aspettare 10 - 20 secondi per permettere al materiale ancora presente nello scaricatore di fuoriuscire. -Dopodichè, premere il pulsante SALITA “PS” della pulsantiera, tenendolo premuto fino al raggiungimento del punto di tutto retratto, dove il finecorsa salita si azionerà e fermerà il motore elettrico automaticamente. The loader is now ready for a Nun ist die Verladegarnitur für Le Chargeur Télescopique est A questo punto, lo scaricatore è new load. eine neue Befüllung bereit. maintenant près à un nouveau pronto per un nuovo carico. chargement. ZG - ZH Before carrying out any maintenance operation on the machine, set the loading bellows and the plant on which it is installed in safety condition. ADJUSTING THE LIMIT STOP 02.13 ENDSCHALTEREINSTELLUNG 2 REGLAGE DU FIN DE COURSE REGOLAZIONE FINE CORSA Bevor man irgendwelche Wartungsarbeiten an der Maschine ausführt, sind die Verladegarnitur und die Anlage, in die diese eingebaut ist, in den sicheren Zustand zu bringen. Avant d’effectuer une quelconque intervention d’entretien sur la machine, mettre le déchargeur télescopique et l’installation sur laquelle il est monté en sécurité. TOR.173.--.M.4L 40 Prima di effettuare un qualsiasi intervento di manutenzione sulla macchina, mettere in sicurezza lo scaricatore telescopico e l’impianto sul quale è installato. - L’opérateur doit atteindre les points - L’operatore deve raggiungere i punti di intervento in sicurezza. - The operator must be able to reach - Der Bediener muss die Stellen d’intervention en toute sécurité. the points for intervention in comerreichen, in der er den Eingriff in Le déchargeur télescopique est gé- Lo scaricatore telescopico è posizionato generalmente in quota, plete safety. Sicherheit ausführen kann. néralement positionné en hauteur; l’installatore dovrà indicare nel The loading bellows is usually posi- Die Verladegarnitur befindet sich l’installateur devra indiquer dans manuale d’uso l’utilizzo di idonea tioned at a height, so the installer in der Regel in einer gewissen le manuel d’utilisation l’emploi piattaforma mobile di lavoro ovmust indicate in the operation Höhe. Der Installateur muss in d’une plate-forme mobile de travero dovrà predisporre apposite manual the use of a suitable moder Betriebsanleitung in der Regel vail approprié et il devra mettre à strutture di accesso. In ogni caso bile work platform or must make die Benutzung einer geeigneten disposition des structures d’accès prima di ogni intervento sullo scaprovision for suitable access Arbeitsbühne vorschreiben bzw. spéciales. ricatore telescopico è necessario structures. muss er geeignete Zu-gangsmög- Avant toute intervention sur le fermare ed accertarsi dell’avvenuto arresto dell’intera macchina In any case, before any intervention licjkeiten vorsehen. déchargeur télescopique il faut e dell’impianto su cui è inserito lo on the loading bellows, it is neces- Vor jedem Eingriff an der Verlaarrêter et contrôler que l’arrêt de scaricatore telescopico. sary to stop the entire machine degarnitur ist es auf jeden Fall la machine et de l’installation dans and the plant on which the loading erforderlich, die ganze Maschine laquelle est inséré le déchargeur bellows is installed and make sure und die Anlage, in welche die télescopique est intervenu corthat it has actually come to a stop. Verladegarnitur eingebaut ist, rectement. zum Stillstand zu bringen und festzustellen, dass der Stillstand eingetreten ist. ADJUSTING THE UP/DOWN LIMIT EINSTELLUNG DES ENDSCHAL- RÉGLAGE DU FIN DE COURSE REGOLAZIONE FINE CORSA ALTO / BASSO STOP TERS OBEN/UNTEN HAUT / BAS (viene spedito già regolato) (adjusted before shipment) (wird bereits werksseitig einge- (il est fournI déjà réglé) stellt zum Versand gebracht) Adjusting the UP position (retracted) - Turn the main switch On; - Press the ASCENT button on the pushbutton panel so that the bellows reaches the fully retracted position [the length of the bellows in the fully retracted position must not be less than that indicated in the Tables in this Manual (see section 1)]; - turn the main switch Off; - unscrew the two black knobs to open the drive unit casing; - using a Phillips screwdriver slacken the two fixing screws on the box cover to adjust the limit stop; - by means of a slot screwdriver slacken the big central screw (a) - Turn screw N.2 (b) CLOCKWISE to retract the bellows even further - Turn screw N.2 (b) ANTICLOCKWISE to increase the length of the loader in the retracted position. Einstellung der Position OBEN (eingefahren) - Den Hauptschalter einschalten. - Die Taste HEBEN auf der Druckknopftafel betätigen, bis die Verladegarnitur sich in der völlig eingefahrenen Position befindet [die Länge der Verladegarnitur in der völlig eingefahrenen Position darf nicht kleiner sein als in den Tabellen dieses Handbuchs angegeben ist (siehe Teil 1)]. - Den Hauptschalter ausschalten. - Die beiden schwarzen Ballengriffe losschrauben, um die Verkleidungsplatte der Elektro-Seilwinde zu öffnen. - Mit einem Sternschraubenzieher die 2 Befestigungsschrauben des Kastendeckels losschrauben, um den Endschalter einstellen zu können. - Mit einem flachen Schraubenzieher die große zentrale Schraube (a) lockern. - Die Schraube N.2 (b) IM UHRZEIGERSINN drehen, um die Verladegarnitur noch weiter einzufahren. - Die Schraube N.2 (b) ENTGEGEN DEM UHRZEIGERSINN drehen, um die Länge der Verladegarnitur in der eingefahrenen Position zu verlängern. Réglage de la position HAUT (rentré) - Allumer l’interrupteur général; - Appuyer sur le bouton MONTÉE sur le panneau des boutons-poussoirs, tant que le déchargeur n’est pas dans la position entièrement rentrée [la longueur du déchargeur en position entièrement rentrée ne doit pas être inférieure de celle indiquée sur les tables de ce manuel (voir section 1)] ; - Eteindre l’interrupteur général; - Dévisser les deux pommeaux noirs pour ouvrir le carter de la motorisation; - Avec un tournevis cruciforme dévisser les 2 vis de fixation du couvercle du boîtier de réglage des fin de course ; - Avec un tournevis plat desserrer la grande vis centrale (a). - Tourner la vis N.2 (b) dans le sens HORAIRE pour faire rentrer encore plus le déchargeur. - Tourner la vis N.2 (b) dans le sens ANTIHORAIRE pour augmenter la longueur du déchargeur dans la position rentrée. Regolazione della posizione ALTO (retratto) - Accendere l’interruttore principale; - nella pulsantiera premere il pulsante SALITA fino che la scaricatore non sia in posizione di tutto retratto [ la lunghezza dello scaricatore in posizione di tutto retratto non deve essere inferiore a quella indicata sulle tabelle di questo manuale (vedi sezione 1)]; - spegnere l’interruttore principale; - svitare i due pomelli neri per aprire il carter della motorizzazione; - con cacciavite a stella svitare le 2 viti di fissaggio del coperchio della scatola per la regolazione dei finecorsa; - con cacciavite piatto allentare la vite grande centrale (a) - Girare la vite N.2 (b) in senso ORARIO per retrarre maggiormente lo scaricatore - Girare la vite N.2 (b) in senso ANTIORARIO per aumentare la lunghezza dello scaricatore in posizione retratta. - IMPORTANT: A rotation of 10 degrees of the adjuster screw - IMPORTANT : La rotation de la - IMPORTANTE : Considerare che una rotazione di 10 gradi della corresponds to a loader length - WICHTIG: Berücksichtigen, dass vis de réglage de 10 degrés corvite di registrazione corrisponde variation of 260mm. eine Drehung um 10 Grad der respond à une variation de la lonad una variazione della lunghezza - Retighten the big central screw (a) Stellschraube einer Längenändegueur du déchargeur de 260mm. dello scaricatore di 260mm. rung der Verladegarnitur um 260 - Serrer de nouveau la grande vis - Serrare di nuovo la vite centrale mm entspricht. centrale (a). grande(a) - Die große zentrale Schraube (a) wieder anziehen. ZG - ZH - 02.13 ADJUSTING THE LIMIT STOP ENDSCHALTEREINSTELLUNG 2 REGLAGE DU FIN DE COURSE REGOLAZIONE FINE CORSA TOR.173.--.M.4L 41 a c b Adjusting the position DOWN (extended) - Turn the main switch ON; - on the pushbutton, press the DESCENT pushbutton until the bellows reaches the completely extended position [the length of the bellows in the fully extended position must not be greater than that indicated in the Tables in this Manual (see section 1)]; - turn the main switch Off; - by means of a slot screwdriver slacken the big central screw (a). - Turn screw N.1 (c) CLOCKWISE to reduce the extension of the loader. - Turn screw N.1 (c) ANTICLOCKWISE to increase the extension of the loader. - IMPORTANT: A rotation of 10 degrees of the adjuster screw corresponds to a loader length variation of 260mm. - Retighten the big central screw (a). fig. 21 Einstellung der Position UNTEN (ausgefahren) - Den Hauptschalter einschalten. - Auf der Druckknopftafel die Taste SENKEN drücken, bis die Verladegarnitur sich in der völlig ausgefahrenen Position befindet [die Länge der Verladegarnitur in der völlig ausgefahrenen Position darf nicht größer sein, als in den Tabellen dieses Handbuchs angegeben (siehe Teil 1)]. - Den Hauptschalter ausschalten. - Mit einem flachen Schraubenzieher die große zentrale Schraube (a) lockern. - Die Schraube N.1 (c) IM UHRZEIGERSINN drehen, um die Verlängerung der Verladegarnitur zu reduzieren. - Die Schraube N.1 (c) ENTGEGEN DEM UHRZEIGERSINN drehen, um die Verlängerung der Verladegarnitur zu erhöhen. - WICHTIG: Berücksichtigen, dass eine Drehung um 10 Grad der Stellschraube einer Längenänderung der Verladegarnitur um 260 mm entspricht. - Die große zentrale Schraube (a) wieder anziehen. Réglage de la position BAS (sorti) - Allumer l’interrupteur général; - Appuyer sur le bouton DESCENTE sur le panneau des boutons-poussoirs, tant que le déchargeur n’est pas dans la position entièrement sortie [la longueur du déchargeur dans la position entièrement sortie ne doit pas être supérieure de celle indiquée sur les tables de ce manuel (voir section 1)] ; - Eteindre l’interrupteur général; - Avec un tournevis plat desserrer la grande vis centrale (a). - Tourner la vis N.1 (c) dans le sens HORAIRE pour réduire la sortie du déchargeur. - Tourner la vis N.1 (c) dans le sens ANTIHORAIRE pour augmenter la sortie du déchargeur. - IMPORTANT : La rotation de la vis de réglage de 10 degrés correspond à une variation de la longueur du déchargeur de 260mm. - Serrer la grande vis centrale (a). Regolazione della posizione BASSO (esteso) -Accendere l’interruttore principale; -nella pulsantiera premere il pulsante DISCESA fino che la scaricatore non sia in posizione di tutto esteso [ la lunghezza dello scaricatore in posizione di tutto esteso non deve essere superiore a quella indicata sulle tabelle di questo manuale (vedi sezione 1)]; -spegnere l’interruttore principale; -con cacciavite piatto allentare la vite grande centrale (a). -Girare la vite N.1 (c) in senso ORARIO per ridurre l’estensione lo scaricatore -Girare la vite N.1 (c)in senso ANTIORARIO per aumentare l’estensione dello scaricatore. -IMPORTANTE : Considerare che una rotazione di 10 gradi della vite di registrazione corrisponde ad una variazione della lunghezza dello scaricatore di 260mm. -S e r r a r e l a v i t e c e n t r a l e grande(a). At the end of each adjustment: Am Ende jeder Einstellung: - refit the limit stop box cover; - Den Deckel des Endschalterka- replace the drive unit casing, stens wieder aufsetzen. making sure the two knobs that - Die Verkleidung der Elektrosupport the guard are tightened Seilwinde wieder schließen correctly; und sicherstellen, dass die 2 - turn the main switch On and test Ballengriffe, die das Gehäuse the working of the loader. tragen, fest angeschraubt sind. - Den Hauptschalter einschalten und den Betrieb der Verladegarnitur prüfen. A la fin de chaque réglage : - remettre le couvercle du boîtier du fin de course. - refermer le carter de la motorisation en vérifiant de bien avoir serrer les 2 pommeaux qui soutiennent le carter. - allumer l’interrupteur général et vérifier le fonctionnement du déchargeur. Al termine di ogni regolazione: -posizionare il coperchio della scatola del finecorsa; -richiudere il carter della motorizzazione assicurandosi di avvitare per bene i 2 pomelli che sorreggono il carter; -accendere l’interruttore generale e verificare il funzionamento dello scaricatore. ZG - ZH - 02.13 INSPECTION AND REPLACEMENT OF SPARE PARTS INSPEKTION UND AUSTAUSCH DER ERSATZTEILE 2 CONTROLE REMPLACEMENT DES PIECES DETACHEES ISPEZIONE SOSTITUZIONE DEI PEZZI DI RICAMBIO Inspection of the “V” belt Inspektion des Keilriemens -Open the drive unit cover. -Check the “V” belt for wear. -Check slackening of the “V” belt (fig. 25) by pressing inwards. -Maximum slackening 10 mm. -Minimum slackening 5 mm. If the slack is not correct, proceed as follows: - slacken the 4 bolts (pos.1, Fig. 26 fixing the gear reducer (pos.2, Fig. 26 ). -Adjust the belt tension by sliding the reducer to the right to increase the tension and to the left to decrease it. -Check the belt tension, and repeat the procedure, if necessary. -If the “V” belt is worn, or it is impossible to correct the tension, contact the maintenance technician. -Refit the cover. -Die Verkleidungsplatte der Elektro-Seilwinde öffnen. -Den Verschleißgrad des Keilriemens prüfen. -Die Spannung des Keilriemens (Abb. 25) prüfen, indem man ihn eindrückt. -Max. Eindrückung 10 mm -Gedringste Eindrückung 5 mm Wenn die Riemenspannung falsch ist, folgendermaßen vorgehen: - Die 4 Schrauben (Pos. 1, Abb. 26 zur Befestigung des Getrie-bes (Pos. 2, Abb. 26 ) lockern. -Die Riemenspannung einstellen, indem man das Getriebe nach rechts gleiten läßt, um sie zu erhöhen, oder nach links, um sie zu verringern. -Die 4 Schrauben wieder anziehen. -Die Riemenspannung erneut überprüfen und die Prozedur ggfls. wiederholen. -Wenn der Keilriemen verschlissen ist oder wenn die Spannung sich nicht richtig einstellen läßt, Wartungspersonal verständigen. -Die Verkleidungsplatte der Elektro-Seilwinde wieder montieren. Contrôle de la courroie trapézoïdale -Ouvrir le couvercle de la motorisation. -Contrôler la courroie trapézoïdale pour vérifier le degré d’usure. -Contrôler la tension de la courroie trapézoïdale (fig. 25) en l’appuyant vers l’intérieur. -Relâchement maximum 10 mm. -Relâchement minimum 5 mm. Si la tension n’est pas correcte procéder de la manière suivante: - desserrer les 4 boulons (pos. 1, fig. 26 de fixation du réducteur (pos. 2, fig. 26). -Régler la tension de la courroie en faisant coulisser le réducteur vers la droite pour l’augmenter et vers la gauche pour la diminuer. -Revisser les 4 boulons. -Contrôler de nouveau la tension de la courroie et si nécessaire répéter la procédure. -Si la courroie trapézoïdale est usée ou s’il est impossible de régler correctement la tension, informer le technicien d’entretien. -Remonter le couvercle. TOR.173.--.M.4L 42 Ispezione della cinghia trapezoidale -Aprite il coperchio della motorizzazione. -Ispezionate la cinghia trapezoidale per verificarne il grado di usura. -Controllate l’allentamento della cinghia trapezoidale (fig.25) premendola verso l’interno. -Allentamento massimo 10 mm. -Allentamento minimo 5 mm. Se l’allentamento non è corretto, procedere come segue: -allentare i 4 bulloni (pos.1, fig. 26 di fissaggio del riduttore (pos.2, fig. 26 ). -Regolate la tensione della cinghia facendo scorrere il riduttore verso destra per aumentarla, verso sinistra per diminuirla. -Riavvitate i 4 bulloni. -Controllate nuovamente il tensionamento della cinghia e ripetere la procedura, se necessario. -Se la cinghia trapezoidale è consumata, o se è impossibile regolarne un corretto tensionamento, informate il vostro tecnico addetto alla manutenzione. -Rimontate il coperchio. fig.24 5-10mm 1 fig.25 fig.26 2 ZG - ZH - 02.13 INSPECTION AND REPLACEMENT OF SPARE PARTS INSPEKTION UND AUSTAUSCH DER ERSATZTEILE 2 CONTROLE REMPLACEMENT DES PIECES DETACHEES ISPEZIONE SOSTITUZIONE DEI PEZZI DI RICAMBIO TOR.173.--.M.4L 43 REMOVING THE ENTIRE BELLOWS UNIT - AUSBAU DER KOMPLETTEN BALGEINHEIT DEPOSE DU GROUPE SOUFFLETS COMPLET - RIMOZIONE DEL GRUPPO SOFFIETTI COMPLETO Before every maintenance operation, set the telescopic loader and the plant on which it is installed in safety conditions. The operator must be able to reach the operating points in complete safety in accordance with the regulations in force, and must always use the protective equipment, such as safety dustproof masks, goggles, hard hat, overalls and protective footwear. Vor der Durchführung von Wartungsarbeiten jeder Art sind die Verladegarnitur und die Anlage, in die sie eingebaut ist, in den sicheren Zustand zu bringen. Der Bediener muss die Eingriffsstellen in voller Sicherheit gemäß den geltenden Bestimmungen erreichen, immer die entsprechenden persönlichen Schutzausrüstungen tragen, wie Feinstaubmaske, Schutzbrille, Schutzhelm, Arbeitsoverall und Unfallschuhwerk. Avant d’effectuer une quelconque intervention d’entretien sur la machine, mettre le chargeur télescopique et l’installation sur lequel il est monté en sécurité. L’opérateur doit atteindre les points d’intervention en toute sécurité suivant les normes en vigueur, en portant toujours vêtements de protection appropriés, tels que masque anti-poussière, lunettes, casque, combinaison complète et chaussure de sécurité. Prima di ogni intervento di manutenzione, mettere in sicurezza lo scaricatore telescopico e l’impianto sul quale è installato. L’operatore deve raggiungere i punti di intervento in completa sicurezza secondo le normative vigenti, indossando sempre gli appositi indumenti protettivi, quali maschera antipolvere, occhiali, casco, tuta completa e scarpe antinfortunistiche. For replacing the bellows, press the “DESCENT” button on the pushbutton panel until the telescopic loader comes to the fully extended position. Zum Austausch der Bälge die Taste „SENKEN” auf der Druckknopftafel betätigen, bis die Verladegarnitur sich in der komplett ausgefahrenen Position befindet Pour remplacer les soufflets, appuyer sur le bouton “DESCENTE” sur le boîtier de commandes jusqu’à placer le chargeur télescopique dans la position entièrement sorti. Per la sostituzione dei soffietti, premere il pulsante “DISCESA” sulla pulsantiera fino a portare lo scaricatore telescopico nella posizione di tutto esteso. Using a pair of scissors, cut the clamps fixing the electric cables along the entire length of the outer bellows, taking care to avoid damaging the bellows and the electric cables. Mit einer Schere die Kabelbinder durchschneiden, mit denen die Stromkabel auf der gesamten Länge des Außenbalgs befestigt werden. Dabei ist zu beachten, dass man den Balg und die Stromkabel nicht beschädigt. A l’aide d’une paire de ciseaux, copier les colliers qui fixent les câbles électriques sur toute la longueur du soufflet extérieur, en faisant attention à ne pas endommager le souffler et les câbles électriques. Utilizzando un paio di forbici, tagliare le fascette che fissano i cavi elettrici su tutta la lunghezza del soffietto esterno, facendo attenzione a non danneggiare il soffietto stesso ed i cavi elettrici. Using a screwdriver, slacken the lower outer clamp, by unscrewing the locking screw, and remove the end of the bellows from the metal cone. Slacken the lower inner clamp, by unscrewing the locking screw, and remove the end of the bellows from the metal cone. Mit einem Schraubenzieher den unteren externen Binder lockern, indem man die Schraube löst und dann das Ende des Balgs aus dem Metallkonus herauszieht. Den unteren innenliegenden Binder lockern, indem man die Schraube löst und dann das Ende des Balgs aus dem Metallkonus herauszieht. A l’aide d’un tournevis, desserrer le collier inférieur extérieur et retirer l’extrémité du soufflet du cône métallique. Desserrer le collier inférieur intérieur en dévissant la vis de blocage et retirer l’extrémité du soufflet du cône métallique. Con un cacciavite, allentare la fascetta inferiore Esterna svitando la vite di bloccaggio, e sfilare l’estremità del soffietto dal cono metallico. Allentare la fascetta inferiore Interna svitando la vite di bloccaggio e sfilare l’estremità del soffietto dal cono metallico. ZG - ZH - INSPECTION AND REPLACEMENT OF SPARE PARTS INSPEKTION UND AUSTAUSCH DER ERSATZTEILE CONTROLE REMPLACEMENT DES PIECES DETACHEES ISPEZIONE SOSTITUZIONE DEI PEZZI DI RICAMBIO 02.13 2 TOR.173.--.M.4L 44 Press the “ASCENT” button on the pushbutton panel to bring the telescopic loader to the completely retracted position. Die Taste „HEBEN” auf der Druckknopftafel drücken, um die Verladegarnitur in die Position „komlett eingefahren“ zu bringen. Appuyer sur le bouton “MONTÉE” sur le boîtier de commandes pour placer le chargeur télescopique dans la position entièrement rentré. Premere il pulsante “SALITA” sulla pulsantiera per portare lo scaricatore telescopico alla posizione di tutto retratto. Slacken the Outer and Inner upper clamps and release both bellows from the upper head section. Den oberen Binder innen und außen lockern und beide Bälge vom Oberkopf befreien. Desserrer le collier supérieur Extérieur et Intérieur et libérer les deux soufflets de la tête supérieure. Allentare la fascetta superiore Esterna ed Interna e liberare entrambi i soffietti dalla testata superiore. Press the “DESCENT” button on the pushbutton panel to extend the telescopic loader bringing the lower terminal to rest against a support (for example, the forks of a lift truck), in such a manner as to slacken the lifting cables. Die Taste „SENKEN” auf der Druckknopftafel drücken, um die Verladegarnitur in die Position „komplett ausgefahren“ zu bringen und den Auslaufkonus auf einem Träger abstützen (z.B. Gabeln eines Gabelstaplers), um die Hubseile zu lockern. Appuyer sur le bouton “DESCENTE” sur le boîtier de commandes pour déployer le chargeur télescopique en faisant appuyer l’embout inférieur sur un support (exemple : fourches d’un chariot), de manière à desserrer les câbles de levage. Premere il pulsante “DISCESA” sulla pulsantiera per estendere lo scaricatore telescopico facendo appoggiare il terminale inferiore su di un supporto (esempio: forche di un muletto), in modo da allentare i cavi di sollevamento. Remove the lifting cables through the opening to the LH of the cable guide bolts present along the length of the bellows. Die Hubseile durch die linke Öffnung der Seilführungsschrauben stecken, die auf der ganzen Länge des Balgs vorhanden sind. Retirer les câbles de levage à travers l’ouverture à gauche des vis guide-câble présentes sur la longueur du soufflet. Sfilare i cavi di sollevamento attraverso l’apertura a sinistra delle viti guidacavo presenti sulla lunghezza del soffietto. ZG - ZH - 02.13 INSPECTION AND REPLACEMENT OF SPARE PARTS INSPEKTION UND AUSTAUSCH DER ERSATZTEILE 2 CONTROLE REMPLACEMENT DES PIECES DETACHEES ISPEZIONE SOSTITUZIONE DEI PEZZI DI RICAMBIO TOR.173.--.M.4L 45 Remove the lifting cables through the opening to the RH of the cable guide bolts present along the length of the bellows. Die Hubseile durch die rechte Öffnung der Seilführungsschrauben stecken, die auf der ganzen Länge des Balgs vorhanden sind. Retirer les câbles de levage à travers l’ouverture à droite des vis guide-câble présentes sur la longueur du soufflet.o. Sfilare i cavi di sollevamento attraverso l’apertura a destra delle viti guidacavo presenti sulla lunghezza del soffietto. When all the cable guide bolts have been freed from both the lifting cables, the bellows can be removed, taking care to make sure they do not fall. Wenn alle Seilführungsschrauben beider Hubseile frei sind, kann man die Bälge herausnehmen, wobei zu beachten ist, dass diese nicht herunterfallen. Quand toutes les vis guide-câble on été libérées des deux câbles de levage, on peut déposer les soufflets en faisant attention à ne pas les faire tomber. Quando tutte le viti guidacavo sono state liberate da entrambi i cavi di sollevamento, si possono rimuovere i soffietti, facendo attenzione a non farli cadere. REPLACING THE LIFTING CABLES - AUSTAUSCH DER HUBSEILE REMPLACEMENT DES CABLES DE LEVAGE - SOSTITUZIONE DEI CAVI DI SOLLEVAMENTO The cables must be replaced if Falls die Drahtseile verschlissen SI les câbles sont usés, il faut les Nel caso che anche i cavi siano usurati, occorrerà eseguire la loro they get worn. sind, muss man sie erneuern. remplacer. sostituzione. REMOVING THE LIFTING CA- ENTFERNUNG DER HUBSEILE DÉPOSE DES CABLES DE RIMOZIONE DEI CAVI DI SOLLEVAMENTO BLES LEVAGE Slacken the two M12 nuts with No. 19 spanner, and free the cable clamp from the fixing bracket. Repeat the operation for the second cable, taking care to make sure the lower part of the loader does not fall to the ground. Die beiden Muttern M12 mit einem 19er Schlüssel lockern und die Seilverankerung aus dem Verankerungsbügel lösen. Den Vorgang mit dem zweiten Seil wiederholen, wobei zu beachten ist, dass der untere Teil der Verladegarnitur nicht herunterfällt. Desserrer les deux écrous M12 avec une clé de 19, et libérer la pièce de serrage du câble de l’étrier d’ancrage. Répéter l’opération même pour le deuxième câble, en faisant attention à ce que la partie inférieure du chargeur ne tombe pas par terre. Allentare i due dadi M12 con una chiave numero 19, e liberare il ferma cavo dalla staffa di ancoraggio. Ripetere l’operazione anche per il secondo cavo, facendo attenzione che la parte inferiore dello scaricatore non cada a terra. ZG - ZH - 02.13 INSPECTION AND REPLACEMENT OF SPARE PARTS INSPEKTION UND AUSTAUSCH DER ERSATZTEILE 2 CONTROLE REMPLACEMENT DES PIECES DETACHEES ISPEZIONE SOSTITUZIONE DEI PEZZI DI RICAMBIO TOR.173.--.M.4L 46 After opening the drive unit enclosure cover, it is possible to access the clamp that blocks the cable in the pulleys. (This is only present when the cable is originally mounted by the Manufacturer). Nach dem Öffnen des Deckels des Seilwindenkastens erhält man Zugang zu der Klemme, die das Seil an den Seilscheiben blockiert. (Diese ist nur dann vorhanden, wenn das Seil ursprünglich vom Hersteller montiert wurde). Après avoir ouvert le couvercle du boîtier motorisation, on a accès au mors qui bloque le câble dans les poulies. (Celui-ci est présent seulement quand le câble est monté d’origine par le Constructeur). Dopo aver aperto il coperchio della cassetta motorizzazione, si ha accesso al morsetto che blocca il cavo nelle pulegge. (Questo è presente solamente quando il cavo è originariamente montato dal Costruttore). Using a cutter for steel cables, cut the cable between the clamp and pulley. The cable can now be removed from the pulley and from the loader. Repeat the operation for the second cable Einen Drahtseilschneider benutzen, um das Seil zwischen Klemme und Scheibe abzutrennen. Nun kann man das Seil von der Seilscheibe herunterziehen und endgültig aus der Verladegarnitur entfernen. Beim zweiten Seil in gleicher Weise vorgehen. En utilisant une pince pour câbles d’acier, couper le câble entre le mors et la poulie. On peut maintenant retirer le câble de la poulie et l’enlever définitivement du chargeur. Effectuer la même opération aussi pour le deuxième câble. Utilizzando una tronchese per cavi di acciaio, tagliare il cavo fra il morsetto e la puleggia. A questo punto è possibile sfilare il cavo dalla puleggia, e toglierlo definitivamente dallo scaricatore. Eseguire la stessa operazione anche per il secondo cavo. ASSEMBLING THE LIFTING EINBAU DER HUBSEILE CABLES MONTAGE DES CABLES DE MONTAGGIO DEI CAVI DI SOLLEVAGE LEVAMENTO Using a No.17 spanner, unscrew the M10 nut and bolt to be able to remove the nylon return pulley present on either side of the head section Unter Verwendung eines 17er Schlüssels die Muttern und die Schraube M10 lösen, um die Nylonumlenkscheibe auf den beiden Seiten des Oberkopfs herausziehen zu können. En utilisant deux clés n. 17, dévisser l’écrou et le boulon M10 pour pouvoir retirer la poulie de renvoi en nylon, placée sur les deux côtés de la tête. Utilizzando due chiavi numero 17, svitare il dado ed il bullone M10 per poter sfilare la puleggia in nylon di rinvio, posta ai due lati della testata. Take the new cable from the side opposite to that where the threaded cable clamp is present. Das neue Seil von der Seite nehmen, die der gegenüberliegt, auf der sich die Seilgewindearretierung befindet. Prendre le câble neuf du côté opposé à celui où se trouve le serre câble fileté. Prendere il cavo nuovo dal lato opposto a quella dove è presente il ferma cavo filettato. ZG - ZH - 02.13 INSPECTION AND REPLACEMENT OF SPARE PARTS INSPEKTION UND AUSTAUSCH DER ERSATZTEILE 2 CONTROLE REMPLACEMENT DES PIECES DETACHEES ISPEZIONE SOSTITUZIONE DEI PEZZI DI RICAMBIO TOR.173.--.M.4L 47 Pass the cable above the nylon return pulley, and taking care not to remove the cable, refit the M10 nut and bolt to fix the pulley in its seat. Das Seil über die Nylonumlenkscheibe legen und dabei darauf achten, dass das Seil nicht ausfranst. Die Mutter und die Schraube M10 erneut anziehen, um die Scheibe an ihrem Sitz zu befestigen. Faire passer le câble sur la poulie de renvoi en nylon, et en faisant attention à ne pas ôter le câble, visser de nouveau l’écrou et le boulon M10 pour fixer la poulie dans son logement. Fare passare il cavo sopra la puleggia in nylon di rinvio, e facendo attenzione a non sfilare il cavo, avvitare nuovamente il dado ed il bullone M10 per fissare la puleggia nella sua sede. Insert the cable from the rear part of the drive unit enclosure, through the two openings. Das Seil vom hinteren Teil des Seilwindenkastens durch die beiden Schlitze einführen. Entrer le câble du côté arrière du boîtier motorisation, à travers les deux fenêtres. Entrare con il cavo dalla parte posteriore della cassetta motorizzazione, attraverso le due finestrelle. Pass the cable above the cable guide pulley and push it inwards. Das Seil über die Seilführungsscheibe leiten und nach innen drücken. Passer le câble sur la poulie guide câble et le pousser vers l’intérieur. Passare il cavo sopra la puleggia guida cavo, e spingerlo verso l’interno. Insert the cable into the pulley and wind it at least through one turn around the inner hub. Das Seil in das Innere der Scheibe eintreten lassen und mindestens um eine Umdrehung um die Innennabe aufwickeln. Faire entrer le câble à l’intérieur de la poulie et l’enrouler au moins pour un tour autour du moyeu interne. Fare entrare il cavo all’interno della puleggia ed avvolgerlo per almeno un giro intorno al mozzo interno. Pull out the end of the lifting cable by about 5cm through the slit present on the inner side of the pulley. Das Ende des Hubseils um circa 5 cm aus dem Schlitz austreten lassen, der auf der Innenseite der Scheibe vorhanden ist. Faire sortir l’extrémité du câble de levage de 5 cm environ par la fissure présente sur le côté interne de la poulie. Fare uscire l’estremità del cavo di sollevamento per circa 5 cm. dalla fessura presente sul lato interno della puleggia. ZG - ZH - INSPECTION AND REPLACEMENT OF SPARE PARTS INSPEKTION UND AUSTAUSCH DER ERSATZTEILE CONTROLE REMPLACEMENT DES PIECES DETACHEES ISPEZIONE SOSTITUZIONE DEI PEZZI DI RICAMBIO 02.13 2 TOR.173.--.M.4L 48 Block the end of the cable with two clamps for each pulley. (Supplied with the bellows spare parts KIT). This blocking must be done in compliance with the relative regulations. Das Ende des Seils auf jeder Seilscheibe mit den beiden Klemmen blockieren (werden mit Ersatzteil-Bausatz der Bälge geliefert). Diese Blockierung muss in Übereinstimmung mit den geltenden Normen durchgeführt werden. Bloquer l’extrémité du câble avec deux mors pour chaque poulie. (Fournis avec le KIT des pièces détachées des soufflets). Ce blocage doit être effectué conformément aux normes correspondantes. Bloccare l’estremità del cavo con due morsetti per ogni puleggia. (Forniti con il KIT di ricambio dei soffietti). Questo bloccaggio deve essere effettuato in conformità alle relative norme. Repeat the operation for the second lifting cable. Den gleichen Arbeitsgang auch für das zweite Hubseil ausführen. Répéter l’opération aussi pour le deuxième câble de levage. Ripetere l’operazione anche per il secondo cavo di sollevamento. Support the lower part of the telescopic loader. Den unteren Teil der Verladegarnitur abstützen. Soutenir la partie inférieure du chargeur télescopique. Sostenere la parte inferiore dello scaricatore telescopico. Secure the cable retainer by means of twp M12 nuts to the fixing bracket for both lifting cables. Für beide Hubseile die Arretierung des Seils am Verankerungsbügel mit den beiden Schrauben M12 absichern. Bloquer avec deux écrous M12 le serre câble à l’étrier d’ancrage des deux câbles de levage. Assicurare con due dadi M12 il ferma cavo alla staffa di ancoraggio per entrambi i cavi di sollevamento. ZG - ZH - 02.13 INSPECTION AND REPLACEMENT OF SPARE PARTS INSPEKTION UND AUSTAUSCH DER ERSATZTEILE 2 CONTROLE REMPLACEMENT DES PIECES DETACHEES ISPEZIONE SOSTITUZIONE DEI PEZZI DI RICAMBIO TOR.173.--.M.4L 49 ASSEMBLING THE ENTIRE BELLOWS UNIT - EINBAU DER KOMPLETTEN BALGEINHEIT MONTAGE DU GROUPE SOUFFLETS COMPLET - MONTAGGIO DEL GRUPPO SOFFIETTI COMPLETO After checking to make sure both lifting cables are in good condition, or after replacing them with new ones, proceed with assembly of the entire bellows unit. Nach der Feststellung des einwandfreien Zustands der beiden Hubkabel oder nach dem Austausch durch neue kann der Einbau der kompletten Balgeinheit vorgenommen werden. Après avoir contrôlé le bon état des deux câbles de levage, ou après les avoir remplacer par des neufs, on peut monter le groupe des soufflets complet. Una volta controllato il buono stato di entrambi i cavi di sollevamento, o dopo averli sostituiti con dei nuovi, si può passare al montaggio del gruppo soffietti completo. Press the “DESCENT” button on the pushbutton panel. After lowering the loader, position the bellows unit between the loading terminal and the upper head section. Die Taste SENKEN auf der Druckknopftafel drücken. Nach dem Ausfahren der Verladegarnitur die Balggruppe zwischen dem Aufsetzkonus und dem Oberkopf anordnen. Appuyer sur le touche “DESCENTE” sur le boîtier de commandes. Après avoir abaissé le chargeur, placer le groupe soufflet entre l’embout de déchargement et la tête supérieure. Premere il tasto “DISCESA” sulla pulsantiera. Dopo aver abbassato lo scaricatore, posizionare il gruppo soffietti fra terminale di scarico e la testata superiore. Fix the inner and outer bellows to the loading terminal, tightening the fixing clamps by means of a screwdriver. Den Innenbalg und den Außenbalg am Aufsetzkonus befestigen und die Seilklemmen mit einem Schraubenzieher anziehen. Fixer le soufflet interne et externe à l’embout de déchargement, en serrant les colliers de blocage avec un tournevis. Fissare il soffietto interno ed esterno al terminale di scarico, stringendo le fascette di bloccaggio con un cacciavite. Press the “ASCENT” button on the pushbutton panel. After retracting the loader, fix the inner and outer bellows to the upper head section, tightening the fixing clamps by mean of a screwdriver. Die Taste „HEBEN” auf der Druckknopftafel drücken. Nach dem Einfahren der Verladegarnitur den Innen- und den Außenbalg am Oberkopf befestigen, indem man die Bänder zur Befestigung mit einem Schraubenzieher anschraubt. Appuyer sur le touche “MONTÉE” sur le boîtier de commandes. Après avoir rentré le chargeur, fixer le soufflet interne et externe à la tête supérieure, en serrant les colliers de blocage avec un tournevis. Premere il tasto “SALITA” sulla pulsantiera. Dopo aver retratto lo scaricatore, fissare il soffietto interno ed esterno alla testata superiore, stringendo le fascette di bloccaggio con un cacciavite. Press the “DESCENT” button on the pushbutton panel and extend the loader. Support the lower part so that the cables are slackened slightly. Insert both cables into the cable guide bolts. The bellows unit is now mounted. Die Taste „SENKEN” auf der Druckknopftafel drücken und die Verladegarnitur ausfahren. Den unteren Teil abstützen, damit die Seile etwas schlaff sitzen. Beide Seile in die Seilführungsschrauben stecken. Damit ist die Balgeinheit fertig montiert. Appuyer sur le touche “DESCENTE” sur le boîtier de commandes et déployer le chargeur. Soutenir la partie inférieure de manière à ce que les câbles soient légèrement détendus. Faire entrer les deux câbles dans les vis guide-câble. Le groupe des soufflets est maintenant monté. Premere il tasto “DISCESA” sulla pulsantiera ed estendere lo scaricatore. Sostenere la parte inferiore in modo da avere i cavi leggermente allentati. Fare entrare entrambi i cavi all’interno delle viti guidacavo. A questo punto il gruppo soffietti è montato. ZG - ZH If a level indicator or another utility (vibrator) that requires the connection of an electric cable between the lower and upper part is present, proceed as follows: 02.13 INSPECTION AND REPLACEMENT OF SPARE PARTS INSPEKTION UND AUSTAUSCH DER ERSATZTEILE 2 CONTROLE REMPLACEMENT DES PIECES DETACHEES ISPEZIONE SOSTITUZIONE DEI PEZZI DI RICAMBIO Wenn ein Vollmelder oder ein anderer Stromverbraucher (Unwuchtmotor) vorhanden ist, der den Anschluss an ein Stromkabel zwischen dem oberen und dem unteren Teil erfordert, ist wie folgt vorzugehen: Si l’indicateur de niveau ou un autre point d’utilisation est prévu (vibrateur) qui exige la connexion d’un câble électrique entre la partie inférieure et supérieure, procéder de la manière suivante : TOR.173.--.M.4L 50 Se presente l’indicatore di livello od un’altra utenza (vibratore) che richieda il collegamento di un cavo elettrico fra la parte inferiore e superiore, procedere come segue: Bring the loader to the fully extended position. From the second lowest ring, press with the tip of a plastic cable clamp on the lower part of the black strip sewn horizontally, and taking care to avoid damaging the bellows, insert it through the back of the steel ring and bring it out above the strip. (See Fig. 33). Die Verladegarnitur bis zur Endposition ausfahren. Vom zweiten Ring ab nach unten mit der Spitze eines Kabelbinders aus Kunststoff auf den unteren Teil des schwarzen Streifens drücken, der in waagerechter Richtung aufgenäht ist. Darauf achten, dass der Balg nicht beschädigt wird, wenn man den Kabelbinder hinter dem Stahlring durchführt und über dem Streifen austreten lässt (siehe Abb. 33). Placer le chargeur dans la position entièrement déployé. A partir du deuxième anneau le plus bas, appuyer la pointe d’un collier serre-câble en plastique contre la partie inférieure de la bande noire cousue dans le sens horizontal, et en faisant bien attention à ne pas endommager le soufflet, la faire passer derrière l’anneau en acier et sortir au-dessus de la bande. (Voir fig. 33). Portare lo scaricatore nella posizione tutto esteso. Dal secondo anello più in basso, premere con la punta di una fascetta stringi cavo in plastica sulla parte inferiore delle striscia nera cucita in senso orizzontale, e facendo bene attenzione a non danneggiare il soffietto, farla passare dietro l’anello d’acciaio ed uscire sopra la striscia (vedi fig. 33). Repeat the operation every two horizontal strips, taking care to make sure they are all approximately on the same vertical line Den gleichen Arbeitsgang alle zwei waagerechten Streifen wiederholen, wobei darauf zu achten ist, dass man in etwas die gleiche vertikale Linie beibehält. Répéter la même opération toutes les deux bandes horizontales, en faisant attention qu’elles soient toutes sur la même ligne verticale. Ripetere la stessa operazione ogni due strisce orizzontali, facendo attenzione che siano tutte circa sulla stessa linea verticale. Fix the electric cable to the clamp with an “S” configuration, in such a way that even with the loader extended the cable is still sufficiently slack. Das Stromkabel mit einer „S”-förmigen Konfiguration an den Kabelbindern befestigen, damit das Kabel auch bei ausgefahrener Verladegarnitur noch ausreichend lang ist. Fixer le câble électrique aux colliers avec une configuration en “S”, de manière à ce que même quand le chargeur est déployé, le câble soit suffisamment détendu. Fissare il cavo elettrico alle fascette con una configurazione ad “S”, in modo che anche con scaricatore esteso, il cavo abbia ancora un allentamento sufficiente. Example - Beispiel - Exemple - Esempio ZG - ZH Replacing the external bellows -Slacken the lock nuts and tensioners (pos. 4/9, Fig. 30-30a). -Unscrew and remove the eyebolts (pos. 5, fig. 30-30b). -You can now remove the external bellows from the internal one (pos. 7). -Replace the external bellows and re-assemble the unit by repeating the procedure in the reverse order. 02.13 INSPECTION AND REPLACEMENT OF SPARE PARTS INSPEKTION UND AUSTAUSCH DER ERSATZTEILE 2 CONTROLE REMPLACEMENT DES PIECES DETACHEES ISPEZIONE SOSTITUZIONE DEI PEZZI DI RICAMBIO Remplacement du soufflet extérieur -Desserrer les contre-écrous et les tendeurs (Pos. 4/9, fig. 3030a). -Dévisser et enlever les vis à oeillet (pos. 5, fig. 30-30b). -Puis sortir le soufflet extérieur (pos. 6) du soufflet intérieur (pos. 7). -Remplacer le soufflet extérieur et l’assembler en procédant dans l’ordre inverse. Austausch des Außenbalges -Die Kontermuttern und Spannvorrichtungen lockern. (Pos. 4/9, Abb. 30-30a) lockern. -Die Ringschrauben (Pos. 5, Abb. 30-30b) lösen und entfernen. -Der Außenbalg (Pos. 6) kann nun vom Innenbalg (Pos. 7) entfernt werden. -Den Außenbalg ersetzen und wieder einbauen, indem man in umgekehrter Reihenfolge vorgeht. 9 • Lock nut (9) Gegenmutter (9) Contre-écrou (9) Controdado (9) •4 7 • Internal bellows Innenbalg Soufflet intérieur Soffietto interno TOR.173.--.M.4L 51 Sostituzione del soffietto esterno -Allentate i controdadi e i tenditori (pos.4/9, fig.30 e 30a). -Svitate e rimuovete le viti ad occhiolo (pos.5, fig.30 e 30b). -Quindi potete rimuovere il soffietto esterno (pos.6) da quello interno (pos.7). -Sostituite il soffietto esterno e riassemblatelo effettuando il procedimento inverso. 6• External bellows Außenbalg Soufflet extérieur Soffietto esterno Tensioner (4) Spannvorrichtung (4) Tendeur (4) Tenditore (4) fig.30a • fig.30 Eyebolt Schrauböse Vis à oeillet Vite a occhiolo fig.30b Replacing the internal bellows -Loosen the bolts (item 4/9, fig. 30-30a). -The internal bellows (item 7) can now be removed from the external bellows (item 6). -Replace the internal bellows and re-assemble the unit by following the procedure in the reverse order. Ersetzen des Innenbalgs -Die Schrauben (Pos. 4/9, Abb. 30-30a) lockern. -Innenbalg (Pos. 7) kann nun vom Außenbalg (Pos. 6) getrennt werden. -Den Innenbalg ersetzen und wieder einbauen, indem man in umgekehter Reihenfolge vorgeht. Remplacement du soufflet intérieur -Desserrer les boulons (pos. 4/9, fig. 30-30a). -Puis sortir le soufflet intérieur (pos. 7) du soufflet extérieur (pos. 6). -Remplacer le soufflet intérieur et l’assembler en procédant dans l’ordre inverse. Sostituzione del soffietto interno -Allentate i bulloni (pos. 4/9, fig. 30 e 30a). -Ora potete rimuovere il soffietto interno (pos.7) dal soffietto esterno (pos.6). -Sostituite il soffietto interno e riassemblatelo effettuando il procedimento inverso. The earlier instructions concern the configuration of double bellows, with or without internal cones. If a loader with single bellows is used, see the following indications: Die obenstehenden Anleitungen beziehen sich auf die Konfiguration mit Doppelbalg, mit oder ohne Innenkonen. Wenn eine Verla-degarnitur mit Einzelbalg ver-wendet wird, sind folgende Anlei-tungen zu befolgen: Les précédentes instructions concernent la configuration du double soufflet, avec ou sans cônes internes. Si vous utilisez un chargeur à simple soufflet, lire les remarques suivantes : Le precedenti istruzioni sono relative alla configurazione di soffietto doppio, con o senza coni interni. In caso utilizziate uno scaricatore con soffietto singolo, vedere le precisazioni seguenti: ZG - ZH - 02.13 INSPECTION AND REPLACEMENT OF SPARE PARTS INSPEKTION UND AUSTAUSCH DER ERSATZTEILE 2 CONTROLE REMPLACEMENT DES PIECES DETACHEES ISPEZIONE SOSTITUZIONE DEI PEZZI DI RICAMBIO TOR.173.--.M.4L 52 Single bellows with internal Einzelbalg mit Innenkonen: Souffler simple à cônes in- Soffietto singolo con coni incones: Der Innenkonus wird an vier ternes : terni : the internal cone will be fixed at Stellen an der Innenwand des le cône interne sera fixé en cono interno sarà fissato in quatfour points on the inner wall of Außenbalgs befestigt (Durch- quatre points sur la paroi interne tro punti sulla parete interna del the external bellows (diam.610 messer 610 mm). In diesem Fall du soufflet extérieur (diam. 610 soffietto esterno (diam.610 mm). mm). In this case, two tighteners fehlen, wie man in der Abb. 30 mm). Dans ce cas, par rapport In questo caso, rispetto a quanto will be missing in comparison a erkennen kann, zwei Spanner. à ce qui est visible dans la fig. visibile in fig.30 a, verranno a to what is seen in Fig.30 a. To Zum Entfernen der Balgein-heit 30, il y aura deux tendeurs mancare i due tenditori. Per remove the bellows kit, detach sind die Verankerungsketten en moins. Pour enlever le kit rimuovere il kit di soffietti occorre the anchoring chains that bind abzutrennen, mit denen der soufflets décrocher les chaînes staccare le catene di ancoraggio the first cone to the end bearing erste Auslaufkonus am Oberteil d’ancrage qui fixent le premier che vincolano il primo cono alla assembly. befestigt ist. testata. cône à la tête. The entire kit must be dismantled Zum Ersetzen der Auslaufkonen Le remplacement des cônes La sostituzione dei coni comporta for replacing the cones. (Fig.30c) muss die komplette Einheit (Abb. comporte toujours le démontage sempre lo smontaggio di tutto il 30c) ausgebaut werden. kit.(Fig.30c) de tout le kit (Fig.30c) Single bellows without cones: the configuration easier, the eyelet bolts are fixed on the inside using a self-locking nut. Einzelbalg ohne Auslaufkonen: Die Konfiguration ist zusätzlich vereinfacht. Die Ringschrauben sind durch eine selbstsperrende Mutter im Inneren befestigt. Soffietto singolo senza coni: Souffler simple sans cônes: la configuration se simplifie en- la configurazione si semplifica core plus, les vis à oeillet sont ulteriormente, le viti a occhiolo fixées sur un écrou autobloquant. sono fissate sull’interno da un dado autobloccante. External fixing bolt - Externe Befestigungsschraube Vis de fixation extérieure - Vite di fissaggio esterna Chain for connection to end bearing assembly Verbindungskette am Oberteil Chaîne de liaison à la tête Catena di collegamento alla testata Chain-cone connecting bolt Verbindungsschrauben Kette-Konus Vis de liaison chaîne-cône Viti di collegamento catena-cono External bellows - Außenbalg Soufflet extérieur - Soffietto esterno Fixing cable guide cone Konusbefestigung Kabelseite Fixation cône guide câble Fissaggio cono guida cavo Cable guide - Kabelführung Guide câble - Guida cavo Internal cone - Innenbalg Cône interne - Cono interno fig. 30c 6 12 3 fig. 31 fig. 32 fig. 33 ZG - ZH Replacing the bottom closure cone bellows - Turn the main switch off. - Slacken the lower and upper locking clamps (item 7, fig. 34) of the unloading end bellows (item 5). - Unscrew the bolts of the level indicator protection cone cover (item 2). - Unscrew the four screws of the level indicator (item 1) and remove the cover. - Disconnect the cable (item 3) from the terminal and remove the level indicator by extract-ing the electric cable from the cone. - Remove the four nuts (item 10). - Remove the screws and hold the level indicator protection cone to prevent it from falling. - Remove the level indicator protection cone (item 1) together with the unloading end (item 4). - Extract the old bellows from the unloading end (item 5). - Position the new bellows on the unloading end (item 5) and fix to the upper part by means of the locking clamps (item 7). - Pass the electric cable (item 3) through the tube in the level indicator protection cone (item 2). 02.13 INSPECTION AND REPLACEMENT OF SPARE PARTS INSPEKTION UND AUSTAUSCH DER ERSATZTEILE CONTROLE REMPLACEMENT DES PIECES DETACHEES ISPEZIONE SOSTITUZIONE DEI PEZZI DI RICAMBIO Ersetzen des Balges des Verschlußkegels - Den Hauptschalter ausschalten. - Die unteren und oberen Befestigungsschellen (Pos. 7 Abb.34) des Schlauchs des Verschleißkegels (Pos.5) lockern. - Die Mutterschrauben des Deckels des Schutzkegels des Füllstandsanzeigers (Pos. 2) lösen. - Die vier Schrauben vom Füllstandsanzeiger (Pos.1) lösen und den Deckel entfernen. - Das Kabel (Pos. 3) an der Klemmenleiste abtrennen und den Füllstandsanzeiger entfernen, indem man das Stromkabel aus dem Kegel herauszieht. - Die vier Muttern (Pos.10) entfernen. - Die Schrauben entfernen und den Verschlußkegel des Füllstandsmelders festhalten, damit er nicht hinfällt. - Den Schutzkegel des Füllstandsanzeigers (Pos.1) zusammen mit dem Aufsetzkonus (Pos. 4) entfernen. - Den alten Balg (Pos.5) aus dem Aufsetzkonus herausziehen. - Den neuen Balg (Pos.5) in den Aufsetzkonus stecken und mit der Befestigungskette (Pos.7) befestigen. - Das Stromkabel (Pos. 3) durch die Leitung in den Schutzkegel des Füllstandsmelders (Pos. 2) führen. Remplacement du soufflet dispositif anti-gaspillage - Eteindre l’interrupteur principal. - Desserrer les colliers de blocage inférieur et supérieur (pos. 7 fig. 34) du soufflet de l’embout de chargement (pos. 5). - Dévisser les boulons du couvercle du cône de protection de l’indicateur de niveau (pos. 2) - Dévisser les quatre vis de l’indicateur de niveau (pos. 1) et enlever le couvercle. - Débrancher le câble de la connexion et enlever l’indicateur en sortant le câble électrique du cône. - Enlever les quatre écrous (pos. 10). - Enlever les vis et soutenir le cône de protection de l’indicateur de niveau pour éviter qu’il tombe. - Enlever le cône de protection de l’indicateur de niveau (pos. 1) avec l’embout de chargement (pos. 4). - Sortir l’ancien soufflet de l’embout de chargement (pos. 5). - Mettre le nouveau soufflet de l’embout de chargement en place (pos. 5) et le fixer dans la partie haute avec le collier de serrage (pos. 7). - Faire passer le câble électrique (pos. 3) à travers le tube dans le cône de protection de l’indicateur de niveau (pos. 2). 6 7 5 7 4 3 2 1 fig.34 2 TOR.173.--.M.4L 53 Sostituzione del soffietto dispositivo antispreco - Spegnete l’interruttore principale. - Allentate le fascette di bloccaggio inferiore e superiore (pos. 7 fig.34) del soffietto del terminale di scarico (pos.5). - Svitate i bulloni del coperchio dal cono di protezione dell’indicatore di livello (pos.2). - Svitate le quattro viti dall’indicatore di livello (pos.1) e rimuovetene il coperchio. - Scollegate il cavo (pos.3) dalla morsettiera e togliete l’indicatore sfilandone il cavo elettrico dal cono stesso. - Rimuovete i quattro dadi (pos.10). - Rimuovere le viti e reggete il cono di protezione dell’indicatore di livello per impedire che cada. - Rimuovete il cono di protezione dell’indicatore di livello (pos.1) assieme al terminale di scarico (pos. 4). - Estraete il vecchio soffietto dal terminale di scarico (pos.5). - Posizionate il nuovo soffietto al terminale di scarico (pos.5) e fissatelo nella parte superiore con la fascetta di bloccaggio (pos.7). - Fate passare il cavo elettrico (pos.3) attraverso il tubo nel cono di protezione dell’ indicatore di livello (pos. 2). ZG - ZH -Fix the protection cone of the level indicator (pos. 2) to loading terminal (pos. 4), using the nuts and bolts supplied for the purpose. -Connect the cables of the level indicator according to the wiring diagram. -Fit the cover on the level indicator protection cone (item 2) and fix it by means of hexagonal head bolts. - the threaded connections used for assembling the bellows unit (cable guide eyebolt - spacer tensioner - inner screw) must be tightened using a minimum tightening torque of 18 Nm. 02.13 INSPECTION AND REPLACEMENT OF SPARE PARTS INSPEKTION UND AUSTAUSCH DER ERSATZTEILE CONTROLE REMPLACEMENT DES PIECES DETACHEES ISPEZIONE SOSTITUZIONE DEI PEZZI DI RICAMBIO -Den Schutzkegel des Vollmelders (Pos. 2) am Aufsetzkonus (Pos. 4) befestigen, und zwar mit den dafür vorgesehenen Schrauben und Muttern. -Die Kabel des Füllstandsmelders aufgrund des Stromlaufplans anschließen. -Den Schutzkegel des Füllstandsmelders (Pos.2) schließen, indem man den Deckel anbringt und den Sechskantkopf mit den Mutterschrauben befestigt. - Die Gewindeanschlüsse, welche die Balgeinheit zusammenhalten (Kabelführungsöse - Abstandhalter - Spannschraube - Innenschraube) sind mit dem Mindestanzugsmoment von 18 Nm anzuziehen. -Fixer le cône de protection de l’indicateur de niveau (pos. 2) à l’embout de déchargement (pos. 4), en utilisant les boulons et les écrous prévus. -Brancher les câbles de l’indicateur de niveau en fonction du schéma électrique. -Fermer le cône de protection de l’indicateur de niveau (pos. 2) montant le couvercle et en le fixant avec les boulons à tête hexagonale. - les raccordements filetés qui relient le groupe soufflet (oeillet guide câble - entretoise - tendeur - vis intérieur) doivent être serrés à un couple minimum de 18 Nm. 2 TOR.173.--.M.4L 54 -Fissate il cono di protezione dell’ indicatore di livello (pos. 2) al terminale di scarico (pos. 4), utilizzando i bulloni ed i dadi appositi. -Collegate i cavi dell’indicatore di livello in base allo schema elettrico. -Chiudete il cono di protezione dell’ indicatore di livello (pos.2), applicando il coperchio e fissandolo con i bulloni a testa esagonale . -I collegamenti filettati che assemblano il gruppo soffietto (occhiolo guida cavo - distanziale - tenditore - vite interna) vanno serrati con coppia di serraggio minima di 18 Nm. ZG - ZH - LUBRICATION 02.13 SCHMIERUNG 2 LUBRICATION LUBRIFICAZIONE TOR.173.--.M.4L 55 The lubrication operations required are localized inside the drive unit box. The following must be lubricated: - The motor shaft bearings (fig.35) - Limit stop drive chain (fig.37) Die erforderlichen Schmierarbeiten sind im Inneren des Antriebsgehäuses auszuführen. Insbesondere sind folgende Teile zu schmieren: -D i e L a g e r d e r Tr i e b w e l l e (Abb.35) - Die Antriebskette des Endschalters (Abb.37) Les interventions de lubrification nécessaires sont localisées à l’intérieur du boîtier motorisation. Il faut lubrifier notamment: -les paliers de l’arbre du moteur (fig.35) - La chaîne de transmission du fin de course (fig.37) Gli interventi di lubrificazione necessari sono localizzati all’interno della cassetta motorizzazione. In particolare occorre lubrificare: -I supporti albero motore (fig.35) -La catena di trasmissione del finecorsa (fig.37). The reducer is already lubricated for life and will not have oil filler holes. The lubricants recommended for maintenance are shown in the Table below. Das Untersetzungsgetriebe ist dauergeschmiert und weist daher keine Stellen zum Ölnachfüllen auf. In der folgenden Tabelle werden jedenfalls die für die Wartung empfohlenen Schmierstoffe angeführt. Le réducteur est fourni lubrifié à vie et peut ne pas avoir de points d’accès pour le rajout d’huile. Dans le tableau ci-dessous sont indiqués les lubrifiants préconisés pour l’entretien. Il riduttore viene fornito già lubrificato a vita e può non presentare punti di accesso per il rabbocco dell’olio. Si riportano comunque nella tabella sottostante i lubrificanti consigliati per la manutenzione. RECOMMENDED LUBRICANTS - EMPFOHLENE SCHMIERSTOFFE LUBRIFIANTS CONSEILLÉS - LUBRIFICANTI CONSIGLIATI Reducer oil - Getriebeöl Huile réducteur - Olio riduttore Chain and bearings grease - Fett für Ketten und Lager Graisse chaîne et paliers - Grasso catena e supporti AGIP TELIUM VSF320 Lithium/Calcium grease CRESCENT with PTFE consistency NLGI 2 for temperatures -from -20°C a + 150°C SHELL TIVELA OIL SC320 Lithium-/Calciumfett CRESCENT mit PTFE Konsistenz NLGI 2 für Temperaturen von -20°C a + 150°C ESSO S220 MOBIL GLYGOYLE 30 Graisse CRESCENT Lithium/Calcium avec PTFE consistance NLGI 2 pour des températures de -20°C a + 150°C CASTROL ALPHASYN PG320 Grasso CRESCENT Litio/Calcio con PTFE consistenza NLGI 2 per temperature da -20°C a + 150°C BP ENERGOIL SG-XP320 Lubricating the bearings -Open the drive cover. -Lubricate the two bearings (fig. 35) using the grease pump containing grease for bearings. Refit the drive unit cover. lanschlager Graissage des paliers -Die Verkleidungsplatte der -Ouvrir le couvercle de la motoElektro-Seilwinde öffnen. risation. -Die beiden Flanschlager (Abb. -Lubrifier les deux paliers (fig. 35) mit einer Schmierpresse 35), en utilisant une pompe de abschmieren, die Lagerfett in graissage à pression. Refermer Standardqualität enthält. le couvercle de la motorisation. -Die Verkleidungsplatte der Elektro-Seilwinde wieder montieren. Lubrificazione dei supporti -Aprite il coperchio della motorizzazione. -Lubrificate i due supporti (fig.35), utilizzando una pompa per ingrassaggio a pressione contenente grasso per supporti. Richiudete il coperchio della motorizzazione. Lubricating the chain with oil -Open the drive unit cover . -Lubricate the chain internally using synthetic oil (fig. 37). -Refit the cover. Ölschmierung der Kette -Die Verkleidungsplatte der Elektro-Seilwinde öffnen . -Die Kette mit synthetischem Öl (Abb. 37) schmieren. -Die Verkleidungsplatte der Elektro-Seilwinde wieder montieren. Lubrificazione ad olio della catena -Aprite il coperchio della motorizzazione . -Lubrificate internamente la catena utilizzando olio sintetico (fig 37). -Richiudete il coperchio. fig.35 Lubrification de la chaîne -Ouvrir le couvercle de la motorisation. -Lubrifier la chaîne en utilisant de l’huile synthétique (fig. 37). -Refermer le couvercle. fig.36 fig.37 ZG - ZH Before carrying out any maintenance operation on the machine, set the loading bellows and the plant in which it is installed in safety condition and make sure the loading bellows and the main switch are switched off. N.B: The following maintenance schedules are to be considered as indicative and must therefore be adapted to the specific application and the loading bellows working conditions. Daily maintenance - Depending on the operating conditions, remove the dust layers deposited carefully, without throwing up clouds of airborne dust. Check the guards to make sure they are intact. - Shake the bellows and the cones to remove the layers of dust deposited. - Check the working of the emergency stop. - Clean the unloading terminal thoroughly. 02.13 PERIODIC CHECKS REGELMÄSSIGE KONTROLLEN 2 CONTROLES PERIODIQUES CONTROLLI PERIODICI TOR.173.--.M.4L 56 Bevor man irgendeinen Wartungseingriff auf der Maschine ausführt, sind die Verladegarnitur und die Anlage, in der sie eingebaut ist, in den sicheren Zustand zu bringen, und dann sicherzustellen, dass die Verladegarnitur und der Hauptschalter ausgeschaltet sind. Anm.: Die folgenden Wartungsintervalle sind unverbindlich und stellen nur Orientierungswerte dar. Sie sind nämlich an die spezifische Anwendung und die Arbeitsbedingungen der Verladegarnitur anzupassen. Avant d’effectuer une quelconque intervention d’entretien sur la machine, mettre le chargeur télescopique et l’installation sur lequel il est monté en sécurité et contrôler que le chargeur et le disjoncteur principal sont éteints. Prima di effettuare un qualsiasi intervento di manutenzione sulla macchina, mettere in sicurezza lo scaricatore telescopico e l’impianto sul quale è installato e assicurarsi che lo scaricatore e l’interruttore principale siano spenti. N.B: Les intervalles d’entretien suivants sont fournis à titre indicatif et doivent donc être adaptés à l’application spécifique et aux conditions de travail du chargeur. N.B: I seguenti intervalli di manutenzione sono da ritenersi indicativi, e vanno quindi adattati sulla specifica applicazione e sulle condizioni di lavoro dello scaricatore. Tägliche Wartung - Je nach den Betriebsbedingungen die Staubschichten, die abgelagert sind, sorgfältig entfernen und dafür sorgen, dass keine Staubwolken entstehen. Prüfung der Unversehrtheit der Schutzvorrichtungen. - Die Bälge und die Konen schütteln, um die abgelagerten Staubschichten davon zu entfernen. - Die Funktionstüchtigkeit der PilzSchlagtaste prüfen. - Den Auslaufkonus sorgfältig reinigen. Entretien journalier - Suivant les conditions de fonctionnement, éliminer soigneusement les couches de poussière déposée en faisant attention à ne pas provoquer de nuages dispersés dans l’air. Contrôler l’intégrité des protections. - Secouer les soufflets et les cônes de manière à enlever les dépôts et les couches de poussière. - Contrôler le fonctionnement de l’arrêt d’émergence. - Nettoyer soigneusement l’embout de chargement. Manutenzione quotidiana - A seconda delle condizioni di funzionamento, rimuovere accuratamente gli strati di povere di deposito avendo cura di non provocare nubi aerodisperse. Verifica dell’integrità delle protezioni. - Scuotere i soffietti e i coni in modo da rimuovere gli strati di povere depositati. - Controllare il funzionamento dell’arresto d’emengenza. - Pulire accuratamente il terminale di scarico. Weekly maintenance Wöchentliche Wartung Entretien hebdomadaire - Check the bellows to make sure they - Die Bälge auf ihre Unversehrtheit - Vérifier l’intégrité des soufflets. are intact. prüfen. Manutenzione settimanale - Verificare l’integrità dei soffietti. Monthly maintenance - Have qualified personnel check the effective equipotentiality (resistance to earth) of the machine. - Check the drive belt tension and wear according to the indications given in the Manual. - Check the condition of the inspection hatch gasket. - Check the reducer seals for oil leaks. - Lubricate the support bearings. - Check the rating plate to make sure it is intact; if it is damaged, request the manufacturer for a copy. - Check the pictograms to make sure they are intact, and replace if damaged. - Check the condition of the steel hoist ropes. - Grease the hoist cable lightly using the lubricant indicated in the Table (point 20). - Lubricate the chain using the lubricant indicated in the Table (point 20). - Check the condition of the eyebolts connecting braid, and the level indicator electric cable. Manutenzione mensile - Far eseguire da personale qualificato la verifica dell’effettiva equipotenzialità (resistenza verso terra) della macchina. - Controllare il corretto tensionamento e usura delle cinghie di trasmissione seguendo le indicazione del manuale. - Controllare lo stato della guarnizione del portello d’ispezione. - Controllare che non vi siano perdite di olio dalle tenute del riduttore. - Lubrificare i cuscinetti di supporto. - Verificare l’integrità della targhetta, se danneggiata, occorre chiederne una copia al costruttore. - Verificare l’integrità del pittogrammi, se danneggiati, sostituirli. - Controllare lo stato dei cavi d’acciaio di sollevamento. - Lubrificare leggermente i cavi di sollevamento usando il lubrificante indicato nell’apposita tabella (punto 20). - Lubrificare la catena usando il lubrificante indicato nell’apposita tabella (punto 20). - Verificare lo stato della treccia di collegamento degli occhielli, e del cavo elettrico dell’indicatore di livello. Monatliche Wartung - Die Prüfung des tatsächlichen Potentialausgleichs (Erdungswiderstand) der Maschine durch qualifiziertes Personal ausführen lassen. - Die korrekte Spannung und den Verschleiß der Triebriemen gemäß der Angaben des Handbuchs prüfen. - Den Zustand der Dichtungen der Inspektionsklappe prüfen. - Sicherstellen, dass es an den Dichtungen des Getriebes keine undichten Stellen gibt, aus denen Öl austritt. - Die Traglager schmieren. - Die Unversehrtheit des Typenschilds prüfen. Ist es beschädigt, muss beim Hersteller eine Kopie angefordert werden. - Die Piktogramme auf Unversehrtheit prüfen und sie ersetzen, wenn sie beschädigt sind. - Den Zustand der Stahlseile zum Heben prüfen. - Die Hebeseile leicht schmieren. Dazu den Schmierstoff benutzen, der in der Tabelle (Punkt 20) angegeben ist. - Die Kette leicht schmieren. Dazu den Schmierstoff benutzen, der in der Tabelle (Punkt 20) angegeben ist. - Den Zustand des Verbindungsgeflechts der Ösen und des Stromkabels des Füllstandsmelders prüfen. Entretien mensuel - Faire contrôler par du personnel qualifié l’effective liaison équipotentielle (résistance vers la terre) de la machine. - Vérifier la tension correcte des courroies de transmission et leur usure en suivant les indication du manuel. - Contrôler l’état de la garniture de la trappe de visite. - Contrôler qu’il n’y a pas de fuites d’huile par les joints du réducteur. - Lubrifier les roulements du palier. - Vérifier l’intégrité de la plaque, si elle est endommagée il faut en demander une copie au constructeur. - Vérifier l’intégrité des pictogrammes, s’ils sont endommagés les remplacer. - Contrôler l’état des câbles en acier de levage. - Lubrifier légèrement les câbles de levage en utilisant le lubrifiant indiqué dans le tableau (point 20). - Lubrifier la chaîne en utilisant le lubrifiant indiqué dans le tableau (point 20). - Vérifier l’état de la tresse de liaison des œillets et du câble électrique de l’indicateur de niveau. Manutenzione semestrale Six-monthly maintenance Halbjährliche Wartung Entretien semestriel - Check the seals and gaskets on the - Die Dichtringe und die Dichtelement - Contrôler les étanchéités et les joints - Controllare le tenute e le guarnizioni sui portelli e sulla flangia di accoppiahatches and the coupling flanges. auf den Klappen und auf dem Versur les portillons et sur la bride mento. - Check the condition of the chain. bindungsflansch prüfen. d’accouplement. - Controllare lo stato della catena. - Den Zustand der Kette prüfen. - Contrôler l’état de la chaîne. Yearly maintenance - Check the condition of the bellows Jährliche Wartung - Den Zustand der Bälge Entretien annuel - Contrôler l’état des soufflets Manutenzione annuale - Controllare lo stato dei soffietti ZG - ZH - 02.13 CLEANING REINIGUNG 2 NETTOYAGE PULIZIA TOR.173.--.M.4L 57 - The user must select suitable - Der Anwender muss Produkte - L’utilisateur doit choisir et sélec- -L’utilizzatore dovrà provvedere cleaning products depending on wählen, die sich für die Reini- tionner les produits appropriés alla scelta dei prodotti idonei the type of plant and the product gung eignen, und zwar je nach aux opérations de nettoyage alle fasi di pulizia in base alla handled, taking care to avoid dem Typ der Anlage und dem en fonction de la typologie de tipologia di impianto ed al tipo the use of toxic or inflammable Typ des behandelten Produkts. l’équipement et du produit traité, prodotto trattato, facendo coproducts. Er muss auf jeden Fall darauf en faisant attention à ne pas munque attenzione a non usare achten, dass er keine giftigen utiliser de produits toxiques ou prodotti tossici o infiammabili. oder brennbaren Reinigungs- inflammables. mittel verwendet. Cleaning operations: - Remove residual dust from the level indicator, unloading terminal and bellows, where accessible. - The cleaning frequency depends on the type of product handled and the plant. - In case of harmful, toxic products, the cleaning wastes must be conveyed into closed, enamelled tanks depending on the indications in the product safety sheet. Reinigungsarbeiten: - Die Staubreste von Füllstandmelder, Auslaufkonus und Balg entfernen, soweit sie zugänglich sind. - Die Häufigkeit der Reinigungsarbeiten hängt von der Beschaffenheit des behandelten Produkts und der Anlage ab. - Bei schädlichen oder giftigen Produkten müssen die Reste des Reinigungswassers in einen geeigneten geschlossenen Behälter geleitet und so entsorgt werden, die es auf dem Sicherheitsdatenblatt des Produkts vorgesehen ist. Opérations de nettoyage: - Enlever les résidus de poussière de l’indicateur de niveau, de l’embout de chargement et du soufflet dans sa partie accessible. - La fréquence des opérations de nettoyage dépend de la nature du produit traité et de l’installation. - Dans le cas de produits nocifs et toxiques, les résidus du nettoyage doivent être convoyés dans un récipient fermé et mis à la décharge conformément aux indications de la fiche de sécurité du produit. Operazioni di pulizia: -Rimuovere residui di polvere da indicatore di livello, terminale di scarico e soffietto laddove è accessibile. -La frequenza delle operazioni di pulizia dipendono dalla natura del prodotto trattato e dell’impianto. -Nel caso di prodotti nocivi, tossici, i reflui della pulitura dovranno essere convogliati in idonea vasca chiusa e smaltiti secondo quanto previsto dalla scheda di sicurezza del prodotto. ZG - ZH The main risks present on the loading bellows are mentioned below. The complete list of residual risks must be prepared by the installer on the basis of the risk evaluation carried out on the entire plant in which the loading bellows is installed. 02.13 RESIDUAL RISKS RESTRISIKEN RISQUES RESIDUELS RISCHI RESIDUI Untenstehend werden die wichtigsten Resterisiken angegeben, die auf den Verladegarnituren vorliegen. Für die vollständige Liste der Restrisiken ist der Installateur aufgrund des Resultats analogen Beurteilungen zuständig, die er auf der vollständigen Anlage vorgenommen hat, in welche die Verladegarnitur installiert wird. 2 TOR.173.--.M.4L 58 Les principaux risques présents sur les chargeurs sont indiqués ci-dessous. La liste complète des risques résiduels incombe à l’installateur en fonction du résultat d’évaluations similaires faites sur l’ensemble de l’installation dans laquelle est monté le chargeur. Si riportano qui di seguito i principali rischi presenti sugli scaricatori. L’elenco completo dei rischi residui spetta all’installatore in base al risultato di analoghe valutazioni fatte sull’impianto completo in cui viene installato lo scaricatore. Mechanical hazards Gefahren mechanischer Art Dangers de nature mécanique Pericoli di natura meccanica - The operator must always use - Für die Wartungsarbeiten ist der - Pour les activités d’entretien, -Per le attività di manutenzione personal protection equipment Bediener verpflichtet, immer die l’opérateur a l’obligation de è fatto obbligo all’operatore di for carrying out maintenance persönlichen Schutzausrüstun- porter toujours les équipements impiegare sempre i dispositivi activities. gen zu benutzen. de protection individuelle. di protezione individuale. Special warning notices in the Besondere Warnschilder an Des panneaux d’avertissement Apposite targhe monitorie nelle various machine sections in- den einzelnen Abschnitten der spécifiques, placés à proxi- singole sezioni di macchina dicate the personal protection Maschine geben an, welche per- mité de chaque section de la indicano quali dispositivi di prodevices that are compulsory: sönlichen Schutzausrüstungen machine, doivent indiquer quels tezione individuale si rendono vorgeschrieben sind. sont les équipements de protec- obbligatori: tion individuelle qui se rendent obligatoires : Hazards deriving from pressurized circuits (hydraulic, pneumatic) -During maintenance and/or repairs, pressure must be discharged from the plants and accumulators, if present, according to the instructions shown near the components and in the respective Operation Manuals. Gefahren durch unter Druck stehende Kreisläufe (hydraulisch, pneumatisch) - Während der Wartungsarbeiten und/oder Reparaturen sind die Anlagen und die etwaigen Druckspeicher in Druckablass zu stellen, so wie es die Anleitungen in der Nähe der Komponenten und die entsprechenden Betriebsanleitungen beschreiben. Les dangers dérivants des cir- Pericoli derivanti da circuiti in cuits sous pression (hydrau- pressione (idraulici, pneumatici) liques, pneumatiques) - Durante le operazioni di manu- Pendant les opérations d’entretien tenzione e/o riparazione occorre et/ou de réparation il faut décharporre in scarico gli impianti e gli ger les installations et les éveneventuali accumulatori, secondo le tuels accumulateurs, conforméistruzioni riportate in prossimità dei ment aux instructions apposées à componenti e nei rispettivi manuali proximité des composants et dans d’uso. les manuels d’utilisation. Noise hazards Pericoli generati da rumore Durch Lärm erzeugte Gefahren Dangers produits par le bruit - The user and employer must - Der Benutzer und der Arbeitge- - L’utilisateur et l’employeur doivent - E’ fatto obbligo all’utilizzatore e respect the laws regarding protecal datore di lavoro di rispettare le ber sind dazu verpflichtet, die respecter les normes en termes tion from daily personal exposure norme di legge in termine di progesetzlichen Bestimmungen in de protection contre l’exposition of operators to noise (in Italy L.D. tezione contro l’esposizione perSachen Schutz gegen die tägliche quotidienne au bruit (en Italie 277/91). sonale quotidiana degli operatori individuelle Lärmexposition der ArD.Législatif 277/91). al rumore (in Italia D.Lgs.277/91). beitnehmer zu beachten (in Italien D. Lgs. 277/91). Falling from heights Absturzgefahr Danger de chute Pericolo di caduta dall’alto - When working at a height, the - Der Arbeitnehmer, der in der - L’opérateur qui travail en hau- -E’ fatto obbligo all’operatore operator must use personal Höhe arbeitet ist verpflichtet, die teur a l’obligation d’utiliser les se opera in quota, l’utilizzo di protection devices for prevent- persönlichen Schutzausrüstun- équipements de protection indi- dispositivi di protezione indiviing falling. gen gegen die Abstutzgefahr viduelle contre la chute. duale contro la caduta dall’alto. In any event, the operator must zu benutzen. Für die Wartungs- Dans tous les cas pour les acti- In ogni caso per le attività di use certain personal protection arbeiten ist der Bediener auf vités d’entretien, et après avoir manutenzione, e dopo aver devices for maintenance opera- jeden Fall verpflichtet, nachdem mis en sécurité la machine, messo in sicurezza la macchina, tions, after setting the machine er die Maschine in den sicheren l’opérateur a l’obligation d’uti- è fatto obbligo all’operatore di in safety condition. Zustand gebracht hat, einige liser certains équipements de impiegare alcuni dispositivi di persönlichen Schutzausrüstun- protection individuelle. protezione individuale. gen zu benutzen. ZG - ZH All operations on the loading bellows must be carried out by specialist personnel equipped with special PPD; before acting on the machine, set it in safety condition. PROBLEM STÖRUNG PROBLEME PROBLEMA LIFT DOES NOT WORK HUBFUNKTION NICHT GEGEBEN SOULEVEMENT PAS EN FONCTION SOLLEVATORE NON IN FUNZIONE 02.13 FAULT FINDING BETRIEBSSTÖRUNGEN UND ABHILFE 2 INCONVENIENTS ET SOLUTIONS INCONVENIENTI E SOLUZIONI Jeder Eingriff an der Verladegarnitur muss durch spezialisiertes Personal ausgeführt werden, aus mit besonderen PSA ausgestattet ist, bevor es auf der Maschine eingreift, ist diese in den sicheren Zustand zu bringen. REASON URSACHE CAUSE CAUSA TOR.173.--.M.4L 59 Toutes les interventions sur le chargeur télescopique doivent être effectuées par du personnel spécialisé disposants des E.P.I. appropriés ; avant d’intervenir sur la machine, la mettre en sécurité. Qualsiasi intervento allo scaricatore telescopico, deve essere effettuato da personale specializzato e munito di appositi DPI, prima di intervenire sulla macchina, metterla in sicurezza. SOLUTION LOSUNG SOLUTION SOLUZIONE “V” BELT SLIDES KEILRIEMEN RUTSCHT DURCH LA COURROIE TRAPEZOIDALE PATINE CINGHIA TRAPEZOIDALE SLITTANTE ADJUST OR REPLACE “V” BELT KEILRIEMEN SPANNEN ODER ERSETZEN REGLER OU REMPLACER LA COURROIE TRAPEZOIDALE REGOLATE O SOSTITUITE LA CINGHIA TRAPEZOIDALE DEFECTIVE MOTOR MOTOR DEFEKT PANNE DE MOTEUR MOTORE DIFETTOSO CHECK ELECTRICAL CONNECTION WITH LIFT MOTOR ELEKTRISCHEN ANSCHLUSS DES HUBMOTORS PRÜFEN CONTROLER LES RACCORDEMENTS ELECTRIQUES AVEC LE MOTEUR DE SOULEVEMENT CONTROLLATE I COLLEGAMENTI ELETTRICI CON IL MOTORE DI SOLLEVAMENTO DEFECTIVE REDUCER GETRIEBE DEFEKT DEFAUT DU REDUCTEUR RIDUTTORE DIFETTOSO REPLACE REDUCER GETRIEBE ERSETZEN REMPLACER LE REDUCTEUR SOSTITUITE IL RIDUTTORE ITEM POS. 8.4 ZG - ZH SCRAPPING THE MACHINE - Scrapping of the machine must be done in an area classified as safe. - Before proceeding with scrapping the loading bellows, clean it thoroughly and dispose off the dust residue in accordance with the indications in the safety sheet. - The operators concerned with dismantling operations must use suitable PPD. - For scrapping or demolition of the machine at the end of its life, separate the plastic parts carefully (gaskets and components) and send them to special collection centres. - The remaining parts must be sent to scrap yards. - During the machine dismantling phases, observe the lifting procedures specified on the relevant sheet. - The loading bellows must be demolished in such a manner that it cannot be reused as a complete unit, nor can one or more of its parts be reused. - Collect the gear oil and send it to a special centre for disposal. SCRAPPING THE MACHINE / RETURNING VERSCHROTTUNG DES GERÄTS / RÜCKGABE DEMANTELEMENT DE LA MACHINE / RESTITUTION ROTTAMAZIONE MACCHINA / RESO MACCHINA VERSCHROTTUNG DER MASCHINE - Die Verschrottung der Maschine ist in einer als sicher klassifizierten Zone auszuführen. - Bevor man mit der Verschrottung der Verladegarnitur beginnt, ist sie vollkommen zu reinigen, um die restlichen Stäube in Übereinstimmung mit den Angaben auf den Sicherheitsdatenblatt zu entsorgen. - Die mit der Entsorgung beauftragten Arbeitnehmer müssen angemessene persönliche Schutzausrüstung tragen. - Bei der Verschrottung oder der Demolierung am Lebensende der Maschine darauf achten, dass die Kunststoffteile (Dichtungen und Komponenten) ausgebaut und den jeweiligen Sammelzentren zuleitet werden. - Die restlichen Teile sind als Alteisen wiederverwertbar. - Während der Zerlegung der Maschine die Verfahren zum Heben beachten, so wie es in dem spezifischen Blatt beschrieben ist. - Die Verladegarnitur muss so demoliert werden, dass die nicht als komplette Einheit wiederverwendet werden kann und dass man auch eines oder mehrere ihrer Teile nicht erneut benutzen kann. - Das Öl aus dem Getriebe ablassen und den Altölsammelstellen zuführen. DÉMANTÈLEMENT DE LA MACHINE - Le démantèlement de la machine doit être effectué dans une zone classée sûre. - Avant mettre le chargeur à la décharge le nettoyer complètement et éliminer les poussières restantes conformément aux indications fournies par la fiche de sécurité. - Les opérateurs préposés à la mise à la décharge doivent porter des équipements de protection individuelle appropriés. - En cas de mise à décharge ou démolition à la fin de la vie de la machine, prendre soin de démonter les pièces en matière plastique (joints et composants) et les destiner aux déchetteries spécialisées. - Les parties restantes seront destinées au recyclage des matériaux ferreux. - Pendant les phases de démantèlement de la machine, observer les procédures de levage indiquées dans la feuille prévue à cet effet. - Le chargeur télescopique doit être démantelé de manière à ne plus être utilisé comme unité complète, et qu’il ne soit pas possible de réutiliser une ou plusieurs de ses parties. - Récupérer l’huile du réducteur et la remettre aux centres de collecte spécialisés. 02.13 2 TOR.173.--.M.4L 60 ROTTAMAZIONE MACCHINA -Lo smantellamento della macchina è da effettuarsi in zona classificata sicura. -Prima di procedere alla rottamazione dello scaricatore, provvedere alla sua completa pulizia ed allo smaltimento delle polveri residue in accordo con le indicazioni della scheda di sicurezza. -Gli operatori addetti allo smaltimento devono indossare dispositivi di protezione personale adeguati. -In caso di rottamazione o demolizione a fine vita della macchina, avere cura di smontare le parti in materiale plastico (guarnizioni e componenti) e destinarle agli appositi centri di raccolta. -Le restanti parti sono da destinare al recupero dei materiali ferrosi. -Durante le fasi di smantellamento della macchina osservare le procedure di sollevamento come indicato nel foglio specifico. -Lo scaricatore telescopico deve essere demolito in modo tale da non essere più riutilizzato come unità completa, ne sia possibile riutilizzare una o più delle sue parti. -Raccogliere l’olio del riduttore e destinarlo agli appositi centri di raccolta. RETURNING THE MACHINE RETOURNIERUNG DER MA- RESTITUTION MACHINE RESO MACCHINA - If the machine is to be returned, SCHINE - En cas de restitution de la -In caso di reso della macchina, use the original packing if it has - Bei der Retournierung der Ma- machine, si l’emballage a été se si è conservato l’imballo oribeen retained; otherwise fix the schine ist diese, falls man die conservé, la remettre dans celui- ginale, reinserirla nello stesso, machine on a pallet and cover it Originalverpackung aufbewahrt ci, sinon la fixer sur une palette altrimenti fissarla su di un pallet with heat-shrink nylon covering hat, wieder darin einzupacken. et la protéger avec du nylon e proteggerla con del nylon for protection from damage dur- Ansonsten befestigt man sie auf thermorétractable, en essayant termoretraibile, cercando di proing transport. einer Palette und schützt sie de la protéger le plus possible teggerla al meglio da eventuali In any case, make sure the ma- mit einer Hülle aus Schrumpf- contre les chocs provoqués par urti derivanti dal trasporto. chine does not contain material folie, wobei man versucht, sie le transport. In ogni caso assicurarsi che la residue. so gut wie möglich vor etwa- Dans tous les cas s’assurer que macchina non abbia residui di igen Stößen beim Transport zu la machine ne contient pas de materiale. schützen. résidus de matière. Auf jeden Fall sicherstellen, dass die Maschine keine Materialreste mehr enthält. N.B. Rights reserved to modify technical specifications N.B. Angaben ohne Gewähr. Änderungen können ohne Vorankündigung vorgenommen werden. N.B. Toutes données portées dans le présent catalogue n’engagent pas le fabricant. Elles peuvent être modifiéès à tout moment. N.B. Tutti i dati riportati nel presente catalogo non sono impegnativi e possono subire variazioni in qualsiasi momento. TOREX S.p.A. Via Canaletto, 139/A I - 41030 San Prospero (MO) - ITALY ++ 39 / 059 / 8080811 fax ++ 39 / 059 / 908204 e-mail [email protected] internet www.torex.it