1
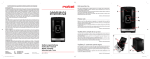
REF:SEDEYA6100
HANDS-FREE CAR KIT
KIT MAINS LIBRES DE VOITURE
KFZ-FREISPRECHEINRICHTUNG
VIVA VOCE PER AUTO
INSTALLATION MANUAL
NOTICE DE MONTAGE
EINBAUANLEITUNG
MANUALE D'ISTALLAZIONE
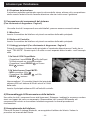
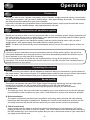
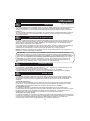
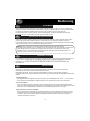
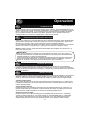
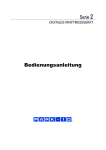
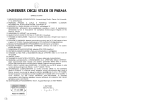
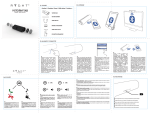
Wiring diagram:
Diagramme de câblage:
Bauschaltplan:
Schema elettrico:
B
A
C
D
AUDIO UNIT
Not Used
Non Utilisé
Nicht Verwendet
Non usato
-2-
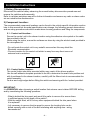
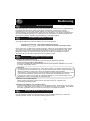
ENGLISH
Welcome
Thank you for choosing this Subaru product which has been carefully designed and developed
using the latest Bluetooth technology to specifically complement the Subaru vehicle model
range.
We recommend you read this manual BEFORE commencing the system installation and keep it
for future reference should the device ever need removing and transferring to another vehicle.
IMPORTANT:
Once the system has been installed in the vehicle and BEFORE it will operate, it will require
pairing with the Bluetooth phone/s.
This is achieved by following a specific pairing procedure, details of which can be found in the
user manual provided in the kit.
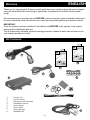
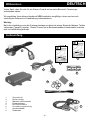
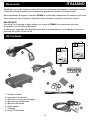
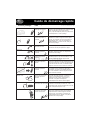
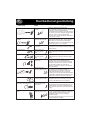
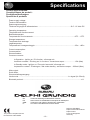
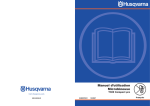
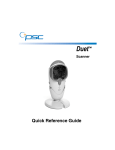
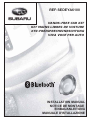
Kit Contents
REF:SEDEYA6100
HANDS-FREE CAR KIT
KIT MAINS LIBRES DE VOITURE
FREIHANDIGER AUTOINSTALLATIONSSATZ
CORREDO HANDS-FREE DELL'AUTOMOBILE
REF:SEDEYA6100
HANDS-FREE CAR KIT
KIT MAINS LIBRES DE VOITURE
FREIHANDIGER AUTOINSTALLATIONSSATZ
CORREDO HANDS-FREE DELL'AUTOMOBILE
2
USER MANUAL
INSTALLATION HANDBUCH
NOTICE DE MONTAGE
MANUALE DELL'INSTALLAZIONE
5
INSTALLATION MANUAL
INSTALLATION HANDBUCH
NOTICE DE MONTAGE
MANUALE DELL'INSTALLAZIONE
4
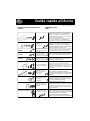
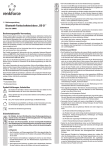
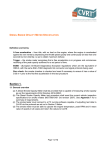
Make a Call
Faire un Appel
Machen einen Anruf
Haga una Llamada
Answer a Call
Le fait de répondre à un Appel
Das Antworten auf einen Anruf
Contestación de una Llamada
In a Call
Pendant un Appel
Während eines Anrufs
Durante una Llamada
John
x15
3
2
sec
Pairing * Le fait d'apparier * Paarung * Apareamiento *
8
sec
2
sec
12
sec
Code1234
6
1
8
1.
2.
3.
4.
5.
6.
7.
8.
Control unit
Control switch
Microphone with fixing kit
Installation manual
User manual
Quick guide
Wiring harness
Installation kit
7
-3-
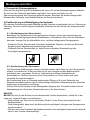
Installation Instructions
1) Battery Disconnection:
English
Disconnect the vehicle battery observing the normal battery disconnection procedures and
remove the vehicles radio assembly.
Refer to vehicles workshop manual for further information and ensure any radio or alarm codes
etc are noted before disconnection.
2) Component Location:
The recommended component locations can be found in the vehicle specific information section
later in this manual but as model specifications can change, the following general observations
and mounting procedures should be made when choosing positions and fixing the components:
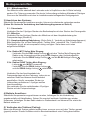
2.1 - Control unit location:Secure the control unit in the chosen location using the adhesive velcro patch or the cable
ties provided in the kit.
When using the velcro, ensure the surfaces are clean by using the alcohol swab provided in
the microphone kit.
- Do not locate the control unit in any metallic surround as this may shield the
Bluetooth communication
- Chose a location for the control unit which is away from any direct source of
extreme heat or moisture.
2.2 - Control button location:
The control button should be mounted within easy reach of the drivers position.
Use the self-adhesive template provided in the kit to determine the exact hole position and
with it positioned in the chosen location, carefully drill the 24mm hole to accommodate the
switch assembly.
De-burr and rough edges before fitting the switch and securing with the locknut provided.
IMPORTANT:
It is ESSENTIAL when choosing a switch location that extreme care is taken BEFORE drilling
and by considering the following questions:
- What is behind the trim panel and would it be safer to remove it to ensure there
is sufficient space for the depth of the switch?.
- With the switch fitted, will it foul any other equipment behind the trim panel when
it is replaced?
- Is it necessary to remove the trim panel to ensure the locating hole can be
drilled squarely with no risk of the drill interfering with anything else - wiring
harnesses etc?
-4-
Installation Instructions
2.3 - Microphone location:
The microphone should be located on the top of the upper steering column surround or
similar location using the adhesive pad provided ensuring it is pointing directly towards the
driver.
Ensure the surface is clean and dry by wiping with the alcohol swab provided in the kit and
face the microphone towards the driver.
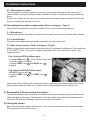
3) Connecting the system components: (Refer to diagram - Page 2)
Once all the components have been installed, they can be connected together:
3.1: Microphone:
Plug the microphone harness connector into the small connector of the main radio harness.
3.2: Control Button:
Plug the control button wiring harness connector into the control unit.
3.3: Main wiring harness: (Refer to diagram - Page 2)
Before connecting the main audio wiring harness it is important to determine if the audio has
a "TEL MUTE" input. This input is usually a separate wire on the rear of the radio - see
example below.
3.3a: Vehicles WITH the Mute input:
- Connect PINK wire D to the Tel Mute input wire
using a suitable connector.
- Connect GREY wire A and BLUE wire C
together.
3.3b: Vehicles WITHOUT Mute input:
- DO NOT connect wire D
- Connect GREY wire A and GREY wire
together.
TEL MUTE input
B
Interconnect the 14-Way white connectors of the main wiring harness between the vehicle
wiring harness and the radio unit. Plug the main wiring harness into the control unit.
4) Reassembly & Reconnecting the battery:
Once all the components have been connected, tidy up any excess wiring and secure with
cable ties where necessary. Reassemble all the trim panels and vehicle components and
reconnect the battery following normal reconnection procedures.
5) Pairing the phone:
Before the Bluetooth system will function, it will need to be paired to the customers phone.
See procedure in the User manual
-5-
FRANÇAIS
Bienvenue
Merci d'avoir choisi ce produit Subaru qui a été soigneusement conçu et développé en utilisant
la dernière technologie Bluetooth pour complèter notre gamme de produits.
Nous vous recommandons de lire ce manuel AVANT de débuter l'installation du système et le
garder pour une future consultation, ou dans le cas d'une dépose et du transfert vers un autre
véhicule.
IMPORTANT :
Après l'instalation du système dans le véhicule et AVANT qu'il ne fonctionne, il est neccessaire
de jumeler le téléphone au systeme Bluetooth . Ceci est réalisé en suivant la procédure
spécifique, détaillée dans le manuel d'utilisation fourni dans le kit.
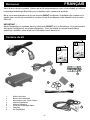
Contenu du kit
REF:SEDEYA6100
HANDS-FREE CAR KIT
KIT MAINS LIBRES DE VOITURE
FREIHANDIGER AUTOINSTALLATIONSSATZ
CORREDO HANDS-FREE DELL'AUTOMOBILE
REF:SEDEYA6100
HANDS-FREE CAR KIT
KIT MAINS LIBRES DE VOITURE
FREIHANDIGER AUTOINSTALLATIONSSATZ
CORREDO HANDS-FREE DELL'AUTOMOBILE
2
USER MANUAL
INSTALLATION HANDBUCH
NOTICE DE MONTAGE
MANUALE DELL'INSTALLAZIONE
5
INSTALLATION MANUAL
INSTALLATION HANDBUCH
NOTICE DE MONTAGE
MANUALE DELL'INSTALLAZIONE
4
Make a Call
Faire un Appel
Machen einen Anruf
Haga una Llamada
Answer a Call
Le fait de répondre à un Appel
Das Antworten auf einen Anruf
Contestación de una Llamada
In a Call
Pendant un Appel
Während eines Anrufs
Durante una Llamada
John
x15
3
2
sec
Pairing * Le fait d'apparier * Paarung * Apareamiento *
8
sec
2
sec
12
sec
Code1234
6
1
8
1.
2.
3.
4.
5.
6.
7.
8.
Module principal
Bouton de commande
Microphone avec kit de fixation
Notice d'installation
Notice d'utilisation
Guide de démarrage rapide
Faisceau
Kit d'installation
7
-6-
Instructions d'installation
1) Débranchement de la batterie:
Débranchez la batterie du véhicule en observant les procédures normales de débranchement
de batterie et accédez à l'arrière de l'autoradio. Se référer au manuel d'atelier du véhicule pour
de plus amples informations.Assurez vous vous d'être en possession du code de l'autoradio et
que la procedure éventuelle pour débrancher l'alarme est bien suivie.
2) Localisation des éléments:
La localisation des éléments différera d'un véhicule à l'autre mais les recommandations et les
procédures suivantes doivent êtres respectées:
2.1 - Emplacement du module principal:
Fixer le module à l'endroit choisi à l'aide de la fixation Velcro adhésive ou des serre-câbles
fournis dans le kit. Nettoyer les surfaces en utilisant le sachet de dégraissant fourni dans le
kit du microphone.
- Ne pas enfermer le module entre des parois métalliques qui altèreraient la qualité de la
liaison Bluetooth.
- Ne pas installer le module près d'une source de chaleur, de climatisation ou une
exposition directe au soleil.
2.2 - Emplacement du bouton de commande:
Le bouton de commande devra être monté à portée de main du conducteur.
Utiliser le gabarit auto-adhésif fourni dans le kit pour déterminer la position exacte du trou à
l'endroit choisi. Percer soigneusement un trou de diamètre 24mm pour loger le bouton.
Utiliser les rondelles entretroises fournies dans le kit si un trou existant (par exemple
l'allume- cigare) est employé ou si elles sont utiles pour l'esthetique du montage.
Ébavurer tous les bords avant d'adapter le bouton et le fixer avec le contre-écrou fourni.
IMPORTANT:
Il est ESSENTIEL en choisissant l'emplacement de fixation du bouton de prendre en
consideration AVANT les points suivants:
- Verifiez de disposer derrière l'élément de planche de bord ou de la console, d'une
profondeur suffisante pour loger le bouton de commande, sans risquer de toucher ou gêner
un autre équipement.
- Il faudra peut être déposer cet élément pour s'en assurer et pour le percer sans risquer de
blesser un autre équipement avec le forêt (faisceau de cablage etc...)
-7-
Instructions d'installation (suite….)
2.3 - Emplacement du microphone:
Le microphone devra être situé sur le dessus du carter supérieur de colonne de direction
ou à un endroit similaire à l'aide de l'adhésif fourni.
Nettoyez la surface en utilisant le sachet de dégraissant fourni dans le kit, et orientez la face
avant du microphone vers le conducteur.
3) Relier les composants du système:
(Se référer au schéma du faisceau de câblage de la page 2)
Une fois que tous les composants ont été installés, ils peuvent être reliés ensemble:
3.1 : Bouton de commande:
Brancher le connecteur 10 voies blanc du faisceau de bouton de commande au module
principal
3.2 : Microphone:
Brancher la rallonge du faisceau entre le microphone et le connecteur blanc du faisceau de
module principal
3.3 : Faisceau de câblage principal: (Se référer au schéma de la page 2)
Avant de connecter le faisceau à l'autoradio,il est important de determiner si ce dernier
dispose d'une entrée "TEL MUTE" . Cette entrée est située sur un fil séparé à l'arrière de
l'autoradio : Voir les exemples suivants.
3.3a: Véhicules avec l'entrée" TEL MUTE"
- Connecter le fil ROSE D à l'entrée " Tel Mute"
en utilisant un connecteur adapté.
- Connecter ensembles le fil GRIS A et le fil
BLEU C .
3.3b: Véhicules sans entrée " TEL MUTE"
- NE PAS connecter le fil D
- Connecter ensembles les fils GRIS A et
TEL MUTE input
B
Intercaler les connecteurs 14 voies blanc du faisceau de câblage principal entre le faisceau
du véhicule et celui de l'autoradio. Connecter le faisceau au module principal.
4) Remontage et rebranchement de la batterie:
Une fois que tous composants ont été reliés, ranger le câblage excessif et le fixer avec des
serres-câble si besoin.
Remonter tous les éléments et composants du véhicule puis rebrancher la batterie en
respectant les procédures normales de reconnexion.
Essuyer les éventuelles salissures et traces de doigts.
5) Jumelage du téléphone
Avant que le système Bluetooth ne fonctionne, il devra être jumelé au téléphone du client.
Voir la procédure sur le manuel d'utilisateur.
-8-
DEUTSCH
Willkommen
Vielen Dank, dass Sie sich für ein Subaru Produkt mit neuester Bluetooth Technologie
entschieden haben.
Wir empfehlen Ihnen dieses Handbuch VOR Installation sorgfältig zu lesen und es auch
zukünftig als Referenz zur Handhabung aufzubewahren.
Wichtig:
Nach der Installation muss die Freisprechanlage zunächst mit einem Bluetooth fähigem Telefon
verbunden ("gepairt") werden. Dieser Prozess ist im Benutzerhandbuch beschrieben, welches
sich im Lieferumfang befindet.
Lieferumfang
REF:SEDEYA6100
HANDS-FREE CAR KIT
KIT MAINS LIBRES DE VOITURE
FREIHANDIGER AUTOINSTALLATIONSSATZ
CORREDO HANDS-FREE DELL'AUTOMOBILE
REF:SEDEYA6100
HANDS-FREE CAR KIT
KIT MAINS LIBRES DE VOITURE
FREIHANDIGER AUTOINSTALLATIONSSATZ
CORREDO HANDS-FREE DELL'AUTOMOBILE
2
USER MANUAL
INSTALLATION HANDBUCH
NOTICE DE MONTAGE
MANUALE DELL'INSTALLAZIONE
5
INSTALLATION MANUAL
INSTALLATION HANDBUCH
NOTICE DE MONTAGE
MANUALE DELL'INSTALLAZIONE
4
Make a Call
Faire un Appel
Machen einen Anruf
Haga una Llamada
Answer a Call
Le fait de répondre à un Appel
Das Antworten auf einen Anruf
Contestación de una Llamada
In a Call
Pendant un Appel
Während eines Anrufs
Durante una Llamada
John
x15
3
2
sec
Pairing * Le fait d'apparier * Paarung * Apareamiento *
8
sec
2
sec
12
sec
Code1234
6
1
8
1.
2.
3.
4.
5.
6.
7.
8.
Steuereinheit
Bedienschalter
Mikrofon mit Einbausatz
Einbauanleitung
Benutzerhandbuch
Kurzbedienungsanleitung
Anschlusskabel
Einbausatz
7
-9-
Montagevorschriften
1) Trennen der Fahrzeugbatterie:
Klemmen Sie den Minuspol der Autobatterie ab, bevor Sie mit der Montage beginnen. Machen
Sie sich nun die Rückseite des Radios zugänglich. Nun muss das Radio von der
Spannungsversorgung des Fahrzeugs getrennt werden. Beachten Sie hierbei zwingend die
Hinweise des Fahrzeug- oder Radioherstellers im Benutzerhandbuch.
2) Positionierung und Befestigung des Systems:
Die optimale Positionierung sowie Befestigung des Systems unterscheidet sich von Fahrzeug zu
Fahrzeug. Dennoch sollten folgende allgemeine Hinweise bei dem Einbau der Anlage beachtet
werden:
2.1- Positionierung der Steuereinheit
Befestigen Sie Steuereinheit in der gewünschten Position sicher unter Verwendung des
beiliegenden Befestigungsmaterials (Kabelbinder u. Klebeband). Wenn Sie das Klebeband
benutzen, reinigen Sie die Klebefläche zuvor mit dem beiliegendem Reinigungstuch.
- Platzieren Sie die Steuereinheit nicht hinter metallische Objekten, da dies den Bluetooth
Empfang durch Abschirmung beeinträchtigen könnte.
- Platzieren Sie die Steuereinheit so, dass sie keiner direkten Hitzestrahlung oder
Feuchtigkeit ausgesetzt ist.
2.2- Positionierung der Steuertaste:
Die Steuertaste (Bedienknopf) sollte so montiert werden, dass diese von der Fahrerposition
einfach zu erreichen ist. Sollte eine Bohrung für eine Aussparung des Bedienknopfes
erforderlich sein, verwenden Sie die im Lieferumfang enthaltene selbstklebende
Bohrschablone. Die Bohrung muss einen Durchmesser von 24mm haben und sollte
vorsichtig durchgeführt werden.
Bei Verwendung einer im Fahrzeug bestehenden Öffnung (z.B. durch Entfernen des
Zigarettenanzünders) dienen die im Lieferumfang enthaltenen Abstandsringe der optimalen
Anpassung an Geometrie und Design.
Sichern Sie die Steuertaste mit der beiliegenden Gegenmutter. Eventuell befreien Sie die
Abstandsringe von Grad oder Unebenheiten bevor Sie diese fixieren.
WICHTIG:
BEVOR Sie sich für das Bohren an einer bestimmten Position entscheiden, sollten Sie in der
Lage sein folgende Fragen zu beantworten:
- Was befindet sich unter der zu bohrenden Fläche? Ist der Raum ausreichend für den
Bedienschalter?
- Wird sichergestellt, dass durch die Bohrung keine wichtigen Leitungen oder Komponenten
zerstört werden?
- Werden durch das Einpassen des Bedienschalters keine wichtigen Komponenten verdeckt
oder in ihrer Funktion beeinträchtigt?
- 10 -
Montagevorschriften
2.3 – Mikrofonposition:
Das Mikrofon sollte oberhalb des Lenkrades oder in Kopfhöhe an der A-Säule befestigt
werden. Zur Fixierung verwenden Sie das im Lieferumfang enthaltene Klebeband. Reinigen
Sie zuvor die Klebefläche mit dem im Installationssatz beiliegendem Reinigungstuch
3) Anschluss des Systems:
Sobald alle Komponenten installieren wurden, können sie miteinander verbunden werden
(Sehen Sie hierzu die Verdrahtung des Kabelstrangdiagramms auf Seite 2)
3.1 - Steuertaste:
Verbinden Sie den 10poligen Stecker des Bedienknopfes mit dem Stecker des Steuergeräts.
3.2 - Mikrofon:
Verbinden Sie den 2poligen Stecker des Mikrofons mit dem Hauptkabelstrang der
Freisprechanlage (Stecker 2).
3.3 - Hauptverdrahtung Kabelstrang: (Siehe Seite 2 - Verdrahtung Kabelstrangdiagramm)
Bitte überprüfen Sie, ob das Radiosystem „Telefon Mute” unterstützt. Die „Telefon Mute“
Schnittstelle ist ggf. als eine separate Leitung verfügbar. Siehe dazu auch unten
aufgeführtes Beispiel.
3.3a - Radios MIT Telefon Mute Eingang:
- Verbinden Sie die PINK-farbige Leitung D mit dem Telefon Mute Eingang des
Radios unter Verwendung eines geeigneten Adapters oder Verbindungsstück.
- Verbinden Sie die GRAU-farbige Leitung A und die BLAU-farbige Leitung C
miteinander.
3.3b - Radios OHNE Telefon Mute Eingang:
- Leitung D wird NICHT verwendet.
- Verbinden Sie die GRAU-farbige Leitung A
und die GRAU-farbige Leitung B miteinander.
Verbinden Sie das Anschlusskabel der
Freisprechanlage mit dem Fahrzeug, indem sie es
zwischen Radio und dessen Anschlusskabel
anschließen. Hierfür verwenden Sie den im
Lieferumfang enthaltenen 14-poligen weißen
Anschlussstecker.
Nun verbinden Sie den verbleibenden 10-poligen
Stecker mit der Freisprechanlage.
TEL MUTE input
4) Batterie Anschluss:
Sobald alle Komponenten angeschlossen wurden, befestigen Sie die Verdrahtung
gegebenenfalls mit Kabelbindern. Setzen Sie eventuell entfernte Verkleidungen wieder
zusammen, befestigen Sie das Radio wieder im Radioschacht und klemmen Sie zuletzt die
Batterie wieder an.
5) Verbinden des Telefons (Pairing):
Bevor das Bluetooth System getestet werden kann, muss es zuvor mit dem Telefon gepaart
(gepairt) werden. Dieses Verfahren wird im Benutzerhandbuch unter Pairing beschrieben.
- 11 -
ITALIANO
Benvenuto
Grazie per aver scelto questo prodotto Subaru, specificatamente disegnato e sviluppato usando
l'ultima tecnologia Bluetooth per completare la gamma dei modelli dei veicoli Subaru.
Raccomandiamo di leggere il manuale PRIMA di cominciare l'istallazione del sistema e per poter
avere referenze future qualora il dispositivo fosse rimosso e trasferito ad un altro veicolo.
IMPORTANTE:
Una volta che il sistema e' stato istallato nel veicolo e PRIMA che sia azionato va prima
accoppiato con il/i telefono/i Bluetooth.
Si ottiene cio' seguendo una specifica procedura di accoppiamento, i cui dettagli si trovano nel
manuale dell'utente fornito nel kit.
Kit Contents
REF:SEDEYA6100
HANDS-FREE CAR KIT
KIT MAINS LIBRES DE VOITURE
FREIHANDIGER AUTOINSTALLATIONSSATZ
CORREDO HANDS-FREE DELL'AUTOMOBILE
REF:SEDEYA6100
HANDS-FREE CAR KIT
KIT MAINS LIBRES DE VOITURE
FREIHANDIGER AUTOINSTALLATIONSSATZ
CORREDO HANDS-FREE DELL'AUTOMOBILE
2
USER MANUAL
INSTALLATION HANDBUCH
NOTICE DE MONTAGE
MANUALE DELL'INSTALLAZIONE
5
INSTALLATION MANUAL
INSTALLATION HANDBUCH
NOTICE DE MONTAGE
MANUALE DELL'INSTALLAZIONE
4
Make a Call
Faire un Appel
Machen einen Anruf
Haga una Llamada
Answer a Call
Le fait de répondre à un Appel
Das Antworten auf einen Anruf
Contestación de una Llamada
In a Call
Pendant un Appel
Während eines Anrufs
Durante una Llamada
John
x15
3
2
sec
Pairing * Le fait d'apparier * Paarung * Apareamiento *
8
sec
2
sec
12
sec
Code1234
6
1
8
1. Unita'di controllo
2. Interruttore di controllo
3. Microfono con kit per il fissaggio
4. Manuale per l'istallazione
5. Manuale dell'utente
6. Guida rapida
7. Cablaggi
8. Kit per l'istallazione
7
- 12 -
Istruzioni per l'Istallazione
1) Disconnessione della Batteria:
English
Disconnettere la batteria del veicolo osservando le normali procedure di disconnessione della
batteria e rimuovere l'assemblaggio radio del veicolo.
Consultare il manuale dell'officina dei veicoli per ulteriori informazioni ed assicurarsi che
vengano scritti i vari codici di una qualsiasi radio o dell'allarme prima di disconnettere.
2) Posizionamento dei Componenti
I posizionamenti raccomandati dei componenti si trovano nella sezione delle informazioni
specifiche del veicolo piu' avanti nel manuale ma dal momento che le specifiche del modello
possono cambiare, vanno fatte le seguenti osservazioni generali e seguente le seguenti
procedure di montaggio quando si scelgono le posizioni e si fissano i componenti:
2.1 Posizionamento dell'unita' di controllo:
Assicurarsi che l'unita' di controllo sia nella posizione scelta usando l'adesivo in velcro od i
fissaggi del cavo forniti nel kit.
Quando si usa il velcro, assicurarsi che le superfici siano pulite usando un batuffolo con
alcohol fornito nel kit del microfono.
- Non posizionare l'unita' di controllo in una qualsiasi bordatura metallica perche' potrebbe
schermare la comunicazione Bluetooth.
- Scegliere una posizione per l'unita' di controllo che sia lontana da una diretta fonte di
estremo calore od umidita'.
2.2 Posizionamento del bottone di controllo:
Il bottone di controllo andrebbe montato cosicche' possa essere facilmente raggiungibile
dalla posizione del guidatore. Usare la sagoma auto adesiva fornita nel kit per determinare
la posizione esatta del foro ed una volta che e' stato posizionato nella posizione scelta,
trapanare con attenzione il buco di 24 mm per l'assemblaggio dell'interruttore.
IMPORTANTE:
E' essenziale quando si sceglie una posizione dell'interruttore che si presti estrema cura PRIMA
di usare il trapano e che si considerino le seguenti domande:
- Cosa c'e' dietro il pannello ed e' sicuro rimuoverlo per assicurarsi che ci sia spazio
sufficiente per la profondita' dell'interruttore?
- Una volta che l'interruttore e' stato montato ostruirebbe una qualsiasi altra attrezzatura dietro
il pannello per la sua sostituzione?
- E' necessario rimuovere il pannello per assicurarsi che il foro della posizione possa venire
trapanato a forma di quadrato senza rischio che il trapano interferisca con qualsiasi altra
cosa - settaggio dei fili etc..?
- 13 -
Istruzioni per l'Istallazione
2.3 Posizione del microfono:
Il microfono andrebbe posizionato sopra la colonna dello sterzo, attorno od in una posizione
simile usando l'adesivo fornito facendo attenzione che sia rivolto verso il guidatore.
3) Connessione dei componenti del sistema:
(Con riferimento al diagramma - Pagina 2)
Una volta che tutti i componenti sono stati istallati, possono essere connessi insieme.
3.1Microfono:
Inserire il connettore del telefono nel piccolo connettore della radio principale.
3.2 Bottone di Controllo:
Inserire il connettore del telefono nel piccolo connettore della radio principale.
3.3 Cablaggi principali (Con riferimento al diagramma - Pagina 2)
Prima di connettere il sistema audio principale e' importante determinare se l'audio ha un
input " TEL MUTE". Questo input e' di solito un cavo separato dietro la radio - vedi l'esempio
sotto.
3.3a Veicoli CON l'input Mute:
- Connettere il cavo ROSA D al filo dell'input
Tel Mute usando un connettore adatto.
- Connettere il cavo GRIGIO A ed il cavo
BLU C insieme.
TEL MUTE input
3.3b Veicoli senza l'input MUTE:
- NON connettere il filo D
- Connettere il filo GRIGIO A ed il filo
GRIGIO B insieme.
Interconnettere I 14 connettori bianchi del principale
sistema di fili tra il sistema di fili del veicolo e l'unita'
della radio.
Inserire il principale sistema di fili nell'unita'di controllo.
4) Riassemblaggio & Riconnessione della batteria:
Una volta che tutti i componenti sono stati riconnessi. Sistemare i cablaggi in eccesso e rendere
sicuri con legami del cavo ove necessario. Riassemblare tutti i pannelli dell'assetto ed i
componenti del veicolo e riconnettere la batteria seguendo le normali procedure di
riconnessione.
5) Accoppiamento del telefono:
Prima che funzioni il sistema Bluetooth, va accoppiato al telefono del cliente. Vedere le
procedure nel manuale dell'Utente.
- 14 -
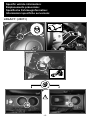
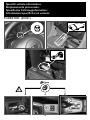
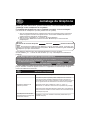
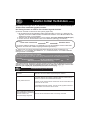
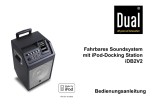
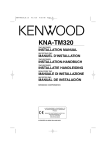
Specific vehicle information:
Emplacements préconisés:
Spezifische Fahrzeuginformation:
Informazioni specifiche sul veicolo:
LEGACY: (2007>)
24mm
!
- 15 -
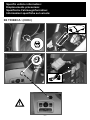
Specific vehicle information:
Emplacements préconisés:
Spezifische Fahrzeuginformation:
Informazioni specifiche sul veicolo:
FORESTER: (2006>)
24mm
!
- 16 -
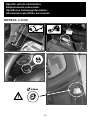
Specific vehicle information:
Emplacements préconisés:
Spezifische Fahrzeuginformation:
Informazioni specifiche sul veicolo:
B9 TRIBECA: (2006>)
24mm
!
- 17 -
Specific vehicle information:
Emplacements préconisés:
Spezifische Fahrzeuginformation:
Informazioni specifiche sul veicolo:
IMPREZA: (>2008)
24mm
!
- 18 -
REF:SEDEYA6100
HANDS-FREE CAR KIT
KIT MAINS LIBRES DE VOITURE
KFZ-FREISPRECHEINRICHTUNG
VIVA VOCE PER AUTO
USER MANUAL
MANUEL D'UTILISATEUR
BENUTZERHANDBUCH
MANUALE DELL'UTENTE
Index
English:
Quick start guide.........................................................................
Pairing the phone........................................................................
Pairing Troubleshooting................................................
Operation.....................................................................................
Bluetooth Connection...................................................
Connection Priority........................................................
Making a call.................................................................
Rejecting a call..............................................................
Private call....................................................................
Disconnection from the handsfree system....................
Controlling the volume..................................................
Sound quality................................................................
Specifications..............................................................................
3
4
4
5
5
5
5
5
6
6
6
6
19
Français:
Guide de démarrage rapide........................................................
Jumelage du téléphone..............................................................
Résolution de problèmes..............................................
Utilisation.....................................................................................
Connexion de Bluetooth...............................................
Priorité de connexxion..................................................
Passer un appel............................................................
Raccrocher ou rejeter un appel....................................
Appel privé....................................................................
Déconnexion du kt mains libres....................................
Contrôle du volume.......................................................
Qualité sonore...............................................................
Caractéristiques..........................................................................
7
8
8
9
9
9
9
9
10
10
10
10
19
Deutsch:
Kurzbedienungsanleitung..........................................................
Telefon Initial Verbinden (Pairing).............................................
Fehlerbehebung beim Pairing.......................................
Bedienung....................................................................................
Bluetooth Verbindung...................................................
Prioritäten verbundener Telefone..................................
Durchführen eines Telefonats.......................................
Auflegen & Ablehnen eines Telefonats.........................
Privat-Modus.................................................................
Trennung der Freisprechfunktion..................................
Lautstärke verändern....................................................
Sprachqualität...............................................................
Spezifikationen............................................................................
11
12
12
13
13
13
13
13
14
14
14
14
19
Italiano:
Guida rapida all'Avvio................................................................
Accoppiamento del telefono......................................................
Per risolvere i problemi dell'Accoppiamento:................
Operazioni....................................................................................
Connessione Bluetooth.................................................
Priorita' di Connessione................................................
Fare una chiamata........................................................
Rifiutare una chiamata..................................................
Chiamata privata...........................................................
Disconnessione dal sistema mani libere.......................
Controllo del volume.....................................................
Qualita' del suono.........................................................
Specifiche....................................................................................
15
16
16
17
17
17
17
17
18
18
18
18
19
-2-
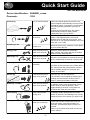
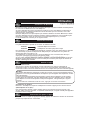
Quick Start Guide
Device Identification: SUBARU_xxxxx
Passcode:
1234
Connecting
Turn on vehicle ignition
(*)
When the vehicle ignition is turned on, the
paired cellphone automatically connects to the
handsfree system. Connection is confirmed by
ascending beeps (dependent upon type of
phone).
If there are no paired phones, the system
automatically enters the pairing mode
(dependent upon type of phone).
Press and hold the button until you hear 3
beeps - after approximately 12 seconds.
Release and you will hear a long buzz. Find
the device on your phones Bluetooth menu and
enter the 1,2,3,4 code.
Pairing
Press control button for
12 seconds
Answering a call
Press control button
quickly once
When the phone rings, press the control button
once to answer the call.
Ending a call
Press and hold control
button for 2 seconds
Press the control button for 2 seconds.
After a pause, the system will give an audible
beep to confirm disconnection.
Rejecting a call
Press and hold control
button for 2 seconds
Adjusting the volume
Press control button
repeatedly
Private call
Press and hold control
button for 8 seconds
During a call, you can transfer the
conversation to the handset by pressing and
holding the control button until you hear 2
beeps - after approximately 8 seconds.
Redialling a number
Press and hold control
button for 2 seconds
In standby mode, press and hold the control
button until you hear single beep - after
approximately 2 seconds. The system will
automatically redial the last number.
Voice dialling
Press control button
quickly once
In standby mode, quickly press the control
button to enter the voice dialling mode. Clearly
speak the name of the person you wish to call.
Erasing paired devices
Press and hold control
button for 15 seconds
Press and hold the control button until you
hear four beeps - after approximately 15
seconds. The Bluetooth system memory is
erased.
Refer to your phones user guide to erase the
phone memory.
-3-
Press the control button for 2 seconds until you
hear a audible beep to reject an incoming call.
During a call, the volume can be adjusted up
and down by short presses of the control button.
The volume level will cycle between min/max
with an audible double-tone at the top and
bottom of the scales.
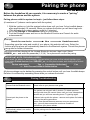
Pairing the phone
Before the handsfree kit can operate, it is necessary to create a "pairing"
between the phone and the system.
Pairing phones with the system is simple - just follow these steps:
(A maximum of 3 phones can be paired with the system)
1. With the ignition on, hold the system button down until you hear 3 short audible beeps after approximately 12 seconds. When you release the button you will hear long buzz.
(This activates the systems pairing mode for 5 minutes).
2. Go to the Settings or Connections menu on your phone.
3. Find the Bluetooth menu and turn on the Bluetooth function and "search for audio
enhancements".
Example:
Search for new device
New
Handsfree search
Depending upon the make and model of your phone, this selection will vary. Select the
function and the phone will automatically search for the Bluetooth system. Consult the phones
user guide for further information.
Your phone will then display all the located Bluetooth devices it has found. Select
SUBARU_xx.... and enter the passcode (1,2,3,4). Your phone will confirm the paring.
IMPORTANT NOTE FOR NOKIA USERS:
If you want the phone to automatically connect when you turn on the vehicle ignition, you
must select Paired devices then SUBARU_xx.. on the phone menu and change the default
setting to:
Device authorised
Yes or Connection Authorised
Yes
or Auto-Connect without Authorisation
Yes
All phone pairings can be deleted by pressing the control button until you hear 4 audible beeps.
Deletion is confirmed by ascending tones when you release the button.
Pairing Troubleshooting
Cannot find the Bluetooth menu
Please refer to your phones user guide
The system can only pair with 3 phones. To delete previous
pairings hold down the control button until you hear 4 beeps then
release and you will hear asceding tones. Try pairing again.
Cannot pair the phone to the
system
Software lock-up with the phone - remove and replace it's battery
and retry the pairing procedure.
Delete other paired Bluetooth devices from your phone and
retry - you may have exceed the maximum number of
connections your phone allows.
My phone does not connect
automatically when I turn on the
vehicle ignition
See the pairing note for Nokia users
-4-
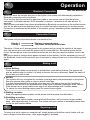
Operation
Bluetooth Connection
When you enter the vehicle and turn on the ignition, the system will automatically establish a
Bluetooth connection with your phone.
If it is the first time the connection has been made or your phone was not the last phone
connected, it will take between 40-90 seconds to connect - otherwise it will take around 10
seconds.
Some phones are faster than others at establishing Bluetooth connections so the system leaves
time for the phone with the highest priority to connect first before searching for the next phone.
Connection is confirmed by the phone or the system giving 3 ascending beeps (dependent upon
phone).
Connection Priority
The system will prioritise which phone it connects to first:
Priority 1
Priority 2
The last connected phone
The phone connected most times
Therefore: If there are 3 phones paired to the system and you enter the vehicle at the same
time, the person who last used the system will be connected first. Should that phone not be
found, the next phone to be connected would be the one who has used the system most in the
past.
Should you want to choose which phone connects to the system, it will be necessary to turn off
the Bluetooth function of the phone/s you do not want to connect then turn on the vehicle ignition
again.
Making a call
1) Voice Dialling:
Press the control button once quickly to activate the voice dialling feature. The system will
give an audible beep to confirm it is ready to receive the voice command. Speak the name of
the contact you wish to call.
NOTES:
The system will only recognise the contacts voice tags which are prerecorded on the phone.
See your phones user guide on how to record voice tags.
It is also recommended to record the voice tags on to the phone through the handsfree
system as this will be more representative of the voice command used when in the vehicle.
If the phone has no prerecorded voice tags it will acknowledge with 4 audible beeps.
To cancel the voice dialling simply press the control button again.
2) Dialling a number:
Enter the required phone number on the phone itself and press the dial button.
3) Redialling a number:
To redial the last called number, press and hold the button until you here a single audible
beep - after approximately 2 seconds. The system will give a series of ascending beeps then
re-call the last number dialled.
Rejecting a call
To hang up a call or reject an unwanted call, simply press and hold the control button until you
here a single confirmation beep - after approximately 2 seconds.
-5-
Operation
Private call
Should you wish to have a private conversation on your handset, simply press and hold the control button
during the conversation, until you hear 2 audible beeps - after approximately 8 seconds. The conversation
will automatically be transferred to your phone handset.
If you wish to transfer the conversation back to the handsfree system, simply press and hold the control
button until you hear 2 audible beeps - after approximately 8 seconds.
Disconnection of handsfree system
Should you not wish to make or receive any phone calls on your handsfree system, simply press and hold
the control button until you hear 2 audible beeps - after approximately 8 seconds (with the vehicle ignition
on). All calls will be directed to your phone handset.
To reconnect your phone to the handsfree system, press an hold the control button until you hear 2
audible beeps - after approximately 8 seconds (with the vehicle ignition on).
NOTE: The phone will automatically return to handsfree mode if you turn the vehicle ignition off then on
again.
IMPORTANT:
If you arrive at your destination during a conversation and turn off the vehicle ignition, the call will be
interrupted. Dependent upon the type of phone it will either automatically transfer the call back to your
phone handset or you may have to do it manually.
It is recommended that you transfer the call manually before turning off the ignition to avoid any
interruption. This is done by pressing the control button for 2 seconds until you hear 2 audible beeps or
through the menu on your phone.
Controlling the volume
The volume of the conversation can be adjusted up and down during a conversation by quick presses of
the control button. The volume will cycle in 15 steps between maximum and minimum volume and at each
end of the scale, 2 audible beeps will be given to advise the volume is changing direction.
Sound quality
The system incorporates the latest DSP (Digital Signal Processing) technology and very high quality
components to provide you with the best sound quality for both the caller and receiver.
It is important however, to remember a few simple things which will give you the best results:
1) Road Noise:
The faster you drive, the more road noise is created by tyres, open windows etc and this will naturally
be transmitted via the microphone to your caller. Close windows to reduce noise whenever possible.
2) Echo cancellation:
The system incorporates excellent echo cancellation technology which prevents the caller hearing
themselves back through the handsfree kit. Keeping the volume at the lowest level at which you can
still easily hear them will provide the best results for your caller and will minimise echo effects.
3) Talk at normal level;
As the system uses the latest in microphone sensitivity technology it is not required to "yell" at the
system in order for your caller to hear you clearly. Your voice volume will be automatically reduced by
the DSP technology if your shout at the system and you may in fact sound quieter to your caller than if
you speak at the normal level.
-6-
Guide de démarrage rapide
Identification produit : SUBARU_xxxxx
Code de jumelage:
1234
Mise en marche
Mettre le contact
d'allumage du véhicule
(*)
Quand le contact d'allumage est mis, le téléphone
jumelé se relie automatiquement au système mains
libres: Confirmation par un signal musical.
S'il n'y a pas de téléphone jumelé, le système entre
automatiquement en mode jumelage.
Jumelage
Appuyer sur le bouton de
commande pendant 12
secondes
Appuyer et maintenir le bouton jusqu'à ce que vous
entendiez une suite de 3 signaux sonores après
environ 12 secondes. Lancer une recherche de
périphériques via le menu de votre téléphone ,
valider SUBARU_xx et entrer le code 1234 pour
terminer le jumelage.
Répondre à un appel
Appuyer sur le bouton de
commande une fois
Quand le téléphone sonne, appuyer sur le bouton de
commande une fois pour répondre à l' appel
Raccrocher
Appuyer sur le bouton de
commande pendant 2
secondes
Appuyer sur le bouton de commande pendant 2
secondes. Après une pause, un "bip" sonore
confirme le raccrochage.
Rejet d'un appel
Appuyer sur le bouton de
commande pendant 2
secondes.
Appuyer sur le bouton de commande pendant 2
secondes jusqu'à ce que vous entendiez un " bip"
sonore confirmant le rejet de l'appel entrant
Ajustement du volume
Appuyer sur le bouton de
commande à plusieurs
reprises
Pendant un appel, le volume peut être ajusté du
maximum au minimum par des pressions brèves du
bouton de commande . Le niveau de volume fera un
cycle entre le maxi et le mini ; une double-tonalité
indique le niveau de volume maximum / minimum
Appel privé
Appuyer sur le bouton de
commande pendant 8
secondes
Pendant un appel, vous pouvez transférer la
conversation vers le combiné en appuyant et
maintenant le bouton de commande jusqu'à ce
que vous entendiez 2 suites de signaux sonores après environ 8 secondes.
Fonction " bis"
Appuyer sur le bouton de
commande pendant 2
secondes
En mode 'raccroché', appuyer et maintenir le
bouton de commande jusqu'à ce que vous
entendiez un "bip" sonore après environ 2
secondes. Le système recomposera
automatiquement le dernier numéro appelé.
Commande vocale
Appuyer 1 fois brièvement
sur le bouton de commande
Dans le mode 'raccroché', appuyer brièvement sur
le bouton de commande pour entrer en mode
commande vocale. Prononcer clairement le nom de
votre correspondant après le " bip".
Effacement de la mémoire
Maintenir une pression sur
le bouton de commande
pendant 15 secondes
-7-
Appuyer et maintenir le bouton de commande
jusqu'à entendre 4 suites de signaux sonores
après environ 15 secondes. La mémoire du
système Bluetooth sera effacée. Le système
repassera en mode jumelage.
Jumelage du téléphone
Avant que le kit mains libres puisse fonctionner, il est nécessaire de créer un
"jumelage" entre le téléphone et le système.
Le jumelage des téléphones avec le système est simple - suivre ces étapes:
(Un maximum de 3 téléphones peut être jumelés avec le système)
1. Avec le contact d'allumage mis, maintenir le bouton de commande jusqu'à entendre 3
suites de signaux sonores courts après environ 12 secondes. Relacher le bouton, le
systeme restera 5 minutes en mode jumelage.
2. Aller au menu configuration ou connexion de votre téléphone.
3. Trouver le menu Bluetooth et activez la fonction Bluetooth puis "rechercher des
périphériques ".
Exemple:
Recherche de nouveau dispositif
Nouveau
Recherche Kit mains
libres
Selon la marque et le modèle de votre téléphone, ce choix changera. Activer la fonction et le
téléphone recherchera automatiquement le système Bluetooth. Consulter le guide d'utilisateur
du téléphone pour plus d'informations
Votre téléphone affichera alors tous dispositifs Bluetooth trouvés à proximité .
Choisir SUBARU_xx…. et entrer le code de liaison (1.2.3.4). Votre téléphone confirmera le
jumelage.
NOTE IMPORTANTE POUR DES UTILISATEURS DE NOKIA:
Si vous voulez que le téléphone se relie automatiquement quand vous mettez le contact du
véhicule, vous devez choisir les dispositifs associés puis SUBARU_xx. sur le menu de
téléphone et changer le mode par défaut en :
Le dispositif est autorisé
oui ou Raccordement autorisé
oui
ou S'autorelie sans autorisation
oui
Tous les téléphones jumelés peuvent êtres supprimés en appuyant sur le bouton de commande
jusqu'à entendre 4 suites de signaux sonores . La suppression est confirmée par un signal
musical au relâchement du bouton .
Résolution de problèmes
Menu Bluetooth inaccessible
Veuillez vous référer à votre guide d'utilisateur du téléphone
Le système ne peut se jumeler qu'avec 3 téléphones au maximum.
Pour supprimer des jumelages précédents maintenir le bouton de
commande jusqu'à ce que vous entendiez 4 suites de signaux sonores
puis un signal musical au relâchement et recommencez le jumelage.
Jumelage du téléphone au
système impossible
Blocage du logiciel avec le téléphone : Faire un " reset" en
débranchant le + batterie et recommencer la procédure de jumelage.
Supprimer d'autres dispositifs Bluetooth jumelés dans votre téléphone ,
vous pouvez avoir excédé le nombre maximum de raccordements que
votre téléphone permet
Mon téléphone ne se relie pas
automatiquement quand je mets
le contact du véhicule
Regardez la note pour l'utilisation des Nokia (valable aussi pour
d'autres marques)
-8-
Utilisation
Connexion du Bluetooth
Quand vous entrez dans le véhicule et mettez l'allumage, le système établira automatiquement
la connexion du Bluetooth avec votre téléphone.
Si c'est la première fois que le raccordement a été fait ou que votre téléphone n'était pas le
dernier connecté le système prendra entre 40-90 secondes pour se connecter, sinon cela
prendra environ 10 secondes.
Quelques téléphones sont plus rapides que d'autres à établir la connexion Bluetooth; la durée
peut etre rallongée lorsque le système recherche d'abord le téléphone avec la priorité la plus
élevée pour se relier, avant de rechercher le prochain téléphone puis s'y connecter.
Le raccordement est confirmé par un signal musical
Priorité de connexion
Le système donnera la priorité de connexion de manière suivante:
Priorité 1
Priorité 2
le dernier téléphone connecté
le téléphone connecté la plupart du temps
Par conséquent : S'il y a 3 téléphones jumelés au système et que vous entrez dans le véhicule
en même temps, la personne disposant du téléphone qui a été utilisé avec le système en
dernier sera celle connectée en 1er.
Si ce téléphone n'a pas être trouvé, le prochain téléphone à se connecter sera celui qu'a
employé le système le plus fréquemment dans le passé.
Si vous voulez choisir le téléphone à relier au système, il sera nécessaire d'arrêter la fonction
Bluetooth du/des téléphone(s) que vous ne voulez pas connecter puis couper et remettre le
contact d'allumage du véhicule.
Passer un appel
1) Commande vocale :
Appuyer sur le bouton de commande une fois brièvement pour activer le dispositif de
commande vocale. Le système emettra 1 "bip" sonore de confirmation puis attendra votre
commande vocale. Prononcez clairement le nom du correspondant que vous souhaitez appeler.
NOTES :
Le système identifiera les empreintes vocales des contacts qui sont pré-enregistrées dans le
téléphone. Voir votre guide d'utilisateur du téléphone pour enregistrer des empreintes vocales
dans le répertoire.
Il est recommandé d'enregistrer les empreintes vocales dans le téléphone par le système
mains libres car l'empreinte sera plus représentative pour son utilisation dans le véhicule.
Si le téléphone n'a aucune empreinte vocale pré-enregistrée, il le signalera par 4 signaux
sonores.
Pour annuler une commande vocale en cours, appuyer à nouveau sur le bouton.
2) Composer un numéro:
Entrer le n° de téléphone requis sur le téléphone lui-même et appuyer sur le bouton d'envoi.
3) Recomposer un n° (bis) :
Pour recomposer le dernier numéro appelé, appuyer et maintenir le bouton jusqu'au " bip"
sonore après environ 2 secondes. Le système confirmera par un signal musical puis rappellera
le dernier numéro composé.
Raccrocher ou rejeter un appel
Pour raccrocher ou rejeter un appel (non désiré), appuyer et maintenir le bouton de commande
jusqu'au "bip" après environ 2 secondes.
-9-
Utilisation
Appel privé
Si vous souhaitez avoir un entretien privé sur votre combiné, pressez et maintenez le bouton de
commande pendant la conversation, jusqu'à entendre 2 suites de signaux sonores après
environ 8 secondes. La conversation sera automatiquement transférée sur votre combiné de
téléphone.
Si vous souhaitez transférer la conversation de nouveau vers le système mains libres, appuyer
et maintenez le bouton de commande jusqu'à entendre 2 suites de signaux sonores après
environ 8 secondes.
Déconnexion du kit mains libres
Si vous souhaitez déconnecter le système mains libres pour recevoir tous les appels sur votre
combiné, pressez et maintenez le bouton de commande jusqu'à entendre 2 signaux sonores après environ 8 secondes (le contact d'allumage du véhicule mis). Tous les appels seront
dirigés vers le combiné de votre téléphone.
Pour reconnecter votre téléphone au système mains libres, pressez et maintenez le bouton de
commande jusqu'à entendre 2 signaux sonores après environ 8 secondes (le contact
d'allumage du véhicule mis). La reconnexion est confirmée par un signal musical.
NOTE: Le téléphone reviendra automatiquement en mode mains libres si vous coupez puis
remettez le contact d'allumage du véhicule.
IMPORTANT : Si vous arrivez à votre destination pendant une conversation et coupez
l'allumage du véhicule, la communication sera interrompue. Selon le type de téléphone, le
transfert se fera automatiquement vers votre combiné ou vous devrez le faire manuellement.
Nous vous recommandons de transférer l'appel manuellement avant la coupure du contact
d'allumage pour éviter le risque d'interruption. Ceci se fait en appuyant sur le bouton de
commande jusqu'à ce que vous entendiez 2 suites de signaux sonores apres environ 8
secondes, ou en utilisant le menu " deconnexion" de votre téléphone.
Contrôle du volume
Le volume de la conversation peut être ajusté en + ou - pendant une communication par des
pressions successives sur le bouton de commande.
La progression du réglage entre maximum et minimum se fait sur 15 niveaux.
A chaque extrémité du réglage, 2 signaux sonores informent du changement de direction.
Qualité sonore
Le système incorpore la dernière technologie DSP (traitement numérique du signal) et des
composants de haute qualité pour garantir la meilleure qualité audio de la communication. Il
est important cependant, de se rappeler des points suivants qui donneront les meilleurs
résultats :
1) Bruit de roulement :
Plus vous roulez rapidement, plus les bruits de roulement créés par les pneus, les fenêtres
ouvertes etc. seront naturellement communiqués par l'intermédiaire du microphone à votre
correspondant. Fermez les fenêtres pour réduire le bruit autant que possible.
2) Annulation d'écho:
Le système incorpore une excellente technologie d'annulation d'écho qui evite à votre
correspondant de s'entendre en fond sonore par le kit mains libres. Règler le volume au niveau
le plus bas possible vous permettant d'entendre encore clairement , fournira les meilleurs
résultats pour votre correspondant en réduisant au minimum les effets d'écho.
3) Entretien au niveau normal:
Le système emploie en complément du DSP une technologie de sensibilité de microphone qui
n'exige pas « de hurler » pour que votre correspondant vous entendre clairement. Le volume de
votre voix sera automatiquement ajusté par la technologie du DSP si vous parlez trop
fort,permettant ainsi à votre correspondant de vous entendre clairement
- 10 -
Kurzbedienungsanleitung
Device Identification: DGTTALK_xxxxx
Passcode:
1234
Verbinden
Fahrzeug (-zündung)
anlassen
(*)
Wurde ein Telefon bereits Initial mit der
Freisprechanlage verbunden ("gepairt"), so wird die
Verbindung mit eingeschalteter Zündung
automatisch wieder hergestellt. Dies wird (abhängig
vom Telefon) durch einen Signalton bestätigt. Sollte
noch kein Telefon mit der Freisprechanlage
verbunden sein, wechselt das System automatisch
in den "Pairing - Modus".
Pairing (Initiale Verbindung
herstellen)
Bedienschalter für 12
Sekunden gedrückt halten
Bluetoothfunktion am Telefon aktivieren.
Bedienschalter gedrückt halten, bis ein Signalton
3mal ertönt (ca. 12 Sekunden). Bedienschalter
anschließend loslassen und im Bluetooth Menü des
Telefons den Code 1, 2, 3, 4 eingeben.
Gespräch annehmen
Bedienschalter einmalig
kurz drücken
Um bei eingehendem Anruf das Gespräch
anzunehmen, muss der Bedienschalter einmalig kurz
gedrückt werden.
Gespräch beenden
Bedienschalter für 2
Sekunden gedrückt
halten
Um ein Gespräch zu beenden, muss der
Bedienschalter für 2 Sekunden gedrückt gehalten
werden.
Gespräch ablehnen
Bedienschalter für 2
Sekunden gedrückt
halten
Um ein Gespräch abzulehnen, muss der
Bedienschalter für 2 Sekunden gedrückt gehalten
werden.
Lautstärke verändern
Bedienschalter wiederholt
kurz drücken
Privat-Modus
Bedienschalter für 8
Sekunden gedrückt halten
Während eines Gesprächs im Freisprech-Modus
kann dieses durch dauerhaftes Drücken des
Bedienschalters (ca. 8 Sekunden) wieder in den
Privat-Modus transferiert werden, so dass das
Gespräch nicht mehr über die Fahrzeuglautsprecher
wiedergegeben stattfindet. Beim Umschalten in den
Privat-Modus erscheint ein zweifacher Signalton.
Wählen einer Nummer
Bedienschalter für 2
Sekunden gedrückt halten
Im Ruhezustand Bedienschalter dauerhaft drücken
bis Signalton ertönt (ca. 2 Sekunden). Nun wird
eine zuvor gewählte Nummer erneut gewählt.
Wählen über Sprachsteuerung
Bedienschalter einmal
kurz drücken
Im Ruhezustand wird durch einmalig kurzes Drücken
des Bedienschalters die Sprachwahlsteuerung des
Handys aktiviert. Für korrekte Funktionalität muss
der zu wählende Name laut und deutlich gesprochen
werden.
Initiale Verbindung
löschen
Bedienschalter für 15
Sekunden gedrückt halten
Um ein Mobiltelefon dauerhaft vom System zu
trennen, muss der Bedienschalter für 15 Sekunden
gedrückt gehalten werden. Das Löschen des
Mobiltelefons wird durch einen viermaligen
Signalton bestätigt.
Die Freisprecheinrichtung kann sich nun nicht mehr
mit dem Mobiltelefon verbinden.
- 11 -
Die Lautstärke kann während eines Gesprächs
verändert werden, indem der Bedienschalter
wiederholt und in kurzen Zyklen gedrückt wird. Die
Lautstärke verändert sich nun zwischen minimaler
und maximaler Lautstärke. Es erscheint ein
zweifacher Signalton beim Erreichen des Mindestoder Maximalwertes.
Telefon Initial Verbinden
(Pairing)
Die Freisprechanlage muss vor Gebrauch zunächst mit einem Bluetooth fähigen
Telefon Initial verbunden (gepairt) werden.
Der Pairing Prozess ist einfach und erfordert folgende Schritte:
(Es können maximal 3 Telefone mit dem System gepairt sein)
1. Mit angelassener Zündung Bedienschalter gedrückt halten, bis nach ca. 2 Sekunden ein
Signalton 3mal ertönt. Bedienschalter anschließend loslassen und im Bluetooth Menü des
Telefons den Code 1,2,3,4 eingeben.
2. Aktivieren Sie die Bluetoothfunktion in Ihrem Telefon (z.B. unter Settings/Verbindungen)
3. Suchen Sie nach "Audiozubehör" oder "neuen Geräten" (abhängig vom Telefon)
Beispiel:
Suche nach neuem Gerät
Neu
Handsfree Suche
Der genaue Ablauf ist abhängig vom Hersteller und Typ des jeweiligen Telefons. Bitte lesen
Sie hierzu auch die beim Telefon beigefügte Bedienungsanleitung.
Ihr Telefon zeigt nun alle in Reichweite befindlichen Bluetooth Geräte. Wählen Sie nun
SUBARU_xx… an und geben anschließend 1, 2, 3, 4 als Passwort ein. Ihr Telefon sollte den
Pairing Prozess nun bestätigen.
Wichtige Zusatzinformation zu NOKIA:
Bei manchen NOKIA Telefonen muss zusätzlich noch eine Grundeinstellung verändert werden,
damit das Mobiltelfon sich nach dem Pairing automatisch mit der Freisprecheinrichtung
verbindet:
Gerät freigegeben
JA oder Verbindung freigeben
JA
Oder Auto-Connect ohne Autorisierung
JA
Alle Telefone können dauerhaft im System gelöscht werden, indem der Bedienknopf so lange
gedrückt wird, bis ein viermaliger Signalton ertönt (ca. 15 Sekunden). Nach dem Loslassen des
Bedienknopfes bestätigt ein ansteigendes Signal den Löschvorgang.
Fehlerbehebung beim Pairing
Bluetooth Menu wird nicht
gefunden
Bitte lesen Sie hierzu Bedienungsanleitung des Telefons
Im System befinden sich bereits 3 gepairte Telefone. Löschen Sie ein
Telefon im System und versuchen Sie es erneut.
Pairing funktioniert nicht
Problem mit der Telefonsoftware. Entnehmen Sie den Telefonakku und
versuchen Sie es erneut.
Kapazitätsproblem des Telefons. Löschen Sie ein gepairtes Gerät aus
Ihrem Telefon und versuchen Sie es erneut.
Trotz erfolgreichen Pairing wird
keine automatische Verbindung
Ersehen Sie die Zusatzinformation zum Pairing zu NOKIA
zwischen Telefon und
Freisprechanlage hergestellt
- 12 -
Bedienung
Bluetooth Verbindung
Beim Anschalten der Fahrzeugzündung wird automatisch die Verbindung zur Freisprechanlage
hergestellt. Dieser Prozess dauert in der Regel 10 Sekunden. Ausnahme im Fall der
Erstverbindung oder wenn das aktuelle Telefon nicht das zuletzt verbundene Gerät ist. In
diesem Fall kann es 40-90 Sekunden dauern bis eine Verbindung zum Telefon hergestellt wird.
Die unterschiedliche Zeit hängt vom Telefontyp ab. Ein erfolgreicher Verbindungsaufbau wird
durch einen dreifachen Signalton mit aufsteigender Lautstärke bestätigt.
Prioritäten verbundener Telefone
Das System definiert mit welchem Telefon es sich zuerst verbindet:
Priorität 1
Priorität 2
Das zuletzt verbundene Telefon
Das Telefon welches am meisten verbunden wurde
Daher: Wenn sich 3 Telefone im Fahrzeug befinden, welche mit der Freisprechanlage gepairt
sind, wird nur das Telefon zum Freisprechen aktiviert, welches zuletzt verbunden war. Ist es
jedoch erwünscht die Freisprechfunktion eines anderen Telefons zu nutzen, so muss die
Bluetooth Funktion der nicht erwünschten Telefone im Telefonmenü deaktiviert werden.
Anschließend muss die Fahrzeugzündung erneut betätigt werden.
Durchführen eines Telefonats
1) Wählen über Sprachsteuerung
Im Ruhezustand wird durch einmalig kurzes Drücken des Bedienschalters die
Sprachwahlsteuerung des Handys aktiviert.
Das System bestätigt die Sprachwahlfunktion durch einen Signalton. Sprechen Sie nun den
im Telefon hinterlegten Namen.
Beachten:
Die Spracherkennung funktioniert nur, wenn diese Funktion vom Telefon unterstützt wird.
Zur Aktivierung der Sprachsteuerung am Telefon lesen Sie bitte die beim Telefon beigefügte
Bedienungsanleitung. Sollte das Telefon die Möglichkeit bieten Sprachbefehle
aufzunehmen, wird empfohlen die Aufnahme über die Freisprechanlage durchzuführen. Dies
erhöht die Genauigkeit der Spracherkennung. Sollten keine Sprachbefehle im Telefon
hinterlegt sein, ertönt vom System ein viermaliger Signalton. Um die Sprachsteuerung zu
deaktivieren drücken Sie einmalig den Bedienschalter.
2) Wählen einer Telefonnummer
Geben Sie die gewünschte Telefonnummer über das Telefon ein. Aktivieren Sie
anschließend die Wahlfunktion..
3) Wiederholtes Wählen einer Telefonnummer
Im Ruhezustand (Zündung aus) drücken Sie den Bedienschalter dauerhaft bis ein Signalton
ertönt (ca. 2 Sekunden). Nun wird eine zuvor gewählte Nummer erneut gewählt. Das Wählen
der zuletzt gewählten Nummer wird durch eine Folge von Signaltönen indiziert.
Auflegen & Ablehnen eines Telefonats
Um ein Gespräch zu beenden oder abzulehnen, muss der Bedienschalter für 2 Sekunden
gedrückt gehalten werden. Ein Signalton bestätigt diesen Schritt.
- 13 -
Bedienung
Privat-Modus
Sollten Sie während eines Gesprächs den Freisprech-Modus verlassen wollen, um z.B. ein vertrauliches
Gespräch zu führen, wird dieses durch dauerhaftes Drücken des Bedienschalters (ca. 8 Sekunden) erreicht.
Ein zweifacher Signalton bestätigt diesen Schritt und das Gespräch wird nicht mehr über die
Fahrzeuglautsprecher sondern über das Telefon wiedergegeben. Erneutes dauerhaftes Drücken des
Bedienschalters (ca. 8 Sekunden) führt das Gespräch wieder zurück.
Trennung der Freisprechfunktion
Sollten Sie im aktiven Zustand (Zündung an) keine Gespräche über den Freisprech-Modus führen wollen,
drücken Sie dauerhaft den Bedienschalter (ca. 8 Sekunden) bis ein zweifacher Signalton ertönt. Ein
erneutes dauerhaftes Drücken des Bedienschalters (ca. 8 Sekunden) aktiviert die Freisprechfunktion wieder.
Dies wird ebenso durch An- und Ausschalten der Zündung erreicht.
WICHTIG: Beim Ausschalten der Fahrzeugzündung während eines Gesprächs wird die
Freisprechfunktion beendet. Je nach Telefontyp kann es erforderlich sein, dass Gespräch manuell in den
Private-Mode (Handset - Ausgabe des Gesprächs über das Telefon) zu transferieren. Daher wird
empfohlen vor dem Ausschalten der Fahrzeugzündung das Gespräch über den Bedienschalter vom
Freisprechmodus zu trennen (siehe Privat-Modus).
Lautstärke verändern
Die Lautstärke kann während eines Gesprächs verändert werden, indem der Bedienschalter wiederholt und
in kurzen Zyklen gedrückt wird. Die Lautstärke verändert sich nun zwischen minimaler und maximaler
Lautstärke in 15 Schritten. Es erscheint ein zweifacher Signalton beim Erreichen des Mindest- oder
Maximalwertes.
Sprachqualität
Das System entspricht der neuesten DSP (Digital Signal Processing) Technologie. Sowie bei den
Materialien als auch während der Produktion wurden höchste
Maßstäbe angewendet, die eine optimale Sprachqualität für Anrufer und Angerufenen garantiert.
Nichtsdestotrotz sollten folgende Faktoren bei der Nutzung und Bewertung der Soundqualität berücksichtigt
werden:
1) Außengeräusche
Mit steigender Geschwindigkeit steigt der Lärmpegel (durch Reifengeräusche, Wind, …) und somit sinkt
die empfundene Soundqualität. Schließen Sie daher wenn möglich die Fenster beim Telefonieren.
2) Echo Canellation
Echo Cancellation verhindert, dass der Anrufer seine eigene Stimme durch die Fahrzeuglautsprecher
hören kann. Das Freisprechsystem verfügt über hochwertige Echo Cancellation Technologie, jedoch wird
diese bei leiserer Wiedergabe des Gesprächs über die Fahrzeuglautsprecher noch erhöht.
3) Sprechen Sie in normaler Lautstärke
Das Freisprechsystem verfügt über ein hochwertiges Mikrofon. Dies erspart Ihnen lautes Schreien und
ermöglicht dennoch eine optimale Qualität Ihrer Stimme bei Ihrem Gesprächspartner. Lautes Sprechen
führt dazu, dass die DSP Technologie die Empfangssensibilität verringert. Daher wird empfohlen in
normaler Lautstärke zu sprechen.
- 14 -
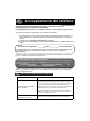
Guida rapida all'Avvio
Identificazione del Dispositivo:
Codice:
Connessione
SUBARU_xxxxx
1234
Accensione del veicolo
(*)
Una volta che il veicolo e' in moto, il telefono
cellulare accoppiato connette direttamente al
sistema mani libere. La connessione viene
confermata da dei segnali sonori ascendenti (a
seconda del tipo di telefono).
Se non vi sono telefono accoppiati, il sistema
entra automaticamente nella modalita' di
accoppiamento (a seconda del tipo di telefono)
Premere e tenere premuto finche' non si
sentono 3 suoni - dopo circa 12 secondi.
Rilasciare e si sentira' un suono prolungato.
Cercare il dispositivo nel menu Bluetooth del
telefono ed inserire il codice 1,2,3,4.
Accoppiamento
Premere il bottone di
controllo per
12 secondi
Rispondere ad una
chiamata
Premere il bottone di
controllo rapidamente
una volta.
Quando squilla il telefono premere il bottone d
controllo appena si risponde alla chiamata.
Terminare una
chiamata
Premere e tenere
premuto il bottone di
controllo per 2 secondi.
Dopo una pausa, il sistema dara' un segnale
sonoro che confermera' la disconnessione.
Rifiutare una
chiamata
Premere e tenere
premuto il bottone di
controllo per 2 secondi
Premere il bottone di controllo per 2 secondi
finche' non si sente un segnale sonoro che
rifiuta una chiamata in arrivo.
Premere ripetutamente
il bottone di controllo
Durante una chiamata, si puo' sistemare il
volume su e giu' premendo brevemente il
bottone di controllo. Il livello del volume avra' un
ciclo tra minimo/massimo con un segnale di
doppio tono nella parte alta e nella parte bassa
della scala.
Aggiustare il volume
Chiamata privata
Premere e tenere
premuto il bottone di
controllo per
8 secondi
Ricomporre un numero
Premere e tenere
premuto il bottone di
controllo per
2 secondi
Comporre la voce
Premere il bottone di
controllo rapidamente
una volta
Cancellazione dei
dispositivi accoppiati
Premere e tenere
premuto il bottone di
controllo per 15 secondi
- 15 -
Durante una chiamata si puo' trasferire la
conversazione al cellulare premendo e
tenendo premuto il bottone di controllo appena
si sentono due segnali sonori - dopo circa 8
secondi.
Nella modalita' di stand by, premere e tenere
premuto il bottone di controllo finche' non si
sente un segnale sonoro singolo - dopo circa
2 secondi. Il sistema ricomporra'
automaticamente l'ultimo numero.
Nella modalita' di stand by, premere
rapidamente il bottone di controllo per inserire la
modalita' di chiamata con la voce. Pronunciare
in maniera chiara il nome della persona che si
desidera chiamare.
Premere e tenere premuto il bottone di
controllo finche' non si sentono quattro segnali
sonori - dopo circa 15 secondi. La memoria del
sistema Bluetooth viene cancellata.
Fare riferimento alla guida dell'utente del
telefono per cancellare la memoria del telefono.
Accoppiamento del telefono
Prima che il kit mani libere possa operare, e' necessario creare un
"accoppiamento" tra il telefono ed il sistema.
L'accoppiamento dei telefoni con il sistema e' semplice - vanno seguiti i seguenti passi:
(Si possono accoppiare al sistema fino ad un massimo di 3 telefoni)
1. Una volta messo in moto, tenere premuto il bottone del sistema finche' non si sentono 3
brevi segnali sonori - dopo circa 12 secondi. Quando si rilascia il bottone si sentira' un
lungo segnale sonoro. (Questo fa attivare la modalita' si accoppiamento dei sistemi per 5
minuti).
2. Andare al menu su Settaggi o Connessioni sul telefono.
3. Cercare il menu Bluetooth ed accendere la funzione di Bluetooth e "cercare miglioramenti
audio".
Esempio:
Cercare un nuovo dispositivo
Nuovo
Cerca di mani libere
A seconda della marca e del modello del telefono, la selezione varia. Selezionare la funzione
ed il telefono cerchera' automaticamente il codice (1,2,3,4). Il telefono confermera'
l'accoppiamento.
Il telefono mosterra' tuti i disponisitivi Bluetooth trovati. Selezionare SUBARY _xx ed inserire
(1,2,3,4). Il telefono confermera' l'accoppiamento
NOTA IMPORTANTE PER GLI UTENTI DI NOKIA:
Se si vuole connettere il telefono automaticamente quando si mette in moto il veicolo, vanno
selezionati Dispositivi accoppiati e poi SUBARU_xx.. sul menu del telefono e cambiare i
settaggi predefiniti a:
Dispositivo autorizzato
Si o Connessione autorizzata
Si
o Auto-Connessione senza Autorizzazione
Si
Tutti gli accoppiamenti del telefono possono venire cancellati premendo il bottone di controllo
finche' non si sentono 4 segnali sonori. La cancellazione e' confermata con toni ascendenti
quando si rilascia il bottone.
Per risolvere i problemi dell'Accoppiamento:
Non si trova il menu del Bluetooth
Fare riferimento alla guida dell'utente dei telefoni
Il sistema puo' accoppiare soltanto 3 telefoni. Per cancellare gli
accoppiamenti precedenti tener premuto il bottone di controllo
finche' non si sentono 4 segnali sonori poi rilasciare finche' non
si sentono toni ascendenti. Provare ad accoppiare di nuovo.
Non si ariesce ad accoppiare il t
elefono al sistema
Il soft-ware si blocca con il telefono - rimuovere e rimpiazzare la
batteria e ritentare con le procedure di accoppiamento.
Cancellare gli altri dispositivi Bluetooth accoppiati dal telefono e
ritentare - e' possible che si sia superato il numero massimo di
connessioni consentite al telefono.
Il mio telefono non connette
automaticamente quando
Vedere le note per l'accoppiamento per gli utenti della Nokia.
- 16 -
Operazioni
Connessione Bluetooth
Quando si sale su un veicolo e si mette in moto, il sistema stabilisce automaticamente una
connessione Bluetooth con il telefono.
Se e' la prima volta che viene stabilita una connessione od il telefono non e' stato l'ultimo ad
essere connesso, occorreranno circa 40-90 seecondi per connettere- mentre di solito ci vogliono
10 secondi.
Alcuni telefoni sono piu' veloci di altri a stabilire una connessione Bluetooth cosi' il sistema
lascia tempo il telefono con la piu' alta priorita' per connettere prima di cercare il prossimo
telefono.
La connessione viene confermata dal telefono od il sistema produce tre segnali sonor
ascendenti (a seconda del telefono).
Priorita' di Connessione
Il sistema stabilira' una priorita' sulla prima connessione del telefono:
Priorita' 1
Priorita' 2
L'ultimo telefono connesso
Il telefono che si connette varie volte
Quindi: se ci sono tre telefoni accoppiati al sistema e si entra nel veicolo nello stesso momento,
la persona che ha usato per ultimo il sistema verra' connessa per prima. Qualora non si dovesse
trovare il telefono, il prossimo telefono da connettere sarebbe quello che ha usato piu' spesso il
sistema nel passato.
Qualora volessi scegliere quale telefono connettere al sistema, sara' necessario disconnettere la
funzione Bluetooth del telefono/dei telefoni che non vuoi connettere e poi mettere di nuovo in
moto.
Fare una chiamata
1) Composizione della chiamata con la voce
Premere il bottone di controllo rapidamente una volta per attivare la funzione di composizione
con la voce. Il sistema emettera' un segnale sonoro di conferma che e' pronto a ricevere il
comando della voce. Pronuncia il nome del contatto che desideri chiamare.
NOTE:
Il sistema riconoscera' soltanto i contatti con etichetta che sono preregistrati sul telefono.
Consulta la guida dell'utente del telefono per vedere come registrare etichette per la voce.
Viene anche raccomandato di registrare le etichette per la voce sul telefono attraverso il
sistema mani libere perche' sara' piu' rappresentativo del comando vocale usato nel veicolo.
Se il telefono non ha etichette vocali preregistrate si sentiranno quattro segnali sonori.
Per cancellare la composizione vocale premere semplicemente di nuovo il bottone di
controllo.
2) Comporre un numero
Inserire il numero telefonico richiesto sul telefono stesso e premere il bottone per comporre il
numero.
3) Ricomporre un numero
Per ricomporre l'ultimo numero chiamato, premere e tenere premuto il bottone finche' non si
sente un segnale sonoro - dopo circa 2 secondi. Il sistema dara' una serie di segnai sonori
ascendenti e richiamera' l'ultimo numero composto.
Rifiutare una chiamata
Per terminare una chiamata o rifiutare una chiamata non volute, premi e tieni semplicemente
premuto il bottone finche' non si sente un segnale sonoro singolo di conferma - dopo circa 2
secondi.
- 17 -
Operazioni
Chiamata privata
Qualora volessi avere una conversazione privata sul tuo cellulare, premi semplicemente e tieni
premuto il bottone di controllo durante la conversazione, fino a quando non si sentono 2 segnali
sonori - dopo circa 8 secondi. La conversazione verra' automaticamente trasferita al telefono.
Per riconnettere il telefono al sistema mani libere, premere e tenere premuto il bottone di
controllo finche' non si sentono 2 segnali sonori - dopo circa 8 secondi.
Disconnessione del sistema mani libere
Qualora non volessi fare o ricevere telefonate sul tuo sistema mani libere, premi semplicemente
e tieni premuto il bottone di controllo fin quando non si sentono 2 segnali sonori - dopo circa 8
secondi (con il veicolo in moto). Tutte le chiamate verranno trasferite al telefono
Per riconnettere il telefono al sistema mani libere, premi e tieni premuto il bottone di controllo fin
quando non si sentono 2 segnali sonori - dopo circa 8 secondi (con il veicolo in moto).
NOTA: Il telefono tornera' automaticamente alla modalita' di mani libere se il veicolo non e' in
moto e poi viene riacceso.
IMPORTANTE:
Se si arriva a destinazione durante una conversazione ed il veicolo non e' piu' acceso, la
chiamata verra' interrotta. A secnda del tipo di telefono la chiamata verra' automaticamente
trasferita al telefono o si deve fare manualmente.
Si raccomenda che si trasferisca la chiamata manualmente prima di spengere il motore per
evitare una qualsiasi interruzione. Si attua premendo il bottone di controllo per 2 secondi
finche' non si sentono due segnali sonori od attraverso il menu sul telefono.
Controllo del volume
Il volume della conversazione puo' essere sistemato su e giu' durante una conversazione
premendo rapidamente il bottone di controllo. Il volume avra' un ciclo di 15 passi tra massimo e
minimo ed ad ogni fine della scala si sentiranno 2 segnali sonori che informano che il volume sta
cambiando direzione.
Qualita' del suono
Il sistema incorpora l'ultima tecnologia DSP (Elaborazione del Segnale Digitale) e componenti di
altissima qualita' che forniscono la migliore qualita' del suono sia per chi chiama che per chi
riceve. E' comunque importante ricordare alcune semplici cose per ottenere i migliori risultati:
1) Rumore della strada:
Piu' si guida velocemente piu' si crea rumore dale gomme, finestre aperte etc.. e questo viene
naturalmente trasmesso a chi chiama attraverso il microfono. Chiudere le finestre per ridurre il
rumore appena possible.
2) Cancellazione dell'eco:
Il sistema incorpora un'eccellente tecnologia per la cancellazione dell'eco per evitare che chi
chiama possa sentire l'eco. Mantendo il volume al livello piu' basso nel quale si possa ancora
sentire fornisce i migliori risultati per chi chiama e minimizza gli effetti di eco.
3) Parlare a livello normale:
Poiche' il sistema usa l'ultima tecnologia per la sensibilita' del microfono non e' necessario
"gridare" al sistema affinche' la voce possa essere piu' chiara dall'altra parte. Il volume della
voce si ridurra' automaticamente con la tecnologia DSP e se si urla al sistema la persona
dall'altra parte sentira' il volume ad un livello piu' basso che se parlassi a livello normale.
- 18 -
Specifications
Product Specifications:
Caractéristiques de produit :
Produktbeschreibungen:
Specifiche di prodotto:
Power supply voltage:
Tension d'alimentation:
Spannungsversorgung
Tensione del gruppo di alimentazione: ...................................................................10.5 - 16 Volts DC
Operating temperature:
Température de fonctionnement:
Betriebstemperatur:
Temperatura di funzionamento:.......................................................................................-250c - +750c
Storage temperature:
Température de stockage:
Lagertemperatur
Temperatura di immagazzinaggio:...................................................................................-350c - +850c
Current consumption:
Consommation:
Stromaufnahme:
Consumo corrente:
In Operation - Ignition on / En fonction - allumage mis
Im aktiven zustand - Zündung an / In funzione - accensione sopra:......................1.5A (Max)
In Standby mode - Ignition on / En mode 'raccroché'- allumage mis
Im passiven zustand - Zündung an / Nel modo standby - accensione sopra: ....800mA (Max)
Mute output:
Sortie Mute:
Stummschaltungsausgang:
Uscita muta: ........................................................................................................Lo signal (0v -50mA)
Bluetooth protocol:.........................................................................................................................v1.1
UK:
FR:
GER:
IT:
Ths product complies with the
EU Directive 2004/108EC
Technical and design modifications reserved
Sous réserve de modifications techniques et esthétiques
Technische und optische Änderungen vorbehalten
Con riserva di modifiche tecniche e ottiche
- 19 -
DELPHI GRUNDIG
Delphi Deutschland GmbH
Delphi Platz 1
D-42119 Wuppertal
Germany