1
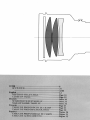
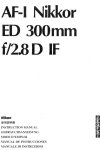
Nikkor
ED 300mm
f/2.8 IF
Nikon
mmmmm
INSTRUCTION MANUAL
GEBRAUCHSANWEISUNG
MODE D'EMPLOI
MANUAL DE INSTRUCCIONES
a*uMc"¥W("%t£~M
English
DEPTH-OF-FIELD TABLECLOSE-UP TABLE
Deutsch
SCHARFENTIEFENTABELLENAHAUFNAHME-TABELLE—
Frances TABLE DE PROFONDEUR DE CHAMPTABLE DE PHOTOMACROGRAPHIE—
Espanol
TABLA DE PROFUNDIDAD DE CAMPOTABLA DE ACERCAMIENTO—
-31
-32H
-12
-Page 31
-Page 32
-Seite 16
-Seite31
-Seite 32
-Page 21
-Page 31
-Page 32
-Pagina 26
-Pagina 31
-Pagina 32
^
1
|EDU > X
ED Glass elements
ED-Glas
Verre ED
Elementos de cristal ED
12
13
3 4 5
6
14
7
8 9 10 11
15 16
17 18 19
•••••••••••I
'3 '
D
'«H
Ei
#»<&£*
1. 9^'S'fJ
7
16.
2. ? U -V * * »> ^
3.
4.
5.
6.
7.
8.
9.
7"
i " j 7 ? I h y 7"ffi«
? V -j 5 -fe -y h >) > y
868 |J > ?*
SKBffi
HlP«it»*S>
lUST-fU-y h
=m&m<)ttii?m*v
A'J'-jJoi'T'-Jt&ft*
<;u?-*;uy—o j *
19. H f l * i 2 i * * i n e H i ( p s
20. tt 'J « s
21.
I-7-?
10. H W A f f i ' M t l T f t *
I I . fi*-a*^ i t 7-C >U ? - * JU ^*—
12. i > 7 f > ' > 3 > 7 - K
13. 1*1*7- K
mrnmM
17. ffl#i&#rt?-f
18. fi*.iA*.^7
«u @a
22. R'J 'J >?
23. EESsKltf-r K(DS-l2#F2AS*>^ffl)
24. l f l » F f i a K ^ - f K
25. 7 7 - r > ? ' - r t S S f f l f u
i s
26. BWtHM&m
27. aaittiSKA'-f K
28. t ' 7 f > 7 -,- A-? - T f o l - y - f f ^ - S
29. -t? ^ ? > 7 -r ;u ? - * JU ? " -
14. tt99MUXB£
15. * W S I E v - ?
; « U > X ( i , - a > F 7 7 > H 7 ) 7 j ^ 5 ^ T - * - i - l ; f t « T S C i : A ! T ? S - r o 2 fc, TTLBtBIt (F401 -h* ? zm o
ta»LTMMijftAMrA. sr=
* # - • : / , * £ « » # C I : (±, + * $ * * > * * t » T « k ?"aC, fU3>/*-?—TC-2OIS-TC-30IS
OJJ6U) * 1 8 t 1 " f t t f , 600mmF5.6OTU>X£: LX
fcC^SMC4"*l*t".
-OTtelz.ffitOTMUBSHSti ^ j f c ? 'J v^T. I- • y 7 £ K l t b f t - £ S £ 8 U > ^ s F*3iKtai;i&*jt7
- K\ tt*<7)x?:xx>->a > 7 - KHE-4, £ S t i 7 > U > ; C * # B T * » # i & # * l l # 5 * t f > f l S f f l > l :
i:\ ffi*ij? t > + « • # * ; * t i t u 4 T„ tf*>\ C < 7 ) U > X £ » u ^ f f ^ p / T T 1 £ f f l - t 3 J * - g \
iSJtffi
-r^^WA'KitT*'; i t .
*y7*x-f^OT)5tJ#lt
A
M.X) ^itS-5>ST-Il]Lt-r o K ' J I i f - r i : # l i , * ^ v*T-"-rOTU>X;gl}£tf ? > £ « L t t t f i b
(.
MHIHBIIH—WimHIII'
Hi Mm IHMII in |
11 ill' '
hi
i |i|H iiii|i|i||ill|l|i||liM||f||llllBHlWM|l
• ;<7)U->XtF-40l*> 5 i O T J I ^ f t - t t T U , * > 7OTJStfj!t(if£fflT-£ i-ttA.„(S!:^kfcH*-ttA.„)
Q-> i; 7 ? - f y h ' J > ? ' ( n t 7 h J 7&W>£«>?>„
•1)? U -y^-b-y h 'J > ? " £ ® L T ? >J • ? ? £ » £ L i i C
( D ^ O T J S c W B T i i * 1 ; > ? " * 0 U #3<7)«ji$S£Kc-fe'y h t 4 „
® ? U •y^-b'y h y 7 " » » 5 ,
* » T » f f t i : f > I- Sr-g-to-tf-Tfc^ i T „ -?#"(:, tent
Z-t-v h j n T i > 6 g ' J affiirHJSOT
To : < n f > hcrjftt£fflilE-f £fc«>, * W i J E } t t i A s # a < 7 ) * T i e ? h x i > i t ,
7-c;i^-<7)3E&—
if-
7?1"
Ci-C 2 -C 3
7 f A - ? — ( i , 7 < J U ? - * J u y - C 3 9 ™ i t a c i i & i t 7 < ^ - S r t a U i A A - T - , u- >X|SWt7)f*a?
llSLiAA-T'ffifflLJ-fo - C 0 U > X ( Z ( i U V 7 < J U ? - ( L 3 7 C ) ^ l * f e # g L T ^ i t o 7 - n U ? SE«C(BUTIJs 7 - f W - t t ^ - o U W L f c J * ,
fflS<7)»«!7-f
H-t-t^nlzteZi
T90-Sf$l+7J[S]i:IIlLT7-i-;U?-^§l?a^Tfrib, 7 - f J l - y - ? - S » U t „
7-f ^ ? - * ; U ? " - « - « L i 7 i f t * « , Sl#«t< t * t l f f l t d f t i l f i T < fciH\
*7-<juj'-s-#j»L'j:^T<sfflL*r£, f > fa^fntrmT-, 7YJu^-«'jz--rg«LTdSffl< K
-H-*cn-tr'7f L >7-f J l / ? - * J l / ? ' - f f l 7 Y J W - ) f ? ^ f i ^ f L T i ? f > 7 < J l - y - ^ I J ? ^ J 1 " „ ;<7)t#, -tz'7^>7<;u?-/)!3p-ST\
4Omm0i;-tDUa^fc-t:*7
+X^Sn<7)4aN*^5i
7
rt*ftl*&#a7-KOfl6V.^—
-E,-E2
T.?Z7->'>3>7-VHE-4<7)&T6l3m
F
i ? 7 , - r > - > a > 7 - KHE-4*JMfT4lilCtt, i » f > ' / a / 7 - KOTfflffilC-^TUSjtflSt
f4Z£
feWff.
- tntfe-g-fc i ? ^ ? > •> a > 7 - Kffiffla#t IH«co*>*T'li U ffrW, BS lJ iff I * f f -3"C<fc*3i».
c<7)uvXi:77"1'v^* -
* * u - ->l :<7>-fl*^
F3
©
c D E
© o o ©
F2
©
© o o ©
A/L
B
bit
Gl G2 G3 G4 HI
H2 H3 H4 J
K/P
M R T
U
O O
O
O 0
©
0 © 9
o o
o © o ©
©
©
H2 H3 H4 J
K/P
M R T
©
• a j i ' 3 > ' < - 9 - TC - 1 4 A S * 3 l J i L f c * l
a*?
—•—_
A/L
B C D E Gl G2 G3 G4 HI
F3
©
© c o 0
©
F2
©
© 0 o ©
© ©
• «•?• i^a >'<• - 9 - TC - U S f c t t T C - 1 4 B S * 8 » l £ i i
©
U
© © ©
©
1=1
——^X?IJ->•h*=7
_
A/L
F3
©
0 0 0 0
o
O
©
©
© © ©
F2
©
©
0 0 ©
o
o
©
©
0
B C D E Gl G2 G3 G4 HI H2 H3 H4 J
l a ^ m V'<-*-TC-200Sfcfcts TC-201S4S»L/:«•&•*
A / L B c D E Gl G2 G3 G4 HI H2 H3
• O
F3
® 0 0 0 ©
O
F2
®
© o o 0
o
o
K/P
M R T
U
f
U
©
®
© .
©
0
®
©
K/P
M R T
H4 J
K/P
M R
|a^3y'<-*-TC-300SfcttTC-301S*£»l,fc*-g»>5
——J A / L
B C D E Gl G2 G3 G4 HI
H2 H3 H4 J
U
F3
®
© o o ©
o
o ©
®
© • ©
F2
®
© o 0 0
o
o ©
®
©
araffl^BiT-ttf. g T i ^ u ^ t u i M - ' i u
ft.
©:
ffit-t.
O : 9Shn—%tf-*'»*X- < < u u JTAMSfflT-? * T ,
IB : ffljtliT^ 2-t+A,A\ f > H J ^ t b t i i r ,
SSLT < tz$l'
(K2.B2NE2*? 'J - > { * * ft.*'nK. B, E2 ? 'J->OTffl£--R<
ti^\.\)
e 16
*
*
Sg St 300mm
ft * P S i t
•
ft
i:2.8
f>h^-^1±
X3>l*]|fc7jitffffl
=
W
360°[e]te5t
7
-
ft
K
1*10*3 L:>A^5t
7 i )l 9 — 3 9 " " n 0 * a U ^ ^ i t 7 - f ^U?—ft
:* I 8tF»9»)
8" 10'
g • a a oo~3m, 1 oft
*?ttiJEffitI f t E
US U B S 2.8-22
v
*
SO * * it
7
>
#
I-
~ 3 > F 7 ^ > I-
?
« I 32mm ( f | * a ) X 255mm (Jfc$ ;
MMJft
S i X ' ) , - £ft,ft263i™
•
••Kfl
D
1
W2,400g
£-j5Kj£¥S^.;:-t±5ta?I* -v 'y 7'
3 9 m m 0 t a U j i ^ i t 7 < >v9 —
a-i:fc
B f l ^ a > ' < - ? -
TC-I4AS
x 9 X r > '> a > 7 — K HE-4
H x U 3 >/<— $ —
TC-I4BS
39mm0fa (JjA<^;t7 < ; u ^ — L37C
a x u 3 >/\'—? —
TC-20IS
Hffl-tf 7 f- > 7 <rt<f — fclb?—
a x u 3 >/<—$ —
TC-30IS
LF-I
1
h 7>^^r-7.CT-302
is>xmvm^±<nz>kM
£ £ # « : , ll'b*l.^;t;S^*$S(7).i^^lr*l7K7'J^a-;^(x^y-;^)^^M';I•i•ti•. 4"i>^b
2Mffl-;'fl*ttt:, S J A 5 , tt?SiJn'A-J: 9 i:;±* Lnc* ; bll< « # ST. i-7^u£"f*ffl
L i f t , zmm^-zT-oxzMitzisyxaim-k.
ssiat^^'JOT^-tsfc^n^&u s
• u-vxsai;, S t i f f f i ^ H l u i i ,
r » l t < « £ i \ , u>Xcoi£IIcti, u>X7-Kfc
-t+/c(7)A\ - 7 = l - ; U E D L - > X T - T „
E D f f i ^ f c l i , Extra-low Dispers.onC^Jfcfe-S-SOfl^OTaSfoT-,
ftlW*,
$>b(c, *SeBaW4c< b-^5I<, « o # i r < i^fc», u >X«j& (::»«£•
B X u f > ' j : < TT<friT„ —»<7>l->Xli 2-7<7)';s*i;-?^Titiico*,
: r o X n n l J 2 - W ^ hi^t^tfittiK z<nn,tm&%eMiztkfflL
T*# < fcij i t .
ED-> 'J -Xff> u > X T - ( i > > XfWfCEDffl^fcffl^SC t C J; tj , t t * ,
Z(7)tz*>. &4X**?3E*l= J: <*.£;* ftffc'K MMxUfrba > h ^ *
h«>ii.»lWMeilW;to*«L*T. tt«, ED •> u - XOT + 1 \ # W S I E B
t a f i a L <i«jau*(f lonxi.'*^ b TT.—», c m s i L *• =is«ci= t
10
NOMENCLATURE
1.
2.
3.
4.
5.
6.
7.
8.
9.
10.
11.
12.
13.
14.
15.
Lens hood screw
Preset-focus ring lock screw
Preset-focus ring alignment index
Preset-focus ring
Focuisng ring
Distance scale
Tripod collar lock screw
Shoulder strap eyelets
Tripod colloar alignment index
Tripod colar alignment scale
(four marks)
Glass filter holder
Extension lens hood HE-4
Built-in lens hood
Depth-of-field indicators
Infrared compensation index
16.
17.
18.
19.
20.
21.
22.
23.
24.
25.
26.
27.
28.
29.
Distance index
Filter holder mounting index
Filter holder knob
Built-in rotating tripod collar
Aperture index
Aperture scale
Aperture ring
EE servo coupling post
Aperture indexing post
Aperture-direct-readout scale
Meter coupling shoe
Meter coupling ridge
Gelatine filter holder plate
Gelatine filter holder
Thank you for your kind patronage of Nikon.
Before using your new lens, read the following carefully so you get the most out of
your lens now and for years to come.
MOUNTING THE LENS
A
To mount, position the lens in the camera's bayonet mount, lining up the aperture
index on the lens with the lens mounting index on the camera. Twist the camera body
clockwise until it clicks into place.
To remove, press the lens release button on the camera and turn the camera body
counterclockwise. For details, refer to the camera's instruction manual.
Note: When the lens is used with the Nikon F-401/N4004*, the camera meter coupling function
does not operate and the exposure indicator LEDs do not appear.
*The Nikon N4004 is sold exclusively in the U.S.A.
FOCUSING
Turn the focusing ring until the image in the viewfinder appears sharp and crisp. The
effective focal length may vary in extreme heat or cold. To compensate for this, turn
the lens focusing ring slightly beyond the °° (infinity) position.
Preset Focusing
B
When you want to refocus rapidly to a specific object distance, preset the focused
distance.
1. Loosen the preset-focus ring lock screw and turn the ring in either direction until it
clicks.
2. Turn the focusing ring to set the desired distance.
3. Tighten the preset-focus ring lock screw.
DEPTH OF FIELD
Depth of field can be checked with the color-coded depth-of-field indicators engraved
on the lens barrel.
If your camera has a depth-of-field preview function, it is possible to check the depth
of field in the viewfinder. (For details, see camera instruction manual.)
Depth of field can also be checked by referring to the table on page 31.
11
INFRARED PHOTOGRAPHY
In infrared photography, it is necessary to make the following adjustments to the
focused distance.
1. Focus subject.
2. Reset the focusing ring to align the focused distance with the infrared focusing
index.
4. Attach the appropriate filter, such as R60, etc., and take the shot.
USING FILTERS
Always use a filter with the lens. The slip-in glass filter holder comes mounted with a
Nikon L37C filter. A slip-in gelatine filter holder is also supplied with the lens.
Replacing Glass Filters
C] *C2'C3
1. Press down on the glass filter holder knob, and turn counterclockwise until the
white line on the knob is at a right angle to the axis of the lens.
2. Pull the holder out.
3. Unscrew the mounted filter and replace with the filter you want to use.
4. Put the holder back, push down on the knob, and turn clockwise to lock.
Using Gelatine Filter
D
1. Cut the gelatine filter into a circle of approx. 40mm (1.6 in.) in diameter.
2. Open the gelatine filter holder plate by pushing on the latch and lifting up.
3. Insert the gelatine filter into the holder and close the plate. Make sure the filter is
unscratched and free from dust and take care that it stays flat.
4. Remove the glass filter holder from the lens and insert the gelatine filter holder.
USING LENS HOODS
When shooting in bright sunlight, use the lens hoods to prevent stray light from entering your lens.
To Use Built-in Lens Hood
E] 'E 2
1. Turn the hood clockwise and pull out as far as it goes.
2. Secure in place by continuing to turn until it locks.
T o Attach Extention Lens H o o d HE-4
1. Loosen the lock screw on the HE-4.
2. Slip the HE-4 onto the front of the built-in hood.
3. Tighten the locking screw.
12
F
RECOMMENDED FOCUSING SCREENS
Various interchangeable focusing screens are available for F3- and F2-series cameras to
suit any type of lens or picture-taking situation. Those which are recommended for use
with your lens are listed below. For screens used with Nikon cameras other than F3and F2-series cameras (e.g., Nikon FA, FE2, FM2 and FE), refer to the column for F3series cameras. For the K2, B2 and E2 focusing screens, refer to the columns on the K,
B and E screens, respectively. For details, also refer to the specific focusing screen's
instruction sheet.
~~~ — — - . ^ ^
Screen
Camera
'—-—^__
A/L
D
E
F3
©
© O
F2
©
©
o
o o
©
©
B
C
G1
G2
G3
G4
HI
o o
o o
M
U
H2
H3
H4
J
K/P
o
o
©
o
o
©
©
0 © 0
©
©
©
©
R
T
• When the Teleconverter TC-14A is attached to this lens, use the following table*:
~~
— — ^ _ _ ^ Screen
Camera
—-—__
A/L
c
D
E
F3
©
© O
©
©
©
0 © ©
F2
©
© O
o
o
©
©
©
©
B
G1
G2
G3
G4
HI
H2
H3
H4
J
K/P
M
R
T
U
• When the Teleconverter TC-14B or TC-14 is attached to this lens, use the following
table:
"— —
Camera
Screen
-——-_^
A/L
D
B
C
o
o o
F3
©
©
F2
©
©
E
Gl
G2
0 <(»
(Q)
G3
G4
HI
H2
H3
H4
J
K/P
M
R
T
U
o
O
©
©
© © 0
°l
o
©
©
©
• When the Teleconverter TC-201 or TC-200 is attached to this lens, use the following
table*:
•*—--..
Camera
Screen
•—-—_
A/L
B
F3
(» ©
F2
•
©
D
E
o 0
o o
©
C
Gl
G2
G3
G4
HI
H2
o
o
©
H3
T
U
•
© •
3
®
©
J
K/P
O
©
o
©
H4
M
R
• When the Teleconverter TC-301 or TC-300 is attached to this lens, use the following
table:
~~~~~~—-—^
Camera
Screen
~-~—_„
A/L
B
C
D
E
F3
•
©
©
F2
•
©
o o
o o
(,»)
Gl
G2
G3
G4
o
o
HI
H2
H3
T
H4
J
K/P
o
o
©
•
© • ©
©
#
©
M
R
U
* Usable, but vignetting or otherjmage deterioration may occur.
©= Excellent focusing
• = Acceptable focusing
The split-image rangefinder, microprism or crosshair area is dim. Focus on the
surrounding matte area.
0 = Acceptable focusing
Slight vignetting or moire phenomenon affects the screen image. But the image on
film shows no trace of this.
• = Exposure measurement not possible
Lens/screen combination permits only focusing operation.
()= Indicates degree of exposure compensation
Blank means not usable.
13
SPECIFICATIONS
Focal length: 300mm
Maximum aperture: f/2.8
Lens construction: 8 elements in 6 groups (plus dustproof glass plate built into front)
Picture angle: 8" 10'
Distance scale: Graduated in meters and feet from 3m (10 ft) to infinity (•»)
Aperture scale: f/2.8 ~ f/22 on both standard and aperture-direct-readout scales
Diaphragm: Fully automatic
Exposure measurement: Via full-aperture method; meter coupling ridge provided for
AI cameras and meter coupling shoe for non-AI cameras
Focusing: Nikon Internal Focusing (IF) system
Infrared focusing index: Provided
Tripod mounting: Built-in tripod mounting collar rotatable through 360°
Lens hood: Built-in Telescopic screw-out type
Extension lens hood: Provided
Filters: Slip-in type glass filter holder accepts 39mm dia. screw-in filters; gelatine filter
holder accepts gelatine filters
Mount: Nikon bayonet mount
Dimensions: Approx. 132mm dia. x 255mm extension from flange; approx. 263mm
long (overall)
Weight: Approx. 2400g
Accessories
Slip-on leatherette front lens cap
Rear lens cap LF-1
Extension lens hood HE-4
Built-in 39mm screw-in filter L37C
Gelatine slip-in filter holder
Heavy-duty case CT-302
39mm screw-in filters
Teleconverter TC-14A
Teleconverter TC-14B
Teleconverter TC-201
Teleconverter TC-301
LENS CARE
• Although you should always keep the lens surfaces clean, rough cleaning must be
avoided. Wipe with a soft, clean cotton cloth moistened with alcohol tq remove
grease or fingerprints from the lens surfaces.
If you use ether in cleaning the lens, a smudge sometimes appears on the surface of a
multi-coated lens. If this happens, wipe it again with a cotton cloth moistened with
alcohol.
• Take care in cleaning the rear part of the lens with a spray-gun type blower, because
its strong stream of air may damage the lens diaphragm blades. To avoid damage,
set the lens at full aperture and use the blower far enough away.
• Always protect the lens surface from dirt or damage. The lens hood also helps tq protect the lens.
• Keep the lens cap in place whenever the lens is not in use.
14
ABOUT THE
NIKKOR
F n QFRTF5
Correction of chromatic aberration in camera lenses has been
limited, for the most part, to the use of techniques which bring
* w o w a v e l e n g t n s of light, normally blue and red, to a common
focus. Although known as "achromatic," lenses employing these
designs exhibit a certain amount of undersirable residual dispersion (called the "secondary spectrum") which limits image
contrast and sharpness, particularly at full aperture. Telephoto
lenses are most prone to the ill effects of chromatic aberration,
since secondary spectrum increases with focal length.
The Nikkor ED series consists of telephoto and super-telephoto
lenses fitted with elements made of a Nippon Kogaku-deveioped
special optical glass called "Extra-low Dispersion" (ED) glass.
Although the optical characteristics of this new glass are similar
to those of calcium-fluortte crystal, ED glass possesses a more
constant refractive index over a wide range of temperatures and
will, therefore, cause less of a focus shift. Also, ED glass is much
harder and more resistant to scratches, enabling its use for front
and rear lens elements to obtain optimum correction of chromatic aberration over the widest possible wavelength range.
Some lenses within the ED series have been so fully corrected
that image sharpness extends uniformly to the infrared region;
for these lenses, corrective refocusing for infrared exposure is
unnecessary. The remaining lenses, such as this Nikkor 300mm
f/2.8 IF-ED, have been built exceptionally compact due to the
use of ED glass elements; for these lenses, however, corrective
refocusing for infrared photography is necessary. Regardless of
which type, ED-series lenses offer exceptional sharpness and
full contrast for the most precise photography under the widest
conditions.
15
NOMENKLATUR
1. Schraube der Erweiterungsblende
2. Feststellschraube fur den
Vorfokussierring
3. Indizes fur vorfokussierring
4. Vorfokussierring
5. Entfernungseinstellring
6. Entfernungsskala
7. Feststellschraube des
Stativanschlusses
8. Osen fur den Schulterriemen
9. Positionierindex des Stativanschlusses
(vier Markierungen)
to. Einstellungsskala
des Stativanschlusses
11. Filter-Einschubfach
12. Erweiterung der Gegenlichtblende
HE-4
13. Eingebaute Objektivkappe
14. Scharfentiefen-lndikatoren
15. Infrarot-Kompensationsindex
16. Entfernungsindex
17. Montierindex fiir das
Filter-Einschubfach
18. Knopf fur das Filter-Einschubfach
19. Eingebauter Stativanschluft
20. Blendenindex
21. Blendenskala
22. Blendenring
23. Kupplungsstift fur automatische
Blendensteuerung
24. Anschlag fur Blendenkupplung
25. Skala fur Blendendirekteinspiegelung
26. Blendenmitnehmer
27. Steuerkurve
28. Halteplatte fiir Gelatinefilter
29. Gelatinefilter-Einschubfach
Vielen Dank fiir Ihr Vertrauen zu Nikon.
Bevor Sie lhr neues Objektiv verwenden, lesen Sie die folgenden Zeilen bitte aufmerksam
durch, damit Ihnen Ihr neues Objektiv gute Dienste leisten wird—viele Jahre lang.
ANBRINGEN DES OBJEKTIVS
A
Setzen Sie das Objektiv so in das Kamerabajonett ein, dafi der Blendenindex am Objektiv und der Objektivindex am Kameragehause miteinander ausgerichtet sind. Drehen
Sie dann das Kameragehause im Uhrzeigersinn, bis es horbar einrastet.
Zur Trennung von Objektiv und Kameragehause den Entriegelungsknopf an der Kamera
driicken und das Kameragehause gleichzeitig im Gegenuhrzeigersinn drehen. Fur weitere
Einzelheiten vergleichen Sie bitte die Hinweise in der Gebrauchsanweisung der Kamera.
Achtung: Wenn das Objektiv an eine Nikon F-401 angesetzt wird, ist die Steuerkurve zur automatischen Eingabe der Lichtstarke unwirksam und die Belichtungs-LEDs im Sucher
der Kamera leuchten nicht auf.
SCHARFENEINSTELLUNG
Drehen Sie den Entfernungseinstellring bis Sie im Sucher ein scharfes und klares Bild
erhalten. In grofier Hitze oder Kalte kann sich die effektive Brennweite verandern. Um
das zu kompensieren, konnen Sie den Entfernungseinstellring ein wenig iiber die
Stellung Unendlich (°3 hinaus verdrehen.
Vorfokussierung
B
Zum schnellen Zuriickfahren auf eine bestimmte Entfernung, ohne das Objektiv absetzen zu miissen, konnen Sie diese Entfernung vorfokussieren.
1. Losen Sie die Feststellschraube am Vorfokussierring und drehen Sie diesen Ring
nach links oder rechts, bis Sie ein horbares Klicken vernehmen.
2. Stellen Sie nun mit dem Entfernungseinstellring die gewiinschte Entfernung ein.
3. Ziehen Sie die Feststellschraube am Vorfokussierring wieder an.
16
SCHARFENTIEFE
Sie konnen die Scharfentiefe anhand der farbigen Scharfentiefe-Indikatoren kontrollieren, die auf dem Objektivtubus eingezeichnet sind.
Wenn Ihre Kamera einen Scharfentiefe-Kontrollknopf besitzt, konnen Sie die Scharfentiefe auch im Sucher kontrollieren. (Siehe Gebrauchsanweisung der Kamera.)
Oder Sie konnen die Scharfentiefe aus der Tabelle auf Seite 31 ablesen.
INFRAROTFOTOGRAFIE
Bei Infrarotaufnahmen ergibt sich fur die fokussierte Entfernung eine Fokusverschiebung, die wie folgt auszugleichen ist.
1. Fokussieren.
2. Die fokussierte Entfernung ablesen und den Entfernungseinstellring drehen, bisdiese
Entfernung dem Infrarot-Kompensationsindex gegeniiberliegt.
4. Das entsprechende Filter einsetzen, z.B. R60 usw., und die Aufnahme machen.
DIE VERWENDUNG VON FILTERN
Verwenden Sie Ihr Objektiv stets mit einem Filter. Das Filter-Einschubfach wird mit
bereits eingesetztem Glasfilter Nikon L37C mitgeliefert. Ein Gelatinefilterhalter gehbrt
ebenfalls zum mitgelierferten Zubehor.
Auswechseln von Glasfiltern
Cj 'Cj'Cs
1. Driicken Sie den Knopf am Glasfilterhalter und drehen Sie ihn im Gegenuhrzeigersinn, bis sein weifier Strich quer zur Objektivachse steht.
2. Ziehen Sie den Halter heraus.
3. Schraubcn Sie das Filter heraus und setzen Sie ein neues Filter ein.
4. Schieben Sie den Halter wieder ein, driicken Sie den Knopf und drehen Sie ihn im
Uhrzeigersinn.
Gelatinefilter
D
1. Schneiden Sie sich ein Gelatinefilter von ca. 40mm Durchmesser zurecht.
2. Offnen Sie die Platte des Gelatinefilterhalters, indem Sie dessen Klinke driicken und
anheben.
3. Legen Sie das Gelatinefilter in den Halter und schliefien Sie die Platte. Vergewissern
Sie sich, dafi das Filter keine Kratzer aufweist, staubfrei ist und plan liegt.
4. Entfernen Sie den Glasfilterhalter aus dem Objektiv und setzen Sie den Gelatinefilterhalter ein.
VERWENDUNG DER SONNENBLENDEN
Verwenden Sie bei Aufnahmen in grellem Sonncnlicht eine der beiden Sonnenblenden,
um Streulichteinfall zu verhindern.
Eingebaute Sonnenblende
E [ • E2
1. Drehen Sie die Sonnenblende im Uhrzeigersinn und Ziehen Sie sie so weit wie
moglich heraus.
2. Arretieren Sie die herausgezogene Sonnenblende, indem Sie sie noch weiter drehen.
Anbringen der Erweiterungsblende
F
1. Lockern Sie die Klemmschraube der HE-4.
2. Setzen Sie die HE-4 vorne auf die eingebaute Sonnenblende auf.
3. Ziehen Sie die Klemmschraube wieder an.
17
EMPFOHLENE EINSTELLSCHEIBEN
Fiir die Kameras der Serie F3 und F2 stehen verschiedene auswechselbare Einstellscheiben passend fiir jede Aufnahmesituation zur Verfugung. Die zur Verwendung mit
diesem Objektiv empfohlenen Einstellscheiben sind unten aufgelistet. Fur Einstellscheiben fur andere Nikon-Kameras als die der Serien F3 und F2 (z.B. die Nikon FA,
FE2, FM2 und FE) siehe die Spalte fiir die Serie Nikon F3. Fiir die Einstellscheiben
K2, B2 und E2 siehe die Spalten fur die Scheiben K, B bzw. E. Siehe auch die Gebrauchsanleitung der jeweiligen Einstellscheibe.
——
Kamera
Einslellscheibe
^~~~—~—.____
F3
A/L
©
B C D E Gl G2 G3 G4 HI
o 0
o o ©
© O
o o
o o
H2 H3 H4 J
o
o
©
O ©
K/P
©
M R T
u
© © ©
© o © ©
©
F2
© ©
(+8)
Bei Befestigung des Telekonverter TC-14A am Objektiv die folgende Tabelle benutzen*
~~~~~~ —^Einslellscheibe
Kamera
-~—-^__
A/L
B C D E Gl G2 G3 G4 HI
o
o o
H2 H3 H4 J
K/P
M R T
U
F3
©
© O
©
©
©
© © ©
F2
©
©
©
©
©
©
Bei Befestigung des Telekonverter TC-14B Oder TC-14 am Objektiv die folgende Tabelle benutzen.
' —• —-^Bnstellscheibe
Kamera
^~——^.
F3
F2
A/L
B C D E Gl G2 G3 G4 HI
©
© O
©
© D
o ©
o 0
o
o
H2 H3 H4 J
K/P
M R T
U
O
©
©
0 © 0
o
©
©
0
Bei Befestigung des Telekonverter TC-201 Oder TC-200 am Objektiv die folgende
Tabelle benutzen*
~ * " * - * - —^Einslellscheibe
Kamera
~~——~__
A/L
B C D E Gl G2 G3 G4 HI
F3
•
©
F2
®
©
o
o o
O
©
©
o
o
H2 H3 H4 J
o
o
K/P
M R T
U
©
®
© • C
©
®
©
Bei Befestigung des Telekonverter TC-301 oder TC-300 am Objektiv die folgende Tabelle benutzen.
~"
^.^Einstellscheibe
Kamera
-——^
A/L
F3
®
© 0
©
F2
•
©
©
B C D E Gl G2 G3 G4 HI
o
o o
o
o
H2 H3 H4 J
o 9
o ©
K/P
M R T
U
®
© • ©
®
©
* Verwendbax, jedoch verschlechterte Abbildungsleistung Oder Vignettierung moglich.
© = Hervorragend geeignet
®= Ausreichende Fokussiermoglichkeit
Schnittbild-Indikator, Mikroprismen bzw. Fadenkreuz dunkeln ab. Fokussierung
auf Mattscheiben-Umfeld.
O = Brauchbare Scharfeinstellung
Leichte Vignettierung oder Moire (im Falle von Mattscheiben mit Mikrospaltzentrum) beeintrachtigen das Bildfeld. Dies hat aber keinen Einfluss auf den Film.
E3= Keine Belichtungsmessung moglich
Einstellscheiben/Objektiv-Kombination gestattet nur Fokussierung
()= Erforderliche Belichtungskorrektur-Stufe.
Leeres Feld bedeutet unbrauchbar.
18
TECHNISCHE DATEN
Brennweite: 300mm
Maximale Blendenoffnung: f/2,8
Optische Konsttuktion: 8 Linsen in 6 Gruppen (plus vorne angebrachte staubdichte
Glasplatte)
Bildwinkel: 8° 10'
Entfernungsskala: Unterteilt in Meter und Fufi und zwar von 3m (10 Fufi) bis unendlich (°°)
Blendenskala: f/2,8 ~ f/22, sowohl auf der Standardskala als auch auf der Skala fur
direkte Ablesung
Blendenart: Vollautomatisch
Belichtungsmessung: Bei voll geoffneter Blende; Steuerkurve fiir den Belichtungsmesser
ist fur AI-Kameras vorgesehen und ein Blendenmitnehmer fur andere Kameras
Scharfeziehen: Innenfocussierung nach dem Nikon IF System
Fokussierungsindex fiir Infrarot: Versorgt
Stativbefestigung: Eingebauter Einschraubkranz, der um 360° drehbar ist
Sonnenblende: Eingebauter, ausschraubbare Teleskopblende
Erweiterungsblende: Vorhanden
Filter: Glasfiltereinschubfacher fiir 39mm-Schraubfilter; Gelatinefilter-Einschubfach
fur Standard-Gelatinefilter
Anschlufi: Nikon-Bajonettanschlufi
Abmessungen: Ca. Durchm. 132mm x Lange bis Flansch 255mm; Lange iiber alles ca.
263mm
Gewicht: Ca. 2400g
Zubehor
Aufsteckbarer Kunstleder-Frontdeckel
Weitere einschraubbare 39mm Filter
Hinterer Objektivedeckel LF-1
Telekonverter TC-14A
Erweiterungsblende HE-4
TelekonverterTC-14B
Eingebauter 39mm Einschraubfilter L37C Telekonverter TC-201
Halter fur einschiebbare Gelatinefilter
Telekonverter TC-301
Massiver Holzkoffer CT-302
OBJECTIVPFLEGE
• Wenngleich die Linsenoberflachen des Objektivs immer sauber gehalten werden
sollten, muft ein grobes Saubern vermieden werden. Reinigen Sie mit einem weichen,
sauberen Baumwolltuch, das vorher mit Alkohol angefeuchtet wurde, um Fett oder
Fingerabdriicke von der Glasoberflache zu entfernen. Wenn Sie zum Reinigen des Objektivs Ather verwenden, erscheint manchmal ein Schmutzfleck auf der Oberflache
eines multicoating-Objektivs. Wenn das einmal vorkommen sollte, noch einmal mit
einem in Alkohol angefeuchteten Baumwolltuch abwischen.
• Bei der Reinigung des hinteren Teils des Objectivs mit einem Spruhdusenblaser
vorsichtig sein, weil der starke Luftstrom die Blendenlamellen beschadigen kann.
Um eine Beschadigung zu vermeiden, die Blende ganz offnen, und den Blaser in
ausreichender Entfernung halten.
19
• Schiitzen Sie die Linsenoberflachen stets vor Schmutz und Beschadigung. Auch die
Gegenlichtblende bewahrt sich als Frontlinsenschutz.
• Bei Nichtbenutzung sollte der vordere Objektivdeckel grundsatzlich aufgesetzt bleiben.
ZUR NIKKOR- In der Vergangenheit beschrankte sich die Korrektion der FarbED-REIHE
fehler in Aufnahmeobjektiven im wesentlichen auf eine einwandfreie Strahlenvereinigung fur zwei Lichtwellenlangen, meist Blau
und Rot. Selbst wenn man so korrigierte Objektive als "achromatisch" bezeichnet, lafit sich eine gewisse unerwunschtc Restdispersion-das sogenannte sekundare Spektrum-nicht vollig
beseitigen. Dieses sekundare Spektrum setzt die Grenzen fur
Kontrast- und Scharfenleistung, insbesondere bei voller Offnung.
Teleobjektive sind besonders anfallig fur diese Farbfehler, denn
mit zunehmender Brennweite macht sich das sekundare Spektrum
immer starker bemerkbar.
Die Nikkor-ED-Reihe besteht aus Tele- und Fernobjektiven mit
Linsen aus einem von der Nippon Kogaku entwickelten Spezialglas besonders niedriger Dispersion (ED = Extra-low Dispersion).
Wenngleich dieses Glas dem Calcium Fluorid ahnelt, bleibt sein
Brechungsindex iiber einen grofien Temperaturbereich konstant,
so daft die Verschiebung der Bildebene wesentlich geringer ist.
Dariiber hinaus ist ED-Glas viel harter und kratzfester. Dadurch
lafit es sich zur Erzielung optimaler Korrektion der Farbfehler
iiber den grofitmoglichen Wellenlangenbereich auch in Frontund Hinterlinsen verwenden. Einige Objektive der ED-Reihe sind
so weitgehend korrigiert, dafi sich die Bildscharfe gleichmafiig bis
in den Infrarotbereich hinein erstreckt. Bei diesen Objektiven ist
nicht einmal mit Infrarotfilm eine Fokuskorrektur notwendig.
Andere Objektive, wie das Nikkor 300mm f/2,8 IF-ED der
Baureihe konnten durch Verwendung von ED-Glas besonders
kompakt gehalten werden. Bei diesen jedoch ist fur Infrarotaufnahmen eine Fokuskorrektur erforderlich. Welcher dieser beiden
Arten Ihr ED-Objektiv auch angehort, seine Scharfen- und
Kontrastleistung ist ungewohnlich hoch.
20
NOMENCLATURE
1. Vis de parasoleil d'objectif
2. Vis de blocage de bague de prereglage
3. Repere d'alignement de bague de
prereglage
4. Bague de prereglage de mise au point
5. Bague de mise au point
6. Echelle des distances
7. Vis de blocage du collier trepied
8. Oeilleton de bandouliere
9. Repere d'alignement du collier trepied
10. Indices d'alignement du collier trepied
(4 marques)
11. Support a filtre de type a insertion
12. Allonge de parasoleil HE-4
13. Parasoleil incorpore
14. Indicateur de profondeur de champ
15. Repere de compensation en infrarouge
16. Repere des distances
17. Repere de montage support a filtre
de type a insertion
18. Poussoir de support a filtre de type a
insertion
19. Collier de montage de trepied
orientable incorpore
20. Repere d'ouverture
21. Echelle des ouvertures
22. Bague d'ouverture
23. Index de servocommande diaphragme
24. Index de couplage photometrique
25. Echelle de lecture directe d'ouverture
26. Glissiere de couplage de posemetre
27. Fourchette de couplage de posemetre
28. Plaque de support a filtre gelatine
29. Support a filtre gelatine
Nous vous remercions de votre achat.
Avant d'utiliser votre nouvel objectif, veuillez lire attentivement les instructions qui
suivent pour tirer le meilleur parti de votre objectif tout de suite et pendant de longues
annees.
MONTAGE
A
Placer l'objectif dans la monture bai'onnette de l'objectif de maniere a ce que les reperes
de fixation du boftier et de l'objectif soient alignes. Ensuite tourner le boitier dans le
sens horaire jusqu'au declic de verrouillage.
Pour demonter l'objectif, appuyez sur le bouton de deverrouillage du boitier et tournez
le boitier dans le sens horaire inverse. Pour de plus amples details, reportez-vous au
manuel d'utilisation du boftier.
Remarque: Quand l'objectif est utilise avec le boitier Nikon F-401, la fonction de couplage photometrique n'opere pas, et Pindicateur d'exposition DEL n'apparait pas.
MISE AU POINT
Tourner la bague de mise au point jusqu'a ce que 1'image dans le viseur soit nette et
bien contrasted. A des temperatures ambiantes tres chaudes ou tres froides, la longueur
focale effective peut varier. Pour compenser cela, tournez la bague de mise au point
legerement au-dela de la position °° (infini).
Prereglage de mise au point
B
Si vous voulez proceder a un prereglage rapide de l'objectif a une distance specifique,
prereglez la distance de mise au point.
1. Desserrer la vis de blocage de la bague de prereglage de mise au point, puis faites
pivoter la bague dans une quelconque direction jusqu'au declic de verrouillage.
2. Ramenez la bague de mise au point sur la position desiree.
3. Serrez la vis de blocage de bague de prereglage de mise au point.
21
REPERAGE DE LA PROFONDEUR DE CHAMP
La profondeur de champ peut etre verifiee par simple lecture des traits de couleur graves
sur le barillet de l'objectif. Si votre appareil est dote de la pre-lecture de profondeur de
champ, il est possible de la verifier dans le viseur. (Pour de plus amples details, se reporter au manuel d'utilisation du boitier).
La profondeur de champ peut egalement etre verifiee en se reportant au tableau de la
page 31.
PHOTOGRAPHIE EN INFRAROUGE
En photographie en infrarouge, il est necessaire d'effectuer les reglages de distance
focale suivants.
1. Mettez au point sur le sujet.
2. Reglez a nouveau la bague de mise au point de maniere a mettre en regard la distance mise au point et le repere de compensation en infrarouge.
4. Montez un filtre convenable, par exemple R60, etc. sur l'objectif et prenez la photographie.
UTILISATION DES FILTRES
Votre objectif necessite toujours I'utilisation d'un filtre. C'est pourquoi le support a filtre a insertion en verre est deja dote d'un filtre Nikon L37C installe a l'usine. L'objectif
est egalement pourvu d'un filtre a gelatine standard accessoire a insertion.
Remplacement des filtres en verre
Cx -C2 '€>i
1. Enfoncez le bouton sur le support a filtre en verre, et tournez-le dans le sens horaire
inverse jusqu'a ce que le trait blanc du filtre soit perpendiculaire a l'axe de l'objectif.
2. Retirez le support a filtre.
3. Devissez le filtre et remplacez-le par le filtre que vous voulez utiliser.
4. Replacez le support a filtre, appuyez sur le bouton et tournez-le dans le sens horaire
pour verrouiller.
Filtres a gelatine
D
1. Decoupez le filtre a gelatine en un cercle d'environ 40mm de diametre.
2. Ouvrez la plaque interne de votre support a filtre a gelatine en poussant sur le verrou et en soulevant la plaque.
3. Inserez le filtre a gelatine dans le support et remettez la plaque. Assurez-vous que le
filtre est exempt de rayure ou de poussiere, et veillez a ce qu'il reste plat.
4. Deposez le support a filtre en verre de l'objectif et inserez le support a filtre a gelatine.
UTILISATION DES PARASOLEILS
Si vous photographiez en plein soleil, utilisez un parasoleil pour eviter la penetration
des lumieres parasites dans votre objectif.
Parasoleil incorpore
Ej -E 2
1. Tournez le parasoleil dans le sens horaire et faites-le sortir autant que possible.
2. Fixez-le en continuant a le tourner jusqu'a son verrouillage.
Allonge de parasoleil HE-4
1. Desserrez la vis de blocage sur le HE-4.
2. Ajustez la HE-4 sur l'avant du parasoleil integre.
3. Serrez la vis de blocage.
22
F
VERRES DE VISEE RECOMMANDES
Differents verres de visee interchangeables peuvent etre montes sur les boitiers Nikon
F3 ou F2 serie pour convenir a tout type d'objectif ou de conditions de prise de vue.
Certains d'entre eux sont plus specialement recommandes avec les objectifs ci-dessous.
Pour les verres utilises avec des boitiers Nikon autres que F3 et F2 series, (cad Nikon
FA, FE2, FM2 et FE), se referer a la colonne sur les boitiers de serie F3. Pour les verres
de visee K2, B2 et E2 se referer aux colonnes sur les verres K, B et F^ respectivement.
Pour de plus amples details, se reporter a la brochure d'utilisation sur les verres de visee.
~^~~~~——^___^ Verre
Boiiier
----..
A/L
©
F3
©
F2
B C D E Gl G2 G3 G4 HI H2 H3 H4 J
©
©
o o
o o
©
O O
©
o o
o
o
K/P
M R T
U
©
O 0
©
© © 0
©
o
©
©
©
• Lorsque Ton adapte le teleconvertisseur TC-14A sur cet objectif, se referer a la table
suivante*:
Boitier
^^———^_^
A/L
B
c
F3
©
0 O
F2
©
© O
D E Gl G2 G3 G4 HI H2 H3 H4 J
o
o
K/P
M R T
u
©
0
©
© 0 ©
©
©
©
a
• Lorsque Ton adapte le teleconvertisseur TC-14B ou TC-14 sur cet objectif, se referer
a la table suivante:
Boitier
——^_
Verre
~—•~-^_
A/L
B C 0
F3
©
©
F2
©
©
o o
o o
E Gl G2 G3 G4 HI H2 H3 H4 J
©
©
o
o
K/P
M R T
U
O
©
©
© © ©
o
9
©
©
• Lorsque Ton adapte le teleconvertisseur TC-201 ou TC-200 sur cet objectif, se referer
a la table suivante*:
~~~~~~- - - ^ ^
Verre
B C D E Gl G2 G3 G4 HI H2 H3 H4 J K/P M R T U
Boitier
"—-—~^__ A / L
F3
®
©
F2
m
©
o o
o o
©
©
o
o
o
o
©
•
© • ©
©
•
©
• Lorsque Ton adapte la teleconvertisseur TC-301 ou TC-300 sur cet objectif, se referer a la table suivante:
~~~~~-~--.-^^
Verre
Boitier
^~~—~~—^
A/L
B
F3
•
©
F2
•
©
c D
o 0
o o
E Gl G2 G3 G4 HI H2 H3 H4 J
9
o
©
0
o
o
K/P
M R T
U
©
•
©
©
©
m
©
*
* Compatible, mais risque de vignettage ou d'alteration de l'image enregistree.
© = Mise au point excellente
® = Mise au point acceptable
La zone du stigmometre du verre de visee, du microprisme ou du reticule est floue.
Faire la mise au point sur la zone depolie.
0 = Mise au point acceptable
Un leger vignettage ou phenomene de moire affecte Timage de visee, mais non
l'image enregistree sur le film.
••= Mesure impossible
Ces combinaisons objectif/verre de visee ne permettent que la mise au point.
()= Indique la compensation d'exposition en valeur.
Les blancs designent des verres inutilisables.
23
CARACTERISTIQUES
Focale: 300mm
Ouverture maximale: f/2,8
Construction optique: 8 lentilles en 6 groupes (plus une plaque de verre a l'epreuve
de la poussiere integree a l'avant)
Champ angulaire: 8° 10'
Echelle des distances: Graduee en metres et en pieds de 3m a rinfini (~)
Gamme d'ouvertures: f/2,8 ~ f/22; reperees sur l'echelle principale et la lecture directe
du diaphragme
Diaphragme: Auto
Mesure de l'exposition: A pleine ouverture; index de couplage photometrique pour
boftiers Al, fourchette de couplage photometrique (externe) pour boftiers non-Al
Mise au point: Procede Nikon de mise au point interne
Repere de mise au point infrarouge: Fourni
Fixation du pied: Bague de fixation a rotation de 360°
Parasoleil: Type telescopique vissant incorpore
Allonge de parasoleil: Fournie
Filtres: Le support a filtre en verre accepte les filtres vissants de 39mm; le support a
filtie gelatine accepte les filtres a gelatine
Monture: Bai'onnette Nikon
Dimensions: Env. 132mm0 x 255mm extension de l'embase; env. 263mm longueur
(totale)
Poids: Env. 2400g
Aceessoires
Bouchon avant en imitation cuir a emboftement
Bouchon arriere d'objectif LF-1
Allonge de parasoleil HE-4
Filtre vissant incorpore de 39mm0 L37C
Support de filtre a gelatine
Varise rigide CT-302
Autres filtres vissants 39mm0
Teleconvertisseur TC-14A
Teleconvertisseur TC-14B
Teleconvertisseur TC-201
Teleconvertisseur TC-301
SOINS A APPORTER A VOTRE OBJECTIF
• II est necessaire de conserver les surfaces des lentilles de l'objectif dans un etat de
proprete maximum. Pour le nettoyage, il est recommande d'utiliser un tissu de coton
doux, imbibe d'alcool afin d'effacer des traces de graisse ou de doights. Lorsque l'on
utilise de Tether, des traces peuvent subsister apres evaporation sur une lentille qui a
subi le traitement multi-couches. Dans un tel cas, frotter a nouveau avec du coton
imbibe d'alcool.
• II convient d'etre prudent lors du nettoyage de la partie arriere de l'objectif avec
une soufflette de nettoyage de type pistolet-aerosol, le jet puissant de la soufflette
etant susceptible de deteriorer les lamelles du diaphragme. Pour eviter tout risque de
deterioration, regler l'ouverture du diaphragme a sa valeur maximum et maintenir le
pisolet aerosol a une distance suffisante.
• Protegez toujours la lentille avant contre la pouissiere et les chocs. Le bouchon avant
est egalement une protection efficace de la lentille avant.
• Bouchez l'avant de votre objectif lorsque vous ne vous servez pas de votre appareil.
24
LA SERIE
NIKKOR ED
La correction des aberrations chromatiques des objectifs s'est
jusqu'a present presque uniquement limitee a ramener deux
longueurs d'ondes-normalement bleu et rouge-dans un spectre
commun. Bien que dit "achromatiques" les objectifs ainsi concus
montrent toujours une certaine dispersion indesirable (le spectre
secondaire) qui diminue le contraste et la nettete de l'image
particulierement a pleine ouverture. Vu que le spectre secondaire
accroft avec la longueur focale, les teleobjectifs sont les plus susceptibles a ces effets d'aberration chromatique. La serie Nikkor
ED consiste en teleobjectifs et super-teleobjectifs pourvus d'elements en verre optique special, fabrique par Nippon Kogaku sous
le nom de "verre a dispersion extra-basse (ED)". Bien que ses
caracteristiques optiques soient semblables a celles du cristal de
calcium fluorite, le verre ED possede un index de refraction plus
constant sur une large gamme de temperatures et assure ainsi une
mise au point plus precise. Le verre ED est plus dure et plus
resistant, ce qui l'indique a l'emploi dans les elements frontaux
et arrieres des objectifs pour obtenir une correction optimale des
aberrations sur une gamme de longueurs aussi large que possible.
Quelques-uns des objectifs de la serie ED ont ete si parfaitement
corriges qu'ils assurent une nettete de l'image uniforme jusqu'en
infrarouge. Avec ces objectifs la correction de la mise au point
est inutile. Les autres objectifs, tel ce Nikkor 300mm f/2,8
IF-ED, ont une construction exceptionnellement compacte grace
a l'emploi du verre ED. Ces objectifs exigent toutefois une
correction de la mise au point en infrarouge.
N'importe le type chaque objectif de la serie ED offre une
nettete exceptionnelle et un contraste parfait pour une photographie de precision dans les conditions les plus diverses.
25
NOMENCLATURA
1. Tomillo del parasol
2. Tornillo de fijacion del anillo de
enfoque prefijado
3. Indice para alineamiento de anillo
de enfoque prefijado
4. Anillo de enfoque prefijado
5. Anillo de enfoque
6. Escala de distancias
7. Tornillo de fijacion del collar del tripode
8. Ojilos para la conea
9. Indice para el alineamiento del
collar del tripode
10. Escala para el alineamiento del
collar del tripode (cuatro marcas)
11. Soporte para el filtro de cristal
12. Parasol extensible HE-4
13. Parasol incorporado
14. Indicadores de profundidad de campo
15. Indice de compensation para
fotografia por rayos infrarrojos
16. Indice de distancias
17. Indice para el montaje del soporte
del filtro
18. Perilla del soporte para el filtro
19. Collar para el tripode incoporado
y rotatorio
20. Indice de aberturas
21. Escala de aberturas
22. Anillo de aberturas
23. Borne del servo acoplador EE
24. Borne del indice de aberturas
25. Escala para lectura directa de
aberturas
26. Zapata de acoplamiento al
exposfmetro
27. Protuberancia de acoplamiento al
exposfmetro
28. Placa de soporte para el filtro de
gelatina
29. Soporte para el filtro de gelatina
Le agradecemos por utilizar los productos Nikon.
Antes de utilizar su nuevo objetivo, lea cuidadosamente las instrucciones que se dan a
continuation, con el fin de obtener los mejores resultados de su objetivo, ahora y durante muchos anos mas.
MONTAJE DEL OBJETIVO
A
Para montar el objetivo, coloquelo en la montura de bayoneta que existe en la camara,
en forma tal que coincidan el indice de aberturas que existe en el objetivo con el indice
para el montaje del objetivo que existe en la camara. Haga girar el cuerpo de la camara
en el sentido de rotacion de las agujas del reloj hasta que escuche un "click", que indica
que esta montado correctamente.
Para retirar el objetivo, oprima el boron liberador del objetivo que existe en la camara,
y haga girar el cuerpo de la camara en el sentido de rotacion contrario al de las agujas
del reloj. Con respecto a los detalles, vea el manual de instrucciones de la camara.
Nota: Cuando se utilice el objetivo con la Nikon F-401/N4004*, no operara la funcion de acoplamiento del exposfmetro de la camara y no apareceran los inidicadores LED de exposition.
*La Nikon N4004 es vendida exclusivamente en EE.UU.
ENFOQUE
Haga girar el anillo de enfoque hasta que la imagen aparezca clara y m'tida en el visor.
La distancia focal efectiva puede variar en condiciones extremas de frfo o calor. Con el
fin de compensar este efecto, haga girar el anillo de enfoque del objetivo, ligeramente
mas alia de la position oo (infinito).
Enfoque prefijado
B
Cuando Ud. desee reenfocar rapidamente hasta la distancia de un objeto especi'fico,
prefije la distancia enfocada.
1. Afloje el tornillo de seguro del anillo de enfoque prefijado y haga girar el anillo en
cualquier sentido hasta que escuche un "click".
2. Haga girar el anillo de enfoque hasta que se encuentre a la distancia deseada.
3. Apriete el tornillo de fijacion del anillo de enfoque prefijado.
26
PROFUNDIDAD DE CAMPO
Es posible verificar la profundidad de campo con los indicadores de profundidad de
campo identificados por colores que se encuentran grabados en el tambor del objetivo.
Si su camara posee la funcion de vision previa de profundidad de campo, es posible
verificar la profundidad de campo en el visor. (Con respecto a los detalles, vea el manual
de instrucciones de la camara).
Tambien es posible verificar !a profundidad de campo haciendo referenda a la tabla de
la pagina 31.
FOTOGRAFIA POR RAYOS INFRARROJOS
En fotografi'a por rayos infrarrojos, es necesario hacer los siguientes ajustes en la distancia enfocada.
1. Enfoque el sujeto
2. Ajuste nuevamente el anillo de enfoque en forma tal que la distancia enfocada coincida con el indice de enfoque para fotografi'a por rayos infrarrojos.
4. Fije el filtro apropiado, tal como el R60, etc., y tome la fotografi'a.
UTILIZACION DE FILTROS
Utilice siempre un filtro con el objetivo. Un filtro Nikon L37C viene motado en el
soporte para filtro de cristal tipo insercion. Con el objetivo tambien se provee un soporte para filtro de gelatina tipo insercion.
Reemplazo de los filtros de cristal
C! -Cj *C3
1. Presione la perilla del soporte del filtro de cristal, y hagala rotar en el sentido contrario al de la rotacion de las agujas del reloj, hasta que la h'nea blanca existente en la
perilla forme un angulo recto con el eje del objetivo.
2. Extraiga el soporte.
3. Desenrosque el filtro que se encuentra montado y reemplacelo con el filtro que Ud.
desea utilizar.
4. Coloque el soporte nuevamente, oprima la perilla y hagala girar en el sentido de
rotacion de las agujas del reloj para fijarla.
Utilization de un filtro de gelatina
D
1. Recorte, del filtro de gelatina, un ci'rculo de aproximadamente 40mm (1,6 pulg.) de
diametro.
2. Abra la placa de soporte para el filtro de gelatina, empujando y levantando la traba.
3. Inserte el filtro de gelatina en el soporte y cierre la placa. Asegiirese de que el filtro
no presenta rayaduras y se encuentra libre de polvo, tenga cuidado para que permanezca piano.
4. Retire del objetivo el soporte para el filtro de cristal e inserte el soporte para el filtro de gelatina.
UTILIZACION DE LOS PARASOLES
Al sacar fotografias a plena luz del sol, utilice los parasoles para impedir la entrada de
rayos parasitos en su objetivo.
Para utilizar el parasol incorporado
— — E i • E2
1. Haga girar el parasol en el sentido al de la rotacion de las agujas del reloj y tire del
mismo hacia afuera lo mas posible.
2. Asegiirelo en posicion haciendolo girar hasta que se trabe.
27
Para montar el parasol extensible HE-4
F
1. Afloje el tomillo de fijacion que existe en el H E 4 .
2. Deslice el H E 4 en la parte delantera del parasol incorporado.
3. Apriete el tornillo de traba.
PANTALLAS DE ENFOQUE RECOMENDADAS
Existen varias pantallas de enfoque para las camaras de las series F3 y F2, capaces de
satisfacer las necesidades de cualquier tipo de objetivo o situation fotografica. Las pantallas recomendadas para ser utilizadas con su objetivo aparecen indicadas mas abajo.
Para pantallas utilizadas en camaras Nikon que no sean de las series F3 ni F2, (por
ejemplo las Nikon. FA, FE2, FM2 y FE), vea la columna correspondiente a las camaras
de las series F3. Para las pantallas de enfoque K2, B2 y E2, vea las columnas de las pantallas K, B y E, respectivamente. Para mas detalles,vea asimismola hoja de instrucciones
de la pantalla respectiva.
~~~~~-~-^
Carara
Pantalla
"""—**•--*_
F3
F2
A/L
B
c
D
E
©
© 0 0 ©
©
©
o
G1
G2
G3
G4
HI
o o
0
o (+JS)
0 ©
H2
H3
H4
J
K/P
o
o
©
o
o
0
©
© © ©
©
©
©
©
M
R
T
U
• Cuando a este objetivo se le adhiere el teleconvertidor TC-14A remitase a la siguiente
tabla*:
m
A/L
B
C
D
E
T
u
F3
©
©
©
©
©
© 0
s
F2
©
©
o o
0 o
©
©
©
©
- ~——___^ Pantalta
camara
"———-^
Gl
G2
G3
G4
HI
H2
H3
j
K/P
M
R
• Cuando a este objetivo se le adhiere el teleconvertidor TC-14B o TC-14, remitase a la
siguiente tabla1.
"""*""•*"-*«_
Pantalla
Camara
^"~-—-___
A/L
F3
©
F2
©
B
C
D
E
© O
©
o
o o
ft
©
Gl
G2
G3
G4
HI
H2
o
o
H3
M
T
J
K/P
O
©
©
© © 0
o
©
©
©
H4
R
U
• Cuando a este objetivo se le adhiere el teleconvertidor TC-201 o TC-200, remitase a
la siguiente tabla*:
~~~~—~-^^
Pantalla
A/L
B
C
D
o
o o
E
F3
®
© O
©
F2
•
©
©
Gl
G2
G3
G4
HI
H2
H3
H4
o
o
o
o
J
K/P
M
©
®
© •' ©
©
•
©
R
T
U
• Cuando a este objetivo se le adhiere el teleconvertidor TC-301 o TC-300, remitase a
la siguiente tabla:
""""""""-—-—_
Pantalla
Camara
^~-—.__^
A/L
B
C
D
E
F3
®
©
©
O
F2
®
©
o o
o o
©
o
Gl
G2
G3
G4
HI
H2
H3
H4
J
K/P
M
o
o
©
®
© • ©
©
m
©
R
T
U
* Utilizable, pero puede producirse vifieteo u otro deterioro de la imagen.
©= Excelente
• = Enfoque aceptable
La imagen es brillante de un boide al otro, pero la parte central del visor micropris»„ matico o reticulado es oscura. Enfoquese sobre la parte mate de alrededor.
O = Enfoque aceptable
Ligero efecto de vineteo o fendomeno de Moire afecta la imagen en la pantalla.
Pero la imagen de la pelfcula no es afectada por esto.
Enfoque aceptable
Q= Medida de la exposicion imposible; la combination objetivo-pantalla solo permite
realizar la operation de enfoque.
()= Indica grado de compensation de exposicion.
Los blancos significan inaplicable.
ESPECIFICACIONES
Longitud focal: 300mm
Abertura maxima: f/2,8
Construction: 8 elementos en 6 groupos (mas una placa a prueba de polvo montada en
la parte delantera)
Angulo: 8° 10'
Excala de distancias: Graduada en metros y pies, desde 3m (10 pies) hasta el infinito
(-)
Escala de aberturas: f/2,8 a f/22 en ambas escalas, la standard y la de lectura directa de
aberturas
Diafragma: Totalmente automatico
Medicion de exposicion: Via el metodo de abertura total; Protuberancia de acoplamiento de medidor provisto para las camaras Al y zapata de acoplamiento de
medidor para las camaras sin Al.
Sistema de enfoque: Interno
Indice para enfoque infrarrojo: Provisto
Montura de tri'pode: Anillo de montura del trfpode incorporado girable hasta 360°
Parasol: Tipo telescopico a rosea incorporado
Parasol extensible: Provisto
Filtros: El soporte para el filtro de cristal acepta filtros a rosea de 39mm de diam.;
soporte para el filtro de geratina acepta filtros de gelatina
Montaje: Tipo bayoneta Nikon
Dimensiones: Aprox. 132mm de diam. x 255mm de extension desde el borde;aprox.
263mm de longitud (total)
Peso: Aprox. 2400g
Accesorios
Tapa del objetivo de cuerina
Tapa trasera del objetivo LF-1
Parasol extensible HE-4
Filtros L37C de rosea, 39mm
Portafiltro de gelatina
Estuche reforzado CT-302
Otros filtros de rosea de 39mm
Teleconvertidor TC-14A
Teleconvertidor TC-14B
Teleconvertidor TC-201
Teleconvertidor TC-301
29
CUIDADO DEL OBJETIVO
• Si bien siempre se debe mantener limpia la superficie del objetivo, debe evitarse una
limpieza tosca. Limpie frontando con un paiio de algodon limpio humedecido en
alcohol cuando deba quitar manchas con grasa o impresiones digitales de la superficie
del objetivo.
Si se utiliza eter para limpiar el objetivo, puede aparecer a veces una mancha sobre
la superficie del objetivo recubierto de capas multiples. Si esto sucede, h'mpielo nuevamente con un paiio de algodon humedecido con alcohol.
• Tenga cuidado cuando limpie la parte traseia del objetivo con un soplador del tip con
pistola de pulverization porque su potente flujo de aire podrfa dafiar las laminillas
del diafragma del objetivo. Para evitar dafios, fije el objetivo a plena abertura y utilice
el soplador desde una distancia lo suficientemente alejada.
• Usar un cepillo suave-nunca tela o tejido-para quitar el polvo, las manchas persistentes han de ser lavadas con un tejido especial para objetivos humedecido con
alcohol o lfquido limpiador.
• Proteja siempre la superficie del objetivo de polvo y danos.
El parasol tarn bien ayuda a proteger el objetivo.
• Dejar la tapa puesta siempre que no se use el objetivo.
ALGO SOBRE
LOS NIKKOR
DE LA SERIE
ED
30
La correction de las aberraciones cromaticas en los objetivos ha
estado limitada, mayormente, al uso de tecnicas que llevan a dos
longitudes de onda (normalmente la azul y la roja) a un foco
comun. Aunque conocidos como acromaticos, los objetivos que
empleaban estos disenos muestran cierto grado de dispersion residual indesdable (Uamada el "espectro secundario") que limita el
contraste de la imagen y la definicion particularmente a abertura
plena. Los teleobjetivos son los mas afectos a los efectos negativos de las aberraciones cromaticas, puesto que el espectro secundario aumenta con la longitud focal. La serie ED de Nikkors
consiste en unos teles o superteles con elementos hechos de un
cristal optico especial desarrollado por Nippon Kogaku llamado
cristal de "Dispersion Extrami'nima (ED)". Aunque las caracten'sticas opticas de este nuevo cristal son similares a las del
calciofluorita, el cristal ED posee un indice de refraction mas
constante a traves de un amplio intervalo de temperaturas y por
tanto causara menor alteration del foco. Tambien el cristal ED
es mucho mas duro y mas resistente a las rayaduras, siendo posible su uso para los elementos delantero y trasero, con optimas
correcciones de aberraciones cromaticas a traves del mayor
indice posible de longitudes de onda. Algunos objetivos de la
serie ED han sido tan bien corregidos que la definicion de la
imagen se extiende uniformemente a la region infrarroja; pues
para estos objetivos es innecesario un reenfoque correctivo para
fotograffa infrarroja. Los demas objetivos tales como el Nikkor
300mm f/2,8 IF-ED se han construido excepcionalmente compactos debido al uso de elementos de cristal ED; para estos
objetivos, sin embargo, si se necesita un enfoque correctivo para
fotograffa infrarroja. Sin importar cual sea, cualquier objetivo de
la serie ED ofrece definicion excepcional y gran contraste, para
una fotograffa mas precisa bajo las condiciones mas diversas.
\J
') i t .
NAHAUFNAHME-TABELLE
TABLE DE PHOTOMACROGRAPHIE
TABLA DE ACERCAMIENTO
(cm)
fflflSSA
Nahaufnahme-Zubehor
Accessoire macro
Accesorio de acercamiento
E2 'J > V
Zwischenring E2
Bague E2
Anillo E2
Zwischenhngsatz K
Jeu de bague K
Juego de anillos K
PK IJ > V
Zwischenring(e) PK
Bague(s) PK
Anillo(s) de la Serie PK
PN'; >0
Zwischenring PN
Bague PN
Anillo de la Serie PN
Objektiv in Normalslellung
Objectif en position normale
Objetivo en la posicion normal
Vergrolierungsbereich
Rapport de reproduction
Relacion de reproduccion
Aufnahmefeld
Champ couvert
Campo abarcado
MUMM
Eingesteilte Entfernung
Distance de mise au point
Distancia de enfoque
1/21.4-1/5.9
51.4x77.114.2x21.2
700.7-232.5
1/51.7-1/3.5
124.1 x 186.28.4 x 12.6
1608.8-168.4
1/37.5-1/3.4
90.0 x 1358.1 x 12.2
1182.3-165.2
1/5.7-1/3.3
13.7 x 20.67.8x 11.7
233.2-162.2
* *PK<) >?<r>u ctfxnftife&PK-wA>) >7i tzi*PK-\ >) >? i Moment ?, ati»attiiPK-iiA-PK-i3i:fc(*PK-i-PK-3'J > ? > a
•Die ersten Zahlen gelten fur den Gebrauch des Kl-Ringcs alleine, diejenigen fiir alle 5 Ringe zusammen.
**Dieerstcn Zahlen gelten fiir den Gebrauch des PK-ll A oder PK-1 Ringes alleine diejenigen fiir 3 Ringc (PK-11A - PK-I3
oder PK-1 - PK-3) zusammen.
*Les premiers ehiffres sont pour la bague K) employee separement et les seconds pour les cinq bagues moniees ensembles.
** Les premiers chiffressont pour la PK-1 lAou PK-1 employee separement et les seconds pour les trois bagues (PK-11 A - PK-13
ou PK-1 - PK-3) moiuees ensembles.
*Losprimeros mimeros son para el anillo KI usado solo, y lossegundos mimeros para el con junto de cinco anillos usados juntos.
**Los primeros mimeros son para el anillo PK-11A o PK-1 usado solo, y lossegundos numeros parae! conjuntode ires anillos
(PK-11A-PK-13 o PK-1-PK-3) usados juntos.
CLOSE-UP TABLE
Close-up attachment
Lens in normal position
Reproduction ratio
Subject field
Focused distance
E2 Ring
1/21.4-1/5.9
20.2 x 3 0 . 4 - 5 . 6 x 8.3
275.9-91.5
K Ring Set
1/51.7-1/3.5
48.9 x 7 3 . 3 - 3 . 3 x 5 . 0
633.4-66.3
PK-Series Ring (s)
1/37.5-1/3.4
35.4x53.1-3.2x4.8
465.5-65.0
PN-Series Ring
1/5.7-1/3.3
5.5 x 8.1-3.1 x 4 . 6
91.8-63.9
•The first values are for the Kl ring used alone and the second ones for five rings used together.
"The first values are for the PK-11 A or PK-t ring used alone and the second ones for three rings (PK-11A- PK-13 or
PK-1-PK-3) used together.
SCHARFENTIEFE-TABELLE
PROFONDEUR DE CHAMP
PROFUNDIDAD DE CAMPO
Eingestellte
Distanz
Distance
de mise
au point
Distancia
enfocada
3
4
5
6
7
8
10
12
15
20
30
70
_
<m)
MMt*
ttmm
Vetgrofierungsbereich
Rapport de
reproduction
Relacion de
reproduccion
MVIMM
Scharfentiefe
Profondeur de champ
Ptofundidad de campo
f/2.8
2.993.01
3.994.01
4.985.02
5.976.03
6.967.05
7.948.06
9.9110.1
11.912.1
14.815.2
19.620.4
29.130.9
65.375.4
965-
f/4
2.993.01
3 18
4.02
4.975.03
5.956.05
6.947.07
7.928.09
9.8710.1
11.812.2
14.715.3
19.420.6
28.831.4
63.578.0
676-
f/5.6
2.993.01
3.974.03
4.965.04
5.946.07
6.917.09
7.888.12
9.8110.2
11.712.3
14.615.5
19.220.8
28.331.9
61.281.7
483-
f/8
2.983.02
3.964.04
4.945.06
5.91
6.09
6.877.13
7.838.18
9.7310.3
11.612.4
14.415.7
18.921.2
27.632.8
58.188.1
338-
f/11
2.973.03
3.954.05
4.925.09
5.876.13
6.837.18
7.778.24
9.6410.4
11.512.6
14.215.9
18.621.7
26.834.1
54.697.6
246-
f/16
2.963.04
3.924.08
4.885.13
5.826.19
f/22
2.953.06
3.94.11
4.835.18
5.766.27
6.667.38
7.568.50
9.3010.8
11.013.2
13.417.0
17.323.7
24.339.4
44.8162
123-
6.75
7.27
7.678.36
9.4810.6
11.312.9
13.816.4
18.022.6
25.636.3
49.7119
169-
1/8.4
1/11.7
1/15.0
1/18.4
1/21.7
1/25.0
1/31.7
1/38.4
1/48.4
1/65.0
1/98.4
1/231.7
1/-
* Durch Verwendung der Imnenfokussierung (IF)ist die kleinste Fokussierentferming dieses Objektivs bei derselben
Brennweite kiirzer als bei friiheren Modellen mit herkommlicher Schraubenfokussierung.
* Grace a un systeme de mise au point interne (IF), la distance de mise au point de cet objectif est plus courte que
celle de modeles anterieurs a mise au point helico'idale, pour une distance t'ocale identique.
* Gracias al uso del sistema de enfoque interno (IF), la distancia de enfoque mas cercana de esta objetivo es mas
corta que la de modelos anteriores, la cuales utilizan el tradicional enfoque helicoidal, empleando la misma
distancia focal.
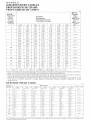
DEPTH-OF-FIELD TABLE
Focused
distance
10
n
15
20
25
30
40
60
100
200
f/2.8
9'11-]1/16"10'
12'll"13'
]4'11"15'
19'10"20'1"
24'9"25'2"
29'8"30'3"
39'6"40'5"
58'll"61*1"
97'103'
188'213'
3165-
f/4
» ^
,n,"-
fflT-
firiffBF
«
•
-
«:-
BT}S-
f/5.6
9'11-3/8"10'
12*10"13*1"
14*10"15*1"
19*9"20'2"
24'7"25'4"
29'5"30'6"
39'40*11"
57'10"62'3"
94'2"106'
177'228'
1583'-
Depth of field
f/8
9 i i-i/a -—
10'
I2'10"13' 1"
14*9"\5'2"
I9'8"20'3"
24'6"25*6"
29*3'*30'9"
38'8"41'4"
57'63'3"
91*11"109'
169'243'
1109'-
f/11
9'10-7/8"
101 J
12'9"13'2"
14'9 " IS'2"
19*6"20'5"
24-3"25'8"
29'31'
38'2"-
4iM r1
56'64'7"
89*2"113'
160'265'
807--
f/22
f/16
«?*»iffIJ?"!R:»iSF-
St
st;=
Bf-
s*r!!?>
Repro. ratio
1/8.5
1/11.6
14'6"15'5"
1/13.6
VS?
1/18.7
&-::»:*?'"-
1/23.8
m '
1/100
Iff-
1/202
1/38.8
1/39.0
1/59.3
404555-1/m
* By using Internal Focusing (IF), the closest focusing distance of this lens is shorter ihan previous models" al the same focal length which
utilized traditional helicoid focusing.
•
2216'm
-
No reproduction in any form of this manual, in
whole or in part (except for brief quotation in
critical articles or reviews), may be made without
written authorization from NIKON CORPORATION.
Nikon
NIKON CORPORATION
FUJI BLDG., 2-3, MARUNOUCHI 3-CHOME, CHIYODA-KU,
TOKYO 100, JAPAN
PHONE: 81-3-214-5311 TELEX: J22601 (NIKON) FAX: 81-3-201-5856
Printed in Japan 8&068-Ae08