1
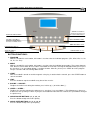
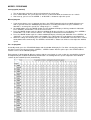
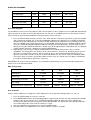
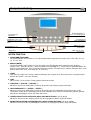
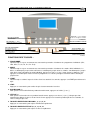
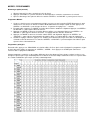
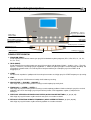
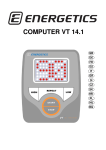
POWER RUN 4.8 HRC
EN
DE
FR
PL
Table of contents - Inhaltsverzeichnis - Table des matières - Spis treści
EN
DE
FR
PL
1. English
P. 3
2. Deutsch
P. 7
3. Français
P. 11
4. Polski
P. 15
© The owner’s manual is only for the customer reference. ENERGETICS can not guarantee for mistakes occurring due to
translation or change in technical specification of the product.
© Die Gebrauchsanweisung dient nur zur Referenz für den Kunden. ENERGETICS übernimmt keine Haftung für Fehler die durch
Übersetzung oder technische Änderungen des Produkts entstehen.
© Le manuel d'utilisation ne sert que d'information au consommateur. ENERGETICS ne peut être tenu responsable pour
d'éventuelles erreurs de traduction, ou pour d'éventuelles modifications techniques du produit.
© Instrukcja obsługi jest informacja dla klienta. ENERGETICS nie ponosi odpowiedzialności za usterki powstałe w wyniku
tłumaczenia lub technicznych zmian produktu.
© Copyright by ENERGETICS
COMPUTER INSTRUCTIONS
QUICK INCLINE BUTTONS
INCLINE+/- BUTTON: To
change the running incline
and set the individual values
PROGRAM BUTTON: To
select individual program
START BUTTON: To
start the exercise
EN
SPEED+/- BUTTON: To
change the running speed
and set the individual values
QUICK SPEED BUTTONS
MODE BUTTON:To Select
and set pre-values
STOP BUTTON: To stop
the exercise at any time
BUTTON FUNCTIONS:
1. PROGRAM
While the treadmill is not in motion, this button is used to select the individual programs (HP1, HP2, HP3, U1, U2,
U3, P1, P2…P15).
2. MODE
While the treadmill is not in motion, this button is used to select the individual target modes. Time counts down to
zero, distance counts down to zero, calories count down to zero. After selecting the individual mode, please press
the speed up (+) or speed down button (-) to adjust the data. After this, please press START to run the program.
The pre-set values will start running down to zero.
3. START
After the treadmill is turned on and the magnetic safety key is attached to the console, press the START button to
start the treadmill.
4. STOP
Press this button to stop the treadmill at any time of the exercise.
5. INCLINE + / INCLINE –
To adjust the incline level during the workout, press incline up (+) or incline down (-).
6. SPEED + / SPEED –
To adjust the speed level during the workout, press speed up (+) or speed down (-). Each button press increases
or decreases the speed by 0.1 km/h. If you press the button for more than 0.5 seconds, the speed will be changed
in a quicker way.
7. QUICK INCLINE BUTTONS 1, 3, 5, 7, 9, 12
Press the button to adjust the incline quickly.
8. QUICK SPEED BUTTONS 2, 5, 8, 11, 14, 16
Press the button to adjust the speed quickly.
MODES / PROGRAMS
Start up quick (manual)
1. Turn on the power at the base of the unit and attach the safety cord.
2. Press START button, the system will enter into a 3 second count down and commence at 1.0 km/h.
3. After start-up, you can use the SPEED +/- or INCLINE +/- button to adjust the speed.
Manual program
1. If you do not choose a pre-set program and press the START button directly, the treadmill will start to run
from a speed of 1km/h, the window display will start an ascending count from zero, press SPEED+/- or
INCLINE +/- to change the speed. The setting range is 1 – 18 km/h.
2. At standby mode, press the “MODE” button, the time window will display a flashing “30:00 min” indication.
Press SPEED+/- or INCLINE +/-”to set the exercise time.
3. Press the “MODE” button again, the distance window will display a flashing “1.0” indication. Press SPEED+/or INCLINE +/- to set the exercise distance. The setting has to be between 0.5 and 99.5 km.
4. Press the “MODE” button again, the calorie window will display a flashing “50” indication. Press SPEED+/-”or
“INCLINE +/-” to set the target calorie consumption. The setting range has to be between 10 and 995 kcal.
5. When the settings are finished, press the “START” button to begin, the treadmill will enter into a three second
count down before commencing. The SPEED+/-or INCLINE +/- button can still be used to adjust the workout
speed.
Pre- set programs
At standby mode, press the “PROGRAM” button and the window will display P1-P15. After selecting the program, set
the target exercise time by pressing the “SPEED+”, “SPEED-“ button. After this please press the START button to
start the exercise in the individual program.
Each program is divided into 20 different sections with the same length. In each section, the speed will be changed
and adjusted by the treadmill automatically. Below table is visualizing how the speed is adjusted in the individual
sections by the treadmill (in km/h) automatically.
RANGE OF PROGRAMS
Initial
Initial setting
Setting range
Showing range
Time (MIN:SEC)
0:00
30:00
5:00-99:00
0:00-99:59
Speed (KM/H)
0.0
N/A
N/A
1.0-18.0
Distance (KM)
0.00
1.0
0.5-99.5
0.00-99.99
Heart rate (Time/Min)
P
N/A
N/A
40-200
Calories
0
50
10-995
0-999
Heart Rate Program
The treadmill uses three heart rate programs (HP1, HP2 and HP3). In these programs, the treadmill will automatically
adjust speed and / or incline to reach your target heart rate. For this it is mandatory to wear a chest belt (heart beat
measurement) or permanently hold onto the hand pulse plates on the side rails.
1. Press the PROG. button until you reach the “HP1, HP2 and HP3” and select any of them. In the Time window
“AG” is displayed meaning age. In the Speed window the default age is blinking. Press SPEED or INCLINE
up/down to set your individual age. The Pulse window will display the target hear rate according to your age.
You may still adjust your target heart rate by pressing MODE, afterwards the Pulse window will blink and you
can press SPEED or INCLINE up/down to adjust the target heart rate individually.. Set your target exercise
time by pressing the SPEED or INCLINE +/- button (can still be adjusted after completion of the user program
setting). Confirm your time setting by pressing the MODE button.
2. Begin with the exercise by pressing the START button. The treadmill will start after a three seconds
countdown. The default time is 22 minutes, the first three minutes is for warm up, during this phase you can
adjust the speed and incline yourself. After the warm up phase, the treadmill will automatically increase /
decrease speed and / or incline every ten seconds After 20 minutes the system enters the cool down mode.
The incline shows “0” and the speed slows down 0.5 km/h every 10 seconds. You can stop the treadmill by
pressing the STOP button or pull out the safety key.
IMPORTANT: To use the heart rate programs, it is mandatory to permanently stay connected to the hand pulse or
(better) wear a chest belt transmitter.
HRC setting range:
Running time
Default age
Default target heart beat
Age setting
Target heart beat setting range
HP1
HP2
HP3
Fix 22:00
Fix 22:00
Fix 22:00
30
30
30
150RPM
160RPM
170RPM
15—80
15—80
15—80
80RPM—180RPM
80RPM—180RPM
80RPM—180RPM
User Programs
Choose among 3 different user programs, which allow you to set up your own training profiles: U1, U2, U3.
1. Press the PROG. button to select U1, U2 or U3.
2. Press MODE button and the corresponding program segment starts flashing. The Speed and Incline window
show the value of the segment. Press SPEED or INCLINE up/down to adjust the values. Confirm your
desired speed and incline per level by pressing the MODE button. The display will automatically jump to the
next section. Adjust the values until all sections are saved.
3. Start your individual user program by pressing the START button
4. The data will be saved without loss even if the treadmill is in power- off mode.
HEART RATE FUNCTION:
Place your palms on the hand pulse and the pulse will be shown in the pulse window after 5 seconds. The heart rate
is for reference only and not for medical purpose.
SAFETY FUNCTION:
If at any stage you require the treadmill to stop, pull the safety cord from the treadmill and it will cut power to the unit
immediately. The window will display “OFF” and the buzzer will make a 15 times “bi” sound.
POWER SAVE FUNCTION:
Without any operation for ten minutes the unit will begin to hibernate, and the display will dim. Press any button to
wake up the display.
CAUTION:
1. We recommend that you maintain a slow speed at the beginning of a session and hold on to the handrails until
you become comfortable and familiar with the treadmill.
2. Attach the magnet end of the safety pulling rope to the computer and also attach the clip of the safety pulling rope
to your clothing.
3. To end your workout safely, press the STOP button or pull out the safety cord, then the treadmill will stop
immediately.
Computeranleitung
Schnellwahltasten
STEIGUNG
DE
GESCHWINDIGKEIT +/Tasten, sowie Eingabetastefür
persönliche Werte
STEIGUNG+/- Taste, sowie
Eingabetaste für persönliche
Werte
PROGRAMM Taste: zur
Programmwahl
START Taste:
Beginnt das Training
Schnellwahltasten
GESCHWINDIGKEIT
MODUS Taste zum
Einstellen von
Zielvorgaben
STOP Taste: Beendet
das Training
TASTEN FUNKTION:
1. PROGRAMM (PROGRAM)
Vor Trainingsbeginn kann mit dieser Taste die Programmwahl vorgenommen werden (HP1, HP2, HP3, U1, U2,
U3, P1, P2…P15).
2. MODUS (MODE)
Vor Trainingsbeginn kann mit dieser Taste der gewünschte Zielvorgabemodus gewählt werden (Kalorien –
Calories, Zeit – Time oder Strecke – Distance). Mit den Geschwindigkeit +/- Tasten kann im gewählten Modus der
Zielwert eingestellt werden. Vom eingestellten Wert der Kalorien, Zeit oder Strecke zählt der Computer dann, nach
drücken der START Taste, nach unten bis „0“ erreicht ist.
3. START
Nach dem Einschalten des Gerätes und dem Anbringen des magnetischen Sicherheitsschlüssels beginnt durch
drücken der START – Taste das Training.
4. STOP
Mit der STOP –Taste kann das Training jederzeit beendet werden.
5. STEIGUNG +/- (INCLINE + / INCLINE –)
Mit diesen Tasten kann während des Trainings die gewünschte Steigung eingestellt werden
6. GESCHWINDIGKEIT +/- (SPEED + / SPEED –)
Mit diesen Tasten kann während des Trainings die gewünschte Geschwindigkeit eingestellt werden. Jeder
Tastendruck ändert die Geschwindigkeit um 0.1 km/h. Wird die Taste mehr als 0.5 Sekunden gedrückt gehalten,
läuft die Geschwindigkeit schnell nach oben bzw. unten.
7. SCHNELLWAHLTASTEN STEIGUNG (QUICK INCLINE BUTTONS 1, 3, 5, 7, 9, 12)
Mit diesen Tasten kann die Steigung schnell auf die vorgegebenen Werte eingestellt werden.
8. SCHNELLWAHLTASTEN GESCHWINDIGKEIT (QUICK SPEED BUTTONS 2, 5, 8, 11, 14, 16)
Mit diesen Tasten kann die Geschwindigkeit schnell auf die vorgegebenen Werte eingestellt werden.
MODUS UND PROGRAMME
Schnell Start – Manuelles Programm (manual)
1.
2.
3.
Schalten Sie den Netzschalter ein und bringen Sie den Sicherheitsschlüssel an.
Nach Drücken der START-Taste beginnt ein 3 Sekunden Countdown dann startet das Gerät bei 1.0 km/h.
Die Geschwindigkeit kann mit den Geschwindigkeit +/- und die Steigung mit den Steigung +/- Tasten geändert werden.
Manuelles Programm
1.
2.
3.
4.
5.
Wenn das Laufband durch drücken der START – Taste gestartet wird ohne eines der vorgespeicherten Programme zu
wählen, beginnt die Geschwindigkeit bei 1.0 km/h. Auf der Anzeige werden die Werte nach oben gezählt, mit den
GESCHWINDIGKEIT +/- oder STEIGUNG +/-Tasten kann die Geschwindigkeit oder Neigung geändert werden. Der
Einstellungsbereich ist von 1 – 18 km/h.
Im Standby Modus kann durch Drücken der MODE – Taste ein Zielvorgabewert eingestellt werden. Nach dem Drücken
der MODE – Taste blinkt auf der Zeitanzeige “30:00 min“. Mit den GESCHWINDIGKEIT +/- oder STEIGUNG +/- kann die
gewünschte Trainingszeit eingestellt werden.
Nach nochmaligem drücken der MODE – Taste blinkt auf der Streckenanzeige “1.0“ Mit GESCHWINDIGKEIT +/- oder
STEIGUNG +/- kann die gewünschte Strecke eingegeben werden. Der Einstellungsbereich ist von 0.5 bis 99.5 km.
Nach nochmaligem Drücken der MODE - Taste blinkt auf der Kalorienanzeige “50”. Mit GESCHWINDIGKEIT +/- oder
STEIGUNG +/- kann der gewünschte Kalorienverbrauch eingestellt werden. Der Einstellungsbereich ist von 10 bis 995
kcal.
Wenn die Werte eingegeben sind beginnt das Training durch Drücken der START – Taste. Anschießend zählt die Zeit in
drei Sekunden nach unten. Mit GESCHWINDIGKEIT +/- oder STEIGUNG +/- kann die Geschwindigkeit oder Neigung
während des Trainings verändert werden.
Vorgespeicherte Programme
Im Standby-Modus kann durch Drücken der PROGRAMM – Taste eine Programmwahl getroffen werden. Auf der Anzeige
erscheint P1-P15. Nachdem das gewünschte Programm gewählt ist wird die Trainingszeit durch Drücken der
GESCHWINDIGKEIT +/- Tasten eingestellt. Durch Drücken der Start – Taste beginnt das Programm.
Jedes Programm ist in jeweils 20 gleichlange Abschnitte aufgeteilt. Die Geschwindigkeit und Steigung wird vom Computer in
jedem Abschnitt geändert (siehe Tabelle unten). Die Geschwindigkeitsangabe ist in km/h.
Einstellbereich der Programme
Beginn
bei
Werkseinstellung Einstellbereich
Anzeigebereich
Zeit in Minuten/Sekunden
0:00
30:00
5:00-99:00
0:00-99:59
Geschwindigkeit km/h
0.0
N/A
N/A
1.0-18.0
Strecke (km)
0.00
1.0
0.5-99.5
0.00-99.99
Herzfrequenz (Schläge
pro Minute)
P
N/A
N/A
40-200
Kalorien
0
50
10-995
0-999
Pulsprogramm
Das Laufband verfügt über drei pulsgesteuerte Programme (HP1, HP2 und HP3). Während dieser Programme wird die
Geschwindigkeit und Steigung vom Computer automatisch geändert, so dass das Training im eingestellten Zielpulsbereich
stattfindet. Wir empfehlen während dieser Programme einen Brustgurt zu tragen. Wenn kein Brustgurt getragen wird, müssen die
Handpulssensoren während des ganzen Programms fest umgriffen werden.
1.
2.
Drücken Sie die PROG. – Taste bis “HP1, HP2 und HP3” erscheint. Wählen Sie eines dieser Programme. Auf der
Zeitanzeige erscheint “AG” (AGE – Alter). Auf der Geschwindigkeitsanzeige blinkt die Werkseinstellung. Mit den
Geschwindigkeit +/- oder Steigung +/- Tasten kann die Altersangabe geändert werden. Auf der Pulsanzeige erscheint der
Zielpuls für das eingegebene Alter. Sie können den Zielpuls durch Drücken der MODE – Taste noch verändern. Nach
dem Drücken der MODE – Taste blinkt die Pulsanzeige. Mit den Geschwindigkeit +/- oder Steigung +/- Tasten kann der
Zielpuls individuell eingestellt werden. Die Trainingszeit kann mit den Geschwindigkeit +/- oder Steigung +/- Tasten
eingestellt werden. Bestätigen Sie die Zeiteinstellung mit der MODE –Taste. Die Zeit kann nach der Einstellungsphase
noch geändert werden.
Durch Drücken der START –Taste beginnt das Programm nach einem 3 Sekunden Count – Down. (Die Werkseinstellung
ist 22 Minuten.) Während der ersten 3 Minuten befinden Sie sich in der Aufwärmphase. Hier können Sie die
Geschwindigkeit und Steigung selbst einstellen. Darauf folgt das Hauptprogramm wo die Geschwindigkeit und/oder
Steigung vom Computer automatisch alle 10 Sekunden geändert wird. Nach 20 Minuten folgt die Abkühlphase. Die
Steigung ist auf 0, die Geschwindigkeit wird alle 10 Sekunden um 0.5 km/h reduziert. Das Laufband kann durch Drücken
der STOP – Taste oder entfernen des Sicherheitsschlüssels jederzeit angehalten werden.
WICHTIG: Zur Ausführung dieses Programms ist es wichtig dass Ihr Puls ununterbrochen gemessen wird. Die Pulssensoren
müssen ohne Unterbrechung umgriffen werden. Wir empfehlen daher das Tragen eines Brustgurts
HP1
HP2
HP3
22:00
22:00
22:00
30
30
30
Werkseinstellung Zielpuls
150RPM
160RPM
170RPM
Einstellungsbereich Alter
15—80
15—80
15—80
Einstellungsbereich Puls
80RPM—180RPM
80RPM—180RPM
80RPM—180RPM
Trainingszeit
(Werkseinstellung)
Werkseinstellung Alter
Benutzer definierte Programme
Das Gerät verfügt über 3 Benutzer definierte Programme, die individuell programmiert werden können: U1, U2, U3.
1.
2.
3.
4.
Durch Drücken der PROG – Taste können Sie zwischen U1, U2 oder U3 wählen.
Drücken Sie die MODE – Taste. Auf der Anzeige blinkt der jeweilige Programmabschnitt. Auf der Geschwindigkeits- und
Steigungsanzeige erscheint die Werkseinstellung für diesen Abschnitt. Mit den Geschwindigkeit +/- bzw. Steigung +/Tasten können Sie den Wert individuell anpassen. Bestätigen Sie die Einstellungen für jeden Abschnitt mit der MODE –
Taste. Die Anzeige springt zum nächsten Abschnitt. Wenn die Werte für alle Abschnitte eingegeben sind ist die
Einstellungsphase beendet.
Das durch den Benutzer definierte Programm kann nun durch Drücken der START – Taste eingeleitet werden.
Die Einstellungen werden gespeichert auch wenn das Gerät vom Netz genommen wird.
PULSFUNKTION:
Umgreifen Sie die Pulssensoren, nach ca. 5 Sekunden erscheint die Pulsmessung auf der Anzeige. Diese
Pulsmessung ist ein Referenzwert und nicht geeignet für medizinische Zwecke.
SICHERHEITSFUNKTION:
Sollte es nötig sein das Gerät anzuhalten ziehen Sie die Sicherheitsleine aus dem Gerät. Das Band bleibt sofort
stehen. Auf der Anzeige erscheint “OFF” und ein Signalton ertönt 15 x in Folge.
ENERGIESPARFUNKTION:
Wenn das Training 10 Minuten unterbrochen wird stellt sich die Schlaffunktion ein. Die Anzeige wird blass. Durch
Drücken einer beliebigen Taste wird die Anzeige wieder aktiviert.
BITTE BEACHTEN:
1. Beginnen Sie die Trainingseinheit mit einer langsamen Geschwindigkeit und halten Sie sich an den Handgriffen
fest, bis Sie sich auf dem Band sicher fühlen.
2. Damit das Laufband anläuft muss der Sicherheitsschlüssel am Computer angebracht sein. Bitte befestigen Sie
die Sicherheitsleine mit dem Clip an Ihrer Kleidung.
3. Um das Training sicher zu beenden, drücken Sie die STOP – Taste oder ziehen Sie den Sicherheitsschlüssel.
INSTRUCTIONS DE L'ORDINATEUR
FR
VITESSE +/- : Pour changer
la vitesse et régler les valeurs
individuelles
TOUCHES RAPIDES
INCLINAISON
INCLINAISON +/- : Pour
changer l'inclinaison et régler
les valeurs individuelles
TOUCHES RAPIDES VITESSE
TOUCHE PROGRAMME :
Pour sélectionner un
programme individuel
TOUCHE START :
Pour commencer
l'exercice
TOUCHE MODE : Pour
sélectionner et prérégler
des valeurs
TOUCHE STOP : Pour
arrêter l'exercice à tout
moment
FONCTIONS DES TOUCHES :
1. PROGRAMME
Quand le tapis n'est pas en mouvement, cette touche permet de sélectionner les programmes individuels (HP1,
HP2, HP3, U1, U2, U3, P1, P2…P15).
2. MODE
Quand le tapis n'est pas en mouvement, cette touche permet de sélectionner les modes ciblés individuels. La
durée est décomptée jusqu'à zéro, la distance est décomptée jusqu'à zéro, les calories sont décomptées jusqu'à
zéro. Après avoir sélectionné le mode individuel, appuyez sur Vitesse (+) ou (-) pour ajuster les données. Puis
appuyez sur START pour mettre en route le programme. Les valeurs préréglées commenceront le décompte
jusqu'à zéro.
3. START
Quand le tapis est allumé et que la clé de sûreté est attachée à la console, appuyez sur START pour démarrer le
tapis.
4. STOP
Appuyez sur cette touche pour arrêter le tapis à tout moment de l'exercice.
5. INCLINAISON +/–
Pour ajuster le niveau d'inclinaison pendant l'entraînement, appuyez sur incline (+) ou (-).
6. VITESSE +/–
Pour ajuster le niveau de vitesse pendant l'entraînement, appuyez sur vitesse (+) ou (-). Chaque pression
augmente ou diminue la vitesse de 0.1 km/h. Si vous appuyez sur la touche pendant plus de 0.5 secondes, la
vitesse changera plus vite.
7. TOUCHES RAPIDES INCLINAISON 1, 3, 5, 7, 9, 12
Appuyez sur cette touche pour ajuster l'inclinaison rapidement.
8. TOUCHES RAPIDES VITESSE 2, 5, 8, 11, 14, 16
Appuyez sur cette touche pour ajuster la vitesse rapidement.
MODES / PROGRAMMES
Démarrage rapide (manuel)
1. Allumez l'appareil à sa base et attachez la clé de sûreté.
2. Appuyez sur START, le système entre dans un décompte de 3 secondes et commence à 1.0 km/h.
3. Après le démarrage, vous pouvez utiliser les touches SPEED +/- ou INCLINE +/- pour ajuster la vitesse.
Programme Manuel
1. Si vous ne choisissez pas un programme préréglé et ne pressez pas la touche START directement, le tapis
commence à une vitesse de 1km/h, la fenêtre d'indication affiche un compte à partir de zéro, appuyez sur
SPEED+/- ou INCLINE +/- pour changer la vitesse. La gamme de réglage est 1 – 18 km/h.
2. En mode veille, appuyez sur “MODE”, la fenêtre durée affiche “30:00 min” clignotant. Appuyez sur SPEED+/ou INCLINE +/-” pour régler la durée d'exercice.
3. Appuyez sur “MODE” à nouveau, la fenêtre distance affiche “1.0” clignotant. Appuyez sur SPEED+/- ou
INCLINE +/- pour régler la distance d'exercice. Le réglage doit être entre 0.5 et 99.5 km.
4. Appuyez sur “MODE” à nouveau, la fenêtre calorie affiche “50” clignotant. Appuyez sur SPEED+/- ou
“INCLINE +/-” pour régler la consommation de calories ciblée. Le réglage doit être entre 10 et 995 kcals.
5. Quand les réglages sont finis, appuyez sur “START” pour commencer, le tapis entre dans un décompte de 3
secondes avant de commencer. Les touches SPEED+/- et INCLINE +/- peuvent toujours être utilisées pour
ajuster la vitesse d'entraînement.
Programmes préréglés
En mode veille, appuyez sur “PROGRAM” et la fenêtre affiche P1-P15. Après avoir sélectionné le programme, réglez
la durée d'exercice ciblée en appuyant sur “SPEED+”, “SPEED-“. Puis appuyez sur START pour commencer
l'exercice dans le programme individuel.
Chaque programme est divisé en 20 sections différentes de même longueur. Dans chaque section, la vitesse sera
changée et ajustée par le tapis automatiquement. Le tableau ci-dessous indique comment la vitesse est ajustée dans
les sections individuelles par le tapis (en km/h) automatiquement.
GAMME DE PROGRAMMES
Initial
Réglage Initial
Gamme de
réglage
Gamme d'affichage
Durée (MIN:SEC)
0:00
30:00
5:00-99:00
0:00-99:59
Vitesse (KM/H)
0.0
N/A
N/A
1.0-18.0
Distance (KM)
0.00
1.0
0.5-99.5
0.00-99.99
fréquence cardiaque
(Durée/Min)
P
N/A
N/A
40-200
Calories
0
50
10-995
0-999
Programme cardiaques
Ce tapis roulant vous offre 3 programmes cardiaques (HP1, HP2 and HP3). Dans tous ces programmes, le tapis
rouland adjuste automatiquement las vitesse et / ou l’inclinaison pour attindre votre zone de poux. Pour que le tapis
roulant puisse reconnaitre votre poux il est obligatoire que vous portize ou bien la cinture torsale (pour mesurer de
votre poux) ou que vous teniez les plaquettes de poux en metal sur les rails laterales.
1. Appuyez la touche “PROG.” Jusque vous arrivé sur “HP1, HP2 and HP3” et choisissez le programme de
votre choix. Sur l’écran de temps vous verrez information “AG”. Sur l’écran de vitesse l’age selectionné
clignottera. En appuyant SPEED ou INCLINE “up/down” vous pouvez adjuster votre age.
L’écran “Pulse” vous indiquera la zone ideale d’entrainement qui correspond à votre age. Voux pouvez
encore adjuster votre zone ideale d’entrainement en appuyant la touché MODE. Apres l’écran “Pulse”
clignotera et en pesant SPEED ou INCLINE “up/down” vous pouvez adjuster votre zone d’entrainement
d’apres vos souhaits.
Indiqué votre temps d’entrainement souhaité en appuyant SPEED ou INCLINE “up/down” (cela peux toujours
être ajusté apres avoir programmé vos donnés).
Confirmé votre temps d’entrainement en appuyant la touche MODE.
2. Commencez votre entrainement en appuyant la touche START. Le tapis roulant ce mettra en marche après
un count down the 3 secondes.
Le tapis roulant est pré-programme sur on temps d’entrainement de 22 minutes. Les 3 premières minutes
son prévu pour votre échaufement. Pendent cette phase vous pouvez adjuster la vitesse et l’inclinaison vousmême. Apres la période d’échaufement le tapis roulant commence automatiquement à accéléré ou à
diminuer la vitesse / ou d’ajuster l’inclinaison à toutes les 10 secondes. Au bout de 20 minutes le tapis roulant
d’éclenche le system de relaxation. L’inclinaison decend à “0” et la vitesse baisse de 0.5 km/h à toutes les 10
seconds.
Vous pouvez arrêter le tapis roulant en appuyant la touché STOP ou en tirant la clé de sécurité.
IMPORTANT: Pour pouvoir vous entrainé avec un programme cardiaque il est obligatoir que vous teniez les
plaquettes de poux en metal sur les rails laterales, ou encore mieux de porter la cinture torsale (pour mesurer de
votre poux).
Zone d’ajustement pour votre entrainment avec un des programmes cardiaques:
Durée
Age pre-ajusté
Objectif de poux
Zone d’age ajustable
Zone de poux misé
HP1
HP2
HP3
Fix 22:00
Fix 22:00
Fix 22:00
30
30
30
150RPM
160RPM
170RPM
15—80
15—80
15—80
80RPM—180RPM
80RPM—180RPM
80RPM—180RPM
Programmes d’entrainement à votre choix
Choisissez parmi ces 3 différent programmes à votre disposition, qui vous permettent de réglé vos profiles
d’entrainement préférée: U1, U2, U3.
1. Appuyez la touce PROG. pour choisir U1, U2 or U3.
2. Appuyez la touche MODE et le programme correspondant se met a clignotter. Les écrans Speed et Incline
vous indiques la valeur de chaque donné. Appuyé SPEED or INCLINE up/down pour adjuster les donnés.
Confirmer votre vitesse et votre inclinaison en appuyant la touché MODE. L’écran changera
automatiquement à la prochaine donné. Ajusté les donnés jusqu’à ce que toutes les informations
demmandées sont complètes.
3. Démarrez votre programme personalise en appuyant la touché START
4. Les donnés sont sauvegardés, meme si votre tapis roulant est débranché.
FONCTION FREQUENCE CARDIAQUE :
Placez vos paumes sur le capteur de pouls et le pouls sera indiqué dans la fenêtre pouls après 5 secondes. La
fréquence cardiaque est utilisée comme référence uniquement et non à des fins médicales.
FONCTION SECURITE :
Si à tout moment vous avez besoin d'arrêter le tapis, tirez sur la clé de sûreté, cela coupera le courant
immédiatement. La fenêtre affichera “OFF” et vous entendrez biper 15 fois.
FONCTION SAUVEGARDE D'ENERGIE :
Sans aucun mouvement pendant 10 minutes, l'appareil se met en veille et l'affichage s'estompe. Appuyez sur une
touche pour reprendre.
ATTENTION :
1. Nous vous recommandons de maintenir une vitesse lente au début de la session et de tenir les poignées jusqu'à
ce que vous vous sentiez confortable et familier avec le tapis.
2. Attachez l'aimant de la corde de sûreté à l'ordinateur ainsi que le clip à vos vêtements.
3. Pour arrêter votre entraînement en toute sécurité, appuyez sur STOP ou tirez sur la corde de sûreté, le tapis
s'arrêtera immédiatement.
Instrukcja obsługi komputera
Szybki wybór
NACHYLANIE
PL
PRĘDKOŚĆ +/- przycisk,
i przycisk do wprowadzenia
indywidualnych wartości
NACHYLANIE+/- przycisk,
jak i przycisk do wprowadzenia
indywidualnych wartości
PROGRAM przycisk:
do wyboru programu
START przycisk:
rozpoczęcie treningu
Szybki wybór
PRĘDKOŚĆ
TRYB przycisk do nastawienia
trybu docelowego
STOP przycisk: koniec
treningu
FUNKCJE PRZYCISKÓW:
1. PROGRAM (PROG.)
Przed rozpoczęciem ćwiczeń moŜna tym przyciskiem dokonać wyboru programu (HP1, HP2, HP3, U1, U2, U3,
P1, P2…P15).
2. TRYB (MODE)
Przed rozpoczęciem treningu moŜna tym przyciskiem wybrać tryb docelowy (Kalorie – Calories, Czas – Time lub
Dystans – Distance). Naciskając przycisk prędkość +/- moŜna w wybranym trybie nastawić wartość docelową. Od
nastawionej wartości kalorii, czasu lub dystansu komputer odlicza po naciśnięciu przycisku START aŜ do
osiągnięcia „0“.
3. START
Po włączeniu urządzenia i podłączeniu klucza bezpieczeństwa naciskając przycisk START rozpoczyna się trening.
4. STOP
Naciskając przycisk STOP moŜna w kaŜdej chwili zakończyć trening.
5. NACHYLENIE +/- (INCLINE + / INCLINE –)
Naciskając te przyciski moŜna podczas treningu ustawić Ŝądany kąt nachylenia.
6. PRĘDKOŚĆ +/- (SPEED + / SPEED –)
Naciskając te przyciski moŜna podczas treningu ustawić Ŝądaną prędkość. KaŜde naciśnięcie przycisku zmienia
prędkość o 0.1 km/h. Naciskając przycisk przez dłuŜej niŜ 0.5 sekund prędkość szybko się zwiększa lub
zmniejsza.
7. PRZYCISKI SZYBKIEGO WYBORU NACHYLENIA (QUICK INCLINE BUTTONS 1, 3, 5, 7, 9, 12)
Naciskając te przyciski moŜna szybko zmienić nachylenie na ustalone wartości.
8. PRZYCISKI SZYBKIEGO WYBORU PRĘDKOŚCI (QUICK SPEED BUTTONS 2, 5, 8, 11, 14, 16)
Naciskając te przyciski moŜna szybko zmienić prędkość na ustalone wartości.
TRYB I PROGRAMY
Szybki start – Manualny program (manual)
1.
2.
3.
Włącz zasilanie i podłącz klucz bezpieczeństwa.
Po naciśnięciu przycisku START rozpoczyna się 3 sekundowy Countdown, następnie startuje urządzenie przy 1.0 km/h.
Prędkość moŜna zmienić przyciskiem prędkość +/- i nachylenie przyciskiem nachylenie +/-.
Manualny program
1.
2.
3.
4.
5.
Startując bieŜnię naciskając przycisk START bez wybrania jednego z zapisanych programów, zaczyna ona pracę od
prędkości 1.0 km/h. Na wyświetlaczu pokazane wartości liczone są w górę. Naciskając przycisk PRĘDKOŚĆ +/- lub
NACHYLENIE +/- moŜna zmienić prędkość i kąt nachylenia. Zakres ustawienia jest od 1 – 18 km/h.
W trybie gotowości moŜna naciskając przycisk MODE nastawić wartość docelową. Po naciśnięciu przycisku MODE miga
na wyświetlaczu czasu “30:00 min“. Przyciskami PRĘDKOŚĆ +/- lub NACHYLENIE +/- moŜna nastawić Ŝądany czas
treningu.
Po ponownym naciśnięciu przycisku MODE miga wyświetlacz dystansu “1.0“. Przyciskami PRĘDKOŚĆ +/- lub
NACHYLENIE +/- moŜna nastawić Ŝądany dystans. Zakres nastawienia jest od 0.5 do 99.5 km.
Po ponownym naciśnięciu przycisku MODE miga wyświetlacz kalorii “50”. Przyciskami PRĘDKOŚĆ +/- lub NACHYLENIE
+/- moŜna nastawić Ŝądane zuŜycie kalorii. Zakres nastawienia jest od 10 do 995 kcal.
Po wprowadzeniu tych wartości rozpoczynasz trening naciskając przycisk START, poczym czas odliczany jest wstecznie
w trzech sekundach. Przyciskami PRĘDKOŚĆ +/- lub NACHYLENIE +/- moŜna podczas treningu zmienić prędkość i kąt
nachylenia.
Fabrycznie zapisane programy
W trybie gotowości moŜna naciskając przycisk PROGRAM wybrać jeden z programów. Na wyświetlaczu pojawi się P1-P15. Po
wybraniu Ŝądanego programu naleŜy ustawić czas treningu naciskając przycisk PRĘDKOŚĆ +/-. Naciskając przycisk Start
zaczynamy program.
KaŜdy program jest podzielony na 20 równych odcinków czasowych. Prędkość i kąt nachylenia komputer zmienia w kaŜdym
odcinku (spójrz na tabelę poniŜej). Prędkość jest podana w km/h.
Zakres nastawień w programach
początek
przy
Ustawienia
fabryczne
Zakres
nastawień
Wyświetlacz
Czas w
minutach/sekundach
0:00
30:00
5:00-99:00
0:00-99:59
Prędkość km/h
0.0
według
wyświetlacza
według
wyświetlacza
1.0-18.0
Dystans (km)
0.00
1.0
0.00-99.99
Rytm serca (Uderzenia na
minutę)
P
według
wyświetlacza
0.5-99.5
według
wyświetlacza
Kalorie
0
50
10-995
0-999
40-200
Program pulsu
BieŜnia posiada trzy programy sterowane pulsem (HP1, HP2 und HP3). Podczas programu prędkość i kąt nachylenia zostają
automatycznie zmieniane przez komputer, tak Ŝe trening przebiega w nastawionym docelowym zakresie pulsu. Podczas tych
programów zalecamy załoŜenie pasa na klatkę piersiową. Jeśli nie uŜywany jest pas na klatkę piersiową, to czujniki pulsu muszą
być podczas całego programu mocno objęte.
1.
2.
Naciśnij przycisk PROG. aŜ do ukazania się “HP1, HP2 i HP3”. Wybierz jeden z tych programów. Na wyświetlaczu czasu
ukaŜe się “AG” (AGE – wiek). Na wyświetlaczu prędkości miga ustawienie fabryczne. Przyciskami prędkość +/- lub
nachylenie +/- moŜna zmienić określenie wieku. Na wyświetlaczu pulsu ukaŜe się puls docelowy dla określonego wieku.
Puls docelowy moŜesz jeszcze zmienić naciskając przycisk MODE. Po naciśnięciu przycisku MODE wyświetlacz pulsu
miga. Przyciskami prędkość +/- lub nachylenie +/- moŜna indywidualnie nastawić puls docelowy. Czas treningu moŜna
ustawić przyciskami prędkość +/- lub nachylenie +/-. Potwierdź ustawiony czas naciskając przycisk MODE. Czas moŜna
jeszcze zmienić po etapie ustawień.
Naciskając przycisk START program zaczyna się po 3 sekundowym Countdown (fabrycznie ustawiene są 22 minuty).
Podczas pierwszych trzech minut znajdujesz się na etapie rozgrzewki. Tu moŜesz sam ustawić prędkość i nachylenie.
Następnie zaczyna się program główny podczas którego prędkość i/ lub nachylenie komputer automatycznie zmienia co
10 sekund. Po 20 minutach następuje etap chłodzenia. Nachylenie jest na poziomie 0, prędkość zmniejszana jest co 10
sekund o 0.5 km/h. BieŜnię moŜna w kaŜdej chwili zatrzymać naciskając przycisk STOP lub odciągając klucz
bezpieczeństwa.
WAśNE: Do wykonania tego programu waŜny jest ciągły pomiar pulsu. Czujniki pulsu muszą być ciągle objęte. Dlatego zalecamy
załoŜenie pasa na klatkę piersiową.
HP1
Czas treningu
HP2
HP3
22:00
22:00
22:00
30
30
30
150RPM
160RPM
170RPM
Zakres ustawień wiek
15—80
15—80
15—80
Zakres ustawień puls
80RPM—180RPM
80RPM—180RPM
80RPM—180RPM
(Ustawienia fabryczne)
Ustawienia fabryczne wiek
Ustawienia fabryczne
puls docelowy
Programy zdefiniowane przez uŜytkownika
To urządzenie posiada 3 programy, które uŜytkownik moŜe sam zdefiniować i indywidualnie zaprogramować: U1, U2, U3.
1.
2.
3.
4.
Naciskając przycisk PROG. moŜna wybrać pomiędzy U1, U2 lub U3.
Naciśnij przycisk MODE na wyświetlaczu miga dany etap programu. Na wyświetlaczu prędkości i nachylenia ukaŜe się
nastawienie fabryczne tego etapu. Naciskając przyciski prędkość +/- lub nachylenie +/- moŜesz indywidualnie nastawić tą
wartość. Potwierdź ustawienia dla kaŜdego etapu naciskając przycisk MODE. Wyświetlacz przeskakuje do następnego
etapu. Po wprowadzeniu wartości dla wszystkich etapów nastawianie jest zakończone.
Program zdefiniowany przez uŜytkownika moŜna rozpocząć naciskając przycisk START.
Wprowadzone nastawienia zostaną zapisane, równieŜ wtedy jeśli odłączymy urządzenie od sieci.
FUNKCJA PULSU:
Obejmij czujniki pulsu, po około 5 sekundach ukaŜe się pomiar pulsu na wyświetlaczu. Tego rodzaju pomiar pulsu nie
jest wartością referencyjną i nie nadaje się do celów medycznych.
FUNKCJA BEZPIECZEŃSTWA:
Jeśli zajdzie nagła potrzeba zatrzymania urządzenia, wyciągnij z niego za linkę klucz bezpieczeństwa. Taśma bieŜni
zatrzyma się natychmiast. Na wyświetlaczu ukaŜe się “OFF” i sygnał dzwiękowy zabrzmi 15 razy.
FUNKCJA OSZCZĘDNOŚCI ENERGII:
Jeśli przerwiesz trening na 10 minut włącza się tryb gotowości. Wyświetlacz bladnie. Naciskając dowolny przycisk
wyświetlacz się reaktywuje.
UWAGA:
1. Zaczynaj sesję treningową od wolnej prędkości i trzymaj się uchwytów do czasu kiedy czujesz się na taśmie
bezpiecznie.
2. Aby uruchomić bieŜnię musisz podłączyć do konsoli klucz bezpieczeństwa. Umocuj linkę klucza bezpieczeństwa
na swoim ubraniu.
3. Aby bezpiecznie zakończyć trening naciśnij przycisk STOP lub odłącz klucz bezpieczeństwa.
Woelflistrasse 2
CH-3006 Bern
Switzerland
www.energetics.eu
© Copyright ENERGETICS 2012