Transcript
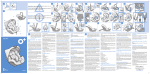
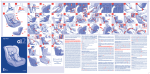
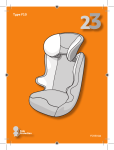
1
2
1
3
13
4
5
6
7
8
9
10
2
9
3
8
4
11
7
12
13
22
23
14
15
16
17
18
19
20
6
5
14
10
21
24
25
26
11
12
IMPORTANT: La classe de taille ISOFIX de ce
siège auto est A,B, B1. Il peut être installé dans
les véhicules disposant de places homologuées
comme étant des positions ISOFIX universelles. Veuillez vous référer au manuel d’utilisation
de votre véhicule.
IMPORTANT: The ISOFIX size class of this car
seat is A, B and B1. It can be fitted in vehicles
with seats approved as universal ISOFIX positions. Please refer to your car manual.
FR
Type D11
Vous venez d’acquérir un Siège Auto ISOFIX
Groupe 1 et nous vous en remercions. Si vous
désirez obtenir une aide concernant ce produit
ou si vous désirez changer un accessoire, vous
pouvez vous adresser à notre service consommateurs.
CONSIGNES DE SECURITE
FCISOFRGB
CETTE NOTICE DOIT ÊTRE LUE ATTENTIVEMENT AVANT
DE COMMENCER L’INSTALLATION. UNE INSTALLATION
INCORRECTE PEUT S’AVÉRER DANGEREUSE. Ce siège
auto doit être uniquement installé sur la banquette
arrière d’un véhicule équipé de fixations ISOFIX et
d’un ancrage Top Tether (ISOFIX universel). Veuillez
vous référer au manuel d’utilisation de votre véhicule.
Pensez toujours à attacher et à régler correctement le
harnais de l’enfant, et ne démarrez jamais sans vérifier
que le siège soit solidement fixé à la banquette de la
voiture comme indiqué dans ce manuel. Il est important
de veiller à ce que la sangle sous-abdominale du harnais
soit installée le plus bas possible pour bien maintenir le
bassin de votre enfant. Assurez-vous que les sangles du
harnais ne soient pas vrillées. Le siège enfant doit être
fixé sur la banquette de manière à ne présenter aucun
jeu, pour assurer une protection maximale. Voir la méthode recommandée sur cette notice. En aucune manière le siège ne doit être modifié ou des éléments rajoutés.
Il est recommandé de remplacer ce siège auto s’il a été
soumis à un effort violent dû à un accident ou en cas
d’usure. Assurez-vous périodiquement que le harnais ne
présente aucun signe d’usure; vérifiez en particulier les
points de fixation, les coutures et les dispositifs de réglages. Ne laissez jamais votre enfant dans le siège sans
surveillance. Assurez-vous qu’aucun élément du siège
n’est coincé dans une porte ou dans un siège rabattable.
Si votre voiture est équipée d’un siège arrière rabattable, assurez-vous qu’il est correctement verrouillé dans
la position verticale. L’exposition directe au soleil augmente la température à l’intérieur des véhicules. C’est
pourquoi il est recommandé de couvrir le siège enfant
lorsqu’il est vide, pour éviter aux éléments, en particulier
aux fixations, de chauffer et de brûler l’enfant. Ne pas
utiliser votre siège sans sa housse et ne la remplacer que
par une housse recommandée par le fabricant. En cas
d’urgence, l’enfant doit pouvoir être libéré rapidement.
La boucle qui peut s’ouvrir simplement, ne doit donc pas
être recouverte. Il faut apprendre à votre enfant à ne pas
jouer avec la boucle. Pensez toujours à vérifier qu’il n’y a
pas de débris alimentaires ou autres dans la boucle du
harnais ou dans l’ajusteur central. Les bagages et autres
objets lourds ou pointus doivent être immobilisés dans la
voiture. Les objets qui ne sont pas attachés peuvent bles-
ser l’enfant en cas d’accident. Veillez à ne pas installer
l’enfant avec des vêtements trop volumineux en hiver.
de fixer le Top Tether (par exemple en perçant, vissant ou
fixant vous même un ancrage).
Votre Siège Auto ISOFIX Groupe 1
Plaquez le siège contre la banquette du véhicule et tirez
sur le brin libre de la sangle Top Tether. Lorsque la tension de la sangle est optimale, le témoin de la sangle Top
Tether passe du rouge au vert (9).
Ce siège enfant est classé Groupe 1 et est conçu
pour les enfants entre 9 et 18 kg (soit de 9 mois à 4
ans environ). (1)
1. Coque + housse
2. Ajusteur (x2)
3. Sangle ajusteur du harnais (x2)
4. Sangle entrejambe
5. Poignée de réglage du système ISOFIX
6. Base ISOFIX
7. Connecteur ISOFIX (x2)
8. Boucle du harnais
9. Fourreau sécurité + Sangle d’épaule (x2)
10. Sangle Top Tether
11. Bouton de déverrouillage des connecteurs ISOFIX
(x2)
12. Sangle pour le déploiement du système ISOFIX
Installation du Siège Auto ISOFIX
Rabattez la sangle Top Thether sur le dossier du siège
auto pour éviter qu’elle ne se coince lors de l’installation
(2). Déployez au maximum les connecteurs ISOFIX du
siège auto en tirant simultanément sur la poignée rouge
de la base et sur la sangle rouge de déploiement du système ISOFIX (3).
Placez le siège auto sur la banquette du véhicule et présentez les connecteurs ISOFIX face aux points d’ancrage
ISOFIX de la banquette (4). Cliquez les connecteurs ISOFIX
sur les points d’ancrage, les témoins présents sur chaque
connecteur doivent passer du rouge au vert (5). Déverrouillez le cran de sûreté du système ISOFIX en tirant sur
la poignée rouge de la base et en poussant légèrement
le siège auto (6). Une fois le cran de sûreté déverrouillé,
poussez le siège auto en exerçant une pression uniforme
sur les deux côtés jusqu’à ce que la partie arrière du siège
auto soit bien plaquée contre la banquette (7).
Faites passer la sangle Top Tether par dessus la banquette du véhicule et accrochez le mousqueton de la sangle
sur le point d’ancrage Top Tether du véhicule (8).
Le point d’ancrage complémentaire Top Tether peut se
situer, selon le modèle de votre véhicule:
• Derrière la banquette arrière du véhicule.
• Au plancher, à l’arrière du véhicule.
• Au plafond, à l’arrière du véhicule.
Veuillez vous référer au manuel d’utilisation de votre véhicule afin de situer le point d’ancrage complémentaire
Top Tether. Ne fixez jamais le Top Tether à un endroit qui
n’est pas recommandé par le constructeur du véhicule.
Vous ne devez en aucun cas modifier votre véhicule afin
Boucle du harnais
Pour verrouiller le harnais, assemblez les deux brins des
bretelles (10) (11) et introduisez-les dans la boucle, vous
devez entendre un ‘clic’ (12).
Pour déverrouiller le harnais, appuyez sur le bouton rouge de la boucle (13).
En option, certains modèles de sièges auto ISOFIX sont
équipés d’une boucle munie d’une alarme sonore. L’alarme d’ouverture de la boucle permet aux parents d’être
alertés si l’enfant ouvre la boucle intempestivement durant un trajet.
Réglage du harnais
Ajustez les sangles d’épaule du harnais sur l’une des deux
positions proposées (14) afin qu’elles passent toujours
au niveau des épaules de votre enfant (voir le paragraphe
‘Ajustement des harnais’).
• Pour serrer le harnais: Tirez sur les sangles de réglage
situées sur chaque harnais, il n’est pas nécessaire d’appuyer sur les boutons des ajusteurs (15). ATTENTION:
un harnais mal ajusté peut être dangereux. On ne doit
pas pouvoir insérer plus de deux doigts entre la sangle
d’épaule et le buste de l’enfant.
• Pour desserrer le harnais: Appuyez sur les boutons
des ajusteurs situés sur les brins supérieurs des harnais,
saisissez la partie inférieure des harnais et tirez simultanément
(16).
Ajustement des harnais
Assurez-vous que le harnais de votre siège auto est
adapté à la taille de votre enfant avant de commencer
l’installation dans votre véhicule.
Les harnais peuvent être réglés sur deux hauteurs, ils
doivent être passés dans les boutonnières les plus proches des épaules de votre enfant. Si les épaules de votre
enfant se situent entre deux hauteurs de boutonnières,
utilisez toujours la position la plus haute.
Pour ajuster la hauteur des harnais, retirez un des brins
supérieurs des harnais en faisant pivoter sa butée de retenue métallique située à l’arrière du dossier puis tirez le
brin à travers les fentes de la coque du dossier et de la
housse (17). Replacez le brin de harnais à la hauteur désirée en utilisant les mêmes fentes, tant dans la housse
que dans la coque et ré-attachez-le à l’arrière du dossier
(18). Assurez-vous que la butée métallique soit bien
en place et que le brin de harnais ne soit pas vrillé.
Répétez la même opération sur le second brin supérieur.
Inclinaison du Siège Auto ISOFIX
Poussez vers le haut le levier de réglage situé sous l’avant
de l’assise du siège, puis tirez ou poussez la coque vers
l’avant ou vers l’arrière (19).
Démontage du Siège Auto ISOFIX
Détendez la sangle Top Tether en appuyant sur le bouton du tensionneur (20) puis décrochez la sangle de son
point d’ancrage et ramenez la sangle à vous (21). Tirez
le siège auto en actionnant la poignée rouge de la base
ISOFIX (22). De chaque côté du siège, déverrouillez les
connecteurs ISOFIX de leurs points d’ancrage en tirant à
vous les boutons de déverrouillage des connecteurs. Les
témoins des connecteurs passent alors du vert au rouge
(23) (24). Votre siège est à présent démonté et peut être
retiré de la banquette (25).
Rangement de la notice
Il est important de consulter les consignes de sécurité.
Lisez ces instructions avec attention avant utilisation et
conservez-les dans la poche prévue à cet effet pour les
futurs besoins de référence (26).
Conseils d’entretien
Toutes les parties textiles sont déhoussables. En cas de
tâches légères, nettoyez à l’aide d’une éponge humide
avec de l’eau savonneuse, ou lavez à la main à 30° dans
de l’eau savonneuse. Ne pas utiliser de javel, ne pas repasser, ne pas laver en machine, ne pas mettre dans un
sèche linge.
AVERTISSEMENT
1- Ceci est un DISPOSITIF DE RETENUE POUR ENFANTS
ISOFIX. Il est homologué suivant le règlement n°44, série d’amendements 04 pour une utilisation dans un véhicule équipé de système d’ancrages ISOFIX.
2 - Il pourra être installé dans les véhicules disposant de
places homologuées comme étant des positions ISOFIX
universelles (voir le manuel d’utilisation du véhicule),
selon la catégorie du dispositif de retenue pour enfants
et du gabarit.
3 - Le groupe de masse et la classe de taille ISOFIX pour
lesquels ce dispositif convient sont: A, B et B1 / 9-18
kg.
En cas d’incertitude, contacter le fabricant du dispositif de retenue, ou votre revendeur.
GB
We would like to thank you for choosing the
ISOFIX Group 1 Car Seat. If you would like help
with this product or need to change an accessory, please get in touch with your our Consumer Department.
SAFETY INSTRUCTIONS
THESE INSTRUCTIONS MUST BE READ CAREFULLY BEFORE INSTALLATION. FITTING THE SEAT INCORRECTLY
CAN PUT YOUR CHILD AT RISK. This car seat must only
be fitted on the rear seat of a vehicle equipped with
ISOFIX fastenings and a Top Tether anchor (universal
ISOFIX approval). Please refer to your car manual.
Always remember to attach and correctly adjust the
child’s harness and never drive away without checking that the seat is securely fastened to the car’s rear
seat as indicated in this manual. Make sure the harness
buckle is fitted as low as possible to keep the lap section
safely across the child’s pelvis. Check that the harness
straps are not twisted. The child car seat must be firmly
attached to the seat as closely as possible (no gap) to
ensure maximum protection. See the procedure recommended in these instructions. Under no circumstances
should the car seat be altered in any way or should parts
be added to it. You should replace this car seat if it is
severely impacted during an accident or if it shows wear
and tear. Regularly check that the harness shows no sign
of wear and tear, particularly the fastening points, the
stitching and the adjuster belts. Never leave your child
in the seat unsupervised. Make sure that no part of the
seat is trapped in a door or folding seat. If your car is
fitted with a rear folding seat, check that it is securely
locked in the upright position. Direct exposure to the sun
increases the temperature inside the vehicle. You should
therefore cover the car seat when it is empty so that the
parts, especially the buckles, do not heat up and burn
the child. Never use the car seat without its cover or use
any other cover than that recommended by the manufacturer. In the event of an emergency, the child must
be able to be released quickly. The buckle, which opens
easily, should therefore never be covered. Tell your child
that he/she must never play with the belt buckle. Always
remember to check that there is no food or other waste
in the belt buckle or the central adjuster. Luggage and
all other heavy or sharp objects in the vehicle must be
securely held down. Objects that are not fastened can
injure the child if an accident occurs. Do not dress your
child in overly-bulky clothing in winter.
Your ISOFIX Group 1 Car Seat
This child seat is classified Group 1 and is suitable for children weighing 9 to 18 kg (approx. age 9
months to 4 years). (1)
1. Base + cover
2. Adjuster (x2)
3. Harness adjuster strap (x2)
4. Crotch strap
5. ISOFIX system adjustment handle
6. ISOFIX base
7. ISOFIX connector (x2)
8. Belt buckle
9. Safety pad + harness shoulder strap (x2)
10. Top Tether Strap
11. ISOFIX connector release button (x2)
12. ISOFIX system strap
Fitting the ISOFIX Car Seat
Fold the Top Tether Strap over the back of the car seat
so that it does not get trapped during installation (2).
Extend the ISOFIX connectors from the car seat as much
as possible by pulling simultaneously on the red handle
on the base and the red ISOFIX system strap (3).
Position the car seat on the vehicle’s rear seat and bring
the ISOFIX connectors so that they are in line with the
seat’s ISOFIX anchor points (4). Click the ISO connectors
into the anchor points; the indicators on each connector should turn from red to green (5). Release the safety
catch of the ISOFIX system by pulling the red handle attached to the base and gently pushing the car seat (6).
With the safety catch released, push the car seat by exerting equal pressure on both sides until the rear of the
car seat is pressed firmly against the rear seat (7).
Bring the Top Tether Strap over the vehicle’s rear seat
and attach the clasp to the vehicle’s Top Tether anchor
point (8).
The additional Top Tether anchor point may be located,
depending on the make of your car:
• Behind the vehicle’s rear seat.
• On the floor, at the rear of the vehicle.
• On the ceiling, at the rear of the vehicle.
Refer to your car user manual to locate the additional
Top Tether anchor point. Never attach the Top Tether to
a point that is not recommended by the vehicle manufacturer. Never alter the vehicle yourself in order to try
and fasten the Top Tether (e.g. by piercing, screwing or
attaching an anchor point).
Push the seat against the back of the rear seat and pull
on the loose end of the Top Tether Strap. When the belt is
as taut as it will go, the indicator on the Top Tether Strap
will turn from red to green (9).
Belt buckle
To fasten the harness, bring the two shoulder straps
together (10) (11) and insert them into the buckle; you
should hear a “click” (12).
To release the harness, press the buckle’s red button
(13).
Some ISOFIX car seat models are fitted with an optional
alarm. The alarm sounds to alert the parents if the child
releases the buckle during a journey.
Fitting the harness
Put the harness shoulder straps in one of the two positions indicated (14) so that they always pass over your
child’s shoulders (see paragraph on “Adjusting the harness”).
To tighten the harness: Pull on the adjusting straps positioned on the harness. You do not need to press on the
adjuster buttons (15).
IMPORTANT: A poorly fitting harness can be dangerous.
You should not be able to insert two fingers between the
shoulder strap and your child’s chest.
To loosen the harness: Press on the adjuster buttons
positioned on the upper section
of the harness, grasp the lower section and pull simultaneously (16).
Adjusting the harness
Make sure that the harness of your car seat is adapted
to the height of your child before starting to install the
seat in your car.
The harness can be adjusted to two different heights.
The straps must pass through the holes that are closest
to your child’s shoulders. If your child’s shoulders are between two levels, always use the higher of the two.
To adjust the height of the harness, remove the upper
section of one of the harness straps by twisting the metal keeper located behind the backrest and then pulling
the end of the harness strap through the slots of the shell
and the cover (17). Feed the end of the harness strap
through the same slots at the desired height, both in the
cover and the shell and reattach it behind the backrest
(18). Make sure that the metal anchor is correctly
positioned and that the harness strap is not twisted.
Repeat the operation on the second strap.
ATTENTION ! Votre Siège Auto ISOFIX Groupe 1
doit être impérativement installé avec la sangle
Top Tether fournie ! La sécurité de votre enfant
ne pourrait être garantie si vous installiez votre
Siège Auto ISOFIX Groupe 1 sans la sangle Top
Tether.
WARNING ! Your ISOFIX Group 1 Car Seat MUST
be fitted using the Top Tether Strap provided !
Your child’s safety cannot be guaranteed if you
fit your ISOFIX Group 1 Car Seat without using
the Top Tether Strap.
Removing the ISOFIX Car Seat
Loosen the Top Tether Strap by pressing the button on
the tensioner (20) then release the strap from its anchor
point and bring the strap towards you (21). Pull the car
seat using the red handle on the ISOFIX base (22). On either side of the seat, release the ISOFIX connectors from
their anchor points by pulling the red plastic release buttons on the connectors towards you. The indicators will
turn from green to red (23) (24). The seat is now unattached and can be removed from the rear side (25).
Storage of the instruction manual
Always read the safety instructions. Read these instructions carefully before use and keep them to hand in the
pocket provided for future reference (26).
Cleaning
All the material can be removed. For light stains, clean
with a wet sponge and soapy water or hand wash at
30°C in soapy water. Do not use bleach, do not iron, do
not machine wash, do not dry in a tumble-dryer.
WARNING
1- This is an ISOFIX SAFETY RESTRAINT DEVICE FOR
CHILDREN. It conforms to the Regulation 44 standard
and 04 amendments for use in a vehicle fitted with an
ISOFIX anchoring system.
2 – It can be used in vehicles fitted with seats approved
as universal ISOFIX positions (refer to your car manual),
according to the category and size of the child safety restraint.
3 – The mass group and the ISOFIX size class for which
this product is suitable are: A, B and B1/9-18 kg.
If you are unsure, please contact the manufacturer of
the safety restraint or the retailer.
Inclining the ISOFIX Car Seat
Push the adjustment lever located under the front of
the seat upwards, then pull or push the base towards or
away from you (19).
Z.I. de Montbertrand - Rue du Claret
38230 Charvieu-Chavagneux
FRANCE
www.nania.com