1
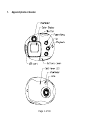
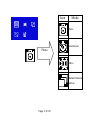
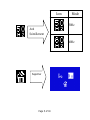
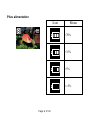
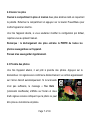
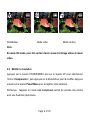
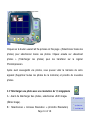
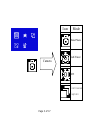
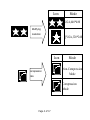
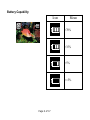
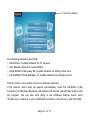
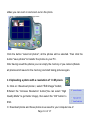
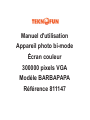
Manuel d'utilisation Appareil photo bi-mode Écran couleur 300000 pixels VGA Modèle BARBAPAPA Référence 811147 1. Appareil photo et bouton Page 1 of 18 2. Utiliser l'appareil photo numérique NOTE IMPORTANTE: Les piles Non-recharge ne doivent pas être rechargées Différents types de piles ou batteries neuves et d'occasion ne doivent pas être mélangés Les piles doivent être insérées en respectant la polarité selon la direction indiquée sur le compartiment et fermer le compartiment. Epuisé les piles doivent être retirées. Les bornes d'alimentation ne doivent pas être en court-circuit Ne démontez pas les piles Cet appareil photo numérique n'est pas destiné aux enfants de moins de 3 ans. S'il vous plaît garder cet emballage car il contient des informations importantes 2.1 Modes de changement de fonction Appuyez sur le bouton POWER/MENU pour afficher l'interface. Appuyez sur UP pour faire votre sélection puis sur le DÉCLENCHEUR pour passer au menu suivant. L'écran affiche alors les symboles détaillés ci-dessous : Page 2 of 18 Icon Mode Photo Retardateur Photo Vidéo Déclenchement continu Page 3 of 18 Icon Mode VGA,640*480 Modifier la résolution QVGA,320*240 Icon compression Mode Non-Compressé Mode Compressé Mode Page 4 of 18 Icon Mode 50Hz Anti Scintillement 60Hz Supprimer Page 5 of 18 Piles alimentation Icon Mean >70% >35% >5% <=5% Page 6 of 18 2.2 Insérer les piles Ouvrez le compartiment à piles et insérez deux piles alcalines AAA en respectant la polarité. Refermez le compartiment et appuyez sur le bouton Power/Menu pour mettre l'appareil en marche. Une fois l'appareil allumé, si vous souhaitez modifier la configuration par défaut, reportez-vous au présent manuel. Remarque : le déchargement des piles entraîne la PERTE de toutes les photos sauvegardées sur l'appareil. Pensez à les sauvegarder régulièrement. 2.3 Prendre des photos Une fois l'appareil allumé, il est prêt à prendre des photos. Appuyez sur le déclencheur. Un signal sonore confirme le déclenchement. Le nombre apparaissant sur l'écran décroît automatiquement. Si la luminosité n'est pas suffisante, le message « Too Dark (luminosité insuffisante) s'affiche sur l'écran et deux brefs signaux sonores indiquent que la photo ne peut être prise ou la mémoire est pleine. Page 7 of 18 2.4 Mode Économie d'énergie L'appareil se met automatiquement en mode Économie d'énergie au bout de 30 secondes d'inactivité. Si vous appuyez sur le bouton Power/Menu pendant 3 secondes, le message « Good Bye » s'affiche. Deux signaux sonores confirment que l'appareil photo a été mis manuellement en mode Économie d'énergie. Avec ce mode, la consommation d'énergie est fortement réduite et la durée de vie des piles, rallongée. Pour réutiliser votre appareil, appuyez à nouveau sur le bouton Power/Menu. 2.5 Modes Retardateur / Vidéo / Déclenchement continu Appuyez une fois sur le bouton Power/Menu. Le premier icône <Photo> est sélectionné. Appuyez sur le déclencheur pour faire défiler les modes <Photo-->Retardateur-->Vidéo-->Déclenchement continu>. Appuyez à nouveau sur le bouton Power/Menu pour faire votre sélection. Page 8 of 18 Retardateur Mode vidéo Mode Continu Note: En mode AVI mode, pour être certain d’avoir assez d’éclairage utiliser le mode video. 2.6 Modifer la résolution Appuyez sur le bouton POWER/MENU puis sur le bouton UP pour sélectionner l'icône <Compression>, puis appuyez sur le déclencheur pour la modifier. Appuyez ensuite sur le bouton Power/Menu pour enregistrer votre sélection. Remarque : l'appareil en mode non compressé permet de prendre des photos avec une résolution plus élevée Page 9 of 18 2.7 Modifier la fréquence Appuyez sur le bouton POWER/MENU puis sur le bouton UP pour sélectionner l'icône <Anti-scintillement>, puis appuyez sur le déclencheur pour la modifier. Appuyez ensuite sur le bouton Power/Menu pour enregistrer votre sélection. 2.8 Effacer toutes les photos de la mémoire (formater la mémoire) Appuyez sur le bouton POWER/MENU puis sur le bouton UP jusqu'à ce que l'écran affiche « Clear all » (Supprimer tout) puis appuyez sur le déclencheur. Appuyez sur le bouton UP pour faire votre sélection, puis sur le déclencheur pour la confirmer. 2.9 Visualiser et effacer les photos Appuyez sur le bouton PLAYBACK et sur UP pour voir vos photos. Vous pouvez effacer la photo affichée sur l'écran en appuyant sur le bouton POWER/MENU. 3. Installation et utilisation du logiciel Insérez le CD dans votre lecteur CD-ROM. L'application démarre automatiquement. Une interface apparaît. Page 10 of 18 Fermer la fenêtre Liste des logiciels : • Install Driver: Install le logiciel de l’appareil photo. • User Manual: Ouvre le dossier du manuel. • Install MAGIX Video easy SE: Install le logiciel de montage vidéo. • Install MAGIX Photo Manager 10: Install le logiciel de retouche de photos. Cliquer sur l’entrée voulue dans le menu d’autorun pour installer le(s) logiciel(s). Si le menu n’apparait pas automatiquement, ouvrez CD-ROM dans [Ordinateur] ou dans [Explorateur Windows] puis double cliquer sur le fichier [Start.exe] pour démarrer le programme. Vous pouvez aussi cliquer sur Exécuter dans le menu démarrer de windows puis entrer : "D:\Start.exe" (Si D est la lettre de votre lecteur CD) dans la boîte de texte, puis cliquer sur [OK]. Note: 1.Ouvrir MAGIX Video easy SE ou MAGIX Photo Manager 10, vous devez enregistrer votre logiciel avant de pouvoir librement utiliser le programme. 2. N’oubliez pas d’installer QuickTime Player pendant l’installation de MAGIX Video Page 11 of 18 easy SE. 3. MAGIX Video easy SE et MAGIX Photo Manager 10 sont uniquement supportés par Windows XP et les plateformes Windows Vista et Windows 7. Configuration minimale pour Magix Video Easy SE: ► Intel® Pentium 4 ou AMD® Athlon® 1 GHz ou supérieur ► 512 MB RAM ► 400 MB d’espace libre sur disque dur et un lecteur DVD pour installation ► Carte graphique avec résolution graphique minimum de : 1024 x 768 ► Carte son Dispositifs supportés : ► Video, TV, ou carte graphique avec sortie vidéo. Configuration minimale pour Magix Photo Manager 10: ► Microsoft® Windows® XP / Vista® / 7. PC avec Intel® Pentium® ou AMD® Athlon® 700 MHz ou supérieur ► 256 MB RAM, 120 MB d’espace libre sur disque dur ► Carte graphique SVGA avec min. 4 MB RAM, (résolution min 1024 x 600, 16-bit technologie : high-color) ► Une souris compatible Microsoft®. 3.1 Installer le pilote Cliquez sur <Install driver> (Installer le pilote) puis suivez les instructions qui s'affichent pour finaliser l'installation. Après l'installation du pilote, redémarrez votre ordinateur. Astuce : pendant l'installation du pilote, ne connectez votre appareil photo à votre ordinateur. Page 12 of 18 3.2 Télécharger les photos Connectez votre appareil photo à l'aide du câble USB et cliquez sur « My DSC » dans le dossier <Dual mode camera> de votre bureau. L'interface suivante s'affiche à l'écran : Cliquez sur <Download photo> (Télécharger photos). Les diapositives de vos photos apparaissent sur l'interface. À l'aide de la souris, faites un clic droit ou gauche sur les diapositives pour les Page 13 of 18 agrandir et les réduire. Cliquez sur le bouton «select all the pictures on this page » (Sélectionner toutes les photos) pour sélectionner toutes vos photos. Cliquez ensuite sur «download photos » (Télécharger les photos) pour les transférer sur le logiciel PhotoImpression. Après avoir sauvegardé vos photos, vous pouvez vider la mémoire de votre appareil (Supprimer toutes les photos de la mémoire) et prendre de nouvelles photos. 3.3 Télécharger une photo avec une résolution de 1,3 mégapixels A : Avant de télécharger des photos, sélectionnez «Edit image» (Éditer image). B : Sélectionnez « Increase Resolution » (Accroître Résolution) Page 14 of 18 (vous pouvez sélectionner « High Quality Mode » (Mode Qualité Supérieure) pour obtenir une meilleure image). Ensuite, cliquez sur « OK » pour ressortir. C : Téléchargez les photos. Ces photos auront une résolution de 1,3 mégapixels sur votre ordinateur. 3.4 Créer et sauvegarder des vidéos Après avoir enregistré une vidéo en mode «AVI », Suivez les mêmes indications pour sauvegarder la vidéo. Utilisez ensuite Windows Media Player pour la visionner. 4. Résolution des problèmes Voici la liste des problèmes les plus fréquents : L'appareil ne s'allume pas lorsque vous appuyez sur Allumer/Menu : -- Les piles ne sont plus assez puissantes, remplacez-les. Il est impossible de télécharger des photos ou le message « No photo » (pas de photos) s'affiche : -- Redémarrez votre ordinateur et reconnectez l'appareil photo. -- Assurez-vous que le pilote et le logiciel ont été correctement installés sur votre ordinateur. Page 15 of 18 -- Si le pilote et le logiciel ont été correctement installés, mais qu'il est toujours impossible de télécharger des photos ou d'utiliser la fonction appareil photo/webcam, DÉSINSTALLEZ le logiciel et redémarrez votre ordinateur. Enfin, réinstallez le pilote et le logiciel à partir du CD d'installation. 5 Technical Specifications Resolution: 300K Pixels (640X480) VGA Lens: Non-spherical Lens Aperture: 1: 2.6 Focus: f=5.4mm Image variation: 0.5m –infinity Illumination: 100 --16000 (lux) Storage Capacity: 2MB Photos: 10 high-resolution (640X480 pixels) pictures 21 compression high-resolution pictures 31 low-resolution (320X240 pixels) pictures 63 compression basse-résolution pictures piece of pictures is related to image in all mode. Power source:2 AAA Battery ou cable USB. Interface:USB port System compatibility: Pentium II and above Personal Computers Windows 98SE/2000/ME/XP/Vista Operating System 32 MB or above Memory (64 MB or above Recommended) 60 MB Hard Disk Capacity CD-ROM Drive Color Monitor (Not Lower than 800*600, 24 Bit) Page 16 of 18 USB interface AVERTISSEMENT 1. Avant d'utiliser votre appareil photo, procédez à quelques essais pour vous assurer de son bon fonctionnement. Nous ne saurions être tenus responsables des pertes causées par un défaut de l'appareil photo. 2. L'électricité statique est susceptible de décharger votre appareil photo ou de provoquer sont extinction. Il suffit de le rallumer pour qu'il se remette à fonctionner. Renseignements importants à conserver. Avant de débuter le montage, lire attentivement la notice technique. Les couleurs et les détails peuvent varier par rapport au modèle présenté sur la boîte. ATTENTION ! A utiliser sous la surveillance rapprochée d’un adulte. Les piles ne doivent pas être rechargées. Les accumulateurs ne doivent être chargés que sous la surveillance d’un adulte. Différents types de piles ou accumulateurs ou des piles ou accumulateurs neufs et usagés ne doivent pas être mélangés. Les piles et accumulateurs doivent être mis en place en respectant la polarité. Les bornes d’une pile ou d’un accumulateur ne doivent pas être mises en court-circuit. Seules les batteries du type recommandé ou d’un type similaire doivent être utilisées. Ne pas pointer l'écran à l'aide d'objets pointus ou durs. Ne pas appuyer d’objet tranchant Page 17 of 18 sur la lentille. Ne pas insérer les fils dans des prises murales. Pour garantir le bon fonctionnement, vérifier et remplacer les piles si nécessaire. Les piles épuisées doivent être retirées du produit. Les piles épuisées doivent être retirées du produit. Fabriqué en RPC © 2015 Teknofun Tous Droits Réservés © 2015 Madcow Entertainment France Tous Droits Réservés http://www.teknofun-entertainment.com © 2015 Alice Taylor & Thomas Taylor ALL RIGHTS RESERVED Page 18 of 18 User’s Manual Color Display 300K pixels Dual Mode Camera Model Barbapapa 811147 1. Camera and Buttons Page 1 of 17 2. Using your digital camera IMPORTANT NOTE: Non-recharge batteries are not to be recharged Different types of batteries or new and used batteries are not to be mixed Batteries are to be inserted with correct polarity according to the direction shown on the compartment and cover. Exhausted batteries are to be removed from the toy The supply terminals are not be short-circuited Do not disassemble the battery This digital camera is not intended for children under 3 years old. Please keep this packaging since it contains important information. 2.1 Changing function modes Press the POWER/MENU button, the camera goes into menu interface, you can press the UP button to select and then by pressing the SHUTTER button to enter next menu, the screen will display the following symbols, and the interpretations are as follows: Page 2 of 17 Icon Mode Take Photo Self-Timer Camera AVI Continuous Capture Page 3 of 17 Icon Mode VGA,640*480 Modifying resolution QVGA,320*240 Icon compression rate Mode Non-Compression Mode Compression Mode Page 4 of 17 Icon Mode 50Hz Anti Flicker 60Hz Deleting all Page 5 of 17 Battery Capability Icon Mean >70% >35% >5% <=5% Page 6 of 17 2.2 Inserting batteries Open the camera’s battery compartment cover and insert 2 new AAA alkaline battery according to its polarity shown, then close it and press the Power/Menu button to power on the camera. After powered on, if you want to make changes to the camera’s default settings, please read the instructions of this manual. Note: Unload the batteries will make the photos saved to the camera memory LOST, so do download the photos saved accordingly 2.3 Taking photos After powered on, the camera is ready to take photos, just press the Shutter button, a distinct beep can be heard and a photo is taken. Automatically the number displayed on the screen wil count by one. Two quick beeps indicate: 1. there is not enough light to take a picture. 2. The memory is full, Do not move the camera until you hear the beep. Moving the camera while taking the picture will cause the photo to blur. Page 7 of 17 If the brightness is too low, 2 quick beeps are heard indicating that the photo cannot be taken. 2.4 Playback and deleting the current photo After taking a photos, you can press the PLAY BACK button to review the saved photo, and you can press the POWER/MENU and UP button to enter deleting the current photo mode. 2.5 Sleep mode (automatic power-saving mode) The camera goes into sleep mode automatically after about 30 seconds of inactivity By pressing the Power/Menu button for 3 seconds, Two beep will be heard at the same time and the camera goes into a sleep mode manually. In sleep mode, energy consumption is very low and the battery life is prolonged. Your camera can remain in sleep mode for save power. To use your camera again just simply press the Power/Menu button. 2.6 Timer / AVI / Continuous Capture mode Press the Power/Menu button once, the first icon<camera> is selected, the shutter button and the camera mode changes in Press turn <Take photos-->Timer-->AVI-->Continuous Capture > ,Press the Power/Menu again to Page 8 of 17 enter to the mode your favorite. Self-Timer AVI Continuous Capture Note: -- In AVI mode, be sure to have enough available light to effectively capture a video image. 2.7 Modifying resolution Press the POWER/MENU button and UP button, until the icon < Modifying resolution > is selected, and then press the shutter button to change, Then Press the Power/Menu again to enter the mode your favorite. PS: The camera changes to high resolution mode and can take clear photos. When you need to take a lot of photos at one time you can choose the low resolution mode. Page 9 of 17 2.8 Modify the compression rate Press the POWER/MENU button and UP button, until the icon < Compression > is selected, and then press the shutter button to change, Then Press the Power/Menu again to enter the mode your favorite. PS: The camera changes to non-compression mode and can take clear photos. 2.9 Modifying frequency Press the POWER/MENU button and UP button until the screen displays the < Anti Flicker> , and press the shutter button to change, Then Press the Power/Menu again to enter the mode your favorite. 2.10 Deleting all the photos saved to memory(Format the memory) Press the POWER/MENU button and UP button until the screen displays the "Clear all " mode and then press the shutter button ,you can press the UP button to select and press the shutter button to confirm your choice. 3. Installation and Utilization of the software program Insert the CD in your CD-ROM drive, and the application runs automatically. An interface will appear. Page 10 of 17 Close the window The following softwares are listed: • Install Driver: Installs software for PC camera. • User Manual: Open the manual folder. • Install MAGIX Video easy SE: Installs software for editing video clips. • Install MAGIX Photo Manager 10: Installs software for editing pictures. Click the items in the autorun menu to install the software. If the autorun menu does not appear automatically, open the CD-ROM in [My Computer] or [Windows Explorer] and double-click the file named [Start.exe] to start the program. You can also click [Run] in the Windows Startup menu, enter "D:\Start.exe" (where D is your CD-ROM drive letter) in the text box, and click [OK]. Page 11 of 17 Notes: 1. Open MAGIX Video easy SE or MAGIX Photo Manager 10, you have to register the software at first, then use program without any time limit. 2. Don't forget to install the QuickTime Player during installing the MAGIX Video easy SE. 3. MAGIX Video easy SE and MAGIX Photo Manager 10 only include Windows XP and Windows Vista, Windows 7 platforms. System requirements for Magix Video Easy SE: ► Intel® Pentium 4 or AMD® Athlon® 1 GHz and higher ► 512 MB RAM ► 400 MB free hard disk memory and a DVD drive for program installation ► Graphics card with a screen resolution of at least 1024 x 768 ► Sound card Supported devices: ► Video, TV, or graphics cards with video input. Magix Photo Manager 10: System Requirements (minimum configuration) ► Microsoft® Windows® XP / Vista® / 7. PC with Intel® Pentium® or AMD® Athlon® 700 MHz or higher ► 256 MB RAM, 120 MB hard disk space for program files ► SVGA graphics card with min. 4 MB RAM, (min. resolution 1024 x 600, 16-bit high-color) Page 12 of 17 ► Microsoft® compatible mouse. 3.1 Installation of driver Click on <Install Driver> and follow the step-by-step instructions to complete the installation. After successful installation of driver, restart your computer. Tip: Do not connect your camera to a computer while installation of driver. 3.2 Downloading picture Once the driver is installed, connect your camera to a computer with the USB cable and run the shortcut mode My DSC in the folder <Dual mode camera>= on your desktop. the interface will appear on screen. Click on <Download photos>=. The slides of the photos that you have taken appear on the interface. By clicking with the right or left button of the mouse on one of the Page 13 of 17 slides you can zoom in and zoom out on the photo. Click the button "select all photos"; all the photos will be selected. Then click the button "save photos" to transfer the photos to your PC. After having saved the photos you can empty the memory of you camera (Delete all photos which saved in the memory) and start taking pictures again. 3.3 Uploading a photo with a resolution of 1.3 M pixels A: Click on <Download photos>, select “Edit image” button; B:Select the “Increase Resolution” button(You can select “High Quality Mode” to get better image), then select the “OK” button to ESC. C: Download photos and these photos now saved to your computer are of Page 14 of 17 1.3 M pixels. 3.4 Creating and saving a video After having saved a video clip with the "AVI" mode, Follow the indication step by step to save. Then use Windows Media Player to watch the video. 4 Problem-solving Here are the most commonly encountered problems: When press the mode button the camera does not turn on: --Battery level is low. You should replace new batteries. The camera cannot download photo or display “no photos”: --Restart the computer and reconnect the camera. -- To ensure driver and the software were successfully installed to your computer. --If the camera driver and software were successfully installed, but still it does not work to download photos or to use the PC camera/webcam function, please UNINSTALL the software and after uninstalled, restart your computer. At last, re-install the driver and software from CD again. 5 Technical Specifications Resolution: 300K Pixels (640X480) VGA Page 15 of 17 Lens: Non-spherical Lens Aperture: 1: 2.6 Focus: f=5.4mm Image variation: 0.5m –infinity Illumination: 100 --16000 (lux) Storage Capacity: 2MB Photos: 10 high-resolution (640X480 pixels)pictures 21 compression high-resolution pictures 31 low-resolution (320X240 pixels)pictures 63 compression low-resolution pictures piece of pictures is related to image in all mode. Power supply:2 AAA Battery or USB cable. Interface:USB port System compatibility: Pentium II and above Personal Computers Windows 98SE/2000/ME/XP/Vista Operating System 32 MB or above Memory (64 MB or above Recommended) 60 MB Hard Disk Capacity CD-ROM Drive Color Monitor (Not Lower than 800*600, 24 Bit) USB interface Page 16 of 17 WARNING 1. Before using your camera to take photos, please sample some photos to check the camera works well or not. Or we are free of any lose resulting from failure of the camera. 2. Using your camera when there is body static-electricity may power off your camera or stop PC-CAM, only restart it and the camera works again. Adobe and Reader are either registered trademarks of Adobe Systems Incorporated in the United States and/or other countries. Made in RPC © 2015 Teknofun All Rights Reserved © 2015 Madcow Entertainment France All Rights Reserved http://www.teknofun-entertainment.com © 2015 Alice Taylor & Thomas Taylor ALL RIGHTS RESERVED Page 17 of 17