1
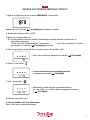
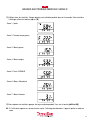
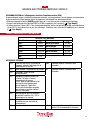
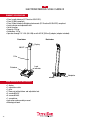
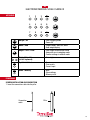
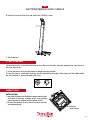
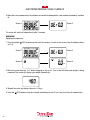
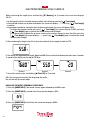
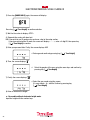
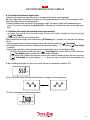
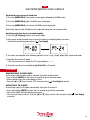
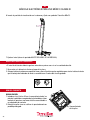
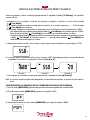
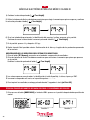
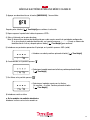
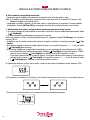
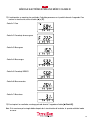
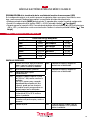
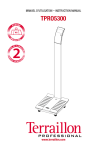
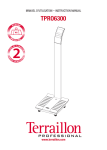
MANUEL D’UTILISATION – INSTRUCTION MANUAL TPRO6300 www.terraillon.com FR BALANCE ELECTRONIQUE MEDICALE CLASSE III Cher Client, Vous venez d’acquérir ce produit et nous vous en remercions. Nous vous en souhaitons un excellent usage. Afin d’en obtenir pleine satisfaction, nous vous recommandons de lire attentivement cette notice d’utilisation. A LIRE AVANT UTILISATION La balance électronique médicale est conçue et fabriquée dans des locaux certifiés par les Systèmes de gestion suivants : Qualité (ISO 9001), Environnement (ISO 14001), Santé et sécurité (OHSAS18001) et Qualité des appareils médicaux (ISO 13485). APPLICATIONS La balance électronique médicale est destinée à la pesée des patients dans le cadre de surveillance, diagnostics et traitement médical. PRÉCAUTIONS D’EMPLOI Ce symbole indique que des précautions d’ordre général devraient être prises lors de l’utilisation de ce produit. ATTENTION Ce symbole prévient d’un accident corporel ou d’un endommagement du produit si les instructions sont ignorées. MISE EN GARDE Ce symbole prévient d’une blessure grave si le produit n’est pas utilisé correctement ou si les directives d’emploi sont ignorées. ATTENTION • Utiliser l’appareil sur une surface ferme et plane. • Nettoyer après usage avec un chiffon humide, en s’assurant que l’eau ne pénètre pas dans l’appareil. Ne pas utiliser de solvants, ni immerger l’appareil dans l’eau. • Eviter les vibrations ou chocs importants, tels que laisser tomber l’appareil sur le sol. • Ne pas sauter sur la plateforme de pesée. • Utiliser uniquement un adaptateur secteur ayant les caractéristiques mentionnées dans le paragraphe : Description du produit. MISE EN GARDE • Ne pas démonter la balance; une mauvaise utilisation peut entraîner des blessures. ENTRETIEN • L’appareil ayant été fabriqué et réglé avec précision, l’utilisateur ne devra ni démonter, ni essayer de régler l’appareil lui-même. • Oter les piles si l’appareil n’est pas utilisé pendant une longue période. • Selon la réglementation française, le détenteur de l’instrument devra faire apposer la première marque de contrôle en service au plus tard 1 mois après la mise en service de l’instrument. • Selon la réglementation française, cet instrument doit être soumis à une vérification périodique annuelle. 2 FR BALANCE ELECTRONIQUE MEDICALE CLASSE III DESCRIPTION DU PRODUIT • Appareil médical de Classe I (Directive CE 93/42 EEC) • Conforme à la classification OIML de Classe III • Conforme à la classification Instruments de Pesée Non Automatiques de Classe III (Directive CE 90/384 EEC) • Fonction pesée • Indicateur de niveau et pieds réglables • Mise en marche : ON/OFF • Capacité : 220 kg • Graduation : 100 g • Alimentation : pile 1.5 V X 6 (AA/ LR6) ou via l’adaptateur d’alimentation secteur 9V [500 mA] (adaptateur fourni) Vue de Face Vue de dos Afficheur ON/OFF Colonne Plateau Indicateur de niveau Roues Adaptateur secteur CONTENU DE L’EMBALLAGE • 1 afficheur. • 1 câble de raccordement. • 1 colonne. • 1 base avec plateau et pieds de réglage. • 3 vis M5x15. • 6 vis M4x45. • 1 tournevis. • Notice et manuel de montage. • Carnet métrologique. 3 FR BALANCE ELECTRONIQUE MEDICALE CLASSE III AFFICHEUR 2 3 Print/CE OFF 4 5 6 0 Tare/Height 3 7 Print/CE 8 9 Memory MODE HOLD OFF 6 3 0 Print/CE Tare/Height OFF 39 6 Print/CE Memory 10 62 9 1 4 1 2 403 MODE OFF HOLD Tare/Height 5 Tare/Height MODE HOLD 1 95 2 76 Memory 3 7 1 4 8 2 5 9 3 6 47 58 69 80 MODE 9 Print/CE HOLD Memory Print/CE 0 0 Memory - Entrer en mode de pesée - Mise hors tension Print/CE Mode\Maintenir - Choisir le mode : BMI (IMC), BFA, MEM - Maintenir le poids OFF 6 Print/CE Memory 3 Poids\ Arrêt Taille\Tare\Entrer 0 OFF Memory Caractère numérique « 0 » MODE à « 9 » (sur HOLDle clavier complet) - Entrée de caractères numériques Haut\Imprimer\Effacer - Précédent - Imprimer les résultats - Correction saisie Tare/Height OFF MODE HOLD OFF Tare/Height Bas\ Mémoire MODE Tare/Height HOLD 7 8 9 - Entrer en mode de mesure de la taille - Tare en mode de pesée - Confirmer paramétrage dans un autre mode Tare/Height - Suivant - Stocker paramètres en mémoire - Rappel de mémoire Memory PROCEDURE MODE HOLD INSTALLATION DE LA COLONNE ET BRANCHEMENT DE L’ECRAN Si vous possédez une toise électronique, veuillez- vous référez à la notice de montage contenue dans l’emballage de la toise pour l’installation. 1. Insérer le câble de raccordement dans la colonne Câble de raccordement 4 Tête de colonne FR BALANCE ELECTRONIQUE MEDICALE CLASSE III 2. Relier le câble de raccordement de la plateforme à celui de la base de la colonne et visser – vérifier le sens de montage de la colonne. Une flèche placée sur la colonne indique l’extrémité à insérer dans la plateforme. Câble de raccordement Câble platefome 3. Déployer le câble de raccordement au maximum puis insérer la colonne dans l’emplacement prévu à cet effet sur la plateforme. Câble de raccordement 4. A l’aide d’un tournevis, fixer la colonne à la plateforme en vissant légèrement 4 vis M4x45 situées sous la plateforme. 5. Relier le câble supérieur de la colonne à celui de l’écran et visser. 5 FR BALANCE ELECTRONIQUE MEDICALE CLASSE III 6. Insérer l’ecran d’affichage dans la colonne et le fixer à l’aide de 2 vis 2 vis M5x15. 7. Régler le niveau (Voir le paragraphe REGLAGE DU NIVEAU DE LA BALANCE). REGLAGE DU NIVEAU DE LA BALANCE • Il est nécessaire de régler le niveau de la balance avant la première utilisation ou si elle a été déplacée dans un autre endroit. 1. Ne pas monter sur la balance et/ou délester le plateau de tout poids. 2. Placer la balance sur une surface ferme et plane. Agir sur les pieds réglables pour ajuster le niveau de la balance jusqu’à ce que la bulle contenue dans l’indicateur de niveau apparaisse au centre du cercle gravé. 3 ✗ UTILISATION DU PRODUIT INITIALISATION 1. Insérer 6 piles AA dans le compartiment à piles situé sous la platefome en respectant les polarités ou brancher l’appareil en le raccordant à un adaptateur d’alimentation secteur via une prise électrique. 2. Oter les piles si l’appareil n’est pas utilisé pendant une longue période. 6 Compartiment à piles FR BALANCE ELECTRONIQUE MEDICALE CLASSE III 3. Lorsque la balance est mise sous tension, quelles que soient les circonstances, tous les chiffres et la version logicielle s’affichent, comme montré ci-dessous : WEIGHT HEIGHT BMI >0< NET STA HOLD Ecran 1 CM % Ecran 2 Kg lb A G E La balance s’éteint automatiquement après 2 secondes FONCTIONNEMENT Mode pesée 1. A ppuyer sur le bouton ( /OFF) pour mettre la balance sous tension. Après deux écrans de contrôle, le chiffre 0 défile sur l’écran (Ecran 3), puis l’affichage se stabilise sur « 0.0kg » (Ecran 4). WEIGHT HEIGHT BMI >0< NET STA HOLD Ecran 1 CM % Ecran 2 Kg lb A G E Ecran 3 Ecran 4 2. Attendre que l’écran affiche «0.0» pour monter sur l’appareil. Monter et rester immobile pendant le calcul du poids. Le poids s’affiche automatiquement : 3. Redescendre de la balance, l’écran affiche à nouveau « 0.0kg ». 4. Appuyer sur le bouton ( /OFF) pour éteindre immédiatement la balance ou patienter 10sec, elle s’éteindra alors automatiquement 7 FR BALANCE ELECTRONIQUE MEDICALE CLASSE III PESÉE AVEC FONCTION IMC ET MÉMOIRE UTILISATEUR 1. Appuyer sur une seule fois sur la touche [MODE/HOLD], après deux écrans de contrôle, le symbole BMI apparait sur l’écran d’affichage : WEIGHT HEIGHT BMI >0< NET STA HOLD CM % Kg lb A G E Ecran 2 Ecran 1 Appuyer alors sur la touche [ Ecran 3 / Tare Height] pour confirmer la sélection. 2. Attendre que la balance affiche « STEP ». 3. Monter sur la balance. NB : Si vous souhaitez utiliser des numéros d’identifiant pour chaque utilisateur, se reporter au paragraphe paramétrage. SI vous avez activé le mode identifiant, l’écran affiche « - - - - », saisir alors un identifiant à 4 chiffres, puis appuyer sur la touche [ / Tare Height] pour valider. 4. Affichage de la taille clignote. a - Pour les modèles sans toise électronique Saisir la taille avec les touches numériques. b - Pour les modèles équipés d’une toise électronique, • Veiller à ce que la toise soit replacée en position initiale avant toute mesure de la taille. NB : Si la toise n’est pas replacée en position initiale avant utilisation, l’écran LCD affiche « InIt ». Replacer alors la toise en position initiale. • Déployer la toise et l’ajuster à la hauteur du sujet. La taille s’affiche alors à l’écran. L’utilisateur peut également appuyer sur la touche [▲/Print-CE] pour remplacer les données affichées par la toise par une saisie clavier. c - Validation de la taille et enregistrement de paramètres personnel d’un utilisateur Si vous ne souhaitez pas mémoriser les paramètres d’un utilisateur Validez la taille immédiatement en appuyant sur la touche [ / Tare Height]. Si vous souhaitez mémoriser les paramètres personnels d’un utilisateur, 8 FR BALANCE ELECTRONIQUE MEDICALE CLASSE III Avant de valider la taille, maintenir appuyée pendant 3 secondes la touche [▼\ Memory], l’écran affiche alors « M-00 » • Saisir au clavier, le numéro de mémoire choisi et valider en appuyant sur [ / Tare Height] • S i le chiffre choisi est libre de tout enregistrement précédent alors l’écran affichera -----. Appuyer alors sur la touche [ / Tare Height] pour confirmer. • Si le chiffre choisi pour l’enregistrement des paramètres est déjà utilisé alors l’écran affichera USED. * Pour écraser l’enregistrement précédent, appuyer alors sur la touche [ / Tare Height], l’écran affiche CLEAR, appuyer à nouveau sur la touche [ / Tare Height], pour confirmer le numéro enregistrement et la taille. * S i vous ne souhaitez pas écraser l’enregistrement précédent, choisissez un autre chiffre pour mémoriser les paramètres, appuyer alors sur la touche [ / Tare Height], l’écran affiche -----, appuyer à nouveau sur la touche [ / Tare Height], pour confirmer le numéro enregistrement et la taille. 5. Après validation de la taille, rester immobile sur la balance et attendre que le poids soit stabilisé : STA. 6. La balance affiche alternativement la taille, le poids et l’IMC. Chaque donnée reste affichée pendant plus de 4 secondes. Pour accélérer l’affichage, utilisez les touches [▲] ou [▼]. Ecran 1 Ecran 2 Ecran 3 7. Pour imprimer les résultats, appuyez de façon continue pendant 3 sec. sur la touche [▲/Print-CE]. NB : Si l’utilisateur appuie sur aucune touche, après l’affichage des données. L’appareil quitte le mode en cours. RAPPEL DES ENREGISTREMENTS DES PARAMÈTRES PERSONNEL D’UN UTILISATEUR 1) Appuyer sur la touche [MODE/HOLD]. Deux écrans de contrôle apparaissent suivis de l’écran BMI. 2) Appuyer alors une deuxième fois sur touche [MODE/HOLD], s’affiche alors à l’écran « BFA » : 3) Appuyer alors une troisème fois sur touche [MODE/HOLD], s’affiche alors à l’écran « MEM » : 9 FR BALANCE ELECTRONIQUE MEDICALE CLASSE III 4) Validez la sélection en appuyant sur [ / Tare Height]. 5) Utiliser les touches flèches ou numériques pour choisir la mémoire à rappeler et confirmer la sélection en appuyant sur la touche [ / Tare Height]. 6) L’identifiant utilisateur, si préalablement enregistré, et la taille apparaissent à l’écran. Confirmer à nouveau le choix de la mémoire en appuyant sur la touche [ / Tare Height]. 7) A l’écran défile alors « 0» puis « 0,0Kg ». 8) R eprendre au niveau 5 du paragraphe ci-dessus : Validation de la taille et enregistrement de paramètres personnels utilisateurs. RAPPEL DE RÉSULTATS DE LA DERNIÈRE PESÉE ENREGISTRÉE 1) Appuyez sur la touche [▼\ Memory] pour entrer en mode « rappel des résultats ». 2) Appuyer sur les touches flèches ou numériques pour choisir la mémoire à afficher à l’écran. Confirmer la sélection en appuyant sur la touche [ / Tare Height]. 3) L es valeurs s’affichent dans l’ordre suivant : l’identifiant (le cas échéant), la taille, le poids et l’IMC. Si la mémoire rappelée est vide, l’écran affiche « - - - ». 4) Pour imprimer les résultats, appuyez de façon continue pendant 3 sec. sur la touche [▲/Print-CE]. PESÉE AVEC FONCTION IMPÉDANCEMÈTRE AVEC MÉMOIRE UTILISATEUR 1) Appuyer sur une seule fois sur la touche [MODE/HOLD], après deux écrans de contrôle, le symbole BMI apparait sur l’écran d’affichage : WEIGHT HEIGHT BMI >0< NET STA HOLD CM % Kg lb A G E Ecran 1 10 Ecran 2 Ecran 3 FR BALANCE ELECTRONIQUE MEDICALE CLASSE III 2) Appuyer une deuxième fois sur la touche [MODE/HOLD], l’écran affiche : / Tare Height] pour confirmer la sélection. Appuyer alors sur la touche [ 3) Attendre que la balance affiche « STEP ». 4) Monter sur la balance pieds nus. NB : Si vous souhaitez utiliser des numéros d’identifiant pour chaque utilisateur, reportez-vous au paragraphe paramétrage. Si vous avez activé le mode identifiant, l’écran affiche « - - - - », saisir alors un identifiant à 4 chiffres, puis appuyer sur la touche [ / Tare Height] pour valider. 5) Saisir vos paramètres personnels. Dans un premier temps, l’écran affiche : AGE Saisir l’âge et valider en appuyant sur la touche [ / Tare Height] A G E 6) Ensuite, l’écran affiche : A G E 7) Enfin, l’écran affiche : A G E Sélectionnerlesexedel’utilisateuraumoyendesflèchesetvalider en appuyant sur la touche [ / Tare Height] A G E Sélectionner le mode utilisateur au moyen des flèches : N = non athlète – A = athlète. Valider en appuyant sur la touche [ / Tare Height] A G E 8) Saisie ou mesure de la taille a - Pour les modèles sans toise électronique, Saisir la taille avec les touches numériques. 11 FR BALANCE ELECTRONIQUE MEDICALE CLASSE III b - Pour les modèles équipés d’une toise électronique, • Veiller à ce que la toise soit replacée en position initiale avant toute mesure de la taille. NB : Si la toise n’est pas replacée en position initiale avant utilisation, l’écran LCD affiche « InIt ». Replacer alors la toise en position initiale. • Déployer la toise et l’ajuster à la hauteur du sujet. La taille s’affiche alors à l’écran. L’utilisateur peut également appuyer sur la touche [▲/Print-CE] pour remplacer les données affichées par la toise par une saisie clavier. c - Validation de la taille et enregistrement de paramètres personnel d’un utilisateur Si vous ne souhaitez pas mémoriser les paramètres d’un utilisateur. Validez la taille immédiatement en appuyant sur la touche [ / Tare Height]. Si vous souhaitez mémoriser les paramètres personnels d’un utilisateur, Avant de valider la taille, maintenir appuyée pendant 3 secondes la touche [▼\ Memory], l’écran affiche alors « M-00 » • Saisir au clavier, le numéro de mémoire choisi et valider en appuyant sur [ / Tare Height] • S i le chiffre choisi est libre de tout enregistrement précédent alors l’écran affichera « ----- ». Appuyer alors sur la touche [ / Tare Height] pour confirmer. • Si le chiffre choisi pour l’enregistrement des paramètres est déjà utilisé alors l’écran affichera USED. * Pour écraser l’enregistrement précédent, appuyer alors sur la touche [ / Tare Height], l’écran affiche CLEAR, appuyer à nouveau sur la touche [ / Tare Height], pour confirmer le numéro enregistrement et la taille. * Si vous ne souhaitez pas écraser l’enregistrement précédent, choisissez un autre chiffre pour mémoriser les paramètres, appuyer alors sur la touche [ / Tare Height], l’écran affiche « ----- », appuyer à nouveau sur la touche [ / Tare Height], pour confirmer le numéro enregistrement et la taille. 9) Après validation de la taille, rester immobile sur la balance et attendre que le poids soit stabilisé : STA 10) Rester immobile sur la balance, le calcul de la masse graisseuse est en cours, l’écran affiche : 11) Un premier écran apparait avec le rappel des paramètres personnels : A G E 12 FR BALANCE ELECTRONIQUE MEDICALE CLASSE III 12) Défilent alors les résultats. Chaque donnée reste affichée pendant plus de 4 secondes. Pour accélérer l’affichage, utilisez les touches [▲] ou [▼]. - Ecran 1 : poids A G E - Ecran 2 : Taux de masse grasse A G E - Ecran 3 : Masse grasse A G E - Ecran 4 : Masse maigre A G E - Ecran 5 : Taux HYDRIQUE A G E - Ecran 6 : Masse Musculaire A G E - Ecran 7 : Masse Osseuse A G E 13) Pour imprimer les résultats, appuyez de façon continue pendant 3 sec. sur la touche [▲/Print-CE]. NB : Si l’utilisateur appuie sur aucune touche, après l’affichage des données, l’appareil quitte le mode en cours. 13 FR BALANCE ELECTRONIQUE MEDICALE CLASSE III Rappel des enregistrements des paramètres personnel d’un utilisateur 1) Appuyer sur la touche [MODE/HOLD]. Deux écrans de contrôle apparaissent suivis de l’écran BMI 2) Appuyer alors une deuxième fois sur touche [MODE/HOLD], l’ecran BFA s’affiche. 3) Appuyer une troisième fois sur touche [MODE/HOLD], l’ecran MEM s’affiche. Se reporter au paragraphe ci-dessus : Validation de la taille et enregistrement de paramètres personnel d’un utilisateur Rappel de résultats de la dernière pesée enregistrée 1) Appuyez sur la touche [▼\ Memory] pour entrer en mode rappel des résultats. 2) Appuyer sur les touches flèches ou numériques pour choisir la mémoire à afficher à l’écran. Confirmer la sélection en appuyant sur la touche [ / Tare Height]. 3) L es valeurs s’affichent dans l’ordre suivant : l’identifiant (le cas échéant), la taille, le poids, âge, sexe et mode. 4) D ans un deuxième temps, les résultats apparaissent. Si la mémoire rappelée est vide, l’écran LCD affiche « ----- ». 5) Pour imprimer les résultats, appuyez de façon continue pendant 3 sec. sur la touche [▲/Print-CE]. MODE DE PARAMÉTRAGE DESACTIVATION du mode PRINT En paramétrage d’origine, le mode print est activé, si vous souhaitez le désactiver : • Maintenir appuyée la touche [MODE] pendant plus de 10 sec pour passer en mode de paramétrage. • Après un écran de contrôle, l’écran affiche « Print ». • Appuyer sur les touches [▲] ou [▼]pour sélectionner « OFF » puis appuyer sur la touche [ / Tare Height] pour confirmer. ACTIVATION du mode IDENTIFIANT En paramétrage d’origine, le mode identifiant est désactivé, si vous souhaitez l’activer : • Maintenir appuyée la touche [MODE] pendant plus de 10 sec pour passer en mode de paramétrage. • Passer le paramétrage de la fonction PRINT en appuyant sur la touche [ / Tare Height]. • L ’écran affiche « Id no ». Appuyer sur les touches [▲] ou [▼] pour sélectionner « ON » et appuyer sur la touche [ / Tare Height] pour confirmer. 14 FR BALANCE ELECTRONIQUE MEDICALE CLASSE III PERSONNALISATION de l’affichage des résultats d’impédancemètrie (BFA) En paramétrage d’origine, s’affichent les données suivantes : masse graisseuse, masse hydrique, masse osseuse et masse musculaire. Vous pouvez choisir de supprimer l’affichage d’une donnée particulière. • Maintenir appuyée la touche [MODE] pendant plus de 10 sec pour passer en mode de paramétrage. • Passer le paramétrage de la fonction PRINT et ID NO en appuyant sur la touche [ / Tare Height]. • S’affiche ensuite à l’écran « BFA ». Pour chacune des données, utiliser les touches [6] ou [5] pour sélectionner ON ou OFF et ainsi désactiver ou pas son affichage. Confirmer votre sélection en appuyant sur la touche [ / Tare Height]. FORMAT D’IMPRESSION DE LA BALANCE IMC Identifiant Âge : Sexe : Activité Taille Poids IMC RÉSULTAT DES MESURES Masse graisseuse 0001 30 ans Masse graisseuse Femme Masse maigre Normale Masse hydrique 175,0 cm Masse osseuse 68,0 kg Masse musculaire 21,5 10 % 5,0 kg 60,0 kg 50 % 4,5 kg 20,5 kg AFFICHAGES SPÉCIAUX Err0 Err1 Err2 Err3 Err4 Err5 bAtt Erreur de zéro initial. Descendre de AdErr l’appareil, attendre l’affichage 0.0 et recommencer la mesure Poids instable : recommencez le pesage. EEP Surcharge : retirez le poids immédiatement. Impédance corporelle au delà de la limite (100 ohm à 1kohm) : recommencez la mesure. Si Err3 apparaît trop souvent et en fonction de votre type de peau (fine ou épaisse), il peut-être nécessaire d’humidifier vos pieds pour assurer un meilleur contact avec les électrodes. Pourcentage de graisse corporelle au delà de la tranche 4 % - 50 % : recommencez la mesure. Volume d’eau au-delà de la norme. Humidifiez un peu vos pieds et recommencez. Remplacer la batterie Ustb Problème matériel. Contacter votre revendeur Problème matériel. Contacter votre revendeur Zéro instable. Attendre que l’appareil affiche 0.0 et recommencer la mesure 15 FR BALANCE ELECTRONIQUE MEDICALE CLASSE III PROTECTION DE L’ENVIRONNEMENT Déposer les piles usagées dans un container prévu à cet effet pour qu’elles soient collectées et recyclées. Ne mélanger pas différents types de piles. Ne mélanger pas les piles usagées avec les piles neuves. En fin de vie, confier ce produit à un point de collecte pour le recyclage des déchets d’équipements électriques et électroniques. GARANTIE Ce produit est garanti contre les défauts de matériaux et de fabrication. Pendant la période de garantie, de tels défauts seront réparés gratuitement (la preuve d’achat devra être présentée en cas de réclamation sous garantie). Cette garantie ne couvre pas les dommages résultant d’accidents, de mauvaise utilisation ou de négligence. En cas de réclamation, contacter en premier lieu le magasin où vous avez effectué votre achat. SERVICE APRES-VENTE Pour tout service après-vente, contacter le service consommateur Terraillon au 0826 88 1789 ou à l’adresse [email protected]. After Sales Service : Terraillon France & Headquarters 1 rue Ernest Gouin - CS 50001 - 78293 CROISSY-SUR-SEINE Cedex - France Service consommateurs : 0 826 88 1789 [email protected] - www.terraillon.com FOOK TIN TECHNOLOGIES LTD 4/F, Eastern Centre, 1065 King Road, HONG KONG www.fooktin.com.hk 16 EN ELECTRONIC MEDICAL SCALE CLASSE III Dear Customer, Thank you for purchasing this product. We hope you will find it satisfactory. Please read these instructions carefully to take full advantage of your product. READ BEFORE USE The Electronic Medical Scale is designed and manufactured in a facility certified in the following Management Systems: ISO 9001 Quality, ISO14001 Environment and OHSAS18001 Health and Safety. APPLICATIONS The electronic medical scaleís intended use is for weighing patients for the purposes of monitoring, diagnosis and medical treatment. PRECAUTIONS OF USE This symbol indicates general precautions that should be taken when using this product. WARNING This symbol indicates the possibility of serious injury if the product is mishandled or instructions are ignored. CAUTION This symbol indicates the possibility of physical injury or equipment damage if instructions are ignored. WARNING • Use the product on a firm and flat surface. • Clean after use with a lightly dampened cloth without allowing any water to get into the device. Do not use solvents or immerse the product in water. • Avoid excessive impact or vibration to the product, such as dropping the product onto the floor. • Do not jump on the weighing platform. CAUTION • Do not disassemble the scale as incorrect handling may cause injury. MAINTENANCE • The product has been manufactured with precision. The user should not disassemble the product on its own. • Remove batteries if the product is not in use for an extended period. 17 EN ELECTRONIC MEDICAL SCALE CLASSE III PRODUCT SPECIFICATION • Class I medical device (EC Directive 93/42 EEC). • Class III OIML compliant. • Class III Non-Automatic Weighing Instruments (EC Directive 90/384 EEC) compliant. • Level indicator and adjustable feet. • On/off function • Capacity: 220 kg. • Graduation: 100 g. • Operates through 1.5 V X 6 (AA/ LR6) or with AC 9V [500 mA] adaptor (adaptor included). Front view Back view Display ON/OFF Pillar Plateform Level indicator wheels ITEMS INCLUDED IN THE PACKAGE • 1 display • 1 connection cable. • 1 pillar. • 1 Base part with platform and adjustable feet. • 3 screws M5x15. • 6 screws M4x45. • 1 screw driver • Instruction and assembly manual. • Metrological book. 18 Adaptator EN ELECTRONIC MEDICAL SCALE CLASSE III AFFICHEUR 2 3 Print/CE OFF 4 5 6 0 Tare/Height 3 7 Print/CE 8 9 Memory MODE HOLD OFF 6 3 0 Print/CE Tare/Height OFF 39 6 Print/CE Memory 10 62 9 1 4 1 2 403 MODE OFF HOLD Tare/Height 5 Tare/Height MODE HOLD 1 95 2 76 Memory 3 7 1 4 8 2 5 9 3 6 47 58 69 80 MODE 9 Print/CE HOLD Memory Print/CE 0 0 Memory - Enter weighing mode - Power Off Print/CE Mode \ Hold - Choose mode : BMI, BFA, MEM - Hold weight display OFF 6 Print/CE Memory 3 Weight \ Off Height \ Tare \ Enter 0 OFF Tare/Height Memory Digits “0” to “9” MODE (on full keyboard) HOLD - Enter digits Up \ Print \ Delete - Previous - Print results - Correct input Tare/Height OFF MODE HOLD OFF Tare/Height Down \ Memory MODE Tare/Height HOLD 7 8 9 - Enter height measurement mode - Automatic zero in weighing mode - Confirm settings in another mode - Next - Store settings - Memory recall Memory PROCEDURE MODE HOLD SCREEN INSTALLATION AND CONNECTION 1. Insert the connection cable into the pillar Connection cable Pillar 19 EN ELECTRONIC MEDICAL SCALE CLASSE III 2. Connect the platform connection cable with the display cable and screw together check the pillar mounting direction. An arrow on the pillar indicates which end to insert into the platform. Connection cable display cable 3. Deploy the cable and then insert the pillar in the space provided for this purpose on the platform Connection cable 4. Using the screwdriver, attach the pillar to the platform by screwing 4 screws M4x45 slightly beneath the platform. 5. Connect the pillar cable to the screen and screw. 20 EN ELECTRONIC MEDICAL SCALE CLASSE III 6. Insert the screen into the pillar and attach with 2 M5x15 screws. 7. Set the balance. SETTING THE BALANCE • Before you use the scale for the first time or when the scale has been moved to another place, the balance of the scale must be set. 1. Do not step on the scale or/and remove all weight from the platform. 2. Place the scale on a hard and flat surface, use the adjustable feet to adjust the balance until the bubble inside the level indicator is centrally located in the circle. 3 ✗ PRODUCT USAGE INITIALISATION 1. Insert 6pc AA battery into the battery compartment located at the back of the base, or power up the scale through connecting the DC adaptor with the power socket. 2. Remove the batteries if the scale has not been used for an extended period. Batteries compartment 21 EN FR ELECTRONIC MEDICAL SCALE CLASSE III 3. When the scale is powered up, the software version will be displayed for a few seconds (see below), and then all. WEIGHT HEIGHT BMI >0< NET STA HOLD Screen 1 CM % Screen 2 Kg lb A G E The scales will switch off automatically after 2 seconds. OPERATION Weighing only operation 1. Press the button ( /OFF) to power up the scale The number 0 scrolls on the screen, then the display settles on “0.0”. WEIGHT HEIGHT BMI >0< NET STA HOLD Screen 1 CM % Screen 2 Kg lb A G E Screen 3 Screen 4 2. Wait until screen displays “0.0” before stepping on the scale. Then, stand still while your weight is being computed. The screen will display your weight automatically. 3. Step off the scale, the display returns to « 0.0kg ». 4. Press the ( /OFF) button to turn the scale off immediately or wait 10 sec, then it will turn off automatically. 22 EN ELECTRONIC MEDICAL SCALE CLASSE III WEIGHING WITH BMI FUNCTION AND USER MEMORY 1. Press the [MODE/HOLD] key once, after two control screens, the symbol BMI appears on the display screen: WEIGHT HEIGHT BMI >0< NET STA HOLD CM % Kg lb A G E Screen 1 Screen 2 Screen 3 Press [ / Tare Height] key to confirm selection. 2. Wait until the scales display «STEP». 3. Step onto the scales. NB: If you wish to use ID numbers for each user, refer to the setup section. If you have activated the ID mode, the screen displays «- - - -», enter a 4-digit ID then press key [ / Tare Height] to confirm.. 4. The height display flashes. a - For models without electronic height meter Input the height with the number keys. b - For models with electronic height meter • Check that the meter has been returned to its starting position before measuring height. NB: If the height meter has not been returned to its starting position before use, the LCD screen displays «InIt». Return the height meter to its starting position. • Extend the height meter and adjust it to the person’s height. The person’s height will be displayed on the screen. The user can also press key [▲/Print-CE] to input data via a keypad rather than using height meter data. c - Validation of the height and recording of user’s personal data If you do not wish to store the user’s data Confirm the height immediately by pressing key [ / Tare Height]. If you wish to store the user’s personal data 23 EN FR ELECTRONIC MEDICAL SCALE CLASSE III Before confirming the height, press and hold key [▼\ Memory] for 3 seconds, the screen then displays «M-00». • On the keypad, enter the selected memory number and confirm by pressing [ / Tare Height] • If the selected number has not been used before, the screen will display -----. Press key [ / Tare Height] to confirm. • If the number selected for storing the data has been used already, the screen will display USED. * To delete the previous record, press key [ / Tare Height], the screen displays CLEAR, press key [ / Tare Height] again to confirm the record number and the height. * If you do not wish to delete the previous record, select another number to store the data, press key [ / Tare Height], the screen displays -----, press key [ / Tare Height] again to confirm the record number and the height. 5. After confirming the height, stay still on the scales and wait for the weight to stabilise: STA. 6. The display will toggle between Height, Weight and BMI. Each result with be displayed for more than 4 seconds. To speed up the display, use the [▲] or [▼] keys. Screen 1 Screen 2 Screen 3 7. To print the results, press and hold key [▲/Print-CE] for 3 seconds. NB: If the user presses any key, after displaying the results, the unit will exit the current mode. RECALLING THE USER’S PERSONAL STORED DATA 1) Press key [MODE/HOLD]. Two control screens appear followed by the BMI screen. 2) Press key [MODE/HOLD] a second time, the screen then displays «BFA»: 3) Press key [MODE/HOLD] a third time, the screen then displays «MEM»: 24 EN ELECTRONIC MEDICAL SCALE CLASSE III 4) Confirm the selection by pressing [ / Tare Height]. 5) Use the arrow or number keys to select the memory to be recalled and confirm the selection by pressing key [ / Tare Height]. 6) The user ID, if previously recorded, and the height will appear on the screen. / Tare Height]. Confirm the memory selection again by pressing key [ 7) The screen then scrolls «0», then «0.0 Kg». 8) Repeat from point 5 of the section above: Validation of height and storing users’ personal data. RECALLING RESULTS FROM THE LAST RECORDED WEIGHING 1) Press key [▼\ Memory] to enter the «recall results» mode. 2) Press on the arrow or number keys to select the memory to be displayed on the screen. Confirm the selection by pressing key [ / Tare Height]. 3) The values are displayed in the following sequence: ID number (if any), height, weight and BMI. If the recalled memory is empty, the screen will display «- - -». 4) To print the results, press and hold key [▲/Print-CE] for 3 seconds. WEIGHING WITH IMPEDANCE (BODY FAT) ANALYSIS WITH USER MEMORY 1) Press key [MODE/HOLD] once, after two control screens, the symbol BMI appears on the display: WEIGHT HEIGHT BMI >0< NET STA HOLD CM % Kg lb A G E Screen 1 Screen 2 Screen 3 25 EN FR ELECTRONIC MEDICAL SCALE CLASSE III 2) Press key [MODE/HOLD] again, the screen will display: Press key [ / Tare Height] to confirm selection. 3) Wait for the scales to display «STEP». 4) Step onto the scales with bare feet. NB: If you wish to use ID numbers for each user, refer to the setup section. If you have activated the ID mode, the screen will display «- - - -», enter a 4-digit ID, then press key [ / Tare Height] to confirm. 5) Enter your personal data. Firstly, the screen displays: AGE Enter age and confirm by pressing key [ / Tare Height] A G E 6) Then, the screen displays: A G E Select the gender of the user using the arrow keys and confirm by pressing key [ / Tare Height] A G E A G E Select the user mode using the arrows: N = non-athlete - A = athlete. Confirm by pressing key [ / Tare Height] 7) Finally, the screen displays: A G E 8) Enter or measure the height a - For models without electronic height meter Input the height with the number keys. 26 EN ELECTRONIC MEDICAL SCALE CLASSE III b - For models with electronic height meter • Check that the meter has been returned to its starting position before measuring height. NB: If the height meter has not been returned to its starting position before use, the LCD screen displays «InIt». Return the height meter to its starting position. • Extend the height meter and adjust it to the person’s height. The person’s height will be displayed on the screen. The user may also press key [▲/Print-CE] to enter data via a keypad rather than using height meter data. c - Validation of the height and recording of user’s personal data I f you do not wish to store the user’s data. Confirm the height immediately by pressing key [ / Tare Height] If you wish to store the user’s personal data Before confirming the height, press and hold key [▼\ Memory] for 3 seconds, the screen will then display «M-00». • On the keypad, enter the selected memory number and confirm by pressing [ / Tare Height] • If the selected number has not been used before, the screen will display «-----». Press key [ / Tare Height] to confirm. • If the number selected for storing the data has been used already, the screen will display USED. * To delete the previous record, press key [ / Tare Height], the screen displays CLEAR, press key [ / Tare Height], again to confirm the record number and height. * If you do not wish to delete the previous record, select another number to store the data, press key [ / Tare Height], the screen displays «-----», press key again to confirm the record number and height. 9) After validating the height, stay still on the scales and wait for the weight to stabilise: STA 10) Stay still on the scales, the body fat calculation is in progress, the screen displays: 11) A first screen appears showing personal data: A G E 27 EN FR ELECTRONIC MEDICAL SCALE CLASSE III 12) Scroll through the results. Each result with be displayed for more than 4 seconds. To speed up the display, use the [▲] or [▼] keys. - Screen 1: Weight A G E - Screen 2: Body fat percentage A G E - Screen 3: Fat mass A G E - Screen 4: Fat-free mass A G E - Screen 5: BODY WATER percentage A G E - Screen 6: Muscle mass A G E - Screen 7: Bone mass A G E 13) To print the results, press and hold key [▲/Print-CE] for 3 seconds. NB: If the user presses any key, after displaying the data, the unit will exit the current mode. 28 EN ELECTRONIC MEDICAL SCALE CLASSE III Recalling the user’s personal stored data 1) Press key [MODE/HOLD]. Two control screens appear followed by the BMI screen. 2) Press key [MODE/HOLD] again, the BFA screen is displayed. 3) Press key [MODE/HOLD] a third time, the MEM screen is displayed. Refer to the above section: Validation of the height and storing the user’s personal data Recalling results from the last recorded weighing 1) Press key [▼\ Memory] to enter recall results mode. 2) Press on the arrow or number keys to select the memory to be displayed on the screen. Confirm the selection by pressing key [ / Tare Height]. 3) The values are displayed in the following sequence: ID no. (if any), Height, Weight, Age, Gender and mode: 4) Secondly, the results will appear. If the recalled memory is empty, the LCD screen displays «-----». 5) To print the results, press and hold key [▲/Print-CE] for 3 seconds. SETUP MODE DEACTIVATION OF THE PRINT MODE In the factory setup, the print mode is activated. If you wish to deactivate it: • Press and hold [MODE] for more than 10 seconds to go into the setup mode. • After a control screen, the screen displays «Print». • Press the [▲] or [▼] keys to select «OFF» then press key [ / Tare Height] to confirm. ACTIVATION OF THE ID MODE In the factory setup, the ID mode is deactivated. If you wish to activate it: • Press and hold key [MODE] for more than 10 seconds to go into the setup mode. • Go from the PRINT function setup by pressing key. • The screen will display «Id no». Press the [▲] or [▼] keys to select «ON» and press key [ to confirm. / Tare Height] 29 EN ELECTRONIC MEDICAL SCALE CLASSE III PERSONALISATION of the body fat analysis results display (BFA) In the factory setup, the following data is displayed: body fat, body water mass, bone mass and muscular mass. You may choose to remove particular data from the display. • Press and hold key [MODE] for more than 10 seconds to go into the setup mode. • Go from the PRINT function and ID NO setup by pressing [ / Tare Height]. • The screen then displays «BFA». For each data, use keys [▲] or [▼] to select ON or OFF and thus deactivate or activate its display. Confirm your selection by pressing key [ / Tare Height]. PRINT FORMAT FROM THE BMI BALANCE ID Age: Gender: Activity Height Weight BMI MEASUREMENT RESULTS Body fat 0001 Body fat 30 yrs Female Fat-free mass Normal Body water mass 175,0 cm Bone mass 68,0 kg Muscle mass 21,5 10 % 5,0 kg 60,0 kg 50 % 4,5 kg 20,5 kg SPECIAL INDICATIONS Err0 Err1 Err2 Err3 Err4 Err5 bAtt 30 Initial zero error. Get off the scales, wait AdErr for the display to show 0.0 and restart the measurement. Unstable weight: restart the weighing. EEP Overload: remove the weight immediately. Body impedance beyond the limit (100 ohm to 1kohm): restart the measurement. If Err3 appears often and depending on your skin type (thin or thick), it may be necessary to moisten your feet to ensure better contact with the electrodes. Body fat percentage out of range 4-50%: restart the measurement. Water volume out of range. Moisten your feet and restart. Replace the battery. Ustb Hardware problem. Contact your retailer. Hardware problem. Contact your retailer. Unstable zero. Wait for the display to show 0.0 and restart the measurement EN ELECTRONIC MEDICAL SCALE CLASSE III PROTECT THE ENVIRONMENT Dispose of used batteries in a designed container so that they can be collected and recycled. Do not mix different types of batteries. Do not mix new and used batteries. After life, dispose of this product at a designated waste recycling point. GUARANTEE This product is guaranteed against defects in materials or manufacturing. During the guarantee period, any such defects will be repaired free of charge (proof of purchase must be shown in the case of a complaint under guarantee). The guarantee does not cover damage resulting from improper use or negligence. In the event of a claim, first contact the shop where you purchased the product. AFTER SALES SERVICE For calibration and after sales services, please contact Terraillon consumer service at 0 826 88 1789 or at the following address: [email protected] After Sales Service : Terraillon France & Headquarters 1 rue Ernest Gouin - CS 50001 - 78293 CROISSY-SUR-SEINE Cedex - France Service consommateurs : 0 826 88 1789 [email protected] - www.terraillon.com FOOK TIN TECHNOLOGIES LTD 4/F, Eastern Centre, 1065 King Road, HONG KONG www.fooktin.com.hk 31 ES BÁSCULA ELECTRÓNICA PARA USO MÉDICO CLASSE III Estimado/a cliente: Gracias por adquirir este producto. Esperamos que haga un excelente uso de él. Para garantizarle una plena satisfacción, le aconsejamos que lea atentamente estas instrucciones de uso. LEA ESTAS INSTRUCCIONES ANTES DE SU USO La báscula electrónica para uso médico ha sido diseñada y fabricada en instalaciones certificadas por los siguientes sistemas de gestión: Calidad (ISO 9001), Medio ambiente (ISO 14001), Salud y seguridad (OHSAS 18001) y Calidad de los productos sanitarios (ISO 13485). APLICACIONES La báscula electrónica para uso médico está indicada para pesar a pacientes durante la observación, el diagnóstico y el tratamiento médico. PRECAUCIONES DE USO Este símbolo indica que deberán tomarse precauciones de carácter general durante el uso de este producto. PRECAUCIÓN Este símbolo avisa de que pueden producirse lesiones o daños en el producto si no se siguen las instrucciones. ADVERTENCIA Este símbolo avisa de que pueden producirse lesiones graves si el producto no se utiliza correctamente o si no se siguen las instrucciones de uso. PRECAUCIÓN • Coloque el aparato sobre una superficie firme y plana. • Limpie el aparato después de cada uso con un paño húmedo, con cuidado de que no entre agua. No emplee disolventes ni sumerja el aparato en agua. • Evite las vibraciones o los golpes fuertes, como las caídas al suelo. • No salte sobre la plataforma de pesaje. • Utilice únicamente un adaptador de corriente con las características indicadas en el apartado «Descripción del producto». ADVERTENCIA • No desmonte la báscula; el uso indebido puede ocasionar lesiones. MANTENIMIENTO • Este aparato ha sido fabricado y regulado con precisión. El usuario no deberá desmontarlo ni tratar de regularlo. • Extraiga las pilas si no se va a utilizar el aparato durante un periodo prolongado. • Según la normativa francesa, el poseedor del instrumento será responsable de estampar la primera marca de control de servicio, antes de que se cumpla 1 mes desde la puesta en servicio del instrumento. • Según la normativa francesa, este instrumento debe someterse a una comprobación periódica anual. 32 ES BÁSCULA ELECTRÓNICA PARA USO MÉDICO CLASSE III DESCRIPCIÓN DEL PRODUCTO • Producto sanitario de clase I (Directiva 93 / 42 / CEE del Consejo) • Conforme a la clasificación OIML de clase III • Conforme a la clasificación de instrumentos de pesaje de funcionamiento no automático de clase III (Directiva 90 / 384 / CEE del Consejo) • Función de pesaje • Indicador de nivel y patas regulables • Activación: ON / OFF • Capacidad: 220 kg • Graduación: 100 g • Alimentación: 6 pilas AA / LR6 de 1,5 V o a través del adaptador de corriente de 9 V (500 mA) (adaptador no incluido) Vista frontal Pantalla ON/OFF Vista trasera Columna Placa Indicador de nivel Ruedas Adaptador de corriente CONTENIDO DE LA CAJA • 1 pantalla • 1 cable de conexión • 1 columna • 1 base con placa y patas regulables • 3 tornillos M5x15 • 6 tornillos M4x45 • 1 llave Allen M3.0 • 1 destornillador • Folleto y manual de montaje • Libreta metrológica 33 ES BÁSCULA ELECTRÓNICA PARA USO MÉDICO CLASSE III AFFICHEUR 2 3 Print/CE OFF 4 5 6 0 Tare/Height 3 7 Print/CE 8 9 Memory MODE HOLD OFF 6 3 0 Print/CE Tare/Height OFF 39 6 Print/CE Memory 10 62 9 1 4 1 2 403 MODE OFF HOLD Tare/Height 5 95 2 76 Memory 3 7 1 4 8 2 5 9 3 6 47 58 69 Memory Print/CE 0 - Escoger modo : BMI, BFA, MEM - Mantener peso OFF 80 MODE 9 Print/CE HOLD Print/CE Modo \ Mantener Talla 0 \ Peso\ Enter Tare/Height MODE HOLD 1 - Entrar en modo pesar - Apagar OFF 6 Print/CE Memory 3 Pesar \ Apagar - Entrar en modo Medir altura - Poner a cero en el modo peso - Confirmar ajustes en otro modo Tare/Height Memory Dígitos “0” a “9” MODE ( sobre elHOLD teclado )- - Introducir los dígitos Arriba \ Imprimir resultados \ Eliminar - Atrás - Imprimir resultados - Corregir Abajo \ Memoria - Siguiente - Configurar memoria - Capacidad memoria Tare/Height OFF MODE HOLD OFF Tare/Height 0 Memory MODE Tare/Height HOLD 7 8 9 Memory PROCEDIMIENTO MODE HOLD INSTALACIÓN Y CONEXIÓN DE LA PANTALLA 1. Introduzca el cable de conexión en la columna. Cable de conexión 34 Cabeza de la columna ES BÁSCULA ELECTRÓNICA PARA USO MÉDICO CLASSE III 2. Conecte el cable de conexión de la plataforma con el de la base de la columna y atorníllelo: compruebe el sentido de montaje de la columna. Hay una flecha en la columna que indica el extremo que debe insertarse en la plataforma. Cable de conexión Cable de la plataforma 3. Extienda el cable de conexión al máximo e inserte la columna en el lugar previsto a tal fin en la plataforma. Cable de conexión 4. Con ayuda de un destornillador, fije la columna a la plataforma atornillando suavemente los 4 tornillos M4x45 situados bajo la plataforma. 5. Conecte el cable superior de la columna con el de la pantalla y atorníllelo. 35 ES BÁSCULA ELECTRÓNICA PARA USO MÉDICO CLASSE III 6. Inserte la pantalla de visualización en la columna y fíjela con ayuda de 2 tornillos M5x15. 7. Ajuste el nivel (véase el apartado AJUSTE DEL NIVEL DE LA BÁSCULA). AJUSTE DEL NIVEL DE LA BÁSCULA • El nivel de la báscula deberá regularse antes de su primer uso o si se ha cambiado de sitio. 1. No se suba a la báscula ni elimine el peso de la placa. 2. Coloque la báscula sobre una superficie firme y plana. Ajuste las patas regulables para nivelar la báscula hasta que la burbuja del indicador de nivel se encuentre en el centro del círculo grabado. 3 ✗ USO DEL PRODUCTO INICIALIZACIÓN 1. Introduzca las 6 pilas AA en el compartimiento de las pilas de la plataforma respetando las polaridades, o bien enchufe el aparato a una toma eléctrica conectándolo a un adaptador de corriente. 2. Extraiga las pilas si no va a utilizar el aparato durante un periodo prolongado. 36 Compartimiento de las pilas FR ES BÁSCULA ELECTRÓNICA PARA USO MÉDICO CLASSE III 3. Cuando la báscula esté conectada a la corriente, deben aparecer en todo momento en la pantalla todas las cifras y la versión del software, como se muestra a continuación: WEIGHT HEIGHT BMI >0< NET STA HOLD Pantalla 1 CM % Pantalla 2 Kg lb A G E La báscula se apagará automáticamente después de dos segundos. FUNCIONAMIENTO Modo de pesaje 1. Pulse el botón ( /OFF) para conectar la báscula. Aparecerá la cifra 0 en la pantalla y después quedará fijo el mensaje «0.0kg». WEIGHT HEIGHT BMI >0< NET STA HOLD Pantalla 1 CM % Pantalla 2 Kg lb A G E Pantalla 3 Pantalla 4 2. Suba a la báscula mientras cuando aparezca el mensaje «0.0» y no se mueva mientras calcula su peso. El peso se muestra automáticamente: 3. Baje de la báscula; en la pantalla volverá a aparecer el mensaje «0.0kg». 4. Pulse el botón ( /OFF) para apagar inmediatamente la báscula o espere 10 segundos hasta que se apague automáticamente. 37 ES BÁSCULA ELECTRÓNICA PARA USO MÉDICO CLASSE III PESO CON FUNCIÓN IMC Y MEMORIA DE USUARIO 1. Pulse una vez el botón [MODE/HOLD], el símbolo «BMI» aparece en la pantalla de visualización después de dos pantallas de control: WEIGHT HEIGHT BMI >0< NET STA HOLD CM % Kg lb A G E Pantalla 1 Después pulse el botón [ Pantalla 2 Pantalla 3 / Tare Height] para confirmar la selección. 2. Espere a que aparezca «STEP» en la pantalla. 3. Suba a la báscula. Nota: si desea utilizar números de identificación para cada usuario, consulte el apartado de configuración. Si se activa el modo identificativo, en la pantalla aparece «- - - -». Escoja un número identificativo de 4 cifras y después pulse el botón [ / Tare Height] para confirmar. 4. La visualización de la altura parpadea en la pantalla. a- En los modelos sin medición electrónica: Introduzca la altura con las teclas numéricas. b- En los modelos con medición electrónica: • Compruebe que el medidor esté colocado en la posición inicial antes de medir la altura. Nota: si el medidor no está colocado en la posición inicial antes de su uso, en la pantalla LCD aparece «InIt». Coloque el medidor en la posición inicial. • Despliegue el medidor y ajústelo a la altura del sujeto. La altura aparece en la pantalla. El usuario también puede pulsar el botón [▲/Print-CE] para reemplazar los datos del medidor por otros con el teclado. c- Confirmación de la altura y el registro de los parámetros personales de un usuario: Si no desea memorizar los parámetros de un usuario: Confirme la altura inmediatamente pulsando el botón [ / Tare Height]. Si desea memorizar los parámetros personales de un usuario: 38 FR ES BÁSCULA ELECTRÓNICA PARA USO MÉDICO CLASSE III Antes de confirmar la altura, mantenga pulsado durante 3 segundos el botón [▼\ Memory], en la pantalla aparece «M-00». • Introduzca con el teclado el número de memoria escogido y confirme la selección pulsando [ / Tare Height] • Si el número elegido no contiene ningún registro anterior, en la pantalla aparecerá -----. Pulse el botón [ / Tare Height] para confirmar. • Si el número elegido para el registro de los parámetros ya se ha utilizado, en la pantalla aparecerá «USED». * Para sobreescribir en el registro anterior, pulse el botón [ / Tare Height], en la pantalla aparece «CLEAR». Pulse de nuevo el botón [ / Tare Height] para confirmar el número de registro y la altura. * Si no desea sobreescribir en el registro anterior, escoja otro número para memorizar los parámetros y pulse el botó [ / Tare Height]. En la pantalla aparece -----, pulse de nuevo el botón [ / Tare Height] para confirmar el número de registro y la altura. 5. Después de confirmar la altura, no se mueva y espere a que la báscula estabilice su peso. Aparece «STA». 6. La báscula muestra alternativamente la altura, el peso y el IMC. Cada dato permanece en la pantalla durante 4 segundos. Para acelerar la visualización, utilice el botón[▲] o [▼]. Pantalla 1 Pantalla 2 Pantalla 3 7. Para imprimir los resultados, mantenga pulsado durante 3 segundos el botón [▲/Print-CE]. Nota: si el usuario no pulsa ningún botón después de la visualización de los datos, el aparato sale del modo en curso. RECUPERACIÓN DE LOS REGISTROS DE LOS PARÁMETROS PERSONALES DE UN USUARIO 1) Pulse el botón [MODE/HOLD]. Aparecen dos pantallas de control seguidas de la pantalla BMI. 2) Pulse de nuevo el botón [MODE/HOLD], aparece en la pantalla «BFA»: 3) Después pulse una tercera vez el botón [MODE/HOLD], en la pantalla aparece «MEM»: 39 ES BÁSCULA ELECTRÓNICA PARA USO MÉDICO CLASSE III 4) Confirme la selección pulsando [ / Tare Height]. 5) Utilice los botones de flecha o los botones numéricos para elegir la memoria que quiere recuperar y confirme la selección pulsando el botón [ / Tare Height]. 6) Si se han introducido previamente, la identificación del usuario y la altura aparecen en la pantalla. Confirme de nuevo la selección de la memoria pulsando el botón [ / Tare Height]. 7) En la pantalla aparece «0» y después «0,0 kg». 8) Repita el punto 5 del apartado anterior: Confirmación de la altura y el registro de los parámetros personales de un usuario. RECUPERACIÓN DE LOS RESULTADOS DEL ÚLTIMO PESO REGISTRADO 1) Pulse el botón [▼\ Memory] para entrar en el modo de «recuperación de resultados». 2) Pulse los botones de flecha o los botones numéricos para seleccionar la memoria que quiere que aparezca en la pantalla. Confirme la selección pulsando el botón [ / Tare Height]. 3) Los valores aparecen en este orden: la identificación (si está disponible), la altura, el peso y el IMC. Si la memoria recuperada está vacía, en la pantalla aparece « - - - - ». 4) Para imprimir los resultados, mantenga pulsado durante 3 segundos la tecla [▲/Print-CE]. PESO CON FUNCIÓN DE MONITOR DE MASA CORPORAL Y CON MEMORIA DE USUARIO 1) Pulse una vez el botón [MODE/HOLD], el símbolo «BMI» aparece en la pantalla después de dos pantallas de control: WEIGHT HEIGHT BMI >0< NET STA HOLD CM % Kg lb A G E Pantalla 1 40 Pantalla 2 Pantalla 3 FR ES BÁSCULA ELECTRÓNICA PARA USO MÉDICO CLASSE III 2) Appuyer une deuxième fois sur la touche [MODE/HOLD], l’écran affiche : Después pulse el botón [ / Tare Height] para confirmar la selección. 3) Espere a que en la pantalla de la báscula aparezca «STEP». 4) Suba a la báscula con los pies descalzos. Nota: Si desea utilizar números de identificación para cada usuario, consulte el apartado de configuración. Si se ha activado el modo de identificación, en la pantalla aparece « - - - - ». Escoja un número de identificación de 4 cifras y después pulse el botón [ / Tare Height] para confirmar. 5) Introduzca sus parámetros personales. Al principio, en la pantalla aparece: «AGE» (edad) Introduzca su edad y confirme pulsando el botón [ / Tare Height] A G E 6) A continuación, en la pantalla aparece: A G E A G E Seleccione el sexo del usuario con las flechas y confirme pulsando el botón [ / Tare Height] 7) Por último, en la pantalla aparece: A G E Seleccione el modo de usuario con las flechas: N= no atleta - A= atleta. Confirme pulsando el botón [ / Tare Height] A G E 8) Introduzca o mida su altura a- En los modelos sin medición electrónica: Introduzca la altura con las teclas numéricas. 41 ES BÁSCULA ELECTRÓNICA PARA USO MÉDICO CLASSE III b- En los modelos con medición electrónica: • Compruebe que el medidor esté colocado en la posición inicial antes de medir la altura. Nota: si el medidor no está colocado en la posición inicial antes de su uso, en la pantalla LCD aparece «InIt». Coloque el medidor en la posición inicial. • Despliegue el medidor y ajústelo a la altura del sujeto. La altura aparece en la pantalla. El usuario también puede pulsar el botón [▲/Print-CE] para reemplazar los datos de la pantalla por otros con el teclado. c- Confirmación de la altura y el registro de los parámetros personales de un usuario: Si no desea memorizar los parámetros de un usuario: Confirme la altura inmediatamente pulsando el botón [ / Tare Height]. Si desea memorizar los parámetros personales de un usuario: Antes de confirmar la altura, mantenga pulsado durante 3 segundos el botón [▼\ Memory], en la pantalla aparece «M-00». • Introduzca con el teclado el número de memoria escogido y confirme la selección pulsando [ / Tare Height] • Si el número elegido no contiene ningún registro anterior, en la pantalla aparecerá «-----». Pulse el botón [ / Tare Height] para confirmar. • Si el número elegido para el registro de los parámetros ya se ha utilizado, en la pantalla aparecerá «USED». * Para sobreescribir en el registro anterior, pulse el botón [ / Tare Height], en la pantalla aparece «CLEAR», pulse de nuevo el botón [ / Tare Height] para confirmar el número de registro y la altura. * Si no desea sobreescribir en el registro anterior, escoja otro número para memorizar los parámetros, después pulse el botón [ / Tare Height], en la pantalla aparece «-----». Pulse de nuevo el botón [ / Tare Height] para confirmar el número de registro y la altura. 9) Después de confirmar la altura, no se mueva y espere a que la báscula estabilice el peso. Aparece «STA». 10) Permanezca sin moverse en la báscula, el cálculo de la masa grasa está en curso y en la pantalla aparece: 11) Aparece una primera pantalla con la recuperación de los parámetros personales: A G E 42 FR ES BÁSCULA ELECTRÓNICA PARA USO MÉDICO CLASSE III 12) A continuación, se muestran los resultados. Cada dato permanece en la pantalla durante 4 segundos. Para acelerar la visualización, utilice el botón [▲] o [▼]. - Pantalla 1: Peso A G E - Pantalla 2: Porcentaje de masa grasa A G E - Pantalla 3: Masa grasa A G E - Pantalla 4: Masa magra A G E - Pantalla 5: Porcentaje HÍDRICO A G E - Pantalla 6: Masa muscular A G E - Pantalla 7: Masa ósea A G E 13) Para imprimir los resultados, mantenga pulsado durante 3 segundos el botón [▲/Print-CE]. Nota: Si el usuario no pulsa ningún botón después de la visualización de los datos, el aparato saldrá del modo en curso. 43 ES BÁSCULA ELECTRÓNICA PARA USO MÉDICO CLASSE III Recuperación de los registros de los parámetros personales de un usuario 1) Pulse el botón [MODE/HOLD]. Aparecen dos pantallas de control seguidas de la pantalla BMI. 2) Pulse de nuevo el botón [MODE/HOLD], aparece la pantalla BFA. 3) Pulse por tercer vez el botón [MODE/HOLD], aparece la pantalla MEM. Consulte el apartado anterior: confirmación de la altura y el registro de los parámetros personales de un usuario. Recuperación de los resultados del último peso registrado 1) Pulse el botón [▼\ Memory] para entrar en el modo de recuperación de resultados. 2) Pulse los botones de flecha o los botones numéricos para seleccionar la memoria que quiere que aparezca en la pantalla. Confirme la selección pulsando el botón.[ / Tare Height]. 3) L os valores aparecen en este orden: la identificación (si está disponible), la altura, el peso, la edad, el sexo y el modo. 4) A continuación, se muestran los resultados. Si la memoria recuperada está vacía, en la pantalla LCD aparece «-----». 5) Para imprimir los resultados, mantenga pulsado durante 3 segundos el botón [▲/Print-CE]. MODO DE CONFIGURACIÓN DESACTIVACIÓN del modo IMPRESIÓN En la configuración original, el modo de impresión está activado, si desea desactivarlo: • Mantenga pulsado el botón [MODE] durante más de 10 segundos para acceder al modo de configuración. • Después de la pantalla de control, en la pantalla aparece «Print». • P ulse el botón [▲] o [▼] para seleccionar «OFF» (desactivado) y después el botón [ / Tare Height] para confirmar. ACTIVACIÓN del modo IDENTIFICATIVO En la configuración original, el modo identificativo está desactivado, si desea activarlo: • Mantenga pulsado el botón [MODE] durante más de 10 segundos para acceder al modo de configuración. • Acceda a la configuración de la función «PRINT» pulsando el botón [ / Tare Height]. • En la pantalla aparece «Id no». Pulse el botón [▲] o [▼] para seleccionar «ON» y pulse el botón para confirmar. 44 ES BÁSCULA ELECTRÓNICA PARA USO MÉDICO CLASSE III PERSONALIZACIÓN de la visualización de los resultados del monitor de masa corporal (BFA) En la configuración original, en la pantalla aparecen los siguientes datos: masa grasa, masa hídrica, masa ósea y masa muscular. Puede escoger suprimir la visualización del algún dato en particular. • Mantenga pulsado el botón [MODE] durante más de 10 segundos para acceder al modo de configuración. • Acceda a la configuración de la función «PRINT» y «ID NO» pulsando el botón[ / Tare Height]. •D espués aparece en la pantalla «BFA». Para cada uno de los datos, utilice los botones [▲] o [▼] para seleccionar «ON» u «OFF» y así desactivar o activar su visualización. Confirme la selección pulsando el botón [ / Tare Height]. FORMAT D’IMPRESSION DE LA BALANCE IMC Identificación Edad: Sexo: Actividad Altura: Peso IMC RESULTADO DE LAS MEDICIONES Masa adiposa 0001 30 ans Masa adiposa Femme Masa magra Normale Masa hídrica 175,0 cm Masa ósea 68,0 kg Masa muscular 21,5 10 % 5,0 kg 60,0 kg 50 % 4,5 kg 20,5 kg PANTALLAS ESPECIALES Err0 Err1 Err2 Err3 Err4 Err5 bAtt Error de cero inicial. Baje de la báscula, espere a que en la pantalla aparezca «0.0» y vuelva a realizar la medición. Peso inestable: vuelva a pesarse. Sobrecarga: retire el peso inmediatamente. Impedancia corporal superior al límite (de 100 Ω a 1 kΩ): vuelva a realizar la medición. Si el «Err3» aparece muy a menudo, dependiendo de su tipo de piel (fina o gruesa), puede que sea necesario humedecer los pies para garantizar un contacto mejor con los electrodos. Porcentaje de grasa corporal superior al intervalo de 4 % a 50 %: vuelva a realizar la medición. Volumen de agua superior al habitual. Humedezca un poco sus pies y vuelva a comenzar. Cambie las pilas. AdErr Problema del aparato. Póngase en contacto con su distribuidor. EEP Problema del aparato. Póngase en contacto con su distribuidor. Ustb El cero no está fijo. Espere a que en la báscula aparezca «0.0» y vuelva a realizar la medición. 45 ES BÁSCULA ELECTRÓNICA PARA USO MÉDICO CLASSE III PROTECCIÓN DEL MEDIO AMBIENTE Deposite las pilas gastadas en los contenedores específicos, para que se puedan reciclar. No utilice diferentes tipos de pilas. No mezcle las pilas usadas con pilas nuevas. Cuando se agote la vida útil del aparato, deposítelo en un punto de recogida para el reciclaje de residuos de equipos eléctricos y electrónicos. GARANTÍA Este producto está garantizado frente a los defectos de materiales y de fabricación. Durante el periodo de garantía, este tipo de defectos se repararán gratuitamente (deberá presentar un comprobante de compra en caso de reclamación dentro del plazo de la garantía). La garantía no cubre los daños ocasionados de manera accidental, por un uso indebido o por negligencia. En caso de reclamación, diríjase al punto de venta donde lo haya comprado. SERVICIO POSVENTA Para cualquier servicio posventa, póngase en contacto con el servicio de atención al cliente de Terraillon en el 0826 88 1789 o en la dirección [email protected]. After Sales Service : Terraillon France & Headquarters 1 rue Ernest Gouin - CS 50001 - 78293 CROISSY-SUR-SEINE Cedex - France Service consommateurs : 0 826 88 1789 [email protected] - www.terraillon.com FOOK TIN TECHNOLOGIES LTD 4/F, Eastern Centre, 1065 King Road, HONG KONG www.fooktin.com.hk 46