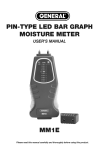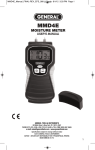
1
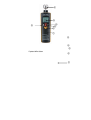
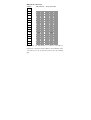
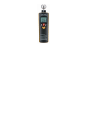
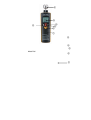
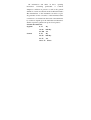
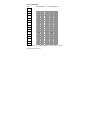
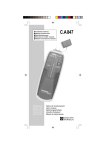
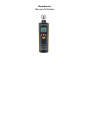
Humidimètre
Manuel d’utilisation
La méthode de mesure capacitive permet
de mesurer l'humidité du béton, du bois,
de la chape et de nombreux autres
matériaux sans les endommager ou les
détruire.
Caractéristiques techniques
Affiche rapidement la teneur en humidité des
matériaux.
Profondeur de pénétration env. 20-40mm.
Indicateur de décharge de batterie
Arrêt automatique
Fonction MAX/MIN
Fonction de mesure et de maintien
Ecran LCD avec rétro-éclairage blanc
Spécifications
Spécifications :
Type de capteur :
sphéroïde métallique
Gamme de mesure :
0 - 100
Résolution maximale :
1
Batterie :
Dimensions :
Poids :
Batterie 9V
180 mm×45mm×35mm
180g
Description de la face avant
①
③
②
④
⑤
⑥
⑦
③
④
⑤
Capteur/bille étalon
⑥
⑦
②Touche MAX/MIN
③Ecran LCD
④Touche d’alimentation
⑤Touche de rétro-éclairage
⑥Touche MEAS
⑦Couvercle du compartiment de batterie
Fonctions des touches
Touche d’alimentation
Met l’appareil sous ou hors tension.
Touche MEAS
L’appareil commence à mesurer dès que vous
appuyez sur la touche MEAS. Lorsque vous
relâchez la touche, l'icône d'affichage
« HOLD » apparaît sur l'écran LCD et la valeur
de mesure actuelle reste figée à l’écran.
Touche MAX/MIN
Pendant l’exécution des mesures, appuyez sur la
touche MAX/MIN. L’icône 'MAX' apparaît alors sur
l'écran LCD. L’instrument de mesure commence à
mesurer la valeur maximale. Lorsque vous appuyez
une nouvelle fois sur cette même touche, l'icône ‘MIN’
apparaît sur l'écran LCD et l’appareil commence à
mesurer la valeur minimale. Appuyez sur la touche
MAX/MIN pendant deux secondes pour quitter ce
mode.
Touche de rétro-éclairage
Active ou désactive le rétro-éclairage.
Utilisation
Tenez l'appareil de manière à ce que vos mains ne soient
pas à proximité de la sonde de mesure circulaire.
Appuyez sur la touche « MESA » et maintenez la bille
sur la surface à mesurer. La bille et la surface de mesure
doivent se toucher. Veuillez toujours mesurer
perpendiculairement à la surface et éviter les bordures
(angles).
La présence de métal dans les matériaux de construction
peut entraîner des mesures inexactes. Les informations
suivantes sont données à titre indicatif. L'instrument est
un indicateur permettant une mesure rapide.
Matériaux de construction :
Plâtre
0..35
sec
36..60 demi-sec
61..100 humide
Ciment
0..25
sec
26..50 demi-sec
51..75 humide
au-dessus de 75 mouillé
Tableau de conversion
Affichage
Plâtre(minéral)
Chape Ciment Bois
15
20
10,00
25
12,00
30
0,25
15,00
35
0,30
2,50
17,00
40
0,40
2,65
20,00
45
0,65
2,85
50
1,00
3,20
55
1,40
3,55
60
1,70
4,00
65
1,90
4,30
70
2,05
4,70
75
2,20
5,10
80
2,35
5,45
85
2,50
5,75
90
2,65
6,10
Les données sont approximatives. Les données concernant les
matériaux de construction peuvent différer selon le fabricant. Celles
concernant le bois ont été obtenues grâce au bois de chauffage
(pin).
Remplacement de la batterie
Veuillez remplacer la batterie, lorsque l’icône „
”
apparaît sur l’écran LCD. Ouvrez le compartiment de la
batterie et remplacez la batterie faible par une neuve.
Moisture Meter
Instruction Manual
The NON-Contact Moisture Meter is an
electronic dampness indicator with a measuring process
working on the principle of high frequency measurement.
The instrument is used for non-destructively tracing
dampness in building materials of all kinds as well as for
detecting damp distribution in walls, ceilings and floors.
It is particularly suitable for pre-testing the readiness of
building materials for covering prior to CM
measurement.
Features
Quickly indicate the moisture content of
materials
Depth of penetration about 20-40mm.
Low battery indication
Auto Power Off
MAX/MIN Function
Measure and HOLD Function
White Backlit LCD Display
Specification
Specifications:
Sensor Type :
Max Resolution:
metal spheroid
0 to 100
1
Battery :
9V battery
Dimensions :
180 mm×45mm×35mm
Weight:
180g
Measuring Range:
Adjustment
The instrument is calibrated fully electronically and
readjustment is not necessary.
Safety remarks
These is a risk of injury if the metal ball comes into
contact with live parts. Do not use the instrument in the
immediate vicinity of older equipment or equipment
equally sensitive to high frequencies (e.g.functioning
medicinal equipment).Use the instrument only for
measuring the dampness in hardened building materials
by bringing the ball into contact with the surface.
Instrument Check
Hold the instrument as near to the back as possible. Press
the “MESA” button and hold the instrument with the ball
in the air. The displayed value must be between -5 and
+5.
Front Panel Description
①
③
②
④
⑤
⑥
⑦
③
④
⑤
Metal Ball
⑥
⑦
② MAX/MIN Button
③LCD Display
④Power ON/OFF Button
⑤Backlight Button
⑥MEAS Button
⑦Battery Cover
Button Function
Power Button
Turn the meter power ON or OFF.
MEAS Button
Press the MEAS button, the instrument will start
measuring. Release this button the “HOLD” icon will
appear on the LCD indicating that the current reading
is being held.
MAX/MIN Button
When taking measurements, press MAX/MIN Button,
the ‘MAX’ icon will appear on LCD display and the
meter will begin keeping track of MAX value. Press
the button again, ‘MIN’ icon will appear on LCD
display and the meter will begin keeping track of MIN
value. Press MAX/MIN button for two seconds to exit
this mode.
Backlight button
Turn the backlight on or off.
Operation
Hold the instrument as near to the back as possible.
Press the “MEAS” button and use the ball to scan the
surface under investigation. The ball must be in firm
contact with the material. To obtain the best results, the
instrument should be held at an angle of 90゜ to the
surface to be measured.
Note:
Do not take measurements on metallic linings!
In corners or recessed areas a distance of ca.8-10 cm
form the edge/recess must be maintained.
If there is any metal in substructure(constructional
steel,channels, pipes,plaster rails,etc.) and with normal
coverings, the display jumps to ca. 50 digits for
otherwise dry surroundings.
It is only possible to reach a conclusion about the
absolute dampness in wt-% or the dampness in CM-% if
the normal drying out process has taken place(e.g not
during or shortly after the use of drying agents or heat
guns). If there is not a roughly normal variation in
dampness between the surface and the interior ,too low a
measured value may be indicated.
The raw density of the material being measured has a
noticeable affect. Basically,the value displayed with dry
and damp building materials increases correspondingly
with increasing raw density.
The values given in the table below are indicative and
non-binding.Please bear in mind, when evaluating the
measured value displayed on the NON-Contact Moisture
Meter with respect to the material, that it is not a
dampness measurement qualified to VOB or the relevant
specialsit regulations.
All information and tables in these operating
instructions concerning permissible or common
dampness conditions in practice as well as the general
definition of terms are taken from the technical literature.
The manufacturer of the instrument can thus not give
any guarantee for the correctness of this information.The
conclusions to be drawn from the result of measurements
by each user depend upon the individual circumstances
and his experience gained from professional practice.
Construction material:
Gypsum
0..35
dry
36..60 half-dry
61..100 wet
Cement
0..25
dry
26..50 half-dry
51..75 wet
above 75 all wet
Converting table
LCD
Gypsum(mineral)
Screed/Cement Wood
15
20
10,00
25
12,00
30
0,25
15,00
35
0,30
2,50
17,00
40
0,40
2,65
20,00
45
0,65
2,85
50
1,00
3,20
55
1,40
3,55
60
1,70
4,00
65
1,90
4,30
70
2,05
4,70
75
2,20
5,10
80
2,35
5,45
85
2,50
5,75
90
2,65
6,10
This information is a roughly indication. For wood the results are
determinated by pine tree.
Battery replacement
If the icon “
” appears on the LCD display, it
indicates that the battery should be replaced. Open the
battery case and replace the exhausted battery with new
battery.