1
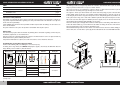
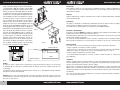
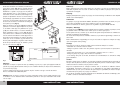
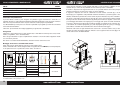
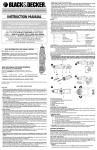
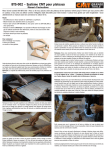
CMT333
Universal hinges boring system
Base por sistema de taladro manual de bisagras
Base modulaire pour têtes de perçage manuel
Base modulare per testine a foratura manuale
Modulbasis für Handbohrung-Köpfe
Instruction Manual
Manual de instrucciones
Manuel d’utilisation
Manuale di istruzioni
Gebrauchsanweisungen
EN
ES
FR
IT
DE
p. 2
p. 6
p. 10
p. 14
S. 18
INDEX, INTRODUCTION & ASSEMBLY OF THE SET
COMPONENT CHARACTERISTICS
INDEX
Introduction, General Notes & Set Assembly
Characteristics of the components
Installation & Use
PAGE
pag.1
pag.2
pag.3
Maintenance & Safety
pag.4
Information on this publication
This booklet is an integral part of the product. Carefully read the warnings and instructions it contains, as
they provide important indications regarding user safety and maintenance. This manual is used by users
under their own responsibility.
C.M.T. UTENSILI SpA cannot be held responsible or liable to prosecution for damage due to incorrect use
of the documentation.
Keep this manual in a safe place for any further consultation that may be required.
This drilling system was designed by CMT for all craftsmen and DIY buffs who require to drill holes for
hinges by various manufacturers in a precise reliable manner.
The system is made up of a multipurpose support to which a 3-arbor chuck head with a space between
holes that varies according to the type of hinge used can be fitted.
The support is made up of two chromed steel runner bars with springs (1) and a threaded bar (2) for
setting drilling depth. On the base, it is possible to adjust drilling distances; from the edge of the panel
to the hinge by means of the stop plate with pin and centre clamp knob (3) whereas, from the underside
of the panel to the hinge, this Is done with a Ø10mm cylindrical bar (not included) that is fitted in the
hole at the side of the base (4). In the bottom part of the support, there are two side holes for fitting the
support board (5) or mounting CMT worktables on the plates.
The head is made up of a shaft (6) with a diameter of 8mm (for use on all drills), which allows the rotation
of three bit holder arbors (7), each of which has two dowels for fitting the bits. The shaft and the arbors
have been burnished in order to avoid the formation of rust.
Two radial ball bearings have been fitted inside each arbor’s head to ensure the utmost drilling precision.
On the front, there is a hole with a sphere (8) for the lubrication of the head with Mobil SHC100.
General notes
This manual was prepared with the intention of providing all the indications regarding technical aspects,
installation, adjustment, use and maintenance.
Data and designs are provided for illustrative purposes. The manufacturer reserves the right to make any
modifications to the product without prior notice.
If any further information is required, out technical assistance service should be contacted.
6
Assembling the set according to the type of hinge
Thanks to the following table, assembling the set is extremely easy.
According to the hinge model, the CMT333 multipurpose support, chuck head, two blind hole bits and
hinge drill bit (code 317.350.11) must be ordered.
Make your set
Support modular base
Boring heads
Drill bits
8
Boring bit
1
2
6
48
7
=
+
+
+
3
CHOOSE YOUR HINGE
GRASS
42/11
BLUM
45/9,5
MEPLA
48/9
SALICE
48/6
HETICH, WURT 52/5,5
CODE
CMT333
CODE
CMT333-4211
CMT333-4595
CMT333-4809
CMT333-4806
CMT333-5255
CODE
CODE
4
5
310.080.12
317.350.11
310.100.12
N.B.: blind hold bits are sold individually, like all the other items, so when ordering, it is necessary to indicate a
quantity of two
2
www.cmtutensili.com
www.cmtutensili.com
3
INSTALLATION & DRILLING ADJUSTMENT
MAINTENANCE & SAFETY
H
According to the hinge model, install the relative chuck
head (Fig. 2) on the multipurpose support (Fig. 1) by
means of the two rear locking screws (1).
Position the drilling system on a work surface suited
to the type of machining. Procure a steel bar with a
diameter of Ø10mm and a length suited to the type of
machining to be carried out and fit it in the side hole
3
(2). Adjust the reference stop and lock everything with
the two clamp knobs (3) and fix one or more reference shims on the table according to the length of the
workpiece to be drilled (Fig. 4).
2
Set drilling distances (Fig. 3): From the panel’s edge
to the hinge (D) by means of the plate and centre
clamp knob (4) and the drilling depth (H) with the
Fig. 1
threaded bar and lock nut (5), then position the
workpiece to be drilled (Fig. 4). The bits suited to the
head chosen are then fitted to the three arbors: on
the centre arbor (6) fit and lock the Ø35mm bit for right hand hinges, whereas, on the two side arbors (7),
fit left-hand Ø8mm or Ø10mm bits for blind holes.
(according to the type of hinge), which are fixed with
the two dowels, (Fig. 2).
Dismantling
To change the head, the two rear screws must be removed and, due to the precise match and use, it may
be necessary to give a light knock with a plastic mallet on the top/front part of the support.
1
Cleaning
Periodically clean the drilling group of machining waste, using compressed air and a cloth with ethylic
alcohol.
5
Lubrication
The drilling groups are supplied already lubricated. During the first hours’ work, there may be a loss of
lubricant due to an excessive amount having been applied.
Every 200 machining hours, grease with 5 grams of “MOBIL SHC100” grease.
4
8
7
6
Fig. 2
STEEL BAR Ø10
D
CMT333
6
REFERENCE SHIMS
48
Fig. 3
Consignment / Unpacking
The support of the CMT333 head is supplied packed in a handy case, in which the head chosen and
three bits can also be placed.
When the product is received, check that the contents correspond exactly to the items ordered and that
nothing has been damaged during transport.
In the event of any obvious defects being noted, do not use the set, but immediately inform the manufacturer.
No lifting equipment is required for handling the set, as it is light-weight (<20 kg).
WORKPIECE
WORK SURFACE
Fig. 4
Use
Use is easy and rapid. Once the equipment is ready, all that has to be done is to fit the shaft of the drilling
system (8) to the arbor of a normal electric or battery-powered column drill and carry out the drilling.
Drilling speed depends on the work piece and the type of bit used.
Maximum rotation speed: 5000 rpm.
Storage
In the event of the product having to be stored, proceed as follows:
- Clean of any machining scrap.
- Protect ground parts with a coating of grease and/or liquids for protection against corrosion or rust.
- Store in a fresh dry location at a temperature of between -5° and 30° C.
- Protect the drilling group from dirt and dust.
- If stored for over six months, before use, it is advisable to replace the lubrication grease.
Safety
During machining, always use personal protection: hearing protection device, dust mask, protective goggles. Never wear loose garments, make certain sleeves are rolled up and do not wear ties.
Follow the regulations described here scrupulously. The manufacturer is exempt from all responsibility in
the event of failure to comply with instructions and indications. The system must not be used in any other
way than that for which it is intended. Cleaning, lubrication and maintenance work must never be carried
out on the system when the drilling group is running.
If unusual noise or vibrations are noted with the system is started, stop machining and contact our Technical Office.
N.B.: Before starting the drilling system, check that the tools are correctly tightened and direction of
machine rotation, to ensure that the tool turns in the correct drilling direction.
4
www.cmtutensili.com
www.cmtutensili.com
5
ÍNDICE, INTRODUCCIÓN Y MONTAJE DEL JUEGO
CARACTERÍSTICAS DE LOS COMPONENTES
ÍNDICE
Introducción, Notas generales y Montaje del Juego
Características de los componentes
Instalación y empleo
PÁGINA
pag.6
pag.7
pag.8
Mantenimiento y seguridad
pag.9
Información sobre la publicación
El presente manual forma parte integrante del producto. Lea con cuidado las advertencias y las instrucciones contenidas, ya que proporcionan indicaciones importantes sobre la seguridad de empleo y mantenimiento. El empleo de este manual por parte del usuario ocurre bajo su propia responsabilidad.
CMT UTENSILI SpA no puede ser considerada responsable o perseguible por daños causados por el
empleo incorrecto de la documentación.
Guarde este manual en un lugar apropiado para que pueda consultarse todas las veces que sea necesario.
Notas generales
El manual se ha realizado con el objeto de facilitar todas las indicaciones relativas al aspecto técnico, la
instalación, la regulación, el empleo y el mantenimiento.
Los datos y los dibujos se reflejan como ejemplos. El fabricante se reserva la facultad de realizar modificaciones sin ningún previo aviso.
En el caso de que necesitara más información, contacte con nuestro servicio de asistencia técnica.
Este sistema de taladrado ha sido estudiado por CMT para todos los artesanos y los hobistas que deseen
taladrar agujeros para bisagras de varios fabricante sin perjudicar precisión y fiabilidad.
El sistema está integrado por un soporte universal sobre el cual es posible montar una cabeza portabroca de 3 mandriles con distancia entre los ejes de los agujeros según el tipo de bisagra utilizada.
El soporte está integrado por 2 barras de deslizamiento de acero cromado con muelles (1) y una barra
roscada (2) para el ajuste de la profundidad de taladrado. Sobre la base es posible ajustar las distancias
de taladrado; del borde del panel a la bisagra mediante la placa de tope con perno y volante central
(2), mientras que la de la parte inferior del panel a la bisagra con una barra cilíndrica Ø10mm (no suministrada) que introducir en el agujero en el lado de la base (4). En la parte inferior del soporte hay 2
agujeros laterales para el montaje de la tabla de soporte (5) o para la fijación sobre las placas de las
mesas de trabajo CMT.
La cabeza está integrada por un eje (6) con diámetro de 8 mm (para empleo con todos los taladros) que
permite la rotación de 3 mandriles portabroca (7), los cuales disponen cada uno de 2 tornillos sin cabeza para la fijación de las brocas. Ejes y mandriles se han bruñido para evitar que se forme herrumbre.
Dentro de la cabeza, sobre cada mandril, se han insertado 2 cojinetes radiales de bolas para conseguir
la máxima precisión de taladrado. En la parte frontal hay un agujero con bola (8) para la lubricación de
la cabeza con Mobil SHC100.
6
Montaje del Juego según el modelo de la bisagra
Gracias a la tabla siguiente, podrá montar su juego de forma muy simple.
Según el modelo de la bisagra, hay que pedir el soporte universal CMT333, la cabeza portabroca, las dos
brocas para agujero ciego y la broca para agujero de bisagra código 317.350.11.
Prepare el juego
Base soporte cabeza
Cabeza portabroca
8
Broca agujero ciego Broca agujero bisagra
1
2
6
48
7
=
+
+
+
3
ELIJA LA BISAGRA
GRASS
42/11
BLUM
45/9,5
MEPLA
48/9
SALICE
48/6
HETICH, WURT 52/5,5
CÓDIGO NO.
CMT333
CÓDIGO NO.
CMT333-4211
CMT333-4595
CMT333-4809
CMT333-4806
CMT333-5255
CÓDIGO NO.
CÓDIGO NO.
4
5
310.080.12
317.350.11
310.100.12
Nota: las brocas para agujero ciego se venden individualmente como todos los demás artículos, por lo tanto en el
momento del pedido es necesario indicar como cantidad un número de 2 piezas.
6
www.cmtutensili.com
www.cmtutensili.com
7
INSTALACIÓN REGULACIÓN TALADRADO
MANTENIMIENTO Y SEGURIDAD
H
Según el modelo de bisagra, instale la cabeza portabroca correspondiente (Fig. 2) al soporte universal (Fig.
1) utilizando los 2 tornillos de fijación posteriores (1).
Coloque el sistema de taladrado sobre una superficie
de trabajo adecuada para el tipo de trabajo. Procúrese
una barra de acero de Ø10mm con longitud adecuada
para el trabajo que realizar y la introduzca en el aguje3
ro lateral (2), ajuste el tope de referencia y bloquee
todo el conjunto con los dos volantes (3), fije sobre la
superficie uno o más elementos de espesor según la
longitud de la puerta que taladrar (Fig. 4). Ajuste las 2
distancias de taladrado (Fig. 3): del borde del panel a
la bisagra (D) mediante placa y volante central (4) y la
profundidad de taladrado (H) con la barra roscada y la
Fig. 1
tuerca de fijación (5), finalmente coloque en posición
la puerta que taladrar (Fig. 4). Luego, se tendrán que
montar en los 3 mandriles las brocas adecuadas para
la cabeza elegida: en el mandril central (6) hay que
introducir y fijar la broca para bisagras derechas de
Ø35mm, mientras que en los dos laterales (7) tienen
que montarse las brocas para agujeros ciegos izquierdos de Ø8mm ó Ø10mm, (según el tipo de bisagra)
que fijar con los 2 tornillos sin cabeza (Fig. 2).
Desmontaje
Para cambiar la cabeza es necesario quitar los 2 tornillos posteriores y, debido al acoplamiento preciso
y el empleo, podría ser necesario golpear ligeramente con un martillo de plástico sobre la parte superior/anterior del soporte.
1
5
Limpieza
Limpie periódicamente el grupo de taladrado de los residuos de trabajo utilizando aire comprimido o un
trapo con alcohol etílico.
Lubricación
Los grupos de taladrado de suministran ya lubricados. Durante las primeras horas de trabajo pueden
ocurrir pérdidas de lubricante debido a una cantidad excesiva del mismo.
Cada 200 horas de trabajo engrase con 5 gramos de grasa “MOBIL SHC100”.
4
8
7
6
Fig. 2
BARRA DE ACERO Ø10
D
CMT333
6
ELEMENTOS DE ESPESOR
48
Fig. 3
PUERTA
SUPERFICIE DE TRABAJO
Fig. 4
Empleo
El empleo es simple y rápido. Una vez preparado el equipo, tendrá sólo que aplicar el eje del sistema
de taladrado (8) en el mandril de un normal taladro de columna, eléctrico o de batería y proceder con
el taladrado.
La velocidad de avance durante el taladrado depende de pieza que se está trabajando y la broca utilizada.
Velocidad de rotación máx. 5000 rpm.
Atención: antes de poner en funcionamiento el sistema de taladrado, compruebe el apriete correcto de
las herramientas y el sentido de rotación que dar a la máquina para hacer que la herramienta gire en la
dirección de corte correcta.
8
Recepción / Desembalaje
El soporte de la cabeza CMT333 se suministra embalado en una cómoda y práctica maleta en la que es
posible poner tanto la cabeza elegida como las 3 brocas.
Al recibir la maleta, compruebe que el contenido corresponda con las especificaciones del pedido y que
no haya daños debidos al transporte.
En el caso de encontrar anomalías evidentes, no utilice el aparato y avise de inmediato al fabricante.
Para desplazar el aparato no se necesitan medios de elevación ya que el peso es reducido (<20 kg).
www.cmtutensili.com
Almacenamiento
En el caso de que sea necesario almacenar el producto, siga las indicaciones siguientes:
- Limpie el aparato de eventuales residuos de trabajo.
- Proteja las partes rectificadas con una película de grasa y/o líquidos protectivos anticorrosión.
- Almacene el equipo en un lugar fresco y seco y con temperaturas entre -5° y 30° C.
- Proteja el grupo de taladrado de suciedad y polvo.
- Si el almacenamiento dura más de seis meses, al volver a utilizar el aparato se aconseja sustituir la
grasa lubricante.
Seguridad
Durante el trabajo, utilice los medios personales de protección: dispositivo para la protección del oído,
máscara antipolvo, gafas de protección, no se ponga nunca indumentos flojos y asegúrese que las
mangas estén arremangadas o fijadas y no lleve corbata.
Siga de forma escrupulosa las normas indicadas arriba. El fabricante se exime de cualquier responsabilidad si no se respetaran las indicaciones. No utilice el aparato para empleos distintos del permitido. No limpie, lubrique o efectúe operaciones de mantenimiento cuando el grupo de taladrado esté
funcionando.
En el caso de oír un ruido anormal o vibraciones al arrancar el aparato, interrumpa el trabajo y contacte con nuestra Oficina Técnica.
www.cmtutensili.com
9
SOMMAIRE, INTRODUCTION ET MONTAGE DE L’APPAREILLAGE
CARACTÉRISTIQUES DES COMPOSANTS
SOMMAIRE
Introduction, Notes générales et Montage de l’Appareillage
Caractéristiques des composants
Installation et Utilisation
PAGE
pag.10
pag.11
pag.12
Entretien et Sécurité
pag.13
Informations sur la publication
Le présent livret fait partie intégrante du produit. Lire attentivement les avertissements et les instructions
qu’il contient, dans la mesure où ils fournissent des indications importantes sur la sécurité d’utilisation
et d’entretien. L’utilisation de ce manuel a lieu sous la responsabilité totale de l’utilisateur.
La société C.M.T. UTENSILI S.p.A. ne pourra pas être retenue responsable, ni être poursuivie pour les
dommages dus à une utilisation erronée de la documentation.
Conserver ce manuel dans un lieu approprié pour toute consultation ultérieure.
Remarque
Le manuel a été réalisé en vue de fournir toutes les indications concernant l’aspect technique, l’installation, le réglage, l’utilisation et l’entretien.
Les données et les schémas sont fournis purement à titre d’exemples. Le fabricant se réserve la faculté
d’apporter les modifications qu’il jugera utiles sans aucun préavis.
Au cas où vous auriez besoin d’informations complémentaires, n’hésitez pas à contacter notre service
d’assistance technique.
Ce système de perçage a été conçu par CMT pour tous les artisans et tous les bricoleurs qui désirent
réaliser des trous pour charnières des différents producteurs sans négliger la précision et la fiabilité.
Le système se compose d’un support universel sur lequel il est possible de monter une tête porte-mèche
à 3 broches avec écartement des trous en fonction du type de charnière utilisée.
Le support se compose de 2 barres de coulissement en acier chromées avec des ressorts (1) et d’une
barre filetée (2) pour le réglage de la profondeur du perçage. Sur la base, il est possible de régler les
distances de perçage ; du bord du panneau à la charnière, à travers la plaque de butée avec pivot et
volant central (3), tandis que celle de la partie inférieure, du panneau à la charnière, se règle avec une
barre cylindrique de Ø 10 mm (non incluse) à insérer sur le trou à côté de la base (4). Dans la partie
inférieure du support, il y a 2 trous latéraux pour le montage de la table de soutien (5) ou pour la fixation
sur les plaques des tables de travail CMT.
La tête se compose d’un arbre (6) de 8 mm de diamètre (pour l’utilisation sur toutes les perceuses) qui
permet de faire tourner trois broches porte-mèche (7) lesquelles disposent chacune de deux vis sans
tête pour la fixation des mèches. L’arbre et les broches ont été brunis pour empêcher la rouille de se
former.
À l’intérieur de la tête, sur chaque broche, l’on a inséré deux roulements à billes radiaux pour garantir
un perçage de la plus haute précision. Sur la partie frontale, l’on a exécuté un trou à sphère (8) pour la
lubrification de la tête avec le produit Mobil SHC100.
6
Montage de l’appareillage en fonction du modèle de la charnière
Grâce au tableau suivant, le montage de l’appareillage est extrêmement simple.
En fonction du modèle de la charnière, il faut commander le support universel CMT333, la tête portemèche, les deux mèches pour trou borgne et la mèche pour trou de charnière code 317.350.11.
Préparer
l’ensemble
Base de support
de la tête
Tête porte-mèche
Mèche pour
trou borgne
8
Mèche pour trou
de charnière
1
2
6
48
7
=
+
+
+
3
CHOISIR LA CHARNIÈRE
GRASS
42/11
BLUM
45/9,5
MEPLA
48/9
SALICE
48/6
HETICH, WURT 52/5,5
CODE N°
CMT333
CODE N°
CMT333-4211
CMT333-4595
CMT333-4809
CMT333-4806
CMT333-5255
CODE N°
CODE N°
4
5
310.080.12
317.350.11
310.100.12
Remarque: Les mèches pour trou borgne sont vendues séparément, comme tous les articles. Au moment de la commande, il est donc nécessaire d’indiquer comme quantité : 2 pièces.
10
www.cmtutensili.com
www.cmtutensili.com
11
INSTALLATION ET RÉGLAGE DU PERÇAGE
ENTRETIEN ET SÉCURITÉ
H
En fonction du modèle de la charnière, installer la tête
porte-mèche relative (Fig. 2) sur le support universel
(Fig. 1) à l’aide des deux vis de fixation arrière (1).
Positionner le système de perçage sur un piano de
travail approprié pour ce gente d’usinage. Se munir
d’une barre en acier de Ø 10 mm, d’une longueur appropriée à l’opération à effectuer et l’insérer dans le
3
trou latéral (2), régler la butée de référence et bloquer
le tout avec les deux volants (3), fixer sur le plan une
ou deux cales de référence en fonction de la longueur
de la porte à percer (Fig. 4).
2
Régler les distances de perçage (Fig. 3): du bord du
panneau à la charnière (D) au moyen de la plaque
et du volant central (4) et la profondeur de perçaFig. 1
ge (H) avec la barre filetée et l’écrou de fixation (5).
Enfin, positionner la porte à percer (Fig. 4). Par la
suite, monter sur les 3 broches les mèches adaptées
à la tête choisie. Sur la broche centrale (6), insérer et
fixer la mèche pour charnières de droite de Ø 35 mm,
tandis que sur les 2 latérales (7), l’on montera les
mèches pour trous borgnes de gauche de Ø 8 mm ou
Ø 10 mm (en fonction du type de charnière), à fixer
avec les 2 vis sans tête, (Fig. 2).
Démontage
Pour le changement de la tête, il faut enlever les 2 vis arrière et, à cause de l’accouplement précis et de
l’utilisation, il pourrait être nécessaire de donner un coup de maillet en plastique sur la partie supérieure/antérieure du support.
1
Nettoyage
Nettoyer périodiquement le groupe de perçage des résidus d’usinage en utilisant de l’air comprimé et un
chiffon et de l’alcool éthylique.
5
Lubrification
Les groupes de perçage sont fournis lubrifiés. Pendant les premières heures de marche, il se peut qu’il y
ait des fuites de lubrifiant à cause d’une quantité excessive de produit lubrifiant.
Toutes les 200 heures de marche, graisser avec 5 grammes de graisse MOBIL SHC100.
4
8
7
6
Fig. 2
BARRE EN ACIER Ø10
D
CMT333
6
CALES DE RÉFÉRENCE
48
Fig. 3
PORTE
Stockage
S’il s’avère nécessaire de stocker le produit, suivre la démarche indiquée ci-dessous:
- Élimination des éventuels résidus de travail.
- Protéger les parties rectifiées avec une pellicule de graisse et/ou des liquides de protection contre la
corrosion.
- Stocker dans un lieu frais et sec, à des températures comprises entre -5° et 30° C.
- Protéger le groupe de perçage contre la saleté et la poussière.
- Si le stockage dure plus de six mois, au moment de la réutilisation, il est conseillé de remplacer la
graisse lubrifiante.
PIANO DE TRAVAIL
Fig. 4
Utilisation
L’utilisation est simple et rapide. Une fois que l’outillage est prêt, il n’y a plus qu’à appliquer l’arbre du
système de perçage (8) sur la broche d’une perceuse à colonne normale, électrique ou à accumulateurs,
et à procéder au perçage.
La vitesse d’avancement du perçage dépend de la pièce à usiner et du type de la mèche utilisée.
Vitesse de rotation maxi: 5000 tours/min.
Attention: Avant de mettre le système de perçage en fonction, s’assurer que les outils sont bien serrés
et contrôler le sens de rotation à donner à la machine pour faire en sorte que l’outil tourne dans le bon
sens de coupe.
12
Réception / Déballage
Le support de la tête CMT333 est fourni emballé dans une mallette commode et pratique, sur laquelle il
est possible d’insérer aussi bien la tête choisie que les 3 mèches pour percer.
À la réception de la tête, s’assurer que le contenu correspond aux spécifications de commande et que le
transport n’a provoqué aucun dommage.
Au cas où l’on remarquerait des anomalies évidentes, ne pas utiliser l’appareillage et avertir le fabricant
sans retard.
Pour la manutention de l’appareillage, il n’est pas nécessaire de disposer de moyens de levage, parce
qu’il est d’un poids réduit (<20 kg).
www.cmtutensili.com
Sécurité
Pendant le travail, porter les moyens de protection personnels: Dispositif pour la protection de l’ouïe,
masque contre la poussière, lunettes de protection. Ne jamais porter de vêtements larges et veiller à bien
retrousser ou fixer les manches, Ne pas porter de cravate.
Respecter scrupuleusement les consignes résumées dans ce document. Le fabricant déclinera toute
responsabilité concernant le non-respect de ces indications. Ne pas utiliser l’appareillage pour une
utilisation autre que celle qui est consentie. Ne pas nettoyer, ne pas lubrifier, ni effectuer des opérations
d’entretien lorsque le groupe de perçage est en marche.
Au cas où l’on entendrait des bruits anormaux ou des vibrations au moment de l’allumage, interrompre
le travail et contacter notre Bureau Technique.
www.cmtutensili.com
13
INDICE, INTRODUZIONE & MONTAGGIO SET
CARATTERISTICHE DEI COMPONENTI
INDICE
Introduzione, Note generali & Montaggio del Set
PAGINA
pag.14
Caratteristiche dei componenti
Installazione & Utilizzo
Manutenzione & Sicurezza
pag.15
pag.16
pag.17
Informazioni sulla pubblicazione
Il presente libretto costituisce parte integrante del prodotto. Leggere attentamente le avvertenze e le
istruzioni contenute, in quanto forniscono importanti indicazioni riguardanti la sicurezza d’uso e manutenzione. L’uso di questo manuale avviene da parte dell’utente sotto la propria responsabilità.
La C.M.T. UTENSILI S.p.A. non può essere ritenuta responsabile o perseguibile per danni arrecati dall’uso
errato della documentazione.
Conservare questo manuale in un luogo appropriato per ogni ulteriore consultazione.
Note generali
Il manuale è stato realizzato con lo scopo di fornire tutte le indicazioni inerenti l’aspetto tecnico, l’installazione, la regolazione, l’uso e la manutenzione.
Dati e disegni sono forniti a scopo esemplificativo. Il costruttore si riserva la facoltà di apportare modifiche senza alcun preavviso.
Nel caso vi necessitano ulteriori informazioni, contattare la nostra assistenza tecnica.
Questo sistema di foratura è stato studiato dalla CMT per tutti gli artigiani e hobbisti che desiderano
realizzare fori per cerniere di vari produttori non trascurando precisione e affidabilità.
Il sistema è composto da un supporto universale su cui è possibile montare una testina portapunta a 3
mandrini con l’interasse dei fori in base al tipo di cerniera utilizzata.
Il supporto è composto da 2 barre di scorrimento in acciaio cromate con molle (1) e da una barra
filettata (2) per la regolazione della profondità di foratura. Sulla base si possono regolare le distanze di
foratura; dal bordo del pannello alla cerniera tramite la piastra di battuta con perno e volantino centrale
(3), mentre quella dalla parte inferiore del pannello alla cerniera con una barra cilindrica Ø10mm (non
inclusa) da inserire sul foro al lato della base (4). Nella parte inferiore del supporto ci sono 2 fori laterali
per il montaggio della tavola di sostegno (5) o per il fissaggio sulle piastre dei tavoli da lavoro CMT.
La testina è composta da un albero (6) del diametro di 8mm (per l’utilizzo su tutti i trapani) che permette la rotazione di 3 mandrini portapunta (7) i quali dispongono ognuno di 2 grani per il fissaggio delle
punte. Albero e mandrini sono stati bruniti onde evitare il formarsi della ruggine.
All’interno della testina su ogni mandrino sono stati inseriti 2 cuscinetti radiali a sfera per ottenere la
massima precisione di foratura. Sulla parte frontale è stato eseguito un foro con sfera (8) per la lubrificazione della testina con Mobil SHC100.
6
Montaggio del Set in base al modello della cerniera
Grazie alla seguente tabella, montare il vostro set sarà semplicissimo.
In base al modello della cerniera, bisogna ordinare il supporto universale CMT333, la testina portapunta,
le due punte foro cieco e la punta foro cerniera codice 317.350.11.
Modello cerniera
Supporto testina
Testina portapunta
Punta foro cieco
8
Punta foro cerniera
1
2
6
48
7
=
+
+
+
3
MARCA CERNIERA
GRASS
42/11
BLUM
45/9,5
MEPLA
48/9
SALICE
48/6
HETICH, WURT 52/5,5
CODICE
CMT333
CODICE
CMT333-4211
CMT333-4595
CMT333-4809
CMT333-4806
CMT333-5255
CODICE
CODICE
4
5
310.080.12
317.350.11
310.100.12
Note: le punte foro cieco vengono vendute singolarmente come tutti gli articoli pertanto al momento dell’ordine è
necessario indicare come quantità nr. 2 pz.
14
www.cmtutensili.com
www.cmtutensili.com
15
INSTALLAZIONE & REGOLAZIONE FORATURA
MANUTENZIONE & SICUREZZA
H
In base al modello della cerniera, installare la relativa testina portapunta (Fig. 2) al supporto universale
(Fig. 1) tramite le 2 viti di fissaggio posteriori (1).
Posizionare il sistema di foratura su un piano di lavoro
idoneo al tipo di lavorazione. Procuratevi una barra in
acciaio da Ø10mm con lunghezza adatta alla lavorazione da eseguire e inserirla nel foro laterale (2),
3
regolate la battuta di riferimento e bloccare il tutto
con i due volantini (3), fissate sul piano uno o più
spessori di riferimento in base alla lunghezza dell’anta da forare (Fig. 4).
2
Regolare le distanze di foratura (Fig. 3): dal bordo del
pannello alla cerniera (D) tramite piastra e volantino
centrale (4) e la profondità di foratura (H) con la barFig. 1
ra filettata e dado di fissaggio (5), infine posizionare
l’antina da forare (Fig. 4). Successivamente vanno
montate sui 3 mandrini le punte adatte alla testina
scelta: sul mandrino centrale (6) va inserita e fissata
la punta per cerniere destra da Ø35mm, mentre sui 2
laterali (7) vanno montate le punte per fori ciechi sinistre da Ø8mm o Ø10mm (in base al tipo di cerniera)
da fissare con i 2 grani, (Fig. 2).
Smontaggio
Per il cambio della testina occorre rimuovere le 2 viti posteriori e, causa il preciso accoppiamento e utilizzo, potrebbe essere necessario dare un colpetto con martello in plastica sulla parte superiore/anteriore
del supporto.
1
5
Pulizia
Pulire periodicamente il gruppo di foratura dai residui delle lavorazioni utilizzando aria compressa e un
panno con alcool etilico.
Lubrificazione
I gruppi di foratura sono forniti già lubrificati. Durante le prime ore di lavoro si possono verificare delle
perdite di lubrificante a causa di una quantità eccessiva.
Ogni 200 ore di lavorazione ingrassare con 5 grammi di grasso “MOBIL SHC100”.
4
8
7
6
Fig. 2
BARRA D’ACCIAIO Ø10
D
CMT333
6
SPESSORE
DI RIFERIMENTO
48
Fig. 3
ANTINA
PIANO DI LAVORO
Stoccaggio
Nel caso occorra immagazzinare il prodotto attenersi a quanto segue:
- Pulizia dagli eventuali residui di lavorazione.
- Proteggere le parti rettificate con pellicola di grasso e/o liquidi protettivi anticorrosione.
- Immagazzinare in luogo fresco e asciutto con temperature comprese fra -5° e 30° C.
- Proteggere il gruppo di foratura dallo sporco e dalla polvere.
- Se l’immagazzinamento si prolunga oltre i sei mesi, al riutilizzo è consigliata la sostituzione del grasso
lubrificante.
Fig. 4
Utilizzo
L’utilizzo risulta semplice e veloce. Una volta preparata l’attrezzatura non Vi resta che applicare l’albero
del sistema di foratura (8) al mandrino di un normale trapano a colonna, elettrico o a batteria e procedere con la foratura.
La velocità di avanzamento in foratura dipende dal pezzo in lavorazione e dal tipo di punta utilizzata.
Velocità di rotazione RPM max 5000.
Attenzione: prima di mettere in funzione il sistema di foratura, verificare il corretto serraggio degli utensili
e il senso rotazione da dare alla macchina per fare in modo che l’utensile giri nella direzione di taglio
corretta.
16
Ricevimento / Disimballo
Il supporto della testina CMT333 viene fornito imballato in una comoda e pratica valigetta su cui è possibile inserire sia la testina scelta che le 3 punte per forare.
Al ricevimento della stessa verificare che il contenuto corrisponda alle specifiche d’ordine e che non vi
siano stati danneggiamenti dovuti al trasporto.
Nel caso si riscontrino anomalie evidenti non utilizzare l’aggregato, ma avvertire immediatamente il costruttore.
Per la movimentazione dell’aggregato non sono richiesti mezzi di sollevamento perché di peso ridotto
(<20 kg).
www.cmtutensili.com
Sicurezza
Durante la lavorazione utilizzare i mezzi personali di protezione: dispositivo per la protezione dell’udito,
maschera antipolvere, occhiali protettivi, non indossare mai indumenti larghi e assicuratevi che le maniche siano rimboccate o fissate e che non indossiate cravatte.
Seguire scrupolosamente le norme qui riassunte. Il costruttore si esime da qualsiasi responsabilità riguardante il non rispetto delle indicazioni. Non utilizzare l’aggregato per un uso diverso dal consentito.
Non pulire, lubrificare o effettuare manutenzione quando il gruppo di foratura sia in funzione.
Nel caso all’avviamento si avverta una rumorosità anomala o vibrazioni, interrompere la lavorazione e
contattare il nostro Ufficio Tecnico.
www.cmtutensili.com
17
INHALT, EINLEITUNG & MONTAGEANLEITUNG DES BAUSATZES
MERKMALE DER KOMPONENTEN
INHALT
Einleitung, Allgemeines & Montageanleitung des Bausatzes
Merkmale der Komponenten
Installation & Benutzung
SEITE
pag.18
pag.19
pag.20
Wartung & Sicherheit
pag.21
Informationen zu diesem Handbuch
Dieses Handbuch ist ein wesentlicher Bestandteil des Produktes. Lesen Sie daher alle darin enthaltenen
Hinweise und Anleitungen aufmerksam durch, da sie wichtige Angaben zur Betriebs- und Wartungssicherheit enthalten. Die Verwendung dieses Handbuches seitens des Benutzers erfolgt auf dessen eigene
Verantwortlichkeit.
Die Firma C.M.T. UTENSILI S.p.A. kann nicht für auf die Benutzung dieser Unterlagen zurückzuführende
Schäden verantwortlich gemacht werden.
Bewahren Sie dieses Handbuch für die weitere zukünftige Verwendung an einem geeigneten Platz auf.
Allgemeines
Dieses Handbuch soll dem Benutzer alle technischen, installations-, einstellungs-, benutzungs- und wartungsrelevanten Informationen liefern.
Daten und Zeichnungen haben reinen Beispielcharakter und sind unverbindlich. Der Hersteller behält sich
das Recht vor, jederzeit ohne Vorankündigung Änderungen anzubringen.
Für zusätzliche Auskünfte steht Ihnen unser Kundendienst jederzeit gerne zur Verfügung.
Dieses Bohrsystem wurde von CMT für alle Handwerker und Heimwerker entworfen, die präzise und zuverlässige Bohrungen für Scharniere diverser Hersteller ausführen wollen.
Das System besteht aus einer Universalhalterung, auf der ein Werkzeugkopf mit 3 Spindeln mit dem dem
benutzten Scharniertyp entsprechenden Mittenabstand der Bohrungen montiert werden kann.
Die Halterung besteht aus 2 verchromten Stahlschienen mit Federn (1) und einer Gewindestange (2) für
die Einstellung der Bohrtiefe. Auf dem Unterbau können die Bohrabstände eingestellt werden: vom Rand
des Paneels zum Scharnier mit der Anschlagplatte mit Zapfen und Handrad (3), vom unteren Paneelrand
zum Scharnier mit einer zylindrischen Stange Ø10mm (nicht inkl.), die in dem Loch auf der Unterbauseite
(4) eingesteckt wird. Im unteren Teil der Halterung sind 2 seitliche Löcher für die Montage der Stützplatte
(5) oder zum Befestigen auf den Platten der CMT-Arbeitstische.
Der Kopf besteht aus einer Welle (6) mit 8 mm Durchmesser (kann auf allen Bohrern benutzt werden) für
die Drehung von 3 Spindeln (7) mit jeweils 2 Stiften für die Befestigung der Werkzeuge.
Welle und Spindeln sind brüniert und daher rostfrei.
Im Kopf wurden auf jeder Spindel 2 Radialkugellager eingesetzt, so dass eine maximale Bohrgenauigkeit
gegeben ist. Auf der Vorderseite befindet sich ein Loch mit Kugel (8) zum Schmieren des Kopfes mit Mobil
SHC100.
6
Montage des Bausatzes anhand des Scharnierbandmodells
Mit Hilfe der folgenden Tabelle wird die Montage Ihres Bausatzes kinderleicht sein.
Je nach Scharniermodell müssen Sie die Universalhalterung CMT333, den Werkzeugkopf, die zwei Blindlochbohrer und den Scharnierlochbohrer Code 317.350.11 bestellen.
Bausatz vorbereiten
Halterung f. Kopf
8
Bohrer für nicht
durchgehende Löcher Scharnierloch-bohrer
Werkzeugkopf
1
2
6
48
7
=
+
+
+
3
SCHARNIER AUSWÄHLEN
GRASS
42/11
BLUM
45/9,5
MEPLA
48/9
SALICE
48/6
HETICH, WURT 52/5,5
CODE NR.
CMT333
CODE NR.
CMT333-4211
CMT333-4595
CMT333-4809
CMT333-4806
CMT333-5255
CODE NR.
CODE NR.
4
5
310.080.12
317.350.11
310.100.12
Anmerkungen: Die Blindlochbohrer werden wie alle Artikel auch einzeln verkauft und daher ist bei der Bestellung die
Anzahl - also 2 Stück - anzugeben.
18
www.cmtutensili.com
www.cmtutensili.com
19
INSTALLATION & EINSTELLUNG DER BOHRUNG
WARTUNG & SICHERHEIT
H
Je nach Scharniermodell den entsprechenden Werkzeugkopf (Abb. 2) auf der Universalhalterung (Abb. 1)
mit den 2 hinteren Befestigungsschrauben (1) montieren. Das Bohrsystem auf einem für die Bearbeitung
geeigneten Arbeitstisch positionieren. Eine Stahlstange
mit Ø10mm und für die auszuführende Arbeit geeigneter Länge besorgen und in das seitliche Loch (2) stec3
ken, den Referenzanschlag einstellen und alles mit den
zwei Handrädern (3) blockieren, und auf dem Tisch ein
oder zwei Referenzunterlagen befestigen, je nach Länge
des anzubohrenden Werkstücks (Abb. 4).
2
Die Bohrabstände (Abb. 3) einstellen: vom Rand des
Paneels zum Scharnier (D) mit Platte und mittlerem
Handrad (4) und die Bohrtiefe (H) mit der GewindeFig. 1
stange und Befestigungsmutter (5) einstellen und zum
Schluss das anzubohrende Werkstück (Abb. 4) positionieren. Danach auf den 3 Spindeln die für den gewählten Kopf passenden Werkzeuge montieren: auf der
mittleren Spindel (6) das rechtsdrehende Werkzeug für
Scharniere Ø35mm, auf den 2 seitlichen Spindeln (7)
die linksdrehenden Werkzeuge für nicht durchgehende
Löcher Ø8mm oder Ø10mm (je nach Scharniertyp), die
mit den 2 Stiften festgestellt werden (Abb. 2).
Wechseln des Kopfes
Zum Wechseln des Kopfes die 2 hinteren Schrauben ausdrehen; durch die genaue Einpassung und Benutzung kann es vorkommen, dass man durch sanftes Klopfen mit einem Plastikhammer auf die Halterung
oben/vorne nachhelfen muss.
1
5
Reinigung
Das Bohraggregat regelmäßig mit Pressluft und einem mit Äthylalkohol angefeuchteten Tuch von Bearbeitungsrückständen säubern.
Schmierung
Die Bohraggregate werden bereits geschmiert geliefert. Während der ersten Arbeitsstunden kann unter
Umständen etwas überschüssiges Schmiermittel austreten.
Alle 200 Arbeitsstunden mit 5 g Fett “MOBIL SHC100” nachfetten.
4
8
7
6
Fig. 2
STAHLSTAB Ø10
D
CMT333
6
BEZUGSMESSPLÄTTCHEN
48
Fig. 3
Erhalt / Auspacken
Die Halterung des Kopfes CMT333 wird in einem praktischen Koffer geliefert, in dem auch der gewählte
Kopf und die 3 Bohrer Platz haben.
Bei Erhalt der Ware kontrollieren, ob alle bestellten Teile geliefert wurden und/oder Transportschäden
vorliegen und gegebenenfalls den Hersteller verständigen - das Aggregat auf keinen Fall benutzen.
Das Aggregat wiegt weniger als 20 kg, zum Transportieren ist also keine Hebemittel erforderlich.
Lagerung
Das Aggregat bei Bedarf wie folgt aufbewahren:
- Reinigen und von Bearbeitungsrückständen befreien.
- Die geschliffenen Teile mit einem Film Fett und/oder Rostschutzflüssigkeit behandeln.
- An einem kühlen, trockenen Platz bei -5°C bis +30°C lagern.
- Vor Schmutz und Staub schützen.
- Wird das Aggregat länger als sechs Monate gelagert, muss vor der neuerlichen Benutzung das Schmierfett ausgewechselt werden.
WERKSTÜCK
ARBEIT OBERFLÄCHE
Fig. 4
Benutzung
Die Benutzung ist einfach und schnell. Nach der Vorbereitung der Ausrüstung die Welle des Bohrsystems
(8) an die Spindel einer handelsüblichen mit Netzstrom oder Akku betriebenen Ständerbohrmaschine
anbringen und mit dem Bohren beginnen.
Die Vorschubgeschwindigkeit beim Bohren hängt vom Werkstück und dem Bohrer ab.
Die max. Drehzahl beträgt 5000 UpM.
Sicherheit
Beim Arbeiten eine PSA benutzen: Gehörschutz, Staubschutzmaske, Schutzbrille, keine weiten Kleidungsstücke, Manschetten zuknöpfen oder aufkrempeln, Krawatte ablegen.
Die in diesem Handbuch enthaltenen Hinweise und Anleitungen genau befolgen. Der Hersteller haftet
nicht für die Nichtbeachtung der Hinweise und Anleitungen. Das Aggregat nur seiner Zweckbestimmung
entsprechend benutzen. Reinigungs-, Schmier- und Wartungsarbeiten dürfen nur bei abgeschaltetem
Bohraggregat ausgeführt werden.
Sollten beim Einschalten verdächtige Geräusche oder Vibrationen bemerkt werden, das Aggregat sofort
ausschalten und den Kundendienst verständigen.
Achtung: Vor dem Einschalten des Bohrsystems kontrollieren, ob die Werkzeuge korrekt eingespannt
sind und die Maschine mit der richtigen Drehrichtung arbeitet, damit das Werkzeug auch in die richtige
Schneidrichtung dreht.
20
www.cmtutensili.com
www.cmtutensili.com
21
03.60.0259
© 2007 C.M.T UTENSILI S.P.A.
This document has been
sent for your personal
use only. All usage
and reproduction is
forbidden without written
permission from
C.M.T. UTENSILI S.P.A.
Este documento
ha sido realizado solo
para uso personal.
Se prohíbe todo tipo
de uso o reproducción
sin la autorización escrita
de C.M.T. UTENSILI S.P.A.
Document envoyé
seulement pour usage
personnel.
Toute utilisation
ou reproduction
est interdite sans
l‘autorisation écrite de
C.M.T. UTENSILI S.P.A.
Questo documento
è stato inviato solo
per uso personale.
Qualsiasi uso
o riproduzione è proibito
senza il permesso scritto
di C.M.T. UTENSILI S.P.A.
Dieses Dokument dient
nur dem persönlichen
Gebrauch. Jegliche Nutzung
oder Vervielfältigung ist
ohneschriftliche Erlaubnis
der Firma
C.M.T. UTENSILI S.P.A.
untersagt.
Printed in Italy
Impreso in Italia
Imprimé en Italie
Stampato in Italia
Gedruckt in Italien