1
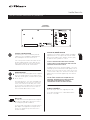
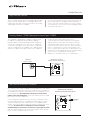
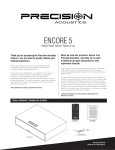
RAVE1
SOUND BAR
BARRE DE SON
Thank you for purchasing the Ultimate Sound Bar,
you are about to greatly enhance your listening
experience.
Merci de vous être procuré la Barre de Son de Ultimate,
vous êtes sur le point d’améliorer de façon extraordinaire
votre expérience d’écoute.
At Ultimate we strive to create loudspeakers and loudspeaker systems engineered to deliver the best value in
stereo and home theatre applications.
Chez Ultimate nous travaillons sans cesse à créer des haut-parleurs et des enceintes conçus pour offrir le meilleur rendement
possible pour les utilisations en stéréophonie et pour le cinéma
maison.
Ultimate loudspeakers are designed for ease of use,
installation, and will provide you with excellent sound
quality for years to come. Reading this manual will assist
you in getting acquainted with your Ultimate system.
Ultimate provides a 1 year parts and service warranty on
all drivers and amplifiers. To obtain servicing, please
contact your Ultimate representative. The original bill of
sale is required for service.
Les enceintes Ultimate sont conçues pour être faciles à utiliser
et à installer, de plus elles vous offriront une excellente qualité
sonore pendant de nombreuses années. La lecture de ce mode
d’emploi vous aidera à vous familiariser avec vos enceintes
Ultimate. Ultimate offre une garantie d’une (1) année sur les
pièces et sur le service pour tous les haut-parleurs et les
amplificateurs. Pour obtenir du service sous garantie, veuillez
communiquer avec votre représentant Ultimate. La facture
originale de l’achat doit être présentée pour obtenir du service.
Carton Contents / Contenu de la boite
3D
(1) Power Cord
(1) x cordon d’alimentation
(1) x Remote with battery
(1) x télécommande avec piles
(4) x Feet
(4) x pieds
(1) x RCA Cable
(1) x câble RCA stéréo
(1) x Manual
(1) x Manuel
(1) x Sound Bar RAVE1
(1) x Barre de Son RAVE1
Owners Manual
Manuel de l’Utilisateur
IMPORTANT SAFETY PRECAUTIONS
The exclamation point within an equilateral triangle is
intended to alert the user of the presence of important
operating and maintenance (servicing) instructions in the
literature accompanying the appliance.
TO PREVENT THE RISK OF ELECTRIC SHOCK, DO NOT REMOVE COVER (OR
BACK). NO USER SERVICABLE PARTS INSIDE. REFER SERVICING TO QUALIFIED
SERVICE PERSONNEL.
The lightning flash with arrowhead, within an equilateral
triangle, is intended to alert the user of the presence of
uninsulated "dangerous voltage" within the product's
enclosure that may be of sufficient magnitude to constitute a
risk of electric shock to persons.
1.
2
3.
4.
5.
Read Instructions - All the safety and operation instructions should be read before the sound bar is operated.
Reta Instructions - The safety and operating instructions should be kept for future reference.
Heed Warnings - All warnings on the sound bar and in these operating instructions should be followed.
Follow Instructions - All operating and other instructions should be followed.
Water and Moisture - The sound bar should not be used near water. For example, near a bathtub, washbowl, kitchen sink, laundry tub, in a wet
basement or near a swimming pool.
6. Ventilation - The Sound Bar should be situated so that its location or position does not interfere with its proper ventilation. For example, the system
should not be situated on a bed, sofa, rug or similar surface that may block airflow past the rear heat sinks; or placed in a built-in installation such
as a bookcase or cabinet that may impede the flow of air past the heat sinks.
7. Heat - The sound bar should be situated away from heat sources such as radiators, heaters, furnace outflow vents or other devices which produce
heat.
8. Power Sources - The Sound Bar should be connected to a power supply only of the type described in these operation instructions or as marked on
the Component.
9. Grounding or Polarization - The sound bar is equipped with a polarized alternating-current line plug (a plug having one blade wider than the other).
This plug will fit into the power outlet only one way. This is an intentional safety feature. If you are unable to insert the plug fully into the outlet, try
reversing the plug. If the plug should still fail to fit, contact an electrician to replace the obsolete (unpolarized) outlet. Do not defeat the safety
purpose of the polarized plug.
10. Power Cord Protection - Power supply cords should be routed so that they are not likely to be walked upon or pinched by items placed upon or
against them. Pay particular attention to cords at plugs, convenience receptacles, and the point where they exit the Sound Bar. To prevent electric
shock, do not use the sound bar polarized plug with an extension cord, receptacle or other outlet unless the blades can be fully inserted to prevent
blade exposure.
11. Non-use Periods - The power cord of the sound bar should be unplugged from the outlet when left unused for a long period of time.
12. Damage Requiring Service - The sound bar should be serviced only by qualified service personnel when:
A. Sound Bar power supply cord or the plug has been damaged; or
B. Objects have fallen or liquid has spilled into the sound bar; or
C. The sound bar has been exposed to rain; or
D. The sound bar does not appear to operate or exhibits a marked change in performance; or
E. The sound bar has been dropped or damaged.
13. Servicing - The user should not attempt to service the sound bar beyond those means described in this operating manual. All other servicing should
be referred to an authorized Service Center.
14. Cleaning - Unplug the sound bar from the wall outlet before cleaning. Do not use liquid cleaners or aerosol cleaners. Use a damp cloth for cleaning.
15. Attachments - Do not use attachments not recommended as they may cause hazards.
16. Accessories - Do not place the sound bar on an unstable cart, stand, tripod, bracket, or table. The sound bar may fall, causing serious injury to a
child or adult, and serious damage to the product. Use only with a cart, stand, tripod, bracket or table recommended by manufacturer, or sold with
the product. Any mounting of the sound bar should follow manufacturer's instructions, and should use a mounting accessory recommended by
manufacturer. An sound bar and cart combination should be moved with care. Quick stops, excessive force, and uneven surfaces may cause the
product and cart combination to overturn.
17. Lightning - For added protection for the sound bar during a lightning storm, or when it is left unattended and unused for long periods of time,
unplug it from the wall outlet.
18. Overloading - Do not overload wall outlets, extension cords, or integral convenience receptacles as this can result in a risk of fire or electric shock.
19. Safety Check - Upon completion of any service or repairs to this product, ask the service technician to perform safety checks to determine that the
product is in proper operating condition.
20. Servicing - Do not attempt to service the Sound Bar yourself as opening or removing covers may expose you to dangerous voltages or other hazards.
Refer all servicing to qualified service personnel.
21. Replacement Parts - When replacement parts are required, be sure the service technician has used replacement parts specified by manufacturer or
have the same characteristics as the original part. Unauthorized substitutions may result in fire, electric shock, or other hazards.
22. Wall or Ceiling Mounting - The product should be mounted to a wall or ceiling only as recommended by manufacturer.
23. Object and Liquid Entry - Never push objects of any kind into this product through openings, as they may touch dangerous voltage points or short-out
parts that could result in a fire or electric shock. Never spill liquid of any kind on the product.
WARNING - To reduce the risk of fire or electric shock, do not expose this appliance to rain or moisture.
IMPORTANTES MESURES DE SÉCURITÉ
Ce symbole de sécurité vise à avertir l’utilisateur que la
notice jointe à l’appareil contient des instructions
importantes au sujet du fonctionnement et de l’entretien
(réparation).
POUR PRÉVENIR LES RISQUES D’ÉLECTROCUTION, NE PAS OUVRIR LE BOÎTIER.
AUCUNE PIÈCE NE PEUT ÊTRE RÉPARÉE PAR L’UTILISATEUR. NE CONFIER
L’ENTRETIEN QU’À UN PERSONNEL QUALIFIÉ.
Ce symbole de sécurité vise à avertir l’utilisateurque le
boîtier contient un voltage dangereux non isolé,
suffisamment puissant pour constituer un risque
1. Lisez les instructions - Vous devez lire toutes les instructions relatives à la sécurité et au fonctionnement avant de faire fonctionner le hautparleur
d’extrêmes graves.
2. Conservez les instructions - Vous devez conserver les instructions relatives à la sécurité et au fonctionnement pour des consultations ultérieures.
3. Avertissement - Vous devez suivre tous les avertissements apposés sur le haut-parleur d’extrêmes graves et dans les instructions relatives àson
fonctionnement.
4. Suivez les instructions - Vous devez suivre toutes les instructions relatives au fonctionnement du haut-parleur.
5. Eau et humidité - Vous ne devez pas utiliser le haut-parleur d’extrêmes graves près d’une source d’eau. Par exemple, ne le placez pas à côté d’un
bain, d’un évier, d’un lavabo ou d’une cuvette, dans un sous-sol humide ou près d’une piscine.
6. Ventilation - Vous devez placer le haut-parleur d’extrêmes graves de manière à ce que sa position ne gêne pas son système d’aération. Par exemple,
ne le placez pas sur un lit, un fauteuil, un tapis ou une surface semblable qui pourrait bloquer l’écoulement d’air provenant du dissipateur thermique
arrière, ou dans un meuble tel une bibliothèque ou un module.
7. Chaleur - Vous devez éviter de placer le haut-parleur d’extrêmes graves près d’une source de chaleur tel un radiateur, une chaufferette, des
ouvertures d’aération ou tout autre appareil qui produit de la chaleur.
8. Sources d’alimentation - Vous devez raccorder le haut-parleur d’extrêmes graves à une source d’alimentation du type décrit dans ce manuel
d’instructions ou tel qu’indiqué sur le produit.
9. Mise à la terre ou polarisation - Ce haut-parleur d’extrêmes graves est muni d’une fiche de courant alternatif polarisée (une prise possédant une
lame plus large que l’autre). Cette fiche s’insère d’une seule façon dans la prise de courant. Il s’agit d’une mesure de sécurité volontaire. Si vous
électricien pour faire remplacer la prise obsolète (non polarisée). Ne retirez pas l’élément de sécurité de la prise polarisée.
10. Protection du cordon d’alimentation - Vous devez placer le cordon d’alimentation de manière à ce qu’il ne soit pas écrasé ou coincé par d’autres éléments.
Portez une attention particulière aux cordons raccordés à une prise, à une prise de courant de service ainsi qu’à son point de sortie du haut-parleur
d’extrêmes graves. Pour prévenir les électrocutions, n’utilisez pas la prise polarisée du haut-parleur avec une ral longe, une prise ou toute autre sortie de
courant, sauf si les lames peuvent être entièrement insérées sans laisser aucune partie à découvert.
11. Période de non utilisation - Vous devez débrancher de la prise le cordon d’alimentation du haut-parleur si vous ne l’utilisez pas pendant une longue période.
12. Dommages nécessitant une réparation - Vous devez faire réparer le haut-parleur par un professionnel lorsque :
A. le cordon d’alimentation ou la prise du haut-parleur a été endommagé;
B. un objet ou un liquide est tombé sur le haut-parleur;
C. le haut-parleur a été exposé à la pluie;
D. le haut-parleur ne semble pas fonctionner ou que son rendement est altéré;
E. le haut-parleur a été échappé ou endommagé.
13. Réparation - L’utilisateur ne devrait pas essayer de réparer le haut-parleur lui-même, sauf dans les situations décrites dans ce manuel d’utilisation. Toute
autre réparation devrait être confiée à un centre de réparation autorisé.
14. Nettoyage - Débranchez le haut-parleur de la prise de courant murale avant de le nettoyer. N’utilisez pas de nettoyants liquides ou de nettoyants en aérosol.
Nettoyez-le avec un chiffon humide.
15. Accessoires - N’utilisez pas des accessoires qui ne sont pas recommandés pour ce produit, car il pourraient devenir une source de danger.
16. Support - Ne placez pas le haut-parleur sur un chariot, un support, un trépied, une tablette ou une table instable. Le haut-parleur pourrait tomber et causer
des blessures graves à un enfant ou à un adulte, et endommager considérablement le produit. N’utilisez qu’un chariot, un support, un trépied, une tablette ou
une table recommandé par le fabricant ou vendu avec le produit. Toute installation du haut-parleur devrait se faire conformément aux directives du fabricant,
et avec un support recommandé par le fabricant. Si vous placez le haut-parleur sur un chariot, déplacez-le avec soin. Des arrêts brusques, une force excessive
et des surfaces inégales pourraient faire basculer le chariot et le haut-parleur.
17. Orage - Pour une protection additionnelle du haut-parleur durant un orage ou lorsque vous ne l’utilisez pendant une longue période, débranchez-le de la
prise de courant murale.
18. Surcharge - Ne surchargez pas les prises murales, les cordons d’alimentation ou les prises de courant de service intégrales, car ceci pourrait entraîner des
risques d’incendie ou d’électrocution.
19. Vérification de sécurité - Après avoir fait réparer ce produit, demandez à un technicien d’effectuer des vérifications de sécurité pour déterminer si le produit
est en bonne condition de fonctionnement.
20. Réparation - N’essayez pas de réparer vous-même le haut-parleur, car le fait d’ouvrir ou de retirer le couvercle pourrait vous exposer à un voltage dangereux
ou à d’autres dangers. Confiez toute réparation du produit à un professionnel.
21. Pièces de rechange - Si vous devez remplacer une pièce, assurez-vous que le technicien utilise une pièce de rechange précisée par le fabricant ou que cette
pièce comporte les mêmes caractéristiques que la pièce originale. Des pièces de rechange non autorisées peuvent entraîner un incendie, une électrocution ou
d’autres dangers.
22. Installation sur un mur ou au plafond - Ce produit peut-être installé sur un mur ou sur un plafond en suivant les recommandations du fabricant seulement.
23. Infiltration d’un objet ou d’un liquide - N’insérez jamais un objet par les ouvertures de ce produit, car il pourrait toucher des points de voltage dangereux ou
provoquer un court-circuit et ainsi entraîner un incendie ou une électrocution. Ne renversez jamais un liquide sur ce haut-parleur.
AVERTISSEMENT - Pour réduire les risques d’incendie ou d’électrocution, n’exposez pas cet appareil à la pluie ou à l’humidité.
Sound Bar / Barre de Son
Warning / Avertissement
FCC Warnings
1) The user that changes or modifications not expressly approved by the party responsible for compliance could void the
user’s authority to operate the equipment.
2)
This equipment has been tested and found to comply with the limits for a Class B digital device
IC Warnings
a.
"Under Industry Canada regulations, this radio transmitter may only operate using an antenna of a type and maximum (or lesser) gain
approved for the transmitter by Industry Canada. To reduce potential radio interference to other users, the antenna type and its gain
should be sochosen that the equivalent isotropically radiated power (e.i.r.p.) is not more than that necessary for successful
communication."
"Conformément à la réglementation d'Industrie Canada, le présent émetteur radio peut fonctionner avec une antenne d'un type et d'un
gain maximal (ou inférieur) approuvé pour l'émetteur par Industrie Canada. Dans le but de réduire les risques de brouillage
radioélectrique à l'intention des autres utilisateurs, il faut choisir le type d'antenne et son gain de sorte que la puissance isotrope
rayonnée équivalente (p.i.r.e.) ne dépasse pas l'intensité nécessaire à l'établissement d'une communication satisfaisante."
b.
"This device complies with Industry Canada licence-exempt RSS standard(s).
Operation is subject to the following two conditions:
(1) this device may not cause interference, and
(2) this device must accept any interference, including interference that may cause undesired operation of the device."
"Le présent appareil est conforme aux CNR d'Industrie Canada applicables aux appareils radio exempts de licence. L'exploitation est
autorisée aux deux conditions suivantes :
(1) l'appareil ne doit pas produire de brouillage, et
(2) l'utilisateur de l'appareil doit accepter tout brouillage radioélectrique subi, même si le brouillage est susceptible d'en
compromettre le fonctionnement."
IMPORTANT NOTE: Radiation Exposure Statement:
This equipment complies with IC radiation exposure limits set forth for an uncontrolled environment. This equipment should be installed and
operated with minimum distance 20cm between the radiator & your body.
Déclaration d'exposition aux radiations:
Cet équipement est conforme aux limites d'exposition aux rayonnements IC établies pour un environnement non contrôlé. Cet équipement
doit être installé et utilisé avec un minimum de 20 cm de distance entre la source de rayonnement et votre corps.
Sound Bar / Barre de Son
Rear Panel Connections / Branchements sur le panneau arrièreections
Sound Bar
Barre de Son
SUB OUT / SORTIE CAISSON
OPTICAL IN / ENTRÉE OPTIQUE
This allows you to connect a Ultimate powered
subwoofer to your Sound Bar to add thunderous
bass and improve the home theater effect.
Sometimes referred to as Toslink or SPDIF, this digital
input allows the use of an optical wire from the sound
bar to your TV, audio system, cable box, satellite, game,
or whatever device you’d like to connect.
Cette sortie permet le branchement d’un caisson
de grave amplifié Ultimate à votre Barre de Son
pour y ajouter du grave retentissant et améliorer
substantiellement l’effet de cinéma maison.
OPTICAL CABLE NOT INCLUDED IN THIS PACKAGE,
PLEASE CONSULT YOUR DEALER FOR ADVICE ON THE
PURCHASE OF AN OPTICAL CABLE.
ANALOG AUDIO IN
You can connect this analog input with the supplied
wire to the analog output of your TV, audio system,
cable box, satellite, game, or whatever device you’d
like to connect.
Vous pouvez brancher cette entrée analogique à la
sortie analogique de votre téléviseur, votre chaine
stéréo, votre convertisseur de câble, votre convertisseur satellite, votre appareil de jeu ou tout autre
appareil que vous aimeriez relier à l’enceinte en
vous servant du câble fourni à cet effet.
On l’appelle aussi l’entrée Toslink ou S/PDIF, cette entrée
numérique permet l’utilisation d’un câble optique entre la
barre de son et votre téléviseur, votre chaine stéréo, votre
convertisseur de câble, votre convertisseur satellite, votre
appareil de jeu ou tout autre appareil que vous aimeriez
brancher.
AUCUN CÂBLE OPTIQUE N’EST FOURNI AVEC CET
ENSEMBLE, INFORMEZ-VOUS AUPRÈS DE VOTRE
MARCHAND POUR OBTENIR DES CONSEILS
CONCERNANT L’ACHAT D’UN CÂBLE OPTIQUE.
DC INPUT / ENTRÉE CC
This is where you connect the supplied power cord.
C’est ici que vous branchez le cordon d’alimentation
inclus avec l’ensemble.
Wall / Table
The table/wall switch will adjust the bass output to
best match its application or placement. Choose
the setting that you find sounds best.
Le fonction table / mur régler le niveau des basses
pour adapter à son application ou de placement.
Choisissez le paramètre que vous trouverez les
meilleurs résultats.
Sound Bar / Barre de Son
Using the Remote and sound bar functions
Utilisation de la télécommande et fonctions de la barre de sonctions
3D
Use this button to turn the Sound Bar on and off. When
off, a red light will be displayed on the Sound Bar. When
on, a green light will be displayed on the Sound Bar. /
Utilisez cette touche pour mettre en marche ou à l’arrêt
la Barre de Son. À l’arrêt, un témoin rouge sera visible
sur la Barre de Son. En marche, un témoin vert sera
visible sur la Barre de Son.
This button allows you to toggle through the inputs.
When you have selected the analog RCA input designated as Line 1, the display light will be blue. When
you have selected the digital Optical input designated
as Line 2, the display light will be white. Remember,
this input can provide better quality of sound but you
must purchase an optical wire at your local dealer to
use this input. / Cette touche vous permet de passer
d’une entrée à l’autre. Si vous avez sélectionné l’entrée analogique RCA désignée comme étant l’entrée
de Ligne 1, le témoin d’affichage sera bleu. Si vous
avez sélectionné l’entrée numérique optique désignée
comme étant l’entrée de Ligne 2, le témoin d’affichage sera blanc. Retenez bien ceci, cette entrée
peut offrir une bien meilleure qualité sonore mais
vous devez vous procurer un câble optique chez votre
marchand local afin de pouvoir l’utiliser.
Pressing this button makes the volume lower. The green
display light will blink when this function is being used. /
Appuyez sur cette touche pour diminuer le volume. Le
témoin vert sur l’enceinte clignotera lorsque cette
fonction sera utilisée.
Pressing this button makes the volume louder. The green
display light will blink when this function is being used. /
Appuyez sur cette touche pour augmenter le volume. Le
témoin vert sur l’enceinte clignotera lorsque cette
fonction sera utilisée.
Pressing this button will mute, or completely reduce, the
volume. Pressing it again will return the volume level to
the last volume level played. / Appuyez sur cette touche
pour mettre l’enceinte en sourdine ou réduire à zéro le
volume. Appuyez de nouveau pour remettre le volume
sonore au même niveau que précédemment.
3D
This button will create a home theater effect to the
sound. / Ce bouton créera un effet de cinéma maison
au son.
Sound Bar / Barre de Son
Connecting your TV / Branchement de votre téléviseur
Option 1: The Popular Analog Connection
Make sure all components are off before starting the
connections. Using the supplied stereo audio cable, connect the
sound bar’s Line 1 (analog) input to your TV’s stereo audio
output. If your TV has two sets of audio outputs labeled as Fixed
and variable, use the pair labeled fixed. This will let you turn
your TV’s speakers down while the TV still supplies a constant
audio signal to the sound bar. Then, connect your source
(Satellite, DVD, etc) using the remaining Optical input.
TV
Option 1: Le branchement analogique, le plus
fréquemment utilisé
Assurez-vous que toutes les composantes soient hors tension
avant de commencer les branchements. En vous servant du câble
stéréo inclus avec l’ensemble, reliez l’entrée de Ligne 1
(analogique) de la barre de son à la sortie de son stéréo de votre
téléviseur. Si votre téléviseur possède deux jeux de sorties audio
étiquetées Fixe et Variable, utilisez la paire Fixe. Ceci vous
permettra de réduire le niveau sonore des haut-parleurs du
téléviseur à zéro tandis que celui-ci envoie toujours un signal
audio à volume constant à la barre de son. Ensuite, branchez
votre source (satellite, DVD, etc.) en vous servant de l’entrée
optique restante.
Back Panel of Sound Bar
Panneau arrière de la barre de son
OPTICAL
AUDIO OUT
( Satellite, DVD, etc. )
OPTICAL
Option 2: The One Wire Digital Connection
Option 2: Le branchement numérique avec un seul câble
Make sure all components are off before starting the connections. If your TV has an Optical Out, and all your sources (bluray, satellite, game, etc.) are currently connected to the TV
using digital cables (such as HDMI, Optical, or Digital Coaxial)
then follow the simple guidelines below. You will need an optical cable, not included but available at your local Ultimate
dealer.
Assurez-vous que toutes les composantes soient hors tension avant
de commencer les branchements. Si vous téléviseur dispose d’une
sortie optique et que toutes vos sources (Blu-Ray, satellite, jeux,
etc.) sont actuellement branchées au téléviseur avec des câbles
dits numériques (tel un câble HDMI, câble optique ou coaxial
numérique) suivez à ce moment les étapes simple du petit guide
ci-dessous. Vous aurez besoin de vous procurer un câble optique
non inclus avec l’ensemble mais disponible chez votre marchand
local Ultimate.
NOTE: If your DVD player, cable tuner or satellite tuner does not have a
coaxial digital output, you can connect its analog audio output to your TV.
The TV will send its audio signal to the sound bar through the analog
connection described above.
Back Panel of Sound Bar
Panneau arrière de la barre de son
TV
OPTICAL
AUDIO IN
( Satellite, BluRay, etc. )
AUDIO OUT
Sound Bar / Barre de Son
Using the AUX Input / Entrée AUX
There is a 3.5mm input on top of the sound bar labeled as AUX
Input for use with a mobile device or anything using a 3.5mm
output. When this input is used it will override the stereo RCA
analog inputs in back of the sound bar.
Il y a une entrée AUX de 3,5 mm sur le dessus de la barre de
pour une utilisation avec un appareil mobile ou quoi que ce
soit avec une sortie 3,5 mm. Lorsque cette entrée est utilisée,
elle aura préséance sur les entrées stéréo analogiques RCA à
l'arrière de la barre de son.
Connecting a Subwoofer - OPTIONAL / Branchement d’un caisson de grave - OPTIONNEL
The Sound Bar is equipped with a subwoofer output to allow
the addition of an optional powered subwoofer. Adding a
Ultimate subwoofer will provide thunderous bass and greatly
enhance the listening experience. Make sure all components
are off before starting the connections. Connect a single RCA
cable to the SUB OUT of the sound bar to the subwoofer/LFE
input on the subwoofer. Turn up the volume on the subwoofer.
Subwoofer
Caisson de grave
La Barre de Son est munie d’une sortie vers un
caisson de grave permettant l’ajout d’un caisson de grave
amplifié optionnel. L’ajout d’un caisson de grave Ultimate
vous offrira des graves spectaculaires et améliorera substantiellement votre expérience d’écoute. Assurez-vous que
toutes les composantes soient hors tension avant de commencer les branchements. Branchez un câble RCA à un seul
conducteur à la sortie SUB OUT (sortie de caisson) de la barre
de son à l’entrée caisson/LFE du caisson de grave.
Augmentez le niveau du volume sur le caisson de grave.
Back Panel of Sound Bar
Panneau arrière de la barre de son
Power Connection / Branchement de l’alimentation
Once you have connected the sound bar to your TV and sources you can then
connect it’s power cord. Connect the small, round connector to the back of
the sound bar where DC24V is indicated. Then, insert the plug into an active,
unswitched AC outlet. Do not plug this cord into the accessory outlets
found on some audio components. You are now ready to turn on the sound
bar, as well as all other components.
Une fois la barre de son branchée à votre téléviseur et aux autres sources,
vous pouvez dès lors brancher le cordon d’alimentation. Branche le petit
connecteur rond à l’arrière de la barre de son où il est indiqué DC24V.
Ensuite, insérez la fiche dans une prise de courant secteur CA active et non
commutée. Ne pas brancher ce cordon dans les sorties auxiliaires
d’alimentation que l’on retrouve à l’occasion sur certains appareils audio.
Vous êtes maintenant prêt à mettre sous tension la barre de son ainsi que
toutes les autres composantes de votre chaine.
Back Panel of Sound Bar
Panneau arrière de la barre de son
Sound Bar / Barre de Son
Placement / Positionnement
Placing the sound bar on a flat surface
If your TV is placed on a flat surface such as a TV stand or
another piece of furniture, center it as much as possible with
the TV screen. Attach the supplied rubber pads to the bottom of
the sound bar to prevent scratching the furniture.
Positionnement de la barre de son
sur une surface plate
Si votre téléviseur est placé sur une surface plate tel un socle de
téléviseur ou tout autre meuble semblable, centrez la barre le
plus possible en rapport avec l’écran du téléviseur. Fixez les
coussinets en caoutchouc sur le dessous de la barre de son pour
éviter d’érafler le mobilier.
Montage au mur de la barre de son
If your TV is placed on a flat surface such as a TV stand or
another piece of furniture, center it as much as possible
with the TV screen. Attach the supplied rubber pads to the
back of the sound bar to prevent scratching the wall.
La barre de son est munie de supports à rainure afin de
permettre facilement l’option de montage sur un mur.
Mesurez soigneusement et ensuite vissez simplement deux
vis dans le mur. Il est toujours recommandé d’utiliser des
ancrages pour cloison sèche lors d’un montage mural.
Wall / la mur
Wall-Mounting the sound bar
Specifications
Spécifications
Description
Sound Bar
Déscription
Barre de Son
Drivers
Dual 3 x 6” Full Range Dynamics Drivers
Haut parleur
Double cônes dynamique de 76 x 152mm
Amplifier power
2 x 20 watts
Amplificateur
2 x 20 watts
Frequency Response
75Hz-20kHz
Réponse en Fréquence
75Hz-20kHz
Inputs
(1) optical, (1) stereo RCA, (1) 3.5mm aux
Entrées
(1) optique digitale, (1) RCA stéréo, (1) 3.5mm aux
Outputs
sub out
Sortie
Sub
Dimensions, (HWD )inches
4-1/4 x 30-1/8 x 4-1/4
Dimensions (HLP) mm
110 x 765 x 108mm
Weight
2.4 kg / 5.4 lbs
Poids
2.4 kg / 5.4 lbs
Notes
Notes
Ultimate, 21000 TransCanada • Baie D’Urfé • Québec • H9X 4B7
Tél.: (514) 457-2555 • Fax: (514) 457-5507
www.ultimate-sound.com