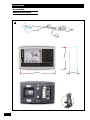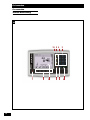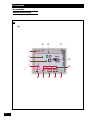
1
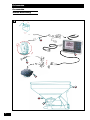
Notice Originale
Original Instructions
Originaldokument
Utilisateur - User - Instruktionsbok
A LIRE ATTENTIVEMENT AVANT D’UTILISER LE BOÎTIER
PLEASE READ CAREFULLY BEFORE USING THE CONTROL UNIT
LÄSES NOGGRANT FÖRE ANVÄNDNING AV DOSAN
Réf: 400 248-05
- FR-GB-SE / DIS
Les Portes de Bretagne
P.A. de la Gaultière – 35220 CHATEAUBOURG France
Tél :(33)02-99-00-84-84 · Fax : (33)02-99-62-39-38
Site Internet : www.sulky-burel.com
E-Mail : [email protected]
Adresse postale
SULKY-BUREL – CS 20005 – 35538 NOYAL SUR VILAINE CEDEX France
Consignes de sécurité
Safety instructions
Säkerhetsanvisningar
FR
•
•
•
•
•
Respecter les instructions de cette notice.
Respecter les instructions du manuel d’utilisation du DPX correspondant.
Ne jamais quitter le poste de conduite lorsque le tracteur est en marche.
Réaliser les réglages du DPX DPB tracteur à l’arrêt.
Assurez-vous qu’il n’y ait personne autour de la machine avant d’effectuer l’étalonnage du DPB.
Risque d’accident
•
•
Risque d’endommager
la machine
Faciliter le travail
Ne pas jeter le boîtier
Ces symboles sont utilisés dans cette notice chaque fois que des recommandations concernent votre sécurité, celle
d’autrui ou le bon fonctionnement de la machine.
Transmettez impérativement ces recommandations à tout utilisateur de la machine.
GB
•
•
•
•
•
Follow the instructions contained in this manual.
Follow the DPX User Manual recommendations.
Never leave the driver’s position whilst the tractor is running.
Carry out DPX DPB adjustments with the tractor ignition switched off.
Make sure no one is near the machine before calibrating the DPB unit.
Risk of accident
•
•
Risk of damage
to the machine
Operating tip
Do not discard the unit
These symbols are used in these instructions every time recommendations are provided concerning your safety, the
safety of others or the correct operation of the machine.
These recommendations must be given to all users of the machine.
SE
• Följ anvisningarna i denna manual.
• Följ rekommendationer i DPX användarmanual.
• Lämna aldrig förarplatsen när traktorn är igång.
• Alla inställningar på DPX-DPB göres med stillastående traktor.
• Se till att ingen är i närheten av maskinen före kalibrering av DPB-enheten.
Olycksrisk
•
Risk för att skada
maskinen
Användningstips
Kasta inte dosan
Dessa symboler användes i instruktionerna varje gång rekommendationerna gäller din säkerhet, andras säkerhet eller
korrekt användning av maskinen.
• Dessa rekommendationer måste ges till samtliga förare av maskinen.
2
Français
Pages
PRESENTATION
6-7
8-9
10-11
12-13
14-19
•A
•B
•C
•D
•E
Pages
PROGRAMMATION
20-23
24-25
26-27
28-29
30-31
32-33
•A
•B
•C
•D
•E
•F
Pages
MISE EN ROUTE
34-35
36-37
38-39
• Français
• Anglais
• Suédois
Pages
INFORMATIONS
40-41
42-43
44-45
46-47
48
•A
•B
•C
•D
•E
SOMMAIRE
Présentation du système DPB
Connexion au tracteur
Mise en place du capteur de vitesse
Boîtier de commande DPB
Présentation des fonctions
Calibrage de la vitesse d'avancement
Réglage du débit
Choix de l’engrais
Sélection de la largeur de travail
Fonction Tribord
Fonctions complémentaires
Enregistrement des données
Modulation automatique
Diagnostique
Maintenance
Pannes/Remèdes
1
2
3
4
Lire attentivement la notice avant l’utilisation. Comprendre son boîtier
électronique c’est mieux l’utiliser. En français suivre le symbole. FR
3
English
Pages
PRESENTATION
6-7
8-9
10-11
12-13
14-19
•A
•B
•C
•D
•E
Pages
PROGRAMMING
20-23
24-25
26-27
28-29
30-31
32-33
•A
•B
•C
•D
•E
•F
Pages
START-UP
34-35
36-37
38-39
• French
• English
• Swedish
Pages
INFORMATION
40-41
42-43
44-45
46-47
49
•A
•B
•C
•D
•E
CONTENTS
DPB system overview
Connecting to the tractor
Fitting the speed sensor
DPB control unit
Functions
Forward speed calibration
Adjusting the flow rate
Choice of fertiliser
Selecting the working width
Tribord function
Additional functions
Saving data
Compatibility
Diagnosis
Maintenance
Problems / Solutions
Read the operator's manual carefully before use. Understanding your electronic unit
will help you make better use of it. English instructions: follow this symbol.
4
GB
Svenska
Sidor
6-7
8-9
10-11
12-13
14-19
Sidor
20-23
24-25
26-27
28-29
30-31
32-33
Sidor
34-35
36-37
38-39
INNEHÅLLSFÖRTECKNING
TEKNISK BESKRIVING
•A
•B
•C
•D
•E
Beskriving av DPB-systemet
Tillkoppling till traktor
Inkoppling av sensor för körsträcka
DPB-styrenhet
Funktionsbeskrivning
1
PROGRAMMERING
•A
•B
•C
•D
•E
•F
Kalibrering av körsträcka
Flödesjustering
Val av gödningstyp
Val av arbetsbredd
Funktion Tribord
Extrafunktioner
2
IGÅNGKÖRNING AV MASKIN
• Franska
• Engelska
• Svenska
Sidor
INFORMATION
40-41
42-43
44-45
46-47
50
•A
•B
•C
•D
•E
Spara data
Automatisk mängdreglering
Diagnos
Service & Underhåll
Felsökning
3
4
Läs noggrant igenom manualen före användning. Genom att förstå den
elektroniska dosan kommer du också att kunna använda den på ett bättre
SE
sätt. Följ denna symbol för svenska instruktioner.
5
Présentation
Presentation
Teknisk Beskrivning
A
+
H
H
2
1
3
7
5
6
4
6
Présentation
Presentation
Teknisk Beskrivning
FR
A Présentation du système DPB
a) Introduction
• Le Système DPB est un instrument de mesure et de contrôle
de l'épandage d'engrais granulés avec débit proportionnel à
l'avancement.
• Les informations de poids données par le DPB ne peuvent
pas être utilisées pour des transactions commerciales.
• Le distributeur DPB ne doit être utilisé que pour les travaux
pour lesquels il a été conçu.
En cas de dommage lié à l’utilisation hors du cadre des
applications spécifiées par le constructeur, la responsabilité de
celui-ci sera entièrement dégagée.
• Le distributeur DPB ne doit être utilisé, entretenu et réparé
que par des personnes compétentes, familiarisées avec les
caractéristiques et le mode d’utilisation de la machine.
b) Présentation
1
³ Boîtier VISION DPB.
2
³ Faisceau d’alimentation 12 V. (option)
3
³ Capteur de vitesse d'avancement ou raccordement radar.
4
³ Capteur ouverture / fermeture des trappes.
5
³ Boîte de connexion.
6
³ Vérin électrique de contrôle du débit.
7
1
1
³ Antenne GPS spécifique pour mesurer la
vitesse.
GB
A DPB system overview
a) Introduction
• The DPB system is a measuring and control instrument for
granular fertiliser spreading with a rate proportional to the
tractor’s forward speed.
• The weight data provided by the DPB may not be used for
commercial transactions
• The DPB spreader must only be used for those applications
for which it was designed.
The manufacturer cannot accept any responsibility for damage
incurred as a result of operating the machine outside of the
scope of applications specified.
• The DPB spreader must only be used, maintained and
repaired by competent personnel familiar with the
specifications and use of the machine.
b) Presentation
1
³ VISION DPB control unit
2
³ 12-volt power bundle (optional).
3
³ Forward speed sensor or radar interface.
4
³ Shutter control sensor.
5
³ Connection box.
6
³ Flow rate control electric actuator.
7
³ Special GPS aerial for measuring speed.
SE
A Beskrivning av DPB-systemet
a) Introduktion
• DPB-systemet är ett mät-och styrsystem för spridning av
granulerad gödning direkt proportionellt med körhastighet.
• Viktdata från DPB kan inte användas för kommersiella
transaktioner.
• DPB-spridaren får endast användas för de applikationer som
den är konstruerad för.
I händelse av skador som uppstått i samband med att
tillverkarens anvisningar inte följts, påtar sig tillverkaren inget
ansvar.
• DPB-spridaren får endast användas, servas och repareras av
kompetent personal som väl känner till specifikationer och
användning av maskin.
b) Komponenter
1
³ VISION DPB-styrenhet
2
³ 12-volt batteri kabel (tillval)
3
³ Sensor körsträcka / radarsensor
4
³ Sensor för öppen/stängd matning
5
³ Kopplingsbox
6
³ Elektriskt ställdon för mängdreglering
7
³ GPS-antenn för hastighetsmätning.
7
Présentation
Presentation
Teknisk Beskrivning
+
H
H
142 mm
B
237 mm
8
75 mm
Présentation
Presentation
Teknisk Beskrivning
FR
B Connexion au tracteur
a) Attelage
• Le DPX DPB est équipé d’un attelage 3 points catégorie II.
La position du DPX est horizontale au travail.
• Monter la transmission en vérifiant que sa longueur
correspond bien au tracteur. Le régime de la PDF est de
540 tr/mn.
• Brancher l’hydraulique d’ouverture et de fermeture
des trappes.
b) Installation du DPB
• Il est impératif de brancher l’alimentation électrique
du boîtier directement à la batterie 12 volts du tracteur.
• Lorsque la prise est branchée, le boîtier peut être allumé.
• Le boîtier DPB possède un accumulateur permettant
de garder en mémoire les données programmées.
• Le boîtier DPB doit être protégé par des fusibles 7,5 A
sur son alimentation.
• Faisceau d’alimentation disponible en option.
• Le boîtier doit être monté de manière à ce qu’il soit
bien visible par le conducteur.
Ne pas poser brusquement l’attelage en pleine charge sur
le sol.
Ne pas dépasser la charge maximale :
2 100 kg sur le DPX 70
2 100 kg sur le DPX PRIMA
2 100 kg sur le DPX 28
Bien remettre les bouchons de protection sur les câbles
de connexion.
Vérifier que le cardan PDF soit à la bonne longueur et ne
touche pas le châssis.
GB
B Connecting to the tractor
a) Hitching up to the tractor
• The DPX DPB is fitted with a 3-point category II linkage.
The DPX operates in a horizontal position.
• Fit the drive shaft while ensuring that its length is suitable
for the tractor. PTS speed is 540 rpm.
• Connect the hydraulic shutter control system.
b) Installing the DPB
• The unit power supply must be connected directly to the
12-volt battery of the tractor.
• Once the plug has been connected, the unit can be switched
on.
• The DPB unit includes an accumulator for storing the
programmed data and settings in the memory.
• The DPB unit is protected by 7.5 Amp fuses.
• Optional power bundle available.
• The unit must be sited so as to be clearly visible to the
driver.
Do not suddenly drop the linkage to the ground when
fully loaded.
Do not exceed the maximum payload:
2100 kg for the DPX 70
2100 kg for the DPX PRIMA
2100 kg for the DPX 28
Make sure that you replace all protective plugs and
covers on connecting cables.
Make sure the PTO universal joint length is correct and
that the shaft is not in contact with the chassis.
SE
B Tillkoppling till traktor
a) Tillkoppling
• DPX-DPB är utrustad med trepunktsinfästning kategori II.
DPX-spridaren skall stå i horisontellt läge.
• Montera kraftöverföringsaxeln efter att rätt längd anpassats
till traktorn. Kraftuttagsvarv är 540 rpm.
• Koppla utmatningens hydrauliska avstängning.
b) Koppla in DPB-styrenhet
• Koppla in 12 volt spänning direkt på batteriet om uttag
saknas på traktorn.
• När spänning har anslutits kan DPB-enheten kopplas på.
• DPB-enheten har ett inbyggt batteri som sparar alla data
och inställningar i minnet.
• DPB-enheten är skyddad med en 7,5A säkring.
• Speciell batterikabel finns som tillval.
• Enheten bör placeras så att föraren har god översikt och
enkel manövrering.
Släpp inte ned trepunktslyften okontrollerat mot marken
med last.
Överskrid aldrig max tillåten last:
2100 kg för DPX 70
2100 kg för DPX PRIMA
2400 kg för DPX 28
Återmontera alltid skydd på elkablar.
Se till att kraftöverföringsaxeln har rätt längd och att den
inte tar i chassit.
9
Présentation
Presentation
Teknisk Beskrivning
C
b)
a)
20mm
5 - 10mm
c)
1
d)
10
2
(min)
Présentation
Presentation
Teknisk Beskrivning
FR
C Mise en place du capteur de vitesse
L’information vitesse peut être réalisée soit :
• par la roue du tracteur,
• par l’arbre de transmission du pont avant d’un tracteur 4x4,
• par information radar pour les tracteurs pré-équipés et
compatibles.
• par antenne GPS.
a) Par la roue du tracteur
• Pour un montage sur roue de grand diamètre, favoriser
l’adaptation avec plusieurs aimants par souci de précision.
• Prévoir un minimum de 8 aimants par roue arrière du
tracteur.
Remarque :
Si la distance entre 2 aimants est ≤ à 15cm, il faut alterner la
polarité des aimants Nord/Sud sur la circonférence.
b) Par l’arbre de transmission du pont avant
• Pour le montage du capteur, suivre les instructions.
• Ce montage est probablement un des plus précis car
l’arbre a une forte démultiplication par rapport à la vitesse
d’avancement.
c) Par information radar
• L’adaptation est possible seulement s’il y a une prise radar
en cabine 1 2 . Voir information complémentaire avec
votre revendeur tracteur.
Exemple :
Fendt, John deere, CASE iH
Massey-fergusson (Datatronic 1).
d) Capteur de vitesse par GPS
- Raccorder le capteur à la prise du boîtier prévue
à cet effet.
GB
C Fitting the speed sensor
The speed data can come from either:
•
•
•
•
the tractor’s wheels,
the front axle drive shaft of a 4x4 tractor,
pre-installed radar on compatible tractors.
by GPS aerial.
b) Front axle drive shaft
• Follow instructions for mounting the sensor.
• This mounting option is probably the most accurate
because of the high reduction ratio of the shaft in relation
to the forward speed.
c) Radar information
a) Tractor wheel
• For fitting to large diameter wheels, it is preferable to use
several magnets for greater accuracy.
• Use at least 8 magnets per tractor wheel (rear).
Note:
If the distance between two magnets is <15cm, it is
necessary to alternate North/South magnet polarity around
the circumference.
• Adaptation is only possible if there is a radar connection in
the cab 1 2 . For additional information see your tractor
dealer.
Example:
Fendt, John deere, CASE iH
Massey-fergusson (Datatronic 1).
d) GPS rate sensor
- Connect the sensor to the plug connection provided on
the unit.
C Inkoppling av sensor för körsträcka
Pulser kan komma från:
• Traktorhjul
• Drivaxel till 4WD
• Radar/hastighetspulser från traktorn
• GPS-antenn.
a) Traktorhjul
• Vid montering på stor hjuldiameter är det en fördel om flera
magneter används för större precision.
• Använd minst 8 magneter per hjul vid bakhjulsmontering
Notera:
Om avståndet mellan två magneter är mindre än 15 cm är det
nödvändigt att växla montering nord/syd polaritet på
magneterna.
SE
b) Drivaxel för 4WD
• Följ sensorns monteringsinstruktion.
• Denna montering är oftast det bästa alternativet beroende
på den höga utväxlingen mellan hjul och drivaxel.
c) Radarinformation
• Endast möjligt om radaranslutning finns i förarhytten
Se tilläggsinformation från din traktoråterförsäljare.
1
2
.
Exempel :
Fendt, John Deere, CASE iH
Massey-fergusson (Datatronic 1).
d) GPS-hastighetssensor
- Anslut sensorn till för ändamålet avsett uttag på dosan.
11
Présentation
Presentation
Teknisk Beskrivning
D
10 8 9
1
12
4
3
5 7
2
6
Présentation
Presentation
Teknisk Beskrivning
FR
D Boîtier de commande DPB
•
1•
Mise sous tension
•
2•
Pavé numérique et alphabétique
•
3•
Ecran multifonction
•
4•
Touches des fonctions
•
5•
Touche menu paramétrage usine
et diagnostique revendeur
•
6•
Touche de “confirmation” ou “entrée” d’un
paramétrage
•7 •
•
8•
Touche “menu épandage” : utilisée en cours
d’épandage
•
9•
Touche “menu information” : utilisée en consultation
•
10 •
Touche “menu réglage” : utilisée en début
d’épandage
• Le boîtier fonctionne sous la forme d’un menu défilant.
• Prendre le temps de lire les informations.
Touche “retour”
GB
D DPB control unit
•
1•
Power on switch
•
2•
Alpha-numeric pad
•
3•
Multifunction screen
•
4•
Function keys
•
5•
Factory settings and diagnostic key
•
6•
Settings confirmation or ENTER key
•
7•
Return key
•
8•
“Spreading menu” key: to be used during spreading
operations
•
9•
“Info menu ” key: used for diagnosis or monitoring
•
10 •
“Settings menu” key: for use when starting
spreading
• The unit operates with scroll-down menus.
• Take time to read all the information.
SE
D DPB-styrenhet
•
1•
Till/från brytare
•
8•
Spridnings meny, används vid körning
•
2•
Alfa numerisk panel
•
9•
Info meny, används vid diagnos och avläsning
•
3•
Display
•
10 •
Inställnings meny, används vid spridningsstart
•
4•
Funktionsval
•
5•
Fabriksinställningar / Diagnos
•
6•
Lagra inställning/ENTER
•
7•
Gå tillbaka
• Enheten arbetar efter meny som bläddrar ned.
• Ta dig tid att läsa av all data och annan information.
13
Présentation
Presentation
Teknisk Beskrivning
E
a)
10
12
11
1
2
13
3
4
10
5
14
6
7
8
9
Présentation
Presentation
Teknisk Beskrivning
FR
E Présentation des fonctions
a) Menu épandage
•
6•
Touche modulation - 10%
•
7•
Retour à la dose hectare de référence après une
modulation.
•
8•
Touche commande TRIBORD et de sélection
modulation “droite” ou “gauche”
•
9•
Touche test de débit
•
10 •
Indicateur d’ouverture/fermeture des trappes
hydrauliques
•
11 •
Alarme
•
12 •
Nom de l’engrais
•
13 •
Dose hectare souhaitée.
• Le menu épandage est utilisé en cours de travail.
Vous disposez des principales informations de contrôle.
•
1•
Heure
•
2•
Vitesse d’avancement. Elle peut être légèrement
différente du compteur tracteur.
•
3•
Quantité d’épandage.
•
4•
Indicateur de positionnement des vérins électriques
de contrôle des débits.
•
5•
Touche modulation + 10%
GB
E Functions
a) Spreading menu
• The spreading menu is used during spreading operations. It
provides the main control data:
•
1•
Time
•
2•
Forward speed. It may be slightly different from that
on the tractor speedometer.
•
3•
Spreading amount.
•
4•
Position indicator of electrical flow rate control
actuators.
•
5•
+10% adjustment key.
•
6•
-10% adjustment key.
•
7•
Return to the reference application rate/hectare
following adjustment.
•
8•
TRIBORD control key and “right” or “left”
adjustment key.
•
9•
Output calibration test key
•
10 •
Hydraulic shutter control indicator
•
11 •
Alarm
•
12 •
Name of fertiliser
•
13 •
Desired application rate per hectare.
SE
E Funktionsbeskrivning
a) Spridnings meny
• Spridnings meny används vid körning och ger de viktigaste
kontroll data.
•
6•
–10 % minskad spridningsmängd.
•
7•
Återställning till normal giva.
•
8•
Styrknapp Tribord samt knapp för val av modulation
« höger » eller « vänster ».
•
9•
Kalibrering av giva.
•
1•
Tid.
•
2•
Körhastighet. Den kan variera något från traktorns
mätare.
•
10 •
Utmatning öppen/stängd indikator.
•
3•
Spridnings mängd.
•
11 •
Alarm
•
4•
Läges indikering över elektriska ställdonens
mängdreglering.
•
12 •
Typ av konstgödning
•
5•
+10 % ökad spridningsmängd.
•
13 •
Önskad dos per hektar.
15
Présentation
Presentation
Teknisk Beskrivning
E
b)
1
2
3
16
4
5
6
Présentation
Presentation
Teknisk Beskrivning
FR
b) Menu informations
• Le menu information est utilisé en consultation
pour connaître les performances du chantier d’épandage.
•
1•
Nombre de tonnes épandues (théorique)
•
2•
Surface en hectare épandue. (réelle)
•
3•
Touche de sélection en information partielle
pour la parcelle ou totale pour le chantier
d’épandage.
•
4•
Touche de sélection de la fonction enregistrement des
données et modulation par GPS.
•
5•
Touche d’information des alarmes actives.
•
6•
Touche de remise à zéro des compteurs hectare et
tonnage.
GB
b) Info menu
• The info menu is used to monitor spreading data and
performance.
•
1•
Number of tonnes spread (theoretical).
•
2•
Area spread in hectares (actual).
•
3•
Selection key for partial (plot) or overall (site)
spreading data.
•
4•
Selection key for data saving function and
adjustment by GPS.
•
5•
Active alarm info key.
•
6•
Area and tonnage counter reset key.
SE
b) Info meny
• Info meny används för att läsa av prestanda och spridnings
data.
•
1•
Spridningsmängd i ton (teoretisk mängd).
•
2•
Körd areal i Ha (verklig).
•
3•
Val av del eller total spridningsdata.
•
4•
Flervalsknapp för att spara data och för GPSmodulering.
•
5•
Aktivt alarm
•
6•
Nollställning av areal och mängd.
17
Présentation
Presentation
Teknisk Beskrivning
E
c)
1
2
18
3
4
5
Présentation
Presentation
Teknisk Beskrivning
FR
c) Menu réglage
•
3•
• Le menu réglage est utilisé à la mise en route du DPX DPB.
Soit pour l’enregistrement des données définitives, soit
pour l’enregistrement des données propres à l’épandage.
•
•
1•
2•
Touche de sélection de l’engrais, mise en mémoire
(8 niveaux), et inscription du “Facteur T” propre
à chaque engrais.
• Inscription du nom de l’engrais avec
.
• Calibrage spécifique avec
Données réglage du boîtier :
1- Réglage de l’heure ;
2- Réglage de la luminosité de l’écran ;
3- Réglage des unités de mesure ;
4- Réglage de la langue utilisée à l’écran ;
5- Coordonnées. Aide
6- Choix instrument (épandeur ou semoir).
.
•
4•
Touche de sélection de simulation de vitesse
pour le remplacement du mode DPA. (mode DPM)
•
5•
Touche de sélection de la largeur de travail.
Touche de calibrage de la vitesse d’avancement
4 possibilités.
GB
c) Settings menu
•
3•
• The settings menu is used to start-up the DPX DPB, either
to save final data or to save real-time spreading data.
•
•
1•
2•
Fertiliser selection key, saving (8 levels) and
recording of the T factor specific to each fertiliser.
• Recording fertiliser name with
Unit settings:
1- Time settings
2- Screen brightness settings
3- Measurement unit settings
4- Display language settings
5- Coordinates. Help
6- Select machine (spreader or seed drill).
• Specific calibration with
.
.
•
4•
Speed simulation selector key for DPA mode
change (DPM mode).
•
5•
Working width selection key.
Forward speed calibration keys.
4 possible options.
SE
c) Meny för inställningar
•
3•
• Inställnings menyn används vid uppstart av DPX-DPB eller
för att spara data.
•
•
1•
2•
Inställningar på DPX-enheten:
1- Tidsinställning
2- Kontrast på display
3- Mätenhet mm/tum
4- Språkval
5- Hjälpmeny. Hjälp
6- Val av instrument (spridare eller drillmaskin).
Val/Lagring T-faktor för 8 olika typer av konstgödning.
• Återkalla typ av konstgödning med
.
• Kalibrering, T-faktor för konstgödning med
.
•
4•
Mängdsimulering.
•
5•
Inställning av arbetsbredd.
Kalibrering av körsträcka.
Faktor för 4 olika traktorer kan lagras.
19
Programmation
Programming
Programmering
A
a)
b)
20
Programmation
Programming
Programmering
FR
A Calibrage de la vitesse d’avancement
Sélectionner le menu REG.
a) Capteur de vitesse
• Jalonner 100 mètres.
• Placer le tracteur au premier jalon.
• Sélectionner la fonction
b) Capteur de vitesse GPS
• Capteur à fixer sur le toit de la cabine du tracteur.
Lors de la mise sous tension,
attendre 1 à 2 minutes.
Procéder de la même manière en effectuant un test sur 100 m.
• La valeur d'impulsion/mètre est beaucoup plus faible
qu'avec un capteur de vitesse standard.
.
• Choisir le type de capteur avec
.
1er tracteur - 2e tracteur -3e tracteur - 4e tracteur
1er
jalon.
• Sélectionner
devant le
• Sélectionner “Calibrage sur 100m”.
• Se placer devant le premier jalon.
• Presser
pour activer.
• Avancer jusqu'au 2ème jalon, espacé d'une distance de 100 m.
• Après arrêt au 2ème jalon.
• Presser
pour valider
• Votre calibrage de vitesse est effectué.
Le DPB a calculé un cœfficient propre au tracteur et le garde
en mémoire.
R EMARQUES :
• Le cœfficient de vitesse est toujours inférieur à 1.
• Le cœfficient de vitesse peut être modifié manuellement :
1
- sélectionner
,
- changer à l’aide du pavé numérique,
- sélectionner
2
pour sortir.
• Il est impératif d'effectuer le test sur 100 m à la mise en
route du DPB, pour remplacer les valeurs "par défaut" du
boîtier.
GB
b) GPS speed sensor
• Sensor to be mounted on the roof of the tractor cab.
Wait 1 to 2 minutes after switching on.
A Forward speed calibration
Select the REG menu.
a) Speed sensor
• Mark out a tramline over 100 metres.
• Position the tractor on the first tramline.
• Select
Proceed in the same way, performing a test over 100m.
• The pulse/metre value is much lower than with a
standard speed sensor.
function.
• Select the sensor type with
.
1st tractor – 2nd tractor – 3rd tractor – 4th tractor
• Select
opposite the first tramline.
• Select “100 m calibration”.
• Position the tractor on the first tramline.
NOTES:
• The rate coefficient is still below 1.
• The rate coefficient can be modified manually:
• Press
- select
,
- change using the numeric keypad,
to activate.
• Move to the second tramline spaced at approx. 100 m.
• After stopping alongside the 2nd tramline, press
to
confirm
• Your forward speed calibration is now complete.
The DPB has calculated a specific coefficient for the tractor and
will save it in the memory.
A Kalibrering av körsträcka
- select
to exit.
• It is essential to carry out the 100 m test when starting up
the DPB to replace the unit default settings.
SE
b) GPS-hstighetssensor
• Sensor som monteras på förarhyttens tak.
Välj REG menyn
a) Sensor för körsträcka
• Markera upp 100 m med två pinnar.
• Placera traktorn vid 1:a pinnen.
Vänta 1 till 2 minuter efter start.
• Välj funktion
• Välj vilken traktor sensor med
.
Gör på samma sätt och utför ett test på 100 m.
• Puls/meter-värdet är mycket lägre än med en vanlig
hastighetssensor.
1:a traktor – 2:a traktor – 3:e traktor – 4:e traktor
• Välj
för start vid 1:a pinnen.
• Välj ”Kalibrering 100 m”.
• Placera traktorn vid den första pinnen.
• Tryck
för att aktivera kalibrering.
• Kör till pinne nr 2 som är 100 m längre fram.
• Stanna vid pinne nr 2 och tryck
för att lagra.
• Körsträckan är nu kalibrerad.
DPB-enheten lagrar i minnet en faktor för varje traktor.
OBSERVERA:
• Hastighetskoefficienten är fortfarande mindre än 1.
• Hastighetskoefficienten kan ändras manuellt:
- välj
,
- ändra med hjälp av den numeriska knappsatsen,
- välj
för att avsluta.
• Det är nödvändigt att utföra ett test på 100 m vid
uppstartning av DPB för att ersätta dosans
standardinställningar.
21
Programmation
Programming
Programmering
A
c)
22
Programmation
Programming
Programmering
FR
c) Simulation de vitesse d’avancement
La simulation de vitesse peut être utilisée :
- lorsqu’il y a un problème avec le capteur,
- pour simuler une ouverture de trappe,
- pour vider l’engrais du distributeur à poste fixe.
- pour utiliser le DPB sans DPA.
• Sélection de la fonction
.
• Entrer la vitesse d’avancement avec le pavé numérique.
• Valider par
pour commencer la simulation.
• Pour stopper la simulation :
- sélectionner
et valider
de nouveau.
Remarque : vous pouvez actionner la simulation de vitesse
d’avancement par le menu REGLAGE.
GB
c) Forward speed simulation
The forward speed simulator can be used:
- when there is a problem with a sensor,
- to simulate a shutter opening,
- to empty the fertiliser from the hopper at a fixed
location,
- to use the DPB without the DPA.
• Select the
function .
• Enter the forward speed with the numeric pad.
• Press
to confirm and start simulation.
• To stop simulation:
- select
and confirm again with
.
Note: It is possible to operate the forward speed
simulation from the SETTINGS menu.
SE
c) Simulering av körsträcka
Simulering av körsträcka kan användas:
- när det är problem med någon sensor,
- vid simulering av utmatningsspjäll,
- för att stillastående tömma ut konstgödningen från
behållaren,
- för att använda DPB utan DPA.
• Välj funktion
.
• Knappa in körhastighet med numeriska panelen.
• Starta simulering med
.
• Stoppa simulering med
och återstarta igen med
.
Notera! Det är möjligt att simulera körsträcka från
inställnings menyn.
23
Programmation
Programming
Programmering
B
a)
24
b)
Programmation
Programming
Programmering
FR
B Réglage du débit
b) Depuis le menu Réglage
• Sélectionner la fonction
Essai de débit à poste fixe
Il est conseillé de calibrer le “Facteur T” du produit avec un
test à poste fixe.
• Installer le kit essais de débit côté droit (voir Manuel DPX).
DEUX
POSSIBILITÉS D'ACCÈS
:
a) Depuis le menu Epandage
• Sélectionner le menu EPAN
• Sélectionner
• Sélectionner 1 test de calibrage.
• Mettre en marche la PDF 540 tr/min et ouvrir la trappe
droite de manière à remplir le sceau au 3/4.
• Entrer le poids obtenu en kg et valider avec
.
Le boîtier a calculé le nouveau “Facteur T” spécifique au produit.
pour sortir.
• Sélectionner
• Le DPB conservera en mémoire le dernier réglage réalisé
sur le produit sélectionné.
• Sélectionner la fonction
• Sélectionner 1 : test de calibrage.
• Mettre en marche la PDF 540 tr/min et ouvrir la trappe
(durée 15 à 20 s) droite de manière à remplir le seau au 3/4.
• Entrer le poids obtenu en kg et valider avec
Le boîtier a calculé le nouveau “Facteur T”
spécifique au produit.
.
(A B C D E F G - Réducteur)
Remarque : Dès que l’on utilise le réducteur de débit (ex:
anti-limace) il faut se positionner sur la lettre H.
(Voir C Choix de l’engrais)
GB
b) From the Settings menu
B Adjusting the flow rate
Stationary calibration test
• Select the
It is recommended that you calibrate the product’s T factor
using a stationary test.
• Fit the calibration test kit on the right hand side (see DPX
Manual).
TWO ACCESS OPTIONS:
a) From the Spreading menu
• Select EPAN
function.
function
• Select product calibration
• Select 1: calibration test.
• Start the PTO at 540 rpm and open the RH shutter to fill
the bucket to 3/4.
• Enter the weight in kg and confirm with
.
The unit calculates the new product-specific T factor.
• Select
• Select the
pour calibrage produit.
to exit.
• Select 1: calibration test.
• The DPB will save the latest setting for the product
selected.
• Power up the PTO at 540 rpm and open the RH shutter for
15 to 20 seconds until the bucket is 3/4 full.
(A B C D E F G - Limiter)
• Enter the weight in kg and confirm with
The unit calculates the new productspecific T factor.
.
B Flödesjustering
Flödestest med stillastående maskin
För att ta fram faktor T för respektive gödningssort
rekommenderas att maskinen kalibreras stillastående.
• Placera provtagningstråg på höger sida (se DPX-manual).
TVÅ MÖJLIGHETER:
a) Från spridnings meny
• Välj EPAN
• Välj funktionen
Please note: As soon as the flow rate limiter is used (e.g.
slug pellets) letter H must be selected.
(See C Choice of fertiliser)
SE
b) Från inställnings meny
• Välj funktionen
• Välj produkt kalibrering
• Välj 1: Kalibrering (calibration test).
• Starta upp kraftuttaget till 540 rpm och öppna höger spjäll
tills att tråget är fyllt till 3/4.
• Väg mängden och knappa in värdet i kg, bekräfta med
.
DPB-enheten har nu lagrat den specifika faktorn T före
denna gödningssort.
• Välj 1: Kalibrering (calibration test).
• Starta PDF 540 tr/min och öppna höger spjäll (detta kan ta
15-20 sek) så att tråget fylls till 3/4.
• Väg mängden och knappa in värdet i kg, bekräfta med
DPB-enheten har nu lagrat den specifika faktorn T
före denna gödningssort.
• Välj
för att backa ur.
• DPB-enheten lagrar den senaste faktorn T för vald
gödningssort.
(A B C D E F G - mängdbegränsat)
Observera : Vid användning av mängdinställning (ex småfrö)
är det nödvändigt att ställa in mätaren på bokstaven H
(Se C Val av gödsel).
25
Programmation
Programming
Programmering
C
26
Programmation
Programming
Programmering
FR
C Choix de l’engrais
Pour une pleine utilisation des capacités du DPB,
il est conseillé de mettre en mémoire vos différents engrais
sur les 7 mémoires possibles, la 8e servant pour les produits
épandus à faible dose. (Réducteur de débit)
Avant chaque épandage, reprendre l’engrais correspondant
ou celui qui se rapproche le plus d’un point de vue physique
(granulométrie, densité,…).
Par défaut en usine, les “Facteurs T” sont de 1.
Après chaque essais de débit, le boîtier conserve le dernier
“Facteur T” calculé en mémoire.
• Sélectionner
.
• Choisir le produit à l’aide de
Remarque
• Si on connait le “Facteur T” de l’engrais (cœfficient
d’écoulement propre à chaque engrais et au distributeur), il est
possible de le sélectionner manuellement :
• Sélectionner “Facteur T” à l’aide de
.
• Entrer la valeur à l’aide du pavé numérique et valider
• Sélectionner
pour sortir.
• La lettre H (réducteur) est à utiliser uniquement avec le
dispositif réducteur de débit.
.
• Sélectionner
si vous voulez inscrire le nom de l’engrais
à l’aide du pavé alphabétique.
GB
C Selecting the fertiliser
In order to fully use the DPB’s capabilities, you are
recommended to save your various fertilisers in the 7
available memories, the 8th one being reserved for products
spread in very low quantities. (Flow rate limiter)
Before each spreading session, select the corresponding
fertiliser or that physically closest (grain size, density,…).
The factory default T factor value is 1.
After each calibration test, the unit keeps the most recently
calculated T factor in the memory.
• Select
Note
• If the fertiliser T factor is known (flow coefficient specific to
each fertiliser and spreader), it can be selected manually:
• Select T Factor with
.
• Enter the value with the numeric pad and confirm
with
• Select
to exit.
.
• Choose the product with
.
• Letter H (the limiter) is only to be used with the flow rate
limiter.
• Select
if you want to enter the fertiliser name with the
alphabetic pad.
SE
C Val av gödningstyp
För effektivt utnyttjande av DPB, rekommenderas att lagra
olika typer av konstgödning i de 7 tillgängliga minnen. Det 8:e
minnet är reserverat för småfrö (mängdbegränsning).
Innan varje spridning väljs rätt typ av konstgödning eller den
som ligger närmast (storlek, densitet, mm).
Fabriksinställt värde för T-faktor är 1.
Efter varje utmatningsprov, behåller DPB-enheten den
senaste T-faktorn i minne.
Notera!
• Om T-faktorn redan är känd (flödesmängd specifik för varje
gödningssort och spridare) kan den programmeras in manuellt:
• Välj T-faktor med
.
• Knappa in värdet med numerisk panel och lagra med
• Välj
för att backa ur.
• Bokstaven H (reducerare) ska endast användas med
mängdinställning.
• Välj
.
• Välj gödningssort med
.
• Välj
och skriv in typ av konstgödning med alfanumeriska panelen
27
Programmation
Programming
Programmering
D
28
Programmation
Programming
Programmering
FR
D Sélection de la largeur de travail
Faire correspondre la largeur sélectionnée dans le DPB
avec la largeur d’épandage utilisée au travail.
• Sélectionner
.
• Entrer la valeur à l’aide du pavé numérique en mètre
et valider avec
• Sélectionner
.
pour sortir.
GB
D Selecting the working width
Match the width selected in the DPB with the spreading
width actually used in the field.
• Select
.
• Enter the value in metres with the numeric pad and
confirm with
.
• Select
to exit.
SE
D Val av arbetsbredd
Programmera in den verkliga arbetsbredden i DPB-enheten.
• Välj
.
• Knappa in arbetsbredden i meter med den numeriska
panelen och lagra med
• Välj
för att backa ur.
29
Programmation
Programming
Programmierung
E
1)
2)
30
Programmation
Programming
Programmierung
FR
E Fonction Tribord
1) Sélection de la fonction Tribord
• 1 appui sur la touche
Tribord, attendre 2 à 3 s.
2) Fonction Tribord avec la modulation
permet d’activer la fonction
L’icône affiche
• Si 2 appuis à suivre sur la touche
sélectionner le côté gauche pour
la modulation de la dose/ha.
L’icône affiche
permet de
Il faut choisir la modulation gauche ou droite avant de
sélectionner le Tribord.
Remarque
S’ il y a un disfonctionnement avec le tribord le boîtier affiche :
“Problème TRIBORD” en clignotant.
.
• Si 3 appuis à suivre sur la touche
sélectionner le côté droit pour la
modulation de la dose/ha.
L’icône affiche
permet de
.
GB
E Tribord function
1) Selecting the Tribord function
2) Combined Tribord function and adjustment
Choose LH or RH adjustment before selecting the Tribord.
• Press the
key once to open the Tribord function;
wait 2 to 3 seconds.
The
icon will be displayed.
Please note
The following message will flash on the control unit if an error
occurs: “TRIBORD malfunction”
• Press the
key twice to adjust the application rate
per hectare on the LH side.
The
icon will be displayed.
• Press the
key three times to adjust the application
rate per hectare on the RH side.
The
icon will be displayed.
SE
E Funktion Tribord
2) Funktion Tribord med modulation
1) Välj Tribord
Välj modulation vänster eller höger innan du väljer Tribord.
• 1 tryck på knappen
Vänta i 2-3 sek.
aktiverar Tribord funktionen.
Observera
Vid problem med tribord funktionen visar boxen « Problem
Tribord » och blinkar.
Ikonen visar
• 2 tryck på knappen
modulation av dos/ha.
Ikonen visar
.
• 3 tryck på knappen
modulation av dos/ha.
Ikonen visar
ställer in den vänstra sidan för
ställer in den högra sidan för
.
31
Programmation
Programming
Programmering
F
2)
a
b
c
d
32
Programmation
Programming
Programmering
FR
F Fonctions complémentaires
1) Heure/Date
• Sélectionner 1.
• Régler les valeurs à l’aide de
numérique.
• Sélectionner
pour sortir.
3) Unités
• Sélectionner 3.
• Réglage sur métrique par défaut.
et du pavé
a Sélectionner 2
• Sélectionner
c Régler l’intensité lumineuse et l’écran
à l’aide de
et
d Sélectionner
pour sortir.
4) Langue
• Sélectionner 4.
• Régler la traduction à l’aide de
2) Affichage (voir exemple)
b
• Sélectionner
.
pour sortir.
5) Aide
.
6) Choix instrument
• Sélectionner 6.
• Sélectionner vision DPB ou semoir.
pour sortir.
• Valider
.
GB
F Additional functions
3) Units
• Select 3.
• Default setting = metric.
1) Time/date
• Select 1.
• Adjust values with
• Select
and numeric pad.
to exit.
4) Language
• Select 4.
• Set the language with
to exit.
2) Display (see example)
a Select 2
b
• Select
• Select
c Adjust brightness and contrast with
and
d Select
.
to exit.
5) Help
6) Machine selection
.
• Select 6.
• Select Vision DPB or seed drill
to exit.
• Confirm with
.
SE
F Extrafunktioner
1) Tid/Datum
• Välj 1 .
• Justera värde med
• Välj
3) Enheter
• Välj 3.
• Fabriksinställning = Metriskt system
och numerisk panel.
• Välj
för att backa ur.
4) Språk
• Välj 4.
• Välj språk med
för att backa ur.
2) Display (se exempel)
(Finns ej på Svenska).
a Välj 2 .
b
c Justera ljus och kontrast med
• Välj
för att backa ur.
och
5) Hjälp meny
d Välj
för att backa ur.
6) Val av instrument
• Välj 6.
• Välj vision DPB eller drillmaskin
• Validera
.
33
Mise en route
Start-up
Igånkörning av maskin
1)
1
2
3
2
2)
ON
+
H
1
H
2
5
4
3
3)
2
4
1
5
34
6
3
Mise en route
Start-up
Igånkörning av maskin
FR
A
•
1•
Sélectionner le menu REG.
•
2•
Vérifier que tous les paramètres sont correctement enregistrés : cœfficient de vitesse
•
3•
Sélectionner votre engrais
•
1•
Sélectionner le menu INFO.
•
2•
Sélectionner le mode PAR/TOT.
•
3•
Mettre à zéro chaque compteur avec la fonction RAZ.
•
4•
A la moindre alarme sonore et apparition de la cloche sur l’écran, sélectionner
Sélectionner OK pour revenir à l’écran de base.
•
5•
Sélectionner
C •
1•
Sélectionner le menu EPAN
•
2•
Vérifier : • que le choix de l’engrais est bon,
• que les trappes hydrauliques sont bien fermées,
•
3•
Sélectionner
•
4•
Sélectionner votre dose hectare :
B
5•
1
3
et effectuer l’essai de débit à poste fixe.
.
Votre épandage est DPA.
sélectionnant
6•
pour connaître les raisons.
si vous désirez enregistrer votre travail.
Vous pouvez moduler votre dose/hectare : sélectionner
•
.
.
utiliser directement le pavé numérique, valider avec
•
et largeur de travail
ou
puis retour en débit initial en
.
Vous pouvez activer le TRIBORD ou moduler soit le côté droit en sélectionnant
sélectionnant
.
Retour à la même dose droite/gauche en sélectionnant
soit le côté gauche en
.
35
Mise en route
Start-up
Igånkörning av maskin
1)
1
2
3
2
2)
ON
+
H
1
H
2
5
4
3
3)
2
4
1
5
36
6
3
Mise en route
Start-up
Igånkörning av maskin
GB
A
•
1•
Select the REG menu.
•
2•
Make sure that all parameters are correctly entered and saved: rate coefficient
•
3•
Select your fertilisers
•
1•
Select the INFO menu.
•
2•
Select the PAR/TOT mode.
•
3•
Reset each counter to zero with the RAZ function.
•
4•
As soon as you hear an alarm sound or see a bell appear on the screen, select
Select OK to return to the baseline menu.
•
5•
Select
C •
1•
Select the EPAN menu
•
2•
Check that: • the fertiliser selection is correct,
• the hydraulic shutters are closed.
•
3•
Select
•
4•
Select the application rate/ha:
use the numeric pad and confirm by pressing
.
You are spreading in DPA mode.
You can adjust the application rate/ha: select
or
B
•
•
5•
6•
and working width
.
.
to determine the cause[s].
to save.
and carry out the stationary test.
You can start the TRIBORD or select
and return to baseline flow rate by selecting
to adjust the RH side or select
Return to the same left/right application rate by selecting
.
to adjust the LH side.
.
37
Mise en route
Start-up
Igånkörning av maskin
1)
1
2
3
2
2)
ON
+
H
1
H
2
5
4
3
3)
2
4
1
5
38
6
3
Mise en route
Start-up
Igånkörning av maskin
SE
A
B
C
•
1•
Välj REG meny.
•
2•
Se till att alla parametrar är rätt inprogrammerade och lagrade: pulser för körsträcka
•
3•
Välj rätt gödningssort
•
1•
Välj INFO meny.
•
2•
Välj PAR/TOT.
•
3•
Nollställ räkneverk med RESET.
•
4•
Vid alarm signal och klocksymbol på displayen, välj
Välj OK för att återgå till bas meny.
•
5•
Välj
•
1•
Välj EPAN meny.
•
2•
Kontrollera att:
•
3•
Välj
•
4•
Tryck in mängd (kg/Ha) på den numeriska panelen och lagra med
•
5•
DPB anpassar spridningsmängd efter körhastigheten
6•
.
.
för att ta reda på orsak till fel.
om arbetet skall sparas..
• val av gödningssort är rätt,
• de hydrauliska manövrerade utmatningsspjällen är stängda.
för att ställa in rätt mängd.
Mängden kan ökas med
•
och arbetsbredd
eller minskas med
och för återgång till normal giva välj
För att aktivera TRIBORD eller modulera antingen höger sida - välj
För att återgå till justering på båda sidor igen välj
.
, eller vänster - sida välj
.
.
.
39
Informations
Information
Information
A
40
Informations
Information
Information
FR
A Enregistrement des données
a) Inscription des noms
Le DPB permet d’inscrire directement à l’écran
des informations alphabétiques : nom de l’engrais ou nom
de la parcelle par exemple.
• Utiliser le pavé numérique et ses symboles :
=J•K•L
=T•U•V
=A•B•C
=D•E•F
=M•N•O
=W•X•Y•Z
=G•H•I
=P•Q•R•S
b) Enregistrement du travail
• Le DPB permet d’enregistrer des données d’épandage afin de
les utiliser soit sur imprimante embarquée, soit sur ordinateur
portable.
• Veuillez contacter votre revendeur.
• Sélectionner le mode INFO
• Sélectionner la fonction
• Sélectionner le mode DEBUT.
• Sélectionner “3” enregistrement résumé. Le “1” est à utiliser en
GPS pour appliquer une carte de préconisation, avec lecteur de
carte PC MCIA. Le “2” permet d’enregistrer le travail réalisé sur
un lecteur de carte PC MCIA.
• Suivre les inscriptions et enregistrer à l’aide du pavé numérique
chaque indication. Valider avec
.
• Donner un code pour les fonctions supplémentaires à saisir
en écriture (ex. : nom du client pour une CUMA ou ETA).
• Sélectionner Pause/Foncs.
• Epandre.
• Sélectionner FIN à la fin du chantier.
• Procéder à cet enregistrement à chaque chantier d’épandage,
le DPB vous le conservera en mémoire.
• Vous disposer de 75 “emplacements” (Début > — < Fin).
.
GB
A Saving data
a) Entering names
The DPB unit enables direct entry of alphabetical data: fertiliser
or plot names, for example.
• Use the numeric pad and its symbols:
=A•B•C
=J•K•L
=T•U•V
=D•E•F
=M•N•O
=W•X•Y•Z
=G•H•I
=P•Q•R•S
b) Saving your work session
• The DPB unit enables you to save spreading data for use
either on the on-board printer or with a laptop computer.
• Please contact your distributor.
• Select the INFO mode
• Select the
function.
• Select DEBUT.
• Select “3” to resume a saved session. Use the “1” in GPS
mode to apply a recommendation map with a PC MCIA card
reader. Select “2” to save the work session to a PC MCIA card.
• Follow the instructions and enter each item with the numeric
key pad. Confirm with
.
• Enter a code for additional information to be entered manually
(e.g. client’s name for UMA or ETA).
• Select Pause/Foncs.
• Start spreading.
• Select FIN at the end of the session.
• Carry out this procedure at the end of each spreading
session; The DPB will save it in the memory for you.
• 75 ‘locations’ are available. (Début > — < Fin).
SE
A Spara data
a) Tryck in namn
På DPB-enheten går det att registrera både bokstäver och siffror
med den alfa-numeriska panelen.
• Använd de numeriska knapparna med bokstavssymboler:
=A•B•C
=J•K•L
=T•U•V
=D•E•F
=M•N•O
=W•X•Y•Z
=G•H•I
=P•Q•R•S
b) Spara arbetsdata
• Med DPB-enheten går det att spara spridningsdata för utskrift
på skrivare eller skickas till en bärbar PC.
• Kontakta leverantören för ytterliggare information.
• Välj INFO.
• Välj funktion
.
• Välj DEBUT.
• Välj « 3 » spara résumé. « 1 » används i GPS-läge för att lägga
till ett rekommendationskort, med PC MCIA kortläsare. « 2 »
används för att spara arbete gjort i en kortläsare PC MCIA.
• Följ instruktioner och bekräfta med numerisk panel. Lagra
med
.
• Tryck in kod för att skriva in ytterligare information (tex
kundens namn för UMA el ETA).
• Välj Pause/Foncs.
• Börja spridning.
• Välj FIN efter körning.
• Gå igenom denna procedur efter varje avslutad spridning:
DPB lagrar spridnings data i minnet.
• Det går att lagra 75 olika arbete (Début >-< Fin).
1
4
41
Informations
Information
Information
B
42
Informations
Information
Information
FR
B Modulation automatique
• Le DPB est compatible pour être piloté directement avec une
interface DGPS.
Veuillez consulter votre revendeur de la marque RDS.
• Le DPB peut être connecté à d’autres systèmes DGPS :
- AGRO-COM ACT CLAAS
- Field Star
MF-Fendt
- Info View
New Holland
- Hydro N Sensor
Hydro Agri
- Greenstar John Deere
Veuillez contacter votre revendeur.
GB
B Compatibility
• The DPB is compatible with the DGPS direct interface.
Please contact the DGPS distributor.
• The DPB can be interfaced with other DGPS brands:
- AGRO-COM ACT CLAAS
- Field Star
MF-Fendt
- Info View
New Holland
- Hydro Sensor
Hydro Agri
- Greenstar John Deere
Please contact your dealer
SE
B Automatisk mängdreglering
• DPB är kompatibel med DGPS interface. Kontakta din
DGPS-leverantör.
• DPB kan också kopplas samman med andra DGPS
fabrikat.
- AGRO-COM ACT CLAAS
- Field Star
MF-Fendt
- Info View
New Holland
- Hydro Sensor
Hydro Agri
- Greenstar John Deere
Kontakta din leverantör för ytterliggare information.
43
Informations
Information
Information
C
44
Informations
Information
Information
FR
C Diagnostique
• Sélectionner le mode
.
- Sélectionner
.
- Vous avez une visualisation des valeurs par défaut
du DPB.
• Toute intervention sur le boîtier ou la boîte de connexion
doit être réalisée par une personne compétente, familiarisée
et formée par le personnel Sulky-Burel.
Contacter votre revendeur.
GB
C Diagnosis
• Select mode
.
- Select
.
- The DPB’s default settings are displayed.
• Any work on the unit or connection box must be carried out
by competent personnel who are familiar with the equipment
and who have been trained by Sulky Burel.
Please contact your dealer.
SE
C Diagnos
• Välj Funktion
.
- Välj
.
- DPB fabriksinställningar visas.
• All felsökning på DPB-enheten och kopplingsboxen måste
utföras av personal som är utbildad på SULKY spridare.
Kontakta din leverantör vid tveksamheter.
45
Informations
Information
Information
D
46
Informations
Information
Information
FR
D Maintenance
• Suivre les instructions du manuel d’utilisation du DPX.
• Ne pas utiliser un nettoyeur haute pression,
surtout sur les parties électriques de la machine.
(Boîte de connexions, prise, vérins électriques).
• Stocker le boîtier dans un endroit sec, dans la malette
prévue à cet effet.
• Il est interdit de procéder à des travaux de soudure
sur le distributeur.
GB
D Maintenance
• Follow the DPX User Manual recommendations.
• Do not use high pressure cleaners, especially on the electrical
parts of the machine.
(Connection box, socket, electrical actuators).
• Store the unit in a dry place in the case provided.
• Do NOT carry out any soldering work on the unit.
SE
D Service & Underhåll
• Följ rekommendationer i instruktionsbok för DPX.
• Spola aldrig direkt på elektriska komponenter med
högtryck.
(Kopplingsbox, ingång, elektriskt ställdon)
• Lagra DPB-enheten i torrt utrymme i sin speciella
förpackning.
• Det är förbjudet att utföra svetsarbeten på DPB-enheten.
47
Informations
Information
Information
FR
E Pannes - Remèdes
Pannes
48
Remèdes
Le boîtier ne s’allume pas
Vérifier
- connexions boîtier / cordon d’alimentation
- fusibles cordon d’alimentation
La vitesse d’avancement n’est pas correcte
Vérifier
- connexion sur boîtier
- distance aimant / capteur
- la bonne rotation de l’aimant
- continuité du fil capteur
(résistance 100Ω ± 10)
- cœfficient / 100m
Compteur tonnage n’est pas correct
Vérifier
- connexion / machine
- la largeur de travail
- la vitesse d’avancement
- le coëfficient de l’engrais
- ouverture et fermeture des trappes
Essai de débit
Vérifier
Les trappes s’ouvrent au maxi puis au mini
Vérifier
- le coefficient de vitesse d’avancement
du tracteur.
- la largeur d’épandage
(24.00 attention à la virgule)
Le boîtier s’allume correctement,
mais les vérins ne bougent pas
Vérifier
- les fusibles
Compteur surface n’est pas correct
Vérifier
- connexion / machine
- la largeur de travail
- la vitesse d’avancement
Le débit
Vérifier
- le débit programmé
- le cœfficient d’engrais
- régime PDF 540 tr/min
- la largeur d’épandage
- la vitesse d’avancement du tracteur
- ouverture/fermeture des trappes
- la course des vérins
- le jalonnage
- le facteur de calibrage
- que les trappes soient fermées
Renouveler l’essai à poste fixe
Informations
Information
Information
GB
E Problems - Solutions
Solutions
Problems
The unit does not switch on
Check
- unit/power supply connections
- power cable fuses
The forward speed rate is incorrect
Check
- connection on unit
- sensor magnet clearance
- magnet rotation
- sensor wire continuity
(resistance 100 ± 10)
- 100-m coefficient
The tonnage counter reading is incorrect
Check
- connection / machine
- working width
- forward speed
- fertiliser coefficient
- shutter opening/closing
Calibration test
Check
Shutters open to maximum then to minimum
Check
- Tractor forward speed coefficient
- spreading width
(24.00 - note the position of the decimal point)
The unit switches on but the actuators do not move
Check
- Fuses
The area meter reading is incorrect
Check
- connection / machine
- working width
- forward speed
Flow rate
Check
- programmed flow rate
- fertiliser coefficient
- PTO speed = 540 rpm
- spreading width
- tractor’s forward speed
- shutter opening/closing performance
- actuator travel
- tramlining
- calibration factor
- shutters are closed
Repeat the stationary test.
49
Informations
Informations
Informationen
SE
E Felsökning - Åtgärder
Felsökning
50
Åtgärder
Enheten tänds inte upp
Kontrollera
-kontakter för spännings matning
-säkringar för spännings matning
Körhastighet är fel
Kontrollera
-kontakter / kablar
-avstånd magnet / sensor
-rotation av magnet
-sensor (100W±10)
-faktor för antal pulser / 100 m
Mängdmätning inte korrekt
Kontrollera
-kontakter på maskin
-arbetsbredd
-körhastighet (pulser / körsträcka)
-T-faktor för konstgödning
-öppning/stängning av spjäll
Utmatningsprov
Kontrollera
Spjällen öppnar till max därefter till min
Kontrollera
-faktor för traktorns sensor
-arbetsbredd (notera decimal 24.00m)
DPB-enheten tänds med ställdon rör sig inte
Kontrollera
-säkringar
Arealmätare visar fel
Kontrollera
-kontakter / kablar
-arbetsbredd
-körhastighet (pulser / körsträcka)
Utmatningsmängd
Kontrollera
-programmerad mängd
-faktor för konstgödning
-kraftuttagsvarv = 540rpm
-arbetsbredd
-körhastighet (pulser / körsträcka)
-öppning/stängning av utmatningsspjäll
-rörelse på elektriska ställdon
-fältmarkering
-faktor vid kalibrering
-stängda utmatningsspjäll
Upprepa testet på en fast plats.
Notes
Notes
Noteringar
51