1
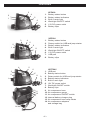
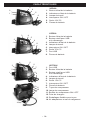
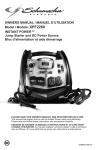
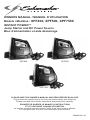
OWNERS MANUAL / MANUEL D’UTILISATION
Models / Modèles : XPF400, XPF500, XPF750C
INSTANT POWER™
Jump Starter and DC Power Source
Bloc d’alimentation et aide démarrage
XPF400
XPF500
XPF750C
PLEASE SAVE THIS OWNER’S MANUAL AND READ BEFORE EACH USE.
This manual will explain how to use the jump starter safely and effectively.
Please read and follow these instructions and precautions carefully.
ESSAYER DE GARDER LE MANUEL D’INSTRUCTIONS
ET LE LIRE AVANT CHAQUE UTILISATION.
Ce manuel explique comment utiliser l’unité d’une façon sûre et efficace.
S’il vous plaît lisez et suivez ces instructions et précautions.
0099001331-00
CONTENTS / TABLE DES MATIÈRES
IMPORTANT SAFETY INSTRUCTIONS.........................................................................3
PERSONAL SAFETY PRECAUTIONS...........................................................................3
FEATURES......................................................................................................................4
CHARGING THE INTERNAL BATTERY OF THE INSTANT POWER.............................5
CHECKING THE INTERNAL BATTERY LEVEL..........................................................5
CHARGING THE INTERNAL BATTERY......................................................................5
CHARGING THE INTERNAL BATTERY WHILE DRIVING..........................................5
USING THE INSTANT POWER.......................................................................................5
USING THE USB PORT .............................................................................................6
USING THE WORK LIGHT..........................................................................................6
POWERING A 12V DC DEVICE..................................................................................6
USING THE AIR COMPRESSOR ...............................................................................6
MAINTENANCE AND CARE...........................................................................................7
TROUBLESHOOTING.....................................................................................................7
BEFORE RETURNING FOR REPAIRS...........................................................................8
SPECIFICATIONS...........................................................................................................8
REPLACEMENT PARTS/ACCESSORIES......................................................................8
LIMITED WARRANTY.....................................................................................................9
WARRANTY CARD / CARTE DE GARANTIE............................................................... 11
CONSIGNES DE SÉCURITÉ IMPORTANTES.............................................................13
MESURES DE SÉCURITÉ PERSONNELLE................................................................13
CARACTÉRISTIQUES..................................................................................................14
CHARGE DE LA BATTERIE INTERNE.........................................................................15
CONTRÔLE DU NIVEAU DE BATTERIE INTERNE..................................................15
CHARGE DE LA BATTERIE INTERNE......................................................................15
CHARGE DE LA BATTERIE INTERNE PENDANT LA CONDUITE..........................15
CONTRÔLE DU NIVEAU DE BATTERIE INTERNE.....................................................15
UTILISATION DU PORT USB....................................................................................16
UTILISATION DE LA LAMPE ....................................................................................16
ALIMENTER LES APPAREILS DE 12V.....................................................................16
UTILISATION DU COMPRESSEUR D’AIR ...............................................................16
MAINTENANCE ET ENTRETIEN..................................................................................17
DÉPANNAGE.................................................................................................................17
AVANT DE RETOURNER POUR LES RÉPARATIONS................................................18
SPÉCIFICATIONS.........................................................................................................18
PIÈCES DE RECHANGE / ACCESSOIRES.................................................................19
GARANTIE LIMITÉE......................................................................................................19
THIS UNIT CONTAINS A SEALED, NON-SPILLABLE LEAD-ACID
BATTERY. MUST BE DISPOSED OF PROPERLY.
WARNING: Possible explosion hazard. Contact with battery acid may
cause severe burns and blindness. Keep out of reach of children.
CET APPAREIL CONTIENT UNE BATTERIE SCELLÉE SANS
ÉCOULEMENT AU PLOMB-ACIDE. LA BATTERIE DOIT ÊTRE JETÉE ADÉQUATEMENT.
AVERTISSEMENT : Risque d’explosion possible. Le contact avec l’acide des batteries
peut causer de graves brûlures et la cécité. Conserver hors de portée des enfants.
IMPORTANT SAFETY INSTRUCTIONS
WARNING – RISK OF EXPLOSIVE GASES
WORKING IN THE VICINITY OF A LEAD-ACID BATTERY IS DANGEROUS. BATTERIES
GENERATE EXPLOSIVE GASES DURING NORMAL BATTERY OPERATION. IT IS
IMPORTANT THAT YOU FOLLOW THESE INSTRUCTIONS EACH TIME YOU USE THE
INSTANT POWER.
To reduce risk of battery explosion, follow these instructions and those published by
battery manufacturer and manufacturer of any equipment you intend to use in vicinity
of battery. Review cautionary marking on these products and on engine.
WARNING: Pursuant to California
Proposition 65, this product contains
chemicals known to the State of California
to cause cancer and birth defects or other
reproductive harm. Wash hands after
handling.
• To prevent arcing, never allow the clamps to
touch together or to contact the same piece
of metal.
• Use of an attachment not recommended or
sold by Schumacher® Electric Corporation
may result in damage to the unit or personal
injury.
• Keep out of reach of children.
• Do not disassemble the Instant Power.
Take it to a qualified service professional
if service or repair is required. Incorrect
assembly may result in fire or electrical
shock.
• Never operate the Instant Power if it is
damaged.
• If someone else uses the Instant Power,
ensure they are well informed on how to
use it safely, and have read and understood
the operating instructions.
• Do not use the Instant Power to jump a
vehicle while charging the internal battery.
• The Instant Power is NOT designed to be
installed as a replacement for a vehicle
battery.
• Do not recharge the Instant Power with a
damaged extension cord.
• The Instant Power gets hot during charging
and must have proper ventilation.
• Use ONLY on vehicles, boats and garden
tractors powered with a 12V DC battery
system.
• Do not set the Instant Power on flammable
materials, such as carpeting, upholstery,
paper, cardboard, etc.
• If the engine fails to start after the
recommended number of attempts,
disconnect the unit and look for other
problems that may need to be corrected.
• Place the Instant Power as far away from
the battery being jumped as the cables
will permit.
• Use the Instant Power for jump starting
lead-acid batteries ONLY. Do not use for dry
cell batteries that are commonly used with
home appliances.
• Do not expose the Instant Power to rain
or snow.
• Never place the Instant Power directly
above battery being jumped.
PERSONAL SAFETY PRECAUTIONS
• Wear complete eye and clothing protection
when working near lead-acid batteries.
Always have someone nearby for help.
• Neutralize any acid spills thoroughly with
baking soda before attempting to clean up.
• Have plenty of fresh water, soap and baking
soda nearby for use, in case battery acid
contacts your eyes, skin, or clothing. Wash
immediately with soap and water and seek
medical attention.
• If battery acid comes in contact with eyes,
flush eyes immediately for a minimum 10
minutes and get medical attention.
• Remove all personal metal items from your
body, such as rings, bracelets, necklaces
and watches. A battery can produce a short
circuit current high enough to weld a ring to
metal, causing a severe burn.
• Never smoke or allow a spark or flame in
the vicinity of the battery or engine.
•3•
FEATURES
3
4
2
1
5
6
3
4
XPF500
1. Battery status button
2. Rotary switch for USB and jump starter
3. Battery status indicators
4. Built-in work light
5. Worklight ON/OFF switch
6. 12V DC power outlet
7. USB port
8. Battery clips
5
2
6
1
7
4
8
5
6
3
7
2
8
1
10 11
12
13
XPF400
1. Battery status button
2. Battery status indicators
3. Built-in work light
4. Worklight ON/OFF switch
5. 12V DC power outlet
6. Battery clips
9
XPF750C
1. USB port
2. Battery status button
3. Rotary switch for USB and jump starter
4. Battery status indicators
5. Built-in work light
6. 12V DC power outlet
7. Worklight ON/OFF switch
8. Battery clips
9. Air compressor hose
10.Air compressor gauge
11.Air compressor ON/OFF switch
12.Internal battery charger plug
13.Air compressor hose wrap cleats
14.Air compressor adapters
and storage bag
14
It
•4•
CHARGING THE INTERNAL BATTERY OF THE INSTANT POWER
IMPORTANT! CHARGE IMMEDIATELY
AFTER PURCHASE, AFTER EACH USE
AND EVERY 30 DAYS, TO KEEP THE
INSTANT POWER’S INTERNAL BATTERY
FULLY CHARGED. RECHARGING
BATTERY AFTER EACH USE WILL
PROLONG BATTERY LIFE.
5.When charging is complete, unplug the
extension cord from the wall outlet and the
back of the unit.
CHECKING THE INTERNAL BATTERY
LEVEL
Press the Battery Status button on the
front of the unit. The LED lights will indicate
the charge level as follows:
RED indicates a 50% or lower charge;
immediately charge the unit.
YELLOW indicates a 50% and higher charge.
GREEN indicates the battery is fully charged.
CHARGING THE INTERNAL BATTERY
Charge the internal battery for the Instant
Power using an extension cord (not included).
NOTE: Use of an improper extension cord
could result in a risk of fire and electric
shock.
1.Flip the AC connector on the back of the
unit up and plug in an 18 AWG or larger
extension cord.
2.Plug the extension cord into a 120V AC
electrical wall outlet.
3.The RED LED will light, indicating charging.
4.The GREEN LED will light when the
battery is fully charged. This could take up
to 72 hours. The charger will automatically
go into maintain mode and maintain the
battery at full charge without damaging it.
CHARGING THE INTERNAL BATTERY
WHILE DRIVING
You may also charge the internal battery
while driving, using a male-to-male
charger cable (part number 94500109 –
not included).
IMPORTANT: DO NOT CHARGE
INTERNAL BATTERY FOR MORE THAN
30 MINUTES OR LEAVE THE BATTERY
UNATTENDED. IT COULD EXPLODE,
CAUSING PROPERTY DAMAGE OR
PERSONAL INJURY.
1.Make sure the car is running.
2.Insert one end of the accessory cable into
the 12V DC power outlet.
3.Insert the other end of the accessory
cable into the vehicle’s accessory outlet
(lighter socket).
NOTE: The RED and the GREEN LEDs do
not operate during this method of charging.
Using this method to charge the battery
overrides the maintain mode and the battery
can be overcharged.
4.Monitor the progress of the charge by
pressing the Battery Status button on
the front of the unit. When it reaches a full
charge, disconnect the accessory cable
from the Instant Power, then from the
lighter socket of the vehicle.
NOTE: Completely disconnect the charger
cable when the engine is not running.
USING THE INSTANT POWER
IMPORTANT: Using the Engine Start
feature without a battery installed in the
vehicle could cause damage to the vehicle’s
electric system.
1.Turn the ignition OFF before making the
cable connections.
2.Lay the DC cables away from any
fan blades, belts, pulleys and other
moving parts.
3.For a negative-ground vehicle (as in most
vehicles), connect the Instant Power’s
POSITIVE (RED) clamp to the POSITIVE
(POS, P, +) battery post. Next, connect
the NEGATIVE (BLACK) clamp to the
vehicle chassis or engine block, away
from the battery.
•5•
4.For a positive-ground vehicle, connect
the Instant Power’s NEGATIVE (BLACK)
clamp to the NEGATIVE (NEG, N, -)
battery post. Next, connect the POSITIVE
(RED) clamp to the vehicle chassis or
engine block away from the battery.
5.Turn the switch to the ON position (does
not apply to the XPF400). Crank the
engine for no more than 8 seconds. If
the engine does not start, wait 2 minutes
before cranking again.
6.After the engine starts, turn the switch to
the OFF position and remove the clips from
the battery.
7.Charge the Instant Power as soon as
possible after use.
Estimated run-times
USING THE USB PORT
(Models XPF500 and XPF750C)
The USB port provides up to 500mA
at 5V DC.
1.Ensure the battery clips are securely
clipped on the storage holders.
2.Turn the Instant Power ON.
3.Plug the device into the USB port.
4.Turn the USB device on.
5.When finished using the USB port, turn
the switch to the OFF position.
6.Charge the Instant Power as soon as
possible after using the USB port.
APPLIANCE
TYPE
USING THE WORK LIGHT
The work light is controlled by a sliding ON/
OFF switch located on the front of the
Instant Power. Make sure the lamp is turned
OFF when the unit is being recharged or
stored. The lamp is efficient and will operate
up to 100 hours on a full charge.
Position the Instant Power on a flat, stable
surface near the intended work area.
Ensure the battery clips are securely clipped
on the storage holders.
POWERING A 12V DC DEVICE
The Instant Power is a power source for all
12V DC accessories that are equipped with
a 12V accessory plug. Use it for power
outages and fishing or camping trips.
NOTE: Do not power a 12V device with the
Instant Power while charging the internal
battery.
1.Make sure the device to be powered
is OFF before inserting the 12V DC
accessory plug into the 12V DC
accessory outlet.
2.Open the protective cover of the DC power
outlet on the Instant Power.
3.Plug the 12V DC device into the DC
power outlet and turn on the 12V DC
device (if required).
4.When finished, turn off the DC device
(if required) and unplug from the DC
power outlet.
CAUTION: Do not use the Instant Power
to run appliances that draw more than
15A DC.
NOTE: Extended operation of a 12V DC
device may result in excessive battery
drain. Recharge the Instant Power
immediately after unplugging the 12V
DC device.
•6•
EST
WATTAGE
XPF400
XPF500
XPF750C
Cell phone
4 watts
13 hrs
19 hrs
34 hrs
Fluorescent
light
4 watts
15 hrs
21 hrs
34 hrs
Radios, fans
9 watts
6.7 hrs
9.3 hrs
14 hrs
Depth finder
9 watts
6.7 hrs
9.3 hrs
14 hrs
Camcorder
15 watts
4 hrs
5.6 hrs
7 hrs
Electrical tool
24 watts
2.5 hrs
3.5 hrs
5 hrs
Electric
cooler
48 watts
1.3 hrs
1.8 hrs
2 hrs
Car vacuum,
air compressor
80 watts
0.8 hrs
1.1 hrs
1.8 hrs
NOTE: Actual time may vary. Times are based on the
internal battery being fully charged.
USING THE AIR COMPRESSOR
(Model XPF750C)
WARNING. Read the instructions of the
product being inflated before using the
compressor. Avoid overinflation; do not
exceed the manufacturer’s recommended
pressures. Do not leave the air compressor
unattended during use.
NOTE: Before you use the compressor for
the first time, you must install the
compressor hose wrap cleats. To install:
Press each cleat into its corresponding
mounting hole on the back of the jump
starter until it clicks into place.
Wrap the compressor hose around these
cleats when it is not being used.
1.Ensure the battery clips are securely on
the storage holders.
2.Remove the air compressor hose
from the storage cleats on the back of
the Instant Power. Install adapters as
necessary.
3.Attach the air compressor hose to the
product or accessory to be inflated by
flipping down the lever.
4.Toggle the Compressor Switch up to the
ON position and inflate the product.
5.When the product is inflated to the proper
air pressure (using the air compressor
gauge), toggle the Compressor Switch
down to the OFF position and remove
the hose.
6.Do not run for more than 10 minutes
maximum at a time. Allow the Instant
Power to cool down for 10 minutes before
using again.
Estimated time for inflating
NOTE: To prevent overheating, the
compressor has built-in thermal protection
that will turn the compressor off before it
overheats. If the compressor shuts off, wait
a few minutes and it will automatically
restart when the compressor cools.
NOTE: The air compressor is rated for
150 PSI.
Vehicle tires 13-16"
6-24 minutes
Bike tires
1-3 minutes
Sports balls
30 seconds
These times are approximate, use the air compressor
gauge to ensure the proper pressure has been reached.
Do not overinflate.
MAINTENANCE AND CARE
A minimal amount of care can keep your
Instant Power working properly for years.
• Recharge the unit once a month when not
in use.
• Unplug the Instant Power before performing
any maintenance.
• Clean the clips and the case each time you
are finished using it.
• The Instant Power can be stored in any
position.
• Store clips on their support posts, to ensure
they do not come into contact with any
metallic surface.
• Never completely discharge the internal
battery.
TROUBLESHOOTING
PROBLEM
POSSIBLE CAUSE
The Instant Power won’t jump Clips are not making a good
start my car.
connection to the battery.
The Instant Power won’t
power my 12V device.
The battery in the Instant
Power won’t hold a charge.
REASON/SOLUTION
Check for poor connection to
battery and frame. Make sure
connection points are clean.
Connections are reversed.
Disconnect the Instant Power
and reverse the clips.
The Instant Power’s battery
is not charged.
Press the Battery Status button
on the front of the unit. The
LEDs will indicate the status of
charge.
The vehicle’s battery is
defective.
Have the battery checked.
Models XPF500 and
XPF750C: the Instant Power
is not turned on.
Turn the Instant Power
ON/OFF switch to the ON
position.
The 12V device is not
turned on.
Turn on the 12V device.
The Instant Power’s battery
is not charged.
Check the battery charge
status by pressing the Battery
Status button.
The 12V device draws more
than 15A or has a short
circuit.
Disconnect the 12V device.
The internal breaker will
automatically reset after a
minute or two. Try the 12V
device again.
The battery is bad (will not
accept a charge).
Have the battery checked.
•7•
BEFORE RETURNING FOR REPAIRS
If these solutions do not eliminate the problem,
or for more information about troubleshooting,
contact customer service for assistance:
[email protected] • www.batterychargers.com
or call 1-800-621-5485
Monday-Friday 7:00am to 5:00pm CST
For REPAIR OR RETURN, contact Customer Service at 1-800-621-5485.
DO NOT SHIP UNIT until you receive a RETURN MERCHANDISE AUTHORIZATION
(RMA) number from Customer Service at Schumacher Electric Corporation.
SPECIFICATIONS
XPF400
Internal battery type
Sealed, maintenance-free, AGM, lead-acid
Nominal voltage
12V DC
12V DC power outlet
15A
Booster cables
8 AWG, 18" long
Weight
7 lbs.
XPF500
Internal battery type
Sealed, maintenance-free, AGM, lead-acid
Nominal voltage
12V DC
12V DC power outlet
15A
Booster cables
8 AWG, 18" long
Weight
8.2 lbs.
XPF750C
Internal battery type
Sealed, maintenance-free, AGM, lead-acid
Nominal voltage
12V DC
12V DC power outlet
15A
Booster cables
8 AWG, 20.5" long
Weight
15.73 lbs.
REPLACEMENT PARTS/ACCESSORIES
Male-To-Male Accessory Cable...............................................................................94500109
•8•
LIMITED WARRANTY
SCHUMACHER ELECTRIC CORPORATION, 801 BUSINESS CENTER DRIVE,
MOUNT PROSPECT, IL 60056-2179, MAKES THIS LIMITED WARRANTY TO THE
ORIGINAL RETAIL PURCHASER OF THIS PRODUCT. THIS LIMITED WARRANTY
IS NOT TRANSFERABLE OR ASSIGNABLE.
Schumacher Electric Corporation (the “Manufacturer”) warrants this Instant Power for one
(1) year and the internal battery for ninety (90) days from the date of purchase at retail
against defective material or workmanship that may occur under normal use and care.
If your unit is not free from defective material or workmanship, Manufacturer’s obligation
under this warranty is solely to repair or replace your product, with a new or reconditioned
unit, at the option of the Manufacturer. It is the obligation of the purchaser to forward the
unit, along with proof of purchase and mailing charges prepaid to the Manufacturer or its
authorized representatives in order for repair or replacement to occur.
Manufacturer does not provide any warranty for any accessories used with this product
that are not manufactured by Schumacher Electric Corporation and approved for use
with this product. This Limited Warranty is void if the product is misused, subjected to
careless handling, repaired, or modified by anyone other than Manufacturer or if this
unit is resold through an unauthorized retailer.
Manufacturer makes no other warranties, including, but not limited to, express,
implied or statutory warranties, including without limitation, any implied warranty
of merchantability or implied warranty of fitness for a particular purpose. Further,
Manufacturer shall not be liable for any incidental, special or consequential damage
claims incurred by purchasers, users or others associated with this product, including,
but not limited to, lost profits, revenues, anticipated sales, business opportunities,
goodwill, business interruption and any other injury or damage. Any and all such
warranties, other than the limited warranty included herein, are hereby expressly
disclaimed and excluded. Some states do not allow the exclusion or limitation of
incidental or consequential damages or length of implied warranty, so the above
limitations or exclusions may not apply to you. This warranty gives you specific legal
rights and it is possible you may have other rights which vary from this warranty.
THIS LIMITED WARRANTY IS THE ONLY EXPRESS LIMITED WARRANTY AND
THE MANUFACTURER NEITHER ASSUMES OR AUTHORIZES ANYONE TO
ASSUME OR MAKE ANY OTHER OBLIGATION TOWARDS THE PRODUCT OTHER
THAN THIS WARRANTY.
Schumacher® and the Schumacher Logo
are registered trademarks
of Schumacher Electric Corporation.
•9•
• 10 •
WARRANTY CARD / CARTE DE GARANTIE
SAVE ON POSTAGE! ACTIVATE YOUR WARRANTY ONLINE – THE QUICK AND EASY WAY!
Go to www.batterychargers.com to register your product online.
(No internet access? Send in the completed warranty card.)
1 YEAR LIMITED
WARRANTY PROGRAM
REGISTRATION
MODEL:______________________ DESCRIPTION:_________________________
This is the only express limited warranty, and the manufacturer neither assumes
nor authorizes anyone to assume or make any other obligation. There is no other
warranty, other than what is described in the product owner’s manual.
The warranty card should be submitted within 30 days of purchase. The customer
must keep the ORIGINAL receipt because it will be required for any warranty claims.
This warranty is not transferable. Send warranty card only.
DO NOT SEND UNIT TO THIS ADDRESS FOR REPAIR.
Mail this card to:
Schumacher Electric Corporation
801 Business Center Drive
Mount Prospect, IL 60056-2179
Name_______________________________________________________________
Street Address________________________________________________________ City_________________________________ State__________ Zip Code__________
Phone______________________ Email____________________________________
Store Name Where Purchased____________________ Date of Purchase__________
Store Location_____________________ UPC Number_________________________ Serial Number_______________________________________ (SEE PRODUCT)
For faster warranty activation, go to www.batterychargers.com to register your product online.
PAS BESOIN DE VOIE POSTAL ! ACTIVEZ VOTRE GARANTIE SUR INTERNET – LA VOIE
PLUS RAPIDE ET FACILE! Aller sur www.batterychargers.com pour enregistrer votre
produit en ligne. (Pas d’accès internet? Envoyer la carte de garantie par poste.)
INSCRIPTION AU
PROGRAMME DE GARANTIE
LIMITÉE DE UN AN
MODÉLE :_____________________ DESCRIPTION :_________________________
Ceci représente la seule garantie limitée expresse, et le fabricant n’accepte ni
autorise qui que ce soit d’assumer ou de prendre toute autre obligation. Il n’existe
aucune autre garantie que celle décrite dans le manuel du propriétaire du produit.
La carte de garantie doit être soumise dans les 30 jours suivant l’achat.
Le client doit retenir le reçu de caisse ORIGINAL puisqu’il sera requis pour une
éventuelle réclamation au titre de la garantie. Cette garantie n’est pas transférable.
Envoyer la carte de garantie seulement.
NE PAS ENVOYER L’UNITÉ À CETTE ADRESSE POUR RÉPARATION.
Envoyer cette carte à :
Schumacher Electric Corporation
801 Business Center Drive
Mount Prospect, IL 60056-2179 (É.-U )
Nom________________________________________________________________
Adresse_____________________________________________________________
Ville_____________________________Prov_______________ Code postal________
Tél :________________________ Courriel__________________________________
Nom du magasin où vous avez acheté le produit_____________ Date de l’achat_____
Emplacement du magasin____________________ Numéro CUP________________
Numéro de série_____________________________________ (VOIR PRODUIT)
Pour l’activation rapide de garantie, aller sur www.batterychargers.com pour enregistrer votre produit en ligne.
• 11 •
CONSIGNES DE SÉCURITÉ IMPORTANTES
AVERTISSEMENT – RISQUE DE GAZ EXPLOSIFS
TRAVAILLER À PROXIMITÉ D’UNE BATTERIE PLOMB-ACIDE EST DANGEREUX. EN
FONCTIONNEMENT NORMALE, LES BATTERIES PRODUISENT DES GAZ EXPLOSIFS.
POUR CETTE RAISON IL EST IMPORTANT QUE VOUS SUIVIEZ CES INSTRUCTIONS
CHAQUE FOIS QUE VOUS UTILISEZ L’UNITÉ.
Pour réduire les risques d’explosion de la batterie, suivez ces instructions et celles
publiées par le fabricant de la batterie et le fabricant de tout équipement que vous
avez l’intention d’utiliser à proximité de la batterie. Examinez les marquages sur ces
produits et sur le moteur.
AVERTISSEMENT : Conformément à la
• Pour éviter un arc électrique, ne jamais
Proposition 65 en Californie, ce produit
laisser les pinces se toucher entre eux ou
contient des produits chimiques reconnus
mis avec le même morceau de métal.
par l’état de Californie pour causer des
• L’utilisation d’un accessoire non
cancers et des malformations congénitales
recommandé ou vendu par le fabricant peut
ou d’autres problèmes de reproduction,
entraîner des dommages à l’appareil ou des
laver les mains après chaque utilisation.
blessures corporelle.
• Ne pas laisser à la portée des enfants.
• Ne démontez pas l’unité. Prenez-la à une
personne qualifiée si une réparation est
nécessaire. Un montage incorrect peut
provoquer un incendie ou un choc électrique.
• Ne pas utiliser l’unité pour démarrer un
véhicule pendant le chargement de la
batterie interne.
• Ne jamais utiliser l’unité si elle est
endommagée.
• Si quelqu’un d’autre utilise l’unité, assurezvous qu’ils sont bien informés sur la façon
de l’utiliser en toute sécurité, et avoir lu et
compris les instructions de fonctionnement.
• L’unité n’est pas conçue pour être installée
comme un remplacement de la batterie du
véhicule.
• Ne pas recharger l’unité avec une rallonge
endommagée.
• Utiliser SEULEMENT sur les véhicules, les
bateaux et les tracteurs de jardin alimentés
par un système de batterie de 12 V DC.
• L’unité devient chaude pendant la charge
et doit avoir une ventilation adéquate.
• Ne mettez pas l’unité sur des matériaux
inflammables, tels que les tapis, tissus
d’ameublement, papier, carton, etc..
• Si le moteur ne démarre pas après le nombre
de tentatives recommandé, débranchez l’unité
et chercher d’autres problèmes qui peuvent
avoir besoin d’être corrigée.
• Placez l’unité loin de la batterie qui va être
utilisé étant que les câbles le permettent.
• Ne pas exposer l’unité à la pluie ou la neige.
• Ne placez jamais l’unité directement
au-dessus de la batterie qui va être utilisé.
• Utilisez l’unité pour le démarrage des
batteries au plomb acide SEULEMENT. Ne
pas utiliser pour des batteries sèches qui
sont couramment utilisés dans les appareils
ménagers.
MESURES DE SÉCURITÉ PERSONNELLE
• Porter des lunettes et des vêtements de
protection lorsque vous travaillez à
proximité des batteries au plomb. Toujours
avoir quelqu’un à proximité pour vous aider.
• Avoir beaucoup d’eau fraîche, du savon et
du bicarbonate de soude pour une utilisation
à proximité, en cas si l’acide touche vos
yeux, la peau ou les vêtements. Laver
immédiatement avec du savon et de l’eau et
consulter un médecin.
• Si l’acide de la batterie entre en contact avec
les yeux, rincer les yeux immédiatement
pendant 10 minutes et consulter un médecin.
• Neutraliser l’acide avec du bicarbonate de
soude avant d’essayer de nettoyer.
• Retirez tous les objets personnels en métal
de votre corps, tels que des bagues,
bracelets, colliers et montres. Une batterie
peut produire un court-circuit suffisamment
élevé pour souder une bague de métal,
causant de graves brûlures.
• Jamais fumer ou laisser une étincelle ou
d’une flamme à proximité de la batterie ou
du moteur.
• 13 •
CARACTÉRISTIQUES
3
4
2
1
1.
2.
3.
4.
5.
6.
5
6
3
4
XPF500
1. Bouton d’état de la batterie
2. Bouton rotatif pour USB
et le démarrage
3. Indicateurs d’état de la batterie
4. Lampe de travail
5. Interrupteur ON / OFF
6. Sortie 12V CC
7. Port USB
8. Pinces de batterie
5
2
6
1
8
7
4
5
6
3
7
2
8
1
XPF400
Bouton d’état de la batterie
Indicateurs d’état de la batterie
Lampe de travail
Interrupteur ON / OFF
Sortie 12V CC
Pinces de batterie
9
10 11
12
13
XPF750C
1. Port USB
2. Bouton d’état de la batterie
3. Bouton rotatif pour USB
et le démarrage
4. Indicateurs d’état de la batterie
5. Lampe de travail
6. Sortie 12V CC
7. Interrupteur ON / OFF
8. Pinces de batterie
9. Tuyau du compresseur
10.Jauge du compresseur
11.Bouton du compresseur ON / OFF
12.Prise du chargeur
13.Emballages flexibles pour tuyau
14.Air adaptateurs et sac de rangement
14
• 14 •
CHARGE DE LA BATTERIE INTERNE
IMPORTANT! CHARGE IMMÉDIATEMENT
APRÈS L’ACHAT, APRÈS CHAQUE
UTILISATION ET TOUS LES 30 JOURS,
POUR GARDER LA BATTERIE INTERNE
DE L’UNITÉ ENTIÈREMENT CHARGÉE.
RECHARGE DE LA BATTERIE APRÈS
CHAQUE UTILISATION PROLONGERA LA
VIE DE BATTERIE.
CONTRÔLE DU NIVEAU DE BATTERIE
INTERNE
Appuyez sur le bouton d’état de la batterie.
Les voyants DEL indiquent le niveau de
charge comme suit :
ROUGE indique une charge de 50 % ou
moins; immédiatement charger l’appareil.
JAUNE indique 50 % et plus de charge.
VERT indique que la batterie est
complètement chargée.
CHARGE DE LA BATTERIE INTERNE
Chargez la batterie interne de l’unité
utilisant une rallonge (non inclus).
REMARQUE : L’utilisation d’une rallonge
inadéquate peut entraîner un risque
d’incendie et d’électrocution.
1.Appuyer sur le connecteur CA à l’arrière
de l’appareil et brancher un cordon AWG
18 ou plus grande.
2.Branchez la rallonge dans une prise
électrique murale 120V AC.
3.LE VOYANT ROUGE s’allume, indiquant
la charge.
4.LE VOYANT VERT s’allume lorsque la
batterie est complètement chargée. Cela
pourrait prendre jusqu’à 72 heures. Le
chargeur passe automatiquement en
mode maintien et de maintenir la batterie
à pleine charge sans l’endommager.
5.Lorsque la charge est terminée,
débranchez le rallonge de la prise
murale et à l’arrière de l’appareil.
CHARGE DE LA BATTERIE INTERNE
PENDANT LA CONDUITE
Vous pouvez également charger la batterie
interne pendant la conduite, en utilisant un
câble de chargement mâle-mâle (Numéro
94500109 - non inclus).
IMPORTANT : NE PAS RECHARGER LA
BATTERIE INTERNE DE PLUS DE 30
MINUTES OU LAISSER LA BATTERIE
SANS SURVEILLANCE. IL POURRAIT
EXPLOSER ET PROVOQUER DES
DOMMAGES MATÉRIELS ET DES
BLESSURES.
1.Assurez-vous que la voiture est en
marche.
2.Insérez une extrémité du câble dans la
prise 12V.
3.Insérez l’autre extrémité du câble dans
la prise accessoire du véhicule (allumecigare).
REMARQUE : Le VOYANT ROUGE et
VERT ne fonctionnent pas pendant ce
mode de fonctionnement. En utilisant cette
méthode pour charger la batterie la batterie
peut être surchargée.
4.Surveillez la progression de la charge
en appuyant sur le bouton d’état de la
batterie de l’unité. Quand il atteint une
charge complète, débranchez le câble
accessoire de l’unité, puis à partir de
l’allume-cigare du véhicule.
REMARQUE : Débranchez complètement
le cordon du chargeur lorsque le moteur
n’est pas en marche.
CONTRÔLE DU NIVEAU DE BATTERIE INTERNE
IMPORTANT : Utilisation de la fonction de
démarrage du moteur sans batterie installée
dans le véhicule peut causer des dommages
au système électrique du véhicule.
1.Coupez le contact avant d’effectuer les
connexions des câbles.
2.Disposez les câbles CC loin de toutes
pales de ventilateur, courroies, poulies et
autres pièces mobiles.
3.Pour un véhicule à masse négative
(comme dans la plupart des véhicules),
connectez POSITIF l’unite (Rouge) pince
à la borne de la batterie (POS, P, +)
• 15 •
POSITIVE. Ensuite, connectez la borne
NÉGATIVE (NOIRE) pince au châssis
du véhicule ou le bloc moteur, loin de la
batterie.
4.Pour un véhicule positive terre, branchez
NEGATIVE l’unité (NOIR) pince à la borne
NÉGATIVE (NEG, N, -) de la batterie.
Ensuite, connectez la borne POSITIVE
(ROUGE) pince au châssis du véhicule ou
le bloc moteur à distance de la batterie.
5.Tournez le sélecteur rotatif à la position
ON (Ne s’applique pas au modèle
XPF400). Démarrer le moteur pendant
pas plus de 8 secondes. Si le moteur ne
démarre pas, attendre 2 minutes avant
une nouvelle tentative.
6.Après le démarrage du moteur, tournez
le sélecteur rotatif à la position OFF et
retirer les pinces de la batterie.
7.Chargez l’unité dès que possible après
chaque utilisation.
UTILISATION DU PORT USB
(Modèles XPF500 et XPF750C)
Le port USB fournit presque 500 mA avec
5V CC.
1.S’assurer que les pinces de batterie sont
correctement installées sur les supports
de stockage.
2.Tournez le sélecteur rotatif ON.
3.Branchez l’appareil sur le port USB.
4.Activez l’appareil mis sur l’USB.
5.Lorsque vous avez terminé du port
USB, mettez le sélecteur rotatif sur la
position OFF.
6.Chargez l’unité dès que possible après
l’utilisation du port USB.
UTILISATION DE LA LAMPE
La lumière de travail est commandé par un
sélecteur ON / OFF situé en avant de l’unité.
Assurez-vous que la lampe est éteinte
lorsque l’appareil est en cours de recharge ou
stockées. La lampe est efficace et fonctionne
jusqu’à 100 heures sur une charge complète.
Placez la puissance instantanée sur une
surface plane et stable près de la zone de
travail prévu.
S’assurer que les pinces de batterie sont
correctement mis sur les supports de
stockage.
ALIMENTER LES APPAREILS DE 12V
Le bloc d’alimentation est une source
d’énergie pour tous les accessoires 12V CC
qui sont équipés d’une prise accessoire
12V. Utilisez le pour des pannes de courant
et des voyages de pêche ou de camping.
REMARQUE : Ne pas alimenter un appareil
12V avec l’unité pendant le chargement de
la batterie interne.
1.Assurez-vous que le dispositif à alimenter
est éteint avant d’insérer la prise 12V
CC accessoire dans la prise 12V CC
accessoire.
2.Ouvrez le couvercle de protection de la
prise d’alimentation CC.
3.Branchez l’appareil 12V CC dans la prise
d’alimentation CC et allumez l’appareil
12V CC (si nécessaire).
• 16 •
4.Lorsque vous avez terminé, éteignez
l’appareil CC (si nécessaire) et
débranchez la prise d’alimentation CC.
ATTENTION : Ne pas utiliser l’unité pour
alimenter les appareils qui attirent plus
que 15A.
REMARQUE : Le fonctionnement prolongé
d’un dispositif 12V CC peut entraîner un
épuisement excessive de la batterie.
Rechargez la batterie interne immédiatement
après avoir débranché la prise 12V.
Temps estimé pour usage de 12V
TYPE
APPAREIL
EST.
WATT
XPF400
XPF500
XPF750C
Téléphone
cellulaire
4 watts
13 hrs
19 hrs
34 hrs
Lumière
fluorescent
4 watts
15 hrs
21 hrs
34 hrs
Radios,
ventilateurs
9 watts
6,7 hrs
9,3 hrs
14 hrs
Sonde des
profondeurs
9 watts
6,7 hrs
9,3 hrs
14 hrs
Caméscope
15 watts
4 hrs
5,6 hrs
7 hrs
Outil
électrique
24 watts
2,5 hrs
3,5 hrs
5 hrs
Refroidisseur
électrique
48 watts
1,3 hrs
1,8 hrs
2 hrs
Aspirateur et
compresseur
80 watts
0,8 hrs
1,1 hrs
1,8 hrs
REMARQUE : La durée réelle peut varier. Les temps sont
basées sur la batterie interne complètement chargée.
UTILISATION DU COMPRESSEUR D’AIR
(Modèle XPF750C)
AVERTISSEMENT : Lisez les instructions du
produit étant gonflé avant d’utiliser le
compresseur. Évitez de trop gonfler, ne pas
dépasser les pressions recommandées par le
fabricant. Ne laissez pas le compresseur d’air
sans surveillance pendant son utilisation.
REMARQUE : Avant d’utiliser le
compresseur pour la première fois, vous
devez installer les taquets flexibles
compresseurs intégrés. Pour l’installer:
Appuyez sur chaque cale dans son trou de
montage correspondant à l’arrière de l’unité
jusqu’à ce qu’elle s’enclenche.
Enroulez le tuyau du compresseur autour
de ces taquets quand il n’est pas utilisé.
1.S’assurer que les pinces de batterie sont
solidement sur les supports de stockage.
2.Retirer le tuyau du compresseur d’air à
partir des taquets de stockage à l’arrière
de l’unité. Installer les adaptateurs, si
nécessaire.
3.Raccorder le tuyau d’air de compresseur
pour le produit ou l’accessoire à gonfler
en basculant vers le bas.
4.Mettez le sélecteur sur la position ON et
gonfler le produit.
5.Lorsque le produit est gonflé à la bonne
pression d’air (en utilisant la jauge au
verso), déplacez le sélecteur sur la
position OFF et retirer le tuyau.
6.Ne pas faire fonctionner pendant plus de
10 minutes maximum à la fois. Laissez
l’unité se refroidir pendant 10 minutes
avant d’utiliser à nouveau.
REMARQUE : Pour éviter la surchauffe, le
compresseur a une protection thermique
incorporée qui va éteindre le compresseur
avant qu’il ne surchauffe. Si le compresseur
s’arrête, attendez quelques minutes et il
redémarre automatiquement quand le
compresseur se refroidit.
REMARQUE : Le compresseur d’air est
conçu pour 150 PSI.
Temps estimé pour le gonflage
Pneus de véhicule 13-16"
6-24 minutes
Pneus des vélos
1-3 minutes
Ballons de sport
30 secondes
Ces temps sont approximatifs, utilisez la jauge de
compresseur d’air pour assurer une pression correcte.
Ne pas trop gonfler.
MAINTENANCE ET ENTRETIEN
• Un minimum de soins peut garder votre
unité en bonne état pendant des années.
• Débranchez l’unité du CA ou de CC avant
d’effectuer toute opération de maintenance.
• Nettoyer les clips et chaque fois que vous
avez terminé de l’utiliser.
• L'unité peut être stockée dans n’importe
quelle position.
• Rechargez l’unité chaque mois quand il
n’est pas en utilisation.
• Stocker les clips accrochés sur leur support,
pour s’assurer qu’ils ne touchent pas une
surface métallique.
• Ne jamais complètement décharger la
batterie interne.
DÉPANNAGE
PROBLÈME
L’unité ne démarre pas ma
voiture.
CAUSE POSSIBLE
RAISON / SOLUTION
Clips ne font pas une bonne
connexion à la batterie.
Vérifiez mauvaise connexion
à la batterie et le châssis.
Assurez-vous que les points
de connexion sont propres.
Connexions sont inversées.
Débranchez et inverser les
clips.
La batterie Interne n’est pas
chargée.
Appuyez sur le bouton d’État
de la batterie de l’appareil.
Les voyants indiquent l’état
de charge.
La batterie du véhicule est
défectueuse.
Faites Vérifiez la batterie.
Unité n’est pas en marche.
Mettez le selécteur
ON / OFF sur la position ON.
(XPF500 et XPF750C)
• 17 •
PROBLÈME
Le bloc d’alimentation
n’allume pas mon appareil
de 12V.
La batterie interne ne garde
pas la charge.
CAUSE POSSIBLE
RAISON / SOLUTION
Le dispositif de 12V n’est pas
activé.
Allumez l’appareil 12V.
La batterie Interne n’est pas
chargée.
Vérifiez l’état de charge de
la batterie en appuyant sur
le bouton d’état de la batterie.
L’appareil 12V consomme
plus de 15A ou a un courtcircuit.
Débranchez le produit de
12V. Le disjoncteur interne se
réinitialise automatiquement
après une minute ou deux.
Essayez à nouveau l’appareil
12V.
La batterie est défectueuse
(n’accepte pas de charge).
Faites Vérifiez la batterie.
AVANT DE RETOURNER POUR LES RÉPARATIONS
Si ces solutions ne permettent pas d’éliminer le problème,
ou pour plus d’informations sur le dépannage,
contacter le service technique au :
[email protected] • www.batterychargers.com
ou composez le 1-800-621-5485
Du lundi au Vendredi 07h00-17h00 CST
Pour RÉPARATION OU RETOUR, contactez le service téchnique au 1-800-621-5485.
NE PAS ENVOYER L'UNITÉ jusqu’à ce que vous receviez une AUTORISATION DE RETOUR
DE MARCHANDISE (RMA) auprès du service clientèle au Schumacher Electric Corporation.
SPÉCIFICATIONS
XPF400
Type de batterie interne
Scellée, sans entretien, AGM, plomb-acide
Tension nominale
12V CC
Sortie 12V CC
15A
Câbles de démarrage
8 AWG, 45,7 cm de long
Poids
3,18 kg
XPF500
Type de batterie interne
Scellée, sans entretien, AGM, plomb-acide
Tension nominale
12V CC
Sortie 12V CC
15A
Câbles de démarrage
8 AWG, 45,7 cm de long
Poids
3,72 kg
XPF750C
Type de batterie interne
Scellée, sans entretien, AGM, plomb-acide
Tension nominale
12V CC
Sortie 12V CC
15A
Câbles de démarrage
8 AWG, 52 cm de long
Poids
7,14 kg
• 18 •
PIÈCES DE RECHANGE / ACCESSOIRES
Câble accessoire mâle-mâle ..................................................................................94500109
GARANTIE LIMITÉE
SCHUMACHER ELECTRIC CORPORATION, 801 BUSINESS CENTER DRIVE,
MOUNT PROSPECT, IL 60056-2179, DONNE CETTE GARANTIE LIMITÉE POUR
PREMIER ACHETEUR DE CE PRODUIT. CETTE GARANTIE LIMITÉE N’EST PAS
TRANSFÉRABLES NI CESSIBLES.
Schumacher Electric Corporation (le « Fabricant ») garantit ce Instant Power pour un (1)
an et la batterie interne pendant quatre vingt dix (90) jours à compter de la date d’achat
au détail contre les défauts de matériaux ou de fabrication qui peuvent se produire dans
des conditions normales d’utilisation et de soins. Si votre appareil n’est pas exempt de
tout vice de matière ou de fabrication, l’obligation du fabricant sous cette garantie se limite
à réparer ou à remplacer le produit, avec un appareil neuf ou remis à neuf, au choix du
fabricant. C’est l’obligation de l’acheteur de renvoyer l’appareil accompagné d’une preuve
d’achat et des frais d’envoi payé au fabricant ou ses représentants autorisés pour la
réparation ou le remplacement de ce produit.
Fabricant ne fournit aucune garantie concernant les accessoires utilisés avec ce produit
qui ne sont pas fabriqués par Schumacher Electric Corporation et approuvés pour une
utilisation avec ce produit. Cette garantie limitée est annulé si le produit est mal utilisé,
soumis à une manipulation imprudente, réparé ou modifié par une personne autre que le
fabricant ou si cet appareil est revendu par un détaillant non autorisé.
Le fabricant ne fait aucune autre garantie, y compris, mais sans limiter, garantie expresse,
implicite ou légale, y compris, sans limitation, toute garantie implicite de valeur marchande
ou la garantie implicite d’adéquation à un usage particulier. De plus, le fabricant ne
sera pas responsable pour tout dommage, dommages spéciaux ou indirects encourus
par affirme acheteurs, des utilisateurs ou d’autres personnes associées à ce produit, y
compris, mais sans s’y limiter, la perte de profits, de revenus, les ventes prévues, les
occasions d’affaires, interruption d’activité écarts d’acquisition, et de toute blessure ou
dommage. Toutes les garanties, autres que la garantie limitée du présent document, sont
par les présentes expressément déclinée. Certains états ne permettent pas l’exclusion
ou la limitation des dommages fortuits ou consécutifs ou la durée de la garantie implicite,
les limitations ou exclusions susmentionnées peuvent ne pas s’appliquer à vous. Cette
garantie vous donne des droits légaux spécifiques et il est possible que vous ayez
d’autres droits qui peuvent varier de cette garantie.
CETTE GARANTIE LIMITÉE EST LA SEULE GARANTIE EXPRESSE LIMITÉE ET
LE FABRICANT N’ASSUME OU N’AUTORISE QUICONQUE À ASSUMER ET NE
FAIT AUCUNE AUTRE OBLIGATION VERS LE PRODUIT AUTRE QUE CETTE
GARANTIE.
Schumacher® et le logo Schumacher
sont des marques déposées
de Schumacher Electric Corporation.
• 19 •