1
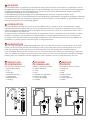
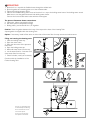
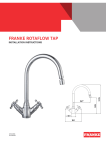
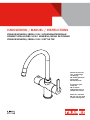
HANDLEIDING / MANUEL / instructions
FRANKE MINERVA/IRENA 3-IN-1 KOKENDWATERKRAAN
ROBINET BOUILLOIRE 3-EN-1 MINERVA/IRENA DE FRANKE
FrAnke minervA/IRENA 3-in-1 kettle tAp
Gelieve te bewaren
voor toekomstige
raadpleging
NB: Enkel gebruiken
met FrankeWarmwatertank
À conserver pour
référence
NB: À utiliser
uniquement avec le
chauffe-eau Franke
Retain for reference
NB: For use only with
Franke Heating Tank
NL
INLEIDING
De Kokendwaterkraan is geschikt voor zowel kokend water (100°C) als warm en koud water. De koppelingen van het
menggedeelte kunnen met filterkleppen direct op de hoofdleidingen van het koud en warm water worden aangesloten.
De kokendwaterleiding van de Kokendwaterkraan moet direct op de Franke-Warmwatertank worden aangesloten.
Raadpleeg de handleiding van de Warmwatertank.
In deze Handleiding staan alle stappen om de Kokendwaterkraan correct en veilig aan te sluiten. Als de
Kokendwaterkraan niet in overeenstemming met deze handleiding is geïnstalleerd, is de garantie ongeldig. De fabrikant
is niet verantwoordelijk voor schade die het gevolg is van het niet-naleven van de installatie- of gebruiksinstructies. De
kraan is enkel bedoeld voor huishoudelijk gebruik.
F
INTRODUCTION
Le robinet bouilloire convient pour fournir de l’eau bouillante (100°C), chaude et froide. Les raccords de la partie
mélangeur peuvent être reliés à l’aide de vannes de filtre directement aux conduites de distribution d’eau chaude et
froide. Le tuyau d’eau bouillante du robinet bouilloire doit être directement raccordé au chauffe-eau Franke. Voir le
manuel d’installation du chauffe-eau.
Ce mode d’emploi contient les instructions pour le raccordement correct et l’utilisation en toute sécurité du robinet
bouilloire. La garantie n’est pas valable si le robinet bouilloire n’est pas installé conformément à ces instructions.
Le fabricant n’est pas responsable des dommages résultant de la non-conformité aux instructions d’installation et
d’utilisation. Le produit convient uniquement pour un usage domestique.
GB
INTRODUCTION
The Kettle Tap is suitable for dispensing boiling water (100°C) and hot and cold water. The connections of the mixer
section can be connected with filter valves directly to the hot and cold water mains. The boiling water hose of the
Kettle Tap should be directly connected to the Franke Heating Tank. See Heating Tank Installation Manual.
In this Installation Manual are the instructions for the correct connection and safe use of the Kettle Tap. If the Kettle
Tap is not installed according to these instructions the warranty is invalid. The manufacturer is not liable for damages
resulting from non-compliance with the installation or user instructions, and is for domestic kitchen use only.
NL INHOUD VAN
DE VERPAKKING
F CONTENU
DE L’EMBALLAGE
GB PACKAGE
CONTENTS
1 x Kokendwaterkraan
1 x Plint
1 x Afsluiting
1 x Rubberen dichting
1 x Opspanplaat
1 x Schroefsleutel
1 x Dichting
1x Robinet bouilloire
1x Socle
1x Joint
1x Rondelle en caoutchouc
1x Plaque de serrage
1x Clé de verrouillage
1x Rondelle
1x Kettle Tap
1x Plinth
1x Seal
1x Rubber Gasket
1x Clamp Plate
1x Locking Spanner
1x Gasket
Kijk de inhoud van de doos na
Check the contents of the box
190
189
1x
1x
22
117
59
43
50
78
117
86
78
80
59
334,5
86
362,5
1x
22
235
1x
241
1x
Vérifier le contenu de la boîte
M35
1x
1x
168
168
NL
INSTALLATIE VAN FRANKE MINERVA/IRENA 3-IN-1 KOKENDWATERKRAAN
Opgelet: Deze kokendwaterkraan moet worden aangesloten op de Franke Warmwatertank.
Voorbereiding
1. Installeer de Franke-Warmwatertank (zie aparte handleiding).
2. Plaats de Minerva 3-in-1 Kokendwaterkraan op de spoelbak of het werkblad.
Tip: Bepaal of de kraan met de linker- of rechterhand wordt gebruikt! Aangezien deze kraan kokend water levert, raden we aan om de uitstroomopening aan de andere kant van de kokendwaterbediening te plaatsen. Denk ook aan de plaats van de spoelbak(ken) en of u links- of rechtshandig bent.
Keer de warmwater- en koudwatertoevoer om door de plaats van de warmwater- en koudwaterslang binnenin de kraan te verwisselen.
3. Boor indien nodig een gat van Ø35mm op een afstand van ten minste 60mm van de achterkant.
4. Draai de slangen met de hand vast. Let op: gebruik hiervoor GEEN gereedschap!
5. Schuif de plint en de O-ring over de voet.
F
INSTALLATION DU ROBINET BOUILLOIRE 3-EN-1 MINERVA/IRENA DE FRANKE
Avertissement: Ce robinet à eau bouillante est à raccorder exclusivement au chauffe-eau Franke.
Préparation
1. Monter le chauffe-eau Franke (cf. le manuel d’installation séparé).
2. Installer le robinet bouilloire 3-en-1 Minerva sur l’évier ou le plan de travail.
Conseil: Choisissez l’usage gaucher ou droitier ! Ce robinet distribue de l’eau bouillante, nous recommandons par conséquent de positionner le bec à l’opposé du bouton de l’eau bouillante. Tenez compte également de la position du (des) bac(s) d’évier, et si vous êtes gaucher ou droitier.
Pour inverser le chaud et le froid, interchangez la position des tuyaux d’eau chaude et d’eau froide dans le corps du robinet.
3. Si nécessaire, percer un trou de Ø35mm à au moins 60mm de l’arrière de l’évier.
4. Serrer les tuyaux à la main.Attention: ne pas utiliser d’outils!
5. Faire glisser le socle et le joint torique sur le pied.
GB
installation of Franke Minerva/IRENA 3-in-1 Kettle Tap
Caution: This boiling water tap must only be connected to the Franke Heating Tank.
Preparation
1. Mount the Franke Heating Tank (see separate Installation manual).
2. Locate the Minerva 3-in-1 Kettle Tap on the sink or worktop.
Tip: Choose left or right handed use! This tap delivers boiling water, therefore we recommend that you
position the spout opposite to the boiling water control. Bear in mind also the position of the sink bowl(s)
and whether you are left or right handed.
Reverse the hot and cold operation by exchanging the position of the hot and cold water hoses in the tap body.
3. If necessary drill a hole Ø35mm at least 60mm from the back.
4. Tighten the hoses by hand. Caution: DO NOT use tools for this!
5. Slide the plinth and the O-ring over the foot.
2
cold
hot
hot
cold
3
Ø 35 mm
min.
60 mm
NL
MONTAGE
1. Schuif de 3-in-1 kraan met de flexibele slangen door het geboorde gat.
2. Schuif de pakking en opspanplaat over de buis met schroefdraad.
3. Draai de schroefsleutel stevig vast.
4. Sluit de flexibele kokendwaterslang van de kraan op de kokendwaterslang van de warmwatertank
aan. Zorg ervoor dat u tussen beide kokendwaterslangen de pakking gebruikt. Sluit de warm- en
koudwaterslangen op de hoofdleidingen aan.
Op de afbeelding zijn de volgende aansluitingen te zien:
a. Koud water, (klemringkoppeling van 10mm)
b. Warm water, (klemringkoppeling van 10mm)
c. Kokend water, (M10 x 1,25 mm aansluiting & pakking)
Opgelet: Plaats de pakking tussen de slang van de kraan en de slang van de Warmwatertank. Bij de Warmwatertank is
een reservepakking inbegrepen.
Optie: Installeer, indien nodig, een filterklep op elke zijde van de waterfilter voor een makkelijkere toegang en
onderhoud.
De Warmwatertank vullen en ontluchten.
1. Sluit de kokendwaterkraan.
2. Open de hoofdklep.
3. Open de inlaatklep van de overdrukklep.
4. Open de kokendwaterkraan.
5. Wacht tot het water uit de kraan stroomt.
6. Laat het water gedurende 3 minuten stromen tot het zuiver is.
7. Controleer op de aanwezigheid van eventuele lekken en corrigeer waar nodig.
Ga voort met de installatie van de Franke-Warmwatertank.
F
MONTAGE
1. Faire glisser le robinet 3-en-1, avec les flexibles, dans le trou percé.
2. Faire glisser la rondelle et la plaque d’arrêt sur le tube fileté.
3. Serrer fermement la clé de verrouillage.
4. Raccorder le flexible d’eau bouillante du robinet 3-en-1 au tuyau d’eau bouillante de la cuve d’eau bouillante. Veiller à bien utiliser la rondelle entre les deux tuyaux d’eau bouillante. Raccorder les tuyaux d’eau chaude et d’eau froide au réseau.
L’image illustre les raccordements suivants:
a. Eau froide, (bague de compression 10 mm)
b. Eau chaude, (bague de compression 10 mm)
c. Eau bouillante, (raccords M10 x 1,25 mm & rondelle)
Avertissement: Placer la rondelle entre le tuyau du robinet et le tuyau du chauffe-eau.
Une rondelle de rechange est fournie avec le chauffe-eau.
Option: Si nécessaire, installer une vanne de filtre de chaque côté du filtre à eau pour un accès et un entretien faciles.
Remplissage et évacuation de l’air du chauffe-eau.
1. Fermer le robinet d’eau bouillante.
2. Ouvrir la vanne du réseau.
3. Ouvrir la soupape d’admission du détenteur.
4. Ouvrir le robinet d’eau bouillante.
5. Attendre que l’eau coule du robinet.
6. Laisser couler l’eau pendant 3 minutes jusqu’à ce que de l’eau claire coule du robinet.
7. Vérifier l’absence de fuites, réparer si nécessaire.
Continuer avec l’installation du chauffe-eau Franke.
GB MOUNTING
1. Slide the 3-in-1 tap with the flexible hoses through the drilled hole.
2. Slide the gasket and retaining plate on to the threaded tube.
3. Tighten the locking spanner firmly.
4. Connect the flexible boiling water hose of the Itho 3-in-1 tap to the boiling water hose of the boiling water vessel. Make sure to use the gasket between both boiling water hoses.
Connect the hot and cold water hoses with the mains pipes.
The picture illustrates these connections:
a. Cold water, (10mm compression fitting)
b. Hot water, (10mm compression fitting)
c. Boiling water, (connection M10 x 1,25 & gasket
Caution: Place the gasket between the hose of the tap and the hose of the Heating Tank.
A spare gasket is supplied with the Heating Tank.
Option: If necessary, install a filter valve on either side of the water filter for easy access and maintenance.
Filling and venting the heating tank.
1. Close the boiling water tap.
2. Open the mains valve.
3. Open the inlet valve of the pressure
relief valve.
4. Open the boiling water tap.
5. Wait until water flows from the tap.
6. Let the water flow for 3 minutes until
clear water flows from the tap.
7. Check for leaks, rectify as necessary.
Continue with the installation of the
Franke Heating Tank.
1
4
2
3
b
a
c
Voor de 10 L warmwatertank:
zie afzonderlijke handleiding.
Pour le chauffe-eau de 10 L:
voir manuel séparé.
For the 10 L heating tank:
see separate instructions.
13mm
c
NL
BEDIENING VAN HET CENTRALE KOKENDWATERHANDVAT
Spoel, wanneer u de Kokendwaterkraan gaat gebruiken, altijd een kopje restwater weg vooraleer u koffie of thee zet.
Daardoor worden luchtbellen van het oppervlaktewater uit uw drankje geweerd. Opgelet: Uit de kraan stroomt altijd
kokend water (100°C): pas dus steeds op om brandwonden te vermijden.
Dit toestel moet buiten het bereik worden gehouden van kinderen, mensen met een fysieke of mentale handicap en
mensen met onvoldoende kennis, tenzij ze gepaste instructies hebben gekregen over de bediening van het toestel door
iemand die voor hun veiligheid instaat. Kinderen mogen in geen geval met het toestel spelen.
Bediening van de kokendwaterfunctie
1. U kunt best uw kop, theepot of pan dicht bij de opening van de kraan houden. Op die manier zal het water niet spatten en kunt u de Kokendwaterkaan op een veilige manier gebruiken.
2. Druk de ontspanknop in en draai aan het handvat.
NB: Bij het loslaten van de knop zal de kokendwatertoevoer onmiddellijk stoppen.
Bediening van het Warm/koud-handvat
Gebruik het verticale handvat op de gebruikelijke manier voor warm, koud of lauw water.
Kinderveiligheid
De kraan is uitgerust met een kinderveilige controlehendel die moet worden ingeduwd en gedraaid voor gebruik.
F
FONCTIONNEMENT DU BOUTON CENTRAL D’EAU BOUILLANTE
Toujours laisser couler un peu d’eau avant d’utiliser l’eau bouillante pour faire du thé ou du café. Cela éliminera
les bulles d’air à la surface de la boisson. Avertissement: Le robinet distribue de l’eau bouillante (à 100°C) à tout
moment, il convient dès lors faire très attention au risque de brûlures.
Ce dispositif ne convient pas aux enfants, aux utilisateurs souffrant de troubles physiques ou mentaux ou aux
utilisateurs non-avertis, qui n’ont pas reçu de consignes adéquates concernant le fonctionnement du dispositif de la
part d’une personne responsable de leur sécurité. Ne laisser en aucun cas les enfants jouer avec le dispositif.
Fonctionnement de l’eau bouillante
1. Il est conseillé de tenir la tasse, la théière ou la casserole à proximité de la sortie du bec du robinet. Cela évitera les éclaboussures d’eau et vous permettra d’utiliser le robinet bouilloire en toute sécurité.
2. Appuyer sur le bouton de déverrouillage et tourner le robinet.
NB: Relâcher le bouton de la poignée coupe immédiatement l’alimentation en eau bouillante.
Fonctionnement du levier chaud/froid
Utiliser le levier vertical de manière conventionnelle pour l’alimentation en eau normale chaude, froide ou tiède.
Sécurité enfant
Le robinet est équipé d’un bouton de sécurité enfant qui nécessite une poussée-rotation pour le faire fonctionner.
GB
operation OF THE BOILING WATER CENTRAL KNOB
When you start using the Kettle Tap, always flush a cupful of residual water prior to making tea or coffee.
This will eliminate the air bubbles from the surface water of your drink. Caution: The tap delivers boiling water (at
100°C) at all times, and care should be taken to avoid scalding.
This appliance is not intended for use by children, users with a physical or mental disability or users with insufficient
knowledge, unless they have received adequate instruction on the operation of the appliance by a person who is
responsible for their safety. Children must not play with the appliance under any circumstances.
Operation of the boiling water function
1. It is advisable to hold your cup, teapot or saucepan close to the outlet of the tap spout.
This will prevent the water from splashing and enable you to operate the Kettle Tap safely.
2. Press the release button and turn the knob.
NB: Releasing the button of the handle will immediately shut off the boiling water supply.
Operation of the Hot/Cold Lever
Utilise the vertical lever in the conventional way for the supply of normal hot, cold or mixed water.
Child safety
The tap is fitted with a childproof control knob which requires a push and turn action to operate it.
100 C
1
Opgelet:
De temperatuur van het water
bedraagt 100°C: pas dus op om
brandwonden te vermijden!
Avertissement:
La température de l’eau est de
100°C, il faut par conséquent faire
très attention au risque de brûlures!
2
Caution:
The temperature of the water is
100°C therefore care should be
taken to avoid scalding!
NL
ONDERHOUD
De beluchter van de kraan kan verkalken.
Opgelet: Gebruik enkel schoonmaakmiddelen die citroenzuur bevatten: andere schoonmaakmiddelen kunnen het
materiaal beschadigen.
Ontkalking van de kraanbeluchter
1. Schroef de ring van de beluchter los.
2. Maak de beluchter met kraan schoon met een geschikt ontkalkingsmiddel.
3. Plaats de beluchter terug en sluit de ring aan.
4. Plaats de O-ring terug op de beluchter en schroef vast.
F
ENTRETIEN
L’aérateur du robinet est susceptible s’entartrer.
Attention: Utiliser uniquement des nettoyants à base d’acide citrique, les autres produits de nettoyage pouvant
endommager le matériel.
Détartrage de l’aérateur du robinet
1. Dévisser le collet de l’aérateur.
2. Nettoyer l’aérateur avec un détartrant approprié au robinet.
3. Replacer l’insert de l’aérateur dans le collet.
4. Replacer le joint torique sur l’aérateur et serrer.
GB
Maintenance
The tap aerator may eventually calcify.
Warning: Only use cleaners containing citric acid as other cleaning agents may affect the material.
Tap aerator decalcification
1. Unscrew the aerator collet.
2. Clean the aerator with tap a suitable descaling agent.
3. Replace the aerator insert into the collet.
4. Replace the o-ring on the aerator and tighten.
2
1
3
Descaling agent
4
4
NL
PROBLEEMOPLOSSING
KLACHTOORZAAKOPLOSSING
Waterlek
Lek in aansluiting
Schroef de aansluiting vaster of vervang ze
Kraan levert geen kokend water
Zie installatie-instructies Franke
Warmtewisselaar
Kokendwaterkraan levert geen water
Kijk na of de hoofdwaterklep en
overdrukklep open staan. Indien
niet, neem contact op met de dienst na
verkoop
Kokendwaterkraan levert enkel koud water
Zie handleiding: Warmwatertank
Minder of spattend water
Overblijfselen of resten van calcium in
Ontkalk de kraanbeluchter
kraanbeluchter
F
GUIDE DE DIAGNOSTIC DES PANNE
PROBLÈMECAUSESOLUTION
Fuite d’eau
Fuite de raccord
Serrer le raccord ou le remplacer
Le robinet ne distribue pas
Voir les instructions d’installation
d’eau bouillante
du chauffe-eau Franke
Vérifier si la vanne d’eau de distribution et
Le robinet bouilloire ne
distribue pas d’eau
le détendeur sont ouverts. Si le
robinet ne fonctionne toujours pas,
veuillez contacter le service après-vente
Le robinet bouilloire ne produit
Voir manuel: chauffe-eau
que de l’eau froide
Trop peu de pression ou éclaboussures L’aérateur du robinet est encrassé
Détartrer l’aérateur du robinet
GB
TROUBLESHOOTING GUIDE
ComplaintCauseSolution
Water leak
Connection leak
Tighten connection or replace it
Tap does not supply boiling water
Check Franke Heating Tank
installation instructions
Kettle Tap does not supply water
Check whether mains water valve and
pressure relief valve are open.
Alternatively please contact the
after-sales service agent
Kettle Tap only supplies cold water
See manual: Heating Tank
Reduced water or splashing water
Debris or calcium deposits in tap aerator
Descale the lime deposits in the
tap aerator
NL
TECHNISCHE GEGEVENS
BESCHRIJVING:
KOKENDWATERGEDEELTE:MENGGEDEELTE:
Hoogte uitlaat
241mm
Algemene hoogte kraan
362.5mm
Maximale werkdruk
1-3 bar
1-5 bar
Maximale temperatuur
110°C
80°C
Maximale diepte werkblad
50mm
50mm
Diameter kraangat
35mm
35mm
Maximaal debiet
3.5 l / min. (zonder waterfilter)
10 l / min. (zonder waterfilter)
bij een druk van 3 barbij een druk van 3 bar
F
SPÉCIFICATIONS TECHNIQUES
CARACTÉRISTIQUE:PARTIE EAU BOUILLANTE:PARTIE MÉLANGEUR:
Hauteur de sortie
241mm
Hauteur totale du robinet
362,5mm
Pression de service maximale
1-3 bar
1-5 bar
Température maximale
110°C
80°C
Profondeur maximale de plan de travail 50mm
50mm
Diamètre trou du robinet
35mm
35mm
Débit maximal
3,5 l / min (sans filtre à eau)
10 l / min (sans filtre à eau)
à une pression de 3 bar
à une pression de 3 bar
GB
TECHNICAL SPECIFICATIONS
CHARACTERISTIC: Boiling water part: Mixer part:
Outlet height 241mm
Overall tap height 362.5mm
Maximum operating pressure 1-3 bar 1-5 bar
Maximum temperature 110°C 80°C
Maximum worktop depth 50mm 50mm
Tap hole diameter 35mm 35mm
Maximum flow rate 3.5 l / min. (without water-filter) 10 l / min. (without water-filter)
at 3 bar pressure at 3 bar pressure
GARANTIEVoorwaarden KRANEN Nederland
Raadpleeg de onderstaande website voor de garantievoorwaarden van dit product. Op uw verzoek kunnen
de garantievoorwaarden ook worden toegestuurd per post of per e-mail.
Franke Nederland b.v.
Postbus 157
5700 AD Helmond
Tel.: 0492 - 585111
www: www.franke.nl
E-mail: [email protected]
GARANTIEVoorwaarden KRANEN Belgie
Conditions de garantie ROBINETS BELGIQUE
Raadpleeg de onderstaande website voor de garantievoorwaarden van dit product. Op uw verzoek kunnen
de garantievoorwaarden ook worden toegestuurd per post of per e-mail.
Pour les conditions de garantie de ce produit, veuillez consulter le site web mentionné ci-dessous. Sur simple
demande, elles vous seront envoyées par courrier ou par e-mail.
Franke n.v.
Ring 10
9400 Ninove
Tel.: 054/310111
www: www.franke.be
E-mail: [email protected]
WARRANTY CONDITIONS TAPS United Kingdom
The warranty conditions for this product can be downloaded from the website or will be sent to you on
request via post or e-mail. Please refer to the following information:
Franke UK Ltd
West Park, MIOC
Styal Road
Manchester
M22 5WB
Tel.: 0161 436 6280
www: www.franke.co.uk
E-mail: [email protected]
Franke houdt het recht voor om zonder voorafgaand bericht technische of visuele wijzigingen aan te brengen aan haar producten indien dit noodzakelijk geacht wordt.
Franke se reserve le droit d’apporter des modifications techniques ou visuelles a touts ses produits sans preavis s’il le juge nécessaire.
Franke reserves the right to technically or visually modify all its products without prior consent whenever it deems to be necessary.
07.98.92.162.1
Franke Nederland b.v.
Postbus 157
5700 AD Helmond
Tel.: 0492 - 585111
Franke n.v.
Ring 10
9400 Ninove
Tel.: 054/310111
www: www.franke.nl
E-mail: [email protected]
www: www.franke.be
E-mail: [email protected]
Franke UK Ltd
West Park, MIOC
Styal Road,
Manchester
M22 5WB
Tel.: 0161 436 6280
www: www.franke.co.uk
E-mail: [email protected]