1
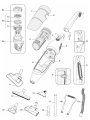
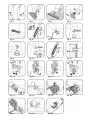
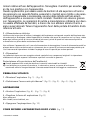
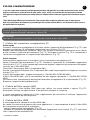
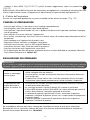
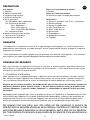
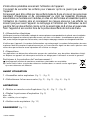
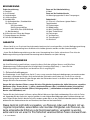
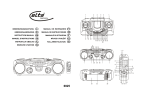
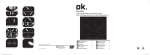
12/13
902604/03
www.rowenta.com
italiano
DESCRIZIONE . . . . . . . . . . . . . . . . . . . . . . . . . . . . . . . . . . . . . . . . . . . . . . . . . . . . 1
GARANZIA . . . . . . . . . . . . . . . . . . . . . . . . . . . . . . . . . . . . . . . . . . . . . . . . . . . . . . . . . 1
CONSIGLI DI SICUREZZA . . . . . . . . . . . . . . . . . . . . . . . . . . . . . . . . . . . . 1
PRIMA DELL’UTILIZZO . . . . . . . . . . . . . . . . . . . . . . . . . . . . . . . . . . . . . . . . 2
ASPIRAZIONE . . . . . . . . . . . . . . . . . . . . . . . . . . . . . . . . . . . . . . . . . . . . . . . . . . . . 2
COME RIPORRE L’APPARECCHIO DOPO L’USO . . . . 2
PULIZIA E MANUTENZIONE . . . . . . . . . . . . . . . . . . . . . . . . . . . . . . . 2
CONSIGLI E PRECAUZIONI . . . . . . . . . . . . . . . . . . . . . . . . . . . . . . . . . 4
RISOLUZIONE DEI PROBLEMI . . . . . . . . . . . . . . . . . . . . . . . . . . . . . 4
français
DESCRIPTION . . . . . . . . . . . . . . . . . . . . . . . . . . . . . . . . . . . . . . . . . . . . . . . . . . . . 5
GARANTIE . . . . . . . . . . . . . . . . . . . . . . . . . . . . . . . . . . . . . . . . . . . . . . . . . . . . . . . . . 5
CONSEILS DE SÉCURITÉ . . . . . . . . . . . . . . . . . . . . . . . . . . . . . . . . . . . . 5
AVANT UTILISATION . . . . . . . . . . . . . . . . . . . . . . . . . . . . . . . . . . . . . . . . . . 6
ASPIRATION . . . . . . . . . . . . . . . . . . . . . . . . . . . . . . . . . . . . . . . . . . . . . . . . . . . . . . 6
RANGEMENT . . . . . . . . . . . . . . . . . . . . . . . . . . . . . . . . . . . . . . . . . . . . . . . . . . . . . 6
NETTOYAGE ET MAINTENANCE . . . . . . . . . . . . . . . . . . . . . . . . . 6
CONSEILS ET PRÉCAUTIONS . . . . . . . . . . . . . . . . . . . . . . . . . . . . . 8
QUE FAIRE SI… . . . . . . . . . . . . . . . . . . . . . . . . . . . . . . . . . . . . . . . . . . . . . . . . . . 8
english
DESCRIPTION . . . . . . . . . . . . . . . . . . . . . . . . . . . . . . . . . . . . . . . . . . . . . . . . . . . . 9
WARRANTY . . . . . . . . . . . . . . . . . . . . . . . . . . . . . . . . . . . . . . . . . . . . . . . . . . . . . . . 9
SAFETY ADVICE . . . . . . . . . . . . . . . . . . . . . . . . . . . . . . . . . . . . . . . . . . . . . . . . . 9
BEFORE USE . . . . . . . . . . . . . . . . . . . . . . . . . . . . . . . . . . . . . . . . . . . . . . . . . . . 10
VACUUMING . . . . . . . . . . . . . . . . . . . . . . . . . . . . . . . . . . . . . . . . . . . . . . . . . . . . 10
STORAGE . . . . . . . . . . . . . . . . . . . . . . . . . . . . . . . . . . . . . . . . . . . . . . . . . . . . . . . . 10
CLEANING AND MAINTENANCE . . . . . . . . . . . . . . . . . . . . . . . 10
ADVICE AND PRECAUTIONS . . . . . . . . . . . . . . . . . . . . . . . . . . . . . 12
WHAT TO DO IF… . . . . . . . . . . . . . . . . . . . . . . . . . . . . . . . . . . . . . . . . . . . . 12
español
DESCRIPCIÓN . . . . . . . . . . . . . . . . . . . . . . . . . . . . . . . . . . . . . . . . . . . . . . . . . . 13
GARANTÍA . . . . . . . . . . . . . . . . . . . . . . . . . . . . . . . . . . . . . . . . . . . . . . . . . . . . . . . 13
CONSEJOS DE SEGURIDAD . . . . . . . . . . . . . . . . . . . . . . . . . . . . . 13
ANTES DE SU USO . . . . . . . . . . . . . . . . . . . . . . . . . . . . . . . . . . . . . . . . . . 14
ASPIRACIÓN . . . . . . . . . . . . . . . . . . . . . . . . . . . . . . . . . . . . . . . . . . . . . . . . . . . . 14
ALMACENAMIENTO . . . . . . . . . . . . . . . . . . . . . . . . . . . . . . . . . . . . . . . . . 14
LIMPIEZA Y MANTENIMIENTO . . . . . . . . . . . . . . . . . . . . . . . . . . 14
CONSEJOS Y PRECAUCIONES . . . . . . . . . . . . . . . . . . . . . . . . . . 16
QUÉ HAY QUE HACER SI... . . . . . . . . . . . . . . . . . . . . . . . . . . . . . . . . 16
türkçe
ÜRÜNÜN TANITIMI . . . . . . . . . . . . . . . . . . . . . . . . . . . . . . . . . . . . . . . . . . . . . . . . . . . . . . . . . . . . . . . 17
GARANTİ . . . . . . . . . . . . . . . . . . . . . . . . . . . . . . . . . . . . . . . . . . . . . . . . . . . . . . . . . . . . . . . . . . . . . . . . . . . . . . . . 17
GÜVENLİK TAVSİYELERİ . . . . . . . . . . . . . . . . . . . . . . . . . . . . . . . . . . . . . . . . . . . . . . . . . . . . . . . . 17
KULLANIM ÖNCESİNDE . . . . . . . . . . . . . . . . . . . . . . . . . . . . . . . . . . . . . . . . . . . . . . . . . . . . . . . 18
SÜPÜRME İŞLEMİ . . . . . . . . . . . . . . . . . . . . . . . . . . . . . . . . . . . . . . . . . . . . . . . . . . . . . . . . . . . . . . . . . . 18
CİHAZIN MUHAFAZASI . . . . . . . . . . . . . . . . . . . . . . . . . . . . . . . . . . . . . . . . . . . . . . . . . . . . . . . . 18
TEMİZLİK VE BAKIM . . . . . . . . . . . . . . . . . . . . . . . . . . . . . . . . . . . . . . . . . . . . . . . . . . . . . . . . . . . . . . 18
ÖNERİLER VE TEDBİRLER . . . . . . . . . . . . . . . . . . . . . . . . . . . . . . . . . . . . . . . . . . . . . . . . . . . . . . 20
NE YAPMALI… . . . . . . . . . . . . . . . . . . . . . . . . . . . . . . . . . . . . . . . . . . . . . . . . . . . . . . . . . . . . . . . . . . . . . . . 20
deutsch
BESCHREIBUNG . . . . . . . . . . . . . . . . . . . . . . . . . . . . . . . . . . . . . . . . . . . . . . . 21
GARANTIE . . . . . . . . . . . . . . . . . . . . . . . . . . . . . . . . . . . . . . . . . . . . . . . . . . . . . . . 21
SICHERHEITSHINWEISE . . . . . . . . . . . . . . . . . . . . . . . . . . . . . . . . . . . . 21
VOR DER VERWENDUNG . . . . . . . . . . . . . . . . . . . . . . . . . . . . . . . . . 22
SAUGEN . . . . . . . . . . . . . . . . . . . . . . . . . . . . . . . . . . . . . . . . . . . . . . . . . . . . . . . . . . 22
AUFBEWAHRUNG . . . . . . . . . . . . . . . . . . . . . . . . . . . . . . . . . . . . . . . . . . . . 22
REINIGUNG UND WARTUNG . . . . . . . . . . . . . . . . . . . . . . . . . . . 22
TIPPS UND VORSICHTSMASSNAHMEN . . . . . . . . . . . 24
WAS TUN, WENN… . . . . . . . . . . . . . . . . . . . . . . . . . . . . . . . . . . . . . . . . 24
fig. 1
fig. 2
fig. 3
fig. 4
fig. 5
fig. 6
fig. 7
fig. 8
fig. 9
fig. 10
fig. 11
fig. 12
fig. 13
fig. 14
fig. 15
fig. 16
fig. 17
fig. 18
fig. 19
fig. 20
fig. 21
fig. 22
fig. 23
DESCRIZIONE
IT
Vista esplosa
1 Impugnatura
2 Pulsante avvio/arresto
3 Variatore di potenza
4 Griglia di uscita dell’aria
5 Contenitore raccoglipolvere
5a Ricettacolo / contenitore raccoglipolvere
5b Sistema di filtrazione
5b1 Separatore
5b2 Filtro spugna
5b3 Filtro HEPA (RS-RH5024)
5c Coperchio del contenitore
6 Pulsante d’apertura del portello
7 Coperchio dell’ aspiratore
8 Compartimento del serbatoio
Ingrandimento dell’avvolgicavo
9 Cavo
Ingrandimento del retro dell’apparecchio
10 Ganci per la cinghia di trasporto*
Accessori*
11 Spazzola a 2 posizioni (pavimenti lisci-moquette)
12 Spazzola parquet
13 Spazzola mobili
14 Mini Turbo spazzola*
15 Maxi Turbo spazzola*
16 Terminale piatto
17 Prolunga
18 Cinghia di trasporto*
19 Flessibile*
GARANZIA
• Questo apparecchio è destinato unicamente alla pulizia della casa e all’uso domestico. In caso di utilizzo inappropriato o non conforme alle istruzioni per l’uso, il fabbricante declina ogni responsabilità e
la garanzia viene annullata.
• Leggere attentamente le istruzioni per l'uso prima di utilizzare l'apparecchio per la prima volta: un utilizzo non conforme alle istruzioni solleva Rowenta da qualsiasi responsabilità.
CONSIGLI DI SICUREZZA
Per garantire la massima sicurezza, questo apparecchio è conforme alle norme e ai regolamenti vigenti
(Direttive Bassa tensione, Compatibilità elettromagnetica, Ambiente, ecc.) Leggere attentamente le
istruzioni per l’uso e conservarle con cura.
1 • Condizioni di utilizzo
Questo aspirapolvere è un apparecchio elettrico e deve pertanto essere utilizzato in condizioni normali.
Utilizzare e riporre l’apparecchio fuori della portata dei bambini. Non lasciare mai l’apparecchio incustodito
mentre è in funzione. Tenete i terminali di aspirazione o l’estremità del tubo lontani dagli occhi e dalle orecchie.
Non passare l’aspirapolvere su superfici umide, su nessun liquido di alcun tipo, su sostanze calde, su
sostanze ultrafini (gesso, cemento, ceneri, ecc.), su detriti taglienti di grandi dimensioni (vetro), su prodotti nocivi (solventi, sverniciatori, ecc.), aggressivi (acidi, prodotti per la pulizia, ecc.), infiammabili ed
esplosivi (a base di benzina o alcol).
Non immergere mai l’apparecchio in acqua, non spruzzare mai acqua sull’apparecchio e non riporlo in ambienti
esterni. Non utilizzare l’apparecchio se è caduto e presenta segni visibili di deterioramento o anomalie di funzionamento. In una simile evenienza, non aprire l’apparecchio, ma inviarlo al centro di assistenza autorizzato più
vicino oppure contattare il servizio consumatori Rowenta (consultare i recapiti all’ultima pagina).
Questo apparecchio non deve essere utilizzato da persone (compresi bambini)
le cui capacità fisiche, sensoriali o mentali sono ridotte, o da persone prive di
esperienza o di conoscenza, a meno che non possano beneficiare, tramite una
persona responsabile della loro sicurezza, di sorveglianza o di istruzioni preli* Secondo il modello
1
minari relative all'uso dell'apparecchio. Sorvegliare i bambini per accertar- IT
si che non giochino con l’apparecchio.
Questo apparecchio può essere usato da bambini di età superiore a 8 anni e
da persone le cui capacità fisiche, sensoriali o mentali sono ridotte o da persone prive di esperienza o conoscenza, se sono state istruite sull’uso sicuro
dell’apparecchio e conoscono i rischi correlati. I bambini non devono giocare
con l’apparecchio. Le operazioni di pulizia e manutenzione ordinaria non devono essere effettuate da bambini, a meno che non abbiano almeno 8 anni e
siano supervisionati. Tenere l’apparecchio fuori dalla portata di bambini di età
inferiore a 8 anni.
2 • Alimentazione elettrica
Verificare che la tensione di utilizzo (voltaggio) dell'aspiratore corrisponda a quella dell'impianto elettrico domestico. Scollegare subito l’apparecchio, tirando sulla presa di corrente e mai sul cavo, subito
dopo ogni utilizzo, prima di ciascun cambio di accessori, prima di qualsiasi intervento di pulizia o
manutenzione o prima della sostituzione del filtro.
Non utilizzare l’apparecchio se il cavo di alimentazione è danneggiato. Il cavo di alimentazione dell’aspiratore deve essere sostituito solo e unicamente da un centro di assistenza autorizzato poiché qualsiasi intervento di riparazione richiede l’impiego di utensili speciali per evitare pericoli.
3 • Riparazioni
Le riparazioni devono essere eseguite solo da specialisti con componenti originali. La riparazione
effettuata da soli può esporre l’utilizzatore a pericoli e annulla la garanzia.
Partecipiamo alla protezione dell’ambiente!
Questo apparecchio è costituito da diversi materiali valorizzabili o riciclabili.
Lasciarlo presso un punto di raccolta o, in alternativa, presso un centro di assistenza
autorizzato affinché venga effettuato il corretto trattamento di riciclaggio o smaltimento.
PRIMA DELL’UTILIZZO
1 • Montare l’aspiratore (fig. 1) - (fig. 2)
2 • Selezionare l’accessorio più idoneo* (fig. 2) - (fig. 3) - (fig. 4) - (fig. 5)
ASPIRAZIONE
3 • Avviare l’aspiratore (fig. 6) - (fig. 7) - (fig. 8)
4 • Regolare la forza di aspirazione (fig. 9)
Max: pavimenti
Min: mobili, tessuti delicati, ecc.
5 • Spegnere l’aspirapolvere (fig. 10)
COME RIPORRE L’APPARECCHIO DOPO L’USO (fig. 11)
* Secondo il modello
2
PULIZIA E MANUTENZIONE
IT
L’aria che respiriamo contiene particelle potenzialmente allergeniche: larve ed escrementi di acaro, muffe,
polline, escrementi e residui di animali (peli, pelle, saliva, urina). Le particelle più fini penetrano a fondo
nell’apparato respiratorio dove possono provocare infiammazioni e alterare in generale la funzione respiratoria.
I filtri HEPA (High Efficiency Particulate Air Filter ovvero filtri ad elevata efficienza per la depurazione
dell’aria) consentono di trattenere le particelle più fini. Grazie al filtro HEPA, l’aria reimmessa nella stanza è
più pulita dell’aria respirata.
IMPORTANTE
Prima di qualsiasi operazione di manutenzione o pulizia, arrestare e scollegare l’aspiratore. Controllare
e pulire regolarmente tutto l’aspiratore e i diversi filtri.
ATTENZIONE
Non fare mai funzionare l’aspiratore in assenza del sistema di filtri (filtro HEPA).
1 • Pulizia del contenitore raccoglipolvere (5)
Pulizia rapida
Quando il contenitore raccoglipolvere (5) è pieno, aprite il coperchio dell’aspirapolvere (Fig.12) e poi
prendete il contenitore (5) inclinandolo leggermente verso il basso (Fig.13).
Mettete sopra una pattumiera e premete “push„ per oscillare la valvola di svuotamento verso il basso
quindi svuotate il contenuto del contenitore (Fig.14). Richiudete la valvola (Fig.15) e ricomponete il
contenitore raccoglipolvere e il coperchio dell’aspirapolvere (Fig.16).
Pulizia completa
Conviene pulire regolarmente il vano dove si trova il contenitore raccoglipolvere (5).
Aprite il coperchio dell’aspirapolvere (Fig.12). Prendete il contenitore (5) inclinandolo leggermente
verso il basso (Fig.13) e poi separate ogni elemento: togliete il coperchio del contenitore raccoglipolvere (5c) poi, il filtro HEPA (5b3).
Tirate fuori il filtro spugna (5b2) e il separatore (5b1).
Passate il contenitore/ricettacolo (5a), il separatore (5b1) sotto l’acqua tiepida e asciugate con un panno
asciutto (Fig.17).
Pulite il filtro spugna (5b2) : leggete al paragrafo 2 – PULIZIA DEL FILTRO SPUGNA.
Pulite il filtro HEPA (5b3) : per la manutenzione dei filtri leggete il paragrafo 3 – PULIZIA DEL FILTRO
HEPA.
Una volta asciutti, ricomponete gli elementi del contenitore raccoglipolvere (5) e riposizionateli (Fig.16).
Rimettere il coperchio dell’aspirapolvere(7).
2 • Pulizia del filtro spugna (5b2)
Conviene pulire il filtro spugna (5b2) dopo ogni utilizzo, con acqua tiepida e sapone
Sciacquate e lasciate asciugare almeno 12 ore prima di rimetterlo al suo posto.
(Fig.18).
Il vostro aspirapolvere è dotato di un filtro supplementare per consentire di utilizzare l’apparecchio
durante l’asciugatura del filtro originario.
3 • Pulizia del filtro HEPA
Il vostro apparecchio è dotato di un filtro HEPA (5b3).
Se notate una mancanza di potenza del vostro apparecchio, vi raccomandiamo di pulire il filtro HEPA
per manetenere le prestazioni di aspirazione:
- aprite il coperchio dell’aspirapolvere (Fig.12)
- prendete il contenitore raccoglipolvere inclinandolo leggermente verso il basso (Fig.13) e poi tirate
fuori il coperchio del contenitore (5c)
* Secondo il modello
3
- togliete il filtro HEPA
(Fig.19-20-21)
quindi scuotete leggermente sopra una pattumiera
(Fig.22)
IT
Riposizionate il filtro HEPA all’interno del contenitore raccoglipolvere, rimontate gli elementi del contenitore e riposizionate il tutto sull’apparecchio. Riposizionate il coperchio dell’aspirapolvere (7).
4 • Pulizia dell’aspiratore
Passare sul corpo dell’apparecchio un panno morbido umido, quindi asciugare.
(Fig. 23)
CONSIGLI E PRECAUZIONI
• Prima di ogni utilizzo, il cavo deve essere srotolato completamente.
• Non piegarlo e non farlo passare sopra bordi taglienti.
• Non spostare l’aspiratore tirando sul cavo. L’apparecchio deve essere spostato mediante l’impugnatura di trasporto.
• Non utilizzare il cavo per sollevare l’apparecchio.
• Se si utilizza una prolunga, assicurarsi che sia in ottimo stato e di sezione adatta alla potenza dell’aspirapolvere.
• Non scollegare mai l’apparecchio tirando il cavo.
• Dopo ogni utilizzo, arrestare e scollegare l’aspiratore.
• Utilizzare solo accessori, sacchi e filtri originali Rowenta.
• Controllare che tutti i filtri siano ben saldi al loro posto.
• Non fare funzionare mai l’apparecchio senza filtro.
• Se il reperimento dei filtri per questo aspiratore dovesse risultare difficoltoso, contattare il Servizio
Consumatori Rowenta al n. 199 207 815
RISOLUZIONE DEI PROBLEMI
IMPORTANTE
Se si riscontra un peggioramento nel funzionamento dell’aspirapolvere, prima di effettuare qualunque
controllo l’apparecchio deve essere arrestato premendo il pulsante avvio/arresto e quindi scollegato.
L’aspiratore non si
mette in moto oppure non aspira
• L’apparecchio non è alimentato: controllare che l’apparecchio sia correttamente collegato alla rete elettrica.
• Un accessorio o un tubo sono otturati: eliminare l’otturazione dall’accessorio o dal tubo.
• Il coperchio è chiuso male o non si chiude: controllare che la vaschetta
sia presente e posizionata correttamente, quindi chiudete il coperchio.
L’aspirapolvere non
aspira bene come
prima, fa rumore, fischia
• Un accessorio o un tubo sono parzialmente otturati: eliminare l’otturazione dall’accessorio o dal tubo.
• La vaschetta è piena o satura di polveri fini: vuotare la vaschetta.
• Il filtro HEPA è pieno: pulire il filtro HEPA se è stato utilizzato per meno di
6 mesi; diversamente, sostituirlo seguendo le istruzioni.
• Il variatore di potenza è posizionato su min.: aumentare la potenza
mediante il variatore di potenza (tranne se si sta passando l’aspirapolvere
su tessuti fragili).
• È difficile spostare il terminale di aspirazione: diminuire la potenza
mediante il variatore di potenza.
Se un problema dovesse persistere, consegnate l’aspiratore al centro di assistenza autorizzato
Rowenta più vicino. Consultare l’elenco dei centri di assistenza autorizzati Rowenta o contattare il
Servizio Consumatori Rowenta al n. 199 207815
4
DESCRIPTION
FR
Vue éclatée
1 Poignée
2 Bouton marche/arrêt
3 Variateur de puissance
4 Grille de sortie d’air
5 Bac à poussière
5a Réceptacle / bac à poussière
5b Système de filtration
5b1 Séparateur
5b2 Filtre mousse
5b3 Filtre HEPA (RS-RH5024)
5c Couvercle du bac
6 Bouton d’ouverture de la porte
7 Couvercle de l’aspirateur
8 Compartiment du bac
Zoom sur l’enroulement du cordon
9 Cordon
Zoom sur l’arrière du produit
10 Accroches pour la sangle de transport
Accessoires*
11 Suceur 2 positions (sols lisses - moquettes)
12 Suceur parquet
13 Suceur ameublement
14 Mini Turbo Brosse*
15 Maxi Turbo Brosse*
16 Suceur plat
17 Prolongateur
18 Sangle de transport*
19 Flexible*
GARANTIE
• Cet appareil est uniquement réservé à un usage ménager et domestique ; en cas d’utilisation non
appropriée ou non conforme au mode d’emploi, aucune responsabilité ne peut engager la marque et
la garantie est annulée.
• Lisez attentivement le mode d’emploi avant la première utilisation de votre appareil : une utilisation
non conforme au mode d’emploi dégagerait Rowenta de toute responsabilité.
CONSEILS DE SÉCURITÉ
Pour votre sécurité, cet appareil est conforme aux normes et réglementations applicables (Directives
Basse Tension, Compatibilité Electromagnétique, Environnement,...). Lisez attentivement votre mode
d'emploi et conservez-le soigneusement.
1 • Conditions d’utilisation
Votre aspirateur est un appareil électrique : il doit être utilisé dans des conditions normales d’utilisation. Utilisez et rangez l’appareil hors de portée des enfants. Ne laissez jamais l’appareil fonctionner
sans surveillance. Ne tenez pas le suceur ou l’extrémité du tube à portée des yeux et des oreilles.
N’aspirez pas de surfaces mouillées, de liquides quelle que soit leur nature, de substances chaudes, de
substances ultrafines (plâtre, ciment, cendres…), de gros débris tranchants (verre), de produits nocifs
(solvants, décapants...), agressifs (acides, nettoyants ...), inflammables et explosifs (à base d’essence
ou d’alcool).
Ne plongez jamais l’appareil dans l’eau, ne projetez pas d’eau sur l’appareil et ne l’entreposez pas à l’extérieur. N’utilisez pas l’appareil s’il est tombé et présente des détériorations visibles ou des anomalies de
fonctionnement. Dans ce cas, n’ouvrez pas l’appareil mais envoyez-le au Centre Service Agréé le plus
proche ou contactez le service consommateurs Rowenta (voir les coordonnées en dernière page).
Cet appareil n’est pas prévu pour être utilisé par des personnes (y compris les
enfants) dont les capacités physiques, sensorielles ou mentales sont réduites, ou des
personnes dénuées d’expérience ou de connaissance, sauf si elles ont tpu bénéficier,
par l’intermédiaire d’une personne responsable de leur sécurité, d’une surveillance ou
* Selon modèle
5
d’instructions préalables concernant l’utilisation de l’appareil.
FR
Il convient de surveiller les enfants pour s’assurer qu’ils ne jouent pas avec
l’appareil.
Cet appareil peut être utilisé par des enfants âgés de 8 ans et plus et les personnes
manquant d’expérience et de connaissances ou dont les capacités physiques,
sensorielles ou mentales sont réduites, si elles ont été formées et encadrées quant à
l’utilisation de manière sûre et connaissent les risques encourus. Les enfants ne
doivent pas jouer avec l’appareil. Le nettoyage et l’entretien par l’utilisateur ne doit
pas être fait par des enfants à moins qu’ils ne soient âgés de 8 et plus et supervisés.
Tenir l’appareil et son cordon hors de la portée des enfants de moins de 8 ans.
2 • Alimentation électrique
Vérifiez que la tension d’utilisation (voltage) de votre aspirateur corresponde bien à celle de votre installation.
Débranchez l’appareil en retirant la prise de courant, sans tirer sur le cordon : immédiatement après utilisation, avant chaque changement d’accessoires, avant chaque nettoyage, entretien ou changement de filtre.
N'utilisez pas l'appareil si le cordon d'alimentation est endommagé. Le cordon d’alimentation de votre
aspirateur doit être remplacé impérativement par un Centre Service Agréé car des outils spéciaux sont
nécessaires pour effectuer toute réparation afin d’éviter un danger.
3 • Réparations
Les réparations ne doivent être effectuées que par des spécialistes avec des pièces détachées d’origine. Réparer un appareil soi-même peut constituer un danger pour l’utilisateur et annule la garantie.
Participons à la protection de l’environnement !
Votre appareil contient de nombreux matériaux valorisables ou recyclables.
Confiez celui-ci dans un point de collecte ou à défaut dans un centre service agréé pour
que son traitement soit effectué.
AVANT UTILISATION
1 • Assemblez votre aspirateur (fig. 1) - (fig. 2)
2 • Sélectionnez le bon accessoire (fig. 2) - (fig. 3) - (fig. 4) - (fig. 5)
ASPIRATION
3 • Mettez en marche votre Aspirateur (fig. 6) - (fig. 7) - (fig. 8)
4 • Réglez la puissance d’aspiration (fig. 9)
Max : sols
Min : mobilier, tissus fragiles…
5 • Arrêtez votre aspirateur (fig. 10)
RANGEMENT (fig. 11)
* Selon modèle
6
NETTOYAGE ET MAINTENANCE
FR
L’air que nous respirons contient des particules qui peuvent être allergènes : les larves et déjections
d’acariens, les moisissures, le pollen, les fumées et les résidus animaux (poils, peau, salive, urine). Les
particules les plus fines pénètrent profondément dans l’appareil respiratoire où elles peuvent provoquer une inflammation et altérer la fonction respiratoire dans son ensemble.
Les filtres HEPA (High Efficiency Particulate Air Filter, c’est-à-dire filtres de Haute Efficacité pour les
Particules Aériennes) permettent de retenir les particules les plus fines.Grâce au filtre HEPA, l’air rejeté
dans la pièce est plus sain que l’air aspiré.
IMPORTANT
Arrêtez et débranchez toujours votre aspirateur avant l’entretien ou le nettoyage. Vérifiez et nettoyez
régulièrement l’ensemble de votre aspirateur et les différents filtres.
ATTENTION
Ne faites jamais fonctionner votre aspirateur sans système de filtration (filtre HEPA).
1 • Nettoyage du bac à poussière (5)
Vidage rapide
Lorsque le bac à poussière (5) est plein, ouvrez le capot de l’aspirateur (Fig.12) puis retirez le bac à
poussière (5) en le faisant légèrement glisser vers le bas (Fig.13). Placez-le au dessus d’une poubelle
et appuyez sur le bouton « push » afin de basculer la trappe de vidage vers le bas puis videz le contenu du bac (Fig.14). Refermez la trappe (Fig.15) et remettez le bac à poussière puis fermez le capot
de l'aspirateur en place (Fig.16).
Nettoyage complet
Il convient de nettoyer régulièrement l’ensemble bac à poussière (5).
Ouvrez le capot de l’aspirateur (Fig.12).
Retirez le bac à poussière (5) en le faisant glisser vers le bas (Fig.13) puis séparez chaque élément :
ôtez le couvercle du bac à poussière (5c) puis le filtre HEPA (5b3).
Retirez ensuite le filtre mousse (5b2) et le séparateur (5b1).
Passez le bac/réceptacle à poussière (5a) et le séparateur (5b1) sous l’eau tiède puis laissez sécher ou
essuyez avec un chiffon sec (Fig.17).
Nettoyez le filtre mousse (5b2) : reportez-vous au paragraphe 2 – NETTOYAGE DU FILTRE MOUSSE.
Nettoyez le filtre HEPA (5b3) : pour l’entretien des filtres reportez-vous au paragraphe 3 – NETTOYAGE
DU FILTRE HEPA.
Une fois secs, remettez les éléments du bac à poussière (5) en place et repositionnez l’ensemble sur
l’appareil (Fig.16).
Remettez le couvercle de l’aspirateur (7).
2 • Nettoyage du filtre mousse (5b2)
Il convient de nettoyer le filtre mousse (5b2) après chaque utilisation, avec de l’eau savonneuse tiède
(Fig.18). Rincez et laissez sécher au moins 12 heures avant de le remettre en place.
Un filtre mousse supplémentaire est fourni avec votre aspirateur afin de vous permettre l'utilisation
de votre appareil pendant le séchage du filtre mousse d'origine.
3 • Nettoyage du filtre HEPA (5b3)
Votre appareil est équipé d’un filtre HEPA (5b3).
Si vous ressentez un manque de puissance de votre appareil, nous vous recommandons de nettoyer
le filtre HEPA afin de conserver les performances d’aspiration :
- retirez le couvercle de l’aspirateur (Fig.12)
* Selon modèle
7
- retirez le bac à poussière en le faisant légèrement glisser vers le bas (Fig.13) puis retirez le
FR
couvercle du bac à poussière (5c)
- ôtez le filtre HEPA (Fig.19-20-21) puis tapotez-le légèrement au dessus d’une poubelle (Fig.22).
Replacez le filtre HEPA à l'intérieur du couvercle du bac à poussière, remettez les éléments du bac à
poussière en place et repositionnez l'ensemble sur l'appareil.
Replacez le couvercle de l’aspirateur (7).
Attention ! Ce nettoyage est exclusivement réservé à la cassette filtre HEPA* RS-RH5024
4 • Nettoyez votre aspirateur
Essuyez le corps de l’appareil et les accessoires avec un chiffon doux et humide, puis séchez. (fig.
23)
CONSEILS ET PRÉCAUTIONS
• Avant chaque utilisation, le cordon doit être déroulé complètement.
• Ne le coincez pas et ne le passez pas sur des arêtes tranchantes.
• Ne déplacez pas l’aspirateur en tirant sur le cordon, l’appareil doit être déplacé par sa poignée de
transport, ou à l’aide de la sangle de transport*.
• N’utilisez pas le cordon pour soulever l’appareil.
• Si vous utilisez une rallonge, assurez-vous qu’elle est en parfait état et de section adaptée à la puissance de votre aspirateur.
• Ne débranchez jamais l’appareil en tirant sur le cordon.
• Arrêtez et débranchez votre aspirateur après chaque utilisation.
• N’utilisez que des accessoires et filtres d’origine Rowenta.
• Vérifiez que tous les filtres sont bien en place.
• Ne le faites jamais fonctionner sans bac et sans filtre.
• En cas de difficultés pour obtenir accessoires et filtres pour cet aspirateur, contactez le Service
Consommateurs Rowenta : 0 810 623 623 ou [email protected]
QUE FAIRE SI…
IMPORTANT
Dès que votre aspirateur fonctionne moins bien et avant toute vérification :
arrêtez-le en utilisant le bouton poussoir marche/arrêt et débranchez-le.
Votre aspirateur ne
démarre pas ou n'aspire pas
• L’appareil n’est pas alimenté : vérifiez que l’appareil est correctement
branché.
• Un accessoire ou le tube est bouché : débouchez l’accessoire ou le tube.
• Le couvercle est mal fermé ou ne se referme pas : vérifiez la mise en
place / ou la présence du bac et refermez le couvercle.
Votre aspirateur aspire moins bien, fait du
bruit, siffle
• Un accessoire ou le tube est partiellement bouché : débouchez l’accessoire ou le tube.
• Le bac est plein ou saturé par des poussières fines : videz le bac.
• Le filtre HEPA est saturé : nettoyez-le si il a moins de 6 mois d’utilisation,
sinon changez-le en suivant les instructions de la notice.
• Le variateur de puissance est en position min. : augmentez la puissance à
l'aide du variateur de puissance (sauf si vous aspirez des tissus fragiles).
• Le suceur est difficile à déplacer : diminuez la puissance à l’aide du variateur de puissance.
Si un problème persiste, confiez votre aspirateur au Centre Service Agréé Rowenta le plus proche.
Voir la liste des Centres Service Agréés Rowenta ou contactez le Service Consommateur Rowenta :
0 810 623 623 ou [email protected]
8
DESCRIPTION
EN
Zoom on cord rewind
9 Cord
Zoom on back of product
10 Hooks for transport strap*
Exploded view
1 Handle
2 On/Off button
3 Power variator
4 Air exit grid
5 Dust container
5a Receptacle / Dust container
5b Filtering system
5b1 Separator
5b2 Foam filter
5b3 HEPA filter (RS-RH5024)
5c Dust container lid
6 Door opening button
7 Container compartment door
8 Container compartment
Accessories*
11 2-position fitting (smooth floors - carpeting)
12 Parquet nozzle
13 Upholstery nozzle
14 Mini turbo brush*
15 Maxi turbo brush*
16 Crevice tool
17 Extension
18 Transport strap*
19 Flexible*
WARRANTY
• This appliance is for household use only; in the event of inappropriate or non-recommended use, no
liability can be accepted and the warranty is cancelled.
• Read the instructions for use carefully before using the appliance for the first time: utilisation not
complying with the instructions for use will relieve Rowenta of any liability.
SAFETY ADVICE
For your safety, this appliance complies with applicable standards (Low voltage directions, electromagnetic compatibility, the environment, …) Read your instructions for use carefully and keep them safe.
1 • Conditions of use
Your vacuum cleaner is an electrical appliance: it must be used under normal conditions of use. Use
and store it out of reach of children. Do not allow it to run unsupervised. Do not hold the suction fitting
or the end of the hose near the eyes or ears.
Do not use on moist surfaces, or to suck up any liquids, hot substances, ultra-fine substances (plaster,
cement, ash…), large or sharp items of waste (glass), harmful products (solvents, descalers...), aggressive products (acids, cleaners ...), inflammable and explosive products (based on petrol or alcohol).
Never place the appliance in water, do not spray water on it and do not store it outside. Do not use it
after it has been dropped and does not function normally or has signs of visible damage. In that event
do not open it but send it to an authorised Service Centre or contact a Rowenta customer service
centre (addresses are on the last page).
This appliance is not designed for use by persons (including children), whose
physical, sensory or mental capacities are impaired, or by persons devoid of
experience or knowledge, unless they are supervised by a person responsible for
their safety, surveillance or have received prior instructions in the use of the
appliance. It is necessary to supervise children to ensure that they do not play
with the appliance.
This appliance may be used by children aged 8 or over, and by persons lacking
* Depending on model
9
appropriate knowledge and experience or whose physical, sensory or EN
mental capacities are limited, provided that they are supervised, have
received instruction in the safe use of the appliance, and are fully aware of the
risks involved. Children must not be allowed to play with the appliance. Home
cleaning and maintenance of the appliance must not be carried out by children
unless they are aged 8 or over and are supervised. Always keep the appliance
and power cord out of reach of children under 8 years.
2 • Electrical supply
Ensure that the voltage at which your vacuum cleaner operates is the voltage installed on your premises. Disconnect the appliance by pulling out the plug without pulling the cord: immediately after
use, before any change of accessory, every cleaning, servicing or change of filter.
Do not use it if the cord is damaged. The power cord of your vacuum cleaner must be replaced by an
approved Service Centre because special tools are needed for carrying out any repair in order to avoid
danger.
3 • Repairs
Repairs must only be carried out by specialists and using original spare parts. Repairing the appliance
oneself may endanger the user and cancels the warranty.
Let us take part in protecting the environment!
Your appliance contains numerous reusable or recyclable materials.
take it to collection point or in its absence, to an approved service centre for disposal.
BEFORE USE
1 • Assemble your vacuum cleaner (fig. 1) - (fig. 2)
2 • Select the right accessory* (fig. 2) - (fig. 3) - (fig. 4) - (fig. 5)
VACUUMING
3 • Switch on your vacuum cleaner (fig. 6) - (fig. 7) - (fig. 8)
4 • Set the vacuum power (fig. 9)
Max: Floors
Min: Furniture, delicate fabrics…
5 • Switch off your vacuum cleaner (fig. 10)
STORAGE (fig. 11)
CLEANING AND MAINTENANCE
The air we breathe contains particles, which may cause allergies; the larvae and waste of mites,
moulds, pollen, smoke and animal residues (hair, skin, saliva, urine). The finest particles penetrate into
the respirator where they may cause inflammation and completely alter the respiratory function.
* Depending on model
10
HEPA filters (high efficiency particulate air filters, namely high efficiency filters for air-borne particle filters) make it possible to hold back the finest particles. Thanks to the HEPA filter, spent air
in the room is cleaner than vacuumed air.
EN
IMPORTANT
Always switch off and disconnect your vacuum cleaner before servicing or cleaning. Check and clean
regularly your whole vacuum cleaner and the different filters.
ATTENTION
Never use your vacuum cleaner without the filtration system (microfilter and filter).
1 • Cleaning the dust container (5)
Quick emptying
When the dust container (5) is full, remove the cover from the vacuum cleaner (Fig. 12) then remove
the dust container (5) by sliding it slightly downwards (Fig. 13). Place it over a waste container and
press the button marked "Push" to tip the emptying flap down, then empty out the contents of the
container (Fig. 14). Close up the flap (Fig. 15) and refit the dust container, then refit the cover onto
the vacuum cleaner (Fig. 16).
Complete cleaning
The container assembly (5) requires regular cleaning.
Remove the cover from the vacuum cleaner (Fig. 12). Then remove the dust container (5) by sliding
it slightly downwards (Fig. 13). Then separate each element: Remove the dust container cap (5c)
then the HEPA filter (5b3).
Then remove the foam filter (5b2) and the separator (5b1).
Place the receptacle/dust container (5a) and separator (5b1) under warm water, then leave it to dry or
wipe it with a dry cloth (Fig. 17).
For cleaning the foam filter (5b2) : Please refer to Section 2 – CLEANING THE FOAM FILTER. For cleaning the HEPA filter (5b3) : For information on servicing filters, please refer to Section 3 – CLEANING
THE HEPA FILTER.
Once dry, refit the dust container (5) elements, then refit the complete assembly onto the vacuum
cleaner (Fig. 16).
Refit the vacuum cleaner cover (7).
2 • Cleaning the foam filter (5b2)
The foam filter (5b2) should be cleaned after every use, using warm soapy water
leave to dry for at least 12 hours before refitting.
(Fig. 18). Rinse and
An additional foam filter is supplied with your vacuum cleaner so that you can continue to use your
vacuum cleaner while the original foam filter is drying.
3 • Cleaning the HEPA filter
Your vacuum cleaner is fitted with a HEPA filter (5b3).
If you notice your vacuum cleaner losing power, then we recommend that you clean the HEPA filter to
retain vacuum performance:
- remove the cover from the vacuum cleaner (Fig. 12)
- remove the dust container by sliding it slightly downwards (Fig. 13) then remove the dust container cap (5c)
- pull out the HEPA (Fig. 19-20-21) filter and tap it lightly over a waste container (Fig. 22)
Replace the HEPA filter inside the dust container cap, refit the dust container elements, then refit the
complete assembly onto the vacuum cleaner. Refit the vacuum cleaner cover (7).
* Depending on model
11
4 • Clean your vacuum cleaner
Wipe the body of the appliance and the accessories with a soft damp cloth and then dry.
(Fig.
EN
23)
ADVICE AND PRECAUTIONS
• Before every cycle of use, the cord must be fully unwound.
• Do not enter corners and do not pass over sharp shards.
• Do not move the vacuum cleaner by pulling the cord, but use the carrying handle.
• Do not lift the appliance by the cord.
• If you are using an extension cable, ensure that it is in perfect condition and matches the power of
your vacuum cleaner.
• Do not unplug the appliance by pulling the cord.
• Stop and disconnect your vacuum cleaner after each utilisation cycle.
• Only use dry accessories and original Rowenta pieces.
• Verify that all filters are in place.
• Never use without dust container and filter.
• In case of difficulty in obtaining accessories and filters for the vacuum cleaner, contact Rowenta
Consumer Service on 0845 302 1454
WHAT TO DO IF…
IMPORTANT
When your vacuum cleaner is not working as it should be and before any verification, stop it by using
the stop/start pushbutton and unplug.
Your vacuum cleaner
will not start or does
not suck.
• The appliance is not receiving current: check that it is correctly connected.
• An accessory or the tube is blocked: unblock the accessory or the pipe.
• The cover is badly closed or cannot be closed: check the position/or the
presence of the dust container and re-close the cover.
Your vacuum cleaner
has less suction
power, makes a
noise, and whistles.
• An accessory or the tube is partially blocked: unblock the accessory or
the tube.
• The dust container is full or saturated with fine dust: replace the dust
container.
• The HEPA filter is saturated: clean the HEPA filter if 6 months of use have
elapsed, otherwise change it following instructions in the notice.
• The power control is in minimum position: increase the power using the
power control (except when cleaning fine fabrics).
• The suction fitting is difficult to move: reduce the power using the power
control.
If a problem persists, take your vacuum cleaner to the nearest approved Rowenta Service Centre. See
the list of approved Rowenta Service Centres or contact Rowenta Customer Service: 0845 302 1454
12
DESCRIPCIÓN
ES
Imagen detallada
1 Asa
2 Botón de encendido/apagado
3 Variador de potencia
4 Rejilla de salida de aire
5 Depósito para polvo
5a Compartimento / depósito para polvo
5b Sistema de filtración
5b1 Separador
5b2 Filtro de espuma
5b3 Filtro HEPA (RS-RH5024)
5c Tapa del depósito
6 Botón de apertura de la puerta
7 Puerta del depósito para polvo
8 Compartimento del depósito
Zoom sobre el proceso de enrollado del cable
9 Cable
Zoom sobre la parte posterior del producto
10 Enganches para la banda de transporte*
Accesorios*
11 Boquilla de 2 posiciones (suelos lisos –
moquetas)
12 Boquilla para parquet
13 Boquilla para muebles
14 Miniturbocepillo*
15 Maxiturbocepillo*
16 Boquilla plana
17 Alargador
18 Banda de transporte*
19 Tubo flexible*
GARANTÍA
• Este aparato está destinado exclusivamente a uso doméstico; en caso de que hagan un uso inadecuado del mismo o que no respeten las instrucciones de uso, la marca no asumirá ninguna responsabilidad y la garantía quedará anulada.
• Lea atentamente el manual de instrucciones antes de utilizar el aparato por primera vez: un uso no
conforme con las instrucciones de uso eximiría a Rowenta de cualquier responsabilidad.
CONSEJOS DE SEGURIDAD
Por su seguridad, este aparato cumple las normas y reglamentaciones aplicables (Directivas de Baja
Tensión, Compatibilidad Electromagnética, Medio Ambiente, etc.). Lea atentamente las instrucciones
de uso y consérvelas.
1 • Condiciones de uso
Su aspiradora es un aparato eléctrico, por lo que debe utilizarse en condiciones normales de uso.
Utilice y guarde el aparato fuera del alcance de los niños. No deje nunca el aparato en marcha sin
supervisión. No sostenga la boquilla o el extremo del tubo a la altura de los ojos o las orejas.
No aspire superficies mojadas ni líquidos de ningún tipo, así como tampoco sustancias calientes,
ultrafinas (yeso, cemento, cenizas, etc.), ni grandes residuos cortantes (vidrio), ni productos nocivos
(disolventes, decapantes, etc.), agresivos (ácidos, limpiadores, etc.), inflamables y explosivos (a base
de gasolina o alcohol).
No sumerja nunca el aparato en el agua, ni vierta agua sobre el mismo y no lo guarde a la intemperie. No
utilice el aparato: si este se ha caído y presenta deterioros visibles o anomalías de funcionamiento. En ese
caso, no abra el aparato, envíelo al Centro de Servicio Autorizado más cercano o póngase en contacto con
el Servicio de Atención al Consumidor de Rowenta (consulte los datos de contacto en la última página).
Este aparato no está pensado para su uso por parte de personas (incluidos los
niños) cuyas facultades físicas, sensoriales o mentales sean reducidas, ni por
aquellas que no tengan experiencia o conocimientos, salvo si están sometidas
a vigilancia o han recibido instrucciones previas en relación al uso del aparato
*En función del modelo
13
por parte de una persona responsable de su seguridad. Se recomienda vigi- ES
lar siempre a los niños para asegurarse de que no juegan con el aparato.
Este aparato puede ser utilizado por niños de 8 años o más y por personas a
las que les falta experiencia y conocimiento o cuyas capacidades físicas, sensoriales o mentales son reducidas, si han sido formados u orientados en cuanto a su utilización de una manera segura y conocen los riesgos que se puede
correr. Los niños no deben de jugar con el aparato. La limpieza y el mantenimiento por el usuario no deben ser hechos por niños a menos que tengan al
menos 8 años y además estén supervisados. Mantener el aparato y su cable
fuera del alcance de los niños menores de 8 años.
2 • Alimentación eléctrica
Asegúrese de que la tensión de uso (voltaje) de la aspiradora se corresponde con la de su instalación.
Desconecte el aparato retirando el enchufe, sin tirar del cable: justo después de su uso, y antes de
cada cambio de accesorios, limpieza, mantenimiento o cambio de filtro.
No utilice el aparato si el cable de alimentación está dañado. El cable de alimentación de vuestra aspiradora deben ser cambiados obligatoriamente por un Centro de Servicio Autorizado, puesto que es
necesario emplear herramientas especiales para efectuar cualquier tipo de reparación y evitar cualquier riesgo.
3 • Reparaciones
Las reparaciones únicamente deben efectuarlas especialistas con piezas de recambio originales. El
hecho de que el usuario repare por sí mismo el aparato puede representar un peligro para él y suponer la anulación de la garantía.
¡Colaboremos en la protección del medio ambiente!
El aparato contiene numerosos materiales aprovechables o reciclables.
Lleve el aparato a un punto de recogida o deséchelo en un Centro de Servicio Autorizado
para su procesamiento.
ANTES DE SU USO
1 • Monte su aspiradora (fig. 1) - (fig. 2)
2 • Seleccione el accesorio adecuado* (fig. 2) - (fig. 3) - (fig. 4) - (fig. 5)
ASPIRACIÓN
3 • Ponga en marcha su aspiradora (fig. 6) - (fig. 7) - (fig. 8)
4 • Ajuste la potencia de aspiración (fig. 9)
Máx.: suelos
Mín.: mobiliario, tejidos delicados, etc.
5 • Pare su aspiradora (fig. 10)
ALMACENAMIENTO (fig. 11)
*En función del modelo
14
LIMPIEZA Y MANTENIMIENTO
ES
El aire que respiramos contiene partículas que pueden provocar alergias: las larvas y los excrementos
de los ácaros, los hongos, el polen, los humos y los residuos de animales (pelos, piel, saliva y orina).
Las partículas más finas penetran profundamente en nuestro sistema respiratorio, donde pueden provocar una inflamación y alterar la función respiratoria en su conjunto.
Los filtros HEPA (High Efficiency Particulate Air Filter, es decir, filtros de aire de gran eficacia para las
partículas aéreas) permiten retener las partículas más finas. Gracias al filtro HEPA, el aire expulsado
por la aspiradora en la habitación es más sano que el aire aspirado.
IMPORTANTE:
Apague y desconecte siempre la aspiradora antes de proceder a su mantenimiento o a su limpieza.
Compruebe totalmente su aspiradora, así como los distintos filtros, y límpielos con regularidad.
ATENCIÓN:
No ponga en marcha nunca su aspiradora sin un sistema de filtración (microfiltro y filtro).
1 • Limpieza del depósito para polvo (5)
Vaciado rápido
Cuando el depósito para polvo (5) esté lleno, retire la tapa de la aspiradora (Fig.12) y a continuación,
retire el depósito para polvo (5) deslizándolo suavemente hacia abajo (Fig.13). Póngalo encima de
un cubo de basura y pulse el botón «push» para inclinar la tapa de vaciado hacia abajo y vaciar el
contenido del depósito (Fig.14). Cierre de nuevo la tapa (Fig.15) y coloque el depósito para polvo y
la tapa de la aspiradora en su sitio (Fig.16).
Limpieza completa
Se recomienda limpiar regularmente todo el depósito para polvo (5).
Retire la tapa de la aspiradora (Fig.12) Retire el depósito para polvo (5) deslizándolo hacia abajo
(Fig.13) y separe cada elemento: abra la tapa del depósito para polvo (5c) yel filtro HEPA (5b3).
A continuación, retire el filtro de espuma (5b2) y el separador (5b1).
Pase el depósito/compartimento para polvo (5a) y el separador (5b1) por debajo de agua tibia y deje
secar o séquelos con un paño seco (Fig.17).
Limpie el filtro de espuma (5b2): diríjase al párrafo 2 – LIMPIEZA DEL FILTRO DE ESPUMA.
Limpie el filtro HEPA (5b3): para el mantenimiento de los filtros, diríjase al párrafo 3 – LIMPIEZA DEL
FILTRO HEPA.
Una vez secos, coloque los elementos de recipiente para polvo (5) en su sitio y vuelva a poner todo el
conjunto en el aparato (Fig.16).
Coloque la tapa de nuevo en la aspiradora (7).
2 • Limpieza del filtro de espuma (5b2)
Se recomienda limpiar el filtro de espuma (5b2) después de cada utilización, con agua tibia y jabón
(Fig.18). Aclare y deje secar al menos 12 horas antes de colocarlo en su sitio.
La aspiradora incluye un filtro de espuma adicional para que pueda utilizar el aparato durante el secado del filtro de espuma original.portante: Cambie el microfiltro* ZR0050 01 cada 5 cambios de bolsa.
3 • Limpieza del filtro HEPA
Según el modelo, el aparato está provisto de un filtro HEPA (5b3).
Si observara que el aparato pierde potencia, le recomendamos que limpie el filtro HEPA para conservar la eficacia de aspiración:
- retire la tapa de la aspiradora (Fig.12)
- retire el depósito para polvo deslizándolo suavemente hacia abajo (Fig.13) y retire la tapa del depósito para polvo (5c)
*En función del modelo
15
- retire el filtro HEPA (Fig. 19-20-21) y sacúdalo ligeramente encima de un cubo de basura
ES
(Fig.22).
Sustituya el filtro HEPA que se encuentra dentro de la tapa del depósito para polvo, coloque los elementos del depósito para polvo en su sitio y ponga todo el conjunto en el aparato. Coloque de nuevo
la tapa de la aspiradora (7).
4 • Limpieza de su aspiradora
Limpie el cuerpo del aparato y los accesorios con un paño suave y húmedo y, a continuación, séquelo. (fig. 23)
CONSEJOS Y PRECAUCIONES
• Antes de cada uso, el cable debe estar completamente desenrollado.
• No lo atranque ni lo haga pasar bajo aristas cortantes.
• No desplace la aspiradora tirando del cable, el aparato debe desplazarse agarrándolo por su asa de
transporte.
• No utilice el cable para levantar el aparato.
• En caso de que utilice un alargador, compruebe primero si se encuentra en perfecto estado y si se
adapta a la potencia de su aspiradora.
• No desenchufe nunca el aparato tirando del cable.
• Apague y desconecte la aspiradora después de cada uso.
• Utilice únicamente y filtros originales Rowenta.
• Compruebe que todos los filtros estén bien colocados.
• No la ponga nunca en marcha sin filtro.
• En caso de que tenga dificultades para conseguir filtros para esta aspiradora, póngase en contacto
con el Servicio de Atención al Consumidor de Rowenta: (34) 90 231 2500
QUÉ HAY QUE HACER SI...
IMPORTANTE
En caso de que su aspiradora no funcione tan bien como es habitual y antes de cualquier comprobación:
Deténgala utilizando el pulsador de encendido/apagado y desenchúfela.
Su aspiradora no se
enciende o no aspira
• El aparato no está conectado: asegúrese de que el aparato se encuentra
bien conectado.
• Se ha taponado algún accesorio o el tubo: desatásquelo.
• La tapa no está bien cerrada o no se cierra: compruebe que el compartimento está dentro y está bien colocado y vuelva a cerrar la tapa.
Su aspiradora ya no
aspira igual de bien,
hace ruido o emite
un silbido
• Se ha taponado parcialmente algún accesorio o el tubo: desatásquelo.
• El compartimento está lleno o saturado por polvos finos: vacíelo.
• El filtro HEPA está saturado: limpie el filtro HEPA si lo ha utilizado durante menos de 6 meses; en caso contrario, cámbielo siguiendo las instrucciones del manual.
• El variador de potencia se encuentra en posición de mín.: aumente la
potencia con ayuda del variador de potencia (salvo si está aspirando tejidos delicados).
• Es difícil desplazar la boquilla: reduzca la potencia con ayuda de un variador de potencia.
Si el problema persiste, lleve su aspiradora al Centro de Servicio Autorizado Rowenta más cercano.
Consulte la lista de Centros de Servicio Autorizados de Rowenta o póngase en contacto con el
Servicio de Atención al Consumidor de Rowenta: (34) 90 231 2500
16
ÜRÜNÜN TANITIMI
TR
Kablo sarma ünitesinin yakından görünümü
9 Kordon
Ürünün arka kısmının yakından görünümü
10 Taşıma askısı için* askılar
Cihazın parçaları
1 Konforlu sap
2 Çalıştırma /durdurma düğmesi
3 Güç ayar düğmesi
4 Hava çıkış ızgarası
5 Toz haznesi
5a Muhafaza / Toz haznesi
5b Filtreleme sistemi
5b1 Toz ayırıcı
5b2 Köpük filtre
5b3 HEPA filtre (RS-RH 5024)
5c Toz haznesi kapağı
6 Kapak açma düğmesi
7 Elektrik süpürgesi kapagi
8 Toz haznesi yuvasi
Aksesuarlar*
11 2 pozisyonlu süpürme başlığı (düz zemin - halı)
12 Parke için süpürme başlığı
13 Döşemeler için süpürme başlığı
14 Mini Turbo Fırça*
15 Maksi Turbo Fırça*
16 Yassı süpürme başlığı
17 Uzatma kablosu
18 Taşıma askısı*
19 Üzerinde*
GARANTİ
• Bu cihaz yalnızca ev içi kullanıma uygun olarak tasarlanmıştır; kullanım kılavuzuna aykırı olarak kullanılması halinde
marka hiçbir mesuliyet kabul etmez, ürün garantisi geçersiz duruma gelir.
• Cihazınızı ilk defa kullanmadan önce, kullanım kılavuzunu dikkatli bir şekilde okuyun: Ürünün kullanım kılavuzuna
aykırı veya uygunsuz bir şekilde kullanılması halinde, Rowenta sorumlu tutulamaz.
GÜVENLİK TAVSİYELERİ
Güvenliğiniz açısından, bu cihaz ilgili düzenlemeler ve normlara uygun olarak üretilmiştir (Düşük Gerilime İlişkin Direktifler,
Elektromanyetik Uyumluluk, Çevre…). Lütfen kullanım kitapçığını dikkatli bir şekilde okuyun ve ileride başvurmak üzere
muhafaza edin.
1. Kullanım koşulları
Elektrikli süpürgeniz, elektrikli bir cihazdır: Normal kullanım koşulları çerçevesinde kullanılması gerekmektedir. Cihazı
çocukların erişemeyeceği yerlerde muhafaza edin. Fişi prize takılı olan cihazın başından ayrılmayın. Süpürme başlığı
veya süpürme borusunun uç kısmını gözleriniz ve kulaklarınız hizasında tutmayın.
Her türlü sıvıyı ve sıcak maddeyi, ince yapılı (alçı, çimento, kül…), zehirli (solvent, pas temizleme ürünleri vb.),
aşındırıcı (asit, temizlik ürünleri vb.), yanıcı ve patlayıcı (benzin ve alkol ve alkol bazlı) maddeleri, kesici özellikli iri atıkları (cam parçaları..) cihazınızla çekmeyin.
Cihazı asla su içine daldırmayın, üzerine su püskürtmeyin, dış ortamda muhafaza etmeyin. Şu hallerde ürünü kullanmayın: Düştüyse ve görünür hasarları varsa veya işleyiş bozukluğu arz ediyorsa. Bu durumda cihazın içini açmadan en
yakın Tescilli Bakım Servisine gönderin veya Rowenta tüketici hizmetleri departmanıyla iletişim kurun (iletişim bilgilerini son sayfada bulabilirsiniz).
Bu cihaz fiziksel, duyusal veya zihinsel engeli olan (erişkin veya çocuk) veya cihaz hakkında
hiçbir tecrübe veya bilgisi olmayan şahıslar tarafından, güvenliklerinden sorumlu bir kişinin gözetimi altında olmadıkları veya bu kişi tarafından cihazın kullanımı konusunda eğitilmedikleri takdirde kullanılmamalıdır. Çocukların cihazla oynamamasına dikkat edilmelidir.
Bu cihaz 8 yaş ve uzeri cocuklar ve cihaz hakkında hicbir tecrube veya bilgisi olmayan
şahıslar tarafından, guvenliklerinden sorumlu bir kişinin gozetimi altında bulunmaları veya
*Modeline göre
17
bu kişi tarafından cihazın kullanımı konusunda eğitilmeleri koşuluyla kullanılabilir.
TR
Cocukların cihazla oynamasına izin verilmemelidir. Kullanıcı tarafından gercekleştirilen temizlik ve bakım 8 yaş uzeri ve bir yetişkin gozetimi altında bulunmamaları halinde
cocuklar tarafından gercekleştirilmemelidir. Cihazı ve kablosunu 8 yaş altındaki cocukların
ulaşamayacakları yerlerde muhafaza edin.
2. Elektrik güç kaynağı
Elektrikli süpürgenizin voltajının, şebekeniz tarafından sağlanan gerilime uygun olduğunu kontrol edin. Cihazın fişini,
kordonundan çekmeden, prizden çıkarın: kullandıktan hemen sonra, her aksesuar değişiminden önce, her temizlik,
bakım veya filtre değişimi işlemi öncesinde.
Kordon hasar görmüşse ürünü kullanmayın. Elektrikli süpürgenizin kordonunun mutlaka Tescilli Bakım Servisi tarafından değiştirilmesi gerekmektedir; herhangi bir tehlikeye meydan vermemek için, gerçekleştirilecek olan tüm onarım
işlemleri için özel aletler gerekmektedir.
3. Onarım işlemleri
Onarımların, ancak konusunda uzman kişiler tarafından, orijinal yedek parçalar kullanılarak gerçekleştirilmesi gerekmektedir. Cihazın kullanıcı tarafından onarılmaya çalışılması tehlikelidir ve garantinin sona ermesine neden olur.
Çevre korumasına katkıda bulunun!
Cihazınız yeniden değerlendirilebilen veya geri dönüşümü gerçekleştirilebilen birçok parçaya sahiptir.
Çevre korumasına uygun bir şekilde işleme konulması için, cihazınızı toplama noktalarına veya bulunmaması halinde bu konuda tescilli bir merkeze bırakın.
KULLANIM ÖNCESİNDE
1. Elektrikli süpürgenizin parçalarını birleştirin (şekil 1) – (şekil 2)
2. Uygun aksesuarı seçin* (şekil 2) – (şekil 3) – (şekil 4) – (şekil 5)
SÜPÜRME İŞLEMİ
3. Süpürgenizi çalıştırın (şekil 6) – (şekil 7) – (şekil 8)
4. Emiş gücünü ayarlayın (şekil 9)
Maks: zeminler
Min: döşemeler, hassas kumaşlar
5. Süpürgenizi durdurun (şekil 10)
CİHAZIN MUHAFAZASI (şekil 11)
TEMİZLİK VE BAKIM
Soludu umuz hava alerjiye neden olabilecek partiküller içermektedir: akarların larvaları ve dı kıları,
polenler, hayvansal atıklar (tüy, deri, salya, dı kı) ve duman. nce yapıdaki partiküller solunum sisteminin derinlerine inebilir ve orada iltihaplanmalara yol açabilir, genel olarak nefes alıp vermeyi olumsuz
yönde etkileyebilirler.
*Modeline göre
18
HEPA (High Efficiency Particulate Air Filter) filtreler, yani Havadaki Partikülleri Yüksek Verimlilikle
emebilen filtreler sayesinde, en ince partiküller bile tutulabilmektedir. HEPA filtre sayesinde
odaya geri verilen hava, emilen havadan daha temizdir.
TR
ÖNEMLİ
Bakım ve temizlik işlemi öncesinde cihazınızı daima durdurun ve fişini prizden çıkarın. Elektrikli süpürgenizin genel
yapısını ve farklı filtrelerini düzenli olarak gözden geçirin ve temizleyin.
DİKKAT
Cihazı asla filtre sistemi olmadan (mikro filtre ve filtre) kullanmayın.
1 • Toz haznesinin temizlenmesi (5)
Hızlı boşaltma
Toz haznesi dolduğunda (5) elektrik süpürgesinin kapağını çıkarın (Şek. 12), daha sonra aşağı doğru yavaşça kaydırarak toz haznesini (5) çıkarın (Şek. 13). Bir çöp kutusu üzerine getirin ve boşaltma kapağının aşağı doğru açılması için
“Push (İt)” işaretli düğmeye basın, sonra hazne içindekileri boşaltın (Şek. 14). Kapağı yukarı doğru kapatın (Şek. 15)
ve toz haznesini yerine yerleştirin, sonra elektrik süpürgesinin kapağını kapatın (Şek. 16).
Komple temizlik
Hazne grubu (5) düzenli temizlik gerektirir.
Elektrik süpürgesinin kapağını çıkarın (Şek. 12). Daha sonra hafifçe aşağı doğru kaydırarak toz haznesini (5) çıkarın
(Şek. 13). Sonra her bir elemanı ayırın: Toz haznesi kapağını (5c) çıkarın sonra, veya HEPA filreyi (5b3) çıkarın.
Daha sonra köpük filtreyi (5b2) ve ayırıcıyı (5b1) çıkarın.
Muhafazayı/toz haznesini (5a), ayırıcıyı (5b1) ılık su altına tutun, kurumaya bırakın veya kuru bir bezle kurulayın (Şek. 17).
Köpük filtreyi (5b2) temizlemek için: Lütfen 2 – KÖPÜK FİLRENİN TEMİZLENMESİ Bölümüne başvurun. HEPA filtrenin
(5b3) temizlenmesi için: Servis gerektiren filtreler hakkında bilgi için, lütfen 3 – HEPA FİLRENİN TEMİZLENMESİ.
Kuruduğunda, toz haznesi (5) PARÇALARINI yeniden takın, sonra tüm grubu elektrik süpürgesine yerleştirin (Şek. 16).
Elektrik süpürgesi kapağını (7) yeniden takın.
2 • Köpük filtrenin temizlenmesi (5b2)
Köpük filtre (5b2) her kullanımdan sonra sabunlu ılık su kullanılarak temizlenmelidir (Şek.
takmadan önce en az 12 saat kurumaya bırakın.
18). Durulayın ve yeniden
Orijinal köpük filtre kururken elektrik süpürgenizi kullanmaya devam edebilmenizi sağlamak üzere elektrik süpürgenizle birlikte ilave bir köpük filtre verilmektedir.
3 • HEPA filtrenin temizlenmesi*
Modele bağlı olarak, elektrik süpürgenize bir HEPA filtre (5b3).
Elektrik süpürgenizde güç kaybı olduğunu fark ettiğinizde, vakum performansını geri kazanmak için HEPA filtreyi temizlemenizi öneririz:
- elektrik süpürgesinin kapağını çıkarın (Şek. 12)
- hafifçe aşağı doğru kaydırarak toz haznesini çıkarın (Şek. 13) sonra toz haznesi kapağını (6c) çıkarın
- HEPA filtreyi dışarı çekin (Şek. 19-20-21) ve bir çöp kutusu üzerindeyken hafifçe vurun (Şek. 22).
Toz haznesi kapağı içindeki HEPA filtreyi değiştirin, toz haznesi elemanlarını yeniden takın, sonra tüm grubu elektrik
süpürgesine takın. Elektrik süpürgesi kapağını (7) yerine takın.
4. Elektrikli süpürgenizi temizleyin
Süpürgenizin gövdesini ve aksesuarlarını yumuşak ve nemli bir bezle silin, ardından kurulayın. (şekil 23)
*Modeline göre
19
ÖNERİLER VE TEDBİRLER
TR
• Kordonun her kullanım öncesinde tamamen açılmış olması gerekmektedir.
• Kordonu sıkıştırmayın, kesici yüzeylerle temas etmesinden kaçının.
• Cihazı kordonundan çekerek taşımayın; cihazın taşıma kolundan tutularak taşınması gerekmektedir.
• Cihazı yerinden kaldırmak için kordonundan tutmayın.
• Uzatma kablosu kullanıyorsanız, uzatma kablosunun durumunun iyi olduğundan ve cihazın gücüne karşılık verebildiğinden emin olun.
• Cihazın fişini asla elektrik kordonundan çekerek çıkarmayın.
• Her kullanım sonrasında cihazı durdurun ve fişini prizden çıkarın.
• Sadece orijinal Rowenta aksesuarları ve filtreleri kullanın.
• Tüm filtrelerin yerlerine düzgün bir şekilde yerleşmiş olduklarından emin olun.
• Elektrik süpürgenizi asla filtre olmadan çalıştırmayın.
• Bu elektrik süpürgesinin filtrelerini bulmakta zorlandığınızda,lütfen Rowenta Müşteri Hizmetlerine başvurun : 444 40 50
NE YAPMALI…
ÖNEMLİ
Elektrik süpürgenizin işleyişinde bozulma tespit etmeniz halinde, her türlü kontrolden önce:
Çalıştırma/durdurma düğmesini kullanarak cihazı durdurun ve fişini prizden çıkarın.
Elektrik süpürgeniz
çalışmıyor veya çekmiyor
• Cihaza elektrik gelmiyor: cihazın fişinin prize doğru bir şekilde takılı olduğundan
emin olun.
• Aksesuarlardan biri veya tüp tıkanmış: tıkalı aksesuarı veya tüpü açın.
• Kapak düzgün kapanmamış veya kapatılmamış: haznenin yerine takıldığını/ veya
düzgün bir şekilde takıldığını kontrol edin ve kapağı kapatın.
Elektrik süpürgenizin
emiş gücü düşük,
gürültü çıkarıyor veya
ıslık çalıyor
• Aksesuarlardan biri veya tüp kısmen tıkanmış: tıkalı aksesuarı veya tüpü açın.
• Hazne dolu veya ince tozlar nedeniyle filtre doymuş: hazneyi boşaltın.
• HEPA filtre dolu: 6 aydan kısa bir süredir kullanılıyorsa, HEPA filtreyi temizleyin. Aksi
halde, kılavuzda belirtilen talimatlara göre değiştirin.
• Güç ayar düğmesi min. konumunda: güç ayar anahtarını kullanarak emiş gücünü
arttırın (cihazı hassas özellikli kumaşlar üzerinde kullanmıyorsanız) .
• Emiş başlığı güçlükle hareket ettiriliyor: güç ayar anahtarını kullanarak emiş gücünü
azaltın.
Sorunun devam etmesi halinde cihazınızı en yakın Rowenta Yetkili Servisine götürün. Yetkili Rowenta Servisleri listesine bkz. veya Rowenta Müşteri Hizmetleri iletişim kurun: 444 40 50
20
BESCHREIBUNG
DE
Explosionszeichnung
1 Handgriff
2 An-/Ausknopf
3 Saugkraftregler
4 Luftauslassgitter
5 Staubbehälter
5a Auffangbehälter / Staubbehälter
5b Filtersystem
5b1 Abscheider
5b2 Schaumstofffilter
5b3 HEPA-Filter (RS-RH5024)
5c Behälterdeckel
6 Griffmulde zum Öffnen der Klappe
7 Zugangsklappe zum Behälter
8 Fach des Staubbehälters
Zoom auf die Kabelaufwicklung
9 Kabel
Zoom auf die Produktrückseite
10 Befestigungspunkte für den Transportgurt
Zubehörteile*
11 Düse mit 2 Positionen (glatter Boden –
Teppichboden)
12 Parkettsauger
13 Möbelsauger
14 Mini-Turbo-Bürste*
15 Maxi-Turbo-Bürste*
16 Flachsauger
17 Verlängerung
18 Transportgurt*
19 Schlauch*
GARANTIE
• Dieses Gerät ist nur für private Haushaltszwecke bestimmt; bei unsachgemäßer, nicht der Bedingungsanleitung
entsprechender Verwendung kann die Marke nicht haftbar gemacht werden und die Garantie verfällt.
• Lesen Sie die Bedienungsanleitung vor der ersten Verwendung Ihres Geräts aufmerksam: Eine nicht der
Bedienungsanleitung entsprechende Verwendung befreit Rowenta von jeder Haftung.
SICHERHEITSHINWEISE
Um Ihre Sicherheit zu gewährleisten, entspricht dieses Gerät den gültigen Normen und Richtlinien
(Niederspannung, Elektromagnetische Verträglichkeit, Umweltverträglichkeit,...). Lesen Sie Ihre
Bedienungsanleitung aufmerksam und bewahren Sie sie sorgfältig auf.
1 • Gebrauchsbedingungen
Ihre Staubsauger ist ein elektrisches Gerät: Es muss unter normalen Gebrauchsbedingungen verwendet werden.
Verwenden und bewahren Sie das Gerät außerhalb der Reichweite von Kindern auf. Lassen Sie es niemals
unbeaufsichtigt laufen. Halten Sie den Sauger oder das Rohrende niemals in die Nähe von Augen oder Ohren.
Saugen Sie keine Personen oder Tiere ab.
Saugen Sie keine feuchten Flächen, saugen Sie keine Flüssigkeiten irgendeiner Art, heiße Substanzen, superfeine
Substanzen (Gips, Zement, Asche,…) große, schneidende Trümmer (Glas), schädliche Produkte (Lösungsmittel,
Beizmittel,…), aggressive Produkte (Säuren, Reinigungsmittel,...), entflammbare und explosive Produkte (auf
Benzin- oder Alkoholbasis) auf.
Tauchen Sie das Gerät niemals in Wasser, spritzen Sie kein Wasser auf das Gerät und bewahren Sie es nicht im Freien
auf. Verwenden Sie das Gerät nicht, wenn es gefallen ist und sichtbare Beschädigungen oder Funktionsstörungen aufweist. Öffnen Sie das Gerät in diesem Fall nicht, sondern senden Sie es an das nächste Kundendienstzentrum oder kontaktieren Sie den Verbraucherservice von Rowenta (siehe Daten auf der letzten Seite).
Dieses Gerät ist nicht dafür vorgesehen, von Personen (oder auch Kindern) mit verringerten körperlichen, sensorischen oder mentalen Fähigkeiten oder Personen, die
keine entsprechende Erfahrung oder Kenntnisse besitzen, verwendet zu werden,
außer wenn sie von einer für ihre Sicherheit verantwortlichen Person überwacht wer* Je nach Modell
21
den oder zuvor hinsichtlich der Nutzung des Geräts eingewiesen wurden. Kinder DE
müssen überwacht werden, um sicherzustellen, dass sie nicht mit dem Gerät
spielen.
Dieses Gerät darf von Kindern in einem Alter ab acht Jahren und von Personen mit
verringerten körperlichen, sensoriellen oder mentalen Fähigkeiten benutzt werden,
wenn sie Anweisungen in Bezug auf eine absolut sichere Benutzung des Geräts
erhalten, wenn sie betreut werden und die Risiken erkennen. Kinder dürfen nicht
mit dem Gerät spielen. Die Reinigung und Wartung, die der Benutzer ausführen
soll, darf nicht von Kindern ausgeführt werden, es sei denn, sie sind mindestens 8
Jahre alt und werden überwacht. Das Gerät und sein Netzkabel müssen außerhalb
der Reichweite von Kindern unter 8 Jahren aufbewahrt werden.
2 • Stromversorgung
Überprüfen Sie, ob die Betriebsspannung (Voltzahl) Ihres Staubsaugers derjenigen Ihrer Elektroinstallation entspricht.
Stecken Sie das Gerät ab, indem Sie den Stecker ziehen, ohne am Kabel zu ziehen: gleich nach der Verwendung, vor dem
Wechseln von Zubehörteilen, vor jeder Reinigung, Wartung oder jedem Filterwechsel.
Verwenden Sie das Gerät nicht, wenn das Stromkabel beschädigt ist. Die Reparatur ihres Staubsaugers muss unbedingt
von einem Kundendienstzentrum durchgeführt werden, da aus Sicherheitsgründen Spezialwerkzeuge erforderlich sind.
3 • Reparaturen
Reparaturen dürfen nur von Fachpersonal mit originalen Ersatzteilen durchgeführt werden. Das Gerät selbst zu
reparieren, kann für den Nutzer gefährlich sein und lässt die Garantie erlöschen.
Helfen Sie, unsere Umwelt zu schützen!
Ihr Gerät enthält zahlreiche wieder verwertbare oder recycelbare Materialien.
Bringen Sie es zu einer Sammelstelle oder, wenn es bei Ihnen keine gibt, in ein zugelassenes
Kundendienstzentrum, damit es wiederverwertet wird.
VOR DER VERWENDUNG
1 • Montage Ihres Staubsaugers (Abb. 1) - (Abb. 2)
2 • Auswahl des richtigen Zubehörs (Abb. 2) - (Abb. 3) – (Abb. 4) – (Abb. 5)
SAUGEN
3 • Einschalten Ihres Staubsaugers (Abb. 6) – (Abb. 7) – (Abb. 8)
4 • Einstellen der Saugleistung (Abb. 9)
Max: Böden
Min: Mobiliar, empfindliche Stoffe,…
5 • Ausschalten Ihres Staubsaugers (Abb. 10)
AUFBEWAHRUNG (Abb. 11)
REINIGUNG UND WARTUNG
Die Luft, die wir atmen, enthält Partikel, die Allergien verursachen können: Milbenlarven und Milbenkot,
Schimmelpilze, Pollen, Rauch und Tierrückstände (Haare, Haut, Speichel, Urin). Besonders feine Partikel dringen
* Je nach Modell
22
tief in den Staubsauger ein, wo sie einen Brand verursachen oder die Saugfunktion insgesamt beeinträchtigen können.
DE
HEPA-Filter (High Efficiency Particulate Air Filter, das heißt hocheffiziente Filter für Luftpartikel) erlauben es,
besonders feine Partikel herauszufiltern. Dank dem HEPA-Filter ist die in den Raum geblasene Luft gesünder als
die angesaugte Luft.
WICHTIG
Schalten Sie Ihren Staubsauger vor der Wartung oder Reinigung stets aus und stecken Sie ihn ab.
Überprüfen und reinigen Sie regelmäßig Ihren gesamten Staubsauger und die verschiedenen Filter.
ACHTUNG
Lassen Sie Ihren Staubsauger niemals ohne Filtersystem (HEPA-Filter) laufen.
1 • Reinigung des Staubbehälters (5)
Schnelles Leeren
Wenn der Staubbehälter (5) voll ist, dann öffnen Sie die Staubsaugerklappe (Abb.12), entfernen Sie dann den
Staubbehälter (5), indem Sie ihn etwas nach unten gleiten lassen (Abb.13). Halten Sie ihn über einen
Mülleimer und drücken Sie auf den Knopf „push“, um die Entleerungsklappe nach unten klappen zu lassen.
Leeren Sie dann den Inhalt des Behälters in den Mülleimer (Abb.14). Schließen Sie die Klappe wieder
(Abb.15) und setzen Sie den Staubbehälter wieder ein. Schließen Sie dann die Staubsaugerklappe wieder
(Abb.16).
Komplette Reinigung
Alle Staubbehälter (5) müssen regelmäßig gereinigt werden.
Öffnen Sie die Staubsaugerklappe (Abb. 12).
Entfernen Sie den Staubbehälter (5), indem Sie ihn nach unten gleiten lassen (Abb.13), bauen Sie ihn dann
auseinander:
- Entfernen Sie den Deckel des Staubbehälters (5c), dann den HEPA-Filter (5b3).
- Entfernen Sie dann den Schaumstofffilter (5b2) und den Abscheider (5b1).
- Halten Sie den Staubbehälter / Auffangbehälter (5a) und den Abscheider (5b1) unter warmes Wasser, lassen Sie
sie dann trocknen oder trocknen Sie sie mit einem trockenen Lappen ab (Abb.17).
- Reinigen Sie den Schaumstofffilter (5b2): Beziehen Sie sich auf Paragraph 2 – REINIGUNG DES SCHAUMSTOFFILTERS.
- Reinigen Sie den HEPA-Filter (5b3): Beziehen Sie sich bezüglich der Wartung der Filter auf Paragraph 3 - REINIGUNG DES HEPA-FILTERS.
Setzen Sie die Teile des Staubbehälters (5) wieder zusammen, wenn sie trocken sind, und setzen Sie alles wieder
in das Gerät ein (Abb.16). Schließen Sie die Staubsaugerklappe (7) wieder.
2 • Reinigung des Schaumstofffilters (5b2)
Der Schaumstofffilter (5b2) muss nach jeder Verwendung mit warmem Seifenwasser gereinigt werden (Abb.18).
Spülen Sie ihn ab und lassen Sie ihn mindestens 12 Stunden trocknen, bevor Sie ihn wieder einsetzen.
Im Lieferumfang Ihres Staubsaugers ist ein Ersatz-Schaumstofffilter enthalten, damit Sie Ihr Gerät während des
Trocknens des originalen Schaumstofffilters verwenden können.
3 • Reinigung des HEPA-Filters (5b3)
Ihr Gerät besitzt einen HEPA-Filter (5b3).
Sollten Sie ein Sinken der Geräteleistung feststellen, empfehlen wir Ihnen, den HEPA-Filter zu reinigen, um die
Saugleistung zu erhalten:
- Öffnen Sie die Staubsaugerklappe (Abb. 12).
- Entnehmen Sie den Staubbehälter, indem Sie ihn etwas nach unten gleiten lassen (Abb. 13), öffnen Sie dann
* Je nach Modell
23
den Deckel des Staubbehälters (5c).
- Entfernen Sie den HEPA-Filter (Abb.19-20-21), klopfen Sie ihn dann leicht über einem Mülleimer aus
(Abb.22).
Setzen Sie den HEPA-Filter wieder in den Staubbehälter ein, bauen Sie die Teile des Staubbehälters wieder
zusammen und setzen Sie alles wieder in das Gerät ein. Schließen Sie die Staubsaugerklappe (7) wieder.
Achtung! Nur die HEPA-Filterkassette* RS-RH5024 darf so gereinigt werden.
DE
4 • Reinigung Ihres Staubsaugers
Wischen Sie den Gerätekörper und die Zubehörteile mit einem feuchten, weichen Lappen ab, trocknen Sie sie
dann (Abb. 23).
TIPPS UND VORSICHTSMASSNAHMEN
• Das Kabel muss vor der Verwendung komplett abgerollt werden.
• Zwicken Sie es nicht ein und führen Sie es nicht über scharfe Kanten.
• Bewegen Sie den Staubsauger nicht durch Ziehen am Kabel. Das Gerät muss mit Hilfe seines Transportgriffs
oder mit Hilfe des Transportgurts* bewegt werden.
• Heben Sie das Gerät nicht am Kabel hoch.
• Sollten Sie ein Verlängerungskabel verwenden, müssen Sie gewährleisten, dass es sich in einem perfekten
Zustand befindet und für die Leistung Ihres Staubsaugers geeignet ist.
• Stecken Sie das Gerät niemals durch Ziehen am Kabel aus.
• Schalten Sie Ihren Staubsauger nach jeder Verwendung aus und stecken Sie ihn ab.
• Verwenden Sie nur originale Zubehörteile und Filter von Rowenta.
• Überprüfen Sie, ob alle Filter richtig eingesetzt sind.
• Lassen Sie ihn nie ohne Behälter oder Filter laufen.
• Wenn Sie Probleme haben, Zubehörteile und Filter für diesen Staubsauger zu erhalten, kontaktieren Sie den
Verbraucherservice von Rowenta: Instandsetzung und Ersatzteile (49) 212 387 400
WAS TUN, WENN…
WICHTIG
Wenn Ihre Gerät schlechter funktioniert und vor jeder Kontrolle: Schalten Sie es über den An-/Ausschalter aus
und stecken Sie es ab.
Ihr Staubsauger läuft
oder saugt nicht.
• Das Gerät erhält keinen Strom: Überprüfen Sie, ob das Gerät korrekt angesteckt ist.
• Ein Zubehörteil oder das Rohr ist verstopft: Entfernen Sie die Verstopfung im
Zubehörteil oder Rohr.
• Die Klappe ist schlecht geschlossen oder lässt sich nicht wieder schließen: Überprüfen Sie, ob der Behälter eingesetzt wurde und schließen Sie die Klappe wieder.
Ihr Staubsauger saugt
schlechter, macht Lärm,
pfeift.
• Ein Zubehörteil oder das Rohr ist teilweise verstopft: Entfernen Sie die
Verstopfung im Zubehörteil oder Rohr.
• Der Behälter ist voll oder durch feinen Staub verstopft: Leeren Sie den Behälter.
• Der HEPA-Filter ist verstopft: Reinigen Sie den HEPA-Filter, wenn er noch keine 6
Monate verwendet wurde. Wechseln Sie ihn ansonsten unter Berücksichtigung
der Anweisungen in der Bedingungsanleitung aus.
• Der Saugkraftregler befindet sich auf der Position Min. : Erhöhen Sie die
Saugkraft mit Hilfe des Saugkraftreglers (außer, wenn Sie empfindliche Stoffe
absaugen).
• Der Sauger ist schwer zu bewegen: Verringern Sie die Saugkraft mit Hilfe des
Saugkraftreglers.
Wenn das Problem weiterhin besteht, senden Sie Ihren Staubsauger an das nächste Kundendienstzentrum von
Rowenta. Konsultieren Sie die Liste der Kundendienstzentren von Rowenta oder kontaktieren Sie den
Verbraucherservice von Rowenta: Instandsetzung und Ersatzteile (49) 212 387 400
24