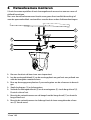
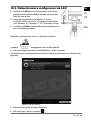
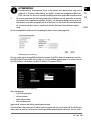
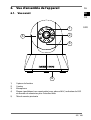
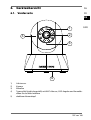
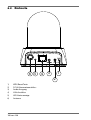
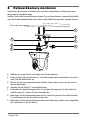
1
Draadloze IP-bewakingscamera voor netwerkgebruik Caméra de surveillance IP sans fil Kabellose Netzwerk-IP-Überwachungskamera MEDION® LIFE® P86019 (MD 86970) Handleiding Mode d‘emploi Bedienungsanleitung Inhoudsopgave NL 1. Over deze handleiding ................................................................................ 5 1.1. In deze handleiding gebruikte waarschuwingspictogrammen en -symbolen .................................................................................................................. 5 2. Systeemeisen ............................................................................................... 6 3. Inhoud van de verpakking .......................................................................... 6 4. Gebruik voor het beoogde doel ................................................................. 7 5. Veiligheidsinstructies .................................................................................. 7 5.1. Elektrische apparaten zijn geen speelgoed .................................................. 7 5.2. Algemeen .................................................................................................................. 8 5.3. Plaats van installatie .............................................................................................. 8 5.4. Wandmontage ......................................................................................................... 9 5.5. Nooit zelf repareren! .............................................................................................. 9 5.6. Reiniging en onderhoud ...................................................................................... 9 5.7. Voeding ....................................................................................................................10 6. Overzicht van het apparaat ...................................................................... 11 6.1. Voorkant...................................................................................................................11 6.2. Achterkant ...............................................................................................................12 6.3. Zijaanzicht ...............................................................................................................13 7. LED functie-indicaties ............................................................................... 13 8. Netwerkcamera monteren ........................................................................ 14 9. Netadapter aansluiten .............................................................................. 15 10. Netwerkcamera configureren ................................................................... 15 10.1. Netwerkcamera configureren via Smart-App LifeViewer.......................15 10.2. Netwerkcamera configureren via WPS-toets ..............................................20 10.3. Netwerkcamera configureren via LAN ..........................................................23 11. Camera bedienen ....................................................................................... 44 11.1. Camera bedienen via Smart-App LifeViewer ..............................................44 11.2. Camera bedienen via Windows UI van Live View ......................................47 12. Camera resetten ......................................................................................... 48 13. Firmware bijwerken ................................................................................... 49 14. Reiniging .................................................................................................... 49 15. Afvoer ......................................................................................................... 49 16. Technische specificaties ............................................................................ 50 17. Verklaring van conformiteit...................................................................... 50 18. Impressum .................................................................................................. 50 Licentiegegevens................................................................................................ 147 3 van 166 FR DE GNU 4 van 166 1. Over deze handleiding NL Lees deze handleiding nauwkeurig door en neem alle aangegeven instructies in acht. Hiermee garandeert u een betrouwbare werking en een lange levensduur van uw apparaat. Houd deze handleiding steeds binnen handbereik bij uw apparaat. Bewaar de handleiding goed, zodat u deze bij de verkoop van het apparaat kunt doorgeven aan de nieuwe eigenaar. 1.1. In deze handleiding gebruikte waarschuwingspictogrammen en -symbolen GEVAAR! Waarschuwing voor direct levensgevaar! WAARSCHUWING! Waarschuwing voor mogelijk levensgevaar en/of ernstig onherstelbaar letsel! VOORZICHTIG! Waarschuwing voor mogelijk middelzwaar of gering letsel! LET OP! Neem de aanwijzingen in acht om materiële schade te voorkomen! OPMERKING! Aanvullende informatie over het gebruik van dit apparaat! OPMERKING! Neem de aanwijzingen in de handleiding in acht! WAARSCHUWING! Waarschuwing voor gevaar van een elektrische schok! • Opsomming van/informatie over voorvallen die zich tijdens de bediening kunnen voordoen Advies over uit te voeren handelingen 5 van 166 FR DE GNU 2. Systeemeisen − Microsoft Windows®: Microsoft® Windows® 8.1, Windows® 7 SP1 − WLAN 802.11 b/g/n of netwerkrouter met breedband en ondersteuning voor IPv4 − CD-ROM station Bij gebruik in combinatie met smartphone/tablet − − − − Breedband internetverbinding met ondersteuning voor IPv4 iPhone/iPad met iOS 5 of hoger Android™ platform 2.3 of hoger Geïnstalleerde IP Cam-app (MEDION LifeViewer) 3. Inhoud van de verpakking Controleer of alles in de verpakking aanwezig is en stel ons binnen 14 dagen na aanschaf op de hoogte van eventueel ontbrekende onderdelen. − IP-camera − Netadapter (model DSA-12PFA-09 FEU, fabrikant DVE) − RJ-45-kabel − Wandbeugel, met schroeven en pluggen − Software-CD − Beknopte handleiding, garantiekaart 6 van 166 4. Gebruik voor het beoogde doel NL Het apparaat dient voor ruimtebewaking via LAN of WLAN. FR • Dit apparaat is uitsluitend bedoeld voor particulier gebruik en is DE niet geschikt voor industriële of zakelijke toepassingen. Denk er aan dat het recht op garantie bij onjuist gebruik komt te vervallen: − breng geen wijzigingen aan zonder onze toestemming en ge- GNU bruik geen accessoires die niet door ons zijn goedgekeurd of geleverd, − gebruik alleen door ons geleverde of goedgekeurde (vervangende) onderdelen en accessoires, − Neem alle informatie in deze handleiding in acht, met name de veiligheidsvoorschriften. Elke andere toepassing wordt beschouwd als oneigenlijk gebruik en kan leiden tot letsel of schade. − Gebruik het apparaat niet in extreme omgevingsomstandigheden. 5. Veiligheidsinstructies 5.1. Elektrische apparaten zijn geen speelgoed Dit apparaat is niet bedoeld om te worden gebruikt door personen (inclusief kinderen) met beperkte lichamelijke, zintuiglijke of geestelijke vermogens of met onvoldoende ervaring en/of kennis, tenzij deze personen onder toezicht staan van of zijn geïnstrueerd in het gebruik van het apparaat door iemand die verantwoordelijk is voor hun veiligheid. Laat kinderen nooit zonder toezicht gebruik maken van elektrische apparatuur. GEVAAR! Houd het verpakkingsmateriaal, zoals bv. folie, uit de buurt van kinderen. Bij onjuist gebruik bestaat gevaar voor verstikking. 7 van 166 5.2. Algemeen • Open nooit de behuizing van het apparaat (gevaar voor elektrische schokken, kortsluiting en brand)! • Steek geen voorwerpen via de sleuven en openingen in het apparaat (gevaar voor elektrische schokken, kortsluiting en brand)! • Plaats geen met vloeistof gevulde voorwerpen, zoals bv. een bloemenvaas, in de buurt van het apparaat of de netadapter en bescherm alle onderdelen tegen drup- en spatwater. Deze voorwerpen kunnen omvallen, waarbij de vloeistof de elektrische veiligheid kan aantasten. • Trek bij beschadiging van de netadapter, het aansluitsnoer of het apparaat direct de netadapter uit het stopcontact. • Wacht even met het aansluiten van het netsnoer nadat het apparaat van een koude in een warme ruimte gebracht wordt. Door de condensatie die daarbij kan ontstaan, kan het apparaat onder bepaalde omstandigheden onherstelbaar worden beschadigd. Als het apparaat op kamertemperatuur is, kan het zonder gevaar in gebruik worden genomen. 5.3. Plaats van installatie Plaats en gebruik alle onderdelen op een stabiele, vlakke en trillingsvrije ondergrond zodat het apparaat niet kan vallen. Stel het apparaat niet bloot aan schokken. De gevoelige elektronica kan door schokken worden beschadigd. Stel het apparaat niet bloot aan directe warmtebronnen (bv. verwarmingsradiatoren of krachtig kunstlicht). Zet geen voorwerpen met open vuur (bv. brandende kaarsen) op of in de buurt van het apparaat. Plaats geen voorwerpen op de snoeren omdat deze daardoor beschadigd kunnen raken. • Gebruik het apparaat niet in de buitenlucht. Het apparaat kan door invloeden van buitenaf, zoals regen, sneeuw etc. worden beschadigd. • Zorg voor een afstand van minimaal één meter tussen het toestel en hoogfrequente en magnetische storingsbronnen (televisietoestel, luidsprekerboxen, mobiele telefoon etc.) om storingen in de 8 van 166 werking te vermijden. NL 5.4. Wandmontage FR Kies voor de netwerkcamera een locatie waar geen direct zonlicht doordringt of waar de beeldkwaliteit verstoord kan worden door andere lichtweerkaatsingen. DE WAARSCHUWING! GNU Er bestaat gevaar voor een elektrische schok. Kies een geschikte locatie voor de montage van het apparaat en let erop dat u bij het boren geen elektriciteitskabels of installatieleidingen beschadigt. OPMERKING! Let er bij de installatie en opstelling van de camera op dat u niet handelt in strijd met de geldende wettelijke voorschriften, met name op het gebied van de gegevensbescherming, het toelatingsrecht en de observatie van openbaar toegankelijke ruimten. 5.5. Nooit zelf repareren! Trek bij beschadiging van de netadapter, het aansluitsnoer of het apparaat direct de netadapter uit het stopcontact. Neem het apparaat niet in gebruik, als het apparaat of het aansluitsnoer zichtbaar zijn beschadigd of als het apparaat is gevallen. WAARSCHUWING! Probeer in geen geval het apparaat zelf te openen en/of te repareren. Daarbij bestaat gevaar voor een elektrische schok! Om risico's te vermijden kunt u bij storingen contact opnemen met het Medion Service Center of een deskundig reparatiebedrijf. 5.6. Reiniging en onderhoud • Trek altijd eerst de netadapter uit het stopcontact voordat u het apparaat schoonmaakt. • Gebruik voor het schoonmaken een droge, zachte doek. Gebruik geen chemische oplos- en schoonmaakmiddelen omdat deze het oppervlak en/of de opschriften van het apparaat kunnen beschadi9 van 166 gen. 5.7. Voeding Let op: Ook wanneer het apparaat zich in de stand-by modus bevindt, staan er onderdelen onder spanning. Onderbreek de stroomvoorziening van uw apparaat of schakel alle spanning uit door de stekker van het netsnoer uit het stopcontact te trekken. • Gebruik de netadapter uitsluitend in een geaard stopcontact met AC 100-240 V~ / 50/60 Hz. Als u niet zeker bent van de netspanning op de plaats van installatie kunt u contact opnemen met uw energieleverancier. • Gebruik uitsluitend de meegeleverde netadapter (DSA-12PFA-09 FEU, fabrikant DVE). Probeer de stekker van de netadapter nooit aan te sluiten op een andere aansluiting, want daardoor kan schade worden veroorzaakt. • Voor extra veiligheid adviseren wij u om gebruik te maken van een overspanningsbeveiliging, zodat het apparaat beschermd is tegen beschadiging door spanningspieken of blikseminslag op het elektriciteitsnet. • Gebruik het apparaat niet bij onweer. Er bestaat gevaar van blikseminslag! Koppel het apparaat bij onweer volledig los van het elektriciteitsnet door de netadapter uit het stopcontact te verwijderen. • Onderbreek de stroomvoorziening van uw apparaat door de stekker van de netadapter uit het stopcontact te halen. • De netadapter moet ook na het aansluiten gemakkelijk bereikbaar zijn, zodat indien nodig of bij gevaar snel de stekker uit het stopcontact kan worden getrokken. • Dek de netadapter niet af om oververhitting te vermijden. • Pak de netadapter nooit met vochtige handen beet. Hierbij bestaat gevaar voor een elektrische schok. • Leg de kabels zo neer dat niemand erop kan trappen of erover kan struikelen. 10 van 166 6. Overzicht van het apparaat NL 6.1. Voorkant FR DE GNU 1 2 5 3 4 1) 2) 3) 4) 5) Lichtsensor Camera Microfoon Typeplaatje (niet weergegeven) met MAC-adres, SSID-aanduiding en aanmeldingsgegevens voor de webinterface Draaibare camerakop 11 van 166 6.2. Achterkant 6 5 4 1 3 2 1) 2) 3) 4) 5) 6) Toets WPS/Reset DC-IN aansluiting voor de netadapter Audio-uitgang LAN-verbinding LED statusindicatie Antenne 12 van 166 6.3. Zijaanzicht NL FR DE GNU 1 2 1) 2) Antenne (niet afneembaar) Schroefdraad voor wandhouder 7. LED functie-indicaties LED status LED uit LED knippert langzaam groen LED knippert snel groen LED groen LED knippert langzaam oranje LED knippert snel oranje LED knippert in twee kleuren (groen/ oranje) Betekenis Camera uit of geen netwerkverbinding Camera niet geconfigureerd of geen verbinding via externe toegang Gegevensoverdracht Netwerkverbinding OK WPS-functie actief Reset is uitgevoerd Camera wordt gestart 13 van 166 8. Netwerkcamera monteren U kunt de camera opstellen of met de meegeleverde accessoires aan een muur of plafond bevestigen. Kies voor de netwerkcamera een locatie waar geen direct zonlicht doordringt of waar de opnamekwaliteit verstoord kan worden door andere lichtweerkaatsingen. 1 7 2 3 6 5 4 Kies een locatie in de buurt van een stopcontact. Leg de montagedriehoek (3) op de montageplaats en geef met een potlood aan waar de boorgaten moeten komen. Boor op de aangegeven plaatsen 2 passende gaten om de schroeven te bevestigen. Steek de pluggen (1) in de boorgaten. Verbind de montagedriehoek (3) en de montagearm (5) via de borgschroef (4). Draai de schroef vast Bevestig de netwerkcamera aan de beugel met de borgschroef (7) en draai de borgschroef vast Bevestig de netwerkcamera via de beugel met de twee meegeleverde schroeven (2) aan de wand. 14 van 166 9. Netadapter aansluiten NL Verbind de meegeleverde netadapter (DSA12PFA-09 FEU, fabrikant DVE) met de DC IN aansluiting van het apparaat. Als u alle aansluitingen hebt uitgevoerd, steekt u de netadapter in een stopcontact (AC 100-240 V~ / 50/60 Hz). De camera is gereed voor configuratie als de LED statusindicatie langzaam knippert. FR DE GNU 10. Netwerkcamera configureren U kunt uw netwerkcamera op drie manieren configureren: − Via de Smart-App LifeViewer (zie “10.1. Netwerkcamera configureren via Smart-App LifeViewer” op pagina 15) − Via de WPS-toets (zie “10.2. Netwerkcamera configureren via WPS-toets” op pagina 20) of − Via het LAN (zie “10.3. Netwerkcamera configureren via LAN” op pagina 23) 10.1. Netwerkcamera configureren via Smart-App LifeViewer Download de app LifeViewer via Google Play resp. de App Store. OPMERKING! Als u toegang wilt krijgen tot de markt van Android ™, Google Play of de Apple App Store, heeft u zowel een internetverbinding als een Google™-account resp. een Apple-registratie nodig. 10.1.1. Verbinding tot stand brengen Verbind uw Smart-apparaat met uw netwerkcamera. Ga hierbij als volgt te werk: Open het menu INSTELLINGEN/WLAN op uw Smart-apparaat. Selecteer in de netwerklijst het netwerk van de netwerkcamera. Uw naam bestaat uit MEDION en de laatste 6 cijfers van het MAC-adres (bv. MEDIONC46245). De toegangsgegevens zijn vermeld op het typeplaatje onder op het apparaat. 15 van 166 10.1.2. Camera in gebruik nemen Start de app LifeViewer. Selecteer de gewenste taal voor de toepassing. Tik op de pijl naar rechts om de invoer te bevestigen. Afbeelding bij benadering Voer het wachtwoord van de netwerkcamera in. Deze informatie is te vinden op het typeplaatje onder op het apparaat. Tik op de pijl naar rechts om de invoer te bevestigen. OPMERKING! Het wachtwoord moet in de volgende stap absoluut worden gewijzigd zodat onbevoegden geen toegang tot de netwerkcamera kunnen krijgen! Afbeelding bij benadering 16 van 166 Wijzig hier de naam van de netwerkcamera en het wachtwoord. Tik op de pijl naar rechts om de invoer te bevestigen. NL FR DE GNU Afbeelding bij benadering De netwerkcamera zoekt naar beschikbare netwerken. Wacht totdat de netwerken worden weergegeven. Afbeelding bij benadering 17 van 166 De beschikbare netwerken worden weergegeven. Selecteer uw thuisnetwerk. Tik op de pijl naar rechts om de selectie te bevestigen. Afbeelding bij benadering Voer het encryptiewachtwoord voor uw thuisnetwerk in. Tik op de pijl naar rechts om de invoer te bevestigen. Afbeelding bij benadering 18 van 166 Het apparaat voert de volgende instellingen uit: − Instellingen (netwerknaam/wachtwoord) worden opgeslagen − Er wordt een verbinding met de router opgebouwd (thuisnetwerk) − De verbinding via externe toegang wordt gecontroleerd/tot stand gebracht. Afbeelding bij benadering De configuratie is geslaagd. Afbeelding bij benadering Controleer onder INSTELLINGEN/WLAN van uw Smart-apparaat of dit nu met uw thuisnetwerk is verbonden en ga terug naar de app. 19 van 166 NL FR DE GNU Als de configuratie is geslaagd, wordt het livebeeld van de camera weergegeven. Afbeelding bij benadering Nu is uw netwerkcamera ingesteld. Het apparaat is met de app LifeViewer via uw Smart-apparaat wereldwijd via internet te besturen. 10.2. Netwerkcamera configureren via WPS-toets OPMERKING! Bij deze verbindingsmethode moeten zowel de router als de camera over een WPS-toets beschikken. Druk op de WPS-toets op de netwerkcamera en houd deze ca. 2-3 seconden ingedrukt totdat de status-LED langzaam oranje knippert. Druk binnen 120 seconden op de WPS-toets op uw router. Als de verbinding tussen de netwerkcamera en de router is geslaagd, brandt de status-LED permanent groen. Als u de netwerkcamera wilt bedienen via uw Smart-apparaat, controleert u of uw router met het Smart-apparaat is verbonden. Download de app LifeViewer via Google Play resp. de App Store. OPMERKING! Als u toegang wilt krijgen tot de markt van Android ™, Google Play of de Apple App Store, heeft u zowel een internetverbinding als een Google™-account resp. een Apple-registratie nodig. 20 van 166 Selecteer de gewenste taal voor de toepassing. Tik op de pijl naar rechts om de invoer te bevestigen. NL FR DE GNU Afbeelding bij benadering De in het netwerk gevonden netwerkcamera's worden weergegeven. Afbeelding bij benadering 21 van 166 Als de configuratie is geslaagd, wordt het livebeeld van de camera weergegeven. OPMERKING! Op de bovenste regel wordt, behalve het gebruikerssymbool, het aantal bij de netwerkcamera aangemelde gebruikers weergegeven. U kunt het verloop van de aanmelding van gebruikers ook in het systeemprotocol bekijken (zie “Systeemprotocol” op pagina 39) Afbeelding bij benadering Nu is uw netwerkcamera ingesteld. Het apparaat is met de app LifeViewer via uw Smart-apparaat wereldwijd via internet te besturen. 22 van 166 10.3. Netwerkcamera configureren via LAN NL Verbind de LAN-poort op het apparaat via de meegeleverde RJ45-netwerkkabel met een netwerkinterface (bv. een router). Plaats de meegeleverde installatie-CD in het CD-ROM-station van uw PC of notebook (met Microsoft® Windows® 8.1, Windows® 7 SP1 of Windows Vista). Installeer de Finder. Volg daarbij de aanwijzingen van het installatieprogramma. FR DE GNU Nadat de installatie met succes is voltooid, wordt het symbool weergegeven op het bureaublad. Start het programma door te dubbelklikken op het symbool. Het programma wordt geopend en de beschikbare netwerkcamera's worden weergegeven. Afbeelding bij benadering Selecteer de gewenste netwerkcamera. Klik vervolgens op het symbool . 23 van 166 Het venster LOGIN wordt geopend. Voer het wachtwoord 1234 in en bevestig met OK. OPMERKING! Het wachtwoord moet absoluut worden gewijzigd zodat onbevoegden geen toegang tot de netwerkcamera kunnen krijgen! Zie onder “Gebruiker” op pagina 28. Het venster ADMIN wordt geopend. Klik op GEAVANCEERD om de camera te configureren. Het configuratieprogramma Live View van de netwerkcamera wordt in de browser geopend. Afbeelding bij benadering Klik op de koppeling DOWNLOAD ACTIVEX. Klik op de knop UITVOEREN. ActiveX wordt geïnstalleerd en u kunt vervolgens de configuratie van de netwerkcamera voortzetten. Klik op de menuoptie SETUP om de netwerkcamera in te stellen. 10.3.1. Basis Voer onder BASIS de basisinstellingen uit voor het netwerk waarin de netwerkcamera moet worden opgenomen. Netwerk In het menu NETWERK vindt u de momenteel ingestelde lokale netwerkinstellingen. De gegevens worden automatisch uit de netwerkcamera uitgelezen. 24 van 166 NL FR DE GNU Afbeelding bij benadering NETWERKTYPE IP-ADRES SUBNETMASKER GATEWAY PRIMAIRE DNS SECUNDAIRE DNS HTTP-POORT DHCP Uw router wijst automatisch een IP-adres aan de netwerkcamera toe. Statisch IP-adres Wijs handmatig een IP-adres toe aan de netwerkcamera. Voer een IP-adres voor de netwerkcamera in. Voer het subnetmasker van het IP-adres in. Voer het gatewayadres van uw netwerk in. Voer het IP-adres van uw primaire DNS-server in. Voer het IP-adres van uw secundaire DNS-server in. Standaard is poort 80 ingesteld. U kunt het nummer van de HTTP-poort wijzigen (1024 t/m 65535). Draadloos Controleer of er een WLAN-verbinding bestaat. Standaard is de camera al op ondersteuning voor WLAN ingesteld. 25 van 166 Afbeelding bij benadering Klik op het optieveld ACTIVEREN. Klik onder BESCHIKBAAR NETWERK op de knop BIJWERKEN. Selecteer uw netwerk. Voer onder VOORAF GEDEELDE WPA-SLEUTEL uw WLAN-wachtwoord in. Klik op de knop INSTELLINGEN OPSLAAN om de instellingen op te slaan. WPS Via de WPS-functie kunt u snel compatibele apparaten draadloos met elkaar verbinden. Ga hierbij als volgt te werk: Klik onder TOEGANG VERKRIJGEN TOT PBC-MODUS op de knop PBC STARTEN. Voer onder VIA PINCODE CONFIGUREREN de SSID van de router in. Klik op de knop PINCODE VOOR STARTEN en voer vervolgens de pincode van de netwerkcamera in en activeer de WPS-pincode van de router. Als de verbinding tussen de netwerkcamera en de router is geslaagd, brandt de status-LED permanent groen. RTSP In het menu RTSP vindt u de huidige instelling voor het Real Time Streaming Protocol. De gegevens worden automatisch uit de netwerkcamera uitgelezen. Als u de gegevens wilt wijzigen, gaat u als volgt te werk: 26 van 166 NL FR DE Afbeelding bij benadering Voer de RTSP-PORT in. Voer het PAD VOOR MJPEG RTSP in. Voer het RTSP-POORTBEREIK in. Selecteer in het uitklapmenu CONTROLE het controletype ACCOUNT of ANONIEM. Klik op de knop INSTELLINGEN OPSLAAN om uw invoer op te slaan. Datum en tijd Via het menu DATUM EN TIJD stelt u de huidige datum en tijd in. Datum en tijd moeten worden ingesteld om eventuele gebeurtenissen precies te kunnen nalopen. Afbeelding bij benadering MODUS Klik op het optieveld NTP (NETWORK TIME PROTOCOL) Tijd en datum worden automatisch ingesteld via een NTP-server in het lokale netwerk (indien beschikbaar). of Klik op het optieveld HANDMATIGE INSTELLING om de datum/tijd zelf in te stellen. DATUM EN TIJD Voer de huidige tijd en datum in de volgende notatie HANDMATIG in: JJJJ/MM/DD (Jaar/Maand/Dag) en UU:MM:SS (Uur/ VASTLEGGEN Minuut/Seconde) SYNCHRONISE- Klik op de knop om automatisch de tijd en datum te REN OP PC-TIJD synchroniseren met de instelling van uw computer. 27 van 166 GNU NTP-SERVER TIJDZONE ZOMERTIJD Als u de NTP-modus heeft gekozen, voert u de hostnaam resp. het IP-adres van de NTP-server in. Selecteer de tijdzone in het uitklapmenu. Klik op het optieveld ACTIVEREN of op DEACTIVEREN als u het automatisch overschakelen op zomertijd wilt in- of uitschakelen. Gebruiker U kunt verschillende gebruikersaccounts instellen voor toegang tot de netwerkcamera. De mogelijkheid bestaat om toegang tot de camera te bieden als gast of als gebruiker. Een gast kan alleen het camerabeeld bekijken, terwijl een gebruiker over volledige toegangsrechten beschikt. Een gebruiker kan ook instellingen uitvoeren. Afbeelding bij benadering LISTE VAN GEBUIKERS GEBRUIKERSNAAM WACHTWOORD WACHTWOORD BEVESTIGEN AUTORISATION Lijst met reeds aangemelde gebruikers. Voer de naam van een nieuwe gebruiker in. Voer het wachtwoord voor de nieuwe gebruiker in. Voer het wachtwoord nogmaals in. Verleen toegangsrechten door in het optieveld GEBRUIKER of GAST te selecteren. Klik op de knop TOEVOEGEN om een nieuwe gebruiker aan te melden, op de knop WIJZIGEN om het gebruikersprofiel te wijzigen of op VERWIJDEREN om een gebruiker te verwijderen. 28 van 166 Klik op het optieveld ACTIVEREN of DEACTIVEREN om een anonieme aanmelding toe ANONIEME AANMELte staan. De anonieme aanmelding stelt iedereen DING in het netwerk in staat de camerabeelden te bekijken. NL FR DE Sluit de invoer door op de knop INSTELLINGEN OPSLAAN te klikken. UPnP Standaard is UPnP (universal plug and play) geactiveerd, zodat uw computer automatisch een netwerkcamera in het lokale netwerk kan herkennen. Afbeelding bij benadering Bonjour Bonjour is een door Apple-apparaten gebruikte technologie om de automatische herkenning van netwerkservices resp. media-inhoud in IP-netwerken mogelijk te maken. Klik op het optieveld ACTIVEREN of DEACTIVEREN om de service uit resp. in te schakelen. Afbeelding bij benadering 10.3.2. Video Onder Video voert u instellingen uit die onder andere betrekking hebben op de opnamekwaliteit van de netwerkcamera. Video-instellingen Onder VIDEO-INSTELLINGEN kunt u indien nodig de instellingen voor video-opname wijzigen. 29 van 166 GNU Afbeelding bij benadering Selecteer in het uitklapmenu de gewenste resolutie (VGA 640 X480 of QVGA 320X240). RESOLUTIE Hoe hoger de resolutie wordt ingesteld, des te duidelijker is het videobeeld. De vereiste bandbreedte is echter ook groter. Maak in het uitklapmenu een keuze tussen HOOGKWALITEIT STE/HOOG/NORMAAL/LAAG/LAAGSTE voor de beeldkwaliteit. Maak in het uitklapmenu een keuze tussen 30, 20, 15, 10, 5 voor een maximale beeldfrequentie. MAXIMALE FRAMESNELHoe hoger de resolutie wordt ingesteld, des te duidelijker HEID is het videobeeld. De vereiste bandbreedte is echter ook groter. Bij installatie van de netwerkcamera aan het plafond BEELD DRAAIEN selecteert u 180° om de bewakingsvideo correct te zien. Bevestig de instellingen door op de knop INSTELLINGEN OPSLAAN te klikken. Beeldkwaliteit U kunt onder BEELDKWALITEIT verschillende beeldinstellingen uitvoeren. 30 van 166 Afbeelding bij benadering Voer een getalwaarde in of gebruik de schuifregelaar om de waarden voor HELDERHEID, CONTRAST, VERZADIGING en SCHERPTE te wijzigen. Klik op de knop WAARDE OPSLAAN om de uitgevoerde wijzigingen op te slaan. Als u op de knop STANDAARDWAARDE HERSTELLEN klikt, worden de waarden teruggezet. NL FR DE GNU Nachtzicht De AUTOMATISCH OMSCHAKELEN is een functie die bij weinig licht de netwerkcamera overschakelt naar nachtzicht. Afbeelding bij benadering Klik op het optieveld ACTIVEREN om de automatische schakelaar te activeren of op het optieveld DEACTIVEREN om deze uit te schakelen. 10.3.3. Gebeurtenissen Onder GEBEURTENISSEN kunnen instellingen zoals bewegingsdetectie, herkenningszone, tijdsplanning alsmede het verzenden van gebeurtenismeldingen worden uitgevoerd. Bewegingsdetectie Schakel de bewegingsdetectie van de netwerkcamera in door op het optieveld ACTIVEREN te klikken. De bewegingsdetectie is uitgeschakeld als op het optieveld DEACTIVEREN is geklikt. Afbeelding bij benadering Selecteer via het uitklapmenu het tijdsinterval tot aan de detectie van een be31 van 166 weging. 1, 3, 4, 10, 15, 20, 30, 45 of 60 SECONDE. OPMERKING Voor de detectie van kleine bewegingen kan het beste een kort tijdsinterval worden ingesteld. Bij langere tussenpozen worden kleine bewegingen niet waargenomen. Klik op het optieveld ACTIVEREN of DEACTIVEREN om het verzenden van gebeurtenismeldingen onder GEBEURTENISBESTAND UPLOADEN NAAR FTP resp. GEBEURTENISBESTAND NAAR E-MAILADRES VERZENDEN in resp. uit te schakelen. Bij geactiveerde bewegingsdetectie wordt een stilstaand beeld naar de opgegeven ontvanger gestuurd bij de beweging die tot de detectie heeft geleid. OPMERKING Verdere instellingen voor het verzenden van gebeurtenismeldingen worden onder SMTP en FTP uitgevoerd. Detectiegebied U kunt maximaal drie bewegingsgevoelige zones instellen. De niet-gemarkeerde zones worden genegeerd om een eventueel vals alarm te voorkomen. Afbeelding bij benadering Activeer het gewenste REGIO 1, 2 of 3 door het selectievakje aan te vinken. Klik op het in kleur gemarkeerde veld en verschuif het naar het beeldgebied dat via bewegingsdetectie moet worden bewaakt. Vergroot of verklein het beeldgebied door op de hoekpunten van het veld te 32 van 166 klikken en deze te slepen. Stel in wanneer de netwerkcamera moet worden geactiveerd door de regelaar voor de gevoeligheid en de drempelwaarde horizontaal te verschuiven. GEVOELIGHEIT 10 tot 100 DREMPEL 0 tot 100 Hoe hoger de gekozen waarde des te gevoeliger de netwerkcamera op kleine bewegingen reageert. Hoe hoger de waarde wordt gekozen, des te groter de objecten zijn die tot een bewegingsdetectie leiden. Klik op de knop OPSLAAN om uw instellingen op te slaan. Schema-instellingen U kunt de netwerkcamera zo instellen dat de bewegingsdetectie op bepaalde tijden automatisch wordt in- resp. uitgeschakeld. Afbeelding bij benadering Voor een permanente bewegingsbewaking klikt u op de knop ALLES SELECTEREN. Als u bepaalde tijdstippen wilt instellen, klikt u op het punt van de tijdsbalk van een bepaalde dag waar de bewegingsdetectie moet worden ingeschakeld en sleept u tot aan de tijd waarop de bewegingsdetectie moet worden uitgeschakeld. U kunt de inschakeltijd wijzigen door op het gewenste tijdvak te klikken en dit vervolgens naar rechts of links te verschuiven. Het actieve tijdvak wordt lichtblauw gekleurd weergegeven en een gemarkeerd tijdvak donkerblauw. Klik op de knop OPSLAAN om uw instellingen op te slaan. Wis een tijdvak door dit eerst te markeren en vervolgens op de knop VERWIJ33 van 166 NL FR DE GNU DEREN te klikken. Als u op de knop ALLES VERWIJDEREN klikt, worden alle tijdvakken gewist. Klik op de knop OPSLAAN om uw instellingen op te slaan. SMTP U kunt het stilstaande beeld van een gebeurtenis naar een specifiek e-mailadres versturen. Activeer de bewegingsdetectie onder GEBEURTENISSEN. Afbeelding bij benadering Selecteer uw provider in het uitklapmenu of voer de instelling handmatig uit. Voer bij SMTP-SERVER de hostnaam resp. het IP-adres van de SMTP-server van het e-mailadres in. Voer het SMTP-poortnummer in (meestal poort 25, gecodeerd poort 465, vraag deze informatie eventueel op bij uw e-mailprovider). Voer het e-mailadres van de ontvanger en de afzender in. Selecteer de SMTP-codering SSL,TLS of GEEN. Selecteer ACTIVEREN als uw SMTP-server verificatie vereist (eventueel informatie opvragen bij e-mailprovider). Als verificatie is vereist, voert u de SMTP-accountnaam in. Voer uw wachtwoord voor de verificatie in. Controleer of de instelling is geslaagd via TESTBERICHT VERZENDEN PER E-MAIL naar het opgegeven e-mailadres. Klik op de knop INSTELLINGEN OPSLAAN om uw instellingen op te slaan. FTP U kunt het stilstaande beeld van een gebeurtenis naar een specifieke FTP-server versturen. Activeer de bewegingsdetectie onder GEBEURTENISSEN. 34 van 166 NL FR DE GNU Afbeelding bij benadering Voer bij FTP-SERVER de hostnaam resp. het IP-adres van de FTP-server in. Voer bij GEBRUIKERSNAAM de gebruikersnaam voor de FTP-server in. Voer WACHTWOORD uw wachtwoord voor de FTP-server in. Voer de POORT van de FTP-server in. Standaard is poort 21 ingesteld. Voer bij PAD de gewenste opslaglocatie op de FTP-server in waar de stilstaande beelden moeten worden opgeslagen. U kunt de passieve modus van de FTP-server ACTIVEREN of DEACTIVEREN door op het betreffende optieveld te klikken. Controleer of de instelling is geslaagd via TESTBESTAND VERZENDEN naar de opgegeven FTP-server. Klik op de knop INSTELLINGEN OPSLAAN om uw instellingen op te slaan. 10.3.4. Kantelen en draaien U kunt de kantel- en zwenkmogelijkheden en bepaalde startposities naar wens instellen. Instellingen voor kantelen en draaien Afbeelding bij benadering Selecteer in het uitklapmenu bij SNELHEID KANTELEN/DRAAIEN de optie 1 (langzaam), 2 of 3 (snel) van de netwerkcamera. Hiermee wordt de snelheid bij gebruik van de pijltoetsen in Live View weergegeven. Selecteer in het uitklapmenu bij AFSTAND KANTELEN/DRAAIEN 1 (kleine afstand), 2 of 3 (grote afstand) van de netwerkcamera. Hiermee wordt het bewegingstraject bij gebruik van de pijltoetsen in Live View weergegeven. U kunt een AUTOMATISCHE KALIBRATIE ACTIVEREN of DEACTIVEREN door op het betreffende optieveld te klikken. Bij de automatische kali35 van 166 bratie voert de netwerkcamera bij wijze van zelftest een zwenkbeweging uit. Bij geactiveerde automatische kalibratie geeft u een tijdstip voor het kalibratieproces aan. Klik op de knop HANDMATIGE KALIBRATIE als u de cameratest zelf wilt initiëren. Klik op de knop INSTELLINGEN OPSLAAN om uw instellingen op te slaan. Voorinstelling U kunt vier opnameposities instellen die u het vaakst wilt gebruiken. Deze zijn gemakkelijk op te roepen in Live View en het handmatig instellen van de opnameposities is niet nodig. Afbeelding bij benadering Selecteer een positie bij POSITIETAL VOORAF INSTELLEN in het uitklapmenu (1–4). De huidige opnamepositie wordt op de afbeelding weergegeven. Klik op de pijlknoppen om de opnamepositie te wijzigen. Klik op POSITIEGEGEVENS OPSLAAN om de instelling op te slaan. of Klik op INSTELLINGEN VERWIJDEREN om de instelling te wissen. Door op de knop EERSTE POSITIE VASTLEGGEN te klikken, kunt u de netwerkcamera terugzetten naar de standaardpositie. 36 van 166 Startpositie NL FR DE GNU Afbeelding bij benadering Kies uit de vier vooraf ingestelde opnameposities de positie die u als STARTPOSITIE wilt gebruiken. Klik op de knop INSTELLINGEN OPSLAAN om uw instellingen op te slaan. 10.3.5. Systeem In het menu SYSTEEM kunt u de naam van uw netwerkcamera wijzigen, een systeemupdate uitvoeren, instellingen voor beveiligen/herstellen en een reset/nieuwe start van de netwerkcamera uitvoeren. Basis Afbeelding bij benadering Voer bij NAAM NETWERKCAMERA een naam voor de netwerkcamera in. Voer bij BEHEERDERSWACHTWOORD een wachtwoord in. Herhaal het wachtwoord bij WACHTWOORD BEVESTIGEN. Schakel de LED-LAMPJES van de netwerkcamera AAN of UIT door op het betreffende optieveld te klikken. Als het LED-lampje is uitgeschakeld, kan een buitenstaander niet bepalen of de netwerkcamera in- of uitgeschakeld is. 37 van 166 Geavanceerd Onder GEAVANCEERD kunt u een update van de firmware uitvoeren, instellingen van de netwerkcamera opslaan en de fabrieksinstellingen herstellen. Afbeelding bij benadering Firmware-update Voer een pad naar het firmwarebestand in. Klik op de knop FIRMWARE BIJWERKENom het aangegeven bestand uit te voeren. Instellingen back-up/herstel Klik bij INSTELLINGEN VOOR BACK-UP op de knop GEBRUIK om uw instellingen op te slaan. Het bestand config.bin wordt gegenereerd. Sla het bestand op uw computer op. Instellingen herstellen Voer het pad naar het back-upbestand (config.bin) in. Klik op de knop HERSTELLEN om het aangegeven bestand uit te voeren en de instellingen te herstellen. Reset Netzwerkkamera neu starten Klik op de knop NETWERKCAMERA OPNIEUW STARTEN. De camera wordt opnieuw gestart. Het proces kan enkele minuten in beslag nemen. Reset Netwerkcamera Selecteer voordat u de netwerkcamera terugzet het optieveld STANDAARDINSTELLINGEN BEHOUDEN of STANDAARDINSTELLINGEN. Als u STANDAARDINSTELLINGEN BEHOUDEN heeft geselecteerd, behoudt de netwerkcamera het IP-adres bij het terugzetten. 38 van 166 Als u STANDAARDINSTELLINGEN heeft geselecteerd, worden alle instellingen van de netwerkcamera teruggezet naar de fabrieksinstellingen. Klik op de knop STANDAARDINSTELLINGEN LADEN om het resetten te starten. Het proces kan enkele minuten in beslag nemen. NL FR DE 10.3.6. Status Systeeminformatie Onder Systeeminformatie kunt u de statusinformatie van uw netwerkcamera bekijken voor een eventuele foutopsporing of netwerkconfiguratie. De volgende informatie is beschikbaar: − System − LAN − Draadloos LAN − IGD (UPnP-poortverwijzing) Systeemprotocol Het systeemprotocol geeft de gebruiksinformatie van de netwerkcamera weer. Afbeelding bij benadering U kunt het protocol opslaan op een externe server. Selecteer een PROTOCOLNIVEAU. 0 (SIMPEL) legt alleen de belangrijkste gebeurtenissen voor de netwerkcamera vast, 4 (DETAIL) neemt alle gebeurtenissen op. De gebeurtenissen worden weergegeven in het tekstveld. ACTIVEER het externe protocol als u het systeemprotocol wilt opslaan op een externe server. 39 van 166 GNU OPMERKING! De netwerkcamera ondersteunt de Syslog-protocolserver Voer bij EXTERNE PROTOCOLSERVER de hostnaam resp. het IP-adres van de server in. Klik op de knop INSTELLINGEN OPSLAAN om de invoer op te slaan. 10.3.7. IP-modus Dynamische DDNS OPMERKING! Standaard is de service Dynamic DDNS uitgeschakeld. Als u echter gegevensoverdracht via een DDNS-service van derden wilt gebruiken, gaat u te werk zoals beschreven aan de hand van een voorbeeld van een Fritz-Box en de gratis provider no-ip.biz. Thuisgebruikers en particuliere huishoudens krijgen doorgaans toegang tot internet via een internetprovider. De internetproviders kennen daartoe een IP-adres toe uit hun adressenbestand (bv. 80.139.140.223). Dit IP-adres wordt echter telkens opnieuw toegekend wanneer de gebruiker verbinding met internet maakt of na uiterlijk 24 uur. Om de router vanaf internet permanent te kunnen bereiken, heeft u dus een vast IP-adres nodig. Zogenaamde DynDNS-providers kennen aan de veranderlijke IP-adressen van uw internetprovider een vast internetadres toe met naamomzetting (zoals in het voorbeeld: http://mijncamera.no-ip.biz). Uw netwerkcamera is daardoor altijd via hetzelfde webadres (http://mijncamera.noip.biz) bereikbaar, hoewel uw router steeds een ander IP-adres krijgt toegewezen van uw internetprovider. Daarvoor wordt telkens het huidige IP-adres van de router door een DynDNS-client (die meestal op de router of op de netwerkcamera is geïnstalleerd) doorgegeven aan de betreffende DynDNS-provider. DynDNS-service installeren en instellen 1. Stel een gebruikersaccount bij een DynDNS-provider in (in het voorbeeld www.no-ip.biz). De meeste DynDNS-providers bieden hiervoor gratis gebruikersaccounts. In het hier aangegeven voorbeeld stelt u bij de DynDNS-provider www.no-ip.biz een account in met de volgende gegevens: Hostnaam: mijncamera.no-ip.biz Gebruiker: mijncamera Wachtwoord: ****** 40 van 166 OPMERKING! De adresnaam "mijncamera" kunt u vrij kiezen, mits deze naam nog niet in gebruik is. De adresuitbreiding "no-ip.biz" wordt vast toegekend door de DNS-service. De account wordt beveiligd met een gebruikerswachtwoord. 2. De naam waarmee de netwerkcamera beschikbaar wordt gemaakt, moet op de router thuis ingevoerd worden. Anders, als de router deze functie niet ondersteunt, is dit ook mogelijk via de interface Live View van de netwerkcamera . Invoeren op de router is technisch echter de meer betrouwbare oplossing. In het voorbeeld wordt hier de instelling bij een router weergegeven: Afbeelding bij benadering Als uw router geen mogelijkheid biedt om een DynDNS-client te activeren, kan de DynDNS-client ook via de setup van Live View worden geactiveerd. De setup van de DynDNS-client vindt plaats onder IP-Modus/Dynamic DDNS: Afbeelding bij benadering Hier worden de − DynDNS-provider − de hostnaam − gebruikersnaam − het wachtwoord ingevoerd, waarna de client wordt geactiveerd. De client leest het internet-IP-adres van de router en stuurt dit naar de DynDNS-provider, die het aan het account en het ingestelde internetadres toewijst (in ons voor41 van 166 NL FR DE GNU beeld: mijncamera.no-ip.biz). Daarmee is de router bij de invoer van het internetadres (in ons voorbeeld: mijncamera.no-ip.biz) in een willekeurige browser via internet bereikbaar. 3. Op de router moet port forwarding worden ingesteld. Aangezien de router de nodige DynDNS-services van de netwerkcamera niet ondersteunt, moet de router dusdanig worden geconfigureerd dat deze de aanvragen vanaf internet doorgeeft aan de netwerkcamera. Deze instelling wordt "port forwarding" genoemd. De instelling voor port forwarding verschilt van router tot router. Meer informatie vindt u in de handleiding van de router. Om de netwerkcamera te kunnen laten antwoorden, moet de router de aanvragen doorsturen naar het bij voorkeur vaste interne IP-adres (in ons voorbeeld 192.168.178.32) van de netwerkcamera en dit voor de internetprotocollen: http (gebruikersinterface netwerkcamera Live View): Poort 80; tcp Alleen als port forwarding correct is ingesteld op de router, is de netwerkcamera via internet bereikbaar onder de naam: http://mijncamera.no-ip.biz OPMERKING! Alle beschreven DynDNS-providers en accounts zijn uitsluitend voorbeelden! Houd er rekening mee dat er zowel gratis aanbieders op de markt zijn als aanbieders die om betaling vragen en dat ook bij een gratis DynDNS-account, afhankelijk van de technische details en uitbreidingen, eventueel aanvullende kosten in rekening kunnen worden gebracht. Toegang op afstand Deze service maakt het mogelijk op afstand, via een server, toegang te krijgen tot de gegevens van de netwerkcamera. Standaard is de service voor externe toegang ingeschakeld om een snelle en gemakkelijke configuratie van de netwerkcamera via bv. een Smart-apparaat mogelijk te maken. ACTIVEREN of DEACTIVEREN de service voor externe toegang en klik op de knop INSTELLINGEN OPSLAAN om uw selectie te bevestigen. Afbeelding bij benadering 42 van 166 AP Direct-modus Als de netwerkcamera nieuw wordt ingesteld resp. nog niet met een beschikbaar netwerk is verbonden, schakelt deze over naar de AP-modus. In de AP-modus functioneert de netwerkcamera als een Access Point. Standaard is de draadloze verbinding al geactiveerd. Onder DRAADLOZE VERBINDING kunt u deze functie ACTIVEREN of DEACTIVEREN. NL FR DE GNU Afbeelding bij benadering Klik op het optieveld ACTIVEREN. Voer onder SSID de naam van de netwerkcamera in die u heeft toegewezen. Voer onder VOORAF GEDEELDE WPA-SLEUTEL uw WLAN-wachtwoord in. Klik op de knop INSTELLINGEN OPSLAAN om de instellingen op te slaan. 43 van 166 11. Camera bedienen Nadat u de camera met een Smart-apparaat of via uw computer heeft geconfigureerd, controleert u het ontvangen camerabeeld. Stel eventueel de beeldscherpte in door voorzichtig aan de cameralens te draaien. De rand van de lens is voorzien van ribbels zodat u de lens met uw vingernagel kunt draaien. 11.1. Camera bedienen via Smart-App LifeViewer Uw netwerkcamera is ingesteld. Het apparaat is met de app LifeViewer via uw Smart-apparaat wereldwijd via internet te besturen. OPMERKING Bij externe toegang tot de gegevens van de netwerkcamera via uw Smart-apparaat, is de overdrachtstijd beperkt tot 90 seconden om kosten te vermijden die eventueel kunnen ontstaan. Na het verstrijken van de tijd kunt u echter de verbinding herstellen door op de knop te tikken. Het livebeeld wordt geladen. OPMERKING De functie voor audioweergave is uitsluitend beschikbaar in het thuisnetwerk. 11.1.1. Menu Live Tik op de knop om het livebeeld weer te geven. OPMERKING Als u meerdere netwerkcamera's heeft aangemeld, kunt u door vegen over het beeldscherm overschakelen tussen de verschillende camera's. In de weergave van livebeelden heeft u de beschikking over de volgende functies: Tik op de knop om het menu CAMERA’S te openen, zodat u camera-instellingen kunt uitvoeren. om een stilstaand beeld op te nemen. Het stilstaande beeld Klik op de knop kan worden bekeken in het menu GEBEURTENISSEN. Tik op de knop om de functie voor zwenken/kantelen te activeren. De camerakop kan worden bewogen door middel van vegen over het livebeeld. De functie wordt via een symbool in de symbolenlijst weergegeven. Pijlen geven bij beweging de richting aan. De functie kan worden beëindigd door op de knop te tikken. Tik op de knop om de luidspreker in resp. uit te schakelen. Tik op de knop om de microfoon in resp. uit te schakelen. 44 van 166 Gebruikt statussymbolen in het Life weergave Linksboven bevindt zich de statusbalk. Bij actieve functies worden de volgende symbolen weergegeven: Verbinding met WLAN-netwerk NL FR DE Verbinding via externe toegang Aantal aangemelde gebruikers GNU Modus voor zwenken/kantelen actief Luidspreker is ingeschakeld Microfoon is ingeschakeld 11.1.2. Menu Gebeurtenissen Tik op de knop GEBEURTENISSEN om de opgenomen camera's op te roepen. Kies de gewenste netwerkcamera door op de betreffende naam te tikken. U kunt nu de resulterende beelden met de bijbehorende opnamegegevens bekijken. 11.1.3. Menu Camera’s Tik op de knop CAMERA’S om camera-instellingen uit te voeren. Kies in de lijst CAMERA’S de gewenste netwerkcamera door op de betreffende naam te tikken. of Tik op NIEUWE CAMERA TOEVOEGEN. Selecteer de netwerkcamera in de lijst door op de naam te tikken of voer de cameragegevens handmatig in via het displaytoetsenbord. Instelmogelijkheden U heeft een netwerkcamera geselecteerd. De volgende informatie wordt weergegeven: − Cameratype − Cameranaam − ID − gebruikersnaam − Wachtwoord Selecteer de menu's en de betreffende opties door op de knoppen te tikken. U kunt de verschillende menu's of opties verlaten door op de pijl naar links boven aan het beeldscherm te tikken. U kunt de instellingen afsluiten door op de knop GEREED rechts boven aan 45 van 166 het beeldscherm te tikken. U kunt de instellingen annuleren door op de knop ANNULEREN links boven aan het beeldscherm te tikken. De huidige ingestelde eigenschappen worden dan in het overzicht voor de netwerkcamera weergegeven. De volgende eigenschappen van de opnamekwaliteit kunnen worden ingesteld: Draaien: Tik op 0°: Geadviseerde weergave bij rechtopstaande installatie van de camera. Tik op 180°: De weergave van het camerabeeld wordt horizontaal gespiegeld, bijvoorbeeld als de camera aan het plafond is gemonteerd. Helderheid: Selecteer de helderheid door op een optie tussen 1 (donker) en 5 (zeer licht) te tikken. Verzadiging: Selecteer de verzadiging door op een optie tussen 1 (grijswaarden) en 5 (zeer hoge kleurwaarden) te tikken. Scherpte: Selecteer de scherpte door op een optie tussen 1 (weinig details) en 5 (zeer veel details) te tikken. Videokwaliteit: Selecteer de videokwaliteit door op een optie tussen HOOGSTE en LAAGSTE te tikken. Kantel- en draaisnelheid: Selecteer de zwenk-/kantelsnelheid door op een optie tussen 1 (langzaam) en 3 (snel) te tikken. 11.1.4. Menu Informatie Klik op de knop INFORMATIE de producent te ontvangen. 46 van 166 om informatie over de versie van de app en 11.2. Camera bedienen via Windows UI van Live View NL FR DE GNU Afbeelding bij benadering Knop Functie Gebruik de pijlknoppen om het zwenken/kantelen van de camera te besturen en de opnamehoek in te stellen. Maak een keuze uit de vier vooraf ingestelde camera-instellingen die u eerder onder SETUP/KANTELEN EN DRAAIEN/VOIRINSTELLING heeft vastgelegd. Klik op de knop om een stilstaand beeld op te nemen. Selecteer een opslaglocatie. Klik op de knop om een video op te nemen. Selecteer een opslaglocatie. Klik op de knop om het camerabeeld schermvullend weer te geven. Druk op de ESC-toets van uw toetsenbord om de schermvullende weergave te verlaten. 47 van 166 Knop Functie Klik op de knop om het camerabeeld te vergroten. Het venster DIGITALE VERGROTING wordt geopend. Markeer het groene veld en beweeg met de muisaanwijzer in het beeldfragment dat u wilt vergroten. Vergroot het beeldfragment door de regelaars te verplaatsen van 100% tot maximaal 400%. Klik op de knop om de functie KANTELEN EN DRAAIEN en de weergave van het camerabeeld horizontaal gespiegeld te gebruiken, bijvoorbeeld als de camera aan het plafond is gemonteerd. Selecteer het gewenste volume voor weergave in het uitklapmenu. of Klik op de knop om de geluidsweergave te dempen. Selecteer in het uitklapmenu het gewenste volume voor de op de camera aangesloten luidsprekers. of Klik op de knop om de audioweergave in twee richtingen van de camera uit te schakelen. OPMERKING! De functie voor audioweergave is uitsluitend beschikbaar in het thuisnetwerk. 12. Camera resetten U kunt de netwerkcamera terugzetten op de fabrieksinstellingen om eventuele verbindingsproblemen op te lossen door als volgt te werk te gaan: Houd de toets WPS/RESET aan de achterkant ca. 10 seconden lang ingedrukt. Laat de toets los zodra de LED-statusindicator oranje knippert. Wacht tot de netwerkcamera opnieuw gestart is. De camera is gereed als de LED-statusindicator permanent groen brandt. Na het terugzetten gaat de LED-statusindicator uit als er geen netwerkverbinding met de netwerkcamera is via een router/access point/switch. 48 van 166 13. Firmware bijwerken NL De netwerkcamera controleert bij een actieve internetverbinding regelmatig of een nieuwere versie van de firmware beschikbaar is. Als een nieuwe versie gereed is om te worden gedownload, wordt een pop-upvenster weergegeven waarin u kunt kiezen of de nieuwe firmware moet worden geïnstalleerd. FR DE 14. Reiniging Trek voor het reinigen altijd de netadapter en alle aansluitkabels los. Gebruik geen oplosmiddelen, bijtende of gasvormige schoonmaakmiddelen. Reinig het apparaat met een zachte, pluisvrije doek. Bewaar het verpakkingsmateriaal goed en gebruik alleen dit om het apparaat te transporteren. LET OP! Het apparaat bevat geen onderdelen die moeten worden gereinigd of moeten worden onderhouden. 15. Afvoer Verpakking Dit apparaat is speciaal verpakt om het tijdens het transport te beschermen tegen beschadiging. Verpakkingen zijn grondstoffen en kunnen worden hergebruikt of terug worden gebracht in de grondstoffenkringloop. Apparaat Afgedankte apparatuur mag niet met huishoudelijk afval worden afgevoerd. Volgens EG-richtlijn 2002/96/EG moet oude apparatuur aan het einde van de levensduur volgens voorschrift worden afgevoerd. Hierbij worden de bruikbare grondstoffen voor recycling gescheiden waarmee de belasting van het milieu wordt beperkt. Lever het afgedankte apparaat in bij een inzamelpunt voor elektrisch afval. U kunt bij de lokale gemeentelijke instanties en reinigingsbedrijven terecht voor openingstijden van de inzamelpunten. 49 van 166 GNU 16. Technische specificaties LAN-verbinding VGA-videoresolutie: Afmetingen (L x B x H) Gewicht 10/100 Mbps RJ-45 640 x 480 pixel ca. 112 x 90 x 116 mm ca. 280 g Netadapter Model: Ingang Uitgang DSA-12PFA-09 FEU, fabrikant DVE AC 100-240 V~ / 50/60 Hz, 0,5 mA 12 V 1A 17. Verklaring van conformiteit 0700 Hiermee verklaart Medion AG dat het product MD 86970 voldoet aan de volgende Europese eisen: • R&TTE-richtlijn 1999/5/EG • EMV-richtlijn 2004/108/EG • Laagspanningsrichtlijn 2006/95/EG • Ecodesign-richtlijn 2009/125/EG • RoHS-richtlijn 2011/65/EU. De complete verklaring van conformiteit is te vinden op www.medion.com/conformity. 18. Impressum Copyright © 2014 Alle rechten voorbehouden. Deze beknopte handleiding is auteursrechtelijk beschermd. Vermenigvuldiging in mechanische, elektronische of enige andere vorm zonder de schriftelijke toestemming van de fabrikant is verboden. Het copyright berust bij de firma: Medion AG Am Zehnthof 77 45307 Essen Duitsland Een complete bedieningshandleiding kan via de Service Hotline wordt nabesteld en is via de serviceportal www.medion.com/be/nl/service/start/ beschikbaar voor download. U kunt ook de hierboven staande OR-code scannen en de handleiding via het serviceportaal op uw mobiele eindtoestel downloaden. 50 van 166 Sommaire NL 1. À propos de ce mode d'emploi ................................................................. 53 1.1. Symboles et avertissements utilisés dans ce mode d'emploi ..............53 2. Configuration système requise................................................................. 54 3. Contenu de l'emballage ............................................................................ 54 4. Utilisation conforme .................................................................................. 55 5. Consignes de sécurité ................................................................................ 55 5.1. Ne pas laisser d'appareils électriques entre les mains des enfants ....55 5.2. Généralités ..............................................................................................................56 5.3. Lieu d'installation..................................................................................................56 5.4. Montage mural ......................................................................................................57 5.5. Ne jamais réparer soi-même l'appareil ! .......................................................57 5.6. Nettoyage et entretien .......................................................................................57 5.7. Alimentation ...........................................................................................................58 6. Vue d'ensemble de l'appareil .................................................................... 59 6.1. Vue avant .................................................................................................................59 6.2. Vue arrière ...............................................................................................................60 6.3. Vue latérale .............................................................................................................61 7. LED de fonctionnement ............................................................................ 61 8. Installer la caméra réseau ......................................................................... 62 9. Raccorder l'adaptateur secteur ................................................................ 63 10. Configurer la caméra réseau ..................................................................... 63 10.1. Configurer la caméra réseau via l'application mobile LifeViewer .......63 10.2. Configurer la caméra réseau via la touche WPS.........................................68 10.3. Configurer la caméra réseau via LAN.............................................................71 11. Utiliser la caméra ....................................................................................... 92 11.1. Utiliser la caméra via l'application mobile LifeViewer .............................92 11.2. Utiliser la caméra via Windows UI Live View ...............................................95 12. Réinitialiser la caméra ............................................................................... 96 13. Actualiser le microprogramme ................................................................. 97 14. Nettoyage ................................................................................................... 97 15. Recyclage.................................................................................................... 97 16. Caractéristiques techniques ..................................................................... 98 17. Déclaration de conformité ........................................................................ 98 18. Mentions légales ........................................................................................ 98 Information relative à la licence ........................................................................ 147 51 / 166 FR DE GNU 52 / 166 1. À propos de ce mode d'emploi NL Veuillez lire attentivement le présent mode d'emploi dans son intégralité et respecter toutes les consignes indiquées. Vous serez ainsi assuré du bon fonctionnement et de la durée de vie de votre appareil. Gardez toujours le présent mode d'emploi à portée de main à proximité de l'appareil. Conservez bien le mode d'emploi afin de pouvoir le remettre au nouveau propriétaire si vous donnez ou vendez l'appareil. FR DE GNU 1.1. Symboles et avertissements utilisés dans ce mode d'emploi DANGER ! Avertissement d'un risque vital immédiat ! AVERTISSEMENT ! Avertissement d'un risque vital possible et/ou de blessures graves irréversibles ! PRUDENCE ! Avertissement d'un risque possible de blessures moyennes à légères ! ATTENTION ! Respecter les consignes pour éviter tout dommage matériel ! REMARQUE ! Informations supplémentaires pour l'utilisation de l'appareil ! REMARQUE ! Respecter les consignes du mode d'emploi ! AVERTISSEMENT ! Avertissement d'un risque d'électrocution ! • Énumération / information sur des événements se produisant en cours d'utilisation Action à exécuter 53 / 166 2. Configuration système requise − Microsoft Windows® : Microsoft® Windows® 8.1, Windows® 7 SP1 − Wi-Fi 802.11 b/g/n ou routeur réseau avec connexion Internet large bande supportant iPv4 − Lecteur CD Si utilisation en combinaison avec smartphone/tablette − − − − Connexion Internet large bande supportant iPv4 iPhone/iPad avec iOS 5 ou supérieur Plateforme Android™ 2.3 ou supérieur Application IP Cam installée (MEDION LifeViewer) 3. Contenu de l'emballage Veuillez vérifier si la livraison est complète et nous informer dans un délai de deux semaines à compter de la date d'achat si ce n'est pas le cas. Avec l'appareil que vous venez d'acheter, vous recevez : − Caméra IP − Adaptateur secteur (modèle DSA-12PFA-09 FEU, fabricant DVE) − Câble RJ 45 − Support mural avec vis et chevilles − CD avec logiciels − Mode d'emploi, carte de garantie 54 / 166 4. Utilisation conforme NL Cet appareil sert à la surveillance de pièce commandée via LAN ou WiFR Fi. • L'appareil est destiné exclusivement à un usage privé et non à une DE utilisation industrielle/commerciale. Veuillez noter qu'en cas d'utilisation non conforme, la garantie est annulée : GNU − Ne transformez pas l'appareil sans notre accord et n'utilisez pas d'appareils supplémentaires autres que ceux que nous avons nous-mêmes autorisés ou livrés. − Utilisez uniquement des pièces de rechange et accessoires que nous avons livrés ou autorisés. − Tenez compte de toutes les informations contenues dans le présent mode d'emploi, en particulier des consignes de sécurité. Toute autre utilisation est considérée comme non conforme et peut entraîner des dommages corporels ou matériels. − N'utilisez pas l'appareil dans des conditions ambiantes extrêmes. 5. Consignes de sécurité 5.1. Ne pas laisser d'appareils électriques entre les mains des enfants Cet appareil n'est pas destiné à être utilisé par des personnes (y compris les enfants) dont les capacités physiques, sensorielles ou mentales sont limitées ou qui manquent d'expérience et/ou de connaissances, sauf si elles sont surveillées par une personne responsable de leur sécurité ou ont reçu de vous les instructions d'utilisation de l'appareil. Ne laissez jamais les enfants utiliser des appareils électriques sans surveillance. DANGER ! Conservez les emballages, p. ex. les plastiques, hors de la portée des enfants : risque d'asphyxie ! 55 / 166 5.2. Généralités • N'ouvrez jamais le boîtier de l'appareil (risque d'électrocution, de court-circuit et d'incendie) ! • N'introduisez aucun objet à l'intérieur de l'appareil par les fentes et ouvertures (risque d'électrocution, de court-circuit et d'incendie) ! • Ne posez pas sur ni à proximité de l'appareil et de l'adaptateur secteur de récipient contenant du liquide, tel qu'un vase, et protégez toutes les pièces contre les gouttes d'eau et éclaboussures. Le récipient pourrait se renverser et le liquide porter atteinte à la sécurité électrique. • Si l'adaptateur secteur, le cordon d'alimentation ou l'appareil est endommagé, débranchez immédiatement la fiche de la prise de courant. • Si l'appareil a été transporté d'une pièce froide dans une chaude, attendez avant de brancher l'adaptateur secteur. L'eau de condensation due au changement de température pourrait détruire l'appareil. Lorsque l'appareil a atteint la température ambiante, il peut être mis en marche sans danger. 5.3. Lieu d'installation Placez et utilisez tous les composants sur une surface stable, plane et exempte de vibrations afin d'éviter que l'appareil ne tombe. N'exposez pas l'appareil à des vibrations. Les vibrations peuvent endommager l'électronique sensible. Veillez à ce que l'appareil ne soit pas exposé à des sources de chaleur directes (p. ex. des radiateurs ou une puissante lumière artificielle). Aucune source de feu nu (p. ex. des bougies allumées) ne doit se trouver sur ou à proximité de l'appareil. Ne posez aucun objet sur les câbles, ils pourraient être endommagés. • N'utilisez jamais l'appareil en plein air, des facteurs externes (pluie, neige, etc.) pourraient l'endommager. • Prévoyez au moins un mètre de distance entre l'appareil et les sources de brouillage haute fréquence et magnétiques éventuelles (téléviseur, haut-parleurs, téléphone portable, etc.) afin d'éviter tout dysfonctionnement. 56 / 166 5.4. Montage mural NL Choisissez pour installer la caméra réseau un endroit qui ne soit pas exposé au rayonnement direct du soleil et où la qualité d'image ne puisse pas être perturbée par d'autres réflexions lumineuses. FR DE AVERTISSEMENT ! Risque d'électrocution ! Pour monter l'appareil, choisissez un endroit approprié et veillez à ne pas endommager GNU de lignes électriques ou d'installation passant dans le mur lorsque vous percez les trous. REMARQUE ! Lorsque vous installez et orientez la caméra, veillez à ne pas enfreindre les dispositions légales en vigueur, en particulier celles relatives à la protection des données, au droit du domicile et à l'observation d'espaces accessibles au public. 5.5. Ne jamais réparer soi-même l'appareil ! Si l'adaptateur secteur, le cordon d'alimentation ou l'appareil est endommagé, débranchez immédiatement la fiche de la prise de courant. Ne mettez jamais l'appareil en marche si vous constatez des dommages visibles de l'appareil ou du cordon d'alimentation ni si l'appareil est tombé par terre. AVERTISSEMENT ! N'essayez en aucun cas d'ouvrir et/ou de réparer vousmême l'appareil. Vous risqueriez de vous électrocuter ! Pour éviter tout danger, adressez-vous en cas de problème au centre de service après-vente Medion ou à un autre atelier spécialisé. 5.6. Nettoyage et entretien • Avant de nettoyer l'appareil, débranchez impérativement l'adaptateur secteur de la prise de courant. • Pour nettoyer l'appareil, utilisez uniquement un chiffon doux et sec. N'utilisez ni solvants ni détergents chimiques qui pourraient endommager la surface et/ou les inscriptions figurant sur l'appareil. 57 / 166 5.7. Alimentation Remarque importante : certaines pièces de l'appareil restent sous tension même si celui-ci est en mode Veille. Pour interrompre l'alimentation de l'appareil ou pour le mettre totalement hors tension, coupez-le complètement du courant secteur en débranchant l'adaptateur secteur de la prise de courant. • Branchez l'adaptateur secteur uniquement sur des prises mises à la terre AC 100-240 V~ 50/60 Hz. Si vous avez des doutes en ce qui concerne l'alimentation électrique sur le lieu d'installation, demandez conseil à votre fournisseur d'électricité. • Utilisez exclusivement l'adaptateur secteur fourni (DSA-12PFA-09 FEU, fabricant DVE). N'essayez pas de brancher la fiche de l'adaptateur secteur sur d'autres prises : vous pourriez endommager l'appareil. • Pour une sécurité supplémentaire, nous conseillons l'utilisation d'une protection contre les surtensions de manière à éviter que l'appareil ne soit endommagé par des pics de tension ou la foudre à travers le réseau électrique. • N'utilisez pas l'appareil en plein air : risque de dommages par la foudre ! En cas d'orage, coupez complètement l'appareil du courant secteur en débranchant l'adaptateur secteur de la prise de courant. • Pour interrompre l'alimentation, débranchez l'adaptateur secteur de la prise de courant. • L'adaptateur secteur doit rester facilement accessible, même une fois branché, de manière à pouvoir être rapidement débranché en cas de besoin. • Ne recouvrez pas l'adaptateur secteur de manière à éviter toute surchauffe. • Ne saisissez jamais l'adaptateur secteur avec les mains mouillées ! Vous risqueriez de vous électrocuter ! • Disposez les câbles de manière à ce que personne ne puisse marcher ou trébucher dessus. 58 / 166 6. Vue d'ensemble de l'appareil NL 6.1. Vue avant FR DE GNU 1 2 5 3 4 1) 2) 3) 4) 5) Capteur de lumière Caméra Microphone Plaque signalétique (non représentée) avec adresse MAC, indication de SSID et données de connexion pour l'interface Web Tête de caméra pivotante 59 / 166 6.2. Vue arrière 6 5 4 1 3 2 1) 2) 3) 4) 5) 6) Touche WPS/Reset Prise DC IN de raccordement au réseau électrique Sortie audio Port LAN LED d'état Antenne 60 / 166 6.3. Vue latérale NL FR DE GNU 1 2 1) 2) Antenne (non amovible) Filetage pour support mural 7. LED de fonctionnement LED d'état LED éteinte LED clignote lentement en vert LED clignote rapidement en vert LED verte LED clignote lentement en orange LED clignote rapidement en orange LED clignote en bicolore vert/orange Signification Caméra éteinte ou pas de connexion réseau Caméra non configurée ou pas de connexion par accès distant Transfert de données Connexion réseau OK Fonction WPS en cours Reset a été effectué Caméra démarre 61 / 166 8. Installer la caméra réseau Vous pouvez poser la caméra sur un meuble ou la fixer sur un mur ou au plafond avec les accessoires fournis. Choisissez pour installer la caméra réseau un endroit qui ne soit pas exposé au rayonnement direct du soleil et où la qualité d'image ne puisse pas être perturbée par d'autres réflexions lumineuses. 1 7 2 3 6 5 4 Choisissez un endroit à proximité d'une prise secteur. Placez l'équerre de montage (3) à l'endroit où vous souhaitez installer la caméra et marquez les trous de perçage correspondants avec un crayon. Percez 2 trous adéquats aux endroits marqués pour fixer les vis. Insérez les chevilles (1) dans les trous. Raccordez l'équerre de montage (3) et le bras de montage (5) à l'aide de la vis de blocage (4). Vissez solidement la vis. Fixez la caméra réseau sur le support à l'aide de la vis de blocage (7) et vissez solidement la vis de blocage. Fixez le support avec la caméra réseau sur le mur à l'aide des deux vis fournies (2). 62 / 166 9. Raccorder l'adaptateur secteur NL Raccordez l'adaptateur secteur fourni (DSA12PFA-09 FEU, fabricant DVE) à la prise DC IN de l'appareil. Une fois tous les raccordements effectués, branchez l'adaptateur secteur sur une prise de courant (AC 100-240 V~ 50/60 Hz). La caméra est prête à être configurée lorsque la LED d'état clignote lentement. FR DE GNU 10. Configurer la caméra réseau Vous avez trois possibilités pour configurer votre caméra réseau : − via l'application mobile LifeViewer (voir « 10.1. Configurer la caméra réseau via l’application mobile LifeViewer » à la page 63), − via la touche WPS (voir « 10.2. Configurer la caméra réseau via la touche WPS » à la page 68) ou − via LAN (voir « 10.3. Configurer la caméra réseau via LAN » à la page 71). 10.1. Configurer la caméra réseau via l'application mobile LifeViewer Téléchargez l'application LifeViewer sur Google Play ou l'App Store. REMARQUE ! Pour pouvoir accéder au market d'Android™, à Google Play ou à l'Apple App Store, vous avez besoin à la fois d'une connexion Internet et d'un compte Google™ ou d'une inscription chez Apple. 10.1.1. Établir la connexion Connectez votre appareil mobile à votre caméra réseau. Procédez comme suit : Ouvrez le menu PARAMÈTRES/WIFI sur votre appareil mobile. Sélectionnez le réseau de la caméra réseau dans la liste des réseaux. Votre identification se compose de MEDION et des 6 derniers caractères de l'adresse MAC (p. ex. MEDIONC46245). Vous trouverez les données d'accès correspondantes sur la plaque signalétique sur le dessous de l'appareil. 63 / 166 10.1.2. Mettre la caméra en service Démarrez l'application LifeViewer. Sélectionnez la langue d'utilisation souhaitée. Tapotez sur la flèche vers la droite pour confirmer votre saisie. Illustration non contractuelle Saisissez le mot de passe de la caméra réseau. Vous le trouverez sur la plaque signalétique sur le dessous de l'appareil. Tapotez sur la flèche vers la droite pour confirmer votre saisie. REMARQUE ! Modifiez dans tous les cas le mot de passe lors de la prochaine étape pour empêcher tout accès à la caméra réseau par des personnes non autorisées ! Illustration non contractuelle 64 / 166 Modifiez ici le nom de la caméra réseau et le mot de passe. Tapotez sur la flèche vers la droite pour confirmer votre saisie. NL FR DE GNU Illustration non contractuelle La caméra réseau cherche les réseaux disponibles. Attendez que les réseaux soient affichés. Illustration non contractuelle 65 / 166 Les réseaux disponibles sont affichés. Sélectionnez votre réseau domestique. Tapotez sur la flèche vers la droite pour confirmer votre sélection. Illustration non contractuelle Saisissez le mot de passe de chiffrement pour votre réseau domestique. Tapotez sur la flèche vers la droite pour confirmer votre saisie. Illustration non contractuelle 66 / 166 L'appareil règle les paramètres suivants : − Paramètres (nom de réseau/mot de passe) sont enregistrés. − Connexion au routeur (réseau domestique) est établie. − Connexion par accès distant est vérifiée/établie. NL FR DE GNU Illustration non contractuelle La configuration a réussi. Illustration non contractuelle Vérifiez dans le menu PARAMÈTRES/WIFI de votre appareil mobile s'il est maintenant connecté à votre réseau domestique et revenez à l'application. 67 / 166 Si la configuration a réussi, vous voyez l'image live de la caméra. Illustration non contractuelle Votre caméra réseau est maintenant configurée. Elle est pilotable avec l'application LifeViewer sur votre appareil mobile de partout dans le monde via Internet. 10.2. Configurer la caméra réseau via la touche WPS REMARQUE ! Cette méthode de connexion présuppose qu'aussi bien le routeur que la caméra soit équipé d'une touche WPS. Appuyez sur la touche WPS de la caméra réseau et maintenez-la enfoncée pendant 2-3 secondes jusqu'à ce que la LED d'état clignote lentement en orange. Appuyez sur la touche WPS de votre routeur dans les 120 secondes qui suivent. Si la connexion entre la caméra réseau et le routeur a réussi, la LED d'état reste allumée en vert en permanence. Pour pouvoir commander la caméra réseau depuis votre appareil mobile, assurez-vous que votre routeur est connecté à l'appareil mobile. Téléchargez l'application LifeViewer sur Google Play ou l'App Store. REMARQUE ! Pour pouvoir accéder au market d'Android™, à Google Play ou à l'Apple App Store, vous avez besoin à la fois d'une connexion Internet et d'un compte Google™ ou d'une inscription chez Apple. 68 / 166 Sélectionnez la langue d'utilisation souhaitée. Tapotez sur la flèche vers la droite pour confirmer votre saisie. NL FR DE GNU Illustration non contractuelle Les caméras réseau trouvées dans le réseau sont affichées. Illustration non contractuelle 69 / 166 Si la configuration a réussi, vous voyez l'image live de la caméra. REMARQUE ! Dans la ligne supérieure, vous voyez apparaître à côté de l'icône d'utilisateur le nombre d'utilisateurs connectés à la caméra réseau. Vous pouvez aussi consulter les activités de connexion des utilisateurs dans le journal système (voir « Journal système » à la page 87). Illustration non contractuelle Votre caméra réseau est maintenant configurée. Elle est pilotable avec l'application LifeViewer sur votre appareil mobile de partout dans le monde via Internet. 70 / 166 10.3. Configurer la caméra réseau via LAN NL Raccordez le port LAN de l'appareil à une interface réseau (p. ex. un routeur) à l'aide du câble réseau RJ 45 fourni. Insérez le CD d'installation fourni dans le lecteur CD de votre ordinateur de bureau ou portable (avec Microsoft® Windows® 8.1, Windows® 7 SP1 ou Windows Vista). Installez le Finder. Suivez à cette occasion les instructions de l'assistant d'installation. FR DE GNU Une fois l'installation réussie, l'icône apparaît sur le Bureau. Démarrez le programme en double-cliquant sur cette icône. Le programme s'ouvre et les caméras réseau disponibles s'affichent. Illustration non contractuelle Sélectionnez la caméra réseau souhaitée. Cliquez ensuite sur l'icône La fenêtre LOGIN s'ouvre. . 71 / 166 Saisissez le mot de passe 1234 et confirmez avec OK. REMARQUE ! Modifiez dans tous les cas le mot de passe pour empêcher tout accès à la caméra réseau par des personnes non autorisées ! Voir la section « Utilisateur » à la page 76. La fenêtre ADMIN s'ouvre. Cliquez sur AVANCÉ pour configurer la caméra. Le programme de configuration Live View de la caméra réseau s'ouvre dans le navigateur. Illustration non contractuelle Cliquez sur le lien DOWNLOAD ACTIVEX. Puis cliquez sur le bouton EXÉCUTER. ActiveX est installé et vous pouvez ensuite poursuivre la configuration de la caméra réseau. Cliquez sur l'option de menu SETUP pour régler la caméra réseau. 10.3.1. Basic Sous BASIC, vous réglez les paramètres de base pour le réseau dans lequel la caméra réseau doit être intégrée. Réseau Le menu RÉSEAU contient tous les paramètres réseau locaux actuellement réglés. Les données sont lues automatiquement par la caméra réseau. 72 / 166 NL FR DE GNU Illustration non contractuelle TYPE DE RÉSEAU ADRESSE IP MASQUE SUBNET PASSERELLE DNS PRIMAIRE DNS SECONDAIRE PORT HTTP DHCP Une adresse IP est assignée automatiquement à la caméra réseau par votre routeur. IP statique Assignez manuellement une adresse IP à la caméra réseau. Saisissez une adresse IP pour la caméra réseau. Saisissez le masque de sous-réseau de l'adresse IP. Saisissez l'adresse de passerelle de votre réseau. Saisissez l'adresse IP de votre serveur DNS primaire. Saisissez l'adresse IP de votre serveur DNS secondaire. Le port 80 est défini par défaut. Vous pouvez modifier le n° du port HTTP (1024 à 65535). Sans fil Assurez-vous qu'une connexion Wi-Fi est bien établie. La caméra est déjà réglée par défaut pour être compatible Wi-Fi. 73 / 166 Illustration non contractuelle Cochez l'option ACTIVER. Cliquez ensuite sous RÉSEAU DISPONIBLE sur le bouton ACTUALISER. Sélectionnez votre réseau. Saisissez votre mot de passe Wi-Fi sous WPA PRE-SHARED-KEY. Cliquez sur le bouton MÉMORISER PARAMÈTRES pour enregistrer les paramètres réglés. WPS La fonction WPS vous permet de connecter entre eux des appareils compatibles rapidement et sans fil. Procédez comme suit : Cliquez sous ACCÉDER AU MODE PBC sur le bouton DÉMARRER PBC. Saisissez le SSID du routeur sous CONFIGURER PAR CODE PIN. Cliquez sur le bouton CODE PIN DE DÉMARRAGE puis saisissez le code PIN de la caméra réseau et activez le PIN WPS du routeur. Si la connexion entre la caméra réseau et le routeur a réussi, la LED d'état reste allumée en vert en permanence. RTSP Dans le menu RTSP, vous trouvez les paramètres actuels concernant le protocole RTSP (Real Time Streaming Protocol). Les données sont lues automatiquement par la caméra réseau. Pour modifier ces données, procédez comme suit : 74 / 166 NL FR DE Illustration non contractuelle Saisissez le PORT RTSP. Saisissez ensuite le CHEMIN D’ACCÈS POUR MJPEG RTSP. Puis la PLAGE DE PORT RTSP. Sélectionnez dans le menu déroulant VÉRIFICATION le type de contrôle COMPTE ou ANONYME. Cliquez sur le bouton MÉMORISER PARAMÈTRES pour enregistrer vos saisies. Date et heure Le menu DATE ET HEURE vous permet de régler la date et l'heure actuelles. Il est conseillé de régler la date et l'heure afin que les événements puissent être au besoin retracés précisément. Illustration non contractuelle MODE DÉFINIR LA DATE ET L’HEURE MANUELLEMENT Cochez l'option NTP (NETWORK TIME PROTOCOL). L'heure et la date sont réglées automatiquement via un serveur NTP dans le réseau local (si disponible). ou Cochez l'option RÉGLAGE MANUEL pour régler vous-même la date et l'heure. Saisissez l'heure et la date actuelles au format suivant : AAAA/MM/JJ (année/mois/jour) et HH:MM:SS (heures/ minutes/secondes). 75 / 166 GNU SYNCHRONISER Cliquez sur ce bouton pour synchroniser l'heure et la AVEC HEURE date automatiquement avec celles réglées sur votre orDU PC dinateur. SERVEUR NTP Si vous avez sélectionné le mode NTP, saisissez le nom d'hôte ou l'adresse IP du serveur NTP. FUSEAU HO Sélectionnez le fuseau horaire dans le menu déroulant. RAIRE HEURE D’ÉTÉ Cochez l'option ACTIVER ou DÉSACTIVER pour activer ou désactiver le passage automatique à l'heure d'été. Utilisateur Vous pouvez configurer différents comptes utilisateur pour l'accès à la caméra réseau. Il est possible d'autoriser l'accès à la caméra en tant qu'invité ou qu'utilisateur. L'invité peut uniquement visionner l'image de la caméra alors que l'utilisateur possède tous les droits d'accès et peut donc aussi régler des paramètres. Illustration non contractuelle LISTE D’UTILISATEUR IDENTIFIANT MOT DE PASSE CONFIRMER MOT DE PASS HABILITATION Liste des utilisateurs déjà connectés. Saisissez le nom d'un nouvel utilisateur. Saisissez le mot de passe pour le nouvel utilisateur. Répétez le mot de passe. Attribuez les droits d'accès en cochant l'option OPÉRATEUR ou HÔTE. Cliquez sur le bouton AJOUTER pour connecter un nouvel utilisateur, sur le bouton MODIFIER pour modifier le profil utilisateur ou sur ENLEVER pour supprimer un utilisateur. 76 / 166 CONNEXION ANONYME Cochez l'option ACTIVER ou DÉSACTIVER pour autoriser une connexion anonyme. La connexion anonyme autorise toute personne connectée au réseau à visionner les images de la caméra. NL FR DE Confirmez votre saisie en cliquant sur le bouton MÉMORISER PARAMÈTRES. GNU UPnP UPnP (universal plug and play) est activé par défaut, votre ordinateur peut donc reconnaître automatiquement une caméra réseau dans le réseau local. Illustration non contractuelle Bonjour Bonjour est un logiciel utilisé par les appareils Apple qui reconnaît automatiquement les services ou contenus multimédia disponibles sur des réseaux IP. Cochez l'option ACTIVER ou DÉSACTIVER pour activer ou désactiver ce service. Illustration non contractuelle 10.3.2. Vidéo Vous réglez ici les paramètres concernant notamment la qualité d'enregistrement de la caméra réseau. Paramètres vidéo Sous PARAMÈTRES VIDÉO, vous pouvez modifier au besoin les paramètres d'enregistrement vidéo. 77 / 166 Illustration non contractuelle RÉSOLUTION QUALITÉ FRÉQUENCE D’IMAGE MAXIMALE PIVOTER IMAGE Sélectionnez la résolution souhaitée dans le menu déroulant (VGA 640 X480 ou QVGA 320X240). Plus la résolution sélectionnée est élevée, plus l'image vidéo est claire, ce qui exige toutefois une largeur de bande supérieure. Sélectionnez dans le menu déroulant un des réglages suivants pour la qualité d'image : MAXIMUM/ÉLEVÉ/NORMAL/FAIBLE/MINIMUM. Sélectionnez dans le menu déroulant 30, 20, 15, 10 ou 5 pour une fréquence d'images maximale. Plus la fréquence d'images sélectionnée est élevée, plus l'image vidéo est fluide, ce qui exige toutefois une largeur de bande supérieure. Si vous avez fixé la caméra réseau sur un plafond, sélectionnez 180° pour voir correctement la vidéo de surveillance. Confirmez les paramètres réglés en cliquant sur le bouton MÉMORISER PARAMÈTRES. Aspect de l’image Sous ASPECT DE L’IMAGE, vous pouvez régler différents paramètres d'image. 78 / 166 Illustration non contractuelle Saisissez une valeur numérique ou utilisez le curseur pour modifier les valeurs de LUMINOSITÉ, CONTRASTE, SATURATION et NETTETÉ. Cliquez sur le bouton MÉMORISER VALEUR pour enregistrer les modifications effectuées. Pour restaurer les valeurs par défaut, cliquez sur le bouton RESTAURER PARAMÈTRES PAR DÉFAUT. Vision nocturne AUTO-COMMUTATION : commutateur faisant passer la caméra réseau en mode Vision nocturne en cas de faible luminosité. Illustration non contractuelle Cochez l'option ACTIVER pour activer cette fonction ou DÉSACTIVER pour la désactiver. 10.3.3. Événements Sous ÉVÉNEMENTS, vous pouvez régler différents paramètres tels que détection de mouvement, zone de détection, programmation ainsi que l'envoi de notifications d'événement. Détection de movement Pour activer la détection de mouvement de la caméra réseau, cochez l'option ACTIVER. Et l'option DÉSACTIVER pour la désactiver. Illustration non contractuelle Sélectionnez dans le menu déroulant l'intervalle souhaité jusqu'à la détection d'un mouvement : 1, 3, 4, 10, 15, 20, 30, 45 ou 60 SECONDE. 79 / 166 NL FR DE GNU REMARQUE Réglez un intervalle court si vous souhaitez que même les légers mouvements soient détectés et des intervalles plus longs pour que les mouvements légers ne soient pas pris en compte. Cochez l'option ACTIVER ou DÉSACTIVER pour activer ou désactiver l'envoi de notifications d'événement sous TÉLÉVERSER FICHIER D’ÉVENEMENT SUR FTP ou ENVOYER FICHIER D’ÉVÉNEMENT À ADRESSE E-MAIL. Si la détection de mouvement est activée, un arrêt sur image est envoyé au destinataire spécifié dès qu'un mouvement est détecté. REMARQUE Vous pouvez régler d'autres paramètres pour l'envoi de notifications d'événement sous SMTP et FTP. Zone de détection Vous pouvez régler jusqu'à 3 zones de détection de mouvement. Les zones non marquées sont ignorées afin d'éviter toute fausse alerte éventuelle. Illustration non contractuelle Activez l'option ZONE 1, 2 ou 3 souhaitée en cochant la case de contrôle correspondante. Cliquez sur le champ marqué en couleur et déplacez-le sur la zone de l'image où vous souhaitez que les mouvements soient détectés. Pour agrandir ou réduire la zone de détection, cliquez sur les coins du champ 80 / 166 marqué et tirez-les vers l'extérieur ou l'intérieur. Déplacez le curseur à l'horizontale pour régler la sensibilité et la taille d'objet à partir desquelles la caméra réseau doit se déclencher. SENSIBILITÉ 10 jusqu’à 100 SEUIL 0 jusqu’à 100 Plus la valeur sélectionnée est élevée, plus la caméra réseau réagit sensiblement au moindre mouvement. Plus la valeur sélectionnée est élevée, plus les objets déclenchant une notification de mouvement sont grands. Cliquez sur le bouton MÉMORISER pour enregistrer les paramètres réglés. Paramètres de programmation Vous pouvez régler la caméra réseau de telle manière que la détection de mouvement s'active ou se désactive automatiquement à des moments définis. Illustration non contractuelle Pour que la détection de mouvement reste activée en permanence, cliquez sur le bouton SÉLECTIONNER TOUT. Pour régler un moment défini, cliquez dans la ligne de temps d'un certain jour sur l'heure à laquelle la détection de mouvement doit être activée et tirez le curseur jusqu'à l'heure à laquelle elle doit être désactivée. Pour modifier l'heure d'activation, cliquez sur la période souhaitée et déplacez-la vers la droite ou la gauche. La période activée est sur fond bleu clair et une période marquée, sur fond bleu foncé. Cliquez sur le bouton MÉMORISER pour enregistrer les paramètres réglés. Pour supprimer une période, marquez-la puis cliquez sur le bouton SUPPRIMER. 81 / 166 NL FR DE GNU Pour supprimer tous les intervalles réglés, cliquez sur le bouton SUPPRIMER TOUT. Cliquez sur le bouton MÉMORISER pour enregistrer les paramètres réglés. SMTP Vous pouvez envoyer l'arrêt sur image d'un événement à une certaine adresse électronique. Activez la détection de mouvement sous ÉVÉNEMENTS. Illustration non contractuelle Sélectionnez votre fournisseur dans le menu déroulant ou réglez les paramètres manuellement. Saisissez sous SERVEUR SMTP le nom d'hôte ou l'adresse IP du SMTP de l'adresse électronique. Saisissez le numéro du port SMTP (généralement port 25, chiffré port 465, renseignez-vous si nécessaire auprès de votre fournisseur de messagerie). Saisissez l'adresse électronique du destinataire et de l'expéditeur. Sélectionnez le chiffrement SMTP SSL, TLS ou AUCUN. Sélectionnez ACTIVER si votre serveur SMTP exige une authentification (renseignez-vous si nécessaire auprès de votre fournisseur de messagerie). Si une authentification est exigée, saisissez le nom du compte SMTP. Saisissez votre mot de passe pour l'authentification. Vérifiez si la configuration a réussi en envoyant un e-mail test à l'adresse électronique indiquée avec ENVOYER E-MAIL TEST. Cliquez sur le bouton MÉMORISER PARAMÈTRES pour enregistrer vos réglages. FTP Vous pouvez envoyer l'arrêt sur image d'un événement à un certain serveur FTP. Activez la détection de mouvement sous ÉVÉNEMENTS. 82 / 166 NL FR DE GNU Illustration non contractuelle Saisissez sous SERVEUR FTP le nom d'hôte ou l'adresse IP du serveur FTP. Saisissez sous IDENTIFIANT le nom d'utilisateur pour le serveur FTP. Saisissez votre MOT DE PASSE pour le serveur FTP. Saisissez le PORT du serveur FTP. Le port 21 est saisi par défaut. Saisissez sous CHEMIN D’ACCÈS l'emplacement de stockage où vous souhaitez que les arrêts sur image soient enregistrés sur le serveur FTP. ACTIVER ou DÉSACTIVER le mode passif du serveur FTP en cochant l'option correspondante. Vérifiez si la configuration a réussi en envoyant un fichier test au serveur FTP indiqué avec ENVOYER FICHIER TEST. Cliquez sur le bouton MÉMORISER PARAMÈTRES pour enregistrer vos réglages. 10.3.4. Incliner et pivoter Vous pouvez régler les paramètres d'inclinaison et de pivotement de la caméra réseau ainsi que certaines positions de départ selon vos besoins. Paramètres d’inclinaison-/de pivotement Illustration non contractuelle Sélectionnez dans le menu déroulant VITESSE D’INCLINAISON/DE PIVOTEMENT 1 (lente), 2 ou 3 (rapide) pour la caméra réseau. Représente la vitesse lors de l'utilisation des touches fléchées dans le Live View. Dans le menu déroulant, sélectionnez ÉCART D’INCLINAISON/DE PIVOTEMENT 1 (distance réduite), 2 ou 3 (grande distance) pour la caméra réseau. Représente le trajet de déplacement lors de l'utilisation des touches fléchées dans le Live View. ACTIVER ou DÉSACTIVER le CALIBRAGE AUTOMATIQUE en co83 / 166 chant l'option correspondante. En cas de calibrage automatique, la caméra réseau exécute un test automatique en déclenchant un mouvement de pivotement. Si vous activez le calibrage automatique, définissez le moment d'activation du calibrage. Cliquez sur le bouton CALIBRAGE MANUEL si vous souhaitez déclencher vous-même le test de la caméra. Cliquez sur le bouton MÉMORISER PARAMÈTRES pour enregistrer vos réglages. Préréglage Vous pouvez régler quatre positions d'enregistrement que vous souhaitez afficher le plus souvent. Ces positions sont alors directement affichables dans le Live View et il n'est pas nécessaire de les régler manuellement. Illustration non contractuelle Sélectionnez sous PRÉRÉGLER LE CHIFFRE DE POSITION une position (1–4) dans le menu déroulant. La position d'enregistrement actuelle est affichée. Cliquez sur les boutons fléchés pour modifier la position d'enregistrement. Cliquez sur MÉMORISER DONNÉES DE POSITION pour enregistrer votre réglage. ou Cliquez sur SUPPRIMER PARAMÈTRES pour supprimer votre réglage. Si vous cliquez sur le bouton DÉFINIR PREMIÈRE POSITION, la caméra réseau se remet sur votre position de départ. 84 / 166 Position de départ NL FR DE GNU Illustration non contractuelle Sélectionnez parmi les quatre positions d'enregistrement que vous avez réglées auparavant celle devant être utilisée comme POSITION DE DÉPART. Cliquez sur le bouton MÉMORISER PARAMÈTRES pour enregistrer vos réglages. 10.3.5. Système Dans le menu SYSTÈME, vous avez la possibilité de rebaptiser votre caméra réseau, d'exécuter une mise à jour du système, d'enregistrer ou de restaurer des paramètres et d'effectuer un reset/redémarrage de la caméra réseau. Basic Illustration non contractuelle Saisissez sous NOM DE CAMÉRA RÉSEAU un nom pour la caméra réseau. Saisissez un mot de passe sous MOT DE PASSE ADMINISTRATEUR. Répétez ce mot de passe sous CONFIRMER MOT DE PASSE. Réglez l'option AFFICHAGE LED de la caméra réseau sur ON ou OFF en cochant la case correspondante. Si cette option est désactivée, une personne ne peut pas voir de l'extérieur si la caméra réseau est allumée ou éteinte. 85 / 166 Avancé Sous AVANCÉ, vous pouvez exécuter une mise à jour du microprogramme, enregistrer et restaurer les paramètres de la caméra réseau ainsi que réinitialiser la caméra réseau aux paramètres par défaut. Illustration non contractuelle Mise à niveau du firmware Indiquez un chemin d'accès au fichier de microprogramme. Cliquez sur le bouton MISE À NIVEAU DU FIRMWARE pour exécuter le fichier indiqué. Paramètres de sauvegarde/retauration Cliquez sous PARAMÉTRES DE SAUVEGARDE sur le bouton APPLIQUER pour enregistrer les paramètres réglés. Le fichier config.bin est généré. Enregistrez ce fichier sur votre ordinateur. Restaurer paramètres Indiquez le chemin d'accès au fichier de backup (config.bin). Cliquez sur le bouton RETAURER pour exécuter le fichier indiqué et restaurer les paramètres. Réinitialisation Redémarrage Cliquez sur le bouton REDÉMARRER CAMÉRA RÉSEAU. La caméra redémarre. L'opération peut durer quelques minutes. Réinitialisation Avant de réinitialiser la caméra réseau, cochez l'option CONSERVER PARAMÈTRES RÉSEAU ou PARAMÈTRES PAR DÉFAUT. Si vous sélectionnez CONSERVER PARAMÈTRES RÉSEAU, la caméra réseau conservera votre adresse IP lors de la réinitialisation. Si vous sélectionnez PARAMÈTRES PAR DÉFAUT, tous les paramètres par 86 / 166 défaut seront restaurés sur la caméra réseau. Cliquez sur le bouton CHARGER PARAMÈTRES PAR DÉFAUT pour lancer le reset (réinitialisation). L'opération peut durer quelques minutes. NL FR DE 10.3.6. Statut Informations système Sous cette option, vous pouvez consulter des informations sur l'état de votre caméra réseau pour une recherche d'erreurs ou une configuration réseau éventuelle. À savoir les informations suivantes : − Système − LAN − Wi-Fi − IGD (redirection de port UPnP) Journal système Le journal système affiche les informations d'utilisation de la caméra réseau. Illustration non contractuelle Vous pouvez enregistrer ce journal sur un serveur distant. Sélectionnez un NIVEAU DU JOURNAL. 0 (SIMPLE) journalise uniquement les événements les plus importants se produisant sur la caméra réseau, 4 (DÉTAIL) enregistre tous les événements. Les événements sont affichés dans le champ de texte. ACTIVER : cochez cette option si vous souhaitez enregistrer le journal système sur un serveur distant. 87 / 166 GNU REMARQUE ! La caméra réseau est compatible avec le serveur de journalisation Syslog. Saisissez sous SERVEUR DE JOURNAUX À DISTANCE le nom d'hôte ou l'adresse IP du serveur. Cliquez sur le bouton MÉMORISER PARAMÈTRES pour enregistrer les paramètres réglés. 10.3.7. Mode IP Dynamic DDNS REMARQUE ! Le service DNS dynamique est désactivé par défaut. Si vous souhaitez cependant utiliser le transfert de données via un service DDNS de fournisseurs tiers, procédez comme dans l'exemple décrit ci-après d'une Fritz!Box et du fournisseur gratuit no-ip.biz. Les utilisateurs à domicile et les ménages privés ont habituellement accès à Internet via un fournisseur Internet. Lors de la connexion à Internet, ce fournisseur attribue alors à votre routeur une adresse IP (p. ex. : 80.139.140.223) de son pool d'adresses. Cette adresse IP est cependant réattribuée à chaque nouvelle connexion à Internet ou au plus tard au bout de 24 heures. Pour pouvoir accéder au routeur durablement depuis Internet, vous avez donc besoin d'une adresse IP fixe. Les fournisseurs de DNS dynamique assignent les adresses IP changeantes de votre fournisseur Internet à une adresse Internet fixe avec résolution de nom (comme dans l'exemple : http://camerareseau.no-ip.biz). Votre caméra réseau est ainsi toujours accessible sous la même adresse Web (http:// camerareseau.no-ip.biz) bien que votre routeur reçoive du fournisseur Internet une adresse IP changeante (IP dynamique). L'adresse IP actuelle respective du routeur est pour cela transmise par un client DynDNS (généralement installé sur le routeur ou aussi sur la caméra réseau) au fournisseur de DNS dynamique correspondant. Installer et configurer un service DNS dynamique 1. Créez un compte utilisateur (Account) auprès d'un fournisseur de services DNS dynamique (dans notre exemple : www.no-ip.biz). La plupart des fournisseurs de tels services proposent des comptes utilisateur gratuits. Dans l'exemple décrit ici, vous créez auprès du fournisseur de DNS dynamique www.no-ip.biz un compte avec les données suivantes : Nom d'hôte : camerareseau.no-ip.biz Nom d'utilisateur : camerareseau Mot de passe : ****** 88 / 166 REMARQUE ! Le nom d'adresse « camerareseau » peut être choisi librement, à condition qu'il ne soit pas déjà attribué. L'extension d'adresse « no-ip.biz » est spécifiée par le service DNS dynamique et ne peut pas être modifiée. Le compte est sécurisé avec un mot de passe utilisateur. 2. Le nom avec lequel la caméra réseau sera accessible doit être saisi sur le routeur à votre domicile. Si votre routeur n'offre pas cette fonction, vous avez aussi la possibilité de saisir le nom via l'interface Live View de la caméra réseau. La variante techniquement la plus fiable est cependant la saisie sur le routeur. L'exemple illustré représente la configuration avec un routeur : Illustration non contractuelle Si votre routeur ne vous permet pas d'activer un client DynDNS, ce dernier peut aussi être activé dans le programme de configuration de Live View. La configuration du client DynDNS s'effectue sous Mode IP/Dynamic DDNS : Illustration non contractuelle C'est ici que − le fournisseur de DNS dynamique, − le nom d'hôte, − le nom d'utilisateur et − le mot de passe sont saisis et que le client est activé. Le client lit l'adresse IP Internet du routeur, l'envoie au fournisseur de DNS dynamique et celui-ci l'affecte au compte et à l'adresse Internet configurée (dans notre 89 / 166 NL FR DE GNU exemple : camerareseau.no-ip.biz). À la saisie de l'adresse Internet (dans notre exemple : camerareseau.no-ip.biz), le routeur est alors accessible depuis Internet avec un navigateur quelconque. 3. Une redirection de port doit être configurée sur le routeur. Le routeur n'offrant pas les services DNS dynamique correspondants de la caméra réseau, il doit être ainsi configuré pour qu'il transfère les demandes d'Internet à la caméra réseau. Cette configuration est appelée redirection de port (activations de port). Le réglage de l'activation de port varie selon le routeur et doit être consulté dans le mode d'emploi du routeur respectif. Pour que la caméra réseau puisse répondre, les demandes doivent lui être envoyées par le routeur à l'adresse IP interne de préférence fixe (dans notre exemple : 192.168.178.32) de la caméra réseau, à savoir pour les protocoles Internet : http (interface utilisateur de la caméra réseau Live View) : port 80 ; tcp Ce n'est qu'une fois que la redirection de port est correctement configurée sur le routeur que la caméra réseau est accessible depuis Internet sous le nom : http:// camerareseau.no-ip.biz. REMARQUE ! Tous les fournisseurs de DNS dynamique et tous les comptes décrits sont à titre d'exemple ! Veuillez noter qu'il existe sur le marché aussi bien des fournisseurs gratuits que payants et que même avec un compte DNS dynamique gratuit, des frais supplémentaires sont éventuellement possibles selon les détails techniques et les extensions. Accès distant Ce service autorise l'accès distant aux données de la caméra réseau via un serveur. Le service d'accès distant est activé par défaut afin de permettre une configuration simple et rapide de la caméra réseau p. ex. depuis des appareils mobiles. ACTIVER ou DÉSACTIVER le service d'accès distant et cliquer sur le bouton MÉMORISER PARAMÈTRES pour confirmer la sélection. Illustration non contractuelle 90 / 166 Mode AP Direct Si la caméra réseau est reconfigurée ou n'est encore connectée à aucun réseau disponible, elle passe en mode AP. En mode AP, la caméra réseau fonctionne en tant que point d'accès. La connexion sans fil est déjà activée par défaut. Sous CONNEXION SANS FIL, vous pouvez ACTIVER ou DÉSACTIVER cette fonction. NL FR DE GNU Illustration non contractuelle Cochez l'option ACTIVER. Saisissez sous SSID le nom que vous avez attribué à la caméra réseau. Saisissez votre mot de passe Wi-Fi sous WPA PRE-SHARED-KEY. Cliquez sur le bouton MÉMORISER PARAMÈTRES pour enregistrer les paramètres réglés. 91 / 166 11. Utiliser la caméra Une fois que vous avez configuré la caméra réseau avec votre appareil mobile ou sur votre ordinateur, vérifiez l'image reçue par la caméra. Réglez si nécessaire la netteté de l'image en tournant prudemment la lentille de la caméra. Le bord de la lentille comporte des striures vous permettant de tourner la lentille avec votre ongle. 11.1. Utiliser la caméra via l'application mobile LifeViewer Votre caméra réseau est configurée. Elle est pilotable avec l'application LifeViewer sur votre appareil mobile de partout dans le monde via Internet. REMARQUE En cas d'accès distant aux données de la caméra réseau via votre appareil mobile, le temps de transmission est limité à 90 secondes afin d'éviter des coûts éventuels. Une fois ce temps écoulé, vous pouvez cependant rétablir la connexion en appuyant sur le bouton . L'image live est chargée. REMARQUE La fonction de lecture audio est disponible uniquement dans le réseau domestique. 11.1.1. Menu Live Appuyez sur le bouton pour afficher l'image live. REMARQUE Si vous avez connecté plusieurs caméras réseau, vous pouvez alterner entre les différentes caméras par un glissé du doigt sur l'écran. Dans l'affichage de l'image live, vous disposez des fonctions suivantes : Appuyez sur le bouton mètres de caméra. pour ouvrir le menu CAMÉRAS et régler les para- Appuyez sur le bouton pour créer un arrêt sur image. Cet arrêt sur image peut être visionné dans le menu ÉVÉNEMENT. pour activer la fonction Inclinaison/Pivotement. Vous Appuyez sur le bouton pouvez maintenant déplacer la tête de caméra par un glissé du doigt sur l'image live. Cette fonction est affichée par une icône dans la barre d'outils. Les flèches indiquent la direction en cas de mouvement. Appuyez de nouveau sur le bouton pour quitter la fonction. Appuyez sur le bouton 92 / 166 pour allumer ou éteindre le haut-parleur. Appuyez sur le bouton NL pour allumer ou éteindre le microphone. FR Icônes d'état utilisées dans l'affichage de l'image live La barre d'état se trouve en haut à gauche. Les fonctions activées sont affichées par les icônes suivantes : DE Connexion au réseau Wi-Fi GNU Connexion par accès distant Nombre d'utilisateurs connectés Mode Inclinaison/Pivotement activé Haut-parleur allumé Microphone allumé 11.1.2. Menu Événements Appuyez sur le bouton ÉVÉNEMENTS pour afficher les caméras intégrées dans le réseau. Sélectionnez la caméra réseau de votre choix en appuyant sur son nom. Vous pouvez maintenant visionner les images d'événement avec vos données d'enregistrement. 11.1.3. Menu Caméras Appuyez sur le bouton CAMÉRAS pour régler les paramètres de caméra. Sélectionnez dans la liste CAMÉRAS la caméra réseau de votre choix en appuyant sur son nom. ou Appuyez sur AJOUTER NOUVELLE CAMÉRA. Sélectionnez la caméra réseau dans la liste en appuyant sur son nom ou saisissez manuellement les données de la caméra sur le clavier d'écran. Réglages possibles Vous avez sélectionné une caméra réseau. Les informations suivantes s'affichent : − Type de caméra − Nom de la caméra − ID − Nom d'utilisateur − Mot de passe Sélectionnez les menus et les options respectives en appuyant chaque fois sur le bouton. 93 / 166 Pour quitter des menus ou options, appuyez sur la flèche dirigée vers la gauche en haut de l'écran. Pour finaliser vos réglages, appuyez sur le bouton TERMINÉ en haut à droite de l'écran. Si vous souhaitez annuler vos réglages, appuyez sur le bouton ANNULER en haut à gauche de l'écran. Les propriétés actuellement réglées sont alors affichées dans l'aperçu de la caméra réseau. Les propriétés de la qualité d'enregistrement suivantes peuvent être réglées : Pivoter : Appuyez sur 0° : affichage conseillé si la caméra a été installée à la verticale. Appuyez sur 180° : l'affichage de l'image de la caméra est inversé horizontalement, p. ex. lorsque la caméra est fixée sur un plafond. Luminosité : Sélectionnez un niveau de luminosité en appuyant sur l'option 1 (sombre) à 5 (très clair). Saturation : Sélectionnez un niveau de saturation en appuyant sur l'option 1 (niveaux de gris) à 5 (valeurs chromatiques très élevées). Netteté : Sélectionnez un degré de netteté en appuyant sur l'option 1 (peu de détails) à 5 (très détaillé). Qualité vidéo : Sélectionnez la qualité vidéo en appuyant sur l'option MAXIMUM à MINIMUM. Vitesse d’inclinaison et de pivotement : Sélectionnez la vitesse de pivotement/d'inclinaison en appuyant sur l'option 1 (lente) à 3 (rapide). 11.1.4. Menu Informations Cliquez sur le bouton INFORMATIONS la version de l'application et le fabricant. 94 / 166 pour obtenir des informations sur 11.2. Utiliser la caméra via Windows UI Live View NL FR DE GNU Illustration non contractuelle Bouton Fonction Utilisez les boutons fléchés pour piloter le pivotement/l'inclinaison de la caméra et régler l'angle d'enregistrement. Sélectionnez un des quatre paramètres de caméra préréglés que vous avez auparavant définis sous SETUP/INCLINER ET PIVOTER/PRÉRÉGLAGE. Cliquez sur le bouton pour enregistrer un arrêt sur image. Sélectionnez un emplacement de stockage. Cliquez sur le bouton pour enregistrer une vidéo. Sélectionnez un emplacement de stockage. Cliquez sur le bouton pour visionner l'image de la caméra en mode plein écran. Pour quitter le mode plein écran, cliquez sur la touche ESC de votre clavier. 95 / 166 Bouton Fonction Cliquez sur le bouton pour agrandir l'image de la caméra. La fenêtre GROSSISSEMENT NUMÉRIQUE s'ouvre. Marquez le champ vert et déplacez-le avec la souris sur la partie de l'image que vous souhaitez agrandir. Agrandissez la partie de l'image en déplaçant le curseur de 100% à 400%. Cliquez sur le bouton pour utiliser la fonction INCLINER ET PIVOTER ainsi que l'affichage de l'image de la caméra inversé horizontalement, p. ex. lorsque la caméra est fixée sur un plafond. Sélectionnez le volume de lecture souhaité dans le menu déroulant. ou Cliquez sur le bouton pour mettre la lecture audio en sourdine. Sélectionnez dans le menu déroulant le volume souhaité pour le haut-parleur raccordé à la caméra. ou Cliquez sur le bouton pour désactiver la lecture audio bidirectionnelle de la caméra. REMARQUE ! La fonction de lecture audio est disponible uniquement dans le réseau domestique. 12. Réinitialiser la caméra Pour restaurer les réglages par défaut sur la caméra réseau p. ex. pour éliminer d'éventuels problèmes de connexion, procédez comme suit : Maintenez la touche WPS/RESET au dos de l'appareil enfoncée pendant env. 10 secondes. Relâchez la touche dès que la LED d'état clignote en orange. Attendez que la caméra réseau redémarre. La caméra est prête lorsque la LED d'état reste allumée en permanence en vert. Après la réinitialisation, la LED d'état s'éteint s'il n'y a pas de connexion réseau entre la caméra réseau et un routeur/point d'accès/switch. 96 / 166 13. Actualiser le microprogramme NL Tant que la caméra réseau est connectée à Internet, elle vérifie régulièrement si une mise à jour de microprogramme est disponible. Si une version plus récente peut être téléchargée, une fenêtre pop-up s'ouvre, où vous pouvez sélectionner si le nouveau microprogramme doit être installé ou non. FR DE 14. Nettoyage Avant de nettoyer l'appareil, débranchez toujours l'adaptateur secteur et tous les câbles de connexion. N'utilisez ni solvants ni détergents corrosifs ou gazeux. Nettoyez l'appareil avec un chiffon doux et non pelucheux. Veuillez conserver soigneusement les emballages et utiliser uniquement ceux-ci pour transporter l'appareil. ATTENTION ! L'intérieur de l'appareil ne comporte aucune pièce nécessitant un entretien ou un nettoyage. 15. Recyclage Emballage Votre appareil se trouve dans un emballage de protection afin d'éviter qu'il ne soit endommagé au cours du transport. Les emballages sont des matières premières et peuvent être recyclés ou réintégrés dans le circuit des matières premières. Appareil Les appareils usagés ne doivent pas être jetés avec les déchets domestiques. Conformément à la directive 2002/96/CE, lorsque l'appareil est arrivé en fin de vie, il doit être recyclé de manière réglementaire. Les matériaux recyclables que contient l'appareil sont alors réutilisés, ce qui permet de ménager l'environnement. Remettez l'appareil usagé dans un centre de collecte des déchets d'équipements électriques et électroniques ou une déchetterie. Pour connaître les heures d'ouverture et les adresses des centres de récupération et de collecte, renseignez-vous auprès de votre municipalité, de votre entreprise de recyclage locale ou de l'organisation de consommateurs. 97 / 166 GNU 16. Caractéristiques techniques Connexion LAN Résolution vidéo VGA Dimensions (L x l x H) Poids 10/100 Mbps RJ 45 640 x 480 pixels 112 x 90 x 116 mm Env. 280 g Adaptateur secteur Modèle : Entrée Sortie DSA-12PFA-09 FEU, fabricant DVE AC 100-240 V~ 50/60 Hz, 0,5 mA 12 V 1A 17. Déclaration de conformité 0700 Par la présente, la société Medion AG déclare que le produit MD 86970 est conforme aux exigences européennes suivantes : • Directive R&TTE 1999/5/CE • Directive CEM 2004/108/CE • Directive « Basse tension » 2006/95/CE • Directive sur l'écoconception 2009/125/CE • Directive RoHS 2011/65/UE Vous pouvez obtenir les déclarations de conformité complètes sur www.medion.com/conformity. 18. Mentions légales Copyright © 2014 Tous droits réservés. Le présent mode d'emploi est protégé par le copyright. La reproduction sous forme mécanique, électronique ou sous toute autre forme que ce soit est interdite sans l'autorisation préalable écrite du fabricant. Le copyright est la propriété de la société : Medion AG Am Zehnthof 77 45307 Essen Allemagne Le mode d'emploi complet peut être à nouveau commandé via la hotline de service et téléchargé sur le portail de service www.medion.com/be/nl/service/start/. Vous pouvez aussi scanner le code QR ci-dessus et charger le mode d'emploi sur votre terminal mobile via le portail de service. 98 / 166 Inhaltsverzeichnis NL 1. Zu dieser Anleitung ................................................................................. 101 1.1. In dieser Anleitung verwendete Warnsymbole und Signalwörter .. 101 2. Systemvoraussetzung ............................................................................. 102 3. Lieferumfang............................................................................................ 102 4. Bestimmungsgemäßer Gebrauch .......................................................... 103 5. Sicherheitshinweise................................................................................. 103 5.1. Elektrische Geräte nicht in Kinderhände ................................................... 103 5.2. Allgemeines ......................................................................................................... 104 5.3. Aufstellort ............................................................................................................. 104 5.4. Wandmontage .................................................................................................... 105 5.5. Niemals selbst reparieren! .............................................................................. 105 5.6. Reinigung und Pflege....................................................................................... 105 5.7. Stromversorgung ............................................................................................... 106 6. Geräteübersicht ....................................................................................... 107 6.1. Vorderseite ........................................................................................................... 107 6.2. Rückseite ............................................................................................................... 108 6.3. Seitenansicht ....................................................................................................... 109 7. LED-Betriebsanzeigen ............................................................................. 109 8. Netzwerkkamera montieren ................................................................... 110 9. Netzadapter anschließen ........................................................................ 111 10. Netzwerkkamera konfigurieren ............................................................. 111 10.1. Netzwerkkamera über Smart-App LifeViewer konfigurieren ............ 111 10.2. Netzwerkkamera über die WPS-Taste konfigurieren ............................ 116 10.3. Netzwerkkamera über LAN konfigurieren................................................ 119 11. Kamera bedienen..................................................................................... 140 11.1. Kamera über Smart-App LifeViewer bedienen ....................................... 140 11.2. Kamera über Windows UI Live View bedienen........................................ 143 12. Kamera zurücksetzen .............................................................................. 144 13. Firmware aktualisieren............................................................................ 145 14. Reinigung ................................................................................................. 145 15. Entsorgung ............................................................................................... 145 16. Technische Daten ..................................................................................... 146 17. Konformitätserklärung ........................................................................... 146 18. Impressum ................................................................................................ 146 Lizenzinformation .............................................................................................. 148 99 von 166 FR DE GNU 100 von 166 1. Zu dieser Anleitung NL Lesen Sie unbedingt diese Anleitung aufmerksam durch und befolgen Sie alle aufgeführten Hinweise. So gewährleisten Sie einen zuverlässigen Betrieb und eine lange Lebenserwartung Ihres Gerätes. Halten Sie diese Anleitung stets griffbereit in der Nähe Ihres Gerätes. Bewahren Sie die Bedienungsanleitung gut auf, um sie bei einer Veräußerung des Gerätes dem neuen Besitzer weitergeben zu können. 1.1. In dieser Anleitung verwendete Warnsymbole und Signalwörter GEFAHR! Warnung vor unmittelbarer Lebensgefahr! WARNUNG! Warnung vor möglicher Lebensgefahr und/oder schweren irreversiblen Verletzungen! VORSICHT! Warnung vor möglichen mittleren und oder leichten Verletzungen! ACHTUNG! Hinweise beachten, um Sachschäden zu vermeiden! HINWEIS! Weiterführende Informationen für den Gebrauch des Gerätes! HINWEIS! Hinweise in der Bedienungsanleitung beachten! WARNUNG! Warnung vor Gefahr durch elektrischen Schlag! • Aufzählungspunkt / Information über Ereignisse während der Bedienung Auszuführende Handlungsanweisung 101 von 166 FR DE GNU 2. Systemvoraussetzung − Microsoft Windows®: Microsoft® Windows® 8.1, Windows® 7 SP1 − WLAN 802.11 b/g/n oder Netzwerkrouter mit Breitband-Internetverbindung mit IPv4 Unterstützung − CD-ROM Laufwerk Bei Nutzung in Verbindung mit Smartphone/Tablet − − − − Breitband-Internetverbindung mit IPv4 Unterstützung iPhone/iPad mit iOS 5 oder höher Android™ Plattform 2.3 oder höher Installierte IP Cam App (MEDION LifeViewer) 3. Lieferumfang Bitte überprüfen Sie die Vollständigkeit der Lieferung und benachrichtigen Sie uns innerhalb von 14 Tagen nach dem Kauf, falls die Lieferung nicht komplett ist. − IP-Kamera − Netzteil (Modell DSA-12PFA-09 FEU, Hersteller DVE) − RJ-45 Kabel − Wandhalterung, inkl. Schrauben und Dübeln − Software CD − Kurzanleitung, Garantiekarte 102 von 166 4. Bestimmungsgemäßer Gebrauch NL Das Gerät dient der LAN-oder WLAN-gesteuerten Raumüberwachung. FR • Das Gerät ist nur für den privaten und nicht für den industriellen/ DE kommerziellen Gebrauch bestimmt. Bitte beachten Sie, dass im Falle des nicht bestimmungsgemäßen Gebrauchs die Haftung erlischt: − Bauen Sie das Gerät nicht ohne unsere Zustimmung um und GNU verwenden Sie keine nicht von uns genehmigten oder gelieferten Zusatzgeräte. − Verwenden Sie nur von uns gelieferte oder genehmigte Ersatzund Zubehörteile. − Beachten Sie alle Informationen in dieser Bedienungsanleitung, insbesondere die Sicherheitshinweise. Jede andere Bedienung gilt als nicht bestimmungsgemäß und kann zu Personen- oder Sachschäden führen. − Nutzen Sie das Gerät nicht unter extremen Umgebungsbedingungen. 5. Sicherheitshinweise 5.1. Elektrische Geräte nicht in Kinderhände Dieses Gerät ist nicht dafür bestimmt, durch Personen (einschließlich Kinder) mit eingeschränkten physischen, sensorischen, oder geistigen Fähigkeiten oder mangels Erfahrung und/oder mangels Wissen benutzt zu werden, es sei denn, sie werden durch eine für ihre Sicherheit zuständige Person beaufsichtigt oder erhielten von Ihnen Anweisungen, wie das Gerät zu benutzen ist. Lassen Sie Kinder niemals unbeaufsichtigt elektrische Geräte benutzen. GEFAHR! Halten Sie das Verpackungsmaterial, wie z. B. Folien von Kindern fern. Bei Missbrauch besteht Erstickungsgefahr. 103 von 166 5.2. Allgemeines • Öffnen Sie niemals das Gehäuse des Geräts (elektrischer Schlag, Kurzschluss- und Brandgefahr)! • Führen Sie keine Gegenstände durch die Schlitze und Öffnungen ins Innere des Geräts (elektrischer Schlag, Kurzschluss und Brandgefahr)! • Stellen Sie keine mit Flüssigkeit gefüllten Gefäße, wie z.B. Vasen, in die Nähe des Gerät, des Netzadapters und schützen Sie alle Teile vor Tropfund Spritzwasser. Das Gefäß kann umkippen und die Flüssigkeit kann die elektrische Sicherheit beeinträchtigen. • Ziehen Sie bei Beschädigungen des Netzadapters, der Anschlussleitung oder des Gerätes sofort den Netzadapter aus der Steckdose. • Warten Sie mit dem Anschluss des Netzadapters, wenn das Gerät von einem kalten in einen warmen Raum gebracht wird. Das dabei entstehende Kondenswasser kann unter Umständen das Gerät zerstören. Wenn das Gerät Zimmertemperatur erreicht hat, kann es gefahrlos in Betrieb genommen werden. 5.3. Aufstellort Stellen und betreiben Sie alle Komponenten auf einer stabilen, ebenen und vibrationsfreien Unterlage, um Stürze des Gerätes zu vermeiden. Setzen Sie das Gerät keinen Erschütterungen aus. Erschütterungen können der empfindlichen Elektronik schaden. Achten Sie darauf, dass keine direkten Wärmequellen (z. B. Heizungen oder starkes Kunstlicht) auf das Gerät wirken. Es dürfen keine offenen Brandquellen (z. B. brennende Kerzen) auf oder in der Nähe des Gerätes stehen. Stellen Sie keine Gegenstände auf die Kabel, da diese sonst beschädigt werden könnten. • Betreiben Sie Ihr Gerät nicht im Freien, da äußere Einflüsse wie Regen, Schnee etc. das Gerät beschädigen könnten. • Wahren Sie mindestens einen Meter Abstand von hochfrequenten und magnetischen Störquellen (Fernsehgerät, Lautsprecherboxen, Mobiltelefon usw.), um Funktionsstörungen zu vermeiden. 104 von 166 5.4. Wandmontage NL Wählen Sie für die Netzwerkkamera einen Ort, wo kein direktes Sonnenlicht einfällt oder die Bildqualität durch andere Lichtreflektionen gestört werden könnte. FR DE WARNUNG! Es besteht die Gefahr eines Stromschlags. Wählen Sie zur Montage der Geräte einen geeigneten Ort und achten Sie GNU darauf, beim Bohren keine verdeckten Elektro- oder Installationsleitungen zu beschädigen. HINWEIS! Beachten Sie bei der Installation und Ausrichtung der Kamera, dass Sie nicht gegen geltende gesetzliche Bestimmungen, insbesondere des Datenschutzes, des Hausrechts und der Beobachtung öffentlich zugänglicher Räume verstoßen. 5.5. Niemals selbst reparieren! Ziehen Sie bei Beschädigung des Netzadapters, der Anschlussleitung oder des Gerätes sofort den Netzadapter aus der Steckdose. Nehmen Sie das Gerät nicht in Betrieb, wenn Gerät oder Anschlussleitung sichtbare Schäden aufweisen oder das Gerät heruntergefallen ist. WARNUNG! Versuchen Sie auf keinen Fall, das Gerät selber zu öffnen und/oder zu reparieren. Es besteht die Gefahr des elektrischen Schlags! Wenden Sie sich im Störungsfall an das Medion Service Center oder eine andere geeignete Fachwerkstatt, um Gefährdungen zu vermeiden. 5.6. Reinigung und Pflege • Bevor Sie das Gerät reinigen, ziehen Sie unbedingt immer zuerst den Netzadapter aus der Steckdose. • Verwenden Sie für die Reinigung nur ein trockenes, weiches Tuch. Benutzen Sie keine chemischen Lösungs- und Reinigungsmittel, weil diese die Oberfläche und/oder die Beschriftungen des Geräts beschädigen können. 105 von 166 5.7. Stromversorgung Bitte beachten Sie: Auch im Standby-Modus sind Teile des Gerätes unter Spannung. Um die Stromversorgung zu Ihrem Gerät zu unterbrechen oder das Gerät gänzlich von Spannung frei zu schalten, trennen Sie das Gerät vollständig vom Netz, indem Sie den Netzadapter aus der Steckdose entfernen. • Betreiben Sie den Netzadapter nur an geerdeten Steckdosen mit AC 100-240 V~ 50/60 Hz. Wenn Sie sich der Stromversorgung am Aufstellort nicht sicher sind, fragen Sie bei Ihrem Energieversorger nach. • Verwenden Sie ausschließlich den mitgelieferten Netzadapter (DSA-12PFA-09 FEU, Hersteller DVE). Versuchen Sie nie, den Stecker des Netzadapters an andere Buchsen anzuschließen, da sonst Schäden verursacht werden können. • Wir empfehlen zur zusätzlichen Sicherheit die Verwendung eines Überspannungsschutzes, um das Gerät vor Beschädigung durch Spannungsspitzen oder Blitzschlag aus dem Stromnetz zu schützen. • Betreiben Sie das Gerät nicht bei Gewitter. Es besteht Gefahr von Schäden durch Blitzeinschlag! Trennen Sie das Gerät bei Gewitter vollständig vom Netz, indem Sie den Netzadapter aus der Steckdose entfernen • Um die Stromversorgung zu unterbrechen, ziehen Sie den Netzadapter aus der Steckdose. • Der Netzadapter muss auch nach dem Anschließen leicht erreichbar sein, damit es im Bedarfsfall oder einer Gefahrensituation schnell vom Netz getrennt werden kann. • Decken Sie den Netzadapter nicht ab, um eine Überhitzung zu vermeiden. • Fassen Sie den Netzadapter niemals mit nassen Händen an! Es besteht Stromschlaggefahr! • Verlegen Sie die Kabel so, dass niemand darauf treten oder darüber stolpern kann. 106 von 166 6. Geräteübersicht NL 6.1. Vorderseite FR DE GNU 1 2 5 3 4 1) 2) 3) 4) 5) Lichtsensor Kamera Mikrofon Typenschild (nicht dargestellt) mit MAC-Adresse, SSID-Angabe und Anmeldedaten für das Web-Interface drehbarer Kamerakopf 107 von 166 6.2. Rückseite 6 5 4 1 3 2 1) 2) 3) 4) 5) 6) WPS/Reset-Taste DC-IN-Stromnetzanschluss Audio-Ausgang LAN-Anschluss LED-Statusanzeige Antenne 108 von 166 6.3. Seitenansicht NL FR DE GNU 1 2 1) 2) Antenne (nicht abnehmbar) Gewinde für Wandhalterung 7. LED-Betriebsanzeigen LED-Zustand LED aus LED blinkt langsam grün LED blinkt schnell grün LED grün LED blinkt langsam orange LED blinkt schnell orange LED blinkt zweifarbig grün/orange Bedeutung Kamera aus oder keine Netzwerkverbindung Kamera nicht konfiguriert oder keine Verbindung über Fernzugriff Datenübertragung Netzwerkverbindung OK WPS Funktion läuft Reset wurde durchgeführt Kamera startet 109 von 166 8. Netzwerkkamera montieren Sie können die Kamera aufstellen oder mit dem mitgelieferten Zubehör an einer Wand oder Decke befestigen. Wählen Sie für die Netzwerkkamera einen Ort, wo kein direktes Sonnenlicht einfällt oder die Aufnahmequalität durch andere Lichtreflektionen gestört werden könnte. 1 7 2 3 6 5 4 Wählen Sie einen Platz in der Nähe einer Netzsteckdose. Legen Sie den Montagewinkel (3) an die Montagestelle und zeichnen Sie mit einem Stift die Bohrlöcher an. Bohren Sie an den eingezeichneten Stellen 2 passende Löcher, um die Schrauben zu befestigen. Stecken Sie die Dübel (1) in die Bohrlöcher. Verbinden Sie den Montagewinkel (3) und den Montagearm (5) über die Feststellschraube (4). Drehen Sie die Schraube fest Befestigen Sie die Netzwerkkamera an der Halterung mit der Feststellschraube (7) und drehen Sie die Feststellschraube fest. Befestigen Sie die Netzwerkkamera über die Halterung mit den zwei mitgelieferten Schrauben (2) an der Wand. 110 von 166 9. Netzadapter anschließen NL Verbinden Sie den mitgelieferten Netzadapter (DSA-12PFA-09 FEU, Hersteller DVE) mit der DC INBuchse am Gerät. Wenn Sie alle Anschlüsse vorgenommen haben, verbinden Sie den Netzadapter mit einer Steckdose (AC 100-240 V~ 50/60 Hz). Die Kamera ist zum Konfigurieren bereit, wenn die LED-Statusanzeige langsam blinkt. FR DE GNU 10. Netzwerkkamera konfigurieren Sie haben drei Möglichkeiten Ihre Netzwerkkamera zu konfigurieren: − über die Smart-App LifeViewer (siehe „10.1. Netzwerkkamera über Smart-App LifeViewer konfigurieren“ auf Seite 111) − über die WPS-Taste (siehe „10.2. Netzwerkkamera über die WPS-Taste konfigurieren“ auf Seite 116) oder − über LAN (siehe „10.3. Netzwerkkamera über LAN konfigurieren“ auf Seite 119) 10.1. Netzwerkkamera über Smart-App LifeViewer konfigurieren Laden Sie sich die App LifeViewer herunter. über Google Play bzw. den App Store HINWEIS! Um auf den Marktplatz von Android ™, Google Play, oder den Apple App Store zugreifen zu können, benötigen Sie sowohl eine Internetverbindung als auch ein Google ™ Konto bzw. eine Apple Registrierung. 10.1.1. Verbindung herstellen Verbinden Sie Ihr Smart-Gerät mit Ihrer Netzwerkkamera. Gehen Sie wie folgt vor: Rufen Sie das Menü EINSTELLUNGEN/WLAN auf Ihrem Smart-Gerät auf. Wählen Sie aus der Netzwerkliste das Netzwerk der Netzwerkkamera aus. Ihre Benennung setzt sich aus MEDION und den letzten 6 Stellen der MAC-Adresse zusammen (z. B. MEDIONC46245). Die entsprechenden Zugangsdaten finden Sie auf dem Typenschild unter dem Gerät. 111 von 166 10.1.2. Kamera in Betrieb nehmen Starten Sie die App LifeViewer. Wählen Sie die gewünschte Anwendungssprache. Tippen Sie auf den Pfeil nach rechts, um die Eingabe zu bestätigen. Abbildung ähnlich Geben Sie das Passwort der Netzwerkkamera ein. Diese Angabe finden Sie auf dem Typenschild unter dem Gerät. Tippen Sie auf den Pfeil nach rechts, um die Eingabe zu bestätigen. HINWEIS! Ändern Sie unbedingt das Passwort im nächsten Schritt, damit Unbefugte keinen Zugriff auf die Netzwerkkamera erlangen können! Abbildung ähnlich 112 von 166 Ändern Sie hier den Netzwerkkameranamen sowie das Passwort. Tippen Sie auf den Pfeil nach rechts, um die Eingabe zu bestätigen. NL FR DE GNU Abbildung ähnlich Die Netzwerkkamera sucht nach verfügbaren Netzwerken. Warten Sie bis die Netzwerke angezeigt werden. Abbildung ähnlich 113 von 166 Die verfügbaren Netzwerke werden angezeigt. Wählen Sie Ihr Heimnetzwerk aus. Tippen Sie auf den Pfeil nach rechts, um die Auswahl zu bestätigen. Abbildung ähnlich Geben Sie das Verschlüsselungspasswort für Ihr Heimnetzwerk ein. Tippen Sie auf den Pfeil nach rechts, um die Eingabe zu bestätigen. Abbildung ähnlich 114 von 166 Das Gerät nimmt folgende Einstellungen vor: − Einstellungen (Netzwerkname/ Passwort) werden gespeichert − Verbindung zum Router (Heimnetzwerk) wird aufgebaut − Verbindung per Fernzugriff wird überprüft/hergestellt. Abbildung ähnlich Die Konfiguration war erfolgreich. Abbildung ähnlich Prüfen Sie in den EINSTELLUNGEN/WLAN Ihres Smart-Geräts, ob es jetzt mit Ihrem Heimnetzwerk verbunden ist und kehren Sie zu der App zurück. 115 von 166 NL FR DE GNU Bei erfolgreicher Konfiguration wird das Kamera-Live-Bild angezeigt. Abbildung ähnlich Jetzt ist Ihre Netzwerkkamera eingerichtet. Sie ist mit der App LifeViewer über Ihr Smart-Gerät weltweit per Internet steuerbar. 10.2. Netzwerkkamera über die WPS-Taste konfigurieren HINWEIS! Diese Verbindungsmethode setzt voraus, dass sowohl der Router als auch die Kamera über eine WPS-Taste verfügen. Drücken und halten Sie die WPS-Taste an der Netzwerkkamera für ca. 2-3 Sekunden, bis Status-LED langsam orange blinkt. Drücken Sie die WPS-Taste an Ihrem Router innerhalb von 120 Sekunden. Bei erfolgreicher Verbindung zwischen der Netzwerkkamera und dem Router leuchtet die Status-LED dauerhaft grün. Um die Netzwerkkamera über Ihr Smart-Gerät bedienen zu können, stellen Sie sicher, dass Ihr Router mit dem Smart-Gerät verbunden ist. Laden Sie sich die App LifeViewer über Google Play bzw. den App Store herunter. HINWEIS! Um auf den Marktplatz von Android ™, Google Play, oder den Apple App Store zugreifen zu können, benötigen Sie sowohl eine Internetverbindung als auch ein Google ™ Konto bzw. eine Apple Registrierung. 116 von 166 Wählen Sie die gewünschte Anwendungssprache. Tippen Sie auf den Pfeil nach rechts, um die Eingabe zu bestätigen. NL FR DE GNU Abbildung ähnlich Die im Netzwerk gefundenen Netzwerkkameras werden angezeigt. Abbildung ähnlich 117 von 166 Bei erfolgreicher Konfiguration wird das Kamera-Live-Bild angezeigt. HINWEIS! In der oberen Zeile erscheint neben dem Benutzersymbol die Anzahl der an der Netzwerkkamera angemeldeten Benutzer. Sie können den Verlauf der Anmeldung von Benutzern auch im Systemprotokoll nachsehen (Siehe „Systemprotokoll“ auf Seite 135) Abbildung ähnlich Jetzt ist Ihre Netzwerkkamera eingerichtet. Sie ist mit der App LifeViewer über Ihr Smart-Gerät weltweit per Internet steuerbar. 118 von 166 10.3. Netzwerkkamera über LAN konfigurieren NL Verbinden Sie den L A N -Port am Gerät über das mitgelieferte RJ45 -Netzwerkkabel mit einer Netzwerkschnittstelle (z. B. einen Router). Legen Sie die mitgelieferte Installations-CD in Ihr CDRom-Laufwerk Ihres PCs oder Notebooks (mit Microsoft® Windows® 8.1, Windows® 7 SP1 oder Windows Vista) ein. Installieren Sie den Finder . Befolgen Sie dabei die Anweisungen des Installationsassistenten. FR DE GNU Nach erfolgreicher Installation wird das Symbol auf dem Desktop angezeigt. Starten Sie das Programm mit einem Doppelklick auf das Symbol. Das Programm wird geöffnet und es werden die verfügbaren Netzwerkkameras angezeigt. Abbildung ähnlich Wählen Sie die gewünschte Netzwerkkamera aus. 119 von 166 Klicken Sie dann auf das Symbol . Das Fenster LOGIN wird geöffnet. Tragen Sie das Passwort 1234 ein und bestätigen Sie mit OK. HINWEIS! Ändern Sie unbedingt das Passwort, damit Unbefugte keinen Zugriff auf die Netzwerkkamera erlangen können! Siehe unter „Benutzer“ auf Seite 124. Das Fenster ADMIN wird geöffnet. Klicken Sie auf ERWEITERT, um die Kamera zu konfigurieren. Das Konfigurationsprogramm Live View der Netzwerkkamera wird im Browser geöffnet. Abbildung ähnlich Klicken Sie auf den Link DOWNLOAD ACTIVEX. Klicken Sie auf die Schaltfläche AUSFÜHREN. ActiveX wird installiert und Sie können anschließend die Konfiguration der Netzwerkkamera fortführen. Klicken Sie auf den Menüpunkt SETUP, um die Netzwerkkamera einzustellen. 10.3.1. Basic Unter BASIC nehmen Sie grundlegende Einstellungen für das Netzwerk vor, in dem die Netzwerkkamera eingebunden werden soll. Netzwerk In dem Menü NETZWERK finden Sie die aktuell eingestellten lokalen Netzwerkeinstellungen. Die Daten werden automatisch von der Netzwerkkamera ausgelesen. 120 von 166 NL FR DE GNU Abbildung ähnlich NETZWERKTYP IP-ADRESSE SUBNETZMASKE GATEWAY PRIMÄRER DNS DHCP Der Netzwerkkamera wird automatisch eine IP-Adresse von Ihrem Router zugewiesen. Statische IP Weisen Sie der Netzwerkkamera manuell eine IP-Adresse zu. Tragen Sie eine IP-Adresse für die Netzwerkkamera ein. Tragen Sie die Subnetzmaske der IP-Adresse ein. Tragen Sie die Gateway-Adresse Ihres Netzwerks ein. Tragen Sie die IP-Adresse Ihres primären DNS-Servers ein. SEKUNDÄRER Tragen Sie die IP-Adresse Ihres sekundären DNS-Servers DNS ein. HTTP-PORT Standardmäßig ist der Port 80 festgelegt. Sie können die HTTP-Port-Nr. ändern (1024 bis 65535). Drahtlos Stellen Sie sicher, dass eine WLAN-Verbindung besteht. Standardmäßig ist die Kamera bereits WLAN-fähig eingestellt. 121 von 166 Abbildung ähnlich Klicken Sie auf das Optionsfeld AKTIVIEREN. Klicken Sie unter VERFÜGBARES NETZWERK auf die Schaltfläche AKTUALISIEREN. Wählen Sie Ihr Netzwerk aus. Geben Sie unter WPA PRE-SHARED-KEY Ihr WLAN-Passwort ein. Klicken Sie die Schaltfläche EINSTELLUNGEN SPEICHERN, um die Einstellungen zu sichern. WPS Durch die WPS-Funktion haben Sie die Möglichkeit schnell kompatible Geräte miteinander kabellos zu verbinden. Gehen Sie wie folgt vor: Klicken Sie unter AUF PBC-MODUS ZUGREIFEN auf die Schaltfläche PBC STARTEN. Geben Sie unter PER PINCODE KONFIGURIEREN die SSID des Routers ein. Klicken Sie die Schaltfläche START-PIN und geben dann den PIN-Code der Netzwerkkamera ein und aktivieren Sie den WPS-Pin des Routers. Bei erfolgreicher Verbindung zwischen der Netzwerkkamera und dem Router leuchtet die Status-LED dauerhaft grün. RTSP In dem Menü RTSP finden Sie die aktuellen Einstellungen zum Real Time Streaming-Protokoll. Die Daten werden automatisch von der Netzwerkkamera ausgelesen. Falls Sie die Daten ändern möchten, gehen Sie wie folgt vor: 122 von 166 NL FR DE Abbildung ähnlich Geben Sie den RTSP-PORT ein. Tragen Sie den MJPEG RTSP-PFAD ein. Tragen Sie den RTSP-PORTBEREICH ein. Wählen Sie aus dem Aufklappmenü ÜBERPRÜFUNG den Überprüfungstyp KONTO oder ANONYM aus. Klicken Sie auf die Schaltfläche EINSTELLUNGEN SPEICHERN, um Ihre Angaben zu sichern. Datum und Uhrzeit Über das Menü DATUM UND UHRZEIT stellen Sie das aktuelle Datum und Uhrzeit ein. Datum und Uhrzeit sollten festgelegt werden, damit Ereignisse ggf. genau nachvollzogen werden können. Abbildung ähnlich MODUS ZEIT UND DATUM MANUELL FESTLEGEN Klicken Sie auf das Optionsfeld NTP (NETWORK TIME PROTOCOL) Zeit und Datum werden über einen NTP-Server im lokalen Netzwerk (falls verfügbar) automatisch eingestellt. oder Klicken Sie auf das Optionsfeld MANUELLE EINSTELLUNG, um das Datum/die Uhrzeit selbst einzustellen. Geben Sie die aktuelle Uhrzeit und das Datum in folgendem Format ein: JJJJ/MM/TT (Jahr/Monat/Tag) und HH:MM:SS (Stunde/Minute/Sekunde) 123 von 166 GNU AUF PC-ZEIT Klicken Sie die Schaltfläche, um automatisch Uhrzeit SYNCHRONISIEund Datum mit der Einstellung Ihres Computers abzuREN gleichen. NTP-SERVER Wenn Sie den NTP-Modus gewählt haben, tragen Sie den Hostnamen bzw. die IP-Adresse des NTP-Servers ein. ZEITZONE Wählen Sie im Aufklappmenü die Zeitzone aus. SOMMERZEIT Klicken Sie das Optionsfeld AKTIVIEREN oder DEAKTIVIEREN, wenn Sie das automatische Umstellen auf Sommerzeit ein- oder ausschalten möchten. Benutzer Sie können verschiedene Benutzerkonten für den Zugriff auf die Netzwerkkamera einrichten. Es gibt die Möglichkeit, den Kamerazugriff als Gast oder als Bediener zuzulassen. Der Gast kann nur das Kamerabild sehen, der Bediener hat die vollen Zugriffsrechte, er kann also auch Einstellungen vornehmen. Abbildung ähnlich BENUTZERLISTE BENUTZERNAME KENNWORT KENNWORT BESTÄTIGEN Liste von bereits angemeldeten Nutzern. Tragen Sie den Namen eines neuen Benutzers ein. Tragen Sie ein Passwort für den neuen Benutzer ein. BERECHTIGUNG Vergeben Sie die Zugriffsrechte, indem Sie das Optionsfeld BEDIENER oder GAST auswählen. Wiederholen Sie das Passwort. Klicken Sie auf die Schaltfläche HINZUFÜGEN, um einen neuen Benutzer anzumelden, auf die Schaltfläche ÄNDERN, um das Benutzerprofil zu ändern oder auf ENTFERNEN, um einen Benutzer zu löschen. 124 von 166 ANONYME ANMELDUNG Klicken Sie das Optionsfeld AKTIVIEREN oder DEAKTIVIEREN, um eine anonyme Anmeldung zuzulassen. Die anonyme Anmeldung erlaubt es jedem im Netzwerk, sich die Kamerabilder anzusehen. NL FR DE Schließen Sie die Eingabe durch Klicken auf die Schaltfläche EINSTELLUNGEN SPEICHERN. GNU UPnP Standardmäßig ist UPnP (universal plug and play) aktiviert, so dass Ihr Computer automatisch eine Netzwerkkamera im lokalen Netzwerk erkennen kann. Abbildung ähnlich Bonjour Bonjour ist eine von Apple Geräten verwendete Technik, die die automatische Erkennung von Netzwerkdiensten bzw. Medieninhalten in IP-Netzen bereitstellt. Klicken Sie das Optionsfeld AKTIVIEREN oder das Optionsfeld DEAKTIVIEREN, um den Dienst ein- bzw. auszuschalten. Abbildung ähnlich 10.3.2. Video Unter Video nehmen Sie Einstellungen vor, die u.a. die Aufnahmequalität der Netzwerkkamera betreffen. Videoeinstellungen In den VIDEOEINSTELLUNGEN können Sie nach Bedarf die Videoaufnahmeeinstellungen ändern. 125 von 166 Abbildung ähnlich AUFLÖSUNG QUALITÄT MAXIMALE FRAMERATE BILDDREHEN Wählen Sie im Aufklappmenü die gewünschte Auflösung (VGA 640 X480 oder QVGA 320X240). Je höher die Auflösung gewählt wird, desto klarer ist das Videobild, es erfordert jedoch eine höhere Bandbreite. Wählen Sie im Aufklappmenü zwischen HÖCHSTE/ HOCH/NORMAL/NIEDRIG/NIEDRIGSTE für die Bildqualität. Wählen Sie im Aufklappmenü zwischen 30, 20, 15, 10, 5 für eine maximale Bildrate. Je höher die Bildrate gewählt wird, desto flüssiger ist das Videobild, es erfordert jedoch eine höhere Bandbreite. Bei Deckeninstallation der Netzwerkkamera wählen Sie 180°, um das Überwachungsvideo korrekt zu sehen. Bestätigen Sie die Einstellungen durch Klicken auf die Schaltfläche EINSTELLUNGEN SPEICHERN. Aussehen des Bildes Sie können unter AUSSSEHEN DES BILDES verschiedene Bildeinstellungen vornehmen. Abbildung ähnlich Tragen Sie entweder einen Zahlenwert ein oder verwenden Sie die Schiebe126 von 166 regler, um die Werte für HELLIGKEIT, KONTRAST, SÄTTIGUNG und SCHÄRFE zu ändern. Klicken Sie auf die Schaltfläche WERT SPEICHERN, um die vorgenommenen Änderungen zu speichern. Durch Klicken auf die Schaltfläche AUF STANDARD ZURÜCKSETZEN, werden die Werte zurückgesetzt. NL FR DE Nachtsicht Bei dem AUTO SWITCH handelt es sich um einen Schalter, der bei geringen Lichtverhältnissen die Netzwerkkamera auf Nachtsicht schaltet. Abbildung ähnlich Klicken Sie auf das Optionsfeld AKTIVIEREN, um den Auto Switch einzuschalten oder auf das Optionsfeld DEAKTIVEREN, um ihn auszuschalten. 10.3.3. Ereignisse Unter EREIGNISSE können Einstellungen wie Bewegungserkennung, Erkennungsbereich, Zeitplanung sowie die Übersendung von Ereignismeldungen eingestellt werden. Bewegungserkennung Schalten Sie die Bewegungserkennung der Netzwerkkamera ein, indem Sie das Optionsfeld AKTIVIEREN klicken. Sie ist ausgeschaltet, wenn das Optionsfeld DEAKTIVIEREN angeklickt wurde. Abbildung ähnlich Wählen Sie über das Aufklappmenü das Zeitintervall bis zur Erkennung einer Bewegung: 1, 3, 4, 10, 15, 20, 30, 45 oder 60 SEKUNDEN. 127 von 166 GNU HINWEIS Für die Erkennung leichter Bewegungen sollte ein kurzes Zeitinvall eingestellt werden, bei größeren Zeitabständen werden leichte Bewegungen nicht wahrgenommen. Klicken Sie auf das Optionsfeld AKTIVIEREN oder DEAKTIVIEREN, um das Übersenden von Ereignismeldungen unter EREIGNISDATEI AUF FTP HOCHLADEN bzw. EREIGNISDATEI AN E-MAIL SENDEN ein- bzw. auszuschalten. Bei aktivierter Bewegungserkennung wird ein Standbild bei auslösender Bewegung an den angegebenen Empänger versendet. HINWEIS Weitere Einstellungen zum Übersenden von Ereignismeldungen werden unter SMTP und FTP vorgenommen. Erkennungsbereich Sie können bis zu drei bewegungsempfindliche Bereiche einstellen. Die nicht markierten Bereiche werden ignoriert, um eventuelle Fehlalarme zu vermeiden. Abbildung ähnlich Aktivieren Sie den gewünschten BEREICH 1, 2 oder 3 durch Anklicken des Kontrollkästchens. Klicken Sie das farblich entsprechend gekennzeichnete Feld an und verschieben sie es auf den Bildbereich, der bewegungsempfindlich überwacht werden soll. Vergrößern oder verkleinern Sie durch Klicken und Ziehen auf den Eckpunkten 128 von 166 des Feldes den Bildbereich. Stellen Sie durch horizontales Verschieben der Regler die Empfindlichkeit und den Schwellenwert, wann die Netzwerkkamera auslösen soll, ein. EMPFINDLICHKEIT 10 bis 100 SCHWELLE 0 bis 100 Je höher der Wert gewählt wird, desto empfindlicher reagiert die Netzwerkkamera auch auf kleine Bewegungen. Je höher der Wert gewählt wird, desto größer sind die Objekte, die eine Bewegungsmeldung auslösen. Klicken Sie auf die Schaltfläche SPEICHERN, um Ihre Einstellungen zu sichern. Zeitplaneinstellungen Sie können die Netzwerkkamera so einstellen, dass die Bewegungserkennung zu bestimmten Zeiten automatisch ein- bzw. ausgeschaltet wird. Abbildung ähnlich Für eine permanente Bewegungsüberwachung klicken Sie die Schaltfläche ALLE AUSWÄHLEN. Um bestimmte Zeiten einzustellen, klicken Sie an die Stelle des Zeitstrahls eines bestimmten Tages, wo die Bewegungserkennung eingeschaltet werden soll und ziehen Sie bis zu der Uhrzeit, an der sie ausgeschaltet werden soll. Um die Einschaltzeit zu verändern, klicken Sie den gewünschten Zeitraum an, verschieben Sie ihn dann nach rechts oder links. Der aktive Zeitraum wird hellblau hinterlegt dargestellt, ein markierter Zeitraum dunkelblau. Klicken Sie auf die Schaltfläche SPEICHERN, um Ihre Einstellungen zu sichern. 129 von 166 NL FR DE GNU Löschen Sie einen Zeitraum, indem Sie ihn zunächst markieren und dann die Schaltfläche LÖSCHEN anklicken. Durch Anklicken der Schaltfläche ALLES LÖSCHEN werden alle Zeitintervalle gelöscht. Klicken Sie auf die Schaltfläche SPEICHERN, um Ihre Einstellungen zu sichern. SMTP Sie können das Ereignis-Standbild an eine bestimmte E-Mail-Adresse senden. Aktivieren Sie die Bewegungserkennung unter EREIGNISSE. Abbildung ähnlich Wählen Sie im Aufklappmenü Ihren Provider aus oder nehmen Sie die Einstellung manuell vor. Tragen Sie bei SMTP-SERVER den Host-Namen bzw. die IP-Adresse des SMTP der E-Mail-Adresse ein. Tragen Sie die SMTP-Portnummer ein (meistens Port 25, verschlüsselt Port 465, ggf. Informationen vom E-Mail-Provider anfordern). Tragen Sie die E-Mail-Adresse des Empfängers und des Absenders ein. Wählen Sie die SMTP-Verschlüsselung SSL,TLS oder KEINE. Wählen Sie AKTIVIEREN, wenn Ihr SMTP-Server Authentifizierung erfordert (ggf. Informationen vom E-Mail-Provider anfordern). Bei geforderter Authentifizierung geben Sie den SMTP-Kontonamen an. Tragen Sie Ihr Passwort für die Authentifizierung ein. Überprüfen Sie, ob die Einrichtung erfolgreich war, indem Sie an die angegebene E-Mail-Adresse eine TEST-E-MAIL ABSENDEN. Klicken Sie auf die Schaltfläche EINSTELLUNGEN SPEICHERN, um Ihre Einstellungen zu sichern. FTP Sie können das Ereignis-Standbild an einen bestimmten FTP-Server senden. Aktivieren Sie die Bewegungserkennung unter EREIGNISSE. 130 von 166 NL FR DE GNU Abbildung ähnlich Tragen Sie bei FTP-SERVER den Host-Namen bzw. die IP-Adresse des FTPServers ein. Tragen Sie bei BENUTZERNAMEN den Benutzername für den FTP-Server ein. Geben Sie Ihr PASSWORT für den FTP-Server ein. Tragen Sie den PORT des FTP-Servers ein. Standardmäßig ist der Port 21 eingetragen. Geben Sie bei PFAD den gewünschten Speicherort auf dem FTP-Server an, in dem die Standbilder gespeichert werden sollen. AKTIVIEREN oder DEAKTIVIEREN Sie durch Anklicken des jeweiligen Optionsfelds den passiven Modus des FTP-Servers. Überprüfen Sie, ob die Einrichtung erfolgreich war, indem Sie an den angegebenen FTP-Server eine TEST-DATEI ABSENDEN. Klicken Sie auf die Schaltfläche EINSTELLUNGEN SPEICHERN, um Ihre Einstellungen zu sichern. 10.3.4. Neigen und schwenken Sie können die Neige- und Schwenkfähigkeit sowie bestimmte Startpositionen nach Ihren Anforderungen einstellen. Neige-/Schwenkeinstellungen Abbildung ähnlich Wählen Sie im Ausklappmenü die SCHWENK-/NEIGEGESCHWINDIGKEIT 1 (langsam), 2 oder 3 (schnell) der Netzwerkkamera. Sie stellt die Geschwindigkeit beim Verwenden der Pfeiltasten im Live View dar. Wählen Sie im Ausklappmenü den SCHWENK-/NEIGEABSTAND 1 (kleiner Abstand), 2 oder 3 (großer Abstand) der Netzwerkkamera. Er stellt die Be131 von 166 wegungsstrecke beim Verwenden der Pfeiltasten im Live View dar. AKTIVIEREN oder DEAKTIVIEREN Sie durch Anklicken des jeweiligen Optionsfelds eine AUTOMATISCHE KALIBRIERUNG. Bei der automatischen Kalibrierung führt die Netzwerkkamera zum Selbsttest eine Schwenkbewegung aus. Bei aktivierter automatischer Kalibrierung geben Sie einen Zeitpunkt für den Kalibrierungsvorgang an. Klicken Sie die Schaltfläche MANUELLE KALIBRIERUNG, wenn Sie den Kameratest selbst auslösen möchten. Klicken Sie auf die Schaltfläche EINSTELLUNGEN SPEICHERN, um Ihre Einstellungen zu sichern. Voreinstellung Sie können vier Aufnahmepositionen einstellen, die Sie am häufigsten abrufen möchten. Sie sind einfach im Live View aufrufbar und ein manuelles Einstellen der Aufnahmepositionen ist nicht notwendig. Abbildung ähnlich Wählen Sie bei POSITIONZAHL EINSTELLEN im Aufklappmenü eine Position (1–4) aus. Die aktuelle Aufnahmeposition wird im Bild dargestellt. Klicken Sie auf die Pfeilschaltflächen um die Aufnahmeposition zu verändern. Klicken Sie auf POSITIONSDATEN SPEICHERN, um die Einstellung zu sichern. oder Klicken Sie auf EINSTELLUNGEN LÖSCHEN, um die Einstellung zu löschen. Durch Klicken auf die Schaltfläche ERSTE POSITION FESTLEGEN, stellt sich die Netzwerkkamera auf Ihre Startposition zurück. 132 von 166 Startposition NL FR DE GNU Abbildung ähnlich Wählen Sie von den vier zuvor eingestellten Aufnahmepositionen die Position aus, die Sie als STARTPOSITION verwenden möchten. Klicken Sie auf die Schaltfläche EINSTELLUNGEN SPEICHERN, um Ihre Einstellungen zu sichern. 10.3.5. System Im Menü SYSTEM haben Sie die Möglichkeit, Ihre Netzwerkkamera umzubenennen, ein Systemupdate durchzuführen, Einstellungen zu sichern/wiederherzustellen und ein Reset/Neustart der Netzwerkkamera auszuführen. Basic Abbildung ähnlich Tragen Sie bei NETZWERKKAMERA NAME einen Namen für die Netzwerkkamera ein. Geben Sie bei ADMINISTRATOR PASSWORT ein Passwort ein. Wiederholen Sie das Passwort bei PASSWORT BESTÄTIGEN. Schalten Sie die LED-ANZEIGE an der Netzwerkkamera EIN oder AUS, indem Sie das jeweilige Optionsfeld anklicken. Bei ausgeschalteter LED-Anzeige kann ein Außenstehender nicht erkennen, ob die Netzwerkkamera ein- oder ausgeschaltet ist. 133 von 166 Erweitert Unter ERWEITERT können Sie ein Update der Firmware durchführen, Einstellungen der Netzwerkkamera speichern und wiederherstellen sowie auf Werkseinstellungen zurücksetzen. Abbildung ähnlich Firmware Update Geben Sie einen Pfad zur Firmware-Datei an. Klicken Sie auf die Schaltfläche UPDATE FIRMWARE, um die angegebene Datei auszuführen. Backup/Restore Einstellungen Klicken Sie bei BACKUP EINSTELLUNGEN auf die Schaltfläche ANWENDEN, um Ihre Einstellungen zu sichern. Die Datei config.bin wird generiert. Speichern Sie die Datei auf Ihrem Computer. Einstellungen wiederherstellen Geben Sie den Pfad zur Backup-Datei (config.bin) an. Klicken Sie auf die Schaltfläche WIEDERHERSTELLEN, um die angegebene Datei auszuführen und die Einstellungen wiederherzustellen. Reset Netzwerkkamera neu starten Klicken Sie auf die Schaltfläche NETZWERKKAMERA NEUSTARTEN. Die Kamera startet neu. Der Vorgang kann einige Minuten in Anspruch nehmen. Netzwerkkamera zurücksetzen Wählen Sie bevor Sie die Netzwerkkamera zurücksetzen entweder das Optionsfeld NETZWERKEINSTELLUNGEN BEIBEHALTEN oder STANDARDEINSTELLUNGEN LADEN aus. Wenn Sie NETZWERKEINSTELLUNGEN BEIBEHALTEN ausgewählt haben, behält die Netzwerkkamera beim Zurücksetzen ihre IP-Adresse. 134 von 166 Wenn Sie STANDARDEINSTELLUNGEN LADEN ausgewählt haben, werden alle Einstellungen der Netzwerkkamera auf Werkseinstellungen zurückgesetzt. Klicken Sie auf die Schaltfläche STANDARDEINSTELLUNGEN LADEN, um den Reset-Vorgang zu starten. Der Vorgang kann einige Minuten in Anspruch nehmen. NL FR DE 10.3.6. Status Systeminformationen Unter Systeminformationen können Sie Statusinformationen Ihrer Netzwerkkamera für eine evtl. Fehlersuche oder Netzwerkkonfiguration ablesen. Folgende Informationen stehen zur Verfügung: − System − LAN − Wireless LAN − IGD (UPnP-Portweiterleitung) Systemprotokoll Das Systemprotokoll stellt die Nutzungsinformationen der Netzwerkkamera dar. Abbildung ähnlich Sie können das Protokoll auf einem Remote-Server speichern. Wählen Sie eine PROTOKOLLEBENE aus. 0 (EINFACH) protokolliert nur die wichtigsten Netzwerkkamera-Ereignisse, 4 (DETAIL) nimmt alle Ereignisse auf. Die Ereignisse werden in dem Textfeld dargestellt. AKTIVIEREN Sie das Remote-Protokoll, wenn Sie das Systemprotokoll auf einem Remote-Server speichern möchten. 135 von 166 GNU HINWEIS! Die Netzwerkkamera unterstützt Syslog-Protokollserver Tragen Sie bei REMOTE-PROTOKOLL-SERVER den Host-Namen bzw. die IP-Adresse des Servers ein. Klicken Sie auf die Schaltfläche EINSTELLUNGEN SPEICHERN, um die Eingaben zu sichern. 10.3.7. IP Modus Dynamic DDNS HINWEIS! Standardmäßig ist der Dienst Dynamic DDNS deaktiviert. Wenn Sie jedoch die Datenübertragung über einen DDNS-Dienst von Drittanbieten verwenden möchten, gehen Sie wie im Folgenden am Beispiel einer Fritzbox und dem kostenlosen Anbieter no-ip.biz beschrieben vor. Heimanwender und Privathaushalte erhalten üblicherweise über einen Internetprovider den Zugang ins Internet. Der Internetprovider vergibt dazu Ihrem Router bei der Einwahl aus seinem Adress-Pool eine IP-Adresse (z.B.: 80.139.140.223). Diese IP-Adresse wird jedoch bei jeder Neueinwahl ins Internet oder spätestens nach 24 Stunden neu vergeben. Um den Router aus dem Internet dauerhaft erreichen zu können, benötigen Sie also eine feste IP-Adresse. Sogenannte DynDNS-Anbieter weisen die wechselnden IP-Adressen Ihres Internetproviders einer festen Internetadresse mit Namensauflösung zu (Wie im Beispiel: http://meinekamera.no-ip.biz). Ihre Netzwerkkamera ist somit immer unter der gleichen Webadresse (http://meinekamera.no-ip.biz) erreichbar, obwohl ihr Router eine wechselnde IP-Adresse vom Internetprovider erhält. Dafür wird die jeweils aktuelle IP-Adresse des Routers von einem DynDNS-Client (meistens im Router oder auch auf der Netzwerkkamera installiert) an den entsprechenden DynDNS-Anbieter übermitelt. DynDNS-Dienst installieren und einrichten 1. Richten Sie ein Benutzerkonto (Account) bei einem DynDNS-Anbieter ein (im Beispiel www.no-ip.biz), die meisten DynDNS-Anbieter bieten hierfür kostenlose Benutzerkonten an. In dem hier aufgezeigten Beispiel richten Sie beim DynDNS-Anbieter www.no-ip.biz ein Account mit den folgenden Daten ein: Hostname: meinekamera.no-ip.biz Benutzer: meinekamera Passwort: ****** 136 von 166 HINWEIS! Der Adressenname „meinekamera“ ist frei wählbar, vorausgesetzt er ist noch nicht vergeben. Die Adresserweiterung „no-ip.biz“ wird vom DNSDienst fest vergeben. Abgesichert wird der Account mit einem BenutzerPasswort. 2. Der Name, über den die Netzwerkkamera erreichbar sein wird, muss im Router zuhause eingegeben werden, alternativ, falls der Router diese Funktion nicht bietet, kann dies auch über die Oberfläche Live View der Netzwerkkamera geschehen. Die technisch zuverlässigere Variante stellt jedoch die Eingabe im Router dar. Im Beispiel wird hier die Einrichtung bei einer Fritz-Box abgebildet: Abbildung ähnlich Sollte Ihr Router nicht die Möglichkeit bieten, einen DynDNS-Client zu aktivieren, kann der DynDNS-Client auch über das Setup des Live View aktiviert werden. Die Einrichtung des DynDNS-Clients wird unter IP-Modus/Dynamic DDNS vorgenommen: Abbildung ähnlich Hier werden der − DynDNS Provider 137 von 166 NL FR DE GNU − der Hostname − Benutzername − das Passwort eingetragen und der Client aktiviert. Der Client liest die Internet IP-Adresse des Routers aus, sendet diese an den DynDNS Anbieter und dieser ordnet sie dem Account und der eingerichteten Internetadresse zu (im Beispiel: meinekamera.no-ip.biz). Damit ist der Router bei der Eingabe der Internetadresse (im Beispiel: meinekamera.no-ip.biz) in einen beliebigen Browser aus dem Internet erreichbar. 3. Im Router muss eine Portweiterleitung eingerichtet werden. Da der Router die entsprechenden DynDNS-Dienste der Netzwerkkamera nicht anbietet, muss der Router so konfiguriert werden, dass er die Anfragen aus dem Internet an die Netzwerkkamera weiterleitet. Diese Einrichtung nennt man Portweiterleitung (Portfreigaben). Die Einstellung der Portfreigabe ist je nach Router unterschiedlich und muss der jeweiligen Router Bedienungsanleitung entnommen werden. Hier wird als Beispiel die Oberfläche der Fritz Box abgebildet: Abbildung ähnlich Damit die Netzwerkkamera antworten kann, müssen Ihm vom Router die Anfragen auf die vorzugsweise feste interne IP-Adresse (im Beispiel 192.168.178.32) der Netzwerkkamera weitergeleitet werden und zwar für die Internet Protokolle: http (Netzwerkkamera Benutzeroberfläche Live View): Port 80; tcp Erst wenn die Portweiterleitung am Router korrekt eingerichtet ist, ist die Netzwerkkamera aus dem Internet unter dem Namen: http://meinekamera.no-ip.biz erreichbar. HINWEIS! Bei allen beschriebenen DynDNS-Anbietern und Konten handelt es sich um Beispiele! Bitte beachten Sie, dass es sowohl kostenfreie als auch kostenpflichtige Anbieter auf dem Markt gibt und dass auch bei einem kostenfreien DynDNS-Konto, je nach technischen Details und Erweiterungen gegebenenfalls weitere Kosten anfallen können. Fernzugriff Dieser Dienst erlaubt den Fernzugriff auf die Daten der Netzwerkkamera über einen Server. Standardmäßig ist der Fernzugriff-Dienst aktiviert, um eine schnelle und ein138 von 166 fache Netzwerkkamerakonfiguration über z.B. Smartgeräte zu ermöglichen. AKTIVIEREN oder DEAKTIVIEREN Sie den Fernzugriff-Dienst und klicken Sie auf die Schaltfläche EINSTELLUNGEN SPEICHERN, um Ihre Auswahl zu bestätigen. NL FR DE GNU Abbildung ähnlich AP Direct-Modus Wenn die Netzwerkkamera neu eingerichtet wird bzw. noch mit keinem verfügbaren Netzwerk verbunden ist, schaltet sie sich in den AP-Modus. Im AP-Modus funktioniert die Netzwerkkamera als Access-Point. Standardmäßig ist die Funkverbindung bereits aktiviert. Unter FUNKVERBINDUNG können Sie diese Funktion AKTIVIEREN oder DEAKTIVIEREN. Abbildung ähnlich Klicken Sie auf das Optionsfeld AKTIVIEREN. Geben Sie unter SSID den Netzwerkkameranamen, den Sie vergeben haben, ein. Geben Sie unter WPA PRE-SHARED-KEY Ihr WLAN-Passwort ein. Klicken Sie die Schaltfläche EINSTELLUNGEN SPEICHERN, um die Einstellungen zu sichern. 139 von 166 11. Kamera bedienen Nachdem Sie die Kamera mit Ihrem Smartgerät oder über Ihren Computer konfiguriert haben, überprüfen Sie das empfangene Kamerabild. Stellen Sie ggf. die Bildschärfe durch vorsichtiges Drehen der Kameralinse ein. Der Rand der Linse weist eine Riffelung auf, damit Sie die Linse mit dem Fingernagel drehen können. 11.1. Kamera über Smart-App LifeViewer bedienen Ihre Netzwerkkamera ist eingerichtet. Sie ist mit der App LifeViewer über Ihr SmartGerät weltweit per Internet steuerbar. HINWEIS Beim Fernzugriff auf die Netzwerkkameradaten über Ihr Smartgerät ist die Übertragungszeit auf 90 Sekunden beschränkt, um u. U. entstehende Kosten zu vermeiden. Nach Ablauf der Zeit können Sie jedoch die Verbindung wiederherstellen, in dem Sie auf die Schaltfläche tippen. Das Live-Bild wird geladen. HINWEIS Die Audiowiedergabe-Funktion ist ausschließlich im Heimnetzwerk verfügbar. 11.1.1. Menü Live Tippen Sie auf die Schaltfläche , um das Live-Bild anzuzeigen. HINWEIS Wenn Sie mehrere Netzwerkkameras angemeldet haben, können Sie durch Wischen über den Bildschirm zu den verschiedenen Kameras wechseln. In der Live-Bild-Anzeige stehen Ihnen folgende Funktionen zur Verfügung: Tippen Sie auf die Schaltfläche , um das Menü KAMERAS zu öffnen, um Kamera-Einstellungen vorzunehmen. , um ein Standbild zu erstellen. Das Standbild Tippen Sie auf die Schaltfläche können Sie sich im Menü EREIGNISSE ansehen. Tippen Sie auf die Schaltfläche , um die Neigen/Schwenken Funktion zu aktivieren. Durch Wischen auf dem Live-Bild kann nun der Kamerakopf bewegt werden. Die Funktion wird mit einem Symbol in der Symbolleiste angezeigt. Pfeile zeigen bei Bewegung die Richtung an. Durch erneutes Tippen auf die Schaltfläche wird die Funktion beendet. Tippen Sie auf die Schaltfläche zuschalten. 140 von 166 , um den Lautsprecher ein- bzw. wieder aus- Tippen Sie auf die Schaltfläche schalten. , um das Mikrofon ein- bzw. wieder auszu- NL FR Verwendete Status-Symbole in der Live-Bild-Anzeige DE Oben links befindet sich die Statusleiste. Bei aktiven Funktionen werden folgende Symbole angezeigt: Verbindung mit WLAN-Netzwerk GNU Verbindung über Fernzugriff Anzahl angemeldeter Benutzer Neigen-/Schwenken-Modus aktiv Lautsprecher ist eingeschaltet Mikrofon ist eingeschaltet 11.1.2. Menü Ereignisse Tippen Sie auf die Schaltfläche EREIGNISSE , um die eingebundenen Kameras aufzurufen. Wählen Sie die gewünschte Netzwerkkamera durch Tippen auf ihren Namen aus. Jetzt können Sie die Ereignisbilder mit ihren Aufnahmedaten ansehen. 11.1.3. Menü Kameras Tippen Sie auf die Schaltfläche KAMERAS , um Kameraeinstellungen vorzunehmen. Wählen Sie aus der Liste KAMERAS die gewünschte Netzwerkkamera durch Tippen auf ihren Namen aus. oder Tippen Sie auf NEUE KAMERA HINZUFÜGEN. Wählen Sie entweder die Netzwerkkamera aus der Liste durch Tippen auf ihren Namen aus oder geben Sie die Kameradaten über die Displaytastatur manuell ein. Einstellmöglichkeiten Sie haben eine Netzwerkkamera ausgewählt. Es werden folgende Informationen angezeigt: − Kameratyp − Kameraname − ID − Benutzername − Passwort 141 von 166 Wählen Sie die Menüs und die jeweiligen Optionen jeweils durch Tippen auf die Schaltflächen aus. Um die jeweiligen Menüs oder Optionen zu verlassen, tippen Sie auf den Pfeil nach Links oben am Bildschirm. Um die Einstellungen abzuschließen, tippen Sie auf die Schaltfläche FERTIG oben rechts am Bildschirm. Um die Einstellungen zu verwerfen, tippen Sie auf die Schaltfläche ABBRECHEN oben links am Bildschirm. Die aktuell eingestellten Eigenschaften werden dann in der Übersicht für die Netzwerkkamera dargestellt. Folgende Eigenschaften der Aufnahmequalität können eingestellt werden: Drehen: Tippen Sie auf 0°: Empfohlene Ansicht bei aufrechter Kamerainstallation. Tippen Sie auf 180°: Die Ansicht des Kamerabilds wird horizontal gespiegelt, z. B. wenn die Kamera an der Decke montiert ist. Helligkeit: Wählen Sie die Helligkeitsstufe durch Tippen auf die Option 1 (dunkel) bis 5 (sehr hell). Sättigung: Wählen Sie die Sättigungsstufe durch Tippen auf die Option 1 (Graustufen) bis 5 (sehr hohe Farbwerte). Schärfe: Wählen Sie den Schärfegrad durch Tippen auf die Option 1 (wenig detailreich) bis 5 (sehr detailreich). Videoqualität: Wählen Sie die Videoqualität durch Tippen auf die Option HÖCHSTE bis GERINGSTE. Schwenk-/Neigegeschwindigkeit: Wählen Sie die Schwenk-/Neigegeschwindigkeit durch Tippen auf die Option 1 (langsam) bis 3 (schnell). 11.1.4. Menü Information Klicken Sie auf die Schaltfläche INFORMATION die App-Version und den Hersteller zu erhalten. 142 von 166 , um Informationen über 11.2. Kamera über Windows UI Live View bedienen NL FR DE GNU Abbildung ähnlich Schaltfläche Funktion Verwenden Sie Pfeilschaltflächen, um das Schwenken/ Neigen der Kamera zu steuern und den Aufnahmewinkel einzustellen. Wählen Sie zwischen den vier voreingestellen Kameraeinstellungen aus, die Sie zuvor unter SETUP/NEIGEN UND SCHWENKEN/VOREINSTELLUNG festgelegt haben. Klicken Sie auf die Schaltfläche, um ein Standbild aufzunehmen. Wählen Sie einen Speicherort aus. Klicken Sie auf die Schaltfläche, um ein Video aufzunehmen. Wählen Sie einen Speicherort aus. Klicken Sie auf die Schaltfläche, um das Kamerabild im Vollbildmodus zu sehen. Klicken Sie die E S C -Taste Ihrer Tastatur, um den Vollbildmodus zu verlassen. 143 von 166 Schaltfläche Funktion Klicken Sie auf die Schaltfläche, um das Kamerabild zu vergrößern. Das Fenster DIGITALE VERGRÖSSERUNG wird geöffnet. Markieren Sie das grüne Feld und bewegen Sie es mit der Maus in den Bildauschnitt, den Sie vergrößern möchten. Vergrößern Sie den Bildausschnitt durch Bewegen des Reglers von 100% bis zu 400%. Klicken Sie auf die Schaltfläche, um die Funktion NEIGEN UND SCHWENKEN sowie die Ansicht des Kamerabilds horizontal gespiegelt zu nutzen, z. B. wenn die Kamera an der Decke montiert ist. Wählen Sie im Aufklapp-Menü die gewünschte Wiedergabelautstärke. oder Klicken Sie auf die Schaltfläche, um die Wiedergabe stummzuschalten. Wählen Sie im Aufklapp-Menü die gewünschte Lautstärke des an der Kamera angeschlossenen Lautsprechers. oder Klicken Sie auf Schaltfläche, um die Zwei-Wege-AudioWiedergabe von der Kamera zu deaktivieren. HINWEIS! Die Audiowiedergabe-Funktion ist ausschließlich im Heimnetzwerk verfügbar. 12. Kamera zurücksetzen Um die Netzwerkkamera die Werksstandardeinstellungen zurückzusetzen, um eventuell bestehende Verbindungsprobleme zu beheben, gehen Sie wie folgt vor: Halten Sie die W P S / R E S E T -Taste auf der Rückseite ca. 10 Sekunden lang gedrückt. Lassen Sie die Taste los, sobald die die LED-Statusanzeige orange blinkt. Warten Sie, bis die Netzwerkkamera neu gestartet wird. Die Kamera ist bereit, wenn die LED-Statusanzeige dauerhaft grün leuchtet. Nach dem Zurücksetzen erlischt die LED-Statusanzeige, wenn es keine Netzwerkverbindung zur Netzwerkkamera von einem Router/Access Point/Switch gibt. 144 von 166 13. Firmware aktualisieren NL Die Netzwerkkamera prüft bei bestehender Internetverbindung regelmäßig, ob eine aktuellere Firmware verfügbar ist. Falls eine neuere Version zum Download bereitsteht, erscheint ein Popup-Fenster, in dem Sie auswählen können, ob die neue Firmware installiet werden soll. FR DE 14. Reinigung Ziehen Sie vor dem Reinigen immer den Netzadapter und alle Verbindungskabel. Verwenden Sie keine Lösungsmittel, ätzende oder gasförmige Reinigungsmittel. Reinigen Sie das Gerät mit einem weichen, fusselfreien Tuch. Bitte bewahren Sie das Verpackungsmaterial gut auf und benutzen Sie ausschließlich dieses, um das Gerät zu transportieren. ACHTUNG! Es befinden sich keine zu wartenden oder zu reinigenden Teile innerhalb des Gerätes. 15. Entsorgung Verpackung Ihr Gerät befindet sich zum Schutz vor Transportschäden in einer Verpackung. Verpackungen sind Rohmaterialien und können wiederverwertet oder dem Recycling-Kreislauf zugeführt werden. Gerät Altgeräte dürfen nicht im normalen Hausmüll entsorgt werden. Entsprechend EG-Richtlinie 2002/96/EG ist das Gerät am Ende seiner Lebensdauer einer geordneten Entsorgung zuzuführen. Dabei werden im Gerät enthaltene Wertstoffe der Wiederverwertung zugeführt und die Belastung der Umwelt vermieden. Geben Sie das Altgerät an einer Sammelstelle für Elektroschrott oder einem Wertstoffhof ab. Über Öffnungszeiten und Adressen von Annahme- und Sammelstellen informieren Sie Ihre kommunale Verwaltung, Ihr örtliches Entsorgungsunternehmen oder die Verbraucherzentrale. 145 von 166 GNU 16. Technische Daten LAN-Verbindung VGA Videoauflösung: Abmessungen (L x B x H) Gewicht 10/100 Mbps RJ-45 640 x 480 Pixel 112 x 90 x 116 mm ca. 280 g Netzteil Modell: Eingang Ausgang DSA-12PFA-09 FEU, Hersteller DVE AC 100-240 V~ 50/60 Hz, 0,5 mA 12 V 1A 17. Konformitätserklärung 0700 Hiermit erklärt die Medion AG, dass das Produkt MD 86970 mit den folgenden europäischen Anforderungen übereinstimmt: • R&TTE Richtline 1999/5/EG • EMV-Richtlinie 2004/108/EG • Niederspannungsrichtlinie 2006/95/EG • Öko-Design Richtlinie 2009/125/EG • RoHS-Richtlinie 2011/65/EU. Vollständige Konformitätserklärungen sind erhältlich unter www.medion.com/conformity. 18. Impressum Copyright © 2014 Alle Rechte vorbehalten. Diese Kurzanleitung ist urheberrechtlich geschützt. Vervielfältigung in mechanischer, elektronischer und jeder anderen Form ohne die schriftliche Genehmigung des Herstellers ist verboten Das Copyright liegt bei der Firma: Medion AG Am Zehnthof 77 45307 Essen Deutschland Eine vollständige Bedienungsanleitung kann über die Service Hotline nachbestellt werden und steht über das Serviceportal www.medion.com/be/nl/service/start/ zum Download zur Verfügung. Sie können auch den oben stehenden QR Code scannen und die Anleitung über das Serviceportal auf Ihr mobiles Endgerät laden. 146 von 166 Licentiegegevens NL OPMERKING! FR Geachte klant, Hieronder is om juridische redenen de GPL/LGPL-licentie in de Originele DE Engelse versie opgenomen. Vertalingen vormen voor de FSF (Free Software Foundation) geen geautoriseerde versie van de GPL. De kennisname van de GPL/LGPL-licentie is voor het gebruik van het apGNU paraat niet van belang maar dient om te voldoen aan de verplichting van publicatie bij toepassing van Open Source software. Indien u interesse hebt in de originele tekst van de gebruikte GPL/LGPL, kunt u deze downloaden via de volgende link: http://www.medion.com. Voer in het Download Center het juiste MD-nummer of MSN-nummer in. Deze nummers vindt u op het betreffende apparaat. Verdere informatie over de GPL/LGPL-licenties vindt u op www.gnu.org. Information relative à la licence REMARQUE ! Chère Cliente, Cher Client, Pour des raisons juridiques, la licence GPL/LGPL est reproduite ici dans la version originale anglaise. Les traductions dans d’autres langues ne sont pas des versions de la GPL autorisées par la FSF (Free Software Foundation). La prise de connaissance de la licence GPL/LGPL n’est pas importante pour l’utilisation de l’appareil, mais sert à l’obligation de publication en cas d’utilisation de logiciels Open Source. Si cela vous intéresse, vous pouvez télécharger le texte source des GPL/ LGPL utilisées sous le lien suivant : http://www.medion.com. Veuillez indiquer le numéro MD ou MSN correspondant dans le centre de téléchargement. Vous trouverez ces numéros sur l’appareil respectif. Vous trouverez de plus amples informations sur les licences GPL/LGPL sur www.gnu.org. 147 von 166 Lizenzinformation HINWEIS! Sehr geehrte Kundin, sehr geehrter Kunde, Im Folgenden wird hier aus juristischen Gründen die GPL/LGPL-Lizenz in der englischen Originalfassung abgebildet. Übersetzungen in andere Sprachen stellen keine von der FSF (Free Software Foundation) autorisierte Versionen der GPL dar. Die Kenntnisnahme der GPL/LGPL-Lizenz ist für den Gebrauch des Gerätes unerheblich, sondern dient der Verpflichtung zur Veröffentlichung bei der Verwendung von Open-Source Software. Bei Interesse können Sie den Quelltext der verwendeten GPL/LGPL unter folgendem Link herunterladen: http://www.medion.com. Bitte geben Sie im Download Center die entsprechende MD Nummer oder MSN Nummer an. Diese Nummern finden Sie auf dem jeweiligen Gerät. Weitere Informationen über die GPL/LGPL-Lizenzen finden Sie unter www.gnu.org. 148 von 166 I. GNU General Public Licence NL Version 2, June 1991 Copyright (C) 1989, 1991 Free Software Foundation, Inc. FR 51 Franklin Street, Fifth Floor, Boston, MA 02110-1301, USA DE Everyone is permitted to copy and distribute verbatim copies of this license document, but changing it is not allowed. Preamble The licenses for most software are designed to take away your freedom to share and change it. By contrast, the GNU General Public License is intended to guarantee your freedom to share and change free software--to make sure the software is free for all its users. This General Public License applies to most of the Free Software Foundation‘s software and to any other program whose authors commit to using it. (Some other Free Software Foundation software is covered by the GNU Lesser General Public License instead.) You can apply it to your programs, too. When we speak of free software, we are referring to freedom, not price. Our General Public Licenses are designed to make sure that you have the freedom to distribute copies of free software (and charge for this service if you wish), that you receive source code or can get it if you want it, that you can change the software or use pieces of it in new free programs; and that you know you can do these things. To protect your rights, we need to make restrictions that forbid anyone to deny you these rights or to ask you to surrender the rights. These restrictions translate to certain responsibilities for you if you distribute copies of the software, or if you modify it. For example, if you distribute copies of such a program, whether gratis or for a fee, you must give the recipients all the rights that you have. You must make sure that they, too, receive or can get the source code. And you must show them these terms so they know their rights. We protect your rights with two steps: (1) copyright the software, and (2) offer you this license which gives you legal permission to copy, distribute and/or modify the software. Also, for each author‘s protection and ours, we want to make certain that everyone understands that there is no warranty for this free software. If the software is modified by someone else and passed on, we want its recipients to know that what they have is not the original, so that any problems introduced by others will not reflect on the original authors‘ reputations. Finally, any free program is threatened constantly by software patents. We wish to avoid the danger that redistributors of a free program will individually obtain patent licenses, in effect making the program proprietary. To prevent this, we have made it clear that any patent must be licensed for everyone‘s free use or not licensed at all. The precise terms and conditions for copying, distribution and modification follow. TERMS AND CONDITIONS FOR COPYING, DISTRIBUTION AND MODIFICATION 0. This License applies to any program or other work which contains a notice placed by the copyright holder saying it may be distributed under the terms of this General Public License. The “Program”, below, refers to any such program or work, and a “work based on the Program” means either the Program or any derivative work under copyright law: that is to say, a work containing the Program or a portion of it, either verbatim or with modifications and/or translated into another language. (Hereinafter, translation is included without limitation in the term “modification”.) Each licensee is addressed as “you”. Activities other than copying, distribution and modification are not covered by this License; they are outside its scope. The act of running the Program is not restricted, and the output from the Program is covered only if its contents constitute a work based on the Program (independent of having been made by running the 149 von 166 GNU Program). Whether that is true depends on what the Program does. 1. You may copy and distribute verbatim copies of the Program‘s source code as you receive it, in any medium, provided that you conspicuously and appropriately publish on each copy an appropriate copyright notice and disclaimer of warranty; keep intact all the notices that refer to this License and to the absence of any warranty; and give any other recipients of the Program a copy of this License along with the Program. You may charge a fee for the physical act of transferring a copy, and you may at your option offer warranty protection in exchange for a fee. 2. You may modify your copy or copies of the Program or any portion of it, thus forming a work based on the Program, and copy and distribute such modifications or work under the terms of Section 1 above, provided that you also meet all of these conditions: a) You must cause the modified files to carry prominent notices stating that you changed the files and the date of any change. b) You must cause any work that you distribute or publish, that in whole or in part contains or is derived from the Program or any part thereof, to be licensed as a whole at no charge to all third parties under the terms of this License. c) If the modified program normally reads commands interactively when run, you must cause it, when started running for such interactive use in the most ordinary way, to print or display an announcement including an appropriate copyright notice and a notice that there is no warranty (or else, saying that you provide a warranty) and that users may redistribute the program under these conditions, and telling the user how to view a copy of this License. (Exception: if the Program itself is interactive but does not normally print such an announcement, your work based on the Program is not required to print an announcement.) These requirements apply to the modified work as a whole. If identifiable sections of that work are not derived from the Program, and can be reasonably considered independent and separate works in themselves, then this License, and its terms, do not apply to those sections when you distribute them as separate works. But when you distribute the same sections as part of a whole which is a work based on the Program, the distribution of the whole must be on the terms of this License, whose permissions for other licensees extend to the entire whole, and thus to each and every part regardless of who wrote it. Thus, it is not the intent of this section to claim rights or contest your rights to work written entirely by you; rather, the intent is to exercise the right to control the distribution of derivative or collective works based on the Program. In addition, mere aggregation of another work not based on the Program with the Program (or with a work based on the Program) on a volume of a storage or distribution medium does not bring the other work under the scope of this License. 3. You may copy and distribute the Program (or a work based on it, under Section 2) in object code or executable form under the terms of Sections 1 and 2 above provided that you also do one of the following: a) Accompany it with the complete corresponding machine-readable source code, which must be distributed under the terms of Sections 1 and 2 above on a medium customarily used for software interchange; or, b) Accompany it with a written offer, valid for at least three years, to give any third party, for a charge no more than your cost of physically performing source distribution, a complete machine-readable copy of the corresponding source code, to be distributed under the terms of Sections 1 and 2 above on a medium customarily used for software interchange; or, c) Accompany it with the information you received as to the offer to distribute corresponding source code. (This alternative is allowed only for noncommercial distribution and only if you received the program in object code or executable form with such an offer, in accord with Subsection b above.) The source code for a work means the preferred form of the work for making modifications to it. For an executable work, complete source code means all the source code for all modules it contains, plus any 150 von 166 associated interface definition files, plus the scripts used to control compilation and installation of the executable. However, as a special exception, the source code distributed need not include anything that is normally distributed (in either source or binary form) with the major components (compiler, kernel, and so on) of the operating system on which the executable runs, unless that component itself accompanies the executable. If distribution of executable or object code is made by offering access to copy from a designated place, then offering equivalent access to copy the source code from the same place counts as distribution of the source code, even though third parties are not compelled to copy the source along with the object code. 4. You may not copy, modify, sublicense, or distribute the Program except as expressly provided under this License. Any attempt otherwise to copy, modify, sublicense or distribute the Program is void, and will automatically terminate your rights under this License. However, parties who have received copies, or rights, from you under this License will not have their licenses terminated so long as such parties remain in full compliance. 5. You are not required to accept this License, since you have not signed it. However, nothing else grants you permission to modify or distribute the Program or its derivative works. These actions are prohibited by law if you do not accept this License. Therefore, by modifying or distributing the Program (or any work based on the Program), you indicate your acceptance of this License to do so, and all its terms and conditions for copying, distributing or modifying the Program or works based on it. 6. Each time you redistribute the Program (or any work based on the Program), the recipient automatically receives a license from the original licensor to copy, distribute or modify the Program subject to these terms and conditions. You may not impose any further restrictions on the recipients‘ exercise of the rights granted herein. You are not responsible for enforcing compliance by third parties to this License. 7. If, as a consequence of a court judgment or allegation of patent infringement or for any other reason (not limited to patent issues), conditions are imposed on you (whether by court order, agreement or otherwise) that contradict the conditions of this License, they do not excuse you from the conditions of this License. If you cannot distribute so as to satisfy simultaneously your obligations under this License and any other pertinent obligations, then as a consequence you may not distribute the Program at all. For example, if a patent license would not permit royalty-free redistribution of the Program by all those who receive copies directly or indirectly through you, then the only way you could satisfy both it and this License would be to refrain entirely from distribution of the Program. If any portion of this section is held invalid or unenforceable under any particular circumstance, the balance of the section is intended to apply and the section as a whole is intended to apply in other circumstances. It is not the purpose of this section to induce you to infringe any patents or other property right claims or to contest validity of any such claims; this section has the sole purpose of protecting the integrity of the free software distribution system, which is implemented by public license practices. Many people have made generous contributions to the wide range of software distributed through that system in reliance on consistent application of that system; it is up to the author/donor to decide if he or she is willing to distribute software through any other system and a licensee cannot impose that choice. This section is intended to make thoroughly clear what is believed to be a consequence of the rest of this License. 8. If the distribution and/or use of the Program is restricted in certain countries either by patents or by copyrighted interfaces, the original copyright holder who places the Program under this License may add an explicit geographical distribution limitation excluding those countries, so that distribution is permitted only in or among countries not thus excluded. In such case, this License incorporates the limitation as if written in the body of this License. 9. The Free Software Foundation may publish revised and/or new versions of the General Public License from time to time. Such new versions will be similar in spirit to the present version, but may differ in detail to address new problems or concerns. 151 von 166 NL FR DE GNU Each version is given a distinguishing version number. If the Program specifies a version number of this License which applies to it and “any later version”, you have the option of following the terms and conditions either of that version or of any later version published by the Free Software Foundation. If the Program does not specify a version number of this License, you may choose any version ever published by the Free Software Foundation. 10. If you wish to incorporate parts of the Program into other free programs whose distribution conditions are different, write to the author to ask for permission. For software which is copyrighted by the Free Software Foundation, write to the Free Software Foundation; we sometimes make exceptions for this. Our decision will be guided by the two goals of preserving the free status of all derivatives of our free software and of promoting the sharing and reuse of software generally. NO WARRANTY 11. BECAUSE THE PROGRAM IS LICENSED FREE OF CHARGE, THERE IS NO WARRANTY FOR THE PROGRAM, TO THE EXTENT PERMITTED BY APPLICABLE LAW. EXCEPT WHEN OTHERWISE STATED IN WRITING THE COPYRIGHT HOLDERS AND/OR OTHER PARTIES PROVIDE THE PROGRAM “AS IS” WITHOUT WARRANTY OF ANY KIND, EITHER EXPRESSED OR IMPLIED, INCLUDING, BUT NOT LIMITED TO, THE IMPLIED WARRANTIES OF MERCHANTABILITY AND FITNESS FOR A PARTICULAR PURPOSE. THE ENTIRE RISK AS TO THE QUALITY AND PERFORMANCE OF THE PROGRAM IS WITH YOU. SHOULD THE PROGRAM PROVE DEFECTIVE, YOU ASSUME THE COST OF ALL NECESSARY SERVICING, REPAIR OR CORRECTION. 12. IN NO EVENT UNLESS REQUIRED BY APPLICABLE LAW OR AGREED TO IN WRITING WILL ANY COPYRIGHT HOLDER, OR ANY OTHER PARTY WHO MAY MODIFY AND/OR REDISTRIBUTE THE PROGRAM AS PERMITTED ABOVE, BE LIABLE TO YOU FOR DAMAGES, INCLUDING ANY GENERAL, SPECIAL, INCIDENTAL OR CONSEQUENTIAL DAMAGES ARISING OUT OF THE USE OR INABILITY TO USE THE PROGRAM (INCLUDING BUT NOT LIMITED TO LOSS OF DATA OR DATA BEING RENDERED INACCURATE OR LOSSES SUSTAINED BY YOU OR THIRD PARTIES OR A FAILURE OF THE PROGRAM TO OPERATE WITH ANY OTHER PROGRAMS), EVEN IF SUCH HOLDER OR OTHER PARTY HAS BEEN ADVISED OF THE POSSIBILITY OF SUCH DAMAGES. END OF TERMS AND CONDITIONS II. LGPL VERSION 2.1 GNU LESSER GENERAL PUBLIC LICENSE Version 2.1, February 1999 Copyright (C) 1991, 1999 Free Software Foundation, Inc. 51 Franklin Street, Fifth Floor, Boston, MA 02110-1301 USA Everyone is permitted to copy and distribute verbatim copies of this license document, but changing it is not allowed. [This is the first released version of the Lesser GPL. It also counts as the successor of the GNU Library Public License, version 2, hence the version number 2.1.] Preamble The licenses for most software are designed to take away your freedom to share and change it. By contrast, the GNU General Public Licenses are intended to guarantee your freedom to share and change free software--to make sure the software is free for all its users. This license, the Lesser General Public License, applies to some specially designated software packages-typically libraries--of the Free Software Foundation and other authors who decide to use it. You can use it too, but we suggest you first think carefully about whether this license or the ordinary General Public License is the better strategy to use in any particular case, based on the explanations below. When we speak of free software, we are referring to freedom of use, not price. Our General Public 152 von 166 Licenses are designed to make sure that you have the freedom to distribute copies of free software (and charge for this service if you wish); that you receive source code or can get it if you want it; that you can change the software and use pieces of it in new free programs; and that you are informed that you can do these things. To protect your rights, we need to make restrictions that forbid distributors to deny you these rights or to ask you to surrender these rights. These restrictions translate to certain responsibilities for you if you distribute copies of the library or if you modify it. For example, if you distribute copies of the library, whether gratis or for a fee, you must give the recipients all the rights that we gave you. You must make sure that they, too, receive or can get the source code. If you link other code with the library, you must provide complete object files to the recipients, so that they can relink them with the library after making changes to the library and recompiling it. And you must show them these terms so they know their rights. We protect your rights with a two-step method: (1) we copyright the library, and (2) we offer you this license, which gives you legal permission to copy, distribute and/or modify the library. To protect each distributor, we want to make it very clear that there is no warranty for the free library. Also, if the library is modified by someone else and passed on, the recipients should know that what they have is not the original version, so that the original author‘s reputation will not be affected by problems that might be introduced by others. Finally, software patents pose a constant threat to the existence of any free program. We wish to make sure that a company cannot effectively restrict the users of a free program by obtaining a restrictive license from a patent holder. Therefore, we insist that any patent license obtained for a version of the library must be consistent with the full freedom of use specified in this license. Most GNU software, including some libraries, is covered by the ordinary GNU General Public License. This license, the GNU Lesser General Public License, applies to certain designated libraries, and is quite different from the ordinary General Public License. We use this license for certain libraries in order to permit linking those libraries into non-free programs. When a program is linked with a library, whether statically or using a shared library, the combination of the two is legally speaking a combined work, a derivative of the original library. The ordinary General Public License therefore permits such linking only if the entire combination fits its criteria of freedom. The Lesser General Public License permits more lax criteria for linking other code with the library. We call this license the “Lesser” General Public License because it does Less to protect the user‘s freedom than the ordinary General Public License. It also provides other free software developers Less of an advantage over competing non-free programs. These disadvantages are the reason we use the ordinary General Public License for many libraries. However, the Lesser license provides advantages in certain special circumstances. For example, on rare occasions, there may be a special need to encourage the widest possible use of a certain library, so that it becomes a de-facto standard. To achieve this, non-free programs must be allowed to use the library. A more frequent case is that a free library does the same job as widely used non-free libraries. In this case, there is little to gain by limiting the free library to free software only, so we use the Lesser General Public License. In other cases, permission to use a particular library in non-free programs enables a greater number of people to use a large body of free software. For example, permission to use the GNU C Library in non-free programs enables many more people to use the whole GNU operating system, as well as its variant, the GNU/Linux operating system. Although the Lesser General Public License is Less protective of the users‘ freedom, it does ensure that the user of a program that is linked with the Library has the freedom and the wherewithal to run that program using a modified version of the Library. The precise terms and conditions for copying, distribution and modification follow. Pay close attention to the difference between a “work based on the library” and a “work that uses the library”. The former contains code derived from the library, whereas the latter must be combined with the library in order to run. 153 von 166 NL FR DE GNU TERMS AND CONDITIONS FOR COPYING, DISTRIBUTION AND MODIFICATION 0. This License Agreement applies to any software library or other program which contains a notice placed by the copyright holder or other authorized party saying it may be distributed under the terms of this Lesser General Public License (also called “this License”). Each licensee is addressed as “you”. A “library” means a collection of software functions and/or data prepared so as to be conveniently linked with application programs (which use some of those functions and data) to form executables. The “Library”, below, refers to any such software library or work which has been distributed under these terms. A “work based on the Library” means either the Library or any derivative work under copyright law: that is to say, a work containing the Library or a portion of it, either verbatim or with modifications and/or translated straightforwardly into another language. (Hereinafter, translation is included without limitation in the term “modification”.) “Source code” for a work means the preferred form of the work for making modifications to it. For a library, complete source code means all the source code for all modules it contains, plus any associated interface definition files, plus the scripts used to control compilation and installation of the library. Activities other than copying, distribution and modification are not covered by this License; they are outside its scope. The act of running a program using the Library is not restricted, and output from such a program is covered only if its contents constitute a work based on the Library (independent of the use of the Library in a tool for writing it). Whether that is true depends on what the Library does and what the program that uses the Library does. 1. You may copy and distribute verbatim copies of the Library‘s complete source code as you receive it, in any medium, provided that you conspicuously and appropriately publish on each copy an appropriate copyright notice and disclaimer of warranty; keep intact all the notices that refer to this License and to the absence of any warranty; and distribute a copy of this License along with the Library. You may charge a fee for the physical act of transferring a copy, and you may at your option offer warranty protection in exchange for a fee. 2. You may modify your copy or copies of the Library or any portion of it, thus forming a work based on the Library, and copy and distribute such modifications or work under the terms of Section 1 above, provided that you also meet all of these conditions: a) The modified work must itself be a software library. b) You must cause the files modified to carry prominent notices stating that you changed the files and the date of any change. c) You must cause the whole of the work to be licensed at no charge to all third parties under the terms of this License. d) If a facility in the modified Library refers to a function or a table of data to be supplied by an application program that uses the facility, other than as an argument passed when the facility is invoked, then you must make a good faith effort to ensure that, in the event an application does not supply such function or table, the facility still operates, and performs whatever part of its purpose remains meaningful. (For example, a function in a library to compute square roots has a purpose that is entirely well-defined independent of the application. Therefore, Subsection 2d requires that any application-supplied function or table used by this function must be optional: if the application does not supply it, the square root function must still compute square roots.) These requirements apply to the modified work as a whole. If identifiable sections of that work are not derived from the Library, and can be reasonably considered independent and separate works in themselves, then this License, and its terms, do not apply to those sections when you distribute them as separate works. But when you distribute the same sections as part of a whole which is a work based on the Library, the distribution of the whole must be on the terms of this License, whose permissions for other licensees extend to the entire whole, and thus to each and every part regardless of who wrote it. Thus, it is not the intent of this section to claim rights or contest your rights to work written entirely by you; rather, the intent is to exercise the right to control the distribution of derivative or collective works 154 von 166 based on the Library. In addition, mere aggregation of another work not based on the Library with the Library (or with a work based on the Library) on a volume of a storage or distribution medium does not bring the other work under the scope of this License. 3. You may opt to apply the terms of the ordinary GNU General Public License instead of this License to a given copy of the Library. To do this, you must alter all the notices that refer to this License, so that they refer to the ordinary GNU General Public License, version 2, instead of to this License. (If a newer version than version 2 of the ordinary GNU General Public License has appeared, then you can specify that version instead if you wish.) Do not make any other change in these notices. Once this change is made in a given copy, it is irreversible for that copy, so the ordinary GNU General Public License applies to all subsequent copies and derivative works made from that copy. This option is useful when you wish to copy part of the code of the Library into a program that is not a library. 4. You may copy and distribute the Library (or a portion or derivative of it, under Section 2) in object code or executable form under the terms of Sections 1 and 2 above provided that you accompany it with the complete corresponding machine-readable source code, which must be distributed under the terms of Sections 1 and 2 above on a medium customarily used for software interchange. If distribution of object code is made by offering access to copy from a designated place, then offering equivalent access to copy the source code from the same place satisfies the requirement to distribute the source code, even though third parties are not compelled to copy the source along with the object code. 5. A program that contains no derivative of any portion of the Library, but is designed to work with the Library by being compiled or linked with it, is called a “work that uses the Library”. Such a work, in isolation, is not a derivative work of the Library, and therefore falls outside the scope of this License. However, linking a “work that uses the Library” with the Library creates an executable that is a derivative of the Library (because it contains portions of the Library), rather than a “work that uses the library”. The executable is therefore covered by this License. Section 6 states terms for distribution of such executables. When a “work that uses the Library” uses material from a header file that is part of the Library, the object code for the work may be a derivative work of the Library even though the source code is not. Whether this is true is especially significant if the work can be linked without the Library, or if the work is itself a library. The threshold for this to be true is not precisely defined by law. If such an object file uses only numerical parameters, data structure layouts and accessors, and small macros and small inline functions (ten lines or less in length), then the use of the object file is unrestricted, regardless of whether it is legally a derivative work. (Executables containing this object code plus portions of the Library will still fall under Section 6.) Otherwise, if the work is a derivative of the Library, you may distribute the object code for the work under the terms of Section 6. Any executables containing that work also fall under Section 6, whether or not they are linked directly with the Library itself. 6. As an exception to the Sections above, you may also combine or link a “work that uses the Library” with the Library to produce a work containing portions of the Library, and distribute that work under terms of your choice, provided that the terms permit modification of the work for the customer‘s own use and reverse engineering for debugging such modifications. You must give prominent notice with each copy of the work that the Library is used in it and that the Library and its use are covered by this License. You must supply a copy of this License. If the work during execution displays copyright notices, you must include the copyright notice for the Library among them, as well as a reference directing the user to the copy of this License. Also, you must do one of these things: a) Accompany the work with the complete corresponding machine-readable source code for the Library including whatever changes were used in the work (which must be distributed under Sections 1 and 2 above); and, if the work is an executable linked with the Library, with the complete machine-readable “work that uses the Library”, as object code and/or source code, so that the user can modify the Library 155 von 166 NL FR DE GNU and then relink to produce a modified executable containing the modified Library. (It is understood that the user who changes the contents of definitions files in the Library will not necessarily be able to recompile the application to use the modified definitions.) b) Use a suitable shared library mechanism for linking with the Library. A suitable mechanism is one that (1) uses at run time a copy of the library already present on the user‘s computer system, rather than copying library functions into the executable, and (2) will operate properly with a modified version of the library, if the user installs one, as long as the modified version is interface-compatible with the version that the work was made with. c) Accompany the work with a written offer, valid for at least three years, to give the same user the materials specified in Subsection 6a, above, for a charge no more than the cost of performing this distribution. d) If distribution of the work is made by offering access to copy from a designated place, offer equivalent access to copy the above specified materials from the same place. e) Verify that the user has already received a copy of these materials or that you have already sent this user a copy. For an executable, the required form of the “work that uses the Library” must include any data and utility programs needed for reproducing the executable from it. However, as a special exception, the materials to be distributed need not include anything that is normally distributed (in either source or binary form) with the major components (compiler, kernel, and so on) of the operating system on which the executable runs, unless that component itself accompanies the executable. It may happen that this requirement contradicts the license restrictions of other proprietary libraries that do not normally accompany the operating system. Such a contradiction means you cannot use both them and the Library together in an executable that you distribute. 7. You may place library facilities that are a work based on the Library side-by-side in a single library together with other library facilities not covered by this License, and distribute such a combined library, provided that the separate distribution of the work based on the Library and of the other library facilities is otherwise permitted, and provided that you do these two things: a) Accompany the combined library with a copy of the same work based on the Library, uncombined with any other library facilities. This must be distributed under the terms of the Sections above. b) Give prominent notice with the combined library of the fact that part of it is a work based on the Library, and explaining where to find the accompanying uncombined form of the same work. 8. You may not copy, modify, sublicense, link with, or distribute the Library except as expressly provided under this License. Any attempt otherwise to copy, modify, sublicense, link with, or distribute the Library is void, and will automatically terminate your rights under this License. However, parties who have received copies, or rights, from you under this License will not have their licenses terminated so long as such parties remain in full compliance. 9. You are not required to accept this License, since you have not signed it. However, nothing else grants you permission to modify or distribute the Library or its derivative works. These actions are prohibited by law if you do not accept this License. Therefore, by modifying or distributing the Library (or any work based on the Library), you indicate your acceptance of this License to do so, and all its terms and conditions for copying, distributing or modifying the Library or works based on it. 10. Each time you redistribute the Library (or any work based on the Library), the recipient automatically receives a license from the original licensor to copy, distribute, link with or modify the Library subject to these terms and conditions. You may not impose any further restrictions on the recipients‘ exercise of the rights granted herein. You are not responsible for enforcing compliance by third parties with this License. 11. If, as a consequence of a court judgment or allegation of patent infringement or for any other reason (not limited to patent issues), conditions are imposed on you (whether by court order, agreement or otherwise) that contradict the conditions of this License, they do not excuse you from the conditions of this License. If you cannot distribute so as to satisfy simultaneously your obligations under this License and any other pertinent obligations, then as a consequence you may not distribute the Library at all. For example, if a patent license would not permit royalty-free redistribution of the Library by all those who 156 von 166 receive copies directly or indirectly through you, then the only way you could satisfy both it and this License would be to refrain entirely from distribution of the Library. NL If any portion of this section is held invalid or unenforceable under any particular circumstance, the balance of the section is intended to apply, and the section as a whole is intended to apply in other circumstances. FR It is not the purpose of this section to induce you to infringe any patents or other property right claims or to contest validity of any such claims; this section has the sole purpose of protecting the integrity of the free software distribution system which is implemented by public license practices. Many people have made generous contributions to the wide range of software distributed through that system in reliance on consistent application of that system; it is up to the author/donor to decide if he or she is willing to distribute software through any other system and a licensee cannot impose that choice. This section is intended to make thoroughly clear what is believed to be a consequence of the rest of this License. 12. If the distribution and/or use of the Library is restricted in certain countries either by patents or by copyrighted interfaces, the original copyright holder who places the Library under this License may add an explicit geographical distribution limitation excluding those countries, so that distribution is permitted only in or among countries not thus excluded. In such case, this License incorporates the limitation as if written in the body of this License. 13. The Free Software Foundation may publish revised and/or new versions of the Lesser General Public License from time to time. Such new versions will be similar in spirit to the present version, but may differ in detail to address new problems or concerns. Each version is given a distinguishing version number. If the Library specifies a version number of this License which applies to it and “any later version”, you have the option of following the terms and conditions either of that version or of any later version published by the Free Software Foundation. If the Library does not specify a license version number, you may choose any version ever published by the Free Software Foundation. 14. If you wish to incorporate parts of the Library into other free programs whose distribution conditions are incompatible with these, write to the author to ask for permission. For software which is copyrighted by the Free Software Foundation, write to the Free Software Foundation; we sometimes make exceptions for this. Our decision will be guided by the two goals of preserving the free status of all derivatives of our free software and of promoting the sharing and reuse of software generally. 157 von 166 DE GNU NO WARRANTY 15. BECAUSE THE LIBRARY IS LICENSED FREE OF CHARGE, THERE IS NO WARRANTY FOR THE LIBRARY, TO THE EXTENT PERMITTED BY APPLICABLE LAW. EXCEPT WHEN OTHERWISE STATED IN WRITING THE COPYRIGHT HOLDERS AND/OR OTHER PARTIES PROVIDE THE LIBRARY “AS IS” WITHOUT WARRANTY OF ANY KIND, EITHER EXPRESSED OR IMPLIED, INCLUDING, BUT NOT LIMITED TO, THE IMPLIED WARRANTIES OF MERCHANTABILITY AND FITNESS FOR A PARTICULAR PURPOSE. THE ENTIRE RISK AS TO THE QUALITY AND PERFORMANCE OF THE LIBRARY IS WITH YOU. SHOULD THE LIBRARY PROVE DEFECTIVE, YOU ASSUME THE COST OF ALL NECESSARY SERVICING, REPAIR OR CORRECTION. 16. IN NO EVENT UNLESS REQUIRED BY APPLICABLE LAW OR AGREED TO IN WRITING WILL ANY COPYRIGHT HOLDER, OR ANY OTHER PARTY WHO MAY MODIFY AND/OR REDISTRIBUTE THE LIBRARY AS PERMITTED ABOVE, BE LIABLE TO YOU FOR DAMAGES, INCLUDING ANY GENERAL, SPECIAL, INCIDENTAL OR CONSEQUENTIAL DAMAGES ARISING OUT OF THE USE OR INABILITY TO USE THE LIBRARY (INCLUDING BUT NOT LIMITED TO LOSS OF DATA OR DATA BEING RENDERED INACCURATE OR LOSSES SUSTAINED BY YOU OR THIRD PARTIES OR A FAILURE OF THE LIBRARY TO OPERATE WITH ANY OTHER SOFTWARE), EVEN IF SUCH HOLDER OR OTHER PARTY HAS BEEN ADVISED OF THE POSSIBILITY OF SUCH DAMAGES. END OF TERMS AND CONDITIONS 158 von 166 III. GNU GENERAL PUBLIC LICENSE NL Version 3, 29 June 2007 Copyright (C) 2007 Free Software Foundation, Inc. <http://fsf.org/> FR Everyone is permitted to copy and distribute verbatim copies of this license document, but changing it is not allowed. DE Preamble The GNU General Public License is a free, copyleft license for GNU software and other kinds of works. The licenses for most software and other practical works are designed to take away your freedom to share and change the works. By contrast, the GNU General Public License is intended to guarantee your freedom to share and change all versions of a program--to make sure it remains free software for all its users. We, the Free Software Foundation, use the GNU General Public License for most of our software; it applies also to any other work released this way by its authors. You can apply it to your programs, too. When we speak of free software, we are referring to freedom, not price. Our General Public Licenses are designed to make sure that you have the freedom to distribute copies of free software (and charge for them if you wish), that you receive source code or can get it if you want it, that you can change the software or use pieces of it in new free programs, and that you know you can do these things. To protect your rights, we need to prevent others from denying you these rights or asking you to surrender the rights. Therefore, you have certain responsibilities if you distribute copies of the software, or if you modify it: responsibilities to respect the freedom of others. For example, if you distribute copies of such a program, whether gratis or for a fee, you must pass on to the recipients the same freedoms that you received. You must make sure that they, too, receive or can get the source code. And you must show them these terms so they know their rights. Developers that use the GNU GPL protect your rights with two steps: (1) assert copyright on the software, and (2) offer you this License giving you legal permission to copy, distribute and/or modify it. For the developers‘ and authors‘ protection, the GPL clearly explains that there is no warranty for this free software. For both users‘ and authors‘ sake, the GPL requires that modified versions be marked as changed, so that their problems will not be attributed erroneously to authors of previous versions. Some devices are designed to deny users access to install or run modified versions of the software inside them, although the manufacturer can do so. This is fundamentally incompatible with the aim of protecting users‘ freedom to change the software. The systematic pattern of such abuse occurs in the area of products for individuals to use, which is precisely where it is most unacceptable. Therefore, we have designed this version of the GPL to prohibit the practice for those products. If such problems arise substantially in other domains, we stand ready to extend this provision to those domains in future versions of the GPL, as needed to protect the freedom of users. Finally, every program is threatened constantly by software patents. States should not allow patents to restrict development and use of software on general-purpose computers, but in those that do, we wish to avoid the special danger that patents applied to a free program could make it effectively proprietary. To prevent this, the GPL assures that patents cannot be used to render the program non-free. The precise terms and conditions for copying, distribution and modification follow. 159 von 166 TERMS AND CONDITIONS 0. Definitions. “This License” refers to version 3 of the GNU General Public License. “Copyright” also means copyright-like laws that apply to other kinds of orks, such as semiconductor masks. “The Program” refers to any copyrightable work licensed under this icense. Each licensee is addressed as “you”. “Licensees” and “recipients” may be individuals or organizations. To “modify” a work means to copy from or adapt all or part of the work n a fashion requiring copyright permission, other than the making of an xact copy. The resulting work is called a “modified version” of the arlier work or a work “based on” the earlier work. A “covered work” means either the unmodified Program or a work based n the Program. To “propagate” a work means to do anything with it that, without ermission, would make you directly or secondarily liable for nfringement under applicable copyright law, except executing it on a omputer or modifying a private copy. Propagation includes copying, istribution (with or without modification), making available to the ublic, and in some countries other activities as well. To “convey” a work means any kind of propagation that enables other arties to make or receive copies. Mere interaction with a user through computer network, with no transfer of a copy, is not conveying. An interactive user interface displays “Appropriate Legal Notices” o the extent that it includes a convenient and prominently visible eature that (1) displays an appropriate copyright notice, and (2) ells the user that there is no warranty for the work (except to the xtent that warranties are provided), that licensees may convey the ork under this License, and how to view a copy of this License. If he interface presents a list of user commands or options, such as a enu, a prominent item in the list meets this criterion. 1. Source Code. The “source code” for a work means the preferred form of the work or making modifications to it. “Object code” means any non-source orm of a work. A “Standard Interface” means an interface that either is an official tandard defined by a recognized standards body, or, in the case of nterfaces specified for a particular programming language, one that s widely used among developers working in that language. The “System Libraries” of an executable work include anything, other han the work as a whole, that (a) is included in the normal form of ackaging a Major Component, but which is not part of that Major omponent, and (b) serves only to enable use of the work with that ajor Component, or to implement a Standard Interface for which an mplementation is available to the public in source code form. A “Major Component”, in this context, means a major essential component (kernel, window system, and so on) of the specific operating system (if any) on which the executable work runs, or a compiler used to roduce the work, or an object code interpreter used to run it. The “Corresponding Source” for a work in object code form means all he source code needed to generate, install, and (for an executable ork) run the object code and to modify the work, including scripts to ontrol those activities. However, it does not include the work‘s ystem Libraries, or general-purpose tools or generally available free rograms which are used unmodified in performing those activities but hich are not part of the work. For example, Corresponding Source ncludes interface definition files associated with source files for he work, and the source code for shared libraries and dynamically inked subprograms that the work is specifically designed to require, uch as by intimate data communication or control flow between those ubprograms and other parts of the work. The Corresponding Source need not include anything that users an regenerate automatically from other parts of the Corresponding ource. The Corresponding Source for a work in source code form is that ame work. 160 von 166 2. Basic Permissions. All rights granted under this License are granted for the term of opyright on the Program, and are irrevocable provided the stated onditions are met. This License explicitly affirms your unlimited ermission to run the unmodified Program. The output from running a overed work is covered by this License only if the output, given its ontent, constitutes a covered work. This License acknowledges your ights of fair use or other equivalent, as provided by copyright law. You may make, run and propagate covered works that you do not onvey, without conditions so long as your license otherwise remains n force. You may convey covered works to others for the sole purpose f having them make modifications exclusively for you, or provide you ith facilities for running those works, provided that you comply with he terms of this License in conveying all material for which you do ot control copyright. Those thus making or running the covered works or you must do so exclusively on your behalf, under your direction nd control, on terms that prohibit them from making any copies of our copyrighted material outside their relationship with you. Conveying under any other circumstances is permitted solely under he conditions stated below. Sublicensing is not allowed; section 10 akes it unnecessary. 3. Protecting Users‘ Legal Rights From Anti-Circumvention Law. No covered work shall be deemed part of an effective technological easure under any applicable law fulfilling obligations under article 11 of the WIPO copyright treaty adopted on 20 December 1996, or imilar laws prohibiting or restricting circumvention of such easures. When you convey a covered work, you waive any legal power to forbid ircumvention of technological measures to the extent such circumvention s effected by exercising rights under this License with respect to he covered work, and you disclaim any intention to limit operation or odification of the work as a means of enforcing, against the work‘s sers, your or third parties‘ legal rights to forbid circumvention of echnological measures. 4. Conveying Verbatim Copies. You may convey verbatim copies of the Program‘s source code as you eceive it, in any medium, provided that you conspicuously and ppropriately publish on each copy an appropriate copyright notice; eep intact all notices stating that this License and any on-permissive terms added in accord with section 7 apply to the code; eep intact all notices of the absence of any warranty; and give all ecipients a copy of this License along with the Program. You may charge any price or no price for each copy that you convey, nd you may offer support or warranty protection for a fee. 5. Conveying Modified Source Versions. You may convey a work based on the Program, or the modifications to roduce it from the Program, in the form of source code under the erms of section 4, provided that you also meet all of these conditions: a) The work must carry prominent notices stating that you modified it, and giving a relevant date. b) The work must carry prominent notices stating that it is released under this License and any conditions added under section 7. This requirement modifies the requirement in section 4 to “keep intact all notices”. c) You must license the entire work, as a whole, under this License to anyone who comes into possession of a copy. This License will therefore apply, along with any applicable section 7 additional terms, to the whole of the work, and all its parts, regardless of how they are packaged. This License gives no permission to license the work in any other way, but it does not invalidate such permission if you have separately received it. d) If the work has interactive user interfaces, each must display Appropriate Legal Notices; however, if the Program has interactive interfaces that do not display Appropriate Legal Notices, your work need not make them do so. A compilation of a covered work with other separate and independent orks, which are not by their nature extensions of the covered work, nd which are not combined with it such as to form a larger program, n or 161 von 166 NL FR DE GNU on a volume of a storage or distribution medium, is called an “aggregate” if the compilation and its resulting copyright are not sed to limit the access or legal rights of the compilation‘s users eyond what the individual works permit. Inclusion of a covered work n an aggregate does not cause this License to apply to the other arts of the aggregate. 6. Conveying Non-Source Forms. You may convey a covered work in object code form under the terms f sections 4 and 5, provided that you also convey the achine-readable Corresponding Source under the terms of this License, n one of these ways: a) Convey the object code in, or embodied in, a physical product (including a physical distribution medium), accompanied by the Corresponding Source fixed on a durable physical medium customarily used for software interchange. b) Convey the object code in, or embodied in, a physical product (including a physical distribution medium), accompanied by a written offer, valid for at least three years and valid for as long as you offer spare parts or customer support for that product model, to give anyone who possesses the object code either (1) a copy of the Corresponding Source for all the software in the product that is covered by this License, on a durable physical medium customarily used for software interchange, for a price no more than your reasonable cost of physically performing this conveying of source, or (2) access to copy the Corresponding Source from a network server at no charge. c) Convey individual copies of the object code with a copy of the written offer to provide the Corresponding Source. This alternative is allowed only occasionally and noncommercially, and only if you received the object code with such an offer, in accord with subsection 6b. d) Convey the object code by offering access from a designated place (gratis or for a charge), and offer equivalent access to the Corresponding Source in the same way through the same place at no further charge. You need not require recipients to copy the Corresponding Source along with the object code. If the place to copy the object code is a network server, the Corresponding Source may be on a different server (operated by you or a third party) that supports equivalent copying facilities, provided you maintain clear directions next to the object code saying where to find the Corresponding Source. Regardless of what server hosts the Corresponding Source, you remain obligated to ensure that it is available for as long as needed to satisfy these requirements. e) Convey the object code using peer-to-peer transmission, provided you inform other peers where the object code and Corresponding Source of the work are being offered to the general public at no charge under subsection 6d. A separable portion of the object code, whose source code is excluded rom the Corresponding Source as a System Library, need not be ncluded in conveying the object code work. A “User Product” is either (1) a “consumer product”, which means any angible personal property which is normally used for personal, family, r household purposes, or (2) anything designed or sold for incorporation nto a dwelling. In determining whether a product is a consumer product, oubtful cases shall be resolved in favor of coverage. For a particular roduct received by a particular user, “normally used” refers to a ypical or common use of that class of product, regardless of the status f the particular user or of the way in which the particular user ctually uses, or expects or is expected to use, the product. A product s a consumer product regardless of whether the product has substantial ommercial, industrial or non-consumer uses, unless such uses represent he only significant mode of use of the product. “Installation Information” for a User Product means any methods, rocedures, authorization keys, or other information required to install nd execute modified versions of a covered work in that User Product from modified version of its Corresponding Source. The information must uffice to ensure that the continued functioning of the modified object ode is in no case prevented or interfered with solely because odification has been made. If you convey an object code work under this section in, or with, or pecifically for use in, a User Product, and the conveying occurs as art of a transaction in which the right of possession and use of the ser Product is transferred to the recipient in perpetuity or for a ixed term (regardless of how the transaction is characterized), the orresponding Source conveyed under this section must be accompanied y the 162 von 166 Installation Information. But this requirement does not apply f neither you nor any third party retains the ability to install odified object code on the User Product (for example, the work has een installed in ROM). The requirement to provide Installation Information does not include a equirement to continue to provide support service, warranty, or updates or a work that has been modified or installed by the recipient, or for he User Product in which it has been modified or installed. Access to a etwork may be denied when the modification itself materially and dversely affects the operation of the network or violates the rules and rotocols for communication across the network. Corresponding Source conveyed, and Installation Information provided, n accord with this section must be in a format that is publicly ocumented (and with an implementation available to the public in ource code form), and must require no special password or key for npacking, reading or copying. 7. Additional Terms. “Additional permissions” are terms that supplement the terms of this icense by making exceptions from one or more of its conditions. dditional permissions that are applicable to the entire Program shall e treated as though they were included in this License, to the extent hat they are valid under applicable law. If additional permissions pply only to part of the Program, that part may be used separately nder those permissions, but the entire Program remains governed by his License without regard to the additional permissions. When you convey a copy of a covered work, you may at your option emove any additional permissions from that copy, or from any part of t. (Additional permissions may be written to require their own emoval in certain cases when you modify the work.) You may place dditional permissions on material, added by you to a covered work, or which you have or can give appropriate copyright permission. Notwithstanding any other provision of this License, for material you dd to a covered work, you may (if authorized by the copyright holders of hat material) supplement the terms of this License with terms: a) Disclaiming warranty or limiting liability differently from the terms of sections 15 and 16 of this License; or b) Requiring preservation of specified reasonable legal notices or author attributions in that material or in the Appropriate Legal Notices displayed by works containing it; or c) Prohibiting misrepresentation of the origin of that material, or requiring that modified versions of such material be marked in reasonable ways as different from the original version; or d) Limiting the use for publicity purposes of names of licensors or authors of the material; or e) Declining to grant rights under trademark law for use of some trade names, trademarks, or service marks; or f ) Requiring indemnification of licensors and authors of that material by anyone who conveys the material (or modified versions of it) with contractual assumptions of liability to the recipient, for any liability that these contractual assumptions directly impose on those licensors and authors. All other non-permissive additional terms are considered “further estrictions” within the meaning of section 10. If the Program as you eceived it, or any part of it, contains a notice stating that it is overned by this License along with a term that is a further estriction, you may remove that term. If a license document contains further restriction but permits relicensing or conveying under this icense, you may add to a covered work material governed by the terms f that license document, provided that the further restriction does ot survive such relicensing or conveying. If you add terms to a covered work in accord with this section, you ust place, in the relevant source files, a statement of the dditional terms that apply to those files, or a notice indicating here to find the applicable terms. Additional terms, permissive or non-permissive, may be stated in the orm of a separately written license, or stated as exceptions; he above requirements apply either way. 8. Termination. You may not propagate or modify a covered work except as expressly rovided under this License. Any 163 von 166 NL FR DE GNU attempt otherwise to propagate or odify it is void, and will automatically terminate your rights under his License (including any patent licenses granted under the third aragraph of section 11). However, if you cease all violation of this License, then your icense from a particular copyright holder is reinstated (a) rovisionally, unless and until the copyright holder explicitly and inally terminates your license, and (b) permanently, if the copyright older fails to notify you of the violation by some reasonable means rior to 60 days after the cessation. Moreover, your license from a particular copyright holder is einstated permanently if the copyright holder notifies you of the iolation by some reasonable means, this is the first time you have eceived notice of violation of this License (for any work) from that opyright holder, and you cure the violation prior to 30 days after our receipt of the notice. Termination of your rights under this section does not terminate the icenses of parties who have received copies or rights from you under his License. If your rights have been terminated and not permanently einstated, you do not qualify to receive new licenses for the same aterial under section 10. 9. Acceptance Not Required for Having Copies. You are not required to accept this License in order to receive or un a copy of the Program. Ancillary propagation of a covered work ccurring solely as a consequence of using peer-to-peer transmission o receive a copy likewise does not require acceptance. However, othing other than this License grants you permission to propagate or odify any covered work. These actions infringe copyright if you do ot accept this License. Therefore, by modifying or propagating a overed work, you indicate your acceptance of this License to do so. 10. Automatic Licensing of Downstream Recipients. Each time you convey a covered work, the recipient automatically eceives a license from the original licensors, to run, modify and ropagate that work, subject to this License. You are not responsible or enforcing compliance by third parties with this License. An “entity transaction” is a transaction transferring control of an rganization, or substantially all assets of one, or subdividing an rganization, or merging organizations. If propagation of a covered ork results from an entity transaction, each party to that ransaction who receives a copy of the work also receives whatever icenses to the work the party‘s predecessor in interest had or could ive under the previous paragraph, plus a right to possession of the orresponding Source of the work from the predecessor in interest, if he predecessor has it or can get it with reasonable efforts. You may not impose any further restrictions on the exercise of the ights granted or affirmed under this License. For example, you may ot impose a license fee, royalty, or other charge for exercise of ights granted under this License, and you may not initiate litigation (including a cross-claim or counterclaim in a lawsuit) alleging that ny patent claim is infringed by making, using, selling, offering for ale, or importing the Program or any portion of it. 11. Patents. A “contributor” is a copyright holder who authorizes use under this icense of the Program or a work on which the Program is based. The ork thus licensed is called the contributor‘s “contributor version”. A contributor‘s “essential patent claims” are all patent claims wned or controlled by the contributor, whether already acquired or ereafter acquired, that would be infringed by some manner, permitted y this License, of making, using, or selling its contributor version, ut do not include claims that would be infringed only as a onsequence of further modification of the contributor version. For urposes of this definition, “control” includes the right to grant atent sublicenses in a manner consistent with the requirements of his License. Each contributor grants you a non-exclusive, worldwide, royalty-free atent license under the contributor‘s essential patent claims, to ake, use, sell, offer for sale, import and otherwise run, modify and ropagate the contents of its contributor version. In the following three paragraphs, a “patent license” is any express greement or commitment, however denominated, not to enforce a patent 164 von 166 (such as an express permission to practice a patent or covenant not to ue for patent infringement). To “grant” such a patent license to a arty means to make such an agreement or commitment not to enforce a atent against the party. If you convey a covered work, knowingly relying on a patent license, nd the Corresponding Source of the work is not available for anyone o copy, free of charge and under the terms of this License, through a ublicly available network server or other readily accessible means, hen you must either (1) cause the Corresponding Source to be so vailable, or (2) arrange to deprive yourself of the benefit of the atent license for this particular work, or (3) arrange, in a manner onsistent with the requirements of this License, to extend the patent icense to downstream recipients. “Knowingly relying” means you have ctual knowledge that, but for the patent license, your conveying the overed work in a country, or your recipient‘s use of the covered work n a country, would infringe one or more identifiable patents in that ountry that you have reason to believe are valid. If, pursuant to or in connection with a single transaction or rrangement, you convey, or propagate by procuring conveyance of, a overed work, and grant a patent license to some of the parties eceiving the covered work authorizing them to use, propagate, modify r convey a specific copy of the covered work, then the patent license ou grant is automatically extended to all recipients of the covered ork and works based on it. A patent license is “discriminatory” if it does not include within he scope of its coverage, prohibits the exercise of, or is onditioned on the non-exercise of one or more of the rights that are pecifically granted under this License. You may not convey a covered ork if you are a party to an arrangement with a third party that is n the business of distributing software, under which you make payment o the third party based on the extent of your activity of conveying he work, and under which the third party grants, to any of the arties who would receive the covered work from you, a discriminatory atent license (a) in connection with copies of the covered work onveyed by you (or copies made from those copies), or (b) primarily or and in connection with specific products or compilations that ontain the covered work, unless you entered into that arrangement, r that patent license was granted, prior to 28 March 2007. Nothing in this License shall be construed as excluding or limiting ny implied license or other defenses to infringement that may therwise be available to you under applicable patent law. 12. No Surrender of Others‘ Freedom. If conditions are imposed on you (whether by court order, agreement or therwise) that contradict the conditions of this License, they do not xcuse you from the conditions of this License. If you cannot convey a overed work so as to satisfy simultaneously your obligations under this icense and any other pertinent obligations, then as a consequence you may ot convey it at all. For example, if you agree to terms that obligate you o collect a royalty for further conveying from those to whom you convey he Program, the only way you could satisfy both those terms and this icense would be to refrain entirely from conveying the Program. 13. Use with the GNU Affero General Public License. Notwithstanding any other provision of this License, you have ermission to link or combine any covered work with a work licensed nder version 3 of the GNU Affero General Public License into a single ombined work, and to convey the resulting work. The terms of this icense will continue to apply to the part which is the covered work, ut the special requirements of the GNU Affero General Public License, ection 13, concerning interaction through a network will apply to the ombination as such. 14. Revised Versions of this License. The Free Software Foundation may publish revised and/or new versions of he GNU General Public License from time to time. Such new versions will e similar in spirit to the present version, but may differ in detail to ddress new problems or concerns. Each version is given a distinguishing version number. If the rogram specifies that a certain numbered version of the GNU General ublic License “or any later version” applies to it, you have the ption of following the terms and conditions either of that numbered ersion or of any later version published by the Free Software oundation. If the Program does not specify a version number of the NU General Public 165 von 166 NL FR DE GNU License, you may choose any version ever published y the Free Software Foundation. If the Program specifies that a proxy can decide which future ersions of the GNU General Public License can be used, that proxy‘s ublic statement of acceptance of a version permanently authorizes you o choose that version for the Program. Later license versions may give you additional or different ermissions. However, no additional obligations are imposed on any uthor or copyright holder as a result of your choosing to follow a ater version. 15. Disclaimer of Warranty. THERE IS NO WARRANTY FOR THE PROGRAM, TO THE EXTENT PERMITTED BY PPLICABLE LAW. EXCEPT WHEN OTHERWISE STATED IN WRITING THE COPYRIGHT OLDERS AND/OR OTHER PARTIES PROVIDE THE PROGRAM “AS IS” WITHOUT WARRANTY F ANY KIND, EITHER EXPRESSED OR IMPLIED, INCLUDING, BUT NOT LIMITED TO, HE IMPLIED WARRANTIES OF MERCHANTABILITY AND FITNESS FOR A PARTICULAR URPOSE. THE ENTIRE RISK AS TO THE QUALITY AND PERFORMANCE OF THE PROGRAM S WITH YOU. SHOULD THE PROGRAM PROVE DEFECTIVE, YOU ASSUME THE COST OF LL NECESSARY SERVICING, REPAIR OR CORRECTION. 16. Limitation of Liability. IN NO EVENT UNLESS REQUIRED BY APPLICABLE LAW OR AGREED TO IN WRITING ILL ANY COPYRIGHT HOLDER, OR ANY OTHER PARTY WHO MODIFIES AND/OR CONVEYS HE PROGRAM AS PERMITTED ABOVE, BE LIABLE TO YOU FOR DAMAGES, INCLUDING ANY ENERAL, SPECIAL, INCIDENTAL OR CONSEQUENTIAL DAMAGES ARISING OUT OF THE SE OR INABILITY TO USE THE PROGRAM (INCLUDING BUT NOT LIMITED TO LOSS OF ATA OR DATA BEING RENDERED INACCURATE OR LOSSES SUSTAINED BY YOU OR THIRD ARTIES OR A FAILURE OF THE PROGRAM TO OPERATE WITH ANY OTHER PROGRAMS), VEN IF SUCH HOLDER OR OTHER PARTY HAS BEEN ADVISED OF THE POSSIBILITY OF UCH DAMAGES. 17. Interpretation of Sections 15 and 16. If the disclaimer of warranty and limitation of liability provided bove cannot be given local legal effect according to their terms, eviewing courts shall apply local law that most closely approximates n absolute waiver of all civil liability in connection with the rogram, unless a warranty or assumption of liability accompanies a opy of the Program in return for a fee. END OF TERMS AND CONDITIONS Letzte Seite 166 von 166 Via de QR-code kunt u de vereiste app voor uw Android-eindapparaat downloaden. Vous pouvez télécharger l‘application nécessaire pour votre terminal Android via ce code QR. Über den QR Code können Sie die erforderliche Apps für Ihr Android Endgerät herunterladen. Via de QR-code kunt u de vereiste app voor uw Apple-eindapparaat downloaden. Vous pouvez télécharger l‘application nécessaire pour votre terminal Apple via ce code QR. Über den QR Code können Sie die erforderliche Apps für Ihr Apple Endgerät herunterladen. Medion B.V. John F. Kennedylaan 16a 5981 XC Panningen Nederland BE Hotline: 022006198 Fax: 022006199 LUX Hotline: 34-20 808 664 Fax: 34-20 808 665 AA 04/14 B Gebruikt u a.u.b. het contactformulier op onze website www.medion.com/be onder „service“ en „contact“. Bitte benutzen Sie das Kontaktformular unter www.medion.com/be unter „service“ und „contact“. Pour nous contacter, merci de vous diriger sur notre site internet www.medion.com/be, rubrique „service“ et „contact“. App Store ist ein Servicezeichen von Apple Inc. Android, Gmail und Google Play sind Marken von Google Inc.