1
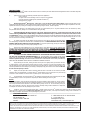
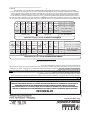
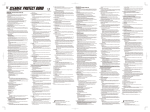
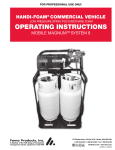
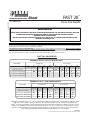
FAST 2K
January 2015
Instruction Sheet
TM
Fence Post Backfill
For Canada Use
WARNING!
BEFORE USING THIS PRODUCT AND PRIOR TO REMOVING OUTER BLACK CLIP AND MIXING CONTENTS, READ AND
UNDERSTAND THIS ENTIRE INSTRUCTION SHEET TO AVOID INJURY AND PROPERTY DAMAGE.
IMPROPER USE MAY BE DANGEROUS.
BAG MAY RUPTURE AND CONTENTS MAY SPRAY OUT IF BAG IS NOT CUT OPEN WITHIN ONE MINUTE AFTER
REMOVING OUTER BLACK CLIP
ANY PROBLEMS OR QUESTIONS? CALL US FIRST AT 1-800-268-6111 OR +1-416-679-5676
If instructions are carefully followed, the unique Fast 2KTM packaging prevents user from coming in contact with Part A and Part B chemicals. Mixed
material poured inside the hole contains no hazardous ingredients.
CAUTION! MAY IRRITATE EYES AND SKIN. Do not get in eyes or on skin or clothing. Do not breathe fumes. Wear protective chemical
resistant gloves and safety glasses or goggles when mixing and pouring FAST 2KTM. KEEP OUT OF REACH OF CHILDREN.
FIRST AID TREATMENT: PART B contains MDI and Polymeric diisocyanates. If swallowed, call a Poison Control Centre. Do not induce vomiting.
If in eyes, rinse with water for at least 15 minutes. If on skin, rinse well with water. Consult a doctor in all cases.
FAST 2K TM CALCULATOR
NUMBER OF 367 mL / 12.4 fl oz BAGS PER HOLE
3 ft (91 cm)
2 ft (61 cm)
Hole Depth
4”
4”
6”
10”
6”
8”
9”
10”
9”
8”
(10 cm) (15 cm) (20 cm) (23 cm) (25 cm) (10 cm) (15 cm) (20 cm) (23 cm) (25 cm)
2 3/8” (6 cm) Post
1.5
3
0.5
2
3
0.5
1.5
4
1
4” x 4” (10 x 10 cm) Post
2
2.5
3.5
2.5
1.5
1.5
2
5” x 5” (13 x 13 cm) Post
1
2
1
2.5
1
2
0.5
6” x 6” (15 x 15 cm) Post
Hole Diameter
NUMBER OF 770 mL / 26 fl oz BAGS PER HOLE
4 ft (122 cm)
3 ft (91 cm)
Hole Depth
6”
10”
9”
8”
(15 cm) (20 cm) (23 cm) (25 cm)
2 3/8” (6 cm) Post
1
1.5
0.5
1
4” x 4” (10 x 10 cm) Post
2
1.5
1
1.5
5” x 5” (13 x 13 cm) Post
1
Hole Diameter
6” x 6” (15 x 15 cm) Post
-
0.5
1
1.5
6”
8”
9”
10”
(15 cm) (20 cm) (23 cm) (25 cm)
1
2
1.5
2
2.5
0.5
2
1.5
1
1
0.5
2
-
NOTICE: The hole depth must be 1/3rd - 1/4th of the fence post height with a minimum of 3 ft (91 cm) deep for chain link/ metal
posts and 2 ft (61 cm) deep for wood and vinyl posts. The narrower and deeper the hole, the better for installations with
Fast 2KTM. As for the hole diameter, a minimum gap between the post and the hole wall is ideal. For example, a hole of 6” (15 cm)
is ideal for the installation of a 4x4 inches (10x10cm) post and a hole of 4” (10 cm) is ideal for a 2” (5 cm) metal post. In areas
exposed to freezing temperatures, the hole depth must be at least 6” (15 cm) below the frost line. For other sizes of holes and
posts, contact Royal Adhesives & Sealants Canada at 1-800-268-6111 or +1-416-679-5676
PM-1385-1
-1G:\Product Information\Restricted Access\Administration Files\Fast 2K\Labels and Literature
INSTRUCTIONS:
1.
NOTICE. Fast 2KTM is ideal to fill voids around a fence or mail box post and is NOT intended for applications where it would be subjected
to load-bearing, such as slabs.
2.
Please ensure you have the following materials required for application:
Knife or scissors
An object with a round hard edge such as a step stool or small table.
Protective chemical resistant gloves (included with Fast 2KTM)
Safety glasses or goggles
3.
Always keep Fast 2KTM bags at 22°C - 25°C (72°F - 77°F) for at least 2 hours before using. Product from bags kept at lower
temperatures will take longer to react, expand and set and will produce less volume. Product from bags kept at higher temperatures will react,
expand and set faster, lowering the working time and producing a higher volume, weaker composite.
4.
Make sure that there is no standing water in the hole. It’s a good idea to put 3-4” of gravel at bottom of hole. Set and brace (or hold)
the post inside the hole, making sure it is leveled before mixing the bag.
5.
CAUTION! Although this bag may have a tear notch, always have scissors or a knife next to the hole ready to cut the
corner of the bag IMMEDIATELY AFTER mixing is complete as indicated in steps 6, 7 & 8 and in case the tear notch does not exist
or malfunctions. Failure to cut the bag immediately after mixing will result in the composite expanding inside the bag which may cause the bag
to rupture, contents to spray out and personal injury as well as property damage to occur. Mixing must be complete and bag must be cut in less
than one minute from removing outer black clip.
Step 6
6.
To release outer black clip that divides the bag, grasp the outer edge of the bag on both ends lengthwise and pull bag outwards with moderate force until black clip eases off. CAUTION! DO NOT PULL THE BAG
SHARPLY AND DO NOT SLIDE THE CLIP OFF THE BAG as it may tear apart the bag, causing the contents to
spray out and personal injury as well as property damage to occur.
7.
Rub the bag with moderate force for 30 seconds along a round hard edge by forcing material inside
the bag from one end to the other with each stroke (“shoe shining” technique). CAUTION! DO NOT EXCEED
MIXING TIME AND NEVER ALLOW THE COMPOSITE TO START EXPANDING INSIDE THE BAG AS BAG
MAY RUPTURE, CAUSING CONTENTS TO SPRAY OUT AND PERSONAL INJURY AS WELL AS PROPERTY
DAMAGE TO OCCUR.
8.
CUT ONE OF THE BAG CORNERS IMMEDIATELY AFTER MIXING AND POUR MIXED COMPOSITE INTO THE HOLE BEFORE EXPANSION STARTS. Tip: To avoid spillage, prior to cutting the bag corner,
gently push the product out of that corner first. CAUTION! Cut the bag open immediately if composite
starts to expand in the bag. EXPANSION INSIDE THE BAG WILL CAUSE THE BAG TO RUPTURE, CONTENTS TO
SPRAY OUT AND PERSONAL INJURY AS WELL AS PROPERTY DAMAGE TO OCCUR.
Step 7
9.
Empty the bag into the hole, wetting the sides of the post at or slightly above ground level. Fast 2KTM
is waterproof after it cures and will help protect posts from rotting. Therefore it is even more beneficial to have
Fast 2KTM filling the hole all the way to the top by pouring some extra Fast 2KTM and/or by setting the post in the
narrowest possible hole. After initial pour, roll the bag to completely empty the content out into the hole. NOTICE.
Do not move the post up or down.
10.
Adjust / level the post side to side if necessary within the next 10 seconds. Do not move the post after
expansion starts. In approximately 3-4 minutes Fast 2KTM should expand up to 3-5 inches (8-13 cm) from the top
of the hole. There should be no need to brace or hold the post 1-2 minutes after that.
Step 8
11.
In approximately 15-30 minutes Fast 2KTM will already be quite hard and can be topped up with dirt. Wait
for approximately 2 hours for the product to completely set before installing the fence or gate.
NOTES:
A.
If necessary, a hole can always be topped up with more composite. When topping up, wait for at least 5
minutes after a bag poured previously has completely expanded or it is cured to the touch. If too much Fast 2KTM
has been poured into the hole and there is an overflow above ground, wait for 10 - 15 minutes after pouring the
bag, or the composite is tack free, and remove the excess by carefully cutting it with a handsaw or a utility knife,
for example. Be careful as this may damage the post surface.
B.
CLEAN UP: Using a soft cloth and mineral spirits , carefully remove any Fast 2KTM smudges from surfaces of the post that are visible
(above ground) as well as from tools before Fast 2KTM dries. After Fast 2KTM dries, it can only be removed by cutting it with a handsaw or a
utility knife, for example. Be careful as this may damage the post surface.
CUSTOMER SERVICE
Royal Adhesives & Sealants Canada Ltd.
T: 1-800-268-6111 OR +1-416-679-5676
266 Humberline Dr.,
F: +1- 416-679-0511
Toronto, Ontario M9W 5X1
[email protected]
Canadawww.Fast2K.com / www.chemque.com
LIMITED WARRANTY: Royal Adhesives & Sealants Canada warrants the performance of this product, provided it is properly stored and applied. If not satisfied, submit
claim in writing to Royal Adhesives & Sealants Canada’s address below, and Royal Adhesives & Sealants Canada will, at its option, replace or refund the purchase price of
this product if proved defective. User shall determine the suitability of this product for the intended use and assume all risks and liability in connection within.
THIS IS THE SOLE AND EXCLUSIVE REMEDY AND SOLE AND EXCLUSIVE LIABILITY OF ROYAL ADHESIVES & SEALANTS CANADA FOR DEFECTS IN OR FAILURE OF THIS
PRODUCT. THIS WARRANTY IS IN LIEU OF ALL OTHER WARRANTIES, WRITTEN OR ORAL, STATUTORY, EXPRESS OR IMPLIED, INCLUDING ANY WARRANTY OF MERCHANTABILITY OR FITNESS FOR A PARTICULAR PURPOSE.
-2-
INSTRUCTIONS:
1.
NB. Vite 2KMC est idéal pour remplir les vides autour des poteaux de clôture ou de boite aux lettres mais n’est pas prévu pour des
fonctionsporteuses telles que stabilisation de dalles par exemple.
2.
S’assurer SVP que vous êtes en possession des outils requis pour l’application:
Un couteau ou des ciseaux qui fonctionnent
Un objet avec un bord arrondi comme un escabeau ou une petite table
Des gants résistants aux produits chimiques (inclus avec Vite 2KMC)
Des lunettes de protection
3.
Toujours stocker les pochons de Vite 2KMC à 22°C - 25°C (72°F - 77°F) pendant au moins 2 heures avant leur utilisation.
Unproduit stocké à des températures plus basses demandera plus longtemps pour réagir, prendre du volume et se solidifier et il produira un volume plus
petit. Un produit stocké à des températures plus élevées réagira, prendra du volume et se solidifiera plus rapidement, raccourcissant le temps de
manipulation utile et produira un volume plus grand d’un composite plus fragile.
4.
Assurez-vous qu’il n’y a pas d’eau stagnante au fond du trou. C’est une bonne idée de mettre 3 à 4 “de gravier au fond du trou. Positionnez et
fixer (ou maintenez) le Poteau dans le trou en vous assurant qu’il est de niveau avant de précéder au mélange.
5.
ATTENTION! Bien que ce pochon possède une encoche prédécoupée, ayez toujours des ciseaux ou un couteau à côté du trou
afin que vous soyez prêt à couper le coin du sac immédiatement après le mélange, comme indiqué dans les étapes 6, 7 et 8 et en cas
d’absence d’encoche prédécoupée ou de dysfonctionnements. Si vous ne coupez le pochon immédiatement après avoir mélangé le produit , cela
permettra son expansion à l’intérieur du pochon, ce qui pourra conduire à sa rupture et au jaillissement du produit ; ceci qui pourra entrainer des blessures
ou des dégâts matériels. Le mélange doit être terminé et le pochon coupé dans la minute qui suit le retrait du clip noir.
Étape 6
6.
Pour libérer le clip extérieur noir qui divise le pochon, saisir les bords extérieurs de chaque bout du pochondans
le sens de la longueur et tirer vers l’extérieur de manière modérée jusqu’à ce que le clip se libère. ATTENTION : NE PAS
TIRER BRUTALEMENT SUR LE SAC ET NE PAS FAIRE GLISSER LE CLIP DU POCHON car cela pourrait déchirer
le sac et permettre au produit de jaillir ce qui pourrait occasionner des blessures ou des dommages matériels.
7.
Faire glisser le pochon en appliquant une force modérée pendant 30 secondes le long d’un bord dur et rond,forçant ainsi le produit dans le pochon à se déplacer d’un côté à l’autre (technique dite du « cireur de chaussure »).
ATTENTION : NE PAS DEPASSER LE TEMPS DE MELANGE ET NE JAMAIS LAISSER LE PRODUIT ENTAMER
SON EXPANSION DANS LE POCHON CAR CELA POURRA CONDUIRE A SA RUPTURE ET AU JAILLISSEMENT
DU PRODUIT, CE QUI POURRA ENTRAINER DES BLESSURES OU DES DEGATS MATERIELS.
8.
COUPER UN DES COINS DU POCHON IMMEDIATEMENT APRES AVOIR MELANGE ET VERSERLE
COMPOSITE DANS LE TROU AVANT QUE L’EXPANSION N’AIT COMMENCE. Conseil : afin d’éviter tout écoulement
non souhaité, repousser d’abord le produit du coin avant de couper celui-ci. ATTENTION : couper le pochon
immédiatement si le composite commence son expansion dans le pochon. L’EXPANSION DU PRODUIT A
L’INTERIEUR DU POCHON POURRA CONDUIRE A LA RUPTURE DE CELUI-CI ET AU JAILLISSEMENT DU PRODUIT, CE QUI
POURRA ENTRAINER DES BLESSURES OU DES DEGATS MATERIELS.
Étape 7
9.
Vider le pochon dans le trou, en imprégnant les côtés du poteau jusqu’au niveau du sol ou légèrement
au-dessus de celui-ci. Vite 2KMC est imperméable à l’eau après durcissement et aidera à protéger les poteaux contre le
pourrissement. Par conséquent, il est encore plus intéressant de remplir le trou jusqu’en haut en versant un peu plus de
Vite 2KMC et / ou en installant le poteau dans un trou le plus étroit possible. Après le versement initial, rouler le sac
complètement pour vider complètement le contenu dans le trou. NB : Ne pas bouger le poteau de haut en bas.
10.
Ajuster / mettre le poteau à équidistance des parois du trou si nécessaire dans les 10 secondes. Ne pas bouger
le poteau une fois que l’expansion a commencé. En approximativement 3 à 4 minutes, Vite 2KMC montera jusqu’à 3 à 5 po
(8-13 cm) en dessous du niveau du sol. Il n’y aura plus besoin de maintenir ou de soutenir le poteau 1 à 2 minutes après
cela.
Étape 8
11.
Approximativement 15 à 30 minutes plus tard, Vite 2KMC sera assez dur et pourra être recouvert de terre.
Attendre environ 2 heures pour que le produit ait pris complètement et pouvoir installer la clôture ou la porte.
REMARQUES:
A.
Si nécessaire, un trou peut toujours être rempli de plus de produit. En cas de rajout de produit, attendre au
minimum 5 minutes après que le pochon précédent ait terminé son expansion ou qu’il soit sec au toucher, avant de verser
plus de produit. Si trop de produit a été utilisé et qu’un débordement au-dessus du niveau du sol a eu lieu, attendre 10 à
15 minutes après avoir versé le produit ou que le celui-ci soit sec au toucher avant de le couper avec une scie à main ou
un cutter. Opérer avec précaution afin de ne pas soin de ne pas endommager la surface du poteau.
e
a
e
t
g
s
B.
NETTOYAGE : Utiliser un chiffon doux imprégné d’essence minérale pour retirer avec précaution les taches visibles de Vite 2KMC de la surface du
poteau (au-dessus du niveau du sol) ainsi que des outils avant que Vite 2KMC ne sèche. Une fois sec, Vite 2KMC ne peut être retiré que mécaniquement
au moyen d’une scie ou d’une lame. Opérer avec précaution afin de ne pas soin de ne pas endommager la surface du poteau.
SERVICE CLIENTÉLE
Royal Adhesives & Sealants Canada Ltd.
T: 1-800-268-6111 OU +1-416-679-5676
266 Humberline Dr.,
F: +1- 416-679-0511
Toronto, Ontario M9W 5X1
[email protected]
Canadawww.Vite2K.com / www.Fast2K.com / www.chemque.com
GARANTIE LIMITÉE : Royal Adhesives & Sealants Canada garantit la performance de ce produit, à condition qu’il soit entreposé et utilisé correctement. Si vous n’êtes pas satisfait,
soumettez votre réclamation par écrit à l’adresse de Royal Adhesives & Sealants Canada ci-dessous et Royal Adhesives & Sealants Canada remplacera ou remboursera le prix d’achat
de ce produit, à sa discrétion, s’il s’avère défectueux. Il appartient au consommateur d’utiliser ce produit tel que prévu et d’assumer tous les risques et responsabilités à l’intérieur
de ce cadre. CECI CONSTITUE LES SEULS ET UNIQUES RECOURS ET RESPONSABILITÉS EXCLUSIFS DE ROYAL ADHESIVES & SEALANTS CANADA POUR LES DÉFAUTS OU LA
DÉFAILLANCE DE CE PRODUIT. CETTE GARANTIE REMPLACE TOUTES LES AUTRES GARANTIES, ÉCRITES OU ORALES, LÉGALES, EXPRESSES OU IMPLICITES, Y COMPRIS TOUTE
GARANTIE DE QUALITÉ MARCHANDE OU DE CONFORMITÉ À UN USAGE PARTICULIER.
-2a-
)
r
,
d
Mode d’emploi
Pour usage au Canada
Janvier 2015
VITE 2K
MC
Matériau composite pour
scellement de poteau
ATTENTION!
AVANT D’UTILISER CE PRODUIT ET AVANT D’ÔTER LE CLIP EXTERIEUR NOIR ET DE MELANGER LE CONTENU,
ASSUREZ-VOUS D’AVOIR LU ET COMPRIS L’INTEGRALITE DE CE MODE D’EMPLOI, ET CE AFIN D’EVITER TOUTE
BLESSURE ET AUTRES DEGATS MATERIELS. UN USAGE INAPPROPRIE PEUT SE REVELER DANGEREUX.
LE POCHON PEUT SE ROMPRE ET LE CONTENU JAILLIR DU SAC SI CELUI-CI N’EST PAS OUVERT EN LE COUPANT
DANS LA MINUTE QUI SUIT LE RETRAIT DU CLIP.
UN PROBLÈME OU UNE QUESTION? APPELEZ-NOUS D’ABORD AU 1-800-268-6111 OU AU +1-416-679-5676
Si les instructions sont suivies correctement, l’emballage exclusif du Vite 2KMC empêche tout contact entre l’utilisateur et les parties A et B du
produit. Le produit mélangé versé dans le trou ne contient aucun produit dangereux.
ATTENTION! PEUT IRRITER LES YEUX ET LA PEAU. Ne pas mettre en contact avec les yeux ou la peau. Ne pas respirer les fumées. Porter
des gants résistants aux produits chimiques ainsi que des lunettes de protection pendant le mélange et le versement du produit.
NE PAS LAISSER A LA PORTEE DES ENFANTS.
TRAITEMENTS DE PREMIER SECOURS: La partie B contient MDI et polymères diisocyanates. En cas d’ingestion, appeler un centre antipoison. Ne pas provoquer de vomissements. En cas de contact avec les yeux, rincer avec de l’eau pendant au moins 15 minutes. En cas de contact
avec la peau, bien rincer avec de l’eau. Consulter un médecin dans tous les cas.
CALCULATEUR VITE 2KMC
NOMBRE DE POCHONS DE 367 ml / 12.4 oz liq PAR TROU
2 ft (61 cm)
Profondeur du trou
3 ft (91 cm)
4”
4”
6”
10”
6”
8”
9”
10”
9”
8”
Diamètre du trou
(10 cm) (15 cm) (20 cm) (23 cm) (25 cm) (10 cm) (15 cm) (20 cm) (23 cm) (25 cm)
Poteau 2 3/8” (6 cm)
1.5
3
0.5
2
3
0.5
1.5
4
1
Poteau 4” x 4” (10 x 10 cm)
2
2.5
3.5
2.5
1.5
1.5
2
Poteau 5” x 5” (13 x 13 cm)
Poteau 6” x 6” (15 x 15 cm)
-
-
1
0.5
1
2
-
-
1
2
2.5
NOMBRE DE POCHONS DE 770 ml / 26 oz liq PAR TROU
4 ft (122 cm)
6”
10”
9”
8”
(15 cm) (20 cm) (23 cm) (25 cm)
1
1.5
0.5
1
1.5
2
1
1.5
Poteau 5” x 5” (13 x 13 cm)
3 ft (91 cm)
Profondeur du trou
Diamètre du trou
Poteau 2 3/8” (6 cm)
Poteau 4” x 4” (10 x 10 cm)
Poteau 6” x 6” (15 x 15 cm)
-
1
0.5
1
6”
8”
9”
10”
(15 cm) (20 cm) (23 cm) (25 cm)
1
2
1.5
2
2.5
0.5
2
1.5
1
1.5
-
1
0.5
2
NB: La profondeur du trou doit être au minimum d’ 1/3 à 1/4 de la hauteur du poteau de clôture avec un minimum de 3 pieds (91 cm)
de profondeur pour les clôtures en maille de chaîne et poteaux métalliques et 2 pieds (61 cm) pour les poteaux en bois et en PVC. Plus
le trou est étroit et profond, meilleure est l’installation avec Vite 2KMC. En ce qui concerne le diamètre du trou, plus l’espace entre le
poteau et la paroi du trou est réduit, meilleur est le résultat. Par exemple, un trou de 6” (15 cm) est idéal pour l’installation d’un
poteau de 4x4 pouces (10x10cm) et un trou de 4 pouces (10 cm) est ideal pour un Poteau en metal 2” (5 cm). Dans les zones qui
connaissent des températures inférieures, le trou doit descendre au minimum 6 pouces (15 cm) sous la ligne de gel. Pour les autres
tailles de trous et de poteaux, contactez Royal Adhesives & Sealants Canada au 1-800-268-6111 ou +1-416-679-5676.
PM-1385-1
-1a-
G:\Product Information\Restricted Access\Administration Files\Fast 2K\Labels and Literature