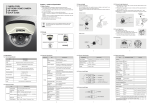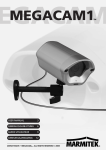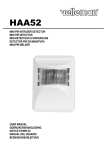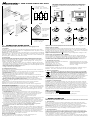
1
20W FLOOD LIGHT XFL-0202 L = Fase - Phase - Phase = Aarding - Terre - Earthing N = Nulleider - Neutre - Neutral wire 100 mm 180mm Fig.1 BRUIN GEEL BLAUW BRUN JAUNE BLEU BROWN YELLOW 140 mm N 205 mm L HET OPENEN VAN DE BEHUIZING DOET DE GARANTIE AUTOMATISCH VERVALLEN / L’OUVERTURE DE L’ALLIAGE ANNULE AUTOMATIQUEMENT LA GARANTIE / OPENING THE HOUSING AUTOMATICALLY VOIDS THE WARRANTY BLUE Fig.2 Fig.3 SENS. TIME LUX BOVENAANZICHT VUE DE DESSUS TOP VIEW Fig.6 ZIJAANZICHT Fig.4 VUE DE CÔTÉ TIME. TIME LUX SIDE VIEW TOT OP 12 10 METER JUSQU’À 12 10 MÊTRES Fig.9 10 METERS UP TO 12 Fig.5 NL. GEBRUIKSAANWIJZING MEMOSTAR 20W FLOOD LIGHT XFL-0202 met bewegingssensor 1. Inleiding Wij danken u voor de aankoop van de Memostar 20W Flood Light XFL-0202. Deze handleiding bevat belangrijke gebruikers- en veiligheidsinstructies. Wij raden u tevens aan deze handleiding te bewaren. Let op! Kijk voor installatie goed na of de plaats waar u uw verstraler wil installeren niet onderhevig is aan bouwvoorschriften waarbij de installatie door een erkend elektricien dient uitgevoerd. Voor alle nodige informatie inzake bedrading en aansluiting kan u alvast bij uw elektricien terecht. 2. Kenmerken De XFL-0202 is een krachtige LED verstraler met bewegingssensor die oplicht als er een beweging wordt gedetecteerd. De LED verstraler kan zowel binnen als buiten worden gebruikt en is de ideale vervanger van halogeen verstralers in allerlei toepassingen: afdak, binnenplaats, carport, garage, tuin, terras, gevel, hangaar, reclameborden, beursstanden… 99Krachtige LED met dubbele reflector voor een optimale verdeling van het licht. 99Stevige aluminium behuizing: efficiënte koeling, roestvrij, IP65 (waterbestendig). 99Eenvoudig en veilig te installeren m.b.v. draagbeugel en aansluitingskabel (0.5 m) 99Laag energieverbruik, hoog lichtrendement. 99Direct licht zonder opwarmingstijd. 99Lange levensduur van 30.000 uur. 3. Veiligheidsinstructies Hou de volgende voorzorgsmaatregelen in het oog alvorens de LED verstraler te installeren of te gebruiken: •SCHAKEL DE STROOM UIT vóór de installatie van het toestel of bij manipulatie na de installatie. •Installeer de LED verstraler nooit buiten bij regen of nat weer. •Bescherm de verstraler tegen schokken en verkeerd gebruik. •Elke aanpassing anders dan beschreven in deze handleiding is verboden uit veiligheidsoverwegingen. •Ander gebruik dan hierboven omschreven kan leiden tot schade aan het product en verhoogt het risico op kortsluiting, brand of elektrische schokken. •Haal het toestel nooit uit elkaar halen. Een verkeerde montage kan brand of gevaar voor elektrische schokken veroorzaken. •Dit product mag niet gebruikt worden door kinderen zonder toezicht van een volwassene. •Kijk nooit recht in een brandende LED want dit kan uw ogen schaden. •Oefen geen druk uit op de glazen lens om breuk te vermijden. •Nazicht en reparaties dienen uitsluitend door erkende technici te gebeuren. 4. Installatievoorschriften Zorg ervoor dat er zich geen obstakels bevinden in de detectiezone. Kies bij voorkeur een overdekte installatieplaats (bijv.: onder een afdak,…) en vermijd blootstelling aan slagregen. Om ongewenst triggeren van de sensor te vermijden, richt de verstraler niet op een warmte-of lichtbron of op objecten die kunnen bewegen door de wind zoals het gebladerte van een boom,…. Lees aandachtig de volgende instructies. 1. Sluit bij buiteninstallatie de LED verstraler aan op een stroomkring met wandschakelaar. 2. Draai de bouten aan de draagbeugel los (zie fig.1) en verwijder de verstraler. 3. Bevestig de beugel d.m.v. tenminste 2 schroeven (niet inbegrepen) op de gewenste plaats. Neem hierbij de volgende voorschriften in acht: a. Installeer de verstraler tussen 1,8m en 2,5m boven de grond; b. Installeer de verstraler horizontaal (zie fig.4) c. Zorg ervoor dat de verstraler stabiel en stevig bevestigd werd alvorens u het in gebruik neemt. 4. Bevestig de LED verstraler terug aan de gemonteerde beugel. Gebruik de bouten om de verstraler te kantelen en de stralingshoek in te stellen. Sluit de elektrische kabels aan op 220-240V zoals getoond in fig.2. Zorg ervoor dat u de elektrische kabels goed isoleert. Raadpleeg indien nodig een elektricien. 5. De verstraler is voorzien van een siliconen verzegeling en heeft beschermingsgraad IP65. Het openen van de behuizing doet de garantie automatisch vervallen en wordt dus ten stelligste afgeraden. Test modus Draai de LUX, TIME en SENS controleknop tot in de positie zoals weergegeven in fig. 6. Schakel de LED verstraler aan. De verstraler zal ± 5 seconden oplichten en nadien automatisch uitgaan. Beweeg door het detectiegebied om de sensor te testen. Bij detectie van een beweging zal de verstraler ± 5 seconden oplichten. U kan de bewegingssensor bijregelen om het gewenste detectiegebied aan te passen. Voor een kleiner detectiegebied, richt de sensor naar beneden. Voor een groter detectiegebied, richt de sensor naar boven. Aanpassing Tijd (TIME) De TIME aanpassing bepaalt hoelang de verstraler zal aanblijven na bewegingsdetectie: van ±5 seconden tot ±15 minuten. MAX. 5 MIN. MIN. 5 SEC Fig.7 Fig.8 Draai de Tijd controleknop met de klok mee om de tijdsspanne te vergroten en tegen de klok in om de tijdsspanne te verkleinen (zie fig.7). Aanpassing Lux (LUX) De LUX aanpassing bepaalt bij welk lichtdetectie niveau de verstraler zal worden getriggerd. Draai de Lux controleknop tegen de klok in tot op de -positie (zie fig. 8). In deze modus zal de sensor actief zijn als het donker is. U kan de Lux controleknop gebruiken om het gewenste lichtdetectie niveau te kiezen. Draai de controleknop tot aan de -positie om de gevoeligheid te verhogen en het triggeren overdag te activeren. Aanpassing gevoeligheid sensor (SENS) De controleknop SENS regelt de gevoeligheid van de sensor, meer bepaald de detectieafstand. De ideale detectieafstand verkrijgt u door de SENS controleknop met de pijl tot in het midden te draaien. Om de detectieafstand te vergroten (tot 12 meter) draait u de controleknop met de klok mee; om de detectieafstand te verkleinen (tot 3 meter) draait de controleknop tegen de klok in. 5. Technische gegevens Ingangsspanning: 100-240V AC (50/60 Hz) Maximale belasting: 20W Detectiezone: 120°, tot 12m Aanpassing tijd: 5 sec tot 5 min. Aanpassing lux: van 0 tot 1000 lux Afmetingen lamp: zie fig.3 Uitgangsspanning: DC 32V; 0,6A Waterbestendigheid verstraler:IP65 Waterbestendigheid sensor: IP43 Gewicht: 1,18kg. De LED verstraler voldoet aan de richtlijn voor fotobiologische veiligheid volgens EN62471. Voor meer technische info over de bewegingssensor zie fig.5. 6. Milieuvoorschriften Verwijdering van elektrische en elektronische apparatuur als afval (AEEE) Dit symbool aangebracht op het product of de verpakking geeft aan dat u het product niet mag wegwerpen met uw gewone huishoudelijk afval. Aan het einde van zijn levenscyclus is het noodzakelijk dat u het inlevert bij een daartoe aangewezen inzamelpunt voor het recycleren van afgedankte elektrische en elektronische apparatuur conform de geldende richtlijnen van het land waar u verblijft. Deze systemen dragen bij aan het behoud van natuurlijke hulpbronnen en waarborgen een verwerking van het toestel op een milieuvriendelijke manier. Neem contact met uw plaatselijke administratie belast met afvalverwerking voor meer informatie over deze inzamelsystemen. 7. Garantie en beperkingen Garantie: u geniet een garantieperiode van twee jaar indien dit product tekortkomingen vertoont in materiaal of vakmanschap. De fabrikant/invoerder zal binnen die garantietermijn alle defecten kosteloos herstellen of het toestel vervangen. Het defecte toestel dient vergezeld te zijn van het aankoopbewijs. Verkeerd gebruik, accidentele of opzettelijke beschadigingen worden niet gedekt door deze garantie evenals slijtage. Onder geen beding is de fabrikant/invoerder verantwoordelijk voor beschadiging aan voorwerpen of toestellen, noch voor gevolgschade of bijkomende schade of opgelopen kosten. Dit tast uw statutaire rechten niet aan. HEEFT U NOG VRAGEN? Stuur ons een e-mail [email protected] of raadpleeg onze website www.memostar.eu voor meer informatie. Invoerder/verdeler I.S. nv, Industriepark 18 - zone B, 2220 Heist-op-den-Berg (Belgium). ------------------------------------------F. MODE D’EMPLOI MEMOSTAR 20W FLOOD LIGHT XFL-0202 avec detecteur de mouvement 1. Introduction Nous vous remercions pour l’achat du Memostar 20W Flood Light XFL-0202. Ce mode d’emploi contient des consignes d’utilisation et de sécurité importantes. Nous vous conseillons de le conserver pour toute référence ultérieure. Attention! Assurez-vous que l’emplacement que vous prévoyez sera accepté par l’autorité compétente et n’exige pas d’installation par un installateur agréé. Il pourra vous informer au sujet du câblage et de l’installation correcte. 2. Caractéristiques Le XFL-0202 est un projecteur LED puissant avec détecteur de mouvement qui s’allume dès l’approche d’un corps en mouvement. Il peut être utilisé aussi bien à l’intérieur qu’à l’extérieur et remplace favorablement un projecteur halogène dans bien des applications: auvent, cour, parking, garage, terrasse, façade, hangar, jardin, végétation, panneau publicitaire, stand d’exposition,…. 99LED puissant avec double réflecteur pour une distribution optimale de la lumière 99Boîtier solide en aluminium: refroidissement efficace, inoxydable, IP65 (étanche) 99Installation facile et sûre grâce au support et au câble de connexion (0.5m) 99Basse consommation d’énergie, haut rendement lumineux. 99Eclairage instantané sans temps de chauffe. 99Longue durée de vie de 30.000h. 3. Consignes de sécurité Veuillez observer les précautions suivantes avant d’installer et de mettre en marche le projecteur LED: •COUPER l’alimentation ELECTRIQUE secteur avant d’installer l’appareil ou de manipuler l’appareil après l’installation. •Ne jamais installer le projecteur à LED à l’extérieur en cas de pluie ou de neige. •Protéger le projecteur de chocs et éviter une mauvaise utilisation. •Toute modification apportée autre que celles décrites dans ce mode d’emploi sont interdites pour raisons de sécurité. •Toute autre utilisation que celle décrite dans ce manuel peut endommager l’appareil et augmente le risque de court-circuit, d’incendie ou de décharges électriques. •Ne jamais démonter l’appareil. Le réassemblage incorrect pourrait provoquer un incendie ou déclencher des décharges électriques. •Ce produit ne peut pas être utilisé par de jeunes enfants sans la surveillance directe d’un adulte. •Ne jamais regarder droit dans la lumière d’un LED afin d’éviter toute lésion aux yeux. •Eviter toute pression sur le verre de protection de l’appareil; il risque de se briser. •Toute révision ou réparation ne peut être effectuée que par un technicien qualifié. 4. Instructions d’installation Choisissez le meilleur emplacement pour le projecteur. Assurez-vous qu’aucun obstacle ne se trouve dans le champ de détection. Choisissez de préférence un emplacement couvert et évitez l’exposition à la pluie battante. Pour éviter tout déclenchement intempestif du projecteur, évitez l’orientation du détecteur vers une source de chaleur ou de lumière, ou des objets pouvant bouger avec le vente comme le feuillage d’un arbre, … Lisez toutes les instructions ci-dessous. 1. Pour l’installation à l’extérieur, raccordez le projecteur LED à un circuit avec interrupteur mural intérieur. 2. Dévissez les vis du support inclinable (voir fig.1) et enlevez le projecteur. 3. Fixez le support à l’endroit souhaité, sur une surface solide, à l’aide de 2 boulons (non inclus) et suivez les consignes suivantes: a.Installez le projecteur à une hauteur entre 1.80 m et 2.50 m du sol. b.Installez le projecteur horizontalement (voir fig.4). c.Réalisez une fixation solide du projecteur avant toute utilisation. 4. Fixez à nouveau le projecteur LED au support. Utilisez les vis pour incliner le projecteur et obtenir l’angle de diffusion souhaité. Raccordez les câbles électriques comme indiqué sur la fig.2 au secteur 100-240V. Une bonne isolation des câbles s’impose. Consultez un électricien si nécessaire. 5. Le projecteur est équipé d’un cachetage de silicone et a un niveau de protection IP65. L’ouverture de l’alliage annule automatiquement la garantie et est donc fortement déconseillé. Mode de Test Tournez les boutons de contrôle LUX, TIME et SENS. dans la position démontrée dans la fig.6. Branchez le projecteur. Il s’éteindra automatiquement après ± 5 secondes. Si ensuite un mouvement est repéré dans la zone de détection le projecteur s’allumera pendant ± 5 secondes. Le détecteur de mouvement peut être adapté à la zone de détection. Pour une zone de détection plus réduite, orientez le détecteur vers le bas. Pour une zone plus étendue, orientez le vers le haut. Réglage de la Temporisation (TIME) Après avoir détecté le passage d’un corps en mouvement, le projecteur reste allumé pendant une durée réglage de 5 secondes à 15 minutes. Pour augmenter la durée, tournez le bouton TIME dans le sens des aiguilles d’une montre et dans le sens contraire pour réduire la durée (voir fig.7). Réglage de la luminosité de déclenchement (LUX) Le détecteur de présence met en veille le projecteur dès que la luminosité ambiante est supérieure à un niveau réglable. Tournez le bouton de réglage de la sensibilité lumineuse LUX dans le sens contraire des aiguilles d’une montre jusqu’à la position (voir fig.8). Dans ce mode, le projecteur se déclenche quand il fait sombre. Tournez le bouton vers pour augmenter la sensibilité et activer le déclenchement quand il fait plus clair. Réglage de la distance de détection (SENS.) Le bouton de contrôle SENS. permet de régler la sensibilité, à savoir la distance de détection. Pour une sensibilité optimale, tournez le bouton SENS. vers le centre. La distance de détection augmente jusqu’à max. 12 mètres en tournant le bouton dans les sens des aiguilles d’une montre. Pour réduire la distance jusqu’à 3 mètres, tournez-le dans l’autre sens. 5. Données techniques Tension d’entrée: 100-240V AC (50/60 Hz) Puissance maximale: 20W Zone de détection: 120°, jusqu’à 12m Durée d’éclairage réglable: 5 sec à 5 min Luminosité réglable: 0 à 1000 lux Dimensions du projecteur: fig.3 Tension de sortie: DC 32V; 0,6A Etanchéité du projecteur: IP65 Etanchéité du détecteur: IP43 Poids: 1,18kg Ce projecteur à LED est conforme à la directive sur la sécurité photo biologique selon la norme EN62471. Pour des informations techniques concernant le détecteur veuillez voir fig.5. 6. Consignes relatives à la protection de l’environnement Déchets d’équipements électriques et électroniques en fin de vie (DEEE) Ce symbole figurant sur le produit ou l’emballage signifie que le produit doit être éliminé séparément des autres déchets ménagers. A la fin de son cycle de vie, vous devez donc éliminer l’appareil dans les centres de triage et de recyclage prévus à cet effet, conformément aux directives en vigueur dans votre pays de résidence. Ainsi votre appareil usagé sera recyclé ou certains matériaux seront réutilisés de manière écologique afin de protéger les ressources naturelles. Pour plus d’information sur les systèmes de collecte, contactez votre organisation locale responsable des déchets. 7. Garantie et limitation de garantie Garantie: une garantie de deux ans couvre tous les défauts de matériaux et de fabrication de ce produit. Le fabricant/importateur s’engage à réparer sans frais ou à remplacer l’appareil. L’appareil défectueux doit être accompagné de la preuve d’achat. Une mauvaise utilisation, des dommages accidentels ou intentionnels et l’usure ne sont pas couverts par cette garantie. L’ouverture ou le démontage de ce produit annule automatiquement la garantie. Le fabricant/importateur ne pourra pas être tenu responsable de la détérioration d’objets ou d’appareils, de dommages directs ou indirects ou frais encourus. Ceci n’affecte pas vos droits statutaires. DESIREZ-VOUS PLUS D’INFORMATION? Envoyez-nous un e-mail à [email protected] ou consultez notre site web www.memostar.eu. Importateur/distributeur I.S. nv, Industriepark 18 - zone B, 2220 Heist-op-den-Berg (Belgium). --------------------------------------------------EN. OPERATING INSTRUCTIONS MEMOSTAR 20W FLOOD LIGHT XFL-0202 with motion sensor 1. Introduction Thank you for purchasing the Memostar 20W Flood Light XFL-0202. This manual contains important operating and safety instructions. We advise you to save this manual. Attention! Check if the installation is not subject to any building regulations in your area that require the installation to be carried out by an accredited electrician. An electrician can give you information for wiring and connecting the LED Flood Light. 2. Characteristics The XFL-0202 is a powerful LED Flood Light with adjustable movement detector for both interior and exterior use. If a movement is detected the Flood Light lights up. It is the ideal replacement for halogen Flood Lights in countless applications: porch (roof),yard, carport, garage, garden, vegetation, terrace, facade, hangar, advertising boards, exhibition stands,… 99Powerful LED with double reflector for optimal light distribution. 99Solid aluminum housing: efficient cooling, stainless, IP65 (water resistant) 99Simple and safe installation with support and connection cable (0.5m) 99Low energy consumption, high light output 99Direct light no warming-up time. 99Long lifetime of 30.000 h. 3. Safety instructions Before installing or using the LED Flood Light XFL-0202, please consider the following precautions: •SWITCH THE POWER OFF before installation of the device or manipulation after installation. •Never install the Flood Light outside in rainy or wet weather. •Protect the Flood Light against shocks and misuse. •All adjustments other than those described in this manual are prohibited for safety reasons. •Other use than described above can cause damage to the product and increase the risk of short-circuit, fire, electric shocks, etc. •Do not disassemble the device. Incorrect reassembly may result in electric shock or fire. •This product is not intended for use by young children without the supervision of an adult. •Never look directly into the burning LEDs as this could damage your eyes. •Do not put pressure on the glass lens of the device to avoid breaking it. •Maintenance and repairs may only be carried out by technicians. 4. Installation instructions Choose the ideal installation place for your LED Flood Light. Make sure that there are no obstacles in the detection area. For an installation outside preferably choose a place under a roof to avoid exposure to heavy rain. To avoid any false triggering do not point the Flood Light to a heat or light source or to objects that could move because of the wind such as tree leaves, … Please carefully read the instructions below. 1. For installation outside connect the LED Flood Light to a power circuit with wall switch. 2.Unscrew the bolts on the side of the support (see fig. 1) and remove the Flood Light. 3. Use at least 2 screws (not included) to mount the support to the desired location. Keep in mind the following instructions: a. Install the Flood Light between 1.8m and 2.5m above the ground; b. Install the Flood Light horizontally (see fig.4) c. Make sure you mount the Flood Light in a stable and firm manner before using it. 4. Fix the LED Flood Light back onto the mounted holder. Use the bolts to tip the Flood Light and adjust the viewing angle. Connect the electric wiring to the mains voltage 220-240V as shown in fig. 2. You will need to insulate your cables thoroughly to avoid short-circuits. If necessary, consult an electrician. 5. The Flood Light is equipped with a silicone sealing and has protection class IP65. Opening the housing automatically voids the warranty and is therefore highly advised against. Test mode Turn the LUX, TIME and SENS control knob anti-clockwise to the position as shown in fig.6. Turn on the Flood Light. It will automatically go out after ± 5 seconds. Walk through the detection area to trigger the Flood Light which will stay on for ± 5 seconds. Adjust the motion sensor to cover the desired detection area. For a smaller coverage area, point the sensor down; for a larger coverage area, point the sensor up. Time adjustment(TIME) The TIME adjustment controls how long the Flood Light will stay on after motion detection. Turn the TIME control knob clockwise to increase the time delay or anti-clockwise to decrease the time delay (see fig.7). Lux adjustment (LUX) The LUX adjustment determines at what lux level (light) the Flood Light will be triggered. Turn the LUX control knob anti-clockwise to the - position (see fig. 8). In this mode, the motion sensor remains inactive during daylight. You can use the LUX knob to choose the desired level of light detection. Turn the control knob to the - position to increase the sensitivity and allow triggering in daylight. Sensitivity adjustment (SENS) You can adjust the sensitivity of the sensor, more specifically the detection distance, by means of the SENS knob. The optimal sensitivity can be achieved by setting the SENS. control knob to its midpoint. Turn the control knob clockwise to increase the detecting distance (up to 12 meters) or anti-clockwise to decrease the detecting distance (down to 3 meters). 5. Technical data Input voltage: 100-240 V AC (50/60 Hz) Maximum load: 20W Detection area: 120°, 12m Time adjustment: 5 sec. to 5 min. Lux adjustment: 0 – 1000 lux Dimensions lamp: see fig.3 Output voltage: DC 32V; 0,6A Water resistant Flood Light: IP65 Water resistant Sensor: IP43 Weight: 1,18kg This Flood Light complies with the regulations for photo-biological safety according to EN62471. For further technical information on the motion sensor see fig.5. 6. Environmental recommendations: Waste from electrical and electronic equipment (WEEE) This symbol on the product or the packaging indicates that the equipment carrying this mark must not be thrown into general waste but should be collected separately and properly processed under local regulations. The appropriate take-back systems will reuse or recycle most of the materials of your end life equipment in an ecological way and diminish the pressure on the natural resources. Please contact your local waste administration if you need more information on the collection systems. 7. Warranty and warranty limitations Warranty: this product is warranted to be free from defects in material and operation for two years. If in the unlikely event it is found to be defective within this period of time, the importer/manufacturer will repair or replace it. When returning the defect device, the sales receipt must be enclosed. Warranty does not cover misuse, accidental or deliberate damage, wear and tear. Opening or disassembling the device automatically void the warranty. Under no condition can the importer/manufacturer be held liable for loss or damage to items or appliances, consequential or incidental damages or expenses incurred. This does not affect your statutory rights. FOR QUESTIONS: Please send us an e-mail at [email protected] or check our website www.memostar.eu Importer/distributor I.S. nv, Industriepark 18 - zone B, 2220 Heist-op-den-Berg (Belgium). www.memostar.eu