1
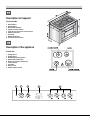
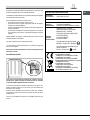
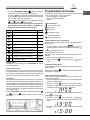
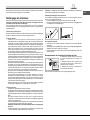
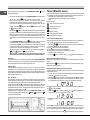
CP 965 R S
Français
Mode d’emploi
CUISINIÈRE
Sommaire
Mode d’emploi,1
Avertissements,2
Assistance,4
Description de l’appareil,5
Installation,6
Mise en marche et utilisation,8
Programmateur électronique,9
Précautions et conseils,12
Nettoyage et entretien,13
English
Operating Instructions
COOKER
Contents
Operating Instructions,1
Warnings,3
Assistance,4
Description of the appliance,5
Installation,15
Start-up and use,17
Timer (Electric oven),18
Precautions and tips,21
Maintenance and care,22
Ne jamais nettoyer l’appareil avec des nettoyeurs
vapeur ou haute pression.
Avertissements
ATTENTION : Cet appareil ainsi que ses parties
accessibles deviennent très chauds pendant leur
fonctionnement. Il faut faire attention à ne pas toucher
les éléments chauffants. Ne pas faire approcher les
enfants de moins de 8 ans à moins qu’ils ne soient
sous surveillance constante. Le présent appareil peut
être utilisé par des enfants de plus de 8 ans et par
des personnes présentant des capacités physiques,
sensorielles ou mentales réduites ou n’ayant pas
l’expérience ou les connaissances indispensables,
à condition qu’ils soient sous bonne surveillance ou
qu’ils aient reçu les instructions nécessaires pour une
utilisation de l’appareil en toute sécurité et à condition
qu’ils se rendent compte des dangers encourus. Les
enfants ne doivent pas jouer avec l’appareil. Les
opérations de nettoyage et d’entretien ne doivent pas
être effectuées par des enfants non surveillés.
ATTENTION : laisser un récipient de cuisson
contenant de l’huile ou de la graisse sur le foyer est
dangereux et risque d’entraîner un incendie.
Il ne faut JAMAIS essayer d’éteindre une flamme ou
un incendie avec de l’eau ! Il faut éteindre l’appareil
et couvrir la flamme avec un couvercle, par exemple,
ou avec une couverture anti-feu.
ATTENTION : risque d’incendie : ne pas laisser
d’objets sur les surfaces de cuisson.
ATTENTION : si la surface vitrocéramique est
fêlée, éteindre l’appareil afin d’éviter tout risque
d’électrocution.
Ne pas utiliser de produits abrasifs ni de spatules
métalliques coupantes pour nettoyer la porte du four
en verre, sous peine d’érafler la surface et de briser
le verre.
Les surfaces intérieures du tiroir (s’il y en a un)
peuvent devenir chaudes.
2
Essuyer tout liquide pouvant se trouver sur le
couvercle avant de l’ouvrir. Ne pas abaisser le
couvercle en verre (s’il y en a un) tant que les brûleurs
gaz ou la plaque électrique sont chauds.
ATTENTION : s’assurer que l’appareil est éteint
avant de procéder au remplacement de l’ampoule,
afin d’éviter tout risque d’électrocution.
! Lors de l’introduction de la grille, s’assurer que
l’arrêt est bien tourné vers le haut et se trouve dans
la partie arrière de l’enceinte.
Warnings
WARNING: The appliance and its accessible parts
become hot during use. Care should be taken to
avoid touching heating elements. Children less than 8
years of age shall be kept away unless continuously
supervised. This appliance can be used by children
aged from 8 years and above and persons with
reduced physical, sensory or mental capabilities or
lack of experience and knowledge if they have been
given supervision or instruction concerning use of the
appliance in a safe way and understand the hazards
involved. Children shall not play with the appliance.
Cleaning and user maintenance shall not be made
by children without supervision.
WARNING: Ensure that the appliance is switched
off before replacing the lamp to avoid the possibility
of electric shock.
! When you place the rack inside, make sure that the
stop is directed upwards and in the back of the cavity.
WARNING: Unattended cooking on a hob with fat or
oil can be dangerous and may result in fire.
NEVER try to extinguish a fire with water, but switch
off the appliance and then cover flame e.g. with a lid
or a fire blanket.
WARNING: Danger of fire: do not store items on the
cooking surfaces.
WARNING: If the surface in glass-ceramic is cracked,
switch off the appliance to avoid the possibility of
electric shock.
Do not use harsh abrasive cleaners or sharp metal
scrapers to clean the oven door glass since they can
scratch the surface, which may result in shattering
of the glass.
The internal surfaces of the compartment (where
present) may become hot.
Never use steam cleaners or pressure cleaners on
the appliance.
“Remove any liquid from the lid before opening it.
Do not close the glass cover (if present) when the
gas burners or electric hotplates are still hot.”
3
Assistance
! Ne jamais faire appel à des techniciens non agréés.
Lui indiquer :
• le type d’anomalie;
• le modèle de l’appareil (Mod.)
• son numéro de série (S/N)
Ces informations figurent sur la plaque signalétique apposée sur l’appareil
Assistance
! Never use the services of an unauthorised technician.
Please have the following information to hand:
• The type of problem encountered.
• The appliance model (Mod.).
• The serial number (S/N).
The latter two pieces of information can be found on the data plate located
on the appliance.
4
Description de l’appareil
Vue d’ensemble
1 Elément radiant
2 Elément radiant
3 Elément radiant/halogène
4 Voyants de chaleur résiduelle
5 Voyant de mise sous tension du four électrique
6 Sélecteur de fonctions
7Thermostat
8 Minuteur électronique
9 Commandes sélection foyers
60
0
Description of the appliance
Overall view
2
1 Heating element
2 Heating element
3 Radiant/halogen heating element
4 Residual heat indicator lights
5 Electric oven operation indicator light
6 Function selector
7Thermostat
8 Electronic timer
9 Hotplate selection controls
5
6
7
3
3
4
8
1
9
5
Installation
! Conserver ce mode d’emploi pour pouvoir le consulter à tout moment. En cas
de vente, de cession ou de déménagement, veiller à ce qu’il suive l’appareil.
Pour monter le câble d’alimentation, procédez comme suit :
• dévissez la vis du serre-câble “V” de même
que les vis des contacts.
• fixez les fils sous les têtes de vis selon le
2
schéma suivant.
1
! Lire attentivement les instructions : elles contiennent des conseils importants
sur l’installation, l’utilisation et la sécurité de l’appareil
! L’installation de l’appareil doit être effectuée par un professionnel du secteur
conformément aux instructions du fabricant.
! Important : avant d’effectuer toute opération de réglage, entretien, etc.,
assurez-vous que l’appareil soit déconnecté électriquement. Si l’appareil
doit obligatoirement rester sous tension, attention à bien prendre toutes les
précaution nécessaires.
1
2
3
4
5
V
Raccordemente
électrique
Tension
d’alimentation
Fusible
Section
230V -1+N ~ 50Hz
32* A
3x4 mm²
400V 2+N ~ 50Hz
32 A
4x4 mm²
400V -3+N ~ 50Hz
25 A
5x2.5 mm²
230V -2 ~ 50Hz
32* A
3x4 mm²
230V -3 ~ 50Hz
25 A
4x4 mm²
400V -2+2N ~ 50Hz
25* A
5x2.5 mm²
Positionnement et nivellement
! L’appareil peut être installé à côté de meubles dont la hauteur ne dépasse
pas celle du plan de cuisson.
! S’assurer que le mur en contact avec la paroi arrière de l’appareil est réalisé
en matériel ignifuge résistant à la chaleur (T 90°C).
420 mm.
Min.
Nivellement
min. 650 mm. with hood
min. 700 mm. without hood
420 mm.
Pour une installation correcte :
• installer cet appareil dans une cuisine, une salle à manger ou un studio
(jamais dans une salle de bains) ;
• si le plan de cuisson de la cuisinière dépasse le plan de travail des meubles,
il faut que ces derniers soient placés à au moins 500 mm de l’appareil.
• si la cuisinière est installée sous un élément
suspendu, il faut que ce dernier soit placé à
HOOD
au moins 420 mm de distance du plan.
Min. 600 mm.
Il faut prévoir une distance de 700 mm si
les éléments suspendus sont inflammables
(voir figure);
• ne pas placer de rideaux derrière ou sur les
côtés de la cuisinière à moins de 200 mm de
distance.
• pour l’installation de hottes, se conformer aux instructions de leur notice
d’emploi.
Min.
FR
Pour mettre l’appareil bien à plat, visser les
pieds de réglage fournis aux emplacements
prévus aux coins à la base de la cuisinière
(voir figure).
*Application du coefficient de simultanéitè conformément à la norme
applicable.
Raccordement électrique
L’APPAREIL DOIT OBLIGATOIREMENT ETRE RELIE A LA TERRE.
La table de cuisson est prévue pour fonctionner en courant alternatif à la
tension et fréquence d’alimentation indiquées sur la plaquette signalétique
(apposée sous la table ou à la dernière page de la notice). Assurez-vous que
la tension d’alimentation du réseau correspond bien à la tension indiquée sur
la plaquette signalétique. L’appareil n’est pas pourvu de câble d’alimentation
électrique car ce dernier doit être dimensionné en fonction du type de
raccordement électrique utilisé (voir schéma de connexion sous indiqué).
Utilisez un câble en caoutchouc type H05RR-F. Ouvrez le bornier en suivant
les illustrations de la figure ci-contre :
6
Remplacement du câble
Utilisez un câble en caoutchouc du type H05RR-F ayant une section 3 x 4 mm².
Le conducteur de mise à la terre jaune/vert devra être plus long de 2÷3 cm
par rapport aux autres conducteurs.
Branchement du câble d’alimentation au réseau électrique
Monter sur le câble une prise normalisée pour la charge indiquée sur l’étiquette
des caractéristiques (voir tableau des caractéristiques techniques).
En cas de raccordement direct au réseau, il faut intercaler entre l’appareil
et le réseau un interrupteur à coupure omnipolaire ayant au moins 3 mm
d’écartement entre les contacts, dimensionné à la charge et conforme aux
normes en vigueur dans le pays (le fil de terre ne doit pas être interrompu par
l’interrupteur). Le câble d’alimentation ne doit atteindre, en aucun point, une
température dépassant de 50°C la température ambiante.
TABLEAU DES CARACTÉRISTIQUES
! L’installateur est responsable du bon raccordement électrique de l’appareil
et du respect des normes de sécurité.
Dimensions
du four HxLxP
32,9 x 59,5 x 39,4 cm
Volume
lt. 78
Tension et
fréquence
d'alimentation:
tension 230/400V~ 3N 50Hz (voir plaque signalétique)
puissance maximum absorbée 10.000 W
Avant de procéder au branchement, s’assurer que :
• la prise est bien munie d’une terre conforme à la loi;
• la prise est bien apte à supporter la puissance maximale de l’appareil,
indiquée sur la plaque signalétique;
• la tension d’alimentation est bien comprise entre les valeurs indiquées sur
la plaque signalétique;
• la prise est bien compatible avec la fiche de l’appareil. Si ce n’est pas le
cas, remplacer la prise ou la fiche, ne pas utiliser de rallonges ni de prises
multiples.
! Après installation de l’appareil, le câble électrique et la prise de courant
doivent être facilement accessibles
! Le câble ne doit être ni plié ni excessivement écrasé.
! Le câble doit être contrôlé périodiquement et ne peut être remplacé que
par un technicien agréé.
! Nous déclinons toute responsabilité en cas de non respect des normes
énumérées ci-dessus.
La chaîne de sécurité
Etiquette
Energie e
Écoconception
FR
Règlement (UE) n ° 65/2014
complétant la directive 2010/30/UE.
Règlement (UE) n ° 66/2014
de compléter la directive 2009/125/CE.
la norme EN 60350-1,
la norme EN 60350-2,
la norme EN 50564
Consommation énergie convection
Naturelle – fonction four : Statique
Consommation énergie déclarée pour
Classe convection
Forcée – fonction four:
Ventilé.
Cet appareil est conforme aux Directives
Communautaires suivantes:
- 2006/95/CE du 12/12/06 (Basse Tension)
et modifications successives
- 2004/108/CE du 15/12/04 (Compatibilité
Electromagnétique) et modifications successives
- 93/68/CEE du 22/07/93
et modifications successives.
- 2009/142/CE du 30/11/09 (Gaz)
et modifications successives.
- 2012/19/UE et modifications successives.
-1275/2008 standby/off mode.
! Pour éviter tout basculement accidentel de l’appareil, causé par
exemple par un enfant qui grimpe sur la porte du four, les chaînettes
de sécurité DOIVENT obligatoirement être installées !
La cuisinière est équipée de chaînettes de sécurité qu’il faut fixer au mur
derrière l’appareil à l’aide d’une vis (non fournie), à la même hauteur que
leur fixation sur la cuisinière.
S’assurer que les chaînettes sont bien fixées à l’arrière de la cuisinière,
comme illustré (voir dessin) de manière à ce qu’elles soient bien serrées et
parallèles au sol.
! Une fois que l’installation est terminée, les chaînettes doivent être bien
tendues.
7
FR
Mise en marche et utilisation
Utilisation du plan de cuisson
Description des éléments de chauffe
Les éléments radiants “1-2-3” sont composés de résistances circulaires.
Ils deviennent rouges quelques dizaines de secondes à peine après leur
allumage.
Leur mode d’emploi est extrêmement simple car c’est le même que celui des
autres éléments chauffants. Se référer au tableau 1.
Les manettes de commande
Chaque foyer est équipé d’un bouton de commande “E” pour un réglage
continu de la température qui va d’un minimum de 1 à un maximum de 12.
Dans le tableau 1 vous trouverez les correspondances entre les positions
indiquées sur les boutons et l’utilisation préconisée pour chaque foyer.
Le bouton de commande du foyer “1-2” sert normalement à n’actionner que
la petite partie
/
du foyer. Pour actionner le foyer tout entier,
/
,
tournez le bouton au-delà de la position 12, sur le symbole
un déclic indiquera l’allumage du grand foyer. Utilisez enfin le même bouton
pour régler la température souhaitée sur une des 12 positions disponibles.
Pos.
Plaque automatique
0
Éteint.
1
Pour faire fondre le beur, le chocolat.
2
3
4
5
6
7
8
9
10
11
12
Pour réchauffer les liquides.
Utilisation du four
ATTENTION ! Le four est équipé
d’un système d’arrêts de grilles qui
permet de les retirer sans que ces
dernières sortent entièrement du
four (1).Pour sortir complètement les
grilles il suffit, comme illustré, de les
soulever en les saisissant par l’avant
et de les tirer (2).
! Avant toute utilisation, enlever les pellicules plastiques sur les côtés de
l’appareil
Pour crèmes et sauces.
! Lors de son premier allumage, faire fonctionner le four à vide, porte fermée,
pendant au moins une heure en réglant la température à son maximum. Puis
éteindre le four, ouvrir la porte et aérer la pièce. L’odeur qui se dégage est
due à l’évaporation des produits utilisés pour protéger le four.
Pot au feu - Blanquette - Entremets.
! Ne jamais poser d’objets à même la sole du four, l’émail risque de s’abîmer.
Pâtes - Riz.
Steaks - Poissons - Omelettes.
Fritures.
Allumage des deux zones de cuisson.
Le voyant de chaleur résiduelle
Il indique que la température d’un ou de plusieurs foyers est supérieure à
60°C même après l’extinction des foyers. La table est équipée de 4 voyants
de chaleur résiduelle, un pour chaque foyer.
Conseils d’utilisation de la table vitrocéramique
Pour obtenir des résultats optimums de votre table de cuisson, suivez certaines
règles fondamentales au moment de préparer ou de cuire les aliments.
• N’utilisez que des casseroles à fond plat pour qu’elles adhèrent bien à la
zone de cuisson.
• Utilisez des casseroles dont le diamètre couvre entièrement la surface de
cuisson pour utiliser à plein toute la chaleur disponible.
8
• Veillez à ce que le dessous des casseroles soit bien sec et propre pour
garantir un bon contact avec les foyers et une plus grande longévité de
votre table de cuisson et de vos casseroles.
• N’utilisez pas les mêmes casseroles que sur les brûleurs à gaz. Il y a
une telle concentration de chaleur sur les brûleurs à gaz que le fond des
casseroles peut se déformer, vous n’obtiendrez par conséquent jamais
le résultat souhaité en les utilisant ensuite sur des tables vitrocéramique.
FOUR ELECTRIQUE MULTIFONCTION
Ce four permet de combiner les résistances électriques entre elles dans neuf
combinaisons différentes et de choisir par conséquent celle qui convient le
mieux à votre plat en obtenant des résultats extrêmement précis.
Tournez la manette du SÉLECTEUR pour obtenir les fonctions de cuisson
indiquées dans le tableau à côté. Choisissez la fonction de cuisson et
de la manette du THERMOSTAT en face
amenez ensuite le symbole
de la température désirée.
• Pour des cuissons traditionnelles en mode CONVENTIONNEL (rôtis,
(chaleur dessus+dessous).
biscuits, etc.) utilisez la fonction
Avant d’enfourner vos plats, sur un seul niveau de préférence, attendez
que le four ait atteint la température sélectionnée.
Si vous désirez davantage de chaleur sur le dessus de vos plats ou en
dessous, amenez le sélecteur en face de la position
(résistance sole + turbine) ou bien
(résistance sole),
(résistance voûte).
“chaleur tournante” c’est l’air chauffé par une
• Dans la fonction
résistance et brassé par un ventilateur à l’intérieur du four qui assure la
cuisson. La montée en température du four est extrêmement rapide, vous
pouvez ainsi enfourner vos plats dès allumage du four. Vous pouvez aussi
cuire sur deux niveaux en même temps.
• La fonction “décongélation rapide”
, n’utilise aucun élément
chauffant mais uniquement la lampe du four et la ventilation.
• La cuisson au “gril” exige une puissance de chauffe très élevée qui permet
de saisir immédiatement les aliments en surface; elle est donc conseillée
pour la viande dont le coeur doit rester tendre.
Pour cuire au gril amenez le sélecteur “G” sur l’une des positions suivantes
(gril),
(maxi gril),
(maxi gril ventilé).
Pendant le fonctionnement du gril, laissez toujours la porte du four
fermée et placez la manette du thermostat sur une température ne
dépassant pas 200°C (même dans la function minigril).
Symbole Fonction
Puissance
—
0) Eteint
1) Résistance supérieure + inférieure
2350 W
2) Résistance inférieure
1300 W
3) Résistance supérieure
1050 W
4) Résistance gril
2000 W
5) Maxigril (Résistance gril + supérieure)
3050 W
6) Maxigril (Résistances gril + supérieure
+ ventilaterur)
3100 W
7) Résistance inférieure + ventilateur
1350 W
8) Résistance circulaire + ventilateur
2850 W
9) Décongélation rapide
50 W
Eclairage du four
L’éclairage du four est automatique dès que le SÉLECTEUR est placé sur
n’importe quelle position.
Voyant de fonctionnement
Ce voyant indique que le four est en train de chauffer et il s’éteint dès que le
four atteint la température sélectionnée au moyen du bouton. A présent, le
voyant s’allume et s’éteint alternativement, il indique ainsi que le thermostat
marche correctement pour garder la température du four constante.
Tournebroche
Cet accessoire n’est à utiliser que pour les cuissons au gril. Procéder comme
suit : enfiler la viande à cuire dans le sens de la longueur et la bloquer à l’aide
des fourches réglables. Introduire les supports “A” et “B” dans les trous prévus
sur la lèchefrite “E”, poser l’extrémité de la broche dans son logement “C” et
enfourner la grille sur le premier gradin du bas; engager à présent la broche
dans le trou du tournebroche en déplaçant l’extrémité de la broche vers le
logement “D” (voir figure).
Amenez le SÉLECTEUR sur les positions repérées par les symboles
(gril),
(maxi gril) ou
tournebroche.
(maxi gril ventilé) pour actionner le gril et le
Programmateur électronique
FR
Il permet de programmer le four ou le gril comme suit:
• départ cuisson différé avec durée établie;
• départ immédiat avec durée établie;
• minuteur.
Fonction des touches :
: minuteur heures, minutes
: durée cuisson
: fin de cuisson
: commutation manuelle
: sélection temps à rebours
: sélection temps en avant
Comment remettre à l’heure l’horloge digitale
Après raccordement à la ligne ou après une coupure de courant, l’afficheur
clignote sur: 0.00
puis, (dans les 4
• Appuyez simultanément sur les touches
secondes suivantes), remettez l’heure exacte à l’aide des touches et
.
La touche sert à augmenter le temps.
La touche sert à diminuer le temps.
Des mises à l’heure éventuelles peuvent être effectuées de deux façons
différentes:
1. Refaire complètement les opérations susmentionnées
2. Appuyer sur la touche
l’heure.
puis, à l’aide des touches
et , mettre à
Fonctionnement manuel du four
Après la sélection de l’heure, le programmateur va automatiquement sur la
position manuelle.
Note: Appuyez sur la touche pour rétablir le fonctionnement manuel après
chaque cuisson “Automatique”.
Départ cuisson différé avec durée établie
Il faut sélectionner la durée et l’heure de fin de cuisson. Supposons que
l’afficheur indique 10 heures
1. Tournez les manettes de commande du four sur la température désirée
(exemple: four statique, 200°C)
puis, (dans les 4 secondes qui suivent)
2. Appuyez sur la touche
programmez à l’aide des touches et la durée désirée. Supposons
une sélection de cuisson de 30 minutes; il y a affichage de:
En lâchant la touche, 4 secondes après, l’heure courante réapparaît avec le
symbole
et l’inscription auto
3. Appuyez sur la touche
puis, sur les touches et jusqu’à la
sélection de l’heure de fin de cuisson désirée, supposons que ce soit 13
heures
4. En lâchant la touche, l’afficheur indique au bout de 4 secondes l’heure
courante:
9
FR
L’inscription auto allumée rappelle qu’il y a programmation de la durée
et de l’heure de fin de cuisson en automatique. Le four s’allume alors
automatiquement à 12h30 pour s’éteindre ensuite au bout de 30 minutes.
Quand le four est allumé, la casserole allumée
la durèe de cuisson. En appuyant sur la touche
apparaît pendant toute
à n’importe quel moment,
vous pouvez afficher la durée programmée, en appuyant sur la touche
vous pouvez afficher l’heure de fin de cuisson.
En fin de cuisson, un signal acoustique retentit; pour l’interrompre,
appuyez sur une touche quelconque sauf sur e .
Correction effacement des données
• les données sélectionnées peuvent être modifiées à tout moment, en
appuyant tout simplement sur la touche correspondante et sur la touche
o .
• En effaçant la durée de cuisson, il y a aussi effacement automatique de
la fin du fonctionnement et vice versa.
• En cas de fonctionnement programmé, l’appareil n’accepte pas des temps
de fin de cuisson antécédents à ceux du départ de cuisson proposés par
l’appareil.
Départ immédiat avec durée établie
En ne programmant que la durée (points 1 et 2 du paragraphe “Départ de
cuisson différé avec durée établie”) la cuisson démarre aussitôt.
Pour annuler une cuisson déjà programmée
Appuyez sur la touche
et à l’aide de la touche
ramenez le temps à
puis appuyez sur la touche de fonctionnement manuel
.
Fonction minuteur
Le fonctionnement du minuteur prévoit la sélection d’un temps qui fait partir
un compte à rebours. Cette fonction ne contrôle ni l’allumage ni l’arrêt du four,
il n’y a qu’un signal acoustique une fois le temps écoulé.
Appuyez sur la touche
il y a affichage de:
A l’aide des touches et sélectionnez le temps désiré. En lâchant la
touche le temps commence immédiatement à courir, l’afficheur indique
l’heure courante.
Une fois le temps écoulé, un signal acoustique retentit, pour l’arrêter appuyez
sur une touche quelconque (sauf touches
et ) et le symbole
s’éteint.
Cuisson au four STATIQUE
Mets
Pâtisserie
Tarte aux fruits
Meringues
Pain de Gênes
Gâteau de l'Ange
Gênoise
Gâteau au chocolat
Fougasse
Choux
Biscuits en pâte feuilletée
Mille-feuille
Pâte brisée
10
Température
°C
Temps de
cuisson
(minutes)
130
130
150
160
160
170
170
200
200
200
200
60-70
30-40
20-30
40-50
40-50
30-40
40-50
15-20
15-20
15-20
15-20
Température
°C
Temps de
cuisson
(heures)
Viandes
Dinde (4-8 kg)
Oie (4-5 kg.)
Canard (2-4 kg.)
Chapon (2½-3 kg.)
Boeuf braisé (1-1½ kg)
Gigot d'agneau
Lièvre rôti (2 kg)
Faisan rôti
Poulet(1-1½ kg)
160
160
170
170
160
160
160
160
170
3-4½
4-4½
1½-2½
2-2½
3-3½
1-1½
1-1½
1-1½
1-1½
Poisson
200
15-25 minutes
Mets
Cuisson au GRIL
Mets
Côtelettes (0.5 kg)
Saucisses
Poulet grillé (1 kg)
Rôti de veau à la broche (0.6 kg)
Poulet à la broche (1 kg)
FR
Temps de
cuisson (minutes)
Position
de la grille
60
15
60
60
60
3ème gradin
2ème gradin
1er gradin
-
Le 1er gradin indique le
gradin situé dans la
position la plus basse.
Cuisson au four à CHALEUR TOURNANTE
Mets
Dolci
* Avec pâte fouettée, en moule
* Avec pâte fouettée, sans moule
Pâte brisée, fond de tarte
Pâte brisée avec farce humide
Pâte brisée avec farce sèche
* Avec pâte à levage naturel
Petits gâteaux
Viande
Rôtis cuits sur la grille
Veau
Boeuf
Rosbif à l'anglaise
Porc
Poulet
Rôtis cuits en plat
Veau
Boeuf
Maiale
Porc
Dinde en tranches
Canard
Braisés
Boeuf braisé
Veau braisé
Poissons
Filets, tranches, colin, merlan, sole
Maquereau, turbot, saumon
Huîtres
Soufflés et gratins
Gratin de pâtes
Gratin de légumes
* Soufflés sucrés et salés
* Pizza et chaussons
Croque-monsieur
Décongélation
Plats cuisinés
Viande
Viande
Viande
N° gradin en
partant du bas
Quantité
kg.
Température
°C
Temps
(minutes)
1-3
1-3-4
1-3-4
1-3
1-3-4
1-3
1-3-4
1
1
0.5
1.5
1
1
0.5
175
175
175
175
175
175
160
60
50
30
70
45
50
30
2
2
2
2
2
1
1
1
1
1-1.5
180
180
220
180
200
60
70
50
70
70
1-3
1-3
1-3
1-3
1-3
1-3
1
1
1
1-1.5
1.5
1-1.5
160
160
160
180
180
180
80
90
90
90
120
120
1
1
1
1
175
175
120
110
1-3
1.3
1-3
1
1
180
180
180
30
45
20
1-3
1-3
1-3
1-3-4
1-3-4
2
2
0.75
0.5
0.5
185
185
180
200
190
60
50
50
30
15
1-3
1-3
1-3
1-3
1
0.5
0.75
1
200
50
50
50
45
50
70
110
Les temps de cuisson peuvent varier en fonction de la nature des aliments, de leur homogénéité et de leur volume. Il est donc conseillé de choisir, lors de la
première cuisson, les valeurs les plus basses parmi les temps de cuisson indiqués et de les augmenter par la suite si nécessaire.
Remarques:
1) Les temps de cuisson indiqués ne comprennent pas le préchauffage du four, à l’exception de ceux repérés par un astérisque.
2) La position de la grille sur les gradins, indiquée dans le tableau, est celle optimale pour la cuisson sur plusieurs niveaux.
3) Les temps indiqués se référent à la cuisson sur un seul niveau; pour plusieurs niveaux, augmentez le temps de cuisson de 5-10 minutes.
4) Dans le cas de rôtis de viande de boeuf, veau, porc et dinde avec os ou roulés, augmentez le temps de cuisson de 20 minutes.
11
FR
Précautions et conseils
! Cet appareil a été conçu et fabriqué conformément aux normes
internationales de sécurité. Ces conseils sont fournis pour des raisons de
sécurité et doivent être lus attentivement.
•
Sécurité générale
• Cette notice concerne un appareil classe 1 (librepose) ou classe 2 sous-classe 1 (encastré entredeux meubles).
• Les instructions fournies ne sont applicables qu’aux pays dont
les symboles sont reportés dans la notice et sur la plaquette
d’immatriculation.
• Cet appareil a été conçu pour un usage familial, de type non professionnel.
• Cet appareil ne doit pas être installé en extérieur, même dans un endroit
à l’abri, il est en effet très dangereux de le laisser exposé à la pluie et aux
orages.
• Pour déplacer le four, se servir des poignées prévues à cet effet sur les
côtés de l’appareil.
• Ne pas toucher à l’appareil si l’on est pieds nus ou si l’on a les mains ou
les pieds mouillés ou humides.
• Cet appareil qui sert à cuire des aliments ne doit être utilisé que
par des adultes conformément aux instructions du mode d’emploi.
Toute autre utilisation (comme par exemple le chauffage d’une
pièce) est impropre et donc dangereux. Le fabricant décline toute
responsabilité en cas de dommages provoqués par un usage
impropre ou erroné.
• En cours de fonctionnement, les éléments chauffants et certaines
parties de la porte peuvent devenir très chauds. Attention à ne pas
les toucher et à garder les enfants à distance.
• Éviter que le cordon d’alimentation d’autres électroménagers touche à
des parties chaudes du four.
• Les orifices ou les fentes d’aération ou d’évacuation de la chaleur ne
doivent pas être bouchés
• Toujours saisir la poignée en son milieu: elle risque d’être très chaude à
ses extrémités.
• Utiliser toujours des gants de protection pour enfourner ou sortir les plats
du four.
• Ne jamais tapisser la sole du four de papier aluminium.
• Ne pas ranger de matériel inflammable à l’intérieur du four: si l’appareil
était par inadvertance mis en marche, il pourrait prendre feu.
• Contrôler toujours que les boutons sont bien dans la position “O” quand
l’appareil n’est pas utilisé.
• Ne pas tirer sur le cordon de l’appareil pour débrancher la fiche de la prise
de courant.
• N’effectuer aucune opération de nettoyage ou d’entretien sans avoir
auparavant débranché la fiche de la prise de courant.
• En cas de panne, n’essayer en aucun cas d’accéder aux mécanismes
internes pour tenter de réparer l’appareil. Contacter le service d’Assistance
(voir Assistance).
• Ne pas poser d’objets sur la porte du four ouverte.
• Si la cuisinière est installée sur un socle, prenez les précautions qui
s’imposent pour que l’appareil ne tombe pas de ce socle.
• Le plan de cuisson vitrocéramique résiste aux sautes de température et
aux chocs. Il risque toutefois de se briser sous l’effet de coups de cutter
ou d’ustensiles à bords coupants. Dans ce cas, coupez tout de suite
l’alimentation et faites appel à un centre technique agréé.
• Si la surface de la table est fêlée, éteindre l’appareil pouréviter tout risque
d’électrocution.
• Ne pas oublier que la température des foyers reste assezélevée pendant
trente minutes au moins après leurextinction.
• Garder à bonne distance de la table de cuisson tout objetqui pourrait
fondre, des objets en plastique ou enaluminium par exemple, ou des
12
•
•
•
produits à haute teneur ensucre. Faire très attention aux emballages,
au film plastiqueet au papier aluminium : au contact des surfaces
encorechaudes ou tièdes, ils risquent d’endommager gravementla table.
Il n’est pas prévu que cet appareil soit utilisé par des personnes (enfants
compris) présentant des capacités physiques, sensorielles ou mentales
réduites ou n’ayant pas l’expérience ou les connaissances indispensables,
à moins qu’elles ne le fassent sous la surveillance de quelqu’un
responsable de leur sécurité ou qu’elles aient été dûment formées sur
l’utilisation de l’appareil.
N’utilisez pas d’appareils de nettoyage à vapeur pour l’entretien de
l’appareil.
S’assurer que les enfants ne jouent pas avec l’appareil.
Le dispositif n’est pas destiné à être mis en œuvre par une minuterie
externe ou un système de télécommande séparée.
Mise au rebut
• Mise au rebut du matériel d’emballage : conformez-vous aux
réglementations locales, les emballages pourront ainsi être recyclés.
• La Directive Européenne 2012/19/UE sur les Déchets des Equipements
Electriques et Electroniques (DEEE), exige que les appareils ménagers
usagés ne soient pas jetés dans le flux normal des déchets municipaux.
Les appareils usagés doivent être collectés séparément afin d’optimiser
le taux de récupération et le recyclage des matériaux qui les composent
et réduire l’impact sur la santé humaine et l’environnement. Le symbole
de la ‘‘poubelle barrée’’ est apposée sur tous les produits pour rappeler
les obligations de collecte séparée.
Les consommateurs pourront confier leur appareil usagé au service
de collecte des collectivités locales ou de leurs groupements, ou si la
législation nationale le permet, le rendre au revendeur lors de l’achat d’un
nouvel appareil similaire.
Tous les principaux fabricants d’appareils ménagers travaillent activement
dans la création et la gestion de systèmes de collecte et d’enlèvement
des appareils usagés.
Economies et respect de l’environnement
• Évitez, dans la mesure du possible, de préchauffer le four et veuillez
toujours le remplir. Ouvrez le moins possible la porte de votre four, car
chaque ouverture laisse échapper la chaleur. Pour faire des économies
considérables d’énergie, éteignez le four cinq à dix minutes avant la fin du
temps de cuisson programmé et utilisez la chaleur dégagée par le four.
• Les programmes automatiques sont élaborés sur la base des produits
alimentaires de qualité.
• Gardez les joints propres et bien rangés afin d’éviter toute perte d’énergie
par la porte.
• Si vous avez un contrat d’électricité de tarif minuté, avec l’option “cuisson
de retard”, sera plus facile à économiser de l’argent, en deplaçant le début
du programme dans les periodes à taux réduits
• Profitez au maximum de la chaleur résiduelle de votre plaque chauffante
en éteignant les plaques en fonte et les plaques vitrocéramiques
respectivement 10 et 5 minutes avant la fin du temps de cuisson.
• La base de votre casserole ou de votre poêle doit couvrir la plaque
chauffante. Si elle est plus petite, une quantité précieuse d’énergie sera
perdue et les casseroles qui débordent laisseront des résidus incrustés
qui peuvent être difficiles à enlever.
• Faites cuire vos aliments dans des casseroles ou des poêles à couvercle
et utilisez le moins d’eau possible. Faire cuire les aliments dans des
casseroles ouvertes augmente considérablement la consommation
d’énergie.
• Utilisez exclusivement des casseroles et poêles à fond plat.
• Si vous cuisinez un aliment qui nécessite beaucoup de temps, il est
préférable d’utiliser un autocuiseur qui est deux fois plus rapide et
économise un tiers de l’énergie.
! Ce produit est conforme à la nouvelle Directive européenne sur la réduction
de la consommation d’énergie en mode standby.
Nettoyage et entretien
Important : débranchez l’alimentation électrique de l’appareil avant de
procéder à toute opération de nettoyage.
Pour prolonger la durée de vie de votre appareil, nous vous conseillons
d’exécuter fréquemment un nettoyage général minutieux en respectant les
règles suivantes.
Important : n’utilisez pas de poudres abrasives, de détergents agressifs ou
de substances acides pour le nettoyage.
Démontage/montage de la porte du four
Pour faciliter le nettoyage à l’intérieur du four, vous pouvez déposer la porte
du four en procédant comme suit:
• Ouvrez complètement la porte et soulevez les 2 leviers “B”;
• Fermez à présent partiellement la porte et soulevez-la en dégageant les
crochets “A” comme illustré figure.
Intérieur de la porte du four :
Nettoyez la surface à l’aide d’un chiffon imbibé d’eau chaude et de détergent
liquide non abrasif, puis rincez et essuyez soigneusement.
L’intérieur du four :
• L’intérieur du four est revêtu d’un émail spécial microporeux et
autonettoyant qui, à une température de cuisson courante comprise entre
200 et 300 °C, oxyde et dissout complètement les projections de graisse
qui salissent les parois intérieures du four. L’opération de nettoyage est
ainsi extrêmement réduite: il suffit en effet, après chaque cuisson, de
passer sur les surfaces du four un chiffon humide pour enlever la mince
couche de poussière qui pourrait s’y déposer pendant la cuisson et
conserver ainsi intacte la propriété autonettoyante du four.
• En cas de débordements de liquides ou si les projections de graisse n’ont
pas été complètement éliminées (en cas par exemple de cuisson au gril
pendant laquelle les températures nécessaires à une action complète de
l’émail autonettoyant ne sont pas atteintes), il est recommandé de faire
fonctionner le four à vide à sa température maximale pour éliminer tous
les résidus de graisse ou autres.
• Si après de nombreuses utilisations, vous constatez des traces évidentes
de graisse sur les parois autonettoyantes, dues probablement au non
respect des règles d’entretien susmentionnées, procédez à un nettoyage
minutieux des surfaces avec un chiffon doux et de l’eau chaude (n’utilisez
aucun type de nettoyant), rincez et essuyez soigneusement.
• Ne raclez pas les incrustations éventuelles avec des objets pointus qui
risquent de rayer le revêtement autonettoyant.
• Si les surfaces autonettoyantes du four sont abîmées ou s’avèrent
inutilisables, par défaut d’entretien ou entretien mal exécuté ou après
de nombreuses années d’utilisation, vous pouvez commander un kit de
panneaux autonettoyants pour revêtir l’intérieur du four. Commandez-les
à nos services après-vente agréés.
• Cadre en aluminium avec un aspect inox. Ne jamais utiliser de produits
de nettoyage et degraissant non applicable sur l’aluminium.
Pour remonter la porte :
• Tenez la porte en position verticale, introduisez les 2 crochets “A” dans
les fentes ;
• Vérifiez que l’encoche “D” soit bien insérée sur le bord de la fente (déplacez
légèrement la porte en avant et en arrière);
• Porte complètement ouverte, décrochez les 2 leviers “B” vers le bas, puis
fermez la porte.
Remplacement de l’ampoule d’éclairage du four
1. Débrancher le four, enlever le couvercle
en verre du logement de la lampe (voir
figure).
2. Dévisser l’ampoule et la remplacer par
une autre de même type : tension 230 V,
puissance 25 W, culot E 14.
3. Remonter le couvercle et rebrancher le
four au réseau électrique.
! Ne pas utiliser la lampe du four comme éclairage de la pièce.
L’extérieur du four :
• Procédez au nettoyage quand le four est froid.
• Les parties en acier, et notamment les zones où sont présents les symboles
en sérigraphie, ne doivent pas être nettoyées avec des solvants ou des
produits détergents abrasifs. Utilisez de préférence un linge mouillé d’eau
tiède.
Des taches peuvent se former sur l’acier inox si ce dernier reste trop
longtemps au contact d’une eau très calcaire ou de détergents agressifs
(contenant du phosphore).
Il est par conséquent recommandé de rincer abondamment et d’essuyer
soigneusement les surfaces après leur nettoyage.
Important : frottez dans le sens horizontal qui est le sens de satinage
de l’acier.
• Après le nettoyage, vous pouvez traiter les surfaces pour les faire briller
: n’utilisez que des produits spéciaux pour acier inox.
13
FR
FR
Entretien du verre vitrocéramique
• Avant de commencer à cuisiner, nettoyez la surface de la table à l’aide d’un
chiffon humide pour enlever la poussière ou les restes d’aliments cuisinés
précédemment. La surface de la table doit être nettoyée régulièrement à
l’eau tiède et avec un produit non abrasif.
Utilisez, de temps en temps, des produits
de nettoyage spéciaux pour tables
de cuisson vitrocéramique. Enlevez
d’abord tous les restes d’aliments et
les projections de graisse à l’aide d’un
racloir à nettoyer du type
par exemple (pas fourni avec l’appareil).
Nettoyez la table de cuisson quand elle
est encore tiède; utilisez un produit de
nettoyage adéquat et du papier cuisine, frottez avec un chiffon humide et
essuyez. Utilisez un racloir pour éliminer immédiatement du foyer encore
chaud toute trace de papier alu, de plastique ou de matériel synthétique
qui auraient accidentellement fondu ou de sucre ou d’aliments à teneur
en sucre élevée.
Des produits de nettoyage spéciaux
forment une couche superficielle
transparente qui repousse la saleté. Cela
sert aussi à protéger la surface contre les
dommages causés par des aliments à
haute teneur en sucre. N’utilisez jamais
d’éponges à récurer ou de produits
abrasifs, les détergents chimiques
agressifs tels que les bombes pour le
nettoyage du four ou les produits détachants sont eux aussi à éviter.
14
Installation
! Before placing your new appliance into operation please read these operating
instructions carefully. It contains important information concerning the safe
installation and operation of the appliance.
! Please keep these operating instructions for future reference. Make sure that
the instructions are kept with the appliance if it is sold, given away or moved.
Use a H05RR-F-type rubber cable. Open the terminal board, following the
instructions for the adjacent figure:
To install the power supply cable, follow the instructions below:
• Loosen the cable clamp screw “V” and the
wire contact screws.
• Fix the wires under the screw heads in
2
accordance with the following diagram.
1
1
2
3
4
5
! The following instructions should be carried out by a qualified technician
to ensure that the appliance is installed, adjusted and technically serviced
correctly in compliance with current regulations.
! Important: any adjustments, maintenance, etc. must be carried out
after the appliance has been disconnected from the electricity supply.
Whenever it is necessary to maintain the electrical connections, proceed with
extreme caution.
V
Electrical connection
Power supply
voltage
Fuse
Crosssection
230V -1+N ~ 50Hz
32* A
3x4 mm²
400V 2+N ~ 50Hz
32 A
4x4 mm²
400V -3+N ~ 50Hz
25 A
5x2.5 mm²
230V -2 ~ 50Hz
32* A
3x4 mm²
230V -3 ~ 50Hz
25 A
4x4 mm²
400V -2+2N ~ 50Hz
25* A
5x2.5 mm²
Positioning and levelling
! The appliance may be installed alongside any cupboards whose height does
not exceed that of the hob surface.
! Make sure that the wall in contact with the back of the appliance is made from
a non-flammable, heat-resistant material (T 90°C).
420 mm.
Min.
min. 650 mm. with hood
min. 700 mm. without hood
420 mm.
Min.
To install the appliance correctly:
• Place it in the kitchen, the dining room or the studio flat (not in the
bathroom).
• If the top of the hob is higher than the cupboards, the appliance must be
installed at least 500 mm away from them.
• If the cooker is installed underneath a wall
cabinet, there must be a minimum distance
HOOD
of 420 mm between this cabinet and the top
Min. 600 mm.
of the hob.
This distance should be increased to 700
mm if the wall cabinets are flammable (see
figure).
• Do not position blinds behind the cooker or
less than 200 mm away from its sides.
• Any hoods must be installed in accordance with the instructions listed in
the relevant operating manual.
Levelling
If it is necessary to level the appliance, screw
the adjustable feet into the places provided
on each corner of the base of the cooker (see
figure).
*Application of the simultaneity coefficient in compliance with the relevant
standard.
Electrical connection
THE EQUIPMENT MUST BE EARTHED CORRECTLY.
The appliance is designed for operation with an alternating current at the
power supply voltage and frequency indicated on the data plate (this is located
underneath the appliance; alternatively the information may be found at the
end of the instruction manual).
Make sure that the local power supply voltage value is the same as the
value indicated on the data plate. The appliance does not come with a power
supply cable, because the size of this cable should be determined according
to the type of electrical connection used (see connection diagram below).
Replacing the cable
Use a rubber cable of the type H05RR-F with a suitable cross section of 3 x 4
mm². The yellow-green earth wire must be 2-3 cm longer than the other wires.
Connecting the supply cable to the mains
Install a standardised plug corresponding to the load indicated on the data
plate. The appliance must be directly connected to the mains using an
omnipolar circuit-breaker with a minimum contact opening of 3 mm installed
between the appliance and the mains. The circuit-breaker must be suitable for
the charge indicated and must comply with current electrical regulations (the
15
GB
GB
earthing wire must not be interrupted by the circuit-breaker). The supply cable
must not come into contact with surfaces with temperatures higher than 50°C.
! The installer must ensure that the correct electrical connection has been
made and that it is compliant with safety regulations.
Before connecting to the power supply, make sure that:
• The appliance is earthed and the plug is compliant with the law.
• The socket can withstand the maximum power of the appliance, which is
indicated on the data plate.
• The voltage is in the range between the values indicated on the data plate.
• The socket is compatible with the plug of the appliance. If the socket is
incompatible with the plug, ask an authorised technician to replace it. Do
not use extension cords or multiple sockets.
! Once the appliance has been installed, the power supply cable and the
electrical socket must be easily accessible.
! The cable must not be bent or compressed.
! The cable must be checked regularly and replaced by authorised technicians
only (see Assistance).
! The manufacturer declines any liability should these safety measures
not be observed.
Safety Chain
! In order to prevent the appliance from overturning accidentally, for
example in case of a child climbing onto the oven door, the safety
chains MUST be installed!
The cooker is provided with safety chains that must be fixed with a screw (not
supplied as accessory) on the wall behind the appliance, at the same height
as the fixing point on the appliance.
Make sure that the chains are fixed in the back of the cooker, as shown in the
drawing, in such way to be tight and parallel to the floor.
! When the installation process is complete, the chains must be kept in tension!
16
TABLE OF CHARACTERISTICS
Oven dimensions
32,9 x 59,5 x 39,4 cm
HxLxP
Volume
lt. 78
Voltage and
frequency
230/400V~ 3N 50Hz (see data plate)
Power supply Max 10 kW
Energy
Label e
Ecodesign
EU Directive no 65/2014
supplementing Directive 2010/30/EU.
EU Regulation no 66/2014
implementing Directive 2009/125/EC.
Standard EN 60350-1,
Standard EN 60350-2
Standard EN 50564
Energy consumption for Natural
convection – heating mode:
Convection mode
Declared energy consumption for
Forced convection Class –
heating mode: Fan assisted.
This appliance conforms to the
following European Economic
Community directives:
- 2006/95/EC dated 12/12/06 (Low
Voltage) and subsequent amendments.
- 2004/108/EC dated 03/05/89
(Electromagnetic Compatibility) and
subsequent amendments.
- 93/68/EEC dated 22/07/93 and
subsequent amendments.
- 2012/19/EU and subsequent
amendments.
- 1275/2008 standby/off mode.
Start-up and use
GB
Using the hob
Description of the heating elements
The radiant elements “1-2-3” consist of circular heating elements. These
become red a few seconds after they have been switched on.
They are extremely easy to use because they are similar to the other heating
elements. Please refer to table 1.
Control knobs
Each cooking zone is fitted with a control knob “5”, which can be used to
continuously adjust the temperature intensity level to values between a
minimum of 1 and a maximum of 12. Table1 lists the correspondences between
the positions indicated on the knob and the use for which the hotplates are
recommended.
• Make sure that pan bases are always clean and dry, in order to guarantee
perfect contact with the hob and to safeguard the durability of the hotplates
and the pans themselves.
• Do not use cookware which has been used with gas burners. The
concentration of heat from gas burners is such that it may warp the base
of the pan, and therefore the desired result will never be achieved if it is
then used on the glass ceramic hob.
Using the oven
/
The “1-2” hotplate control knob usually only activates the small
part of the hotplate. To activate the entire large hotplate, turn the knob past
WARNING ! The oven is provided
with a stop system to extract the
racks and prevent them from coming
out of the oven (1).
As shown in the drawing, to extract
them completely, simply lift the racks,
holding them on the front part, and
pull (2).
/
symbol; a click will indicate that the entire
position 12, to the
hotplate has been activated. The temperature level may now be adjusted to
the desired value, up to level 12, using the same knob.
Set.
Radiant Burner
0
Off.
1
To melt butter and chocolate.
! Before operating the product, remove all plastic film from the sides of the
appliance.
To heat liquids.
! The first time you use your appliance, heat the empty oven with its door
closed at its maximum temperature for at least half an hour. Ensure that the
room is well ventilated before switching the oven off and opening the oven
door. The appliance may emit a slightly unpleasant odour caused by protective
substances used during the manufacturing process burning away.
2
3
4
5
6
7
8
9
10
11
12
For creams and sauces.
For cooking at the boiling point.
For Roasts.
For boiling large pieces of meat.
For frying.
For utilising both cooking areas.
Residual heat indicator light
This indicates that one or more cooking zones are at a temperature greater
than 60°C, even after the cooking zones have been switched off. The hob is
fitted with 4 residual heat indicator lights, one for each cooking zone.
Advice for the operation of the ceramic glass hob
To achieve the best results using your hob, there are several basic suggestions
which should be taken into account while cooking or preparing food.
• Use pans with a flat base so as to ensure the pan adheres properly to the
cooking zone.
• Always use pans with a diameter which is large enough to cover the
cooking zone fully, in order to use all the available heat.
MULTI-FUNCTION OVEN
The oven offers new, different combinations of electrical heating elements;
by selecting the most suitable combination for the dish you wish to cook, the
results achieved will be very precise.The various functions can be selected
by turning SELECTOR KNOB to the following positions:
Symbol Function
0) Off
Power
—
2) Upper + Lower heating elements
2350 W
3) Lower heating element
1300 W
4) Upper heating element
1050 W
5) Grill heating element
2000 W
6) Maxigrill (Top + Grill heating elements)
3050 W
6) Maxigrill (Top + Grill heating elements) + fan
3100 W
7) Lower heating elements + fan
1350 W
8) Rear round heating element + fan
2850 W
9) Quick defrosting
50 W
17
GB
After selecting the cooking function, set THERMOSTAT KNOB
desired temperature.
to the
• For normal cooking procedures using CONVENTIONAL methods (roasts,
biscuits, etc.), use the
function (heat from above + below).
Only place the foods to be cooked in the oven when the selected
temperature has been reached and, if possible, use only one shelf.
If you wish more heat to be generated below or above the dish, turn the
selector to position
or
(heat from below),
Timer (Electric oven)
The programmer makes it possible to preset the oven and the grill in terms of:
• delay start with a preset length of time for cooking;
• immediate start with a preset length of time for cooking;
• timer.
Button functions:
: Timer with hour and minutes;
(heat from below + fan)
: Length of cooking time;
: End cooking time;
(heat from above).
“fan”, cooking takes place through the action of air which
• With function
has been preheated by a heating element and which is then circulated
inside the oven by a fan. The oven heats up very quickly, therefore the
foods you wish to cook may also be placed inside the oven as soon as it
is switched on. It is also possible to cook using two shelves at the same
time.
takes place without using the
• The “quick defrosting” function
heating elements; only the oven light and the fan are activated.
• Cooking with the “grill” uses a high power level, which makes it possible
to brown the surface of foods quickly; it is particularly suited to the cooking
of meats, which should remain soft and juicy on the inside.
To cook with the grill, turn selector knob to one of the following positions:
(grill),
(maxigrill),
(maxigrill with fan).
While the grill is operating, the oven door must be kept shut. The
thermostat knob should also be positioned at a maximum of 200°C.
Oven light
Lighting inside the oven is obtained automatically when SELECTOR KNOB
is set to any position. If you wish to switch the light on without activating any
of the heating elements, set the thermostat knob to 0°C.
Indicator light
This indicates the heating-up phase of the oven is underway; as soon as
the inside of the oven reaches the set temperature the light switches off. At
this point the indicator light will begin switching on and off intermittently; this
shows that the thermostat is operating correctly in order to maintain a constant
temperature inside the oven.
Spit - Rotisserie
This accessory should only be used when cooking with the grill. Proceed as
follows: thread the meat you wish to cook onto the rod positioned across the
oven lengthwise, fixing it in place with the adjustable forks supplied .
Position supports “A” and “B” in the relevant holes in dripping pan “E”, rest
the groove on the rod in slot “C” and use the guide rail to place the rack in
the lowest position in the oven; next position the rod in the rotisserie spit hole,
sliding the groove forwards to slot “D”.
Activate the grill and rotisserie spit by turning SELECTOR KNOB on the
commutator to the positions displaying the
(maxigrill with fan) symbols.
(grill),
(maxigrill) or
: Manual change;
: Change time (backwards);
: Change time (forwards).
How to Reset the Digital Clock
After the appliance has been connected to the power source or following a
power outage, the clock display will begin to blink and read: 0:00
buttons at the same time. Then use (within 4 seconds)
• Press the
the and buttons to set the exact time.
Use the button to move the time forwards.
Use the button to move the time backwards.
The time can also be changed in the following two ways:
1. Repeat all of the foregoing steps.
2. Press the
button, and then use the
and
buttons to reset the time.
Manual Operation Mode for the Oven
After the time has been set, the programmer is automatically set to manual
mode.
button to return the oven to manual mode after every
Note: Press the
“Automatic” cooking session.
Delayed Start Time with Preset Cooking Length
The length and the end cooking times must be set. Let us suppose that the
display shows 10:00.
1. Turn the oven control knob to the cooking setting and temperature desired
(example: convection oven at 200°C).
and the use (within 4 seconds) the and buttons to set
2. Press the
the length of the cooking time. Let us suppose that 30 minutes was set
for the length of the cooking time. In this case, the display will show:
Release the button, and within 4 seconds, the current time will reappear with
the
symbol and “auto.”
3. Press the
button, and then use the and
cooking time. Let us suppose that it is 13:00
buttons to set the end
4. Release the button and the display will show the current time within 4
seconds:
When “auto” is lighted, it indicates that the length and end cooking time
have been preset to operate in automatic mode. At this point, the oven will
turn on automatically at 12:30 in order to finish the cooking session within 30
minutes. When the oven is on, the
18
symbol (cooking pot) will appear on
the display for the entire length of the cooking process. The
button can
be pressed at any time to display the setting for the length of the cooking
button can be pressed to display the end cooking time.
time, while the
At the end of the cooking time, an acoustic signal will sound. Press any
button it turn it off (except the and buttons).
Immediate Start Time with Preset Cooking Length
When only the length of the cooking time is set (points 1 and 2 of the paragraph
entitled, “Delayed Start Time with Preset Cooking Length”), the cooking
session starts immediately.
Changing and Cancelling Settings
• The settings can be changed at any time by pressing the corresponding
button and using the or button.
• When the length setting for the cooking time is cancelled, the end cooking
time setting is also cancelled, and vice versa.
• When in automatic cooking mode, the appliance will not accept end cooking
times prior to the start cooking time proposed by the appliance itself.
Cancelling a Preset Cooking Time
Press the
button, and use the
button to set the time to:
Then press the manual cooking mode button
.
Timer Feature
The timer can be used to count down from a given length of time. This feature
does not control when the oven comes on or turns off, but, rather, it only emits
an acoustic signal when the preset time has run out.
Press the
button, and the display will read:
Then use the and buttons to set the desired time.
Release the button, and the timer will start at that second. The display will
show the current time.
At the end of the preset time, an acoustic signal will sound, which can be
turned off by pressing any button (except the and buttons), and the
symbol will turn off.
CONVENTIONAL oven cooking
Type of dish
Pastries and cakes
Fruit pie
Meringues
Sponge cake
Angel cake
Madeira cake
Chocolate cake
Flat sweet loaf
Puffs
Flaky pastry biscuits
Mille feuilles
Short crust pastry
Temperature Cooking time
°C
(minutes)
130
130
150
160
160
170
170
200
200
200
200
60-70
30-40
20-30
40-50
40-50
30-40
40-50
15-20
15-20
15-20
15-20
Type of dish
Temperature Cooking time
°C
(hours)
Meat
Turkey (4-8 kg)
Goose (4-5 kg)
Duck (2-4 kg)
Capon (2½-3 kg)
Braised beef (1-1½ kg)
Leg of lamb
Roast hare (2 kg)
Roast pheasant
Chicken (1-1½ kg)
160
160
170
170
160
160
160
160
170
3-4½
4-4½
1½-2½
2-2½
3-3½
1-1½
1-1½
1-1½
1-1½
Fish
200
15-25 minutes
19
GB
GB
GRILLING
Type of dish
Chops (0.5 kg)
Saussages
Grilled chicken (1 kg)
Veal on the spit (0.6 kg)
Chicken on the spit (1 kg)
Cooking time
(minutes)
Position of shelf
60
15
60
60
60
3rd guide rail
2nd guide rail
2st guide rail
-
The 1st guide rail is
understood as being
the lowest position.
FAN ASSISTED cooking
Guide rail no.
from bottom
Quantity
kg.
Temperature
°C
Time
(minutes)
1-3
1-3-4
1-3-4
1-3
1-3-4
1-3
1-3-4
1
1
0.5
1.5
1
1
0.5
175
175
175
175
175
175
160
60
50
30
70
45
50
30
2
2
2
2
2
1
1
1
1
1-1.5
180
180
220
180
200
60
70
50
70
70
1-3
1-3
1-3
1-3
1-3
1-3
1
1
1
1-1.5
1.5
1-1.5
160
160
160
180
180
180
80
90
90
90
120
120
1
1
1
1
175
175
120
110
Fish
Fillets, steaks, cod, hake, sole
Mackerel, turbot, salmon
Oysters
1-3
1.3
1-3
1
1
180
180
180
30
45
20
Timbales
Baked pasta dish
Vegetable pudding
* Sweet and savoury soufflés
* Pizzas and savoury rolls
Toasted sandwiches
1-3
1-3
1-3
1-3-4
1-3-4
2
2
0.75
0.5
0.5
185
185
180
200
190
60
50
50
30
15
1-3
1-3
1-3
1-3
1
0.5
0.75
1
200
50
50
50
45
50
70
110
Type of dish
Cakes
* With beaten mix, in mould
* With beaten mix, without mould
Short pastry, flan base
Short pastry with wet filling
Short pastry with dry filling
* With natural leavened mix
Small cakes
Meat
Roasts under the grill
Veal
Beef
English roast beef
Pork
Chicken
Roasts on a tray
Veal
Beef
Pork
Chicken
Turkey slices
Duck
Casseroles
Beef casserole
Veal casserole
Defrosting
Ready-to-eat meals
Meat
Meat
Meat
Cooking times may vary according to the nature of the foods, their homogeneity and their volume. When cooking a certain food for the first time, it is advisable to
choose the lowest values in the cooking time range given in the table and then increase them if necessary.
Notes:
1) Cooking times do not include oven pre-heating, except for those marked with an asterisk.
2) The indication given in the table for the guide rails is the one that should preferably be used in the event of cooking on more than one level.
3) The indicated times refer to cooking on one shelf only; for cooking on more than one level, increase the time by 5 ÷ 10 minutes.
4) For roast beef, veal, pork and turkey, on the bone or rolled, increase the times by 20 minutes.
20
Precautions and tips
! This appliance has been designed and manufactured in compliance with
international safety standards. The following warnings are provided for safety
reasons and must be read carefully.
General safety
• The instruction booklet accompanies a class 1(insulated) or class
2 - subclass 1 (recessed between2 cupboards) appliance.
• These instructions are only valid for the countries whose symbols
appear in the manual and on the serial number plate.
• The appliance was designed for domestic use inside the home and is not
intended for commercial or industrial use.
• The appliance must not be installed outdoors, even in covered areas. It is
extremely dangerous to leave the appliance exposed to rain and storms.
• When moving or positioning the appliance, always use the handles
provided on the sides of the oven.
• Do not touch the appliance while barefoot or with wet or damp hands and
feet.
• The appliance must be used by adults only for the preparation of
food, in accordance with the instructions provided in this booklet.
Any other use of the appliance (e.g. for heating the room) constitutes
improper use and is dangerous. The manufacturer may not be held
responsible for any damage caused as a result of improper, incorrect
and unreasonable use of the appliance.
• Do not touch the heating elements or certain parts of the oven door
when the appliance is in use; these parts become extremely hot.
Keep children well away from the appliance.
• Make sure that the power supply cables of other electrical appliances do
not come into contact with the hot parts of the oven.
• The ventilation and heat dispersal openings must never be obstructed.
• Always grip the oven door handle in the centre: the ends may be hot.
• Always use oven gloves when placing cookware in the oven or when
removing it.
• Do not use aluminium foil to line the bottom of the oven.
• Do not place flammable materials in the oven: if the appliance is switched
on accidentally, the materials could catch fire.
• Always make sure the knobs are in the “0” position when the appliance is
not in use.
• When unplugging the appliance, always pull the plug from the mains
socket; do not pull on the cable.
• Do not perform any cleaning or maintenance work without having
disconnected the appliance from the electricity mains.
• If the event of malfunctions, under no circumstances should you attempt
to perform the repairs yourself. Contact an authorised Service Centre (see
Assistance).
• Do not rest objects on the open oven door.
• If the cooker is placed on a pedestal, take the necessary precautions to
prevent the cooker from sliding off the pedestal itself.
• The glass ceramic hob is resistant to mechanical shocks, but it may crack
(or even break) if hit with a sharp object such as a tool. If this happens,
disconnect the appliance from the electricity mains immediately and
contact a Service Centre.
• If the surface of the hob is cracked, switch off the appliance to prevent
electric shocks from occurring.
• Remember that the temperature of the cooking zones remains relatively
high for at least thirty minutes after they have been switched off.
• Keep any object that could melt away from the hob, for example plastic
and aluminium objects, or products with a high sugar content. Keep plastic
or aluminium objects away from the hob: if you forget them on surfaces
that are still hot, they may cause serious damage to the hob.
• The appliance should not be operated by people (including children)
with reduced physical, sensory or mental capacities, by inexperienced
individuals or by anyone who is not familiar with the product. These
individuals should, at the very least, be supervised by someone who
assumes responsibility for their safety or receive preliminary instructions
relating to the operation of the appliance.
• Never use steam cleaners or pressure cleaners on the appliance.
• Do not let children play with the appliance.
• The appliance is not intended to be operated by means of an external
timer or separate remote-control system.
Disposal
• When disposing of packaging material: observe local legislation so that
the packaging may be reused.
• The European Directive 2012/19/EU on Waste Electrical and
Electronic Equipment (WEEE), requires that old household electrical
appliances must not be disposed of in the normal unsorted municipal
waste stream. Old appliances must be collected separately in order
to optimise the recovery and recycling of the materials they contain
and reduce the impact on human health and the environment.
The crossed out “wheeled bin” symbol on the product reminds you of your
obligation, that when you dispose of the appliance it must be separately
collected. Consumers should contact their local authority or retailer for
information concerning the correct disposal of their old appliance.
Respecting and conserving the environment
• Whenever possible, avoid pre-heating the oven and always try to fill it.
Open the oven door as little as possible because heat is lost every time it
is opened. To save a substantial amount of energy, simply switch off the
oven 5 to 10 minutes before the end of your planned cooking time and
use the heat the oven continues to generate.
• Automatic programmes are based on standard food product.
• Keep gaskets clean and tidy to prevent any door energy losses
• If you have a timed tariff electricity contract, the “delay cooking” option
will make it easier to save money by moving operation to cheaper time
periods.
• Make the most of your hot plate’s residual heat by switching off cast iron hot
plates 10 minutes before the end of your cooking time and glass ceramic
hot plates 5 minutes before the end of cooking time.
• The base of your pot or pan should cover the hot plate. If it is smaller,
precious energy will be wasted and pots that boil over leave encrusted
remains that can be difficult to remove.
• Cook your food in closed pots or pans with well-fitting lids and use as little
water as possible. Cooking with the lid off will greatly increase energy
consumption
• Use purely flat pots and pans
• If you are cooking something that takes a long time, it’s worth using a
pressure cooker, which is twice as fast and saves a third of the energy.
! This product complies with the requirements of the latest European Directive
on the limitation of power consumption of the standby mode.
21
GB
GB
Maintenance and care
Important: The appliance should be disconnected from the mains
supply before starting cleaning operations.
To ensure a long life cycle for the appliance, it is essential to carry out a
thorough general clean frequently, while observing the following instructions:
Inside the oven door:
Clean the surface with a cloth moistened with hot water and non abrasive
liquid detergent, then rinse and dry thoroughly.
Inside the oven:
• The inside of your oven is coated with a special self-cleaning microporous
enamel glaze which, at a normal cooking temperature of between 200
and 300°C, oxidises and completely eliminates all grease spots or other
substances that inevitably attack the inner walls of the oven. This way,
cleaning is kept right down to a minimum: as a matter of fact, you just need
to rub the surfaces of the oven with a wet cloth regularly, after cooking, to
remove the thin layer of ash that may have been deposited during cooking,
in order to maintain the self-cleaning property of the oven intact.
• After cooking where liquid has overflowed or when the dirt has not
been eliminated completely (for example when grilling food, and the
temperatures reached are not high enough for the full self-cleaning action
of the enamel to be performed), we recommend you leave the oven on
at maximum temperature so that all grease residue and the like are
eliminated.
• If, after long-term use, you find evident grease stains deposited on the
self-cleaning oven walls, probably due to your failing to follow the above
maintenance advice, clean the surfaces thoroughly with hot water and a
soft cloth (do not use any detergents), then rinse and dry thoroughly.
• Do not remove any dry caked-on grease using sharp objects, as these
could etch the self-cleaning coating.
• If the self-cleaning surfaces inside the oven are damaged or worn, due to
incorrect or poor maintenance or after many years of use, you can request
a kit of self-cleaning panels to line the inside of the oven. To order these,
just contact an authorised Service Centre.
Oven exterior:
• Only clean the appliance when the oven is cold.
• The steel parts and especially the areas with the screen-printed symbols
should not be cleaned with solvents or abrasive detergents. It is advisable
to use only a damp cloth with lukewarm water and washing up liquid.
Stainless steel may remain stained if in long-term contact with very
calcareous water or aggressive detergents (containing phosphorus).
It is therefore always necessary to rinse and dry all surfaces thoroughly
after cleaning.
Important: cleaning operations must be made horizontally, in the
direction of the steel glazing.
• After cleaning, any treatments to polish the surfaces may be performed:
only use specific products for stainless steel.
Important: do not use abrasive powders, aggressive detergents or acidic
substances for cleaning.
Disassembling/assembling the oven door
To make it easier to clean the inside of your oven, the oven door can be
removed, by proceeding as follows:
• Open the door completely and lift the 2 levers “B”;
• Now, shutting the door slightly, you can lift it out by pulling out the hooks
“A” as shown in figure.
22
To reassemble the door:
• With the door in a vertical position, insert the two hooks “A” into the slots;
• Ensure that seat “D” is hooked perfectly onto the edge of the slot (move
the oven door backwards and forward slightly);
• Keep the oven door open fully, unhook the 2 levers “B” downwards and
then shut the door again.
Replacing the oven light bulb
Make sure that the appliance is
disconnected from the electricity
supply.Unscrew the glass protective
cover from inside the oven, unscrew
the lightbulb and replace it with
an identical one suitable for high
temperatures (300°C) and with the
following characteristics:
- Voltage 230 V
- Wattage 15 W
- Type E 14.
! Do not use the oven lamp as/for ambient lighting.
Cleaning the glass ceramic hob
• Before cooking, the surface of the hob should be cleaned using a damp
cloth, to remove dust or residue from foods cooked previously. The surface
of the hob should be cleaned regularly with a solution of warm water and
non-abrasive detergent.
It will occasionally be necessary to use
special cleaning products for glass
ceramic hobs. First, remove all food
residues and traces of grease from the
hob using a special cleaning scraper,
(not supplied).
for example
Clean the hob when it is warm; use a
suitable cleaning product and absorbent
kitchen paper, polish with a damp cloth
and dry. Aluminium foil, plastic objects or synthetic materials which are
accidentally melted on the hob, even sugar or foods with a high sugar
content, should be removed from the hot cooking zone immediately, using
a scraper.
Special cleaning products form a
transparent protective layer which repels
dirt. This also protects the surface from
potential damage caused by foods with
a high sugar content. Never use abrasive
products or sponges; even aggressive
chemical detergents such as oven sprays
or stain removal products should be
avoided.
GB
23
195122578.00
05/2014 - XEROX FABRIANO
GB
Indesit Company S.p.A.
Viale Aristide Merloni,47
60044 Fabriano (AN)
www.scholtes.com
24