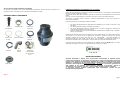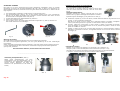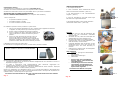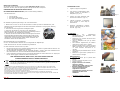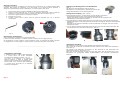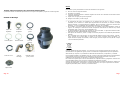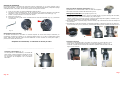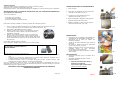
1
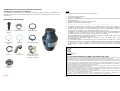
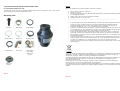
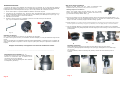
ISTRUZIONI PER L’INSTALLAZIONE DEL DISSIPATORE
Italiano - Pag. 1-7 (Garanzia Pag. 31)
FOOD WASTE DISPOSER INSTALLATION
English - Pages 8-13
INSTRUCCIONES PARA LA INSTALACION DEL TRITURADOR
Espaňol - Páginas 14-19
NOTICE D’UTILISATION ET DE MONTAGE
Français - Pages 20-25
ANWEISUNGEN ZUR INSTALLATION EINES ZERMALMGERÄTES
Deutch - Seiten 26-30
Caratteristiche tecniche
Electrical data
Caracteristicas técnicas
Caractéristiques techniques
Technische Eigenschaften
FWD 40E
1/2 Hp
220-240V/50Hp
380 W
A – 182 mm
B – 327 mm
C – 176 mm
D – 127 mm
Pag. 32
FWD 65E
3/4 Hp
220-240V/50Hz
550 W
A – 182 mm
B – 327 mm
C – 176 mm
D – 127 mm
FWD 75E
1 Hp
220-240V/50Hz
750 W
A – 191 mm
B – 362 mm
C – 186 mm
D – 162 mm
Pag. 1
Ad uso esclusivo degli installatori specializzati
Le istruzioni che seguono sono rivolte all’installatore qualificato, affinché compia le operazioni nel
modo più corretto e secondo le norme elettriche ed idrauliche in vigore.
ELEMENTI PER IL MONTAGGIO
CONDIZIONI GENERALI DI GARANZIA (solo per l’Italia)
La Res Nova Srl garantisce il dissipatore da difetti di fabbricazione, nei materiali e nella funzionalità
durante il periodo di garanzia. (2 anni)
La garanzia decorre dalla data d’acquisto riportata sul documento accompagnatorio o sullo scontrino
fiscale.
Per poter usufruire della garanzia è necessario conservare lo scontrino fiscale d’acquisto.
Nel periodo di garanzia saranno riparate o sostituite gratuitamente le parti con originali vizi di
costruzione o materiale.
Il servizio d’intervento in garanzia può essere rifiutato:
1
Tappo
convogliatore
2
Flangia lavello
•
3
Guarnizione
in gomma
•
•
•
4
Guarnizione
in carta
5
Anello in metallo
6
Ghiera di
fissaggio
Per difetti dell’apparecchiatura dipendenti da installazione e/o messa in funzione in modo
improprio.
Per difetti imputabili a fattori ambientali e/o climatici
Per utilizzo dell’apparecchiatura in modo anormale , con dolo o negligenza e comunque non
conforme alle prescrizioni e istruzioni d’uso.
Quando l’apparecchiatura sia stata manomessa, trasformata in qualsiasi modo o riparata da
tecnici non autorizzati
L’apparecchio difettoso dovrà essere recapitato al Centro Assistenza Tecnico o alla sede di Res Nova
Srl. Nel caso in cui l’utente non sia in grado di far pervenire il prodotto a propria cura, egli potrà
contattare l’ufficio tecnico della Res Nova Srl (Tel. 0461.993484 – Fax 0461.961136 e-mail
[email protected]) negli usuali orari di lavoro, per concordare le modalità di spedizione che
dovrà essere effettuata da un trasportatore convenzionato ed autorizzato dalla Res Nova Srl.
I materiali resi per riparazioni saranno soggetti ad un addebito minimo di 30,00 € oltre al recupero
delle spese di trasporto nel caso in cui gli stessi siano risultati privi di difetti
7
8
9
Morsetto
Tubo di
scarico
Flangia del
Tubo di scarico
con guarnizione
e viti
NOTA IMPORTANTE
1/bis
Tappo extra
Grossisti, Rivenditori e Agenti, oltre ad informare correttamente la clientela riguardo
l’utilizzo del dissipatore, si impegnano ad osservare le regole deontologiche proposte dal
gruppo D.R.A. di Unione Imprese Difesa Ambiente di A.N.I.M.A.; in particolare per quanto
riguarda la compilazione ed invio della speciale cartolina, fornita insieme ai dissipatori,
riportante i dati anagrafici dell’acquirente finale. – La raccolta e successiva gestione di tali
dati, affidata in via esclusiva all’associazione UIDA/DRA di A.N.I.M.A., servirà alla
costituzione di un “Catasto dei D.R.A.”, previsto dalla normativa vigente nazionale.
E’ comunque escluso l’utilizzo commerciale delle informazioni raccolte da parte
dell’associazione UIDA/DRA.
Pag. 2
Pag. 31
SICHERHEIT ELEMENTE
FISSAGGIO AL LAVELLO DEL DISSIPATORE
Das Gerät ist mit einer Schutzvorrichtung gegen Überlastung ausgestattet. Wenn ein fremder
Gegenstand ins Innere der Zermalmungskammer fällt oder wenn in dieser eine Überfüllung von
Nahrungsabfälle vorkommt, schaltet die Vorrichtung des Gerätes automatisch ab. In diesem Fall wie
folgt vorgehen:
1.
2.
3.
4.
5.
Den Stromschalter ausschalten und den Stecker von der Buchse ziehen.
Den Sechskantschlüssel (Abb.12), der mit den Zubehör geliefert wird, in der vorgesehenen
Öffnung, die am Boden des Gerätes liegt, einstecken und den Schlüssel nach rechts und links
drehen bis das Zermalmgerät befreit wird (Abb.13).
Fremde Gegenstände oder Materialüberfüllung entfernen.
Dann 5 bis 10 Minuten warten.
Die rote Taste "reset", die auf den Boden des Gerätes angebracht ist, (Abb.14) drücken und
dann wieder das Gerät normal betätigen
Levare la piletta di scarico del lavello (fig. 1)
Con l’aiuto di un cacciavite togliere la piletta di scarico dalla
vasca del lavello eliminando eventuali residui di stucco dalla
flangia.
Montaggio del Dissipatore
Allentare il morsetto (6), toglierlo e facendo leva con le mani
staccare tutto il gruppo di montaggio dal Dissipatore svitando e
togliendo la ghiera di fissaggio (5)e la guarnizione in carta (4)
A. Posizionare la piletta (2) nel foro del lavello, facendo attenzione affinché la guarnizione nera in
B.
C.
Fig. 12
Fig. 13
Fig. 1
gomma (3) sia correttamente posizionata.
Nel caso il Vs. lavello non sia in acciaio ma in materiale sintetico o porcellana, consigliamo di
usare al posto della guarnizione in gomma un sottile strato di stucco per sanitari.
Da sotto, infilate ora la guarnizione in carta, l’anello in metallo e provvedete ad avvitare la
ghiera di fissaggio (4-5-6) fissando anche le tre viti presenti sulla ghiera in modo che tutta la
piletta sia solidale con il lavello.
Passate un leggero strato di olio sul bordo della guarnizione in modo da facilitare l’innesto del
dissipatore e provvedete a montarlo, sorreggendolo fintanto che non avrete richiuso il morsetto
di fissaggio (D)
Fig. 14
Wartung des Gerätes
Wenn das Gerät normalerweise gebraucht wird, ist keine Reinigung notwendig.
Der Motor wird durchgehend geschmiert; mit einer guten Benützung ist es nicht notwendig Öl
hinzuzufügen.
Sollten vom Gerät unangenehme Gerüche aufsteigen, muss man einfach mehrere Eiswürfel mit einer
in viertel aufgeschnittenen Zitrone zermalmen. Durch diesen Vorgang wird Zermalmungskammer
gereinigt und parfümiert
Durch korrekten Gebrauch, wird ihr Gerät viele Jahre dauern
C.
B.
D.
A.
Collegamento idraulico
Attaccare il tubo di scarico al dissipatore con la flangia e viti in dotazione. (E.)
Collegare quindi lo scarico del dissipatore al sifone del lavello (esempi F.1-F.2)
Controllare che le tubazioni confluiscano nella colonna di scarico con la giusta pendenza
e rimuovere eventuali ostruzioni prima di procedere all’allacciamento.
_________________________________
Verbindung der Spülmaschine (Abb.11)
Mittels
einem
Schraubenzieher
und
einen
Gummihammer muss der Plastikpfropfen, der im
Anschlussrohr der Spülmaschine eingesetzt ist,
entfernt werden. Befestigen Sie dann das
Abflussrohr der Spülmaschine an das Gerät (Ø
25mm).
E.
F.1
Abb. 11
Pag. 3
Pag. 30
F.2
Collegamento elettrico
Tutti i modelli sono predisposti per funzionare a 220-240V/50 Hz.
Accertarsi che la tensione d’alimentazione corrisponda al valore suddetto.
Verificare che esista sotto il lavello una presa adatta all’uso o provvedere a installarla.
ISTRUZIONI PER LA CORRETTA INSTALLAZIONE
DEL KIT INTERRUTTORE PNEUMATICO (non compreso nella confezione)
Il Kit si compone di:
•
•
•
Un pulsante a soffietto (cromato)
Una staffa angolare in metallo
Un metro di tubetto di raccordo in PVC
GEBRAUCHSANWEISUNGEN:
1. den Pfropfen abnehmen.
2. einen reichlichen kalten Wasserstrahl fließen
lassen und das Gerät einschalten. (Abb. G-H)
3. die Nahrungsreste
eingeben. (Abb. I-L)
in
der
Zermalmkammer
4. nach der Zermalmung muss das Gerät einige
Sekunden leer eingeschaltet bleiben
Abb. G
5. das Gerät abschalten und für einige Sekunden
noch Wasser fließen lassen. (Abb. M-N)
Per installare il pulsante occorre procedere in questo modo:
1.
2.
3.
4.
Fare un foro da 35mm di diametro sul top o al lavello oppure applicare la staffa con
le apposite viti nella posizione più conveniente per l’uso
Svitare la ghiera di fissaggio del pulsante a soffietto
Inserire il pulsante nel foro o nella staffa. Infilare poi da
sotto la guarnizione e fissarlo riavvitando la ghiera in
plastica.
Inserire un capo del tubetto di raccordo in PVC nel
beccuccio del pulsante a soffietto e l’altro capo al
beccuccio dell’interruttore ad aria posto nella base del
dissipatore (immagine a lato) dopo aver svitato la sua
protezione a dado. Riavvitare infine il dado di protezione
Il dissipatore è ora pronto per essere usato
Per l’accensione e lo spegnimento premere una sola volta il pulsante a soffietto
E’ possibile installare in alternativa un RADIOCOMANDO
Abb. H
ACHTUNG:
Versichern Sie sich, dass die Installation des
Gerätes von den zustehenden Autoritäten
genehmigt wird.
Versichern Sie sich, dass die Druckknöpfe der
Wiederbetätigung sofort zugänglich sind
Benutzen des Gerätes nur für Nahrungsreste.
Das Gerät darf nicht für solide Materialien, wie
Glas oder Metall, benutzt werden
Das Gerät abschalten oder den Stecker von der
Steckbuchse ziehen, bevor man versucht den
blockierten Rotor mit einem Werkzeug zu
befreien.
Während dem Gebrauch des Zermalmgerätes
nur kaltes Wasser benutzen.
NICHT EINGEBEN:
Artischocken oder Ananasblätter,
Spargel, Sellerie, rohes Fleisch oder
rohe Hϋhnnerhaut
Fadenförmiger Stoff muss zunächst
zerschneidet und schrittweise mit
einer homogenen Mischung anderer
Speiseresten eingefϋhrt.
Abb. M
Sie könnten den Abfluss verstopfen!
DECLINIAMO OGNI RESPONSABILITA’ NEL CASO LE NORME ANTINFORTUNISTICHE NON VENGANO
RISPETTATE.
Pag. 4
Abb. L
Chemische Lösungen für die Sauberkeit
des Abflusses.
Übertriebene Fettmengen.
Plastikstoffe.
Prima di effettuare l’allacciamento accertarsi che:
•
L’impianto di alimentazione sia munito di efficace collegamento di terra secondo le norme e le
disposizioni di legge in vigore.
•
La presa e l’interruttore usati nell’allacciamento siano facilmente raggiungibili con
l’apparecchiatura installata e fuori della portata dei bambini.
•
Nell’impianto elettrico sia presente un interruttore differenziale di valore nominale 10A/0,03A
per la protezione contro i contatti indiretti (salvavita)
Questo è un apparecchio con collegamento di tipo Y, se il cavo di alimentazione è danneggiato deve
essere sostituito dal costruttore o dal suo servizio assistenza tecnica o comunque da una persona con
qualifica similare, in modo da prevenire ogni rischio.
Abb. I
Abb. N
Pag. 29
Elektrische Verbindung
Alle Modelle werden mit einer Spannung von 220-240 V/50 Hz betrieben.
Versichern Sie sich, dass die Spannung dem obengenannten Wert entspricht.
HINWEISE FÜR DIE RICHTIGE INSTALLATION
KIT PNEUMATISCHEN SCHALTER (nicht im Lieferumfang enthalten)
ISTRUZIONI D’USO:
1.
Togliere il tappo-convogliatore
2.
Fare scorrere un’abbondante getto
d’acqua fredda ed accendere il
dissipatore.(Fig. G-H)
3.
Inserire gli avanzi alimentari nella
camera di triturazione. (Fig. I-L)
4.
Lasciare funzionare il dispositivo
alcuni secondi a vuoto dopo la
macinazione.
5.
Spegnere il dissipatore e lasciare
scorrere l’acqua ancora per alcuni
secondi. (Fig. M-N)
Das Kit besteht aus:
•
•
•
Chrome Knopf
Eine metall Spannbϋgel
Ein meter PVC-Verbindungsrohres
Die Installierung des Knopfes erfolgt wie unten beschrieben:
1. Machen Sie ein Loch von 35 mm Durchmesser auf dem Top oder am Waschbecken, oder
befestigen Sie die Spannbügel mit den dazu bestimmten Schrauben in die geeignete Stellung
für den Betrieb.
2. Lösen Sie die Sicherungsmutter des Balgenknopfes
3. Legen Sie den Knopf ins Loch oder in den Spannbügel.
Schieben Sie dann von unten die Dichtung und befestigen Sie ihn
beim Zuschrauben der Plastiksicherungsmutter.
4. Stecken Sie das eine Ende des PVC-Verbindungsrohres auf die
Spitze des Balgenknopfschnabels und das andere Ende an den
Luftschalterschnabel am Fuße des Schneidegerätes (Siehe Bild)
nachdem Sie die Schutzmutter gelöst haben. Schrauben Sie
schließlich wieder die Schutzmutter zu.
Das Schneidegerät ist nun Einsatzbereit.
Um ein- und auszuschalten drücken sie ein einziges Mal den Balgenknopf
* Nach Wunsch können Sie eine Fernbedienung installieren
Vor dem Anschluss versichern Sie sich, dass:
•
Die Stromversorgung eine wirksame Erdverbindung hat und den vorgeschriebenen Normen und
Anordnungen des Schutzgesetzes entspricht.
•
Die angewendete Steckdose und der zweipolige Schalter müssen nach dem Geräteanschluss
leicht erreichbar sein und sich außerhalb der Kinderreichweite befinden.
•
In der elektrischen Schaltung muss ein Stromschutzschalter mit einem Nennwert von 10A/0,03A
für den Schutz gegen indirekte Kontakte vorhanden sein.
JEDE VERANTWORTUNG, WIRD IM FALL, BEI NICHT BEACHTETEN DER
VORGESCHRIEBENEN SCHUTZ- NORMEN ABGELEHNT.
Mischen Sie dieses Produkt, wenn Sie es entsorgen wollen, nicht mit gewöhnlichen
Haushaltsabfällen. Es gibt ein getrenntes Sammelsystem fϋr gebrauchte elektronische Produkte,
ϋber das die richtige Behandlung, Rϋckgewinnung und Wiederverwertung gemäß der bestehenden
Gesetzgebung gewährleistet wird.
Privathaushalte in den Mitgliedsstaaten der EU, in der Schweiz und in Norwegen Können ihre gebrauchten
elektronischen Produkte an vorgesehenen Sammeleinrichtungen kostenfrei zurϋckgeben oder aber an einen
Händler zurϋckgeben (wenn sie ein ähnliches neues Produckt kaufen).
Bitte wenden Sie sich in den Ländern, die oben nicht aufgefϋhrt sind, hinsichtlich der korrekten Verfahrensweise
der Entsorgung an die örtliche Kommunalverwaltung.
Auf diese Weise stellen Sie sicher, dass das zu entsorgende Produkt der notwendingen Behandlung,
Rϋckgewinnung und Wiederverwertung unterzogen wird, und so mögliche negative Einflϋsse auf die Umwelt und
die menschliche Gesundheit vermieden werden.
ATTENZIONE:
•
Assicurarsi
che
l’installazione
dell’apparecchio sia permessa dalle
autorità competenti.
•
Assicurarsi che i pulsanti di riarmo siano
subito accessibili
•
Usare il dissipatore solo per gli avanzi
alimentari.
•
Non utilizzare l’apparecchio per trattare
materiali duri come vetro e metallo
•
Spegnere l’apparecchio o togliere la spina
dalla presa prima di cercare di sbloccare
un rotore bloccato servendosi di un
utensile.
•
Usare solo acqua fredda durante l’uso del
trituratore.
•
Sostituire la guarnizione paraspruzzi in
caso di rottura o strappo
NON immettere:
•
Soluzioni chimiche per la pulizia dello
scarico.
•
Eccessive quantità di grasso e unto.
•
Materie plastiche.
•
Foglie di carciofo o di ananas,
asparagi, sedano,
carne cruda o pelle cruda di pollo
•
Elementi filamentosi devono
essere preventivamente
tagliuzzati e immessi
gradualmente insieme ad un mix
omogeneo di altri scarti
alimentari
potrebbero otturare lo scarico !
Pag. 5
Pag. 28
Fig. G
Fig. H
Fig. I
Fig. L
Fig. M
Fig. N
Elementi di sicurezza
Il dissipatore è fornito di un dispositivo di protezione per il sovraccarico. Se un oggetto estraneo cade
all’interno della camera di triturazione, o se nella stessa c’è un eccesso di rifiuti alimentari il
dispositivo automaticamente spegne il dissipatore. In tal caso operare come segue:
1.
2.
3.
4.
5.
Portare l’interruttore in posizione SPENTO o togliere la spina dalla presa.
Inserire la chiave esagonale (Fig. 12) fornita in dotazione nell’apertura posta sul fondo del
dispositivo e ruotare in senso orario e antiorario per sbloccare il trituratore (Fig. 13).
Rimuovere l’oggetto estraneo o l’eccesso di materiale.
Attendere 5/10 minuti.
Premere il tasto rosso di “reset” posto sul fondo del Tritarifiuti (Fig. 14) e riavviarlo
normalmente.
Fig. 12
Fig. 13
Entfernung des Abflussgarnitur vom Waschbecken
(Abb. 1)
Mit Hilfe eines Schraubenziehers entfernen Sie den
Abflussgarnitur vom Waschbecken, gleichzeitig entfernen Sie
etwaige Kittruckstände von der Sicherungsmutter
Abb. 1
Montage der Vorrichtung (Abb. A-B-C-D)
A. Die Druckklemme lockern, um den Flansch von dem Gerät zu entnehmen.
Die Befestigungszwinge lösen und die Papierdichtung abnehmen.
Nachher den Flansch und die Gummidichtung (3),wählen Sie die Geigneste in der
Abflussöffnung des Spülbeckens einlegen.
B. Die Papierdichtung und das Metallring auf die untere Seite legen und durch das benützen der
Befestigungszwinge und den entsprechenden Schrauben mit Kraft den Flansch an das Spülbecken
befestigen.
Das Gerät an den Flansch anschließen und die Druckklemme neu anlegen, man muss auf die
Montageseite achten.
C. Für ein leichteres Einfügen des Gerätes in den Flansch, sollte man mit Küchenöl den Rand des
Sprühschützers aus Gummi leicht beschmieren. (Abb. D)
Fig. 14
Manutenzione del Dissipatore
Usato normalmente il dissipatore non necessita di pulizia.
Il motore è sempre lubrificato; in condizioni normali di utilizzo non serve aggiungere olio.
Se dal dispositivo vi fosse emissione di odori sgradevoli, tritare una vaschetta di cubetti di ghiaccio
con l’aggiunta di un limone tagliato in quarti per pulire e profumare la camera di triturazione.
_________________________________
Collegamento lavastoviglie
E’ possibile collegare lo scarico della lavastoviglie
o il “troppo pieno” del lavello all’apposita
connessione sul dissipatore Ø 25mm. (Fig. 11)
Con l’aiuto di un cacciavite e un martello di
gomma rimuovere il tappo di plastica posto
all’interno della connessione per la lavastoviglie.
Fissare quindi il tubo di scarico della lavastoviglie
o il “troppo pieno” del lavello con un adeguato
accessorio al dissipatore.
A.
D.
B.
C.
Hydraulischer Anschluss
Das Abflussrohr an den Gerät mit den gelieferten Schraubflansch anschließen.
Dann erfolgt die Verbindung des Abflussrohres des Gerätes an den Siphon des Spülbeckens
(siehe Abb. E)
Den Pfropfen vom Abflussrohr des Gerätes vor dem Anschluss an das Überlaufrohr des
Spülbeckens entfernen. (Beispiele F.1-F.2)
Bevor man mit dem Anschluss vorgeht muss man acht geben, dass die Rohrleitungen in der
Abflusssäule mit genügendem Gefälle zusammenfließen und eventuelle Verstopfungen
entfernen
E.
Fig. 11
F.1
Pag. 6
Pag. 27
F.2
ANWEISUNGEN ZUR INSTALLATION EINES ZERMALMGERÄTES
Ausschließlich für spezialisierte Installateure
Die folgenden Anweisungen sind an qualifizierte Installateure gewandt, damit die Installation des
Gerätes in regelrechter Art und Weise und nach den elektrischen und hydraulischen Normen in Kraft
gesetzt wird.
NOTE
Ricordiamo che la corretta procedura d’uso è la seguente:
1.
2.
3.
Aprire l’acqua (getto massimo)
Accendere il Dissipatore
Spingere progressivamente il materiale organico all’interno della camera di triturazione fino alla
totale eliminazione
4. Lasciare scorrere l’acqua ancora per alcuni secondi
5. Spegnere il Dissipatore e chiudere l’acqua
________________________________________________________________________
Elemente für die Montage
•
1
Spülbecken
Pfropfen
2
Spülbeckenflansch
3
Gummidichtung
•
•
•
4
Faserpapierdic
htung
5
Metallring
6
Befestigungszwinge
7
8
9
Klemme
Abflussrohr
Flansch und Dichtung
für Abflussrohr mit
entsprech. Schraube
1/bis
Zusätzlicher
Pfropfen
•
E’ importante NON caricare la camera di triturazione prima di aver acceso l’acqua e il
Dissipatore. In questo caso o comunque usandone poca durante la triturazione si creerebbe un
impasto di difficile evacuazione o che potrebbe otturare lo scarico. Nel Dissipatore l’acqua è il
veicolo dei rifiuti; maggiore ne è la quantità usata, migliori sono i risultati.
Il Dissipatore non è dotato di lame, ma funziona come una grattugia. Questa particolarità rende
la macchina sicura. Al tempo stesso però la mancanza di lame, rende problematico lo
smaltimento di scarti molto fibrosi (carciofi, sedano o porri in quantità ecc.).
NON è consigliato usare acqua calda mentre si usa il Dissipatore. L’acqua fredda mantiene solide
le particelle di grasso eliminandole più facilmente.
Per velocizzare la triturazione tagliare o rompere in parti più piccole ossa e bucce
particolarmente grandi.
Se il Dissipatore funziona rumorosamente pur non triturando scarti duri come ossa o noccioli
della frutta, verificare che non sia caduto accidentalmente all’interno della camera di triturazione
un cucchiaino, un tappo di bottiglia o un altro oggetto estraneo. Spegnere il Dissipatore,
chiudere l’acqua e togliere l’oggetto servendosi di una pinza a manici lunghi o altro utensile
simile.
Fig. A
IT – La Direttiva 2002/96/EC (RAEE): informazioni agli utenti
Questa nota informativa è rivolta esclusivamente ai possessori di apparecchi che presentano il simbolo di (Fig. A)
nell’etichetta adesiva riportante i dati tecnici applicata sul prodotto stesso (etichetta matricolare):
Questo simbolo indica che il prodotto è classificato, secondo le norme vigenti, come apparecchiatura elettrica od
elettronica ed è conforme alla Direttiva EU 2002/96/EC (RAEE) quindi, alla fine della propria vita utile, dovrà
obbligatoriamente essere trattato separatamente dai rifiuti domestici, consegnandolo gratuitamente in un centro
di raccolta differenziata per apparecchiature elettriche ed elettroniche oppure riconsegnandolo al rivenditore al
momento dell’acquisto di una nuova apparecchiatura equivalente.
L’utente è responsabile del conferimento dell’apparecchio a fine vita alle appropriate strutture di raccolta, pena le
sanzioni previste dalla vigente legislazione sui rifiuti.
L’adeguata raccolta differenziata per l’avvio successivo all’apparecchio dismesso al riciclaggio, al trattamento e
allo smaltimento ambientabile compatibile contribuisce ad evitare possibili effetti negativi sull’ambiente e sulla
salute e favorisce il riciclo dei materiali di cui è composto il prodotto.
Per informazioni più dettagliate inerenti i sistemi di raccolta disponibili, rivolgersi al servizio locale di smaltimento
rifiuti, o al negozio in cui è stato effettuato l’acquisto.
I produttori e gli importatori ottemperano alla loro responsabilità per il riciclaggio, il trattamento e lo
smaltimento ambientale compatibile sia direttamente sia partecipando ad un sistema collettivo
Pag. 26
Pag. 7
FOOD WASTE DISPOSER INSTALLATION INSTRUCTIONS
NOTES
For specialized installers use only.
The following instructions are for qualified installers able to do all the operations in the most correct
way according to the electrical and plumbing rules.
Nous vous rappelons que le mode d’emploi correct est le suivant :
Assembly parts
1.
2.
3.
Ouvrir l’eau du robinet au maximum
Allumer le broyeur
Introduire progressivement les déchets alimentaires dans le chambre de trituration jusqu’à
leur complète élimination
4. Laisser couler l’eau pour encore quelques secondes
5. Eteindre le broyeur et couper l’eau
______________________________________________________________________
•
1
Conveyor
2
Sink flange
3
Flange gasket
•
•
•
4
Flange washer
5
Metal ring
6
Mounting ring
7
8
9
Hinged Clamp
Drain pipe
Tube flange,
tube rubber
gasket and
screws
1/bis
Extra sink
stopper
•
Il ne faut jamais verser les déchets à l’intérieur du broyeur sans avoir auparavant allumé le
broyeur et ouvert le robinet. Sans eau ou trop peu les déchets se transformeraient en
grumeau difficiles à évacuer ou bien boucheraient l’évier. La fonction de l’eau est de
transporter les déchets ; plus il y en a, meilleurs seront les résultats.
Le broyeur n’a pas de lames à son intérieur, il râpe les aliments au lieu de les couper ce qui
le rend aussi plus sur. Seul inconvénient,’il ne peut donc éliminer les aliments trop fibreux
avec la même efficacité (artichauts, céleri poireaux en grosse quantité).
Il n’est pas conseillé d’ utiliser l’eau chaude quand le broyeur est en route, en effet l’eau
froide aide à maintenir les particules de gras à ‘l’état solide ce qui facilite leur élimination.
Pour accélérer la trituration coupez ou cassez en petits morceaux les os ou écorces de fruits
particulièrement épais.
Si le broyeur fait trop de bruit alors qu’il n’y a pas de déchets particulièrement durs à son
intérieur (petits os ou noyaux de fruits) vérifiez qu’il n’y soit pas tombé une petite cuillère,
un bouchon en plastique ou un objet quelconque. Si c’est le cas, éteignez le broyeur,
coupez l’eau et retirez l’objet en question à l’aide d’une pince a manche long ou autre outil
du même genre.
Si vous souhaitez vous débarrasser de cet appareil, ne le mettez pas à la poubelle avec vos ordures
ménagères : Il existe un système de collecte séparé pour les appareils électroniques usagés, qui
doivent ètre récuperés. Traités et recyclés conformément à la législation
Les habitants des états membres de l’UE, de Suisse et de Norvège peuvent retourner gratuitement
leurs appareils électronique usagés aux centres de collecte agréés ou à un détaillant (si vous
rachetez un appareil neuf)
Dan les pays qui ne sont pas mentionnés ci-dessus, veuillez contacter les autorités locales pour
savoir comment vous pouvez vous débarrasser de vos appareils.
Vous garantirez ainsi que les appareils dontvous débarrassez sont correctement récupérés, traités et
recyclés et préviendrez de cette façon les impacts néfastes possibles sur l’environnement et la santé
humaine
Pag. 8
Pag. 25
MESURES DE SECURITE
Le broyeur est fourni d’un dispositif de protection pour la surcharge. Si un corps étranger tombe à
l’intérieur de la chambre de broyage, ou s’il y a dans cette dernière un excès de déchets alimentaires,
le dispositif éteint automatiquement le broyeur. En tel cas procéder de la manière suivante :
1.
2.
3.
4.
5.
Porter l’interrupteur en position ÉTEINT ou détacher la fiche de la prise.
Introduire la clé hexagonale (Fig. 12)fournie avec l’équipement dans l’ouverture placée sur le
fonds du dispositif et tourner en sens horaire ou anti-horaire pour débloquer le broyeur (Fig. 13).
Enlever le corps étranger ou l’excès de matériel.
Attendre 5/10 minutes.
Presser la touche rouge de « resettage » placé sur le fonds du Broyeur de déchets
(Fig. 14) et le réactiver normalement.
Sink mount flange installation
Remove the sink waste trap (fig. 1)with a screwdriver and
scrape the left over plumbers putty used to seal the sink
Garbage disposer installation
Loosen the hinged clamp (6)and levering with your hands
remove the garbage disposer flange, unscrew the mount ring
(5) and take the flange washer away. (4)
Fig. 1
A. Put the sink flange (2)in the discharge sinkhole, taking care that the black flange gasket (3)
sets perfectly well. If it’s not a stainless steel sink but a synthetic or a ceramic one, you better
apply a thin coat of sanitary stopper instead of flange gasket.
B. Under the sink: you need to firmly seat and attach the mounting ring which has three screws
used to tighten the mounting ring (4-5-6) assembly so it will apply firmly to the sink bottom
C. Join the garbage disposer to the flange and put the hinged clump in position (D) To facilitate
insertion between the garbage disposer and the flange put some cooking oil on the border of the
guard-splash.
Fig. 12
Fig. 13
Fig. 14
Entretien du Broyeur
Si on l’utilise normalement le broyeur n’a pas besoin de nettoyage.
Le moteur est toujours lubrifié ; en conditions normales d’emploi, il n’est pas nécessaire d’ajouter de
l’huile.
Si le cas se présente où le dispositif émette des odeurs désagréables, il suffit de broyer un plateau de
petits cubes de glace en ajoutant un citron coupé en quatre pour nettoyer et parfumer la chambre de
broyage
Employé correctement, votre appareil vous durera de nombreuses années
______________________________________________________
A.
C.
B.
D.
Plumbing Connection
Attach the disposer discharge tube with the tube flange using the given screw.
Connect the garbage disposer discharge tube (see fig.E) and tighten it to the drain trap
(ex. F.1-F.2)
To avoid problems, before connecting the plumbs, control the tubes cleaning them if
needed.
Branchage du lave-vaisselle (Fig. 11)
Ă l’aide d’un tournevis et d’un marteau détacher le
bouchon en caoutchouc situé à l’intérieur de la
connexion pour le lave-vaisselle.
Fixer ensuite le tube de décharge du lave-vaisselle
au dissipateur (Ø 25mm).
E.
Fig. 11
F.1
Pag. 9
Pag.24
F.2
MODE D’EMPLOI :
Electric connection
All models are preset to operate at 220-240V/50 Hz.
See to it that the feeding tension corresponds to the said value.
Make sure that a proper socket is installed under the sink. If not, fit it up.
1.
Détacher le bouchon.
2.
Laisser couler un abondant jet d’eau froide et
allumer le dissipateur. (Fig. G-H)
HOW TO FIT THE PNEUMATIC SWITCH KIT (not included in the package)
3.
Introduire les restes alimentaires
chambre de broyage. (Fig. I-L)
dans
4.
Laisser fonctionner le dispositif
secondes à vide après le broyage.
quelques
5.
Éteindre le broyeur et laisser couler l’eau
encore quelques secondes. (Fig. M-N)
la
Fig. G
The kit consists of:
•
•
•
One (chromium-plated) folded switch
One angular metal bracket
One meter long PVC connecting tube
How to fit the switch:
Fig. H
1.
Either make a 35mm diameter hole on the top of the sink or fix the bracket by
means of the screws in the proper position.
2. Unscrew the fastening ring nut of the folded switch.
3. Insert the switch into the hole or the bracket. Fit the gasket
from underneath and fasten it by screwing again the plastic
ring nut.
4. Insert one end of the PVC connecting tube into the beak of
the folded switch and connect the other end to the beak of
the air switch placed on the base of the disposer (see the
side picture) after having unscrewed its guard nut. Finally
screw again the guard nut.
The disposer is now ready to be used.
Press only once the folded switch to carry out the switching on and the turning off.
It is alternatively possible to install one REMOTE CONTROL
Before carrying out the connection make sure that:
•
The feeeding plant is provided with an efficient earth connection as per the rules and the
provisions of the law in force.
•
The socket and the switch being utilized can be easily reached by the installed appliance. See to
it they cannot be reached by children.
•
Into the electric plant there is one differential switch having a nominal value of minale
10A/0.03A to prevent any indirect contact (automatic circuit breaker).
IN CASE OF NON COMPLIANCE WITH THE ACCIDENT PREVENTION RULES WE WOULD DECLINE ANY
RESPONSIBILITY
ATTENTION :
•
•
•
•
•
•
S’assurer que l’installation de l’appareil soit
autorisée par les autorités compétentes.
Assurez vous que le bouton de réarmement
reste accessible lors de l’installation du
broyeur.
Utiliser le broyeur seulement pour les restes
alimentaires.
Ne pas utiliser l’appareil
pour traiter les
matériaux durs comme le verre et le métal.
Éteindre l’appareil ou enlever la fiche de la
prise avant de chercher à débloquer un rotor
bloqué en se servant d’un ustensile.
Utiliser seulement de l’eau froide durant
l’emploi du broyeur.
NE PAS METTRE :
•
Des solutions chimiques pour le nettoyage
de la décharge.
•
D’excessives quantités de graisse et d’
huile.
•
Des matières plastiques
•
Feuilles d’artichaut ou d’ananas,
asperges, céleri, viande crue ou peau
de poulet cru.
•
Les résidus filamenteux doivent être
préalablement déchiquetés et
introduits progressivement ensemble
avec un mélange homogène de
déchets alimentaire.
Autrement ils pourraient boucher votre évier !
Pag. 10
Pag. 23
Fig. I
Fig. L
Fig. M
Fig. N
Branchage électrique
Tous les modèles sont prédisposés pour fonctionner à 220-240 V/50Hz.
S’assurer que la tension de l’alimentation corresponde à la valeur susdite.
.
INSTRUCTIONS POUR UNE CORRECTE INSTALLATION DE L’ INTERRUPTEUR PNEUMATIQUE
PRET A MONTER (non inclus dans la confection)
El Kit se compone de:
•
•
•
OPERATING INSTRUCTIONS :
1. Remove the sink drain stopper
2.
Turn cold water on to a mediumhigh flow and turn the waste
disposer on. (Fig. G-H)
3.
Put all food waste into the
diaposer while the disposer is
operating and water running.
(Fig. I-L)
5.
Let the disposer continue to run
for about half a minute after the
grinding is over.
6.
Turn the disposer off and leave the
water running for half a minute
(Fig. M-N)
Un bouton à soufflet (chromé)
Un rebord angulaire en métal
Un mètre de tube de raccord en PVC
Pour une correcte installation du bouton à soufflet, suivez ce processus:
1.
2.
3.
4.
Faire un trou de 35mm de diamètre sur le plancher de l’évier ou bien fixer le
rebord angulaire en métal avec ses 3 visses à l’endroit le mieux indiqué pour
son utilisation.
Dévisser le contre-écrou du bouton à soufflet
Insérer le bouton dans le trou ou dans le rebord
angulaire. Introduire le joint par en dessous et le
fixer en resserrant le contre-écrou en plastique
Introduire une des extrémité du tube de raccord en
PVC dans le bec du bouton à soufflet et l’autre dans
l’interrupteur à air situé sous le broyeur (voir image)
après avoir préalablement dévissé l’écrou de
protection. Enfin remettre l’écrou en place.
Le broyeur est maintenant prêt à l’utilisation.
Pour l’allumer et l’éteindre, appuyer une seule fois sur le bouton à soufflet.
Fig. H
CAUTION:
•
•
•
•
•
•
Comme alternative, on peut aussi installer un
télécommande.
Fig. G
•
Make sure that the authorities permit the
installation of the waste disposer
The appliance must be installed so that the
reset buttons is readily accessible
The appliance must be positioned so that the
plug is accessible
Use the garbage disposer only for food waste.
Do not use the food waste disposer with hard
materials like glass or metal.
Turn the machine off or unplug it while trying
to unblock a blocked grinding wheel with a
tool.
Use only cold water.
Fig. I
Fig. L
DO NOT PUT INSIDE:
Branchage du câble d’alimentation électrique au réseau
Il est nécessaire d’interposer entre l’appareil et le réseau un interrupteur bipolaire, avec courant
nominal minimum de 10A répondant aux normes en vigueur.
Le câble de terre, jaune/vert, ne doit pas être interrompu par l’interrupteur.
•
•
•
Metal, glass, china.
Lye and drain cleaning chemicals.
Plastic materials.
•
Avant d’effectuer le branchage s’assurer que :
•
Le système d’alimentation soit muni de branchage de terre efficient selon les normes et les
dispositions de loi en vigueur.
•
La prise et l’interrupteur bipolaire utilisés dans le branchement soient facilement rejoignables
avec l’appareillage installé et hors de portée des enfants.
•
Que soit présent dans le système d’électricité un interrupteur différentiel de valeur nominale
10A/0,03 pour la protection contre les contacts indirects (disjoncteur différentiel)
NOUS DECLINONS TOUTE RESPONSABILITE AU CAS OU LES MESURES POUR EVITER LES
ACCIDENTS N’ONT PAS ETE RESPECTEES
Pag. 22
Pag. 11
artichoke or pineapple leaves,
asparagus, celery ,
filamentous elements should be
previously shredded and gradually
spilled together with a homogeneous
mix of other food waste
Fig. M
Fig. N
SAFETY INSTRUCTIONS
The waste disposer has an overload protection.
If an object falls into the housing or if there is overload the waste disposer stops automatically. You
should operate as follows:
1.
2.
3.
4.
5.
Put the switch of the plant in the OFF position or unplug it.
Insert the hex wrench (Fig.12) into the opening at the bottom of the motor shaft and rotate the
tool and the counter clockwise to unblock the food waste disposer(Fig. 13)
Remove the object or the overload.
Wait for 5/10 minutes.
Push the red reset disposer bottom (Fig. 14) and restart the machine.
Fig. 13
Fig. 12
Enlever la bonde de l'évier (Fig. 1)
Retirer la bonde de l'évier avec l'aide d'un tournevis, ôtant
toute trace de mastic adhéré à la bride.
Fig. 1
Montage du broyeur
A. Desserrer le clamp pour enlever la manchon. Dévisser la bague de serrage et détacher la joint en
papier.
Positionnez ensuite la manchon avec la joint en caoutchouc dans le trou de décharge de l’évier,
faisant attention à ce que le joint noir soit installé correctement.
B. Par en dessous, positionnez la joint en papier, l’anneau métallique et visser la bague à l’évier en
utilisant les 3 vis de fixage.
Unir l’appareil à la manchon et positionner à nouveau la bague de serrage en faisant attention au
côté à monter.
C. Pour un branchement plus facile du broyeur à la manchon, lubrifier légèrement avec de l’huile
de cuisine le bord du pare jets. (Fig. D)
Fig. 14
DISPOSER MAINTENANCE
With normal usage your disposer should not require any special care.
The motor is permanently lubricated and will not require oiling under normal usage conditions. If
used according to the operating instructions above, your disposer should not require cleaning.
However should it start to smell grinding a tray of ice cubes in the disposer will clean the grinding
components. Grinding a lemon cut into quarters will also give your disposer a fresh, clean smell.
If used in a proper way the will last for years
A.
D.
B.
C.
Branchement hydraulique
Attacher le tube d’évacuation au broyeur avec la bride e le vis fournie avec l’équipement.
Brancher ensuite la décharge du dissipateur au siphon de l’évier (voire l’exemple fig.E).
Détacher le bouchon dans le collecteur de décharge du dissipateur avant de le brancher avec
le « trop-plein » de l’évier. (voire l’exemple fig.F.1-F.2)
Contrôler l’état des tuyauteries en les libérant des éventuelles obstructions avant de procéder
au branchage.
Dishwasher Connection (Fig.11)
It is possible to connect the dishwasher discharge
tube with the food waste disposer Ø 25mm.
With the help of a screwdriver and a rubber
hammer remove the plastic stopper positioned in
the inner site of the dishwasher connection.
Fasten the dishwasher discharge tube to the
garbage disposer
E.
Fig. 11
F.1
Pag. 12
Pag. 21
F.2
MODE D’EMPLOI POUR L’INSTALLATION DU BROYEUR
NOTES
Reminding the right procedure for use the machine:
Ă usage exclusif des installateurs spécialisés
Le mode d’emploi qui suit est adressé à l’installateur qualifié, afin qu’il puisse exécuter les opérations
de la façon plus correcte possible et selon les normes électriques et hydrauliques en vigueur.
1.
2.
3.
4.
5.
Open the water (maximum jet)
Turn on the disposer
Gradually push the organic material within the grinding chamber until its total elimination
Let the water run for a few seconds
Turn off the disposer and turn off the water
Éléments pour le montage
1
Bouchon
2
Manchon de
bonde
3
Joint de bonde
4
Joint
5
Anneau
métallique
6
Anneau de
serrage
7
8
9
Bague de
serrage
Tube
d’évacuation
Bride
métallique, Joint
d’étanchéïté, Vis
de fixage
• It’s important not to load the grinding chamber before opening the water and turning on the
disposer or using a slow jet of water during the grinding, otherwise it would create a dough difficult
to evacuate or even worse clog the drain. Water is the waste vehicle so more water means better
results.
• Our disposer has no blades inside, it works like a grater. This peculiarity makes it safer. At the
same time, absence of blades complicates strong fibrous waste disposal (artichoke, celery, leeks in
big quantities, etc).
• It is not recommended to use hot water while using the disposer. Cold water keeps fat particles
solid, removing them more easily.
• To speed grinding cut or break into smaller pieces bones and peels, especially larger ones.
• If the disposer works loudly in absence of hard waste such as bones or fruits hazels, make sure
that a spoon, bottle cap or some object didn’t fall accidentally into the grinding chamber. If it is so,
turn off the disposer, turn off the water and remove the object using a pair of pincers with long
handles or any other similar tool.
If you want to dispose this product, do not mix it with general household waste. There is a separate
collection system for used electronic products in accordance with legislation that requires proper
treatment, recovery and recycling.
Private household in the member states of the EU, in Switzerland and Norvay may return their used
electronic products free of charge to designated collection facilities or to a retailer (if you purchase a
similar one).
For countries not mentioned above, please contact your local authorities for the correct method of
disposal.
By doing so you will ensure that your disposed product undergoes the necessary treatment, recovery
and recycling and thus prevent potential negative effects on the environment and human health.
1/bis
Bouchon Extra
Pag. 13
Pag. 20
NOTAS
Recordamos que el procedimento correcto de utilisación es el siguente:
MANUAL PARA USO EXCLUSIVO DEL INSTALADOR ESPECIALIZADO
que deberá efectuar las distintas operaciones en la mejor forma posible y según las normas vigentes.
Unidad de Montaje
6.
7.
8.
Abrir el chorro de agua al máximo
Encender el triturador
Introducir progresivamente el material orgánico al interior de la cámara de trituración hasta su
completa eliminación
9. Dejar correr el agua por algunos segundos
10. Apagar el triturador y cortar el agua
_______________________________________________________________________
•
•
1
Tapón del
fregadero
2
Brida del
Fregadero
3
Junta de
goma
•
•
•
4
Junta de papel
5
Anillo de metal
6
Anillo de
montaje
7
8
9
Anillo de cierre
Tubo de
descarga
Brida de metal,
junta, tornillo
Es importante NO inserir los alimentos en la cámara antes de abrir el grifo y encender el
triturador, de lo contrario o usando poca agua durante la trituración, se crearía un empasto
dificil de eliminar o que podría obturar el desagüe. Para el triturador el agua es el vehículo de los
desechos ; a mayor cantidad de agua utilizada mejores son los resultados.
El Triturador no contiene lamas, funziona como un raspador. Esta particularidad lo vuelve mas
seguro. Sin embargo la ausencia de lamas complica la eliminación de materias muy fibrosas
(alcachofas, apio o puerros en mucha cantidad, etc.).
Se aconseja NO usar agua caliente mientras se usa el triturador. El agua fría mantiene frías las
partículas de graso, deshaciéndolas mas facilmente.
Para apurar la trituración, cortar o romper los huesos pequeños o las cáscaras particularmente
grandes.
Si el triturador hace ruido aunque no esté moliendo desechos duros como huesos, cuescos de
fruta, verificar que no haya caído un objeto en su interior (cuchara, tapón de botella u otro
objeto extraneo. Apagar el triturador, cortar el agua, sacar el objeto con la ayuda de una pinza
u otra herramienta parecida.
Si desea deshacerse de este producto, no lo mezcle con los residuos generales de su hogar. De
conformidad con la legislación vigente, existe un sistema de recogida distinto para los productos
electrónicos que requiren un procedimiento adecuato de tratamiento, recuperación y reciclado.
Las viviendas privadas en los estados de la UE, en Suiza y Noruega pueden devolver gratuitamente
sus productos eletrónicos usados en las instalaciones de recolección previstas o bien en las
instalaciones de minoristas (si adquieren un producto similar nuevo).
En el caso de los paises que no se han mencionado en el párrafo anterior, póngase en contacto con
sus autoridades locales a fin de conocer al método de eliminación correcto.
Al actuar siguiendo estas instrucciones, se asegurarà de quel el producto de desecho se somete a los
procesos de tratamiento, recuperación y reciclaje necesarios, con lo que se previenen los efectos
negativos potenciales para el entorno y la salud humana.
1 bis
Tapón-extra
Pag. 14
Pag. 19
MEDIDAS DE SEGURIDAD
El triturador posee un dispositivo de protección para la sobrecarga. Si un cuerpo extraneo cae al
interior del triturador, o si hay en este último un exceso de residuos alimentarios, el dispositivo apaga
automáticamente el triturador. En tal caso proceder de la siguiente manera:
1.
2.
Poner el interruptor en posición APAGADO o desenchufarlo.
Introducir la llave hexagonal (Fig. 12) de autoservicio en la apertura situada en el fondo del
dispositivo y girar en el sentido horario o antihorario para liberar el triturador (Fig. 13).
Retirar el cuerpo extraneo o el exceso de residuo.
Esperar 5/10 minutos.
Presionar la tecla roja de "reset" colocada sobre el fondo del triturador (Fig. 14) y reactivarlo
normalmente.
3.
4.
5.
Fig. 12
Fig. 13
Sacar la brida de desagőe del fregadero (fig. 1)
Ayudándose de un destornillador retirar la brida del fregadero
eliminando eventuales residuos de macilla de la junta.
Fig. 1
Montaje del triturador (ver ejemplo fig. A-B-C-D)
A. Aflojar el anillo de cierre y sacarlo, retirar con ambas manos el grupo de montaje del triturador,
desatornillar y quitar el anillo de montaje y la junta de papel.
Colocar la brida con la junta de goma en el agujero de descarga del fregadero, cuidando que la
junta negra de gomma (3) sea colocada correctamente
B. Por debajo colocar la junta de papel, l’anillo de metal y fijar fuertemente el anillo de montaje con
los 3 tornillos.
C. Para facilitar la uniòn del triturador a la brida del fregadero, lubrificar levemente con aceite de
cocina el borde de la junta y montarlo, sosteniendolo hasta que estè colocado el anillo de cierre.
Fig. 14
Mantenimiento del Triturador
Si utilizada normalmente el triturador no necesita limpieza. El motor está siempre lubrificado; en
condiciones normales de empleo no es necesario añadir aceite. En el caso se desprendan malos
olores, basta triturar algunos cubos de hielo añadiendo un limón cortado en cuatro para limpiar y
perfumar la camara de trituración.
Empleado correctamente, su triturador le durará por aňos
A.
D.
B.
C.
Conexión al desague
- Conectar el tubo de descarga al triturador con la brida y el tornillo adjunto (ver E)
- Luego inserir la descarga del triturador en el sifón del fregadero. (ver F.1-F.2)
- Controlar el estado de las tuberias liberandolas de posibles obstrucciones antes de
seguir con la conexión.
______________________________________________________
Conexion al lavavajillas (fig. 11)
Con la ayuda de un destornillador y un martillo de
goma retirar el tapón de plastico situado al interno
de la conexión al lavavajillas. Luego fijar el tubo
de descarga del lavavajillas con el accesorio
adecuado.
E.
F.1
F.2
Fig. 11
Pag. 15
Pag. 18
Conexiòn electrica
Todos los modelos estàn proyectados para funcionar a 220-240 V/50Hz.
Asegurarse que la tensión corresponda a dicho valor.
Controlar que exista un enchufe adecuado debajo el fregadero, en caso contrario provver a instalarlo.
INSTRUCICONES PARA EL FUNCIONAMIENTO
1.
Sacar el tapón.
2.
Dejar caer un abundante chorro de agua fría y
encender el triturador. (Fig. G-H)
El Kit se compone de:
3.
. Un botón a fuelle (cromato)
. Una trabilla angular de metal
. Un metro de latiguillo de enlace en PVC
Introducir los restos alimentarios en la
Cámara de trituración. (Fig. I-L)
4. Dejar funcionando el dispositivo vacío algunos
segundos después de la trituración.
INSTRUCIONES PARA LA CORRECTA INSTALACION DEL KIT INTERRUPTOR PNEUMATICO
(no incluido en la confección)
5. Apagar el triturador y dejar correr el agua por
algunos segundos más. (Fig. M-N)
Para instalar el botón pulsable es necesario proceder de la manera siguiente:
1.
Crear un orificio de 35mm de diametro en el fregadero o aplicar el dispositivo de trinca
con sus respectivos pernos en la posición mas conveniente para el uso
2.
3.
Destornillar la abrazadera del boton pulsable
Insertar el boton en el orificio o en el dispositivo de trinca,
luego enfilar la junta por debajo y fijarla atornillando la
abrazadera en plastica
Insertar una punta del latiguillo en PVC en el pitorro del
boton a fuelle y la otra punta en el pitorro del interruptor
situado en la base del triturador (imagen lateral) despues de
haber destornillado su proteccion. Por fin atornillar la tuerca
de proteccion.
4.
Fig. G
Fig. H
PRECAUCIONES:
•
Asegurarse que la instalación del aparato esté
autorizada por las autoridades competentes
•
Asegurarse que el botón de rearme sea
facilmente accesible
•
Utilizar el triturador solamente para restos de
alimentos
•
No utilizar el aparato para triturar materiales
duros como el vidrio y el metal
•
Apagar el aparato o retirar el enchufe antes de
pretender
liberar
un
rotor
bloqueado
sirviéndose de una herramienta
•
Utilizar solamente agua fría durante el empleo
del triturador
El triturador està listo para ser utilizado.
Para encenderlo o apagarlo apoyar una sola vez el boton a fuelle
En alternativa es posible instalar un
RADIOCOMANDO
Antes de efectuar la conexiòn asegurarse que:
•
la instalacion electrica posea el contacto tierra segun las normas y disposiciones legales en
vigor.
•
el enchufe y el interruptor utilizados para la conexión sean fácilmente accesibles con el
material instalado y fuera de alcance de los niños.
•
el sistema electrico incluya un interruptor diferencial de valor nominal 10A/0,03 para
protegerse de contactos indirectos (cortacircuitos diferencial)
Este es un aparato con enlace de tipo Y, si el cable de alimentacion esta dañado tiene que ser
sostituido por el constructor o por un servizio de asistenciaq tecnica, o de todos modos por un tecnico
calificado para prevenir cualquier riesgo.
DECLINAMOS TODA RESPONSABIIDAD SI NO SE RESPETAN LAS NORMAS DE
PREVENCION DE RIESGOS
Fig. I
Fig. L
NO INTRODUCIR:
•
Soluciones quimicas para la limpieza de la
descarga.
•
Excesivas cantidades de grasa y aceite.
•
Materias plásticas
•
Hojas de alcachofa, apio, hinojo o
desechos muy fibrosos,
carne cruda o piel cruda de pollo
Fig. M
podrían obturar el desagőe!
Pag. 16
Pag. 17
Fig. N