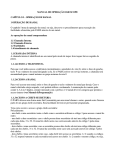
1
MANOR 6x4DD
USER MANUAL | MODE D'EMPLOI | MANUAL DEL USUARIO | GEBRAUCHSANLEITUNG |
GEBRUIKSHANDLEIDING | MANUALE PER L’UTENTE | MANUAL DO UTILIZADOR
A-1274-3 563345
SKU: 17197127 | 17194152
US:
Tel: 1-(888)-374-4262, Fax: 317-575-4502
Canada: Tel: 1-(800)-661-6721
UK:
Tel: 0121-5060008, Fax: 0121-4220808
Spain:
Tlf: +34.949 27 74 21, Fax: +34.949 34 89 76
Other European Countries:
Tel: 31-1612-28301, Fax: 31-1612-28322
WARRANTY ACTIVATION
WWW.KETER.COM
Thank you for your purchase of the Keter shed. In order to activate your warranty,
please log onto our website and fill in the form under warranty activation.
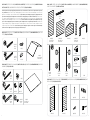
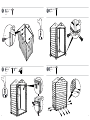
SITE PREPARATION | PRÉPARATION DU SITE | PREPARACIÓN DEL LUGAR | VORBEREITUNG DES
AUFSTELLUNGSORTES | VOORBEREIDING VAN HET TERREIN | PREPARAZIONE DEL LUOGO DI MONTAGGIO |
PREPARAÇÃO DO LOCAL
BEFORE STARTING ASSEMBLY | AVANT DE COMMENCER LE MONTAGE | ANTES DE EMPEZAR EL ARMADO | VOR
MONTAGEBEGINN | VOORDAT U BEGINT TE MONTEREN | PRIMA DI INIZIARE IL MONTAGGIO | ANTES DE INICIAR
A MONTAGEM
Level the ground surface | Égalisez la surface du sol | Nivele la superficie del suelo | Ebnen Sie die Bodenoberfläche |
Maak de bodem vlak | Livella la superficie del terreno | Nivele a superfície do solo
Read the care and safety guidelines at the end of this manual | Review all assembly instructions | Assemble all the parts
according to the directions in this manual. Do not skip any steps.
Lisez les instructions de précaution et de sécurité à la fin de ce manuel | Lisez toutes les instructions de montage | Assemblez
toutes les pièces selon les instructions de ce manuel. Ne sautez aucune étape.
Lea las intrucciones de precauciones y seguridad que están al final de este manual | Revise todas las instrucciones de montaje
| Monte todas las piezas según las instrucciones de este manual. No se saltee ningún paso.
Lesen Sie die Sicherheitsrichtlinien am Ende des Benutzerhandbuchs durch | Gehen Sie noch einmal die komplette
Aufbauanleitung durch | Bauen Sie alle Teile entsprechend der Anleitung in diesem Handbuch zusammen. Lassen Sie dabei keinen
Arbeitsschritt aus.
Recommendation: Construct a wooden or concrete base as a foundation | Recommandation: fabriquez une base en bois ou
en béton en guise de fondation | Recomendación: construya una base de madera o de cemento a modo de cimiento |
Empfehlung: Bauen Sie als Fundament eine Grundfläche aus Holz oder Beton | Aanbeveling: maak een houten of betonnen
ondergrond als fundering | Raccomandazione: costruisci una base di legno o di cemento come fondamenta |
Recomendação: Construa uma base de madeira ou de cimento como fundação
Option | Opción | optie | opzione | opção
A
Option | Opción | optie | opzione | opção
B
Lees de richtlijnen voor zorg en veiligheid achterin deze handleiding | Bekijk alle montagehandleidingen | Monteer alle
onderdelen volgens de aanwijzingen van deze handleiding. Sla geen stappen over.
Leggi le linee guida di assistenza e sicurezza alla fine di questo manuale | Consulta tutte le istruzioni di montaggio | Monta tutti i
componenti secondo le istruzioni contenute in questo manuale. Non saltare nessuna fase.
Leia as diretrizes de cuidados e segurança que constam da parte final deste manual | Reveja todas as instruções de montagem
| Monte todas as peças de acordo com as instruções do manual. Não salte quaisquer passos.
REQUIRED TOOLS | OUTILS EXIGÉS | HERRAMIENTAS NECESARIAS | BENÖTIGTE WERKZEUGE | BENODIGD
GEREEDSCHAP | ATTREZZATURA OCCORRENTE | FERRAMENTAS NECESSÁRIAS
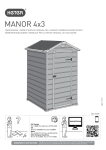
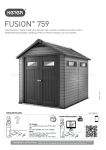
External floor measurements are:
SPATULA | SPATULE | ESPÁTULA | SPACHTEL | SPATEL | SPATOLA | ESPÃTULA
Les measures externes de la étage sont:
Las medidas del suelo externo son:
• Use spatula (part “SPA”) for easier insertion of panel into profile.
• Utilisez la spatule (partie “SPA”) pour une meilleure insertion du panneau dans le profil.
• Utilice una espátula (pieza “SPA”) para una mejor inserción del panel en el perfil.
• Benutzen Sie den Spachtel (Bezeichnung „SPA“), um die Platten leichter in die Nut einführen zu können.
• Gebruik spatel (onderdeel SPA) voor het gemakkelijk invoeren van het paneel in het profiel.
• Utilizzare la spatola (parte SPA) per inserire il pannello più facilmente nel profilo.
• Utilize uma espátula (peça “SPA”) para facilitar a inserção do painel no perfil.
Die Außen-Bodenmaße betragen:
De afmetingen van de externe vloer zijn:
Le misure del pavimento esterno sono:
As medidas externas do chão são:
spa x1
ASSEMBLY REQUIRES TWO PEOPLE | LE MONTAGE DOIT ÊTRE EFFECTUÉ PAR DEUX PERSONNES | SE
NECESITAN DOS PERSONAS PARA ARMARLO | ZWEI PERSONEN ZUR MONTAGE NOTWENDIG | MONTAGE
VEREIST TWEE PERSONEN | MONTAGGIO RICHIEDE DUE PERSONE | A MONTAGEM EXIGE DUAS PESSOAS
175 cm
68.9”
2
117 cm
46.1”
3
SHED PARTS | PIÈCES DE L’ABRI | PARTES DEL COBERTIZO | TEILE DES SCHUPPENS | ONDERDELEN VAN
HET SCHUURTJE | COMPONENTI DEL DEPOSITO ATTREZZI | PEÇAS DO ABRIGO
WALL PARTS | PIÈCES DU CONTOUR | PARTES DE LAS PAREDES | WANDELEMENTE | MUURONDERDELEN |
PARTI DELLA PARETE | PAINÉIS LATERAIS
Remove all parts from the package(s) and spread them out on a clean work surface | Code letters are imprinted on each part for
easy identification | Retirez toutes les pièces du/des paquet(s) et étalez-les sur une surface de travail propre | Des lettres sont
imprimées sur chaque pièce pour une identification facile | Saque todas las piezas del paquete o paquetes y póngalas sobre una
superficie de trabajo limpia | El código de letras está marcado en cada pieza para que sea más fácil identificarla | Nehmen Sie alle
Teile aus der Verpackung und breiten Sie sie auf einer sauberen Arbeitsfläche aus | Auf jedem Teil sind Kennbuchstaben
aufgedruckt, die die Zuordnung der einzelnen Teile erleichtern | Haal alle onderdelen uit het pakket (of uit de pakketten) en leg ze
op een schoon werkoppervlak | Op ieder onderdeel zijn codes aangebracht voor een gemakkelijke identificatie | Rimuovi tutti i
componenti dal pacchetto (i) e spargili su una superficie di lavoro pulita | Le lettere del codice sono state stampate su ciascun
componente per una facile identificazione | Retire todas as peças da embalagem e espalhe-as numa superfície de trabalho limpa
| Existem letras de código impressas em cada peça para fácil identificação
h1b (x1)
165 cm
65”
ROOF PARTS | PIÈCES DU TOIT | PARTES DEL TECHO | DACHELEMENTE | DAKONDERDELEN | PARTI DEL
TETTO | PEÇAS DO TELHADO
w1b (x2)
111 x 187 cm
43.7”x 73.6”
e1a (x4)
87 cm
34.2”
bu1a (x1)
bd1a (x2)
169 x 109 cm
66.5”x 42.9”
fd1b (x2)
17 x 131 cm
6.7”x 51.5”
fu1a (x1)
rc (x4)
dt (x2)
e1c (x2)
105 cm
41.3”
r1b (x1)
121 x 195 cm
47.6”x 76.8”
kc (x2)
rm (x1)
FLOOR PARTS | ÉLÉMENTS DU PLANCHER | PARTES DEL SUELO | BODENTEILE | VLOERONDERDELEN | PARTI DEL
PAVIMENTO | PEÇAS DO CHÃO
c1b (x4)
186 cm
73.2”
c1a (x1)
164 cm
64.6”
c1e (x2)
106 cm
41.7”
d1a (x1)
138 cm
54.3”
t (x4)
dsl (x1)
dfr (x1)
179 cm
70.5”
lm (x1)
v (x2)
DOOR PARTS | PIÈCES DE LA PORTE | TÜRELEMENTE | PARTES DE LA PUERTA | DEURONDERDELEN | PARTI
DELLA PORTA | PEÇAS DAS PORTAS
dsr (x1)
c1d (x2)
14.5 cm
5.7”
dpt (x2)
db1 (x1)
dp1 (x2)
dh (x4)
f1b (x1)
111 x 169 cm
43.7”x 66.5”
dl1a (x1)
4
dfl (x1)
179 cm
70.5”
dr1a (x1)
5
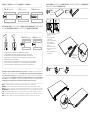
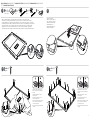
FLOOR ASSEMBLY | MONTAGE DU SOL | ARMADO DEL PISO | MONTAGE DER BODENPLATTE | VLOERMONTAGE |
MONTAGGIO DEL PAVIMENTO | MONTAGEM DO PISO
SCREWS | VIS | TORNILLOS | SCHRAUBEN | SCHROEVEN | VITI | PARAFUSOS
S13b (x35) 12 mm / 0.47"
cm
inch
1
2
0.5
3
1
4
1.5
Sc15 (x6) 16 mm / 0.63"
cm
inch
1
2
0.5
3
1
S26b (x128) 26 mm / 1"
cm
4
1
inch
1.5
2
0.5
3
1
4
1
d1a (x1)
f1b (x1)
138 cm
54.3”
111x169 cm
43.7”x 66.5”
1.5
SELF-DRILLING SCREW | VIS AUTO-FOREUSE | TORNILLO DE AUTO-ATORNILLADO | SELBSTBOHRENDE
SCHRAUBE | ZELF TAPPENDE SCHROEF | VITE AUTOFILETTANTE | PARAFUSO AUTORROSCANTE
dS2b (x10) 10 mm / 0.39"
cm
inch
1
2
0.5
cm
3
1
S10b (x8) 12 mm / 0.47"
1.5
inch
1
2
0.5
3
1
1.5
•
•
•
•
Use a powerful electric screwdriver. The screw should drill itself to a metal profile.
Utilisez un tournevis électrique puissant. La vis doit percer elle-même une tablette de métal.
Use un destornillador eléctrico potente. El propio tornillo debería perforar el contorno de metal.
Verwenden Sie bitte einen leistungsstarken, elektrischen Schraubenzieher. Die Schraube soll sich in das
Metallprofil hineinschrauben, ohne vorzubohren.
• Gebruik een krachtige electrische schroevendraaier. De schroef moet zichzelf in een metalen profiel boren.
• Usare un cacciavite elettrico con buona potenza. La vite si filetterà automaticamente nel profilo metallico.
• Utilize uma chave de fendas elétrica potente. O parafuso deve atarrachar-se num contorno de metal.
• Fit the panel accordingly within
the crevice
• Placez le panneau convenablement dans la fente
• Coloque el panel adecuadamente
dentro de la hendidura
• Passen Sie das Panel genau in
den Spalt ein
• Plaats het paneel zo in de gleuf
• Inserite il pannello seguendo la
scanalatura
• Encaixe o painel adequadamente
dentro da abertura
ide
his s
T
~18
cm
7”
2
dsl (x1)
up
~18
cm
7”
Front | Avant
Delante | Vorderseite
Voorkant | Anteriore
Frente
~18
cm
7”
dsr (x1)
Packaging may contain some additional small parts for use as spare parts | L’emballage peut contenir de petites pièces
supplémentaires à utiliser comme pièces de rechange | El envoltorio puede contener algunas piezas pequeñas adicionales
que se pueden utilizar como repuestos | In der Verpackung können kleine Zusatzteile enthalten sein, die als Ersatzteile
genutzt werden können | De verpakking kan een aantal kleine extra onderdelen bevatten, die als reserveonderdeel gebruikt
kunnen worden | La confezione potrebbe contenere piccole parti supplementari da utilizzare come parti di ricambio | A
embalagem pode conter algumas pequenas peças adicionais para utilização como peças de reposição
NOTE: Due to variations in production, the actual assembled size may vary slightly from the specified dimensions.
REMARQUE: En raison de variantes dans la production, la taille de montage réelle peut différer quelque peu des dimensions indiquées.
NOTA: debido a las variaciones en la producción, el tamaño real al montarlo puede variar ligeramente con respecto a las dimensiones especificadas.
BITTE BEACHTEN: Aufgrund von Abweichungen in der Herstellung kann die tatsächliche Größe leicht von den angegebenen Maßen abweichen.
LET OP: vanwege afwijkingen in de productie kan de werkelijke afmeting na montage een klein beetje afwijken van de opgegeven afmetingen.
NOTA: a causa di variazioni nella produzione, la dimensione effettiva del prodotto assemblato può variare leggermente dalle dimensioni menzionate.
NOTA: Devido a variações na produção o tamanho real da montagem poderá variar ligeiramente das dimensões especificadas.
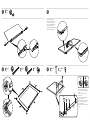
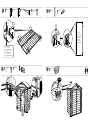
6
7
c1d (x2)
14.5 cm
5.7”
3
5
•
•
•
•
•
•
•
c1d
1
c1d
c1a (x1)
4
2
c1e (x2)
164 cm
64.6”
Turn over the floor panel
Retournez le panneau du sol
Dé la vuelta al panel del suelo
Drehen Sie die Bodenplatte um
Draai het vloerpaneel om
Capovolgi il pannello del pavimento
Vire o painel do pavimento
t (x4)
106 cm
41.7”
6
s26b (x2)
sc15 (x6)
26 mm
1”
18 mm
0.63”
s26b
1
t
sc15
c1e
s26b
a
c1
t
m
5c
17 8.9”
6
sc15
s26b
2
t
c1
e
t
8
sc15 sc15
m
0c
~1 4”
m
0c
~4 5.7”
1
• Fully fit the panel inside the profile
• Fixez entièrement le panneau dans la
découpe
• Coloque completamente el panel
dentro del perfil
• Passen Sie das Panel genau und
akkurat in das Profil ein
• Plaats het paneel volledig in het profiel
• Inserire correttamente il pannello
all’interno delle guide
• Encaixe totalmente o painel dentro do
contorno
9
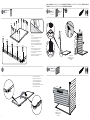
WALL ASSEMBLY | MONTAGE DU MUR | ARMADO DE PAREDES | MONTAGE DER WÄNDE | MONTAGE VAN DE
MUREN | ASSEMBLAGGIO DELLE PARETI | MONTAGEM DA PAREDE
7
9
s26b (x14)
26 mm
1”
1
s26b
c1b (x1)
w1b (x1)
186 cm
73.2”
111 x 187 cm
43.7” x 73.6”
1
w1b
c1b
s26b
s26b
s26b
s26b
~40c
15.7 m
”
~40c
15.7”m
~40cm
15.7”
s26b
~10c
m
4”
• Fit the panel inside the profile screw on
mark line
• Insérez le panneau à l’endroit prévu pour
la vis sur la ligne dessinée
• Encaje el panel dentro del marco y
atorníllelo en la línea marcada
• Verschrauben Sie die Bodenplatte an der
markierten Linie auf dem Profil mit der
Schraube
• Plaats het paneel binnen het profiel,
schroef op de gemarkeerde lijn
• Inserite il pannello nel profilo. Avvitate
sulla linea guida
• Ajuste o Painel no Interior do Contorno.
Aparafuse na linha Marcada.
This side up
2
Front | Avant
Delante | Vorderseite
Voorkant | Anteriore
Frente
10
8
•
•
•
•
•
•
•
Turn over the floor panel
Retournez le panneau du sol
Dé la vuelta al panel del suelo
Drehen Sie die Bodenplatte um
Draai het vloerpaneel om
Capovolgi il pannello del pavimento
Vire o painel do pavimento
bd1a (x1)
169 x 109 cm
66.5” x 42.9”
bd1a
This sid
e up
10
Back | Arrière
Trasero | Hinterseite
Achterkant | Indietro
Traseiro
11
11
13
s26b (x8)
26 mm
1”
bu1a (x1)
s26b
bu1a
c1b (x1)
186 cm
73.2”
c1b
• Fully fit the panel inside the profile
• Fixez entièrement le panneau dans la
découpe
• Coloque completamente el panel
dentro del perfil
• Passen Sie das Panel genau und
akkurat in das Profil ein
• Plaats het paneel volledig in het profiel
• Inserire correttamente il pannello
all’interno delle guide
• Encaixe totalmente o painel dentro do
contorno
This s
ide up
s26b
12
This ide in
s
h1b (x1)
165 cm
65”
14
"This
"
side in
This ide in
s
s26b (x7)
26 mm
1”
This
side in
h1b
• Fully fit the panel inside the profile
• Fixez entièrement le panneau dans la
découpe
• Coloque completamente el panel
dentro del perfil
• Passen Sie das Panel genau und
akkurat in das Profil ein
• Plaats het paneel volledig in het profiel
• Inserire correttamente il pannello
all’interno delle guide
• Encaixe totalmente o painel dentro do
contorno
• Parts are tangent to one
another
• Les parties sont tangentes
les unes aux autres
• Las piezas son tangentes
entre sí
• Die teile berühren einander
• Delen staan haaks op elkaar
• Le parti sono tangenti tra loro
• As peças são tangentes uma
à outra
s26b
12
13
15
17
c1b (x1)
s26b (x5)
186 cm
73.2”
26 mm
1”
c1b (x1)
s26b (x5)
186 cm
73.2”
26 mm
1”
c1b
c1b
• Fully fit the panel inside the profile
• Fixez entièrement le panneau dans la
découpe
• Coloque completamente el panel
dentro del perfil
• Passen Sie das Panel genau und
akkurat in das Profil ein
• Plaats het paneel volledig in het profiel
• Inserire correttamente il pannello
all’interno delle guide
• Encaixe totalmente o painel dentro do
contorno
s26b
FRONT WALL & DOOR FRAME ASSEMBLY | ASSEMBLAGE DU MUR DE DEVANT ET DU CADRE DE LA PORTE |
MONTAJE DEL MARCO DE LA PUERTA Y DE LA PARED FRONTAL | MONTAGE DER VORDEREN WAND & DES
TÜRRAHMENS | MONTEREN VOORSTE MUUR EN DEURFRAME | ASSEMBLAGGIO DEL MURO FRONTALE E DEL
TELAIO DELLA PORTA | MONTAGEM DA PAREDE FRONTAL E DA ESTRUTURA DA PORTA
s26b
16
18
w1b (x1)
s26b (x5)
111 x 187 cm
43.7” x 73.6”
26 mm
1”
fd1b (x2)
17 x 131 cm
6.7” x 51.5”
s26b (x6)
26 mm
1”
fd1b
w1b
ide
This s
up
• Fully fit the panel inside the profile
• Fixez entièrement le panneau dans la
découpe
• Coloque completamente el panel
dentro del perfil
• Passen Sie das Panel genau und
akkurat in das Profil ein
• Plaats het paneel volledig in het profiel
• Inserire correttamente il pannello
all’interno delle guide
• Encaixe totalmente o painel dentro do
contorno
This side up
s26b
14
fd1b
fd1b
s26b
15
19
21
rm (x1)
lm (x1)
10 mm
0.39”
Left
Gauche
Izquierdo
Verließ
Links
Sinistra
esquerdo
lm
lm
20
Self drill screw
ds2b (x2)
dfr (x1)
179 cm
70.5”
Right
Droit
Derecho
Richtig
Rechts
Destra
Direito
rm
rm
fu1a (x1)
dfl (x1)
179 cm
70.5”
dfr
dfl
s26b (x4)
26 mm
1”
1
22
dfr
fu1a
ds2b
s26b
16
• Ensure that the aluminum profile is fully down
• Assurez-vous que la tablette d’aluminium va bien jusqu’en bas
• Asegúrese de que el contorno de aluminio esté completamente abajo
• Vergewissern Sie sich, dass das Aluminiumprofil vollständig abgesetzt ist
• Verzeker u ervan dat het aluminium profiel helemaal naar beneden is
• Assicurarsi che il profilo in alluminio sia completamente in fondo
• Certifique-se de que o Contorno de Alumínio está Completamente Assente
17
22
Self drill screw
24
s10b (x8)
12 mm
0.47”
s26b (x16)
26 mm
1”
x4
x8
s26b
s10b
23
Self drill screw
ds2b (x8)
25
dt (x2)
10 mm
0.39”
s26b (x10)
26 mm
1”
1
dt
dt
s26b
2
x8
ds2b
s26b
18
19
ROOF ASSEMBLY | MONTAGE DU TOIT | ARMADO DEL TECHO | DACHMONTAGE | DAKMONTAGE | MONTAGGIO DEL
TETTO | MONTAGEM DO TELHADO
26
r1b (x1)
e1c (x1)
121 x 195 cm
47.6” x 76.8”
e1a (x1)
105 cm
41.3”
rc (x4)
87 cm
34.2”
28
• Turn over the roof panel
• Retourner le panneau supérieur
• Dele la vuelta al panel del techo
• Platte für das Dach umklappen
• Draai het dakpaneel om
• Capovolgi il pannello del tetto
• Volte o painel do telhado
• Note: The roof fold line and the “This side down” label must be facing up as seen depicted in this figure
• La pliure du toit et l’étiquette “This Side Down” doivent être tournées vers le haut comme le montre cette figure
• La línea de doblez del techo y la etiqueta “This side down” deben estar hacia arriba como se puede ver en esta imagen
• Die Knickkante des Daches und der „This Side Down“-Aufkleber müssen wie im unteren Bild dargestellt nach oben zeigen
• De vouwlijn van het dak en het “This Side Down” label moeten naar boven liggen, zoals te zien is op de afbeelding
• La piega del tetto e l’etichetta “This Side Down” devono essere rivolti verso l’alto come Indicato In questa figura
• A Linha do Vinco do Telhado e a Etiqueta “This side down” Devem Estar Viradas Para Cima Como Ilustrado Nesta Figura
rc
e1a
e1c
e1a
rc
rc
2
1
e1a
e1c
~ 7.5 cm
e1a
~7.5 cm
3”
3”
rc
27
29
s26b (x8)
26 mm
1”
s26b (x22)
26 mm
1”
s26b
• Fully fit the panel inside the profile
• Fixez entièrement le panneau dans la
découpe
• Coloque completamente el panel
dentro del perfil
• Passen Sie das Panel genau und
akkurat in das Profil ein
• Plaats het paneel volledig in het profiel
• Inserire correttamente il pannello
all’interno delle guide
• Encaixe totalmente o painel dentro do
contorno
20
s26b
• Fully fit the panel inside the profile
• Fixez entièrement le panneau dans la
découpe
• Coloque completamente el panel
dentro del perfil
• Passen Sie das Panel genau und
akkurat in das Profil ein
• Plaats het paneel volledig in het profiel
• Inserire correttamente il pannello
all’interno delle guide
• Encaixe totalmente o painel dentro do
contorno
21
30
32
s26b (x12)
26 mm
1”
s26b
1
2
• Screwe on the mark line
• Vissez sur la ligne dessinée
• Atornillar en la línea de la marca
• Auf der Markierungslinie festschrauben
• Schroef op de markering
• Avvita sulla linea guida
• Aparafuse na linha Marcada
31
• Ensure roof is set fully down; use spatula as shown in the figure
• Assurez-vous que le toit est bien entièrement posé ; utilisez la spatule comme le montre la figure
• Asegúrese de que el techo esté completamente encajado abajo;
utilice la espátula como lo muestra la figura
• Vergewissern Sie sich, dass das Dach vollständig aufgesetzt ist
Benutzen Sie den Spachtel wie in der Zeichnung dargestellt
• Verzeker u ervan dat het dak volledig naar beneden is;
Gebruik het spatelwerktuig zoals getoond op de afbeelding
• Assicurati che il tetto sia completamente inserito fino in fondo. Usa la spatola come mostrato in Figura
• Certifique-se de que o telhado está completamente ajustado; Utilize a espátula como indicado na figura
22
33
DOOR ASSEMBLY | MONTAGE DE LA PORTE | ARMADO DE LA PUERTA | MONTAGE DER TÜR |
DEURMONTAGE | MONTAGGIO DELLA PORTA | MONTAGEM DA PORTA
Left Door
Right Door
Porte Gauche
Porte Droite
Puerta Izquierda
Puerta Derecha
Linke Tür
Rechte Tür
Linker Deur
Rechter Deur
Porta Sinistra
Porta Destra
Porta Esquerda
Porta Direita
dl1a
dr1a
23
34
dl1a (x1)
dr1a (x1)
dh (x4)
s13b (x16)
36
12 mm
0.47”
dpt (x2)
x4
s13b
dp1 (x2)
1
dh
Left Door
Porte Gauche
Puerta Izquierda
Linke Tür
Linker Deur
Porta Sinistra
Porta Esquerda
dh
dh
2
dl1a
• Pre-drilled holes
• Trous pré-percés
• Orificios preperforados
• Vorgebohrte Löcher
• Voorgeboorde gaten
• Fori prestampati
• Orifícios pré-perfurados
35
dh
db1 (x1)
s13b (x19)
12 mm
0.47”
1
s13b
dr1a
37
2
x4
v (x2)
click
v
db1
x2
v
s13b
24
25
38
kc (x2)
s26b (x4)
OPTION | OPCIÓN | OPTIE | OPZION | OPÇÃOE
26 mm
1”
click
x4
2
1
s26b
kc
26
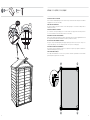
SECURING THE SHED TO A FOUNDATION
Affix the shed to the foundation by drilling holes in the shed floor at the pre-marked locations and screwing it into the foundation
using appropriate screws (screws not included).
FIXER L’ABRI SUR UNE FONDATION
Fixez l’abri à la fondation en perçant des trous dans le sol aux endroits pré-marqués et en insérant des vis adéquates dans la
fondation (vis non fournies).
ASEGURAR EL COBERTIZO A UN CIMIENTO
Fije el cobertizo a los cimientos perforando agujeros en el suelo del cobertizo en los lugares previamente marcados y atorníllelo
a los cimientos utilizando los tornillos adecuados (los tornillos no están incluidos).
ABSICHERN DES SCHUPPENS AN EIN FUNDAMENT
Bringen Sie den Schuppen auf dem Fundament an, indem Sie an den Markierungen Löcher in den Schuppenboden bohren und
diesen mit passenden Schrauben auf dem Fundament festschrauben (Schrauben nicht enthalten).
HET SCHUURTJE OP HET FUNDAMENT VASTZETTEN
Bevestig het schuurtje aan de fundering door op de aangegeven plaatsen gaten te boren in de vloer van het schuurtje en het
schuurtje aan de fundering te schroeven met behulp van passende schroeven (schroeven niet inbegrepen).
ASSICURARE LA COPERTURA ALLE FONDAMENTA
Fissa il deposito attrezzi alle fondamenta facendo dei fori nel pavimento nelle posizioni pre-segnalate ed avvitandolo alle
fondamenta utilizzando apposite viti (viti non incluse).
FIXAR O ABRIGO NUMA FUNDAÇÃO
Afixe o abrigo à base abrindo buracos no chão nos locais previamente assinalados e aparafusando-o à mesma utilizando
parafusos adequados (os parafusos não estão incluídos).
kc
1
2
3
4
27
FETY GUIDELINES
CARE AND SAFETY GUIDELINES
ntended
• The
for storage
shed is purposes
intended for
only.
storage
It is not
purposes
designed
only.
for It
habitation.
is not designed for habitation.
recommended
• It is strongly
to secure
recommended
the shed toto
ansecure
immovable
the shed
object
to an
or immovable
anchor to the
object
ground
or anchor
by drilling
to the
holes
ground
in the
byshed
drilling
floor
holes in the shed floor
marked locations)
(at the pre-marked
and inserting
locations)
proper and
screws
inserting
into the
proper
ground
screws
(screws
intoare
thenot
ground
included).
(screws are not included).
pt assembly
• Do not
onattempt
windy orassembly
cold days.on windy or cold days.
check the
• Periodically
shed to ensure
checkthat
theitshed
is stable
to ensure
and that
thatthe
it issite
stable
is level.
and that the site is level.
hen handling
• Be careful
parts when
with steel
handling
edges.
parts with steel edges.
bling or
• When
handling
assembling
the shed,or
use
handling
only those
the shed,
tools listed
use only
in the
those
user
tools
manual.
listed in the user manual.
work gloves,
• Always
safety
weargoggles
work gloves,
and long
safety
sleeves
goggles
when
and
assembling
long sleeves
or performing
when assembling
any maintenance
or performing
on your
any maintenance
shed.
on your shed.
a lawnmower
• Avoidor
using
mechanical
a lawnmower
scytheornear
mechanical
the shed.scythe near the shed.
goggles• and
Wearalways
safetyfollow
goggles
theand
manufacturer’s
always followinstructions
the manufacturer’s
when using
instructions
power tools.
when using power tools.
ed with•aWash
garden
thehose
shedorwith
a mild
a garden
detergent
hosesolution.
or a mildDo
detergent
not use asolution.
stiff brush
Do or
notabrasive
use a stiff
cleaners,
brush or abrasive cleaners,
greasersincluding
and oil- or
degreasers
acetone-based
and oilcleaning
or acetone-based
materials, as
cleaning
these may
materials,
stain oras
damage
these may
the shed.
stain or damage the shed.
hot items,
• Dosuch
not store
as recently
hot items,
usedsuch
grills
asand
recently
blowtorches,
used grills
andand
volatile
blowtorches,
chemicals
and
in volatile
the shed.
chemicals in the shed.
g heavy•items
Avoidagainst
placingthe
heavy
walls,
items
as against
this maythe
cause
walls,
distortion.
as this may cause distortion.
f clear•ofKeep
accumulated
the roof clear
snowofand
accumulated
leaves. Large
snow
amounts
and leaves.
of snow
Large
on the
amounts
roof can
of snow
damage
on the
the roof
shed,can
making
damage
it unsafe
the shed,
to enter.
making it unsafe to enter.
n is an•important
Wind direction
factoristoanconsider
important
when
factor
determining
to consider
thewhen
location
determining
of the shed.
the Reduce
locationexposure
of the shed.
to the
Reduce
wind,exposure
in general,
to the wind, in general,
or side in
and
particular.
of the door
Keep
side
doors
in particular.
closed and
Keep
locked
doors
when
closed
the and
shedlocked
is not when
in usethe
to prevent
shed is not
windindamage.
use to prevent wind damage.
on the•roof.
Do not stand on the roof.
local authorities
• Consult your
to check
localifauthorities
permits are
to required
check if permits
to erect are
the required
shed. to erect the shed.
S DE SÉCURITÉ
INSTRUCTIONS
ET D'ENTRETIEN
DE SÉCURITÉ ET D'ENTRETIEN
onçu uniquement
• L'abri a étéà conçu
des fins
uniquement
de stockage.
à des
Il n'a
fins
pas
deété
stockage.
conçu àIldes
n'afins
pas d'habitation.
été conçu à des fins d'habitation.
ent recommandé
• Il est fortement
de sécuriser
recommandé
l'abri à un
de objet
sécuriser
inamovible
l'abri àou
unde
objet
le fixer
inamovible
au sol en
oucreusant
de le fixer
des
autrous
sol endans
creusant
le sol des
de l'abri
trous dans le sol de l'abri
ements marqués)
(aux emplacements
et d'insérermarqués)
les vis adaptées
et d'insérer
dansles
le sol
vis adaptées
(vis non incluses).
dans le sol (vis non incluses).
s de réaliser
• N’essayez
le montage
pas depar
réaliser
jour venteux
le montage
ou froid.
par jour venteux ou froid.
mps en
• Vérifiez
temps ladetenue
temps
deen
l'abri
temps
afinladetenue
garantir
de l'abri
sa stabilité
afin deetgarantir
la misesa
à niveau
stabilitéduetsite,
la mise
sur lequel
à niveau
il est
du posé.
site, sur lequel il est posé.
s pièces
• Manipulez
présentantles
despièces
bordsprésentant
en acier avec
desprécaution.
bords en acier avec précaution.
emblage
• Lors
ou de
delal'assemblage
manipulationoudedel'abri,
la manipulation
utilisez seulement
de l'abri,
lesutilisez
outils seulement
listés dans les
le mode
outilsd'emploi.
listés dans le mode d'emploi.
urs des•gants
Portezdetoujours
travail, des lunettes
gants dede
travail,
protection
des lunettes
et des vêtements
de protection
à manches
et des vêtements
longues lors
à manches
de l'assemblage
longues lors
ou de
del'accomplissement
l'assemblage ou de l'accomplissement
maintenance
d'activités
sur votre
de maintenance
abri.
sur votre abri.
er une•tondeuse
Évitez d'utiliser
à gazonune
ou tondeuse
une faux mécanique
à gazon ou àune
proximité
faux mécanique
de l'abri. à proximité de l'abri.
unettes•de
Portez
sécurité
des et
lunettes
suivez de
toujours
sécurité
lesetinstructions
suivez toujours
du fabricant
les instructions
lors de l'utilisation
du fabricant
d'outils
lors deélectriques.
l'utilisation d'outils électriques.
à l'aide•d'un
Lavez
tuyau
l'abri
d’arrosage
à l'aide d'un
de jardin
tuyau ou
d’arrosage
d'un détergent
de jardin
non
ouabrasif.
d'un détergent
N'utiliseznon
pasabrasif.
une brosse
N'utilisez
dure pas
ou de
une
nettoyants
brosse dure
abrasifs,
ou de nettoyants abrasifs,
s dégraissants
y compris
et les
lessolutions
dégraissants
de nettoyage
et les solutions
à base d'acétone
de nettoyage
ou d'huile,
à base d'acétone
car ils peuvent
ou d'huile,
tachercar
ouils
endommager
peuvent tacher
l'abri.
ou endommager l'abri.
as d'objets
• Ne chauds,
stockez pas
tels d'objets
qu'un grill
chauds,
ou un tels
chalumeau
qu'un grill
récemment
ou un chalumeau
utilisé, ourécemment
des produits
utilisé,
chimiques
ou desvolatiles
produitsdans
chimiques
l'abri. volatiles dans l'abri.
cer des• objets
Évitez lourds
de placer
contre
des les
objets
murs
lourds
de votre
contre
abri,
lescela
murs
peut
de entraîner
votre abri,une
celadéformation.
peut entraîner une déformation.
• Entretenez
toit pour
éviter l'accumulation
le toit pour de
éviter
neige
l'accumulation
ou de feuilles.deUne
neige
grande
ou dequantité
feuilles.de
Une
neige
grande
sur le
quantité
toit peut
deendommager
neige sur le toit
l'abri,
peutrendant
endommager
périlleux
l'abri,
l'accès
rendant
à l'intérieur.
périlleux l'accès à l'intérieur.
du vent•est
La un
direction
facteurduimportant
vent est un
à prendre
facteur en
important
compteàlors
prendre
du choix
en compte
de la localisation
lors du choix
de l'abri.
de la localisation
Réduisez l'exposition
de l'abri. Réduisez
au vent, en
l'exposition
général, au vent, en général,
ur le côté
etde
surtout
la porte.
pour
Maintenant
le côté de les
la porte.
portesMaintenant
fermées etles
verrouillées
portes fermées
lorsque
et l'abri
verrouillées
n'est pas
lorsque
utilisé,l'abri
afin n'est
d'éviter
pastout
utilisé,
dégât
afin
dûd'éviter
au vent.tout dégât dû au vent.
as sur •leNe
toit.
montez pas sur le toit.
s autorités
• Consultez
de votreles
localité
autorités
pourde
vérifier
votre la
localité
nécessité
pourde
vérifier
disposer
la nécessité
d'un permis
de disposer
pour ériger
d'unl'abri.
permis pour ériger l'abri.
A SOBRE
ADVERTENCIA
EL CUIDADO SOBRE
Y LA SEGURIDAD
EL CUIDADO Y LA SEGURIDAD
está diseñada
• La cobertizo
solo para
estáeldiseñada
almacenamiento
solo parade
el productos.
almacenamiento
No estádediseñada
productos.
para
Nohabitar
está diseñada
en ella. para habitar en ella.
da encarecidamente
• Se recomienda
fijarencarecidamente
la cobertizo a unfijar
objeto
la cobertizo
inamovible
a un
o anclarla
objeto inamovible
al suelo taladrando
o anclarlaagujeros
al suelo en
taladrando
el suelo de
agujeros
la cobertizo
en el suelo de la cobertizo
es premarcadas
(en los lugares
para ello),
premarcadas
e insertando
para
tornillos
ello), eadecuados
insertandoen
tornillos
el suelo
adecuados
(los tornillos
en el
nosuelo
están(los
incluidos).
tornillos no están incluidos).
ontarlo• en
Nodías
intente
de viento
montarlo
o cuando
en díashaga
de viento
frío. o cuando haga frío.
a cobertizo
• Compruebe
periódicamente
la cobertizo
para periódicamente
asegurarse de que
paraesasegurarse
estable y de
deque
queeleslugar
estable
es uniforme.
y de que el lugar es uniforme.
do al manejar
• Tengalas
cuidado
partesalcon
manejar
bordeslas
departes
acero.con bordes de acero.
manipular
• Al la
montar
cobertizo,
o manipular
use solamente
la cobertizo,
las herramientas
use solamente
enumeradas
las herramientas
en el manual
enumeradas
del usuario.
en el manual del usuario.
guantes
• Use
de trabajo,
siempreanteojos
guantesprotectores
de trabajo, anteojos
y mangasprotectores
largas paray armar
mangas
el largas
cobertizo
para
o realizar
armar elcualquier
cobertizotarea
o realizar
de mantenimiento
cualquier tarea
ende
el mantenimiento
mismo.
en el mismo.
cortacésped
• Evite usar
o un un
cortacésped
cortacésped
cerca
o un
decortacésped
la cobertizo.cerca de la cobertizo.
de seguridad
• Llevey gafas
siga siempre
de seguridad
las instrucciones
y siga siempre
del las
fabricante
instrucciones
al utilizar
del herramientas
fabricante al utilizar
eléctricas.
herramientas eléctricas.
rtizo con
• Lave
una manguera
la cobertizodecon
jardín
unaomanguera
con un detergente
de jardín suave.
o con un
Nodetergente
utilice un cepillo
suave. rígido
No utilice
ni limpiadores
un cepillo rígido
abrasivos,
ni limpiadores abrasivos,
esengrasantes
incluyendo
y materiales
desengrasantes
de limpieza
y materiales
basados de
en limpieza
petróleo o
basados
acetona,
enyapetróleo
que todos
o acetona,
ellos pueden
ya quemanchar
todos ellos
o dañar
pueden
la cobertizo.
manchar o dañar la cobertizo.
bjetos calientes,
• No guarde
como
objetos
sopletes
calientes,
usados
como
recientemente,
sopletes usados
ni elementos
recientemente,
químicos
ni volátiles.
elementos químicos volátiles.
bjetos•pesados
Evite situar
contra
objetos
las paredes,
pesadosyacontra
que esto
las paredes,
puede causar
ya que
deformación.
esto puede causar deformación.
techo •
limpio
Mantenga
de nieve
el techo
y hojas
limpio
acumuladas.
de nieve yUna
hojas
gran
acumuladas.
cantidad deUna
nieve
gran
en cantidad
el tejado de
puede
nieve
dañar
en eleltejado
cobertizo,
puedehaciendo
dañar elque
cobertizo,
sea inseguro
haciendo
entrar.
que sea inseguro entrar.
del viento
• Laes
dirección
un factor
del
importante
viento es un
a tener
factorenimportante
cuenta al determinar
a tener en cuenta
la ubicación
al determinar
del cobertizo.
la ubicación
Reduzca
dellacobertizo.
exposición
Reduzca
al vientolaen
exposición
general al viento en general
e la puerta
y alen
lateral
particular.
de la puerta
Mantenga
en particular.
las puertasMantenga
cerradas las
y bloqueadas
puertas cerradas
cuandoyno
bloqueadas
utilice el cobertizo
cuando no
para
utilice
evitar
el cobertizo
daños delpara
viento.
evitar daños del viento.
as sur•leNe
toit.
montez pas sur le toit.
n sus autoridades
• Consulte locales
con susyautoridades
son necesariosNo
localesse
y son
ponga
necesariosNo
de pie sobreseelponga
techo.de
permisos
pie sobre
para
el techo.
levantar
permisos
el cobertizo.
para levantar el cobertizo.
D SICHERHEITSHINWEISE
PFLEGE - UND SICHERHEITSHINWEISE
chuppen
• Der
dient
Gartenschuppen
einzig und alleindient
der Lagerung
einzig undvon
allein
Gegenständen.
der LagerungDer
vonSchuppen
Gegenständen.
ist nicht
Der
fürSchuppen
Wohnzwecke
ist nicht
ausgelegt.
für Wohnzwecke ausgelegt.
end empfohlen,
• Es wird dringend
den Schuppen
empfohlen,
an einem
denunbeweglichen
Schuppen an einem
Gegenstand
unbeweglichen
zu befestigen
Gegenstand
oder Mithilfe
zu befestigen
von Löchern
oder im
Mithilfe
Schuppenboden
von Löchernim
imBoden
Schuppenboden
zu verankern
im Boden zu verankern
en müssen
(diean
Bohrungen
den vormarkierten
müssen an
Stellen
den vormarkierten
erfolgen), wobei
Stellen
geeignete
erfolgen),
Schrauben
wobei geeignete
zu verwenden
Schrauben
sind (Schrauben
zu verwenden
sindsind
nicht(Schrauben
im Lieferumfang
sind nicht
enthalten).
im Lieferumfang enthalten).
en Aufbau
• Führen
nicht Sie
an windigen
den Aufbau
oder
nicht
kalten
an windigen
Tagen durch.
oder kalten Tagen durch.
Sie den•Schuppen
Überprüfen
regelmäßig
Sie den Schuppen
auf Stabilität
regelmäßig
und stellen
auf Stabilität
Sie sicher,
und
dass
stellen
der Standort
Sie sicher,
eben
dass
ist.der Standort eben ist.
sichtig,• wenn
Seien Sie
Sie mit
vorsichtig,
Teilen hantieren,
wenn Sie mit
die Teilen
Stahlkanten
hantieren,
aufweisen.
die Stahlkanten aufweisen.
nd Handhabung
• Für Aufbau
desund
Schuppens
Handhabung
verwenden
des Schuppens
Sie bitte nur
verwenden
Werkzeuge,
Sie bitte
die innur
derWerkzeuge,
Aufbauanleitung
die in der
aufgelistet
Aufbauanleitung
sind.
aufgelistet sind.
ei der Montage
• Tragen des
Sie bei
Gartenschuppens
der Montage des
oder
Gartenschuppens
Wartungsarbeiten
oder
stets
Wartungsarbeiten
Arbeitshandschuhe,
stets eine
Arbeitshandschuhe,
Schutzbrille undeine
Kleidungsstücke
Schutzbrille und
mit Kleidungsstücke
langen Ärmeln mit langen Ärmeln
ie den •Einsatz
Vermeiden
von Rasenmäher
Sie den Einsatz
undvon
maschineller
Rasenmäher
Sense
und im
maschineller
direkten Umfeld
Sensedes
im direkten
Schuppens.
Umfeld des Schuppens.
28
• Tragen Sie eine Schutzbrille
• Tragen Sie
undeine
befolgen
Schutzbrille
Sie bei Verwendung
und befolgenvon
Sie Elektrowerkzeugen
bei Verwendung vonimmer
Elektrowerkzeugen
die Anweisungen
immer
desdie
Herstellers.
Anweisungen des Herstellers.
• Reinigen Sie den Schuppen
• Reinigen
mitSie
einem
den Schuppen
Gartenschlauch
mit einem
und einem
Gartenschlauch
milden Reinigungsmittel.
und einem milden
Verwenden
Reinigungsmittel.
Sie auf keinen
Verwenden
Fall eine
Sieharte
auf keinen
BürsteFall
undeine harte Bürste und
Scheuer - oder Entfettungsmittel
Scheuer - oder
sowie
Entfettungsmittel
Öl- oder Acetonhaltige
sowie Öl-Reinigungsmittel,
oder Acetonhaltige
da Reinigungsmittel,
diese Flecken verursachen
da diese Flecken
oder denverursachen
Schuppen beschädigen
oder den Schuppen
könnten.beschädigen könnt
• Lagern Sie keine heißen
• Lagern
Gegenstände
Sie keine heißen
im Schuppen,
Gegenstände
wie etwa
im kürzlich
Schuppen,
benutzte
wie etwa
Grills
kürzlich
oder Lötlampen
benutzte Grills
und oder
auch Lötlampen
keine flüchtigen
und auch
Chemikalien.
keine flüchtigen Chemikalien.
• Lehnen Sie keine schweren
• LehnenGegenstände
Sie keine schweren
an die Wände
Gegenstände
des Schuppens,
an die Wände
da sich
desdadurch
Schuppens,
der gesamte
da sich dadurch
Schuppen
derverziehen
gesamte könnte.
Schuppen verziehen könnte.
• Halten Sie das Dach•frei
Halten
von Schnee
Sie das und
Dachangesammeltem
frei von Schnee und
Blattwerk.
angesammeltem
Große Mengen
Blattwerk.
an Schnee
Große
können
Mengen
denanSchuppen
Schnee können
beschädigen
den Schuppen
und beimbeschädigen
Betreten gefährlich
und beimwerden.
Betreten gefähr
• Die Windrichtung ist
• ein
Die wichtiger
Windrichtung
Faktor,
ist ein
derwichtiger
bei der Aufstellung
Faktor, derdes
beiSchuppens
der Aufstellung
unbedingt
des Schuppens
berücksichtigt
unbedingt
werden
berücksichtigt
muss.
werden muss.
Vermeiden Sie zu hohe
Vermeiden
Windbelastungen,
Sie zu hohe
insbesondere
Windbelastungen,
einen hohen
insbesondere
Winddruck
einen
aufhohen
die Türen.
Winddruck
Haltenauf
Siedie
dieTüren.
Türen Halten
immer Sie
geschlossen
die Türen und
immer
verriegelt,
geschlossen und verriegelt,
wenn der Schuppen nicht
wenngenutzt
der Schuppen
wird, um
nicht
einegenutzt
Beschädigung
wird, umdurch
eine Beschädigung
Windbelastungen
durch
zu vermeiden.
Windbelastungen zu vermeiden.
• Betreten Sie auf keinen
• Betreten
Fall das
SieDach
auf keinen
des Schuppens.
Fall das Dach des Schuppens.
• Wenden Sie sich bitte
• Wenden
an Ihre Sie
lokale
sichBehörde
bitte an und
Ihreerkundigen
lokale Behörde
Sie sich
unddort,
erkundigen
ob zumSie
Aufbau
sich des
dort,Schuppens
ob zum Aufbau
eine Genehmigung
des Schuppenserforderlich
eine Genehmigung
ist.
erforderlich ist.
RICHTLIJNEN VOOR RICHTLIJNEN
ZORG EN VEILIGHEID
VOOR ZORG EN VEILIGHEID
• Het tuinhuisje is uitsluitend
• Het tuinhuisje
bedoeldisvoor
uitsluitend
opslag. bedoeld
Het is niet
voor
ontworpen
opslag. Het
voor
is bewoning.
niet ontworpen voor bewoning.
• Het wordt sterk aanbevolen
• Het wordt
omsterk
het tuinhuisje
aanbevolen
vastom
te het
maken
tuinhuisje
aan een
vast
immobiel
te maken
object
aan of
een
inimmobiel
de grond object
te verankeren
of in de grond
door het
te verankeren
boren van gaten
door in
het
deboren
vloer van gaten in de vloer
(op de gemarkeerde plaatsen)
(op de gemarkeerde
en het met plaatsen)
de geschikte
en het
schroeven
met de geschikte
in de grond
schroeven
te bevestigen
in de(schroeven
grond te bevestigen
zijn niet inbegrepen).
(schroeven zijn niet inbegrepen).
• Probeer niet op stormachtige
• Probeer niet
of koude
op stormachtige
dagen te monteren.
of koude dagen te monteren.
• Controleer het tuinhuisje
• Controleer
regelmatig
het tuinhuisje
dat het stabiel
regelmatig
en waterpas
dat hetstaat.
stabiel en waterpas staat.
• Wees voorzichtig als
• Wees
u werkt
voorzichtig
met onderdelen
als u werkt
met met
staalranden.
onderdelen met staalranden.
• Gebruik bij de montage
• Gebruik
of hetbij
hanteren
de montage
van het
of het
tuinhuisje
hanteren
alleen
van het
de gereedschappen
tuinhuisje alleendie
de in
gereedschappen
de handleiding die
vermeldt
in de handleiding
staan.
vermeldt staan.
• Draag altijd werkhandschoenen,
• Draag altijd oogbescherming
werkhandschoenen,
en lange
oogbescherming
mouwen alsen
u uw
lange
schuurtje
mouwen
monteert
als u uwofschuurtje
onderhoud
monteert of onderhoud
• Vermijd het gebruik•van
Vermijd
een grasmaaier
het gebruik of
van
mechanische
een grasmaaier
zeis of
in de
mechanische
buurt van het
zeistuinhuisje.
in de buurt van het tuinhuisje.
• Draag een veiligheidsbril
• Draag
eneen
volgveiligheidsbril
altijd de instructies
en volgvan
altijd
de de
fabrikant
instructies
als uvan
elektrisch
de fabrikant
gereedschap
als u elektrisch
gebruikt.
gereedschap gebruikt.
• Was het schuurtje met
• Was
eenhet
tuinslang
schuurtje
of met
een zacht
een tuinslang
schoonmaakmiddel.
of een zacht schoonmaakmiddel.
Gebruik geen harde borstel
Gebruikofgeen
schuurmiddelen,
harde borstel of schuurmiddelen,
met inbegrip van ontvetters
met inbegrip
en schoonmaakmiddelen
van ontvetters en schoonmaakmiddelen
op basis van olie of aceton,
op basis
omdat
van olie
die het
of aceton,
tuinhuisje
omdat
kunnen
die het
beschadigen
tuinhuisje kunnen
of vlekken
beschadigen
achterlaten.
of vlekken achterlaten.
• Zet geen hete voorwerpen,
• Zet geen
zoals
hete
een
voorwerpen,
pas gebruikte
zoals
grill
een
of pas
branders
gebruikte
in degrill
schuur,
of branders
en bewaar
in deerschuur,
ook geen
envluchtige
bewaar erstoffen.
ook geen vluchtige stoffen.
• Plaats geen zware voorwerpen
• Plaats geen
tegen
zware
devoorwerpen
wanden, dietegen
daardoor
de wanden,
misvormd
diekunnen
daardoor
raken.
misvormd kunnen raken.
• Houd het dak vrij van
• Houd
opgehoopte
het daksneeuw
vrij van en
opgehoopte
bladeren.sneeuw
Grotereen
hoeveelheden
bladeren. Grotere
sneeuw
hoeveelheden
op het dak kunnen
sneeuw
het
opschuurtje
het dak kunnen
beschadigen,
het schuurtje beschadigen,
waardoor het betreden
waardoor
gevaarlijk
hetkan
betreden
zijn. gevaarlijk kan zijn.
• De windrichting is een
• Debelangrijke
windrichting
factor
is een
bij belangrijke
het bepalenfactor
van debijlocatie
het bepalen
van hetvan
tuinhuisje.
de locatie
Verminder
van het tuinhuisje.
blootstelling
Verminder
aan de wind,
blootstelling
in het algemeen,
aan de wind, in het algemeen,
en bijzonder aan de deurzijde.
en bijzonder
Houd
aandededeuren
deurzijde.
gesloten
Houden
devergrendeld
deuren gesloten
wanneer
en vergrendeld
het tuinhuisje
wanneer
niet in het
gebruik
tuinhuisje
is om niet
windschade
in gebruik
te is
voorkomen.
om windschade te voorkomen.
• Ga niet op het dak staan.
• Ga niet op het dak staan.
• Raadpleeg uw plaatselijke
• Raadpleeg
autoriteiten
uw plaatselijke
om te controleren
autoriteiten
of om
eente
vergunning
controleren
vereist
of een
is vergunning
voor het plaatsen
vereistvan
is voor
het tuinhuisje.
het plaatsen van het tuinhuisje.
LINEE GUIDA PER LALINEE
CURAGUIDA
E LA SICUREZZA
PER LA CURA E LA SICUREZZA
• Il prodotto va utilizzato
• Il prodotto
solo per va
scopi
utilizzato
di immagazzinamento.
solo per scopi di immagazzinamento.
Non è progettato perNon
abitarvi.
è progettato per abitarvi.
• Si raccomanda vivamente
• Si raccomanda
di fissare ilvivamente
prodotto su
di fissare
un piano
il prodotto
inamovibile
su un
o ancorandolo
piano inamovibile
al suolo
o ancorandolo
tramite i forial
nel
suolo
pavimento
tramite i fori nel pavimento
(nelle posizioni pre-segnalate)
(nelle posizioni
ed inserendo
pre-segnalate)
viti adeguate
ed inserendo
nel terreno
viti adeguate
(le viti nonnel
sono
terreno
incluse).
(le viti non sono incluse).
• Non tentare il montaggio
• Non in
tentare
giornate
il montaggio
ventose oin
fredde.
giornate ventose o fredde.
• Controllate periodicamente
• Controllate
il prodotto
periodicamente
per accertarvi
il prodotto
che siaper
stabile
accertarvi
e che sia
cheasia
livello
stabile
del eterreno.
che sia a livello del terreno.
• Fai attenzione quando
• Fai
maneggi
attenzione
partiquando
con bordi
maneggi
in acciaio.
parti con bordi in acciaio.
• Durante il montaggio
• Durante
o la manipolazione
il montaggiodel
o la
prodotto,
manipolazione
utilizzate
delsolo
prodotto,
gli strumenti
utilizzate
elencati
solo gli
nelstrumenti
manualeelencati
utente. nel manuale utente.
• Indossare sempre guanti
• Indossare
da lavoro,
sempre
protezioni
guanti per
da lavoro,
gli occhi
protezioni
e maniche
perlunghe
gli occhi
durante
e maniche
il montaggio
lunghe durante
o durante
il montaggio
la manutenzione
o durante la manutenzione
• Evitate di utilizzare •unEvitate
tosaerba
di utilizzare
o una falce
un tosaerba
meccanica
o una
nei pressi
falce meccanica
del prodotto
neistesso.
pressi del prodotto stesso.
• Indossate occhiali di
• Indossate
sicurezza eocchiali
seguitedisempre
sicurezza
le istruzioni
e seguite del
sempre
produttore
le istruzioni
quando
delutilizzate
produttore
utensili
quando
elettrici.
utilizzate utensili elettrici.
• Lavate il prodotto con
• Lavate
un tubo
il prodotto
da giardino
conoun
una
tubo
soluzione
da giardino
detergente
o una soluzione
delicata. Non
detergente
utilizzate
delicata.
una spazzola
Non utilizzate
dura o detergenti
una spazzola
abrasivi,
dura o detergenti abrasivi,
né sgrassanti e materiali
né sgrassanti
di pulizia per
e materiali
l'olio - odiapulizia
base diper
acetone,
l'olio -in
o aquanto
base di
questi
acetone,
possono
in quanto
macchiarlo
questi opossono
danneggiarlo.
macchiarlo o danneggiarlo.
• Non conservate oggetti
• Non
caldi,
conservate
come grill
oggetti
e lampade
caldi, come
per saldature
grill e lampade
né sostanze
per saldature
chimichenéevaporabili
sostanze chimiche
all’internoevaporabili
del prodotto.
all’interno del prodotto.
• Evitate di posizionare
• Evitate
oggettidipesanti
posizionare
controoggetti
le pareti,
pesanti
in quanto
controciò
lepotrebbe
pareti, in causare
quanto ciò
unapotrebbe
deformazione
causare
deluna
prodotto.
deformazione del prodotto.
• Mantenete il tetto pulito
• Mantenete
dalla neve
il tetto
e dalle
pulito
foglie
dalla
accumulate.
neve e dalle
Grandi
fogliequantità
accumulate.
di neve
Grandi
sul tetto
quantità
possono
di neve
danneggiare
sul tetto possono
il prodotto,
danneggiare
rendendone
il prodotto,
precariarendendone
la struttura.precaria la
• La direzione del vento
• Laè direzione
un fattoredel
importante
vento è un
dafattore
considerare
importante
quando
da scegliete
considerare
la posizione
quando scegliete
del prodotto.
la posizione
Riducete
del
l'esposizione
prodotto. Riducete
al vento,l'esposizione al vento,
in generale, in particolare
in generale,
della porta
in particolare
laterale. Tenete
della porta
le porte
laterale.
chiuse
Tenete
e bloccate
le porte
quando
chiuse
il prodotto
e bloccate
non
quando
è in uso
il prodotto
per prevenire
non è iindanni
uso per
del prevenire
vento.
i danni del vento.
• Non salite sul tetto.• Non salite sul tetto.
• Consultate le autorità
• Consultate
locali per verificare
le autoritàse
locali
sonoper
necessari
verificare
deisepermessi
sono necessari
per assemblare
dei permessi
il prodotto.
per assemblare il prodotto.
DIRETRIZES SOBRE CUIDADOS
DIRETRIZESE SOBRE
SEGURANÇA
CUIDADOS E SEGURANÇA
• O abrigo destina-se•apenas
O abrigo
a fins
destina-se
de armazenamento.
apenas a fins Não
de armazenamento.
foi projetado para
Não
habitação.
foi projetado para habitação.
• Recomenda-se vivamente
• Recomenda-se
a fixação do
vivamente
abrigo a aum
fixação
objetodoimóvel
abrigooua fixá-lo
um objeto
no chão
imóvel
fazendo
ou fixá-lo
furos
nono
chão
pisofazendo
do abrigo
furos no piso do abrigo
(nos locais previamente
(nosmarcados)
locais previamente
e a inserção
marcados)
de parafusos
e a inserção
adequados
de parafusos
no chão (os
adequados
parafusosnonão
chão
estão
(os incluídos).
parafusos não estão incluídos).
• Não tente fazer a montagem
• Não tente
em
fazer
diasaventosos
montagem
ou em
frios.
dias ventosos ou frios.
• Verifique periodicamente
• Verifique
o abrigo
periodicamente
para garantiro que
abrigo
está
para
estável
garantir
e que
que
o sítio
estáestá
estável
nivelado.
e que o sítio está nivelado.
• Tenha cuidado ao manusear
• Tenha cuidado
peças com
ao manusear
pontas empeças
aço. com pontas em aço.
• Ao montar ou manipular
• Ao montar
o abrigo,
ouutilize
manipular
apenas
o abrigo,
as ferramentas
utilize apenas
indicadas
as ferramentas
no manual indicadas
do utilizador.
no manual do utilizador.
• Utilize sempre luvas
• Utilize
e óculos
sempre
de protecção,
luvas e óculos
assim como
de protecção,
vestuárioassim
comprido
comoao
vestuário
montar comprido
ou efectuar
aoqualquer
montar ou
procedimento
efectuar qualquer
de manutenção
procedimento
no seu
deabrigo.
manutenção no seu abri
• Evite a utilização de•um
Evite
cortador
a utilização
de relva
de um
ou foice
cortador
mecânica
de relva
perto
ou foice
do abrigo.
mecânica perto do abrigo.
• Use óculos de segurança
• Use óculos
e siga sempre
de segurança
as instruções
e siga sempre
do fabricante
as instruções
ao utilizar
do fabricante
ferramentas
ao elétricas.
utilizar ferramentas elétricas.
• Lave o abrigo com uma
• Lave
mangueira
o abrigo com
de jardim
uma mangueira
ou uma solução
de jardim
de detergente
ou uma solução
suave.de
Não
detergente
use uma escova
suave. Não
rija ou
usedetergentes
uma escovaabrasivos
rija ou detergentes
incluindo abrasivos incluindo
desengordurantes oudesengordurantes
materiais de limpeza
ou materiais
com basede
delimpeza
óleo ou com
acetona,
basevisto
de óleo
queou
estes
acetona,
podem
visto
manchar
que estes
ou danificar
podem manchar
o abrigo.ou danificar o abrigo.
• Não guarde artigos•quentes,
Não guarde
como
artigos
grelhas
quentes,
e maçaricos
como grelhas
recentemente
e maçaricos
utilizados,
recentemente
e químicosutilizados,
voláteis no
e químicos
abrigo. voláteis no abrigo.
• Evite a colocação de• artigos
Evite a colocação
pesados contra
de artigos
as paredes,
pesadosvisto
contra
queas
isto
paredes,
pode causar
visto que
distorção.
isto pode causar distorção.
• Mantenha o telhado• livre
Mantenha
de acumulação
o telhado de
livre
neve
de acumulação
e folhas. Grandes
de neve
quantidades
e folhas. Grandes
de neve quantidades
no telhado podem
de neve
danificar
no telhado
o abrigo,
podem
tornando-o
danificar oinseguro
abrigo, tornando-o
para entrar.inseguro para
• A direção do vento é• um
A direção
fator importante
do vento é aum
terfator
em consideração
importante a ter
ao determinar
em consideração
a localização
ao determinar
do abrigo.
a localização
Reduza a exposição
do abrigo.ao
Reduza
vento,aem
exposição
geral, ao vento, em geral,
e em particular da porta
e emlateral.
particular
Mantenhas
da portaaslateral.
portasMantenhas
fechadas e as
trancadas
portas fechadas
quando oeabrigo
trancadas
não quando
estiver aoser
abrigo
utilizado
não estiver
para evitar
a serdanos
utilizado
causados
para evitar
pelodanos
vento.causados pelo
• Não fique no telhado.
• Não fique no telhado.
• Consulte as autoridades
• Consulte
locaisas
para
autoridades
saber se são
locais
necessárias
para saberlicenças
se são necessárias
para erguer licenças
o abrigo.para erguer o abrigo.
29
10-YEAR LIMITED WARRANTY
RRANTY
Your
Keter
shed (“the from
Product”)
was manufactured
from high-quality,
recyclable
materials
under rigorous control and supervision.
Product”)
was
manufactured
high-quality,
recyclable materials
under rigorous
control
and supervision.
Should
a problem
withyour
the Product,
pleasecustomer
address your
claim
customer
service on our
website
ur with the
Product,
pleaseoccur
address
claim to Keter
service
on to
ourKeter
website
(www.keter.com)
or by
phone.(www.keter.com) or by phone.
warranty
covers
resulting from
defects infor
manufacturing
materials
for date
a period
of 10 years
the date
of term
original retail purchase. (The term
product This
failure
resulting
fromproduct
defects failure
in manufacturing
or materials
a period of 10or
years
from the
of original
retailfrom
purchase.
(The
“defects"
is defined
as imperfections
that impair the use of the Product).
s imperfections
that
impair the
use of the Product).
This warranty
does
notnormal
cover defects
resulting
from normal
wear
and tear,
including,
but not limited
to, scuffing,
or fractures caused during use,
t cover defects
resulting
from
wear and
tear, including,
but not
limited
to, scuffing,
scratches
or fractures
causedscratches
during use,
discoloration
or fading,
rusting,
unreasonable
use, abuse,
negligence,
moving,
or of
relocating
Product, “acts of Nature”, including,
g, rusting,
unreasonable
use, abuse,
negligence,
alterations,
painting,
moving, alterations,
transportingpainting,
or relocating
thetransporting
Product, “acts
Nature”,the
including,
butofnot
limited
to,and
hail,fire,
anyand
typeconsequential
of storm, flood
fire, and
consequential or incidental damages.
, any type
storm,
flood
orand
incidental
damages.
and
handling
not in accordanceguidelines
with the recommendations,
restrictions
described
theusage
Product's
g not inAssembly
accordance
with
the recommendations,
and restrictions asguidelines
described and
in the
Product's as
user
manual,inand
for user manual, and usage for
commercial
public
applications, will void this warranty.
applications,
will voidorthis
warranty.
Keter
is notincurred
responsible
for any
damage
incurred
by loss
thirdof
parties
orinside
damage
to or the
lossshed.
of objects inside or near the shed.
le for any
damage
by third
parties
or damage
to or
objects
or near
Upon submitting
proof
of purchase
and evidence
thesubject
claimedtoproduct
failure,
and subject
to reporting
failure
in asole
timely
manner,will
Keter, at its sole discretion, will
f of purchase
and evidence
of the
claimed product
failure,ofand
reporting
the failure
in a timely
manner,the
Keter,
at its
discretion,
the Product,
or refund
you a prorated
portion
of theline
purchase
price on
a straight
depreciated
basis for the length of the warranty.
s of the replace
Product,defective
or refundparts
you aofprorated
portion
of the purchase
price on
a straight
depreciated
basis
for the line
length
of the warranty.
GARANTIE LIMITÉE DE 10 ANS
E 10 ANS
abriade
jardin
Keterà ("le
Produit")
a été fabriqué
à partir
de matériaux
de grande
qualité, en
faisant l'objet
de contrôles rigoureux et d'une
eter ("le Votre
Produit")
été
fabriqué
partir
de matériaux
recyclables
de grande
qualité,recyclables
en faisant l'objet
de contrôles
rigoureux
et d'une
surveillance stricte.
Si un problème
devait veuillez
se présenter
avecvotre
le produit,
veuillezauadresser
votre réclamation
service
de(www.keter.com)
Keter sur notre site
internet (www.keter.com) ou par
se présenter
avec le produit,
adresser
réclamation
service clients
de Keter suraunotre
siteclients
internet
ou par
téléphone.
Cette garantie
couvre
les dommages
du produit
découlant
d'unmatériaux
défaut de pendant
fabrication
des matériaux
une
de 10 ans
les dommages
du produit
découlant
d'un défaut
de fabrication
ou des
uneoudurée
de 10 ans pendant
à partir de
la durée
date d'achat.
(Leà partir de la date d'achat. (Le
terme
est défini
qui du
nuisent
à la bonne utilisation du produit).
fini comme
des"défaut"
imperfections
quicomme
nuisentdes
à laimperfections
bonne utilisation
produit).
Cette
garantie
ne couvre
pas
les défauts
résultant
d'une
usure
y compris,
non limitée
aux éraflures
ou aux bris provoqués par l'utilisation,
vre pas les
défauts
résultant
d'une
usure
normale,
y compris,
mais
nonnormale,
limitée aux
rayures,mais
aux éraflures
ou aux
aux rayures,
bris provoqués
par l'utilisation,
la décoloration
ou l'estompement
de la couleur,
la rouille,
déraisonnable,
les abus, la
altérations, lalepeinture, les déplacements, le
tompement
de la couleur,
la rouille, l'utilisation
déraisonnable,
lesl'utilisation
abus, la négligence,
les altérations,
lanégligence,
peinture, lesles
déplacements,
la "conditions
relocalisation
du produit,
les "conditions climatiques
exceptionnelles",
compris,
mais
nondelimitée
à, lales
grêle,
tout typeetde tempête, les inondations et
lisation transport
du produit,oules
climatiques
exceptionnelles",
y compris, mais
non limitée à,yla
grêle, tout
type
tempête,
inondations
incendies,
tous dégâts
ou consécutifs qui y seraient liés.
âts accidentels
ou et
consécutifs
quiaccidentels
y seraient liés.
Un assemblage
et une aux
manipulation
non conformes
aux recommandations,
aux instructions
aux restrictions,
telles
que décrites
dans le mode d'emploi du Produit,
e manipulation
non conformes
recommandations,
aux instructions
et aux restrictions,
telles que et
décrites
dans le mode
d'emploi
du Produit,
ainsi
que l'utilisation
à des finsannuleront
commerciales
publiques, annuleront cette garantie.
à des fins
commerciales
ou publiques,
cetteougarantie.
Keter ne saurait
tenu
responsable
tout dégât
par
une ou
tierce
partie
ou deà tout
dégât ou perte
d'objets
l'intérieur ou à proximité de l'abri.
enu responsable
de toutêtre
dégât
encouru
par unedetierce
partie encouru
ou de tout
dégât
perte
d'objets
l'intérieur
à proximité
deàl'abri.
Après
avoir
une preuve
d'achatsur
et le
une
preuvedétérioré,
du dommage
sur le produit
détérioré,
etdommage
à conditiondans
d'avoir
le dommage
dans
ne preuve
d'achat
etsoumis
une preuve
du dommage
produit
et à condition
d'avoir
signalé le
les signalé
délais impartis,
Keter,
à les délais impartis, Keter, à
son absolue
discrétion,
remplacera
les pièces
défaillantes
du Produit
ou vous
remboursera
une partie
du prix
au linéaire
prorata,pour
amorti
n, remplacera
les pièces
défaillantes
du Produit
ou vous
remboursera
une partie
du prix
d'achat au prorata,
amorti
surd'achat
une base
la sur une base linéaire pour la
durée de la garantie.
GARANTÍA LIMITADA DE 10 AÑOS
DE 10 AÑOS
Su cobertizo
Keter (“Elcon
Producto”)
ha sido
fabricada
reciclables
alta calidad
bajo rigurosos controles y supervisión.
l Producto”)
ha sido fabricada
materiales
reciclables
decon
altamateriales
calidad bajo
rigurososde
controles
y supervisión.
En caso de
que
consu
elreclamación
Producto, por
dirija
su reclamación
al servicio
cliente
de (www.keter.com)
Keter en nuestra opágina
zca un problema
con
el aparezca
Producto,un
porproblema
favor, dirija
alfavor,
servicio
al cliente
de Keter en
nuestraalpágina
web
por web (www.keter.com) o por
teléfono.
Esta de
garantía
cubre
fallos
de producto
pormateriales
defectos dedurante
fabricación
o de materiales
unfecha
periodo
decompra
10 añosdel
desde
la fecha de la compra del producto.
rrores fallos
producto
porerrores
defectos
de fabricación
o de
un periodo
de 10 añosdurante
desde la
de la
producto.
(El como
término
“defectos” seque
define
comoalimperfecciones
que afectan al uso del Producto).
se define
imperfecciones
afectan
uso del Producto).
Esta
garantía no
cubre
defectosdebido
resultantes
el desgaste
debido
alarañazos,
uso, incluyendo,
entre
otros, arañazos,
rasguños
roturas
e defectos
resultantes
por
el desgaste
al uso,por
incluyendo,
entre
otros,
rasguños
o roturas
provocados
duranteosu
uso, provocados durante su uso,
decoloración,
oxidación,negligencia,
uso no razonable,
maltrato,
negligencia,
transportar
o reubicar
el Producto, “causas climatológicas“,
n, uso no
razonable, maltrato,
alteraciones,
pintado,
mover, alteraciones,
transportar o pintado,
reubicarmover,
el Producto,
“causas
climatológicas“,
incluyendo,
otros,
granizo,inundación
cualquier etipo
de tormenta,
y daños resultantes o accidentales.
s, granizo,
cualquierentre
tipo de
tormenta,
incendio
y dañosinundación
resultantese oincendio
accidentales.
y surecomendaciones,
manipulación sin directrices
seguir las recomendaciones,
directrices
y restricciones
como
describen
en el manual
ulaciónEl
sinmontaje
seguir las
y restricciones como
se describen
en el manual
delseusuario
del Producto
y su del
usousuario
para del Producto y su uso para
aplicaciones
comerciales
o públicas anularán esta garantía.
ales o públicas
anularán
esta garantía.
no se hace
ningúno daño
por
o dañoso ocerca
pérdida
decobertizo.
objetos dentro o cerca de la cobertizo.
onsableKeter
por ningún
daño responsable
realizado porpor
terceros
dañosrealizado
o pérdida
deterceros
objetos dentro
de la
ticket odel
factura
de compra
prueba dely presunto
fallo del del
producto,
sujeto a puntual,
informarKeter,
del fallo
dediscreción,
manera puntual,
Keter, a su discreción, reemplazará
factura Al
deentregar
compra yelprueba
presunto
fallo dely producto,
sujeto a informar
fallo dey manera
a su
reemplazará
las piezas
Producto
o le reembolsará
una parte
proporcional
del de
precio
de compra
en función
de los años de garantía consumidos.
s del Producto
o ledefectuosas
reembolsarádel
una
parte prorrateada
proporcional
del prorrateada
precio de compra
en función
los años
de garantía
consumidos.
GEBRAUCHSANLEITUNG
UNG
Ihr Keter-Schuppen
(„das Produkt”)
wurde
unter genauer
Kontrolle
und strenger
Aufsicht
aus hochwertigen
recycelbaren Materialien hergestellt.
das Produkt”)
wurde unter genauer
Kontrolle
und strenger
Aufsicht
aus hochwertigen
und
recycelbaren
Materialien und
hergestellt.
Falls Probleme
amadressieren
Produkt auftauchen
sollten, adressieren
SieKeter-Kundendienst
Ihre Ansprüche bitteauf
anunserer
den Keter-Kundendienst
auf unserer
Webseite
odukt auftauchen
sollten,
Sie Ihre Ansprüche
bitte an den
Webseite (www.keter.com)
oder
wenden(www.keter.com) oder wenden
n uns. Sie sich per Telefon an uns.
Die auf 10 Jahre
begrenzte
Gewährleistung
umfasst Herstellungsoderund
Materialdefekte
am Produkt
und gilt ab dem
Datum des
Erwerbs. (Der Begriff
enzte Gewährleistung
umfasst
Herstellungsoder Materialdefekte
am Produkt
gilt ab dem Datum
des ursprünglichen
Erwerbs.
(Derursprünglichen
Begriff
„Defekte“ wird definiert
alsNutzung
Beeinträchtigungen,
die
die Nutzung des Produktes herabsetzen).
rt als Beeinträchtigungen,
die die
des Produktes
herabsetzen).
Diese
umfasst
keine
Defekte, resultieren
die aus normalem
Gebrauch
resultieren
schließen
unterdes
anderem
durch
die Nutzung des Produktes entstandenen
umfasst
keineGewährleistung
Defekte, die aus
normalem
Gebrauch
und schließen
unter
anderemund
durch
die Nutzung
Produktes
entstandenen
Kratzer
oder Risse Rostansatz
mit ein, sowie
Rostansatz
und Schäden aufgrund
unsachgemäßer
Nutzung, Abänderungen,
Missbrauch, Unachtsamkeit, Abänderungen,
Risse mitAbrieb,
ein, sowie
Verfärbungen,
undVerfärbungen,
Schäden aufgrund
von unsachgemäßer
Nutzung,von
Missbrauch,
Unachtsamkeit,
das Versetzen
oder Transportieren
des Produktes
und „Naturereignisse“,
wozu jegliche
unter anderem
Hagelschlag,
Form von Sturm, Flut und Feuer
en oderBemalen,
Transportieren
des Produktes
und „Naturereignisse“,
wozu unter
anderem Hagelschlag,
Form von
Sturm, Flutjegliche
und Feuer
zählen,verbundene
sowie mittelbare
und damit verbundene
are und damit
Beschädigungen
hierdurch. Beschädigungen hierdurch.
und Handhabung,
die nicht
gemäß den
Vorgaben
und Beschränkungen
werden, wie sie
der Gebrauchsanleitung zu dem
habung, Bei
die Aufbau
nicht gemäß
den Empfehlungen,
Vorgaben
undEmpfehlungen,
Beschränkungen
durchgeführt
werden, wie sie durchgeführt
in der Gebrauchsanleitung
zuin
dem
Produkt
vermerkt sind, verliert
diese Gewährleistung
ihreeinen
Gültigkeit.
Dies zu
giltkommerziellen
auch für einenund
Gebrauch
zu kommerziellen
d, verliert
diese Gewährleistung
ihre Gültigkeit.
Dies gilt auch für
Gebrauch
öffentlichen
Zwecken. und öffentlichen Zwecken.
ist nicht verantwortlich
für Beschädigungen
durch
Drittevon
undGegenständen
Schäden an und
Verlust oder
von Gegenständen
innerhalb
oder in der Nähe des Schuppens.
wortlich Keter
für Beschädigungen
durch Dritte
und Schäden an und
Verlust
innerhalb
in der Nähe des
Schuppens.
Nach der Einreichung
von Kaufnachweis
und Beweismaterial
beanstandeten
Defekt
amzeitnahen
Produkt, vorbehaltlich
einer zeitnahen
von Kaufnachweis
und Beweismaterial
für den beanstandeten
Defektfür
amden
Produkt,
vorbehaltlich
einer
Meldung des Defekts,
wird Meldung des Defekts, wird
während der gesamten
Gewährleistungsdauer
nach alleinigem
Ermessen fehlerhafte
austauschen
oderKaufpreises
einen anteiligen
Betrag des Kaufpreises auf Basis
samten Keter
Gewährleistungsdauer
nach alleinigem
Ermessen fehlerhafte
Teile austauschen
oder einenTeile
anteiligen
Betrag des
auf Basis
der linearen Abschreibung zurückerstatten.
bung zurückerstatten.
10-JAAR BEPERKTE GARANTIE
GARANTIE
Uw Keter
tuinhuisje ("het
product") is vervaardigd
uit hoogwaardige
en recyclebare
materialen,
onder strenge controle en toezicht.
het product")
is vervaardigd
uit hoogwaardige
en recyclebare
materialen, onder
strenge controle
en toezicht.
Mochtmet
zichhet
eenproduct,
probleem
voordoen
met naar
het product,
kunt u uwvan
claim
naar
de klantendienst
van Keter
sturen via onze
website
(www.keter.com) of per telefoon.
em voordoen
kunt
u uw claim
de klantendienst
Keter
sturen
via onze website
(www.keter.com)
of per
telefoon.
Deze
dekt
hetproductie
product voor
gebreken voor
in deeen
productie
materialen
voor een
periode
van
jaar vanaf de datum
van(De
de oorspronkelijke
aankoop. (De term
t product
voorgarantie
gebreken
in de
of materialen
periodeofvan
10 jaar vanaf
de datum
van
de10
oorspronkelijke
aankoop.
term
"gebreken"
wordt gedefinieerd
onvolkomenheden
dieschaden).
het gebruik van het product schaden).
efinieerd
als onvolkomenheden
die het als
gebruik
van het product
30
Deze garantie
geldt
nietzijn
voor
defecten
dieslijtage,
het gevolg
van normale
slijtage,
met inbegrip
van, maar
niet beperkt
tot, ontstaan
schuren, tijdens
krassen of breuk
Deze garantie geldt niet voor defecten
die het
gevolg
van
normale
met zijn
inbegrip
van, maar
niet beperkt
tot, schuren,
krassen
of breuken
het gebruik,
verkleuring
of vervaging
vangebruik,
de kleuren,
roest, nalatigheid,
onredelijk gebruik,
misbruik,
nalatigheid,
verven,
vervoeren
of verplaatse
het gebruik, verkleuring of vervaging
van de
kleuren, roest,
onredelijk
misbruik,
wijzigingen,
verven,
vervoerenwijzigingen,
of verplaatsen
van het
product,
"natuurlijke
calamiteiten",
met inbegrip
van, elke
maarvorm
niet van
beperkt
tot,overstroming
hagel, elke vorm
van storm,
overstroming
en brand,
en gevolg- of incidentele
"natuurlijke calamiteiten", met
inbegrip van,
maar niet beperkt
tot, hagel,
storm,
en brand,
en gevolgof incidentele
schade.
Bijniet
assemblage
en behandeling
in overeenstemming
met en
de beperkingen
aanbevelingen,
richtlijnen
en beperkingen
zoals beschreven
in de
gebruiksaanw
Bij assemblage en behandeling
in overeenstemming
met niet
de aanbevelingen,
richtlijnen
zoals
beschreven
in de gebruiksaanwijzing
van het
product,
gebruik voor
commerciële
of publieke
toepassingen, vervalt deze garantie.
en gebruik voor commerciële en
of publieke
toepassingen,
vervalt
deze garantie.
is nietschade
verantwoordelijk
schade
opgelopen
derden
of schade
aan of
van objecten
binnen of in de buurt van het tuinh
Keter is niet verantwoordelijk Keter
voor enige
opgelopen voor
door enige
derden
of schade
aan of door
verlies
van objecten
binnen
ofverlies
in de buurt
van het tuinhuisje.
Door het indienen
het van
aankoopbewijs
en gebrek
het bewijs
geclaimde
gebrek
aan het product,
onder
voorbehoud
tijdige rapporta
Door het indienen van het aankoopbewijs
en hetvan
bewijs
het geclaimde
aanvan
hethet
product,
en onder
voorbehoud
van eenen
tijdige
rapportage
vanvan
de een
gebreken,
zal Keter,
naar
eigen goeddunken,
defectevervangen
onderdelen
van het
of een pro
rata deel van
zal Keter, naar eigen goeddunken,
defecte
onderdelen
van het product
of een
pro product
rata deelvervangen
van de koopprijs
terugbetalen
vande
opkoopprijs
basis vanterugbetalen
een lineair van op basis
afgeschreven
bedrag over de duur van de garantie.
afgeschreven bedrag over de duur
van de garantie.
10 ANNI DI GARANZIA LIMITATA
10 ANNI DI GARANZIA LIMITATA
Il tuo èprodotto
Keter (“ilcon
Prodotto”)
è stato
fabbricato
materiali
riciclabili
di alta
qualità
sotto un controllo
Il tuo prodotto Keter (“il Prodotto”)
stato fabbricato
materiali
riciclabili
di altacon
qualità
sotto un
controllo
ed una
supervisione
rigorosi. ed una supervisione rigorosi.
In caso
di problemi con
il prodotto,
cortesemente
rivolgetevi
al servizio
clienti
Keter sul nostro
sitotelefono.
web (www.keter.com) o per telefono.
In caso di problemi con il prodotto,
cortesemente
rivolgetevi
al servizio
clienti Keter
sul nostro
sito web
(www.keter.com)
o per
Questa
garanziadovuto
copreaildifetti
guastodidel
prodotto dovuto
difetti diper
fabbricazione
undiperiodo
di 10
anni dalla
data di acquisto origin
Questa garanzia copre il guasto
del prodotto
fabbricazione
o dei amateriali
un periodoodidei
10materiali
anni dallaper
data
acquisto
originale.
(Il termine
"difetti"che
è definito
come imperfezioni
compromettono l'uso del prodotto).
"difetti" è definito come imperfezioni
compromettono
l'uso del che
prodotto).
Questa
garanzia
copreusura,
i difettiinclusi,
derivanti
normale
inclusi, magraffi
non limitati
a, sfregamento,
graffi
o fratture
createsiruggine,
durante l'uso, sc
Questa garanzia non copre i difetti
derivanti
danon
normale
mada
non
limitatiusura,
a, sfregamento,
o fratture
createsi durante
l'uso,
scolorimento,
uso irragionevole,
abuso,
negligenza,
alterazione,
movimento,
trasporto"eventi
o spostamento
"eventi
naturali",
tra cui, ma non lim
uso irragionevole, abuso, negligenza,
alterazione,
pittura,
movimento,
trasportopittura,
o spostamento
del prodotto,
naturali",del
traprodotto,
cui, ma non
limitati
a, grandine,
qualsiasi etipo
di tempeste,
inondazioni eoincendi
e danni conseguenti o accidentali.
qualsiasi tipo di tempeste, inondazioni
incendi
e danni conseguenti
accidentali.
L'assemblaggio
e la manipolazione
non in conformità
conguida
le raccomandazioni,
le linee guida
e le restrizioni
descritte
nel ed
manuale
utente del pro
L'assemblaggio e la manipolazione
non in conformità
con le raccomandazioni,
le linee
e le restrizioni descritte
nel manuale
utente del
prodotto
il loro utilizzo
applicazioni
commerciali
o pubbliche
renderà nulla questa garanzia.
per applicazioni commerciali oper
pubbliche
renderà
nulla questa
garanzia.
nondanni
è responsabile
per eventuali
danni
subiti da terzi
o per danni
o smarrimenti
di oggetti
all'interno
o nei pressi del prodotto stesso.
Keter non è responsabile per Keter
eventuali
subiti da terzi
o per danni
o smarrimenti
di oggetti
all'interno
o nei pressi
del prodotto
stesso.
Dopo aver
prova
di acquisto
e la prova
del problema
del prodotto,
soggetto
dichiarazione
tempestiva
del problema,
Keter, a sua esclu
Dopo aver inviato la prova di acquisto
e lainviato
provaladel
problema
del prodotto,
soggetto
a dichiarazione
tempestiva
dela problema,
Keter,
a sua esclusiva
discrezione,
sostituirà leuna
partiparte
difettose,
o rimborserà
una parte
proporzionale
prezzo
di acquisto
su una linea rettaper
basata
sull’ammortamento
sostituirà le parti difettose, o rimborserà
proporzionale
del prezzo
di acquisto
su una del
linea
retta basata
sull’ammortamento
la durata
della garanzia. per la dura
GARANTIA LIMITADA DE 10 ANOS
GARANTIA LIMITADA DE 10 ANOS
O seu
Keter
(“o Produto”)
foi fabricado
manualmente
a partir
de materiais
recicláveis
de qualidade
superior
sob controlo e supervisão rig
O seu abrigo Keter (“o Produto”)
foi abrigo
fabricado
manualmente
a partir
de materiais
recicláveis
de qualidade
superior
sob controlo
e supervisão
rigorosos.
Em problema
caso de ocorrência
de algum
o Produto,
por para
favor,ofaça
a sua
paraKeter
o serviço
de apoio
cliente Keter no nosso si
Em caso de ocorrência de algum
com o Produto,
porproblema
favor, façacom
a sua
reclamação
serviço
dereclamação
apoio ao cliente
no nosso
siteao
(www.keter.com)
ou por telefone.
ou por telefone.
garantia
cobre falhas
do produto
resultantes
de defeitos
de um
fabrico
ou materiais
durante
10 anos
a partiroriginal.
da data da compra
Esta garantia cobre falhas do Esta
produto
resultantes
de defeitos
de fabrico
ou materiais
durante
período
de 10 anos
a partirum
daperíodo
data dade
compra
a retalho
termo
“defeitos” éque
definido
como imperfeições
que
a utilização do Produto).
(O termo “defeitos” é definido(O
como
imperfeições
comprometam
a utilização
docomprometam
Produto).
Estaresultantes
garantia não
defeitos
resultantes
da utilização
desgaste
normais,a,incluindo,
mas não limitado
a, fricção,
arranhões
Esta garantia não cobre defeitos
da cobre
utilização
e desgaste
normais,
incluindo,e mas
não limitado
fricção, arranhões
ou fraturas
causadas
duranteou
a fraturas caus
utilização, descoloração
ou desbotamento,
oxidação,
utilização
pouco modificações,
razoável, abuso,
negligência,
modificações,
pintura,
deslocação, transport
utilização, descoloração ou desbotamento,
oxidação, utilização
pouco razoável,
abuso,
negligência,
pintura,
deslocação,
transporte
ou reposicionamento
do incluindo,
Produto, “atos
mas não género
limitadodea,tempestade,
granizo, qualquer
género
de tempestade,
e incêndio,
e danos conseque
do Produto, “atos da Natureza”,
mas da
nãoNatureza”,
limitado a,incluindo,
granizo, qualquer
inundação
e incêndio,
e danosinundação
consequentes
ou acidentais.
A montagem
e manipulação
que não
estejam
em conformidade
com as
recomendações,
diretrizes
restrições
de acordo
o descrito
A montagem e manipulação que
não estejam
em conformidade
com
as recomendações,
diretrizes
e restrições
de acordo
com o edescrito
no manual
do com
utilizador
do no man
Produto, ecomerciais
a utilizaçãoou
para
finalidades
comerciais
ou públicas, anularão esta garantia.
Produto, e a utilização para finalidades
públicas,
anularão
esta garantia.
Keter
não se responsabiliza
porpor
quaisquer
incorridos
pordentro
terceiros
ou danos
e perdas dentro ou perto do abrigo.
A Keter não se responsabilizaApor
quaisquer
danos incorridos
terceirosdanos
ou danos
e perdas
ou perto
do abrigo.
Mediante a apresentação
comprovativo
comprareclamado,
e prova daefalha
do aproduto
reclamado,
sujeito atempadamente,
a reportar a falhaadoKeter,
produto
atempadam
Mediante a apresentação do comprovativo
de compra edo
prova
da falha dodeproduto
sujeito
reportar
a falha doeproduto
ao seu
exclusivo,
irápartes
proceder
à substituição
das partes
defeituosas com
do Produto,
ou reembolsá-lo
com
uma parcela
proporcional
ao de
preço de co
critério exclusivo, irá procedercritério
à substituição
das
defeituosas
do Produto,
ou reembolsá-lo
uma parcela
proporcional
ao preço
de compra
numa base
amortização
linear relativa à duração da garantia.
amortização linear relativa à duração
da garantia.
31
For assistance with assembly, or to request replacement parts, log onto our website or call Customer Service.
DO NOT RETURN THE PRODUCT TO THE STORE.
Si vous avez besoin d’aide pour le montage, ou pour demander des pièces de rechange, connectez-vous sur notre site Web ou appelez le service à la clientèle.
NE RETOURNEZ PAS LE PRODUIT AU MAGASIN.
Para obtener ayuda sobre el montaje o para solicitar piezas de repuesto, conéctese a nuestra página web o llame a Atención al cliente.
NO DEVUELVA EL PRODUCTO A LA TIENDA.
Wenn Sie Hilfe beim Aufbau oder Ersatzteile benötigen, melden Sie sich auf unserer Webseite an oder rufen Sie unseren Kundenservice an.
GEBEN SIE DAS PRODUKT NICHT IM GESCHÄFT ZURÜCK.
Als u hulp nodig heeft bij de montage of vervangende onderdelen wilt bestellen, kunt u inloggen op onze website of bellen met de klantenservice.
BRENG HET PRODUCT NIET TERUG NAAR DE WINKEL.
Per assistenza al montaggio, o per richiedere pezzi di ricambio, accedi al nostro sito o chiama il servizio clienti.
NON RESTITUIRE IL PRODOTTO AL NEGOZIO.
Para obter ajuda na montagem, ou para solicitar peças de substituição, inicie a sessão no nosso sítio da Internet ou ligue para o Serviço de Apoio ao Cliente.
NÃO DEVOLVA O PRODUTO À LOJA.
US:
6435 South Scatterfield Road,
Anderson, Indiana 46013, USA
Tel: 1-(888)-374-4262
Fax: 317-575-4502
Canada: Tel: 1-(800)-661-6721
UK:
Unit 4, Woodgate Business Park,
Clapgate Lane, Birmingham,
B32 - 3DB, United Kingdom
Tel: 0121-5060008
Fax: 0121-4220808
Spain:
Avenida Conde de Romanones 6-b.
Polg. Ind. Miralcampo, 19200 Azuqueca
de Henares - Guadalajara, Spain
Tlf. +34.949 27 74 21
Fax +34.949 34 89 76
WWW.KETER.COM
Other European Countries:
Ericssonstraat 17, Postbus 224,
5120 AE Rijen, the Netherlands
Tel: 31-1612-28301,
Fax: 31-1612-28322