1
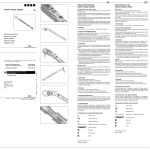
Parcus PEEK CF Interference Screw Driver
Important Product Information
Produktinformationsblatt
Información Importante sobre el Producto
Informations Importantes sur le Produit
Directions for Use
Gebrauchsanleitung
Instrucciones de uso
Mode d’emploi
Parcus PEEK CF Interference Screw Driver
Product Information Sheet and Directions for Use:
1.
Indications:
2.
The Parcus PEEK CF Interference Screw Driver is designed to insert and remove Parcus PEEK CF Interference
Screws. The shafts feature a 1.5mm cannulation and are designed to fit into the Parcus Ratcheting Handle and
may fit into other handles that utilize a Hudson chuck.
Warnings:
3.
A. This product is intended for use by or on the order of a physician.
B. This product should not be used to implant any device other than Parcus PEEK CF Interference Screws.
C. Do not use this product if it is bent or there is visible damage to the shaft or drive section.
Material:
4.
This device is manufactured from a Stainless Steel Alloy. The materials used in the manufacture of this device
that are intended to be placed inside the body are radio-opaque and can, therefore, be detected with
conventional X-Ray or fluoroscopy.
Inspection:
5.
A. Inspect the device for damage at all stages of handling.
B. If damage is detected, consult the manufacturer for guidance.
Cleaning:
A.
6.
Immediate rinsing and cleaning after use with an enzymatic detergent will effectively remove and prevent
drying of adherent blood, tissue, etc.
B. Scrub device with a soft brush, paying special attention to the cannulation and other areas where debris
might accumulate. Always avoid any harsh materials that can scratch or mar the surface of the device.
C. Rinse the device thoroughly with water following the cleaning process.
D. The device should be placed in an ultrasonic cleaning unit and processed according to the unit’s directions.
E. The device should be rinsed thoroughly with water following the ultrasonic process.
Sterilization:
This product is a non-sterile item that must be cleaned and sterilized prior to use. The following table provides
-6
recommended minimum sterilization parameters that have been validated by Parcus Medical to provide a 10
sterility assurance level (SAL):
Cycle Type
Minimum Temperature
Minimum Exposure Time
(Wrapped)
Gravity
132°C / 270°F
15 minutes
Pre-vacuum
132°C / 270°F
4 minutes
Minimum Dry Time
30 minutes
1
1
7.
Drying times vary according to load size and should be increased for larger loads
Directions for use:
A.
B.
C.
D.
E.
Connect the Parcus PEEK CF Interference Screw Driver to the Parcus Ratcheting Handle by pulling the
locking collar of the handle towards its proximal end and inserting the Parcus PEEK CF Interference Screw
Driver until it is fully seated. It will be necessary to align the flats of the driver with the slots of the handle to
allow the locking collar to slide distally, securing the driver to the handle. (See Parcus Ratcheting Handle
Directions for Use for details on attaching accessories).
Place a Parcus PEEK CF Interference Screw onto the drive portion of the driver until it is fully engaged.
Place the screw and driver over an appropriately placed Parcus 1.5mm Nitinol Guide Wire to guide the
screw into the insertion site.
Rotate the driver clockwise until the screw has reached the desired depth. A counterclockwise rotation of
the driver will remove the screw.
Remove the driver from the screw followed by removal of the guide wire.
Parcus PEEK CF Interferenzschraubendreher
Produktblatt und Gebrauchsanleitung:
1.
2.
3.
4.
5.
6.
Indikationen:
Der Parcus PEEK CF Interferenzschraubendreher dient zum Anbringen und Entfernen von Parcus PEEK CF
Interferenzschrauben. Die Schäfte besitzen eine 1,5 mm Kanüle und passen in den Parcus-Ratschengriff.
Möglicherweise passen sie auch in andere Griffe mit Hudson-Spannfutter.
Warnhinweise:
A. Dieses Produkt ist nur zur Verwendung durch einen Arzt oder auf Anweisung eines Arztes bestimmt.
B. Dieses Produkt sollte nicht zur Implantation von anderen Vorrichtungen als Parcus PEEK CF
Interferenzschrauben verwendet werden.
C. Verwenden Sie dieses Produkt nicht, wenn es verbogen ist oder wenn sichtbare Schäden am Schaft oder
am Drehabschnitt vorhanden sind.
Material:
Dieses Produkt ist aus einer Edelstahllegierung hergestellt. Die bei der Herstellung von im Körper zu
platzierenden Vorrichtungen verwendeten Materialien sind strahlenundurchlässig und sind mit konventionellen
Röntgen- und Fluoroskopieverfahren erkennbar.
Inspektion:
A. Inspizieren Sie das Produkt in jeder Handhabungsphase auf Schäden.
B. Wenn Schäden vorhanden sind, berät Sie der Hersteller weiter.
Reinigung:
A. Das Produkt sollte direkt nach der Verwendung mit einem Enzymreiniger abgespült und gereinigt werden.
Damit werden Blut und Geweberückstände usw. effektiv entfernt und trocknen nicht an.
B. Schrubben Sie den Schraubendreher mit einer weichen Bürste und achten Sie dabei besonders auf die
Kanüle und andere Stellen, an denen sich Schmutz ansammeln könnte. Verwenden Sie auf keinen Fall
harte Materialien, die die Oberfläche des Produktes beschädigen oder zerkratzen könnten.
C. Spülen Sie das Werkzeug nach der Reinigung gründlich mit Wasser ab.
D. Legen Sie den Schraubendreher in ein Ultraschallreinigungsgerät und reinigen Sie ihn gemäß der
Gebrauchsanleitung des Geräts.
E. Spülen Sie das Werkzeug nach der Ultraschallreinigung gründlich mit Wasser ab.
Sterilisierung:
Dieses Produkt ist nicht steril und muss vor der Anwendung gereinigt und sterilisiert werden. Die folgende
Tabelle zeigt die empfohlenen Mindestparameter für die Sterilisierung. Diese wurden von Parcus Medical
-6
validiert und bieten eine Sterilisierungssicherheit (Sterility Assurance Level, SAL) von 10 .
1
7.
Zyklusart
Mindesttemperatur
Mindestkontaktzeit
(eingewickelt)
Gravität
132 °C/270 °F
15 Minuten
Vorvakuum
132 °C/270 °F
4 Minuten
Mindesttrocknungszeit
30 Minuten
1
Die Trocknungszeit hängt von der Ladungsgröße ab und sollte für größere Ladungen verlängert werden.
Gebrauchsanleitung:
A. Befestigen Sie den Parcus PEEK CF Interferenzschraubendreher am Parcus Ratschengriff, indem Sie den
Sperrring des Griffs in Richtung des proximalen Endes schieben und den Parcus PEEK CF
Interferenzschraubendreher einführen, bis er richtig sitzt. Die Flachstellen am Drehwerkzeug müssen mit
den Schlitzen im Griff ausgerichtet werden, damit der Sperrring in die distale Richtung geschoben werden
kann, um Schraubendreher und Griff fest miteinander zu verbinden. (Nähere Angaben zum Anbringen von
Zubehörteilen finden Sie in der Gebrauchsanleitung zum Parcus Ratschengriff.)
B. Stecken Sie eine Parcus PEEK CF Interferenzschraube in das Drehteil des Schraubendrehers, bis sie gut
sitzt.
C. Legen Sie die Schraube und den Schraubendreher über einen ordnungsgemäß platzierten Parcus 1,5 mm
Nitinol-Führungsdraht, um die Schraube in die Einführöffnung zu führen.
D. Drehen Sie den Schraubendreher im Uhrzeigersinn, bis die Schraube so tief sitzt wie gewünscht. Wenn Sie
den Schraubendreher gegen den Uhrzeigersinn drehen, wird die Schraube entfernt.
E. Nehmen Sie den Schraubendreher von der Schraube und entfernen Sie dann den Führungsdraht.
Introductor Parcus para Tornillo de Interferencia de PEEK CF
Ficha de Información de Producto e Indicaciones de Uso
1.
2.
3.
4.
5.
6.
7.
Indicaciones:
El Introductor Parcus para Tornillo de Interferencia de PEEK CF se ha diseñado para insertar y extraer los
Tornillos de Interferencia Parcus de PEEK CF. Los ejes incluyen una canulación de 1,5 mm y se han diseñado
para encajar en el mango de trinquete Parcus (n.º de pieza: 20010); también pueden encajar en otros mangos
que utilicen mandril de sujeción o portabrocas Hudson.
Advertencias:
A. Este producto debe ser utilizado por un médico o por prescripción facultativa.
B. Este producto no debe utilizarse para implantar ningún dispositivo que no sean Tornillos de Interferencia de
PEEK CF Parcus.
C. No debe utilizarse este producto si está curvado o si muestra daños visibles en el eje o en la sección de
empuje.
Material:
Este dispositivo está fabricado en aleación de acero inoxidable. Los materiales utilizados en la fabricación de
los dispositivos que se pretende colocar en el interior del cuerpo son radiopacos y, por lo tanto, pueden
detectarse mediante radiografía tradicional o fluoroscopia.
Inspección:
A. Inspeccione el dispositivo en todas las etapas de su manejo, para comprobar que no presenta ningún daño.
B. Si se detecta algún daño, consulte al fabricante para obtener asesoramiento.
Limpieza:
A. El enjuague y la limpieza inmediatos con un detergente enzimático después del uso eliminarán con eficacia,
e impedirán que se sequen, la sangre o los tejidos adheridos, etc.
B. Cepille el dispositivo con un cepillo de cerdas suaves, prestando especial atención a la canulación y a otras
zonas donde pueda acumularse la suciedad. Evite siempre los materiales abrasivos que pudieran arañar o
estropear la superficie del dispositivo.
C. Enjuague bien el dispositivo con agua después del proceso de limpieza.
D. El dispositivo debe colocarse en una unidad de limpieza ultrasónica y procesarse de acuerdo con las
instrucciones de la unidad.
E. El dispositivo debe enjuagarse concienzudamente con agua después del proceso ultrasónico.
Esterilización:
Este producto es un artículo no estéril, y debe limpiarse y esterilizarse antes de su uso. En la siguiente tabla se
indican los parámetros mínimos de esterilización recomendados que han sido validados por Parcus Medical
-6
para alcanzar un nivel de garantía de esterilidad (SAL) de 10 :
Tiempo de exposición
Tiempo de secado
Tipo de ciclo
Temperatura mínima
mínimo (instrumental
mínimo
envuelto)
Desplazamiento por
132 °C/270 °F
15 minutos
1
gravedad
30 minutos
Pre-vacío
132 °C/270 °F
4 minutos
1
El tiempo de secado varía en función del tamaño de la carga y deberá aumentarse para cargas mayores.
Instrucciones de uso:
A. Conecte el Introductor Parcus para Tornillo de Interferencia de PEEK CF al mango de trinquete de Parcus
tirando del cuello de fijación del mango hacia su extremo proximal e insertando el introductor para Tornillo
de Interferencia Parcus de PEEK CF hasta que encaje por completo. Será necesario alinear las partes
planas del introductor con las ranuras del mango para permitir que el cuello de fijación se deslice en sentido
distal y fije el introductor al mango. (Véanse las Instrucciones de uso del mango de trinquete Parcus para
ver los detalles sobre la fijación de accesorios).
B. Coloque un Tornillo de Interferencia Parcus de PEEK CF en la porción de empuje del introductor hasta que
esté completamente engranado.
C. Coloque el tornillo y el introductor sobre un cable guía Parcus de Nitinol de 1,5 mm colocado correctamente
para guiar el tornillo al punto de inserción.
D. Gire el introductor en sentido horario hasta que el tornillo haya alcanzado la profundidad deseada. La
rotación del introductor en sentido antihorario extraerá el tornillo.
E. Retire el introductor del tornillo y, a continuación, retire el cable guía.
Tournevis d’Interférence PEEK CF Parcus
Feuille d'informations techniques et mode d'emploi :
1.
Indications :
2.
Le Tournevis d’Interférence PEEK CF Parcus permet d’insérer et d’enlever les Vis d’Interférence PEEK CF
o
Parcus (n de réf. 10021-10040). Son axe, avec canulation de 1,5 mm, a été conçu pour s’enclencher dans la
poignée à cliquet Parcus et peut s’enclencher dans d’autres poignées qui utilisent un mandrin Hudson.
Avertissements :
A.
B.
C.
3.
Ce produit est prévu pour une utilisation par un médecin ou sur prescription médicale.
Ce produit ne doit pas servir à implanter un autre dispositif que des Vis d’Interférence PEEK CF Parcus.
Ne pas utiliser ce produit s’il est courbé ou s’il porte des signes de dommage visibles au niveau de son axe
ou de sa section d’entraînement.
Matériau :
4.
Ce dispositif est fait d'alliage inox. Les matériaux utilisés pour la fabrication de ce dispositif qui sont prévus pour
une implantation sont radio-opaques et peuvent par conséquent être détectés sous RX ou fluoroscopie
conventionnelle.
Inspection :
5.
A. Inspecter l’état du dispositif à chaque étape de la manipulation.
B. En cas de dommages détectés, consulter le fabricant.
Nettoyage :
A.
6.
Un rinçage et un nettoyage immédiats après usage avec un détergent enzymatique enlèvera et empêchera
le séchage du sang, des tissus, etc.
B. Frotter le dispositif à l’aide d’une brosse à soies douces, en insistant particulièrement sur la canulation et à
d’autres endroits où des particules ont pu s’accumuler. Toujours éviter les matériaux abrasifs susceptibles
de rayer ou d’abîmer la surface du dispositif.
C. Rincer minutieusement le dispositif avec de l’eau après le nettoyage.
D. Placer le dispositif dans un appareil de nettoyage ultrasonique et utiliser conformément au mode d'emploi.
E. Rincer minutieusement le dispositif avec de l’eau après le nettoyage ultrasonique.
Stérilisation :
Ce produit est non stérile et doit donc être nettoyé et stérilisé avant utilisation. Le tableau suivant fournit les
paramètres de stérilisation minimum recommandés et validés par Parcus Medical pour fournir un niveau
-6
d’assurance de stérilité de 10 (SAL) :
Type de cycle
Température minimum
Temps d’exposition minimum
(emballé)
Gravité
132 °C / 270 °F
15 minutes
Vide préalable
132 °C / 270 °F
4 minutes
Temps de séchage
minimum
30 minutes
1
1
7.
Les temps de séchage varient en fonction de la taille de la charge et doivent être augmentés pour des charges
plus importantes
Mode d’emploi :
A.
B.
C.
D.
E.
Connecter le Tournevis d’Interférence PEEK CF Parcus à la poignée à cliquet Parcus en tirant le collier de
verrouillage de la poignée vers son extrémité proximale et en y insérant le Tournevis d’Interférence PEEK
CF Parcus jusqu’à ce qu’il soit bien calé. Pour cela, il faut aligner les méplats du tournevis sur les fentes de
la poignée. (Pour des détails sur la fixation d’accessoires, se reporter au mode d’emploi de la poignée à
cliquet Parcus.)
Placer une Vis d’Interférence PEEK CF Parcus dans la section entraînement du tournevis jusqu'à ce qu’elle
soit enclenchée à fond.
Placer la vis et le tournevis sur un guide en Nitinol 1,5 mm Parcus correctement placé pour guider la vis
dans le site d’insertion.
Tourner le tournevis dans le sens horaire jusqu’à ce que la vis ait atteint la profondeur souhaitée. La
rotation anti-horaire du tournevis permet d’enlever la vis.
Enlever le tournevis de la vis, puis enlever le guide.