1
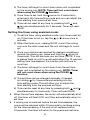
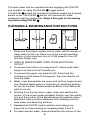
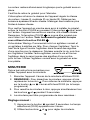
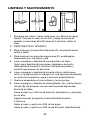
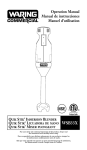
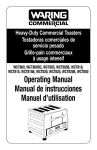
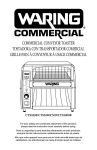
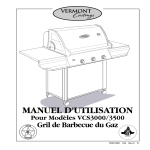
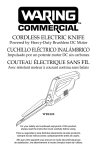
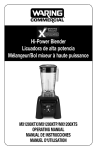
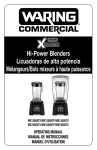
3-SPEED DRINK MIXER
MALTEADORA DE 3 VELOCIDADES
SHAKER À 3 VITESSES
WDM120/WDM240/WDM360
WDM120T/WDM240T/WDM360T (not shown)
For your safety and continued enjoyment of this product,
always read the instruction book carefully before using.
Para su seguridad y para disfrutar plenamente de este producto,
siempre lea las instrucciones cuidadosamente antes de usarlo.
Afin que votre appareil vous procure en toute sécurité beaucoup de
satisfaction, lire attentivement le mode d’emploi avant de l’utiliser.
IMPORTANT SAFEGUARDS
When using electrical appliances, basic safety precautions should
always be taken including the following:
1.READ
ALL INSTRUCTIONS.
2.Unplug from outlet when not in use, before putting on
or taking off parts, and before cleaning.
3.This appliance is not intended for use by persons (including
children) with reduced physical, sensory or mental
capabilities, or lack of experience and knowledge.
4.Children should be supervised to ensure that they do not
play with the appliance.
5. To protect against electrical hazards, do not put the Waring®
Commercial Drink Mixer in water or other liquids.
6. Avoid contact with moving parts.
7.Do not operate the Waring® Commercial Drink Mixer or any
other electrical equipment with a damaged cord or plug, or
after the unit malfunctions or is dropped or damaged in any
manner. Return it to the nearest authorized service facility
for examination, repair, or adjustment.
8. Do not use outdoors.
9.Do not let cord hang over edge of table or counter, or touch
hot surfaces.
10. Put this instruction manual in a safe place. Do not discard.
SAVE THESE INSTRUCTIONS
APPROVED FOR COMMERCIAL USE
GROUNDING INSTRUCTIONS
For your protection, the Waring® Commercial Drink Mixer is
equipped with a 3-conductor cord set.
120-volt units are supplied with a molded 3-prong groundingtype plug, and should be used in combination with a properly
connected grounding-type outlet as shown in Figure 1.
2
If a grounding type outlet is not available, an adapter, shown in
Figure 2, may be obtained to enable a 2-slot wall outlet to be
used with a 3-prong plug.
As shown in Figure 3, the adapter must be grounded by attaching
its grounding lug under the screw of the outlet cover plate.
CAUTION: Before using an adapter, it must be determined that
the outlet cover plate screw is properly grounded. If in doubt,
consult a licensed electrician.
Never use an adapter unless you are sure it is properly grounded.
NOTE: Use of an adapter is not permitted in Canada.
HOW TO USE YOUR
WARING ® COMMERCIAL DRINK MIXER
Each spindle on your Waring® Commercial Drink Mixer has
its own independent 1 peak HP motor. Your new Waring®
Commercial Drink Mixer has an automatic ON/OFF switch
(actuator) located behind the front tab of each upper cup support
that starts the motor when the mixing cup is placed in the proper
position on the lower cup support. The cup support has two
steps. To activate the automatic ON/OFF switch, the bottom of
the mixing cup must be securely resting on the upper step of the
cup support and the top rim of the mixing cup must go behind
the front tab of the upper cup support.
The motor will continue to operate while the mixing cup remains
on the mixer, activating the actuator.
Removal of the mixing cup will shut off the motor.
The 3-speed switch on top of the Waring® Commercial Drink
Mixer regulates the operating speed. Choose either LO (I), MED
(II), or HI (III) speed. For mixing heavy drinks, use HI (III) speed
only; for light drinks with more liquid, use LO (I) speed.
3
The drink mixer can be operated without engaging the ON/OFF
cup actuator by using the PULSE
toggle switch. The PULSE
switch will operate at whatever speed the 3-speed switch is set to.
The PULSE
switch will operate only while pressed forward or
backward. Keep a firm grip on the cup while using PULSE .
Your Waring® Commercial Drink Mixer is supplied with 2 agitators,
1 standard and 1 “butterfly” (with the movable flaps), per spindle.
To switch agitators, simply hold the spindle shaft with one hand
and turn the agitator in a clockwise direction. This will loosen
the screw, and you can unscrew to remove. Insert replacement
agitator and screw bottom screw back in. Tighten by turning the
agitator in a counterclockwise direction. Use only a standard
metal mixing cup with the standard agitator.
TIMER UNIT INSTRUCTIONS
To operate your drink mixer with the
timer, you must follow the following
instructions:
1.When plugging in the unit, the timer(s) will automatically read
R0:00.
2.NOTE: To turn the timer off at any point, press the arrow
three times in rapid fashion. To turn the unit back on, tap the
or arrow once and the unit will display R0:00, or any
previously set time.
3.You can reset your time at any point by pressing and holding
the and
arrows simultaneously for 3 seconds.
4.There are two ways to set the timer for your commercial
drink mixer:
Setting the timer manually:
1)Press and hold the
arrow for 3 seconds and the unit
will enter into time-setting mode S0:00.
2)Once the timer is on and you have activated setting
mode, you can set the timer using the and
arrows.
(HINT: holding the arrow buttons down will allow you to
count up in 10-second increments.) Unit will display S
(time selected).
3)When you’ve reached your desired time, the timer will
automatically set after 3 seconds.
4
4)The timer will begin to count down when unit is actuated
by the mixing cup. NOTE: Timer will not count down
when using the PULSE
function.
5)Once timer is set, hold the
arrow for 3 seconds to
enter back into time-setting mode and you can adjust the
time starting from previous set time.
6)Time can be reset at any time by pressing both and
arrows simultaneously for 3 seconds. Timer will read
R0:00.
Setting the timer using assisted mode:
1)To set the timer using assisted mode, your timer must be
on. If the timer is not on, tap the or
arrow once to
activate.
2)When the timer is on, reading R0:00, mount the mixing
cup onto the drink mixer and the unit will begin to count
up.
3)Once your mixture has reached its desired consistency,
remove the mixing cup, press and hold the arrow for
3 seconds. This will become your set time. (NOTE: If cup
is placed back on unit to re-actuate before the 10-second
setting time has elapsed, the counter will continue to
count up.)
4)The timer will begin to count down from the set time
when unit is actuated by the mixing cup. NOTE: Timer
will not count down when using the PULSE
function.
5)The set time can be changed manually, if needed,
by holding
for 3 seconds and entering into the
time-setting mode. This will allow you to adjust the
time starting from the previous set time.
6)Time can be reset at any time by pressing both and
simultaneously for 3 seconds. Timer will read R0:00.
5.When the set time elapses, the motor will automatically shut
off, the timer will flash 0:00, and then automatically return to
set time.
6.If mixing cup is removed before the set time elapses, the
cup must be returned within 10 seconds to continue mixing
for the time remaining. If the cup is not replaced within
10 seconds, the timer will return to the previously set time.
5
The drink mixer can be operated without engaging the ON/OFF
cup actuator by using the PULSE
toggle switch.
The PULSE
switch will operate at whatever speed the 3-speed
switch is set. The PULSE
switch will operate only while
pressed forward or backwards. Keep a firm grip on the mixing
cup while using PULSE
CLEANING & MAINTENANCE INSTRUCTIONS
1.Rinse cup thoroughly under running water. Add 8 ounces of
clean water to the cup. Place cup in the normal operating
position on the mixer and run on HI (III) speed for two (2)
minutes. Empty cup.
2.UNPLUG MIXER POWER CORD FROM ELECTRICAL
OUTLET.
3.To remove the bottom cup supports (C), simply push each
support up then pull out towards you.
4.To remove the upper cup supports (D), firmly hold the
notches on both sides of the support, then pull directly out
from the base.
5.Wash, rinse and sanitize the upper and bottom supports and
cup. Sanitize these parts by immersing in sanitizing solution
for two (2) minutes. Shake excess moisture off and allow all
parts to air-dry.
6.Working from the top down, wash, rinse, and sanitize the
portion of the mixer housing situated directly over the mixing
cup and the portion of the spindle above the agitator using
absorbent wiping cloths moistened with cleaning solution,
rinse water and sanitizing solution.
7.Reassemble ON/OFF switch actuator and mixing cup
supports to mixer housing by reversing steps 3 and 4.
8.For each spindle, wash, rinse and sanitize the bottom of the
6
spindle and the agitator (illustrations A and B) as follows:
Plug the Waring® Commercial Drink Mixer cord into
electrical outlet.
Add 8 ounces of washing solution to mixing cup and place
in normal operating position on mixer.
Run on HI (III) speed for a minimum of two (2) minutes.
Empty cup and repeat two-minute run with 8 ounces of
water.
Empty cup and repeat two-minute run with 8 ounces of
sanitizing solution.
Empty cup. Run motor for a few seconds with empty cup in
normal operating position to spin off any excess moisture.
Do not rinse cup, spindle or agitator after sanitizing is
completed. Allow all parts to air-dry.
Wash, rinse, and sanitize as outlined above prior to initial use, and
whenever mixer will not be used again within a period of one hour
to avoid bacteria buildup.
Surfaces of the mixer housing that are outside of the food contact
areas may be cleaned as required, using wiping cloths moistened
with cleaning solution, rinse water and sanitizing solution.
UNPLUG POWER CORD FROM ELECTRICAL OUTLET BEFORE
CLEANING HOUSING. Prevent liquid from running into housing
by wringing all excess moisture from wiping cloths before using
them.
Washing solutions based on non-sudsing detergents and
chlorine-based sanitizing solutions having a minimum chlorine
concentration of 100 PPM are recommended.
The following washing, rinsing, and sanitizing solutions, or their
equivalents, may be used:
SOLUTION PRODUCT
DILUTION IN WATER TEMPERATURE
Washing: Calgon Calgolac
1 Tablespoon/Gallon Hot (115°F)
®
Rinsing:
Plain Water
Warm (95°F)
Sanitizing: Clorox Institutional 1 Tablespoon/Gallon Cold (50°F– 70°F)
Bleach
®
Calgon® is a registered trademark owned by Calgon Corporation.
Clorox® is a registered trademark owned by the Clorox Corporation.
7
HELPFUL HINTS
1. Always unplug the Waring® Commercial Drink Mixer before
disassembling or assembling parts.
2. Be sure to keep all the instructions, parts lists, and service
information in a safe and handy place.
3. If using ice, only use crushed ice or small cubes in the
Waring® Commercial Drink Mixer.
4. Clean the Waring® Commercial Drink Mixer thoroughly
before initial use.
5. Keep mixing cup clean. Wash, rinse and sanitize thoroughly
after use.
6. Be sure that all detachable parts are fastened tightly before
operating the Waring® Commercial Drink Mixer.
7. Operate the Waring® Commercial Drink Mixer only when
it is fully assembled.
8. To avoid splashing drinks of thin consistency, operate
on LO speed.
Any other servicing should be performed by an authorized service
representative.
LIMITED ONE YEAR WARRANTY
Waring warrants every new Waring® Commercial Drink Mixer to
be free from defects in material and workmanship for a period of
one year from the date of purchase when used with foodstuffs,
nonabrasive liquids (other than detergents) and nonabrasive
semiliquids, provided it has not been subject to loads in excess of
the indicated rating. In addition, the motor in this appliance has a
full three-year warranty.
Under this warranty, the Waring Commercial Division will repair
or replace any part that, upon our examination, is defective in
materials or workmanship, provided the product is delivered
prepaid to the Waring Service Center at:
314 Ella T. Grasso Ave. Torrington, CT 06790, or any Factory
Approved Service Center.
This warranty does not: a) apply to any product that has become
worn, defective, damaged or broken due to use or due to repairs
or servicing by other than the Waring Service Center or a Factory
8
Approved Service Center, or due to abuse, misuse, overloading
or tampering; or b) cover incidental or consequential damages of
any kind.
The one-year warranty is applicable only to appliances used in
the United States or Canada; this supersedes all other express
product warranty or warranty statements. For Waring products
sold outside of the U.S. and Canada, the warranty is the
responsibility of the local importer or distributor. This warranty
may vary according to local regulations.
Warning: This warranty is void if appliance is used on Direct
Current (DC).
SERVICE
Should service on this product in USA or Canada be required at
any time, call or write to:
Waring Service Center
314 Ella T. Grasso Ave.
Torrington, CT 06790
Tel. 1-800-492-7464 • FAX (860) 496-9017
or Nearest Authorized Service Center
Replacement parts for Waring Out of Warranty repairs are
obtainable at the above address.
Note: If your application involves the processing of biologically
active materials, any items returned for service must be sterilized
before being shipped. Such items must be clearly identified as
having been sterilized, both by a tag on the item itself and by a
statement in the accompanying correspondence. Waring will not
accept delivery of any returns unless they are so identified.
9
IMPORTANTES CONSIGNES
DE SÉCURITÉ
L'utilisation d'appareils électriques requiert la prise de précautions
élémentaires, parmi lesquelles les suivantes :
1.LIRE
TOUTES LES INSTRUCTIONS.
2.Débrancher après usage et avant toute manipulation ou
entretien.
3.Cet appareil ne devrait pas être utilisé par des enfants ou
des personnes souffrant d’un handicap physique, mental ou
sensoriel, ou qui ne disposent pas des connaissances ou de
l'expérience nécessaires.
4.Veiller à ce que les enfants ne jouent pas avec l'appareil.
5. Afin de prévenir tout risque de choc électrique, ne jamais
placer l'appareil dans l’eau ou tout autre liquide.
6. Éviter tout contact avec les éléments en mouvement.
7.Ne pas utiliser l'appareil si le cordon d’alimentation
ou la fiche sont endommagés, s’il ne fonctionne pas
correctement, s'il est abîmé ou après qu'il soit tombé.
Envoyer l'appareil à un service après-vente autorisé afin qu’il
soit inspecté, réparé ou réglé au besoin.
8. Ne pas utiliser l'appareil à l'air libre.
9.Ne pas laisser le cordon pendre au bord d'une table ou
d'un plan de travail, ni entrer en contact avec des surfaces
chaudes.
10. Garder ces instructions pour référence ultérieure. Ne pas les
jeter.
GARDER CES INSTRUCTIONS
USAGE COMMERCIAL AUTORISÉ
INSTRUCTIONS DE MISE À LA TERRE
10
Pour votre protection, votre appareil est doté d'un cordon à trois
fils de mise à la terre.
Les appareils de 120V sont équipés d'une fiche à trois
broches. Cette fiche doit être branchée dans une prise de terre
correctement configurée (Fig. 1).
Vous pouvez utiliser un adaptateur temporaire (Fig. 2) pour
brancher l’appareil dans une prise polarisée jusqu’à ce que vous
fassiez installer une prise de terre par un électricien.
Afin d'assurer la mise à la terre, la languette de l’adaptateur doit
être fixée au boîtier par une vis en métal (Fig. 3).
ATTENTION : Vérifier que le boîtier est mis à la terre avant
d'utiliser l'adaptateur. En cas de doute, demander conseil à un
électricien.
Ne jamais utiliser un adaptateur, à moins qu'il ne soit
correctement mis à la terre.
REMARQUE : L’utilisation d’un adaptateur comme celui
mentionné ci-dessus est interdite au Canada.
MODE D'EMPLOI DU SHAKER
WARING ® COMMERCIAL
Chaque agitateur est activé par un moteur de 1 HP indépendant.
Le moteur de votre nouveau shaker Waring® Commercial est
équipé d'un système de démarrage automatique, activé par la
mise en place du gobelet. L'agitateur se mettra en route dès que
le gobelet poussera vers le haut le commutateur situé derrière
le boîtier. Le support inférieur du gobelet a deux niveaux. Pour
activer le commutateur, le gobelet doit reposer sur le niveau
supérieur du support, et le bord du gobelet doit être inséré
derrière la patte du support du haut.
11
Le moteur restera allumé aussi longtemps que le gobelet sera en
place.
Il suffira de retirer le gobelet pour l'éteindre.
L'interrupteur situé sur le dessus de l'appareil régule la vitesse
du moteur : basse (I), modérée (II) ou haute (III). Mélanger les
boissons épaisses à haute vitesse. Mélanger des boissons plus
fluides à basse vitesse.
Pour mettre l'appareil en marche sans avoir à installer le gobelet,
activer la fonction PULSE en poussant l'interrupteur
vers l'avant
ou l'arrière. L'appareil se mettra en marche, à la vitesse choisie.
Remarque: l'interrupteur PULSE
ne pourra être poussé que
vers l'avant ou l'arrière. Tenir fermement le gobelet lorsque
vous utilisez la fonction PULSE .
Votre shaker Waring® Commercial inclut un agitateur normal et
un agitateur à ailettes par tête. Pour changer l'agitateur: Tenir le
haut de la tige et tourner l'agitateur dans le sens des aiguilles
d'une montre pour le desserrer. Dévisser ensuite la vis, puis tirer
sur l'agitateur. Installer l'autre agitateur, serrer la vis et tourner
l'agitateur dans le sens inverse des aiguilles d'une montre
pour le fixer. Utiliser l'agitateur normal avec le gobelet en acier
inoxydable.
MINUTERIE
Suivre les instructions suivantes pour
utiliser l'appareil avec la minuterie.
1.Brancher l'appareil. L'écran de la minuterie affichera R0:00.
2.
REMARQUE : Pour désactiver le minuteur, appuyer à trois
reprises sur le bouton . Pour rallumer la minuterie, appuyer
sur le bouton ou . L'écran affichera R0:00 (ou le temps
programmé).
3.Pour remettre le minuteur à zéro, appuyer simultanément sur
les boutons et
pendant 3 secondes.
4.La minuterie peut être programmée de deux manières :
Réglage manuel :
1)Appuyer sur le bouton
pendant 3 secondes. Le temps
sélectionné (S0:00) apparaîtra sur l’écran.
2)Utiliser les boutons
et
12
pour régler la minuterie.
REMARQUE : Appuyer sur le bouton continuellement
pour augmenter/diminuer le temps en incréments de
10 secondes. “S” (le temps sélectionné) apparaîtra sur
l’écran.
3)Une fois arrivé au temps voulu, relâcher le bouton. Votre
programmation sera automatiquement enregistrée au
bout de 3 secondes.
4)Le minuteur se mettra en route dés que vous mettrez
le gobelet en place. REMARQUE : Le minuteur ne
fonctionne pas avec le mode PULSE .
5)Pour changer le temps programmé, appuyer sur le
bouton
pendant 3 secondes.
6)Pour remettre le minuteur à zéro, appuyer simultanément
sur les boutons
et
pendant 3 secondes. L'écran de
la minuterie affichera R0:00.
Réglage assisté :
1)La minuterie doit être activée. Si elle ne l'est pas, appuyer
sur le bouton ou .
2)Une fois que l'écran affiche R0:00, mettre le gobelet
en place. L'appareil se mettra en route et la minuterie
commencera à compter.
3)Une fois la boisson prête, appuyer sur le bouton
pendant 3 secondes. Le temps sera automatiquement
enregistré. REMARQUE :Si vous remettez le gobelet
en place avant 10 secondes, la minuterie continuera à
compter.
4)Le minuteur se mettra en route dés que vous mettrez
le gobelet en place. REMARQUE : Le minuteur ne
fonctionne pas avec le mode PULSE .
5)Pour changer le temps programmé, appuyer sur le
bouton
pendant 3 secondes. Régler la minuterie sur le
temps désiré.
6)Pour remettre le minuteur à zéro, appuyer simultanément
sur les boutons et
pendant 3 secondes. L'écran de
la minuterie affichera R0:00.
5.À la fin du temps programmé, le moteur s'éteindra
automatiquement et l'écran affichera 0:00
6.Si vous retirez le gobelet avant la fin du temps programmé, il
faudra le remettre en place dans les 10 secondes qui suivent
13
pour continuer. Si le gobelet n'est pas remis en place, la
minuterie s'éteindra.
Pour mettre l'appareil en marche sans avoir à installer le gobelet,
activer la fonction PULSE .
L'appareil se mettra en marche, à la vitesse choisie. Remarque:
l'interrupteur PULSE
ne pourra être poussé que vers l'avant ou
l'arrière. Tenir fermement le gobelet lorsque vous utilisez la
fonction PULSE .
NETTOYAGE ET ENTRETIEN
1.Rincer le gobelet. Ajouter 235 ml d’eau claire. Remettre
le gobelet en place et faire fonctionner l’appareil à haute
vitesse (III) pendant 2 minutes. Vider le gobelet.
2. DÉBRANCHER L’APPAREIL.
3.Retirer les supports inférieurs (C) en les poussant vers le
haut, puis en tirant.
4.Retirer les supports supérieurs (D), en les tenant fermement
par les côtés et en tirant.
5.Laver, rincer et désinfecter les supports et le gobelet.
Remarque : pour désinfecter, faire tremper les pièces dans
une solution désinfectante pendant 2 minutes. Secouer et
laisser sécher à l’air libre.
6.Nettoyer, rincer et désinfecter le dessous du bloc-moteur et
le haut de la tige à l'aide d'une éponge imbibée de solution
nettoyante, eau claire et solution désinfectante.
7.Ré-assembler le commutateur et les supports.
8.Laver, rincer et désinfecter chaque agitateur (A) et bas de
tige (B), selon les instructions suivantes :
Brancher l'appareil.
Remplir le gobelet de 235 ml de solution de nettoyage et le
mettre en place.
14
Faire fonctionner l'appareil à haute vitesse (III) pendant 2
minutes.
Vider et recommencer avec 235 ml d'eau claire.
Vider et recommencer avec 235 ml de solution
désinfectante.
Vider le gobelet. Faire fonctionner à vide pendant quelques
secondes pour sécher partiellement l'agitateur. Ne pas
rincer le gobelet, la tige ou l'agitateur après les avoir
désinfectés. Laisser sécher à l'air libre.
Nettoyer, rincer et désinfecter l'appareil avant de l'utiliser pour la
première fois et après chaque utilisation, à moins que vous ne le
réutilisiez dans l'heure qui suit.
Nettoyer, rincer et désinfecter le corps de l'appareil au besoin, à
l'aide d'une éponge imbibée de solution nettoyante, eau claire et
solution désinfectante.
DÉBRANCHER L'APPAREIL AVANT DE NETTOYER LE BOÎTIER.
Bien essorer l’éponge pour éviter que le liquide ne pénètre dans
le boîtier.
Nous recommandons l'utilisation d'une solution de nettoyage à
base de détergent non moussant et d'une solution désinfectante
à base de chlore, avec une concentration minimum de 100 ppm.
Vous pouvez utiliser les solutions suivantes ou leur équivalent :
SOLUTIONPRODUIT
PROPORTIONS
TEMPÉRATURE
NettoyageCalgon®*
5 ml/litre d'eau
Chaude (45˚C)
Rinçage
Eau claire
Désinfection Eau de javel
Tiède (35°C)
5 ml/litre d'eau
Froide (10–20˚C)
CONSEILS UTILES
1. Toujours débrancher l'appareil avant de d'installer ou de
retirer des pièces.
2. Garder les instructions, la liste des pièces et l'information de
garantie dans un endroit sûr, pour référence ultérieure.
3. Si une boisson inclut de la glace, utiliser de la glace pilée.
*Calgon® est une marque déposée de Calgon Corporation.
15
4. Nettoyer soigneusement l'appareil avant de l'utiliser pour la
première fois.
5. Garder le gobelet propre. Le laver, rincer et désinfecter
après chaque utilisation.
6. Vérifier que toutes les pièces amovibles sont bien installées
avant d'utiliser l'appareil.
7. Ne pas utiliser l'appareil à moins qu'il ne soit complètement
assemblé.
8. Pour éviter les éclaboussures, mélanger les boissons très
liquides à basse vitesse.
Toute autre opération d'entretien ou réparation doit être effectuée
par un service après-vente autorisé.
GARANTIE LIMITÉE D'UN AN
Waring garantit tout nouveau shaker Waring® Commercial contre
tout vice de matière ou de fabrication pendant une période
d'un an suivant sa date d’achat, à condition qu’il ait été utilisé
uniquement avec des produits alimentaires, des liquides nonabrasifs (autres que des détergents) et des semi-liquides nonabrasifs, à condition que l'appareil n'ait pas été soumis à des
charges excédant sa capacité maximale. Le moteur de l'appareil
est sous garantie totale pendant une période de trois ans.
Au titre de cette garantie, la division Waring Commercial réparera
ou remplacera toute pièce nous paraissant afficher un vice
de matière ou de fabrication. Pour un service au titre de cette
garantie, envoyez l'appareil, port payé, au service après-vente cidessous ou amenez-le à un centre de réparation agréé.
314 Ella T. Grasso Ave. Torrington, CT 06790.
Cette garantie a) n’est pas valable si l’appareil est endommagé,
cassé, détérioré ou s’il affiche un vice ou défaut résultant de
l’utilisation, de l’entretien ou de la réparation par des personnes
non autorisées, ou consécutif à l’usage abusif ou inapproprié, à la
surcharge ou à la modification de l'appareil ; b) ne couvre aucun
dommage accessoire ou indirect.
Cette garantie n’est valable que sur les appareils utilisés aux
États-Unis et au Canada et abroge toute autre garantie formelle
ou tout autre accord de garantie. La garantie des produits Waring
vendus en dehors des États-Unis et du Canada est à la charge
16
de l'importateur ou du distributeur local. Les droits de garantie
peuvent varier d’un pays ou d’une région à l’autre.
Avertissement : Brancher cet appareil sur Courant Continu (C.C.)
annulera la garantie.
SERVICE APRÈS-VENTE :
Afin de faire réparer ou de remplacer cet appareil aux États-Unis
ou au Canada, contactez :
Waring Service Center
314 Ella T. Grasso Ave.
Torrington, CT 06790
Tel.: 1-800-492-7464 • Fax : (860) 496-9017
ou bien adressez-vous au service après-vente le plus proche.
Les pièces détachées pour réparations "hors garantie" sont
également disponibles à l’adresse ci-dessus.
Remarque : Si l'appareil est utilisé pour le traitement de
matériaux biologiquement actifs, il sera nécessaire d'en stériliser
les pièces avant de l'expédier à un de nos centres de service. Les
pièces stérilisées doivent être clairement identifiées au moyen
d'une étiquette et d'une déclaration jointe. Waring se réserve le
droit de ne pas accepter les pièces, à moins qu'elles ne soient
identifiées de cette manière.
17
MEDIDAS DE SEGURIDAD
IMPORTANTES
Siempre que use aparatos eléctricos, debe tomar precauciones
básicas de seguridad, entre las cuales las siguientes:
1.LEA
TODAS LAS INSTRUCCIONES.
2.Desconecte el aparato cuando no esté en uso, antes de
instalar o remover piezas y antes de limpiarlo.
3.Los niños o las personas que carezcan de la experiencia o
de los conocimientos necesarios para manipular el aparato,
o aquellas cuyas capacidades físicas, sensoriales
o mentales estén limitadas, no deben utilizar el aparato.
4.Asegúrese de que los niños no jueguen con este aparato.
5. Para reducir el riesgo de electrocución, no sumerja el
aparato en agua u otro líquido.
6. Evite el contacto con las piezas móviles.
7.No utilice este aparato si el cordón o la clavija estuviesen
dañados, después de que hubiese funcionado mal o que se
hubiese caído o si estuviese dañado. Regrese el aparato a
un centro de servicio autorizado para su revisión, reparación
o ajuste.
8. No lo utilice en exteriores.
9.No permita que el cordón cuelgue del borde de la encimera
o de la mesa, ni que haga contacto con superficies
calientes.
10. Guarde este manual de instrucciones para futura referencia.
No lo deseche.
GUARDE ESTAS INSTRUCCIONES
APROBADO PARA USO COMERCIAL
18
INSTRUCCIONES DE PUESTA A TIERRA
Para su protección, este aparato está equipado con un cable de
puesta a tierra.
Los cables de los aparatos de 120V están dotados de un enchufe
con puesta a tierra, el cual debe ser conectado a una toma de
corriente debidamente puesta a tierra (Fig. 1).
Si una toma de corriente puesta a tierra no está disponible, se
podrá usar un adaptador para conectar el aparato a una toma de
corriente polarizada (Fig. 2).
El adaptador debe ser puesto a tierra mediante un tornillo de
metal que conecte la lengüeta del adaptador a la placa de la
toma de corriente (Fig. 3).
PRECAUCIÓN: Antes de conectar el adaptador, asegúrese de
que la toma de corriente esté puesta a tierra. Si no está seguro,
comuníquese con un electricista.
Nunca use un adaptador sin estar seguro de que la toma de
corriente esté puesta a tierra.
NOTA: Está prohibido usar un adaptador en el Canadá.
MODO DE EMPLEO DE LA MALTEADORA
WARING ® COMMERCIAL
Cada agitador está activado por un motor de 1 HP independiente.
El motor de su nueva malteadora Waring® Commercial está
equipado con un sistema de paro/marcha automático, activado
por un conmutador. El motor se encenderá en cuanto coloque el
vaso en su sitio, moviendo el conmutador hacia arriba. El soporte
inferior del vaso tiene dos escalones. Para activar el conmutador,
la base del vaso debe reposar de manera segura sobre el escalón
superior del soporte y el borde del vaso debe encontrarse atrás
de la pata del soporte superior.
19
El motor permanecerá encendido mientras el vaso esté en su sitio.
Se apagará al remover el vaso.
El interruptor ubicado en la parte superior del aparato regula la
velocidad del motor: Elija la velocidad deseada: baja (I), moderada
(II) o alta (III). Para mezclar bebidas densas, utilice la velocidad
alta. Para mezclar bebidas ligeras, utilice la velocidad baja.
Para poner el aparato en marcha sin tener que colocar el vaso
en el soporte, active la función de pulso, moviendo el interruptor
hacia delante o atrás. El aparato se pondrá en marcha a la
velocidad elegida. Nota: el interruptor de pulso
solamente podrá
moverse hacia delante o hacia atrás. Sostenga firmemente el
vaso al usar la función de pulso .
Su malteadora Waring incluye un agitador regular y un agitador de
aletas por cada agitador. Para cambiar el agitador: Sostenga el eje
del motor y gire el agitador en sentido horario para aflojarlo. Afloje
el tornillo y jale el agitador. Instale otro agitador, apriete el tornillo
y gire el agitador en sentido antihorario para sujetarlo. Utilice el
agitador regular con el vaso de acero inoxidable.
TEMPORIZADOR
Siga las instrucciones a continuación
para usar el temporizador.
1.Conecte el aparato. La pantalla
del temporizador mostrará R0:00.
2.NOTE: Para desactivar el temporizador en cualquier
momento, presione el botón tres veces seguidas. Para
activar el temporizador, presione el botón o . La pantalla
mostrará R0:00 (o el tiempo programado).
3.Para reiniciar el tiempo, mantenga oprimidos los botones
y
durante 3 segundos.
4.El temporizador puede programarse de dos maneras:
Programación manual
1)Mantenga oprimido el botón
durante 3 segundos. El
tiempo seleccionado (S0:00) aparecerá en la pantalla.
2)
Fije el tiempo deseado, usando los botones y .
NOTA: mantenga oprimido los botones para subir/bajar en
incrementos de 10 segundos. “S” (el tiempo seleccionado)
aparecerá en la pantalla.
20
3)Una vez fijado, el tiempo será automáticamente guardado
en la memoria después de 3 segundos.
4)El temporizador se pondrá en marcha al colocar el vaso
en su sitio. NOTA: El temporizador no funcionará con
la función de pulso .
5)Para cambiar el tiempo programado, mantenga oprimido
el botón
durante 3 segundos.
6)Para reiniciar el tiempo, mantenga oprimidos los botones
y
durante 3 segundos. La pantalla mostrará R0:00.
Programación asistida
1)El temporizador debe estar activado. Si no lo está,
presione el botón o .
2)Una vez que R0:00 aparece en la pantalla, coloque el
vaso en su sitio. El aparato se pondrá en marcha y el
temporizador empezará a contar.
3)Cuando la bebida esté lista, mantenga oprimido el botón
durante 3 segundos. El tiempo será automáticamente
guardado en la memoria. NOTA: Si regresa el vaso en
su sitio antes de 10 segundos, el temporizador seguirá
contando.
4)El temporizador se pondrá en marcha al colocar el vaso
en su sitio. NOTA: El temporizador no funcionará con
la función de pulso .
5)Para cambiar el tiempo programado, mantenga oprimido
durante 3 segundos. Fijar el tiempo deseado.
el botón
6)Para reiniciar el tiempo, mantenga oprimidos los botones
y
durante 3 segundos. La pantalla mostrará R0:00.
5.Al final del tiempo, el motor se apagará automáticamente y
0:00 aparecerá en la pantalla.
6.Si retira el vaso antes del final del tiempo, deberá regresarlo
en su sitio dentro de 10 segundos para que el temporizador
siga contando. Si no regresa el vaso en su sitio, el
temporizador se apagará.
Para poner el aparato en marcha sin tener que colocar el vaso en
el soporte, active la función de pulso, moviendo el interruptor
hacia delante o atrás.
El aparato se pondrá en marcha a la velocidad elegida. Nota: El
solamente podrá moverse hacia delante
interruptor de pulso
o hacia atrás. Sostenga firmemente el vaso al usar la función
de pulso .
21
LIMPIEZA Y MANTENIMIENTO
1.Enjuague los vasos. Llene cada vaso con 235 ml de agua
limpia. Coloque el vaso en su sitio y haga funcionar el
aparato a velocidad alta (III) durante 2 minutos. Vacíe el
vaso.
2.DESCONECTE EL APARATO.
3.Para remover los soportes inferiores (C), empújelos hacia
arriba y jálelo.
4.Para remover los soportes superiores (D), sosténgalos
firmemente por los lados y jale.
5.Lave, enjuague y desinfecte los soportes y el vaso.
Nota: para desinfectar las piezas, déjelas en solución
desinfectante durante 2 minutos. Sacuda las piezas y
permita que sequen al aire libre.
6.Lave, enjuague y desinfecte la parte inferior del bloquemotor y la parte superior del eje con una esponja empapada
en solución limpiadora, agua y solución desinfectante.
7.Vuelva a ensamblar el conmutador y los soportes.
8.Lave, enjuague y desinfecte cada agitador (A) y parte inferior
del eje (B), de acuerdo con las instrucciones siguientes:
Enchufe el cable.
Llene el vaso con 235 ml de solución limpiadora y colóquelo
en su sitio.
Haga funcionar el aparato a velocidad alta durante
2 minutos.
Vacíe el vaso y repita con 235 ml de agua.
Vacíe el vaso y repita con 235 ml de solución desinfectante.
22
Vacíe el vaso. Haga funcionar el aparato durante varios
segundos para secar parcialmente el agitador. No enjuague
el vaso, el eje o el agitador después de desinfectarlos.
Permita que las piezas sequen al aire libre.
Lave, enjuague y desinfecte el aparato antes del primer uso y
después de cada uso, a menos que vuelva a utilizarlo dentro de
la hora siguiente.
Lave, enjuague y desinfecte el cuerpo del aparato cuando sea
necesario, con una esponja empapada en solución limpiadora,
agua y solución desinfectante.
DESCONECTE EL APARATO ANTES DE LIMPIAR SU CUERPO.
Estruje bien la esponja para evitar que agua penetre adentro del
aparato.
Le recomendamos que use soluciones limpiadoras a base de
detergente sin espuma y soluciones desinfectantes con una
concentración mínima de cloro de 100 ppm.
Se podrán usar las soluciones siguientes o sus equivalentes:
SOLUCIÓNPRODUCTO
PROPORCIONES
TEMPERATURA
LimpiezaCalgon *
5 ml/litro de agua
Caliente (45 ˚C)
®
Enjuague
Agua
DesinfecciónCloro
Tibia (35 °C)
5 ml/litro de agua
Fría (10–20 ˚C)
CONSEJOS ÚTILES
1. Siempre desconecte el aparato antes de instalar/remover
piezas.
2. Guarde las instrucciones, la lista de las piezas y la
información de garantía en un lugar seguro, para futura
referencia.
3. Si una bebida incluye hielo, utilice hielo picado.
4. Limpie el aparato cuidadosamente antes del primer uso.
5. Mantenga el vaso limpio. Lave, enjuague y desinféctelo
después de cada uso.
6. Asegúrese de que todas las piezas amovibles estén
debidamente sujetadas antes usar el aparato.
7. No utilice el aparato a menos que esté completamente
ensamblado.
*Calgon® es una marca registrada de Calgon Corporation.
23
8. Para evitar las salpicaduras, utilice la velocidad baja para
mezclar las bebidas muy líquidas.
Cualquier otro servicio debe ser realizado por un técnico
autorizado.
GARANTÍA LIMITADA DE UN AÑO
Waring garantiza toda nueva malteadora Waring® Commercial
contra todo defecto de materiales o fabricación durante un año a
partir de la fecha de compra, siempre en cuando haya sido usada
con alimentos, líquidos no abrasivos (a excepción de detergentes)
y semi-líquidos no abrasivos, y que no haya sido sujeta a cargas
que excedan su máxima capacidad. Por otra parte, el motor de
este aparato tiene una garantía completa de tres años.
Bajo esta garantía, Waring Commercial reparará o reemplazará
toda pieza que, tras estar inspeccionada por nuestro servicio
posventa, demuestre defectos de materiales o fabricación,
siempre que el producto se entregue con franqueo pagado a:
314 Ella T. Grasso Ave. Torrington, CT 06790, o a cualquier
servicio postventa aprobado.
Esta garantía: a) no se aplica a ningún producto desgastado,
defectuoso, dañado o roto debido a uso, reparaciones/servicio
realizados por personas no autorizadas, o abuso, mal uso,
sobrecarga o daños intencionales; b) no cubre daños incidentales
o consecuentes de ningún tipo.
Esta garantía es válida solamente para los aparatos comprados
en los Estados Unidos y el Canadá y reemplaza todas las demás
declaraciones expresas de garantía. La garantía de los productos
Waring adquiridos fuera de los Estados Unidos y del Canadá es
la responsabilidad del importador/distribuidor local. Los derechos
de garantía pueden variar según las regulaciones locales.
Advertencia: El utilizar este aparato con corriente continua (C.C.)
invalidará la garantía.
24
SERVICIO POSTVENTA
Para servicio en los Estados Unidos o el Canadá, comuníquese
con:
Waring Service Center
314 Ella T. Grasso Ave.
Torrington, CT 06790
Tel.: 1-800-492-7464 • Fax: (860) 496-9017
o con el centro de servicio más cercano.
Piezas de repuesto para reparaciones "fuera de garantía" están
disponibles en la misma dirección.
Nota: Si el aparato ha sido usado para procesar sustancias
biológicamente activas, se deberán esterilizar las piezas antes
de enviarlas. Las piezas esterilizadas deberán ser claramente
identificadas, mediante una etiqueta puesta en las mismas y una
declaración adjunta. Waring no aceptará la entrega de artículos
esterilizados que no tengan identificación adecuada.
25
NOTES
26
NOTES
27
©2013 Waring Commercial
314 Ella T. Grasso Ave
Torrington, CT 06790
www.waringcommercialproducts.com
Printed in Taiwan
Impreso en Taiwán
Imprimé à Taïwan
WDM120/WDM240/WDM360
WDM120T/WDM240T/WDM360T IB
13WC139263
IB-10529B