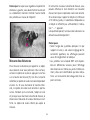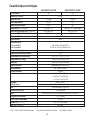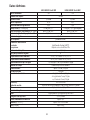
1
LEICA GEOVID 8/10 x 42 BRF
LEICA GEOVID 8/15 x 56 BRF
Anleitung / Instructions
Notice d’utilisation / Gebruiksaanwijzing
Istruzioni / Instrucciones
2
1a
1b
7
3
4
4
5
6
3a
3
7a
7
8
9/10
Important notice for USA
This equipment has been tested and found to comply with the limits for a Class B digital device, pursuant to
Part 15 of the FCC Rules. These limits are designed to provide reasonable protection against harmful interference in a residential installation. This equipment generates, uses and can radiate radio frequency energy
and, if not installed and used in accordance with the instructions, may cause harmful interference to radio
communications. However, there is no guarantee that interference will not occur in a particular installation.
If this equipment does cause harmful interference to radio or television reception, which can be determined
by turning the equipment off and on, the user is encouraged to try to correct the interference by one or more
of the following measures:
– Reorient or relocate the receiving antenna.
– Increase the separation between the equipment and receiver.
– Connect the equipment into an outlet on a circuit different from that to which the receiver is connected.
– Consult the dealer or an experienced radio/TV technician for help.
Vorwort
1. Okular-Augenmuscheln
Stellung a: herausgedreht für Beobachtung
ohne Brille
Stellung b: hereingedreht für Beobachtung
mit Brille
2. Zentral-Fokussierungsring
3. Dioptrien-Ausgleichsring mit
a. Skala
4. Ösen für Tragriemen
5. Auslösetaste zur Entfernungsmessung
6. Laser-Sendeoptik
7. Dioptrienausgleich für Zielmarke mit
a. Skala
8. Gelenkachse für Einstellung des
Augenabstands
9. Batteriefach
10. Batteriefachdeckel
Sehr geehrte Kundin, sehr geehrter Kunde,
Der Name Leica steht weltweit für höchste Qualität, feinmechanische Präzision bei äußerster
Zuverlässigkeit und langer Lebensdauer.
Wir wünschen Ihnen viel Freude und Erfolg mit
Ihrem neuen Leica Geovid BRF Fernglas.
Damit Sie es richtig einsetzen können, empfehlen
wir Ihnen, zunächst diese Anleitung zu lesen.
Lieferumfang
– Fernglas
– 1 Lithium Rundzelle 3 V Typ CR 2
– Tragriemen
– Bereitschaftstasche
– Okularschutzdeckel
– 2 Objektivschutzdeckel
– Garantiekarte
1
deutsch
Bezeichnung der Teile
Inhaltsverzeichnis
Bezeichnung der Teile . . . . . . . . . . . . . . . . . . . . . . . . . . . . . . . . . . . . . . . . . . . . . . . . . . . . . . . . . . . . . . 1
Lieferumfang . . . . . . . . . . . . . . . . . . . . . . . . . . . . . . . . . . . . . . . . . . . . . . . . . . . . . . . . . . . . . . . . . . . . . 1
Vorwort . . . . . . . . . . . . . . . . . . . . . . . . . . . . . . . . . . . . . . . . . . . . . . . . . . . . . . . . . . . . . . . . . . . . . . . . . 1
Entsorgung elektrischer und elektronischer Geräte. . . . . . . . . . . . . . . . . . . . . . . . . . . . . . . . . . . . . . . . 3
Anwendungsmöglichkeiten . . . . . . . . . . . . . . . . . . . . . . . . . . . . . . . . . . . . . . . . . . . . . . . . . . . . . . . . . . 3
Anbringen des Tragriemens und des Okular-Schutzdeckels. . . . . . . . . . . . . . . . . . . . . . . . . . . . . . . . . . 3
Anbringen der Objektiv-Schutzdeckel . . . . . . . . . . . . . . . . . . . . . . . . . . . . . . . . . . . . . . . . . . . . . . . . . . 3
Einsetzen und Auswechseln der Batterie . . . . . . . . . . . . . . . . . . . . . . . . . . . . . . . . . . . . . . . . . . . . . . . . 4
Ladezustand der Batterie . . . . . . . . . . . . . . . . . . . . . . . . . . . . . . . . . . . . . . . . . . . . . . . . . . . . . . . . . . . . 5
Einstellen der Augenmuscheln / Verwendung mit und ohne Brille . . . . . . . . . . . . . . . . . . . . . . . . . . . . . 6
Einstellen des Augenabstands . . . . . . . . . . . . . . . . . . . . . . . . . . . . . . . . . . . . . . . . . . . . . . . . . . . . . . . . 6
Einstellen der Schärfe / Dioptrienausgleich . . . . . . . . . . . . . . . . . . . . . . . . . . . . . . . . . . . . . . . . . . . . . . 7
Entfernungsmessung . . . . . . . . . . . . . . . . . . . . . . . . . . . . . . . . . . . . . . . . . . . . . . . . . . . . . . . . . . . . . . . 8
Scan-Betrieb . . . . . . . . . . . . . . . . . . . . . . . . . . . . . . . . . . . . . . . . . . . . . . . . . . . . . . . . . . . . . . . . . . . . . 9
Messreichweite und Genauigkeit . . . . . . . . . . . . . . . . . . . . . . . . . . . . . . . . . . . . . . . . . . . . . . . . . . . . . . 9
Pflege/Reinigung . . . . . . . . . . . . . . . . . . . . . . . . . . . . . . . . . . . . . . . . . . . . . . . . . . . . . . . . . . . . . . . . . 10
Zubehör . . . . . . . . . . . . . . . . . . . . . . . . . . . . . . . . . . . . . . . . . . . . . . . . . . . . . . . . . . . . . . . . . . . . . . . . 10
Ersatzteile . . . . . . . . . . . . . . . . . . . . . . . . . . . . . . . . . . . . . . . . . . . . . . . . . . . . . . . . . . . . . . . . . . . . . . 10
Was tun, wenn . . . . . . . . . . . . . . . . . . . . . . . . . . . . . . . . . . . . . . . . . . . . . . . . . . . . . . . . . . . . . . . . . . . 11
Technische Daten. . . . . . . . . . . . . . . . . . . . . . . . . . . . . . . . . . . . . . . . . . . . . . . . . . . . . . . . . . . . . . . . . 12
Leica Akademie . . . . . . . . . . . . . . . . . . . . . . . . . . . . . . . . . . . . . . . . . . . . . . . . . . . . . . . . . . . . . . . . . . 14
Leica im Internet . . . . . . . . . . . . . . . . . . . . . . . . . . . . . . . . . . . . . . . . . . . . . . . . . . . . . . . . . . . . . . . . . 14
Leica Infodienst . . . . . . . . . . . . . . . . . . . . . . . . . . . . . . . . . . . . . . . . . . . . . . . . . . . . . . . . . . . . . . . . . . 14
Leica Kundendienst . . . . . . . . . . . . . . . . . . . . . . . . . . . . . . . . . . . . . . . . . . . . . . . . . . . . . . . . . . . . . . . 14
Warnhinweis: Vermeiden Sie, wie bei jedem Fernglas, den direkten Blick mit Ihrem Leica Geovid BRF in helle
Lichtquellen, um Augenverletzungen auszuschließen.
2
Anwendungsmöglichkeiten
Die Leica Geovid BRF Ferngläser besitzen ein
robustes Aluminium-Gehäuse, das den Einsatz
selbst unter widrigen Bedingungen erlaubt. Dabei
muss auch auf Nässe keine Rücksicht genommen
werden – sie sind bis 5 m Wassertiefe absolut
dicht und die innenliegende Optik beschlägt dank
einer Stickstoff-Füllung nicht.
(Gilt für die EU, sowie andere
europäische Länder mit getrennten Sammelsystemen)
Dieses Gerät enthält elektrische und/oder elektronische Bauteile und darf daher nicht im normalen Hausmüll entsorgt werden!
Stattdessen muss es zwecks Recycling an entsprechenden, von den Gemeinden bereitgestellten Sammelstellen abgegeben werden.
Dies ist für Sie kostenlos.
Anbringen des Tragriemens und des
Okular-Schutzdeckels
Falls Sie den Okular-Schutzdeckel am Tragriemen
befestigen möchten, müssen Sie letzteren durch
die Öse des Okular-Schutzdeckels fädeln, bevor
Sie den Tragriemen an der linken Seite des Fernglases befestigen.
Falls das Gerät selbst wechselbare Batterien
oder Akkus enthält, müssen diese vorher entnommen werden und ggf. ihrerseits vorschriftsmäßig entsorgt werden (siehe dazu die Angaben
in der Anleitung des Geräts).
Anbringen der Objektiv-Schutzdeckel
Zur Montage der beiden Objektiv-Schutzdeckel
werden die Gummiringe der Deckel von der
Objektivseite her so über die Fernglas-Rohre
gezogen, dass die Deckel nach unten aufklappen.
Weitere Informationen zum Thema bekommen
Sie bei Ihrer Gemeindeverwaltung, Ihrem Entsorgungsunternehmen, oder dem Geschäft, in dem
Sie dieses Gerät erworben haben.
3
deutsch
Entsorgung elektrischer
und elektronischer Geräte
Hinweise:
• Batterien sind kühl und trocken zu lagern.
• Wenn das Fernglas längere Zeit nicht benutzt
wird, sollte die Batterie herausgenommen werden.
Einsetzen und Auswechseln der
Batterie
Die Leica Geovid BRF Ferngläser werden zur
Energieversorgung mit einer 3 Volt Lithium-Rundzelle (z.B. Duracell DL CR2, Ucar CR2, Varta CR2,
oder andere CR2 Typen) bestückt.
Achtung:
• Batterien dürfen keinesfalls ins Feuer geworfen-, erhitzt, wieder aufgeladen, zerlegt oder
aufgebrochen werden.
• Verbrauchte Batterien dürfen nicht in den normalen Hausmüll geworfen werden, denn sie
enthalten giftige, umweltbelastende Substanzen. Um sie einem geregelten Recycling zuzuführen, sollten sie beim Handel abgegeben
oder zum Sondermüll (Sammelstelle) gegeben
werden.
1. Öffnen Sie den Deckel (10) des Batteriefachs
(9) indem Sie ihn, z. B. mit einer Münze, gegen
den Uhrzeigersinn drehen.
2. Legen Sie die Batterie mit ihrem Pluskontakt
voran (entsprechend der Kennzeichnung im
Batteriefach) ein.
3. Schließen Sie den Deckel wieder durch Drehen
im Uhrzeigersinn.
4
deutsch
Ladezustand der Batterie
Eine neue Batterie reicht für mehr als 1000 Messungen bei 20°C.
Je nach Anwendungsbedingungen kann die Batterie-Lebensdauer deutlich kürzer oder länger
sein. Verkürzend auf die Batterie-Lebensdauer
wirken sich niedrige Temperaturen und häufige
Anwendung des Scan-Betriebs (s. S. 9) aus.
Eine verbrauchte Batterie wird durch eine blinkende Messwert- und Zielmarkenanzeige signalisiert. Nach dem erstmaligen Blinken sind noch
ca. 50 Messungen möglich, allerdings mit fortschreitend verminderter Reichweite.
Achtung: Kälte verringert die Batterieleistung.
Bei niedrigen Temperaturen sollte das Leica
Geovid BRF deshalb möglichst in Körpernähe
getragen und mit einer frischen Batterie benutzt
werden.
5
A
B
C
Einstellen der Augenmuscheln /
Verwendung mit und ohne Brille
D
Einstellen des Augenabstands
Durch Knicken des Fernglases um die Gelenkachse (8) wird der individuelle Augenabstand
eingestellt. Rechtes und linkes Sehfeld müssen
dabei zu einem kreisrunden Bild verschmelzen.
Die Okular-Augenmuscheln (1) lassen sich durch
Drehen einfach verstellen und rasten in den
gewählten Positionen sicher ein. Zur gründlichen
Reinigung können sie auch ganz entfernt werden.
Für die Beobachtung mit Brille (Bild A) bleiben sie
in der ganz eingedrehten Stellung. Für die Beobachtung ohne Brille werden sie durch Drehen
gegen den Uhrzeigersinn herausgedreht. Es stehen zur optimalen Anpassung zwei Positionen zur
Verfügung (Bilder B, C).
Sind die Okulare stark verschmutzt, empfiehlt es
sich, die Augenmuscheln zur Säuberung abzunehmen (Bild D). Dazu werden sie aus der ganz
herausgedrehten Position unter leichtem Zug
abgenommen.
6
B
2
7
3
5
3. Mit der Auslösetaste (5) aktivieren Sie nun die
Zielmarke.
Einstellen der Schärfe /
Dioptrienausgleich
4. Nach Erscheinen der Zielmarke stellen Sie –
während Sie weiterhin mit beiden Augen beobachten – den rechten Dioptrien-Ausgleichsring
(7, roter Index) so ein, dass Sie die Zielmarke in
der rechten Optik scharf sehen.
Die Einstellung der Schärfe auf verschieden weit
entfernte Objekte erfolgt an den Leica Geovid BRF
Ferngläsern mit dem Zentral-Fokussierungsring (2).
Zum Ausgleich individueller Fehlsichtigkeit für
die Beobachtung ohne Brille und zum Scharfstellen der Zielmarke dienen die beiden DioptrienAusgleichsringe (3/7).
Führen Sie die nachfolgend beschriebenen
Schritte sorgfältig durch. Nur dann können Sie
die volle Leistungsfähigkeit der Optik nutzen.
5. Anschließend stellen Sie – bei weiterhin eingeschalteter Zielmarke, jetzt aber nur noch mit
dem rechten Auge beobachtend - mit dem
Zentral-Fokussierungsring das Bild im rechten
Rohr exakt scharf ein.
6. Schließlich stellen Sie das Bild im linken Rohr
mit dem linken Dioptrienring (3) auf optimale
Schärfe ein.
1. Drehen Sie beide Dioptrien-Ausgleichsringe
auf ihre Nullstellungen.
2. Stellen Sie – bei Betrachtung mit beiden Augen
– mit dem Zentral-Fokussierungsring auf ein
weit entferntes Objekt ein.
Die eingestellten Werte können Sie an den "+" oder
"-" Werten der Dioptrienskalen (3a/7a) ablesen.
7
deutsch
A
Die Zielmarke geht bei der Messung kurz aus.
Durch erneuten Druck auf die Auslösetaste kann
jederzeit eine neue Messung gestartet werden,
solange die Zielmarke noch leuchtet.
Beträgt die Objektentfernung weniger als 10 Meter/
Yards oder wird die Reichweite überschritten,
bzw. reflektiert das Objekt ungenügend, so
erscheint die Anzeige „- --“.
Mit dem Erlöschen der Anzeige schaltet sich der
Entfernungsmesser automatisch ab.
Hinweis: Beim einseitigen linken oder rechten
Durchblicken sollte das jeweils andere Auge
zugekniffen, oder einfach die entsprechende
Fernglashälfte vorne am Objektiv zugehalten
werden.
Hinweise:
• Je nach Winkel der optische Systeme zueinander, d.h. je nach eingestelltem Augenabstand,
können die Anzeigen auch leicht schräg stehen.
• Die Leica Geovid BRF Ferngläser sind in unterschiedlichen Versionen für die Entfernungsanzeige in Metern, bzw. Yards erhältlich. Äußerlich sind die verschiedenen Versionen an den
Angaben auf dem Deckel des Zentral-Fokussierungsrings zu erkennen.
Entfernungsmessung
Um die Entfernung zu einem Objekt zu messen,
muss es genau angepeilt werden. Dazu aktiviert
man die Zielmarke, indem man die Auslösetaste
(5) einmal drückt. Nach dem Loslassen der Taste
leuchtet die Zielmarke noch für etwa 4 s weiter.
Bei gedrückt gehaltener Taste leuchtet die Zielmarke permanent. Während sie leuchtet, wird
das Objekt angepeilt und durch erneuten Druck
auf die Auslösetaste die Entfernungsmessung
durchgeführt und der Messwert anschließend
angezeigt.
8
Messreichweite und Genauigkeit
Mit den Leica Geovid BRF Ferngläsern kann auch
im Dauerbetrieb gemessen werden. Wenn die
Auslösetaste (5) bei der 2. Betätigung gedrückt
gehalten wird, schaltet sich das Gerät nach ca.
0,5 s in diesen Scan-Betrieb und führt dann permanent Messungen durch. Zu erkennen ist dies
an der wechselnden Anzeige: Nach jeweils ca.
1,5 s wird ein neuer Messwert ausgegeben.
Der Scan-Betrieb ist besonders praktisch bei der
Messung auf kleine Ziele.
Die Messgenauigkeit der Leica Geovid BRF Ferngläser beträgt bis zu ±1 Meter/Yard. Die maximale Reichweite wird erreicht bei gut reflektierenden Zielobjekten und einer visuellen Sichtweite von 10 km. Die Messreichweite wird von
folgenden Faktoren beeinflusst:
Reichweite
Farbe des Objekts
Winkel zum Objekt
Objektgröße
Allgemeine
Helligkeit
Atmosphärische
Bedingungen
Objektstruktur
Hinweise:
• Im Scan-Betrieb ist der Stromverbrauch aufgrund der permanenten Messungen höher als
bei Einzelmessungen.
• Nach 10 s schaltet sich der Scan-Betrieb automatisch ab, damit die Batterie bei unbeabsichtigtem Tastendruck geschont wird.
höher
weiß
senkrecht
groß
geringer
(bewölkt)
klar
homogen
(Hauswand)
geringer
schwarz
spitz
klein
hoch
(Mittagssonne)
dunstig
inhomogen
(Busch, Baum)
Bei Sonnenschein und guter Sicht gelten folgende Reichweiten und Genauigkeiten:
Reichweite
Genauigkeit
9
10 m / yds bis ca. 1200 m / 1300 yds
±1 m / yd bis 350 m / 380 yds
±2 m / yds bis 700 m / 763 yds
±0,5 % über 700 m / 763 yds
deutsch
Scan-Betrieb
Pflege/Reinigung
Zubehör
Best.-Nr.
Stativadapter mit 1/4" Gewinde . . . . . . . 42 220
Schwimm-Trageriemen, orange . . . . . . . 42 163
Eine besondere Pflege Ihrer Leica Geovid BRF
Ferngläser ist nicht notwendig. Grobe Schmutzteilchen, wie z. B. Sand, sollten mit einem Haarpinsel entfernt oder weggeblasen werden. Fingerabdrücke u. ä. auf Objektiv- und Okularlinsen
können mit einem weichen, sauberen Leder oder
staubfreien Tuch abgewischt werden. Bei starker
Verschmutzung, z. B. der Okular-Drehhülsen,
kann eine Reinigung des Fernglases durch einfaches Abspülen unter fließendem Wasser erfolgen. Salzwasser sollte ebenso abgespült werden.
Ersatzteile
Falls sie einmal Ersatzteile für Ihr Fernglas
benötigen sollten, wie z. B. Augenmuscheln,
Deckel oder Tragriemen, wenden Sie sich bitte an
unseren Kundendienst (Adresse s. S. 13) oder
Ihre Leica Landesvertretung (Adressen siehe
Garantiekarte).
Achtung: Üben Sie auch beim Abwischen stark
verschmutzter Linsenoberflächen keinen großen
Druck aus. Die Vergütung ist zwar hochabriebfest, durch Sand oder Salzkristalle kann sie dennoch beschädigt werden.
Jedes Leica Geovid BRF Fernglas trägt außer der
Typbezeichnung seine "persönliche" Fabrikationsnummer. Notieren Sie sich diese Nummer
zur Sicherheit in Ihren Unterlagen.
10
Fehler
Ursache
Abhilfe
Bei der Beobachtung wird kein
kreisrundes Bild erreicht.
a) Das Fernglas ist nicht
genügend dem persönlichen Augenabstand
angepasst.
a) Einfach durch stärkeres
oder schwächeres
Knicken der Gelenkachse
den Abstand der beiden
Fernglas-Rohre korrigieren.
b) Die Pupille des Beobachters liegt nicht in der Austrittspupille des Fernglases.
b) Kopfhaltung, Augen- und
Fernglasposition korrigieren.
c) Die Stellung der OkularDrehhülsen entspricht nicht
der richtigen Benutzung
mit und ohne Brille.
c) Anpassung korrigieren:
Brillenträger drehen die
Okularhülsen hinein; Bei
Beobachtung ohne Brille:
Okularhülsen herausdrehen.
Anzeige unscharf
Dioptrienausgleich ist nicht exakt
Dioptrienausgleich erneut
durchführen (s. S. 7)
Bei der Entfernungsmessung
erscheint die Anzeige „- - -“
a) Messbereich ist über- oder
unterschritten
Angaben zum Messbereich
berücksichtigen (s. S. 9)
b) Der Reflexionsgrad des
Objekts ist unzureichend
Anzeige blinkt oder keine
Messung möglich
Batterie verbraucht
11
Batterie auswechseln (s. S. 4)
deutsch
Was tun, wenn . . .
Technische Daten
LEICA GEOVID 8x42 BRF
Vergrößerung
Objektiv-Durchmesser
Austrittspupille
Dämmerungszahl
Geometrische Lichtstärke
Sehfeld (auf 1000 m/yds)
Naheinstellgrenze (bei 0 Dioptr.)
Austrittspupillen-Längsabstand
Pupillendistanz
Prismenart
Vergütung
auf Linsen
auf Prismen
Dioptrien-Ausgleich
Brillenträgertauglich
Funktionstemperatur
Lagertemperatur
Wasserdichtigkeit
Gehäusematerial
Maximale Reichweite
Mindestentfernung
Messgenauigkeit
Bei 20°C und durchschnittlichem Anwendungsprofil
10 x
42 mm
5,25 mm
18,33
27,56
125 m/yds / 7,1°
ca. 5,6 m/18’4’’
18,5 mm
4,2 mm
20,5
17,64
110 m/yds / 6,3° (Weitwinkel)
ca. 5,6 m/18’4’’
15,6 mm
56–74 mm
Dachkant
High Durable Coating (HDC™)
Phasenkorrekturbelag P40
ca. ± 3,5 Dioptr.
ja
–25°C/–13°F bis +55°C/+131°F
–40°C/–40°F bis +85°C/+185°F
0,5 bar (ca. 5 m Wassertiefe)
Aluminium Druckguss
ca. 1200 m/1300 yds
10 m / yds
±1 m/yd bis 350 m/380 yds
±2 m/yds bis 700 m/763 yds
±0,5 % über 700 m/763 yds
LED mit 4 Ziffern
wahlweise als Meter- oder Yard-Version erhältlich
1 Lithium Rundzelle 3 V Typ CR 2
≥ 1000 Messungen
augensicher nach EN und FDA Class 1
2,5 x 0,5 mrad
ca. 1,4 s
ca. 124 x174 x 65 mm
ca. 945 g
Anzeige/
Maßeinheit
Batterie
Batterielebensdauer1
Laser
Laserstrahl-Divergenz
Maximale Messdauer
Maße (B2 x H3 x T2)
Gewicht (mit Batterie)
1
LEICA GEOVID 10x42 BRF
8x
2
Bei Augenabstand 65 mm
12
3
Bei eingedrehten Augenmuscheln
LEICA GEOVID 8x56 BRF
Vergrößerung
Objektiv-Durchmesser
Austrittspupille
Dämmerungszahl
Geometrische Lichtstärke
Sehfeld (auf 1000 m/yds)
Naheinstellgrenze (bei 0 Dioptr.)
Austrittspupillen-Längsabstand
Pupillendistanz
Prismenart
Vergütung
auf Linsen
auf Prismen
Dioptrien-Ausgleich
Brillenträgertauglich
Funktionstemperatur
Lagertemperatur
Wasserdichtigkeit
Gehäusematerial
Maximale Reichweite
Mindestentfernung
Messgenauigkeit
Anzeige/
Maßeinheit
Batterie
Batterielebensdauer3
Laser
Laserstrahl-Divergenz
Maximale Messdauer
Maße (B1 x H2 x T1)
Gewicht (mit Batterie)
1
Bei Augenabstand 65 mm
2
LEICA GEOVID 15x56 BRF
8x
15 x
56 mm
7 mm
21,17
49
118 m/yds / 6,8°
ca. 5,5 m/18’4’’
18,5 mm
3,7 mm
28,98
13,94
72 m/yds / 4,1°
ca. 5,5 m/18’4’’
15,6 mm
58–74 mm
Dachkant
High Durable Coating (HDC™)
Phasenkorrekturbelag P40
ca. ± 3,5 Dioptr.
ja
–25°C/–13°F bis +55°C/+131°F
–40°C/–40°F bis +85°C/+185°F
0,5 bar (ca. 5 m Wassertiefe)
Aluminium Druckguss
ca. 1200 m/1300 yds
10 m / yds
±1 m/yd bis 350 m/380 yds
±2 m/yds bis 700 m/763 yds
±0,5 % über 700 m/763 yds
LED mit 4 Ziffern
wahlweise als Meter- oder Yard-Version erhältlich
1 Lithium Rundzelle 3 V Typ CR 2
≥ 1000 Messungen
augensicher nach EN und FDA Class 1
2,5 x 0,5 mrad
ca. 1,4 s
ca. 135 x182 x 68 mm
ca. 135 x 208 x 68 mm
ca. 1100 g
ca. 1245 g
Bei eingedrehten Augenmuscheln
3
13
Bei 20°C und durchschnittlichem Anwendungsprofil
deutsch
Technische Daten
Leica Akademie
Leica Infodienst
In den verschiedenen Seminaren wird dem Teilnehmer in praxisorientierter, zeitgemäßer Form
die Werte-Welt der Leica und die Faszination des
gekonnten Umgangs mit den Leica Produkten
vermittelt. Die Inhalte sind anwendungsorientiert
und bieten eine Fülle von Anregungen, Informationen und Ratschlägen für die Praxis.
Nähere Auskünfte und das aktuelle Seminarprogramm sind erhältlich bei:
Anwendungstechnische Fragen zum Leica Programm beantwortet Ihnen, schriftlich, telefonisch, per Fax oder per e-mail der Leica Informations-Service:
Leica Camera AG
Informations-Service
Postfach 1180
D 35599 Solms
Tel.:
+49 (0) 64 42-208-111
Fax:
+49 (0) 64 42-208-339
e-mail: [email protected]
Leica Camera AG
Leica Akademie
Oskar-Barnack-Str. 11
D- 35606 Solms
Tel.:
+49 (0) 64 42-208-421
Fax:
+49 (0) 64 42-208-425
e-mail: [email protected]
Leica Kundendienst
Für die Wartung Ihrer Leica Ausrüstung sowie in
Schadensfällen steht Ihnen der Customer Service der Leica Camera AG oder der Reparatur-Service einer Leica Landesvertretung zur Verfügung
(Adressenliste siehe Garantiekarte).
Leica im Internet
Aktuelle Informationen zu Produkten, Neuheiten,
Veranstaltungen und dem Unternehmen Leica
erhalten Sie auf unserer Homepage im Internet
unter:
Leica Camera AG
Customer Service
Solmser Gewerbepark 8
D 35606 Solms
Tel.: +49 (0) 64 42-208-189
Fax: +49 (0) 64 42-208-339
e-mail: [email protected]
http://www.leica-camera.com
14
Foreword
1. Eyepiece cups
Position a: Unscrewed for viewing without
glasses
Position b: Screwed in for viewing with
glasses
2. Central focusing dial
3. Dioptre compensation dial with
a. Scale
4. Eyelets for carrying strap
5. Release button for distance metering
6. Laser transmission optics
7. Dioptre compensation for target mark with
a. Scale
8. Hinged axis for adjustment of eye spacing
9. Battery compartment
10. Battery compartment cap
Dear customer
Throughout the world, the name Leica stands for
premium quality, precision mechanics, excellent
reliability and long service life.
We wish you a great deal of enjoyment and
success with your new Leica Geovid BRF binoculars.
To ensure that you can use them correctly, we
recommend that you read this manual first.
Scope of delivery
– Binoculars
– 1 lithium cell 3 V Type CR 2
– Carrying strap
– Ever ready case
– Eyepiece cover
– 2 lens covers
– Warranty Card
15
english
Designation of parts
Contents
Designation of parts . . . . . . . . . . . . . . . . . . . . . . . . . . . . . . . . . . . . . . . . . . . . . . . . . . . . . . . . . . . . . . 15
Scope of delivery. . . . . . . . . . . . . . . . . . . . . . . . . . . . . . . . . . . . . . . . . . . . . . . . . . . . . . . . . . . . . . . . . 15
Foreword . . . . . . . . . . . . . . . . . . . . . . . . . . . . . . . . . . . . . . . . . . . . . . . . . . . . . . . . . . . . . . . . . . . . . . . 15
Possible applications . . . . . . . . . . . . . . . . . . . . . . . . . . . . . . . . . . . . . . . . . . . . . . . . . . . . . . . . . . . . . . 17
Attaching the carrying strap and the eyepiece cover . . . . . . . . . . . . . . . . . . . . . . . . . . . . . . . . . . . . . 17
Disposal of electric and electronic equipment . . . . . . . . . . . . . . . . . . . . . . . . . . . . . . . . . . . . . . . . . . 17
Attaching the lens covers . . . . . . . . . . . . . . . . . . . . . . . . . . . . . . . . . . . . . . . . . . . . . . . . . . . . . . . . . . 17
Inserting and changing the battery . . . . . . . . . . . . . . . . . . . . . . . . . . . . . . . . . . . . . . . . . . . . . . . . . . . 18
Battery charge level. . . . . . . . . . . . . . . . . . . . . . . . . . . . . . . . . . . . . . . . . . . . . . . . . . . . . . . . . . . . . . . 19
Adjusting the eyepiece cups / Using with and without glasses. . . . . . . . . . . . . . . . . . . . . . . . . . . . . . 20
Adjusting the eyebase . . . . . . . . . . . . . . . . . . . . . . . . . . . . . . . . . . . . . . . . . . . . . . . . . . . . . . . . . . . . . 20
Setting the focus / Dioptre compensation. . . . . . . . . . . . . . . . . . . . . . . . . . . . . . . . . . . . . . . . . . . . . . 21
Distance metering . . . . . . . . . . . . . . . . . . . . . . . . . . . . . . . . . . . . . . . . . . . . . . . . . . . . . . . . . . . . . . . . 22
Scan mode . . . . . . . . . . . . . . . . . . . . . . . . . . . . . . . . . . . . . . . . . . . . . . . . . . . . . . . . . . . . . . . . . . . . . 23
Metering range and accuracy . . . . . . . . . . . . . . . . . . . . . . . . . . . . . . . . . . . . . . . . . . . . . . . . . . . . . . . 23
Maintenance/cleaning . . . . . . . . . . . . . . . . . . . . . . . . . . . . . . . . . . . . . . . . . . . . . . . . . . . . . . . . . . . . 24
Accessories . . . . . . . . . . . . . . . . . . . . . . . . . . . . . . . . . . . . . . . . . . . . . . . . . . . . . . . . . . . . . . . . . . . . . 24
Spare parts . . . . . . . . . . . . . . . . . . . . . . . . . . . . . . . . . . . . . . . . . . . . . . . . . . . . . . . . . . . . . . . . . . . . . 24
Troubleshooting. . . . . . . . . . . . . . . . . . . . . . . . . . . . . . . . . . . . . . . . . . . . . . . . . . . . . . . . . . . . . . . . . . 25
Technical data . . . . . . . . . . . . . . . . . . . . . . . . . . . . . . . . . . . . . . . . . . . . . . . . . . . . . . . . . . . . . . . . . . . 26
Leica Academy . . . . . . . . . . . . . . . . . . . . . . . . . . . . . . . . . . . . . . . . . . . . . . . . . . . . . . . . . . . . . . . . . . 28
Leica on the Internet . . . . . . . . . . . . . . . . . . . . . . . . . . . . . . . . . . . . . . . . . . . . . . . . . . . . . . . . . . . . . . 28
Leica info service . . . . . . . . . . . . . . . . . . . . . . . . . . . . . . . . . . . . . . . . . . . . . . . . . . . . . . . . . . . . . . . . 28
Leica customer service . . . . . . . . . . . . . . . . . . . . . . . . . . . . . . . . . . . . . . . . . . . . . . . . . . . . . . . . . . . . 28
Warning notice: As with all binoculars, to prevent damaging the eyes avoid using your Leica Geovid BRF to look
directly at bright sources of light.
16
Possible applications
The Leica Geovid BRF binoculars have a robust
aluminium housing, allowing them to be used
even under adverse conditions. This means that
you do not have to worry about them getting wet
- they are absolutely waterproof to a depth of 5 m
and there is no fogging in the internal optical
system thanks to a nitrogen filling.
(Applicable in the EU and other
European countries with separate
collection systems)
This equipment contains electric and/or electronic parts and must therefore not be disposed
of as normal household waste.
Instead, it should be disposed at the respective
collection points for recycling provided by the
communities. For you, this is free of charge.
Attaching the carrying strap and the
eyepiece cover
If you want to attach the eyepiece cover to the
carrying strap, you must thread the strap through
the eyelet on the eyepiece cover before you
attach the carrying strap to the left-hand side of
the binoculars.
If the equipment contains exchangeable (rechargeable) batteries, these too must be removed
before and, if necessary, in turn be disposed of
according to the relevant regulations (see also
the respective comments in this unit’s instructions).
Attaching the lens covers
To fit the two lens covers, place the rubber rings
of the covers over the binocular tubes from the
lens side so that the covers open downwards.
Further information about the subject is available
at your community administration, your local
waste collection company, or in the store where
you purchased this equipment.
17
english
Disposal of electric and
electronic equipment
Notes:
• Batteries should be stored in a cool dry place.
• If the binoculars are not going to be used for a
long time, the battery should be removed.
Inserting and changing the battery
The Leica Geovid BRF binoculars are supplied
with power by one 3 Volt lithium cell (e.g.
Duracell DL CR 2, Ucar CR 2, Varta CR 2, or otherCR 2 types).
Warning:
• Batteries should never be put in a fire, heated,
recharged, disassembled, or broken apart.
• Used batteries may not be disposed of as
normal, household waste as they contain
hazardous materials that are harmful to the
environment. To ensure that they are properly
recycled, they should be returned to the dealer
or disposed of as special waste (at a collection
point).
1. Open the battery compartment (9) cover (10)
by turning it anticlockwise, with a coin for
example.
2. Insert the battery with its positive contact
facing forwards (as marked in the battery
compartment).
3. Close the cover again by turning it clockwise.
18
Battery charge level
english
A new battery is sufficient for more than 1000
measurements at 20°C.
Depending on the conditions of use, the battery
life can be significantly shorter or longer than
this. Low temperatures and frequent use of the
scan mode (see p. 23) shorten the battery life.
A flat battery is indicated by a flashing measured
value and target display. Once this flashing
starts, around 50 more measurements are
possible, but with a continuously reduced range.
Warning: Cold conditions impair the battery
performance. At low temperatures, the Leica
Geovid BRF should therefore be carried close to
the body and used with a fresh battery.
19
A
B
C
Adjusting the eyepiece cups / Using
with and without glasses
D
Adjusting the eyebase
The individual eyebase is adjusted by bending the
binoculars around the hinged axis (8). The right
and left fields of view must merge into a circular
field.
The eyepiece cups (1) can easily be adjusted by
turning them and lock securely into the selected
position. They can also be completely removed
for thorough cleaning.
For viewing with glasses (Figure A), they remain
in their fully screwed in position.
For viewing without glasses, they are unscrewed
by turning them anticlockwise. Two positions are
available for optimum adjustment (Figures B, C).
If the eyepieces are very dirty, it is recommended
that the eyepiece cups are removed for cleaning
(Figure D). To do this, they are removed by pulling
them slightly when in their fully unscrewed
position.
20
B
2
7
3
5
3. Now press the release button (5) to activate
the target.
Setting the focus /
Dioptre compensation
4. Once the target appears, while continuing to
view with both eyes adjust the right-hand dioptre compensation dial (7, red index) so that the
target is in focus in the right-hand optical field.
On the Leica Geovid BRF binoculars, the focus is
set for objects different distances using the
central focusing dial (2).
The two dioptre compensation dials (3/7) are
used to compensate for individual vision defects
for viewing without glasses and for focusing on
the target mark.
Run carefully through the steps described below.
You will then be able to fully utilize the optical
capabilities of the binoculars.
5. Then, with the target still activated but now
viewing with the right eye only, use the central
focusing dial for fine focusing of the image in
the right-hand tube.
6. Then adjust the image in the left-hand tube to
optimum focus using the left-hand dioptre dial (3).
1. Turn both dioptre compensation dials to their
zero positions.
You can read off the set "+" and "-" values on the
dioptre scales (3a/7a).
2. While viewing with both eyes, focus on a
distant object using the central focusing dial.
21
english
A
You can start a new measurement at any time by
pressing the release button again, as long as the
target mark is illuminated.
If the object distance is less than 10 meters /
yards or if the range is exceeded or the object
does not reflect sufficient light, the display
shows "- --".
When the display goes out, the distance meter is
automatically deactivated.
Note: When looking through the binoculars with
the right or left eye only, the other eye should
be kept tightly shut, or simply place your hand
in front of the lens on the other side of the
binoculars.
Notes:
• Depending on the angle of the optical systems to
each other, i.e. the set interpupillary distance,
the displays may appear slightly slanted.
• The Leica Geovid BRF binoculars are available
in different versions displaying the distance in
meters or yards. Externally, the different versions can be recognised by the information on
the cover of the central focusing dial.
Distance metering
To measure the distance to an object, you must
lock onto it precisely. To do this, activate the target mark by pressing the release button (5) once.
Once the button is released, the target mark
remains illuminated for around another 4 s. If the
button is held down, the target marker is
illuminated continuously. While it is illuminated,
lock onto the object and carry out the distance
metering by pressing the release button again.
The measured value is then displayed. The target
mark disappears briefly during metering.
22
Metering range and accuracy
The Leica Geovid BRF binoculars can also be
used for continuous metering. If you hold down
the release button (5) after the second press,
after approx. 0.5 s the binoculars switch to this
scan mode and then perform constant metering.
This can be identified by the changing display: A
new measured value is output approx. every 1.5 s.
Scan mode is particularly practical when metering
small targets.
The Leica Geovid BRF binoculars have a metering
accuracy of up to ±1 meter/yard.
The maximum range is achieved with highly
reflective target objects and visibility of 10 km.
The metering range is influenced by the following
factors:
Range
Colour of object
Angle to object
Object size
General brightness
Notes:
• Scan mode consumes more power than individual
metering due to the constant metering.
• Scan mode automatically shuts down after
10 s, to preserve the battery in case the button
is pressed accidentally.
Atmospheric
conditions
Object structure
Higher
white
vertical
large
low
(cloudy)
clear
homogeneous
(building wall)
Lower
black
acute
small
high
(midday sun)
hazy
inhomogeneous
(bush, tree)
With sunshine and good visibility, the ranges and
accuracies are as follows:
Range
10 m / yds up to approx. 1200 m / 1300 yds
Accuracy ±1 m / yd up to 350 m / 380 yds
±2 m / yds up to 700 m / 763 yds
±0.5 % above 700 m / 763 yds
23
english
Scan mode
Maintenance / Cleaning
Accessories
Order no.
Tripod adapter with 1/4" thread . . . . . . . 42 220
Swimming carrying strap, orange . . . . . 42 163
Your Leica Geovid BRF binoculars do not require
any special maintenance. Coarse dirt particles,
such as sand, should be removed with a fine hair
brush or blown away. Fingerprints etc. on lenses
or eyepieces can be wiped off with a soft, clean
leather or dust-free cloth. For heavy soiling, e.g.
to the rotating eyepiece cups, the binoculars can
be cleaned by simply rinsing them under running
water. Saltwater can be rinsed off in the same
way.
Spare parts
If you should require any spare parts for your
binoculars, e.g. eyepiece cups, covers or carrying
strap, please contact our Customer Service
department (for address, see p. 27) or the Leica
office in your country (see Warranty Card for
addresses).
Warning: Do not exert excessive pressure when
wiping heavily soiled lens surfaces. Although the
coating is highly resistant to abrasion, sand or
salt crystals can still damage it.
As well as its type designation, each set of Leica
Geovid BRF binoculars have their "personal" serial number. Make a note of this number in your
documents for security.
24
Fault
Cause
Remedy
Circular field is not achieved
during viewing
a) The binoculars are not
correctly adjusted to
personal eye base.
a) Simply correct the
eyebase of the two
binocular tubes by
bending the hinged axis
inwards or outwards.
b) The viewer's pupil is not in
the binoculars' exit pupil.
b) Correct head, eye and
binocular position.
c) The position of the
eyepiece cups does
not match the correct
use with and without
glasses.
c) Correct adjustment:
If wearing glasses, screw
in eyepiece cups; for
viewing without glasses:
unscrew eyepiece cups.
Image out of focus
Dioptre compensation
is not accurate
Repeat dioptre
compensation (see p. 21)
During distance metering, the
display shows "- - -"
a) Object too close or
metering range
exceeded
Note information on
metering range (see p. 23)
b) The object is
insufficiently reflective
Display is flashing or metering
not possible
Battery flat
Replace battery (see p. 18)
25
english
Troubleshooting
Technical Data
LEICA GEOVID 8 x 42 BRF
Magnification
Lens diameter
Exit pupil
Twilight number
Geometric luminous intensity
Field of view (at 1000m/yds)
Close range limit (at 0 dioptres)
Exit pupil longitudinal distance
Pupil distance
Prism type
Coating
on lenses
on prisms
Dioptre compensation
Suitable for wearers of glasses
Operating temperature
Storage temperature
Water tightness
Housing material
Maximum range
Minimum distance
Metering accuracy
20°C and average usage profile
10 x
42 mm
5.25 mm
18.33
27.56
125 m/yds / 7.1°
approx. 5.6 m/18’4’’
18.5 mm
4.2 mm
20.5
17.64
110 m/yds / 6.3° (wide angle)
approx. 5.6 m/18’4’’
15.6 mm
56–74 mm
Roof
High Durable Coating (HDC™)
Phase correction coating P40
approx. ± 3.5 dioptres
yes
–25°C/–13°F to +55°C/+131°F
–40°C/–40°F to +85°C/+185°F
0.5 bar (approx. 5 m water depth)
die cast aluminium
approx. 1200 m/1300 yds
10 m/yds
±1 m/yd up to 350 m/380 yds
±2 m/yds up to 700 m/763 yds
±0.5 % above 700 m/763 yds
4-digit LED
available either in Meter- or Yard-version
1 lithium cell 3 V Type CR 2
≥ 1000 measurements
safe for eyes to EN and FDA Class 1
2.5 x 0.5 mrad
approx. 1.4 s
approx. 124 x174 x 65 mm
approx. 945 g
Display/
Measuring unit
Battery
Battery life1
Laser
Laser beam divergence
Maximum metering duration
Dimensions (W2 x H3 x D2)
Weight (including battery)
1 At
LEICA GEOVID 10 x 42 BRF
8x
2 With
eye spacing 65 mm
3 With
26
eyepiece cups screwed in
Technical Data
LEICA GEOVID 8 x 56 BRF
Magnification
Lens diameter
Exit pupil
Twilight number
Geometric luminous intensity
Field of view (at 1000m/yds)
Close range limit (at 0 dioptres)
Exit pupil longitudinal distance
Pupil distance
Prism type
Coating
on lenses
on prisms
Dioptre compensation
Suitable for wearers of glasses
Operating temperature
Storage temperature
Water tightness
Housing material
Maximum range
Minimum distance
Metering accuracy
20°C and average usage profile
15 x
7 mm
21.17
49
118 m/yds / 6.8°
approx. 5.5 m/18’4’’
18.5 mm
3.7 mm
28.98
13.94
72 m/yds / 4.1°
approx. 5.5 m/18’4’’
15.6 mm
58–74 mm
Roof
High Durable Coating (HDC™)
Phase correction coating P40
approx. ± 3.5 dioptres
yes
–25°C/–13°F to +55°C/+131°F
–40°C/–40°F to +85°C/+185°F
0.5 bar (approx. 5 m water depth)
die cast aluminium
approx. 1200 m/1300 yds
10 m/yds
±1 m/yd up to 350 m/380 yds
±2 m/yds up to 700 m/763 yds
±0.5 % above 700 m/763 yds
4-digit LED
available either in Meter- or Yard-version
1 lithium cell 3 V Type CR 2
≥ 1000 measurements
safe for eyes to EN and FDA Class 1
2.5 x 0.5 mrad
approx. 1.4 s
approx. 135 x182 x 68 mm
approx. 135 x 208 x 68 mm
approx. 1100 g
approx. 1245 g
2 With
eye spacing 65 mm
3 With
27
eyepiece cups screwed in
english
56 mm
Display/
Measuring unit
Battery
Battery life1
Laser
Laser beam divergence
Maximum metering duration
Dimensions (W2 x H3 x D2)
Weight (including battery)
1 At
LEICA GEOVID 15 x 56 BRF
8x
Leica Academy
Leica Information Service
Our seminars offer participants practical information on the Leica world of values and the
fascination of skilled use of Leica products.
Course programs are application-oriented and
informative. They offer a wealth of practical
suggestions, help, and advice.
More details, along with the current program of
seminars, are available from:
Should you have any technical questions regarding
the use of Leica products, the Leica Information
Service will be happy to answer in writing or by
phone, fax, or e-mail:
Leica Camera AG
Informations-Service
Postfach 1180
D 35599 Solms
Tel.: +49 (0) 64 42-208-111
Fax: +49 (0) 64 42-208-339
e-mail: [email protected]
Leica Camera AG
Leica Akademie
Oskar-Barnack Str. 11
D- 35606 Solms
Tel.: +49 (0) 64 42-208-421
Fax: +49 (0) 64 42-208-425
e-mail: [email protected]
Leica Customer Service
For service of your Leica equipment and in case
of necessary repairs please contact the Customer Service of Leica Camera AG or of any national Leica agency (see Warranty Card for address
list). Ask your authorized dealer and Leica specialist for advice.
Leica in the Internet
Up to date information about products, novelties,
special events, and the Leica company is
available on our home page on the internet at:
Leica Camera AG
Customer Service
Solmser Gewerbepark 8
D35606 Solms
Tel.:
+49 (0) 64 42-208-189
Fax:
+49 (0) 64 42-208-339
e-mail: [email protected]
http://www.leica-camera.com
28
Avant-propos
1. Œillères d'oculaire
Position a: Sorties pour l’observation sans
lunettes
Position b: Rentrées pour l’observation avec
lunettes
2. Bague de mise au point centrale
3. Bague de compensation dioptrique avec
a. Échelle
4. Œillets pour la courroie de port
5. Touche de mesure pour la mise au point
6. Optique d’émission laser
7. Compensation dioptrique pour le repère de visée et affichage de la distance dioptrique avec
a. Échelle
8. Axe de mise au point pour le réglage de la
distance interoculaire
9. Compartiment pile
10. Vis de verrouillage
Chère cliente, cher client,
Dans le monde entier, la marque Leica est
synonyme de grande qualité, de haute précision,
de fiabilité exceptionnelle et de longue durée
de vie.
Nous vous souhaitons beaucoup de plaisir et de
réussite avec vos nouvelles jumelles Leica
Geovid BRF.
Pour pouvoir les utiliser correctement, nous vous
conseillons de lire d'abord ce mode d’emploi.
Produit livré
– Jumelles
– 1 pile au lithium 3 V type CR 2
– Courroie de port
– Housse
– Bouchon de protection d’oculaire
– 2 couvercles de protection d’objectif
– Carte de Garantie
29
français
Désignation des composants
Table des matières
Désignation des composants . . . . . . . . . . . . . . . . . . . . . . . . . . . . . . . . . . . . . . . . . . . . . . . . . . . . . . . 29
Produit livré . . . . . . . . . . . . . . . . . . . . . . . . . . . . . . . . . . . . . . . . . . . . . . . . . . . . . . . . . . . . . . . . . . . . 29
Avant-propos . . . . . . . . . . . . . . . . . . . . . . . . . . . . . . . . . . . . . . . . . . . . . . . . . . . . . . . . . . . . . . . . . . . 29
Recyclage des appareils électriques et électroniques . . . . . . . . . . . . . . . . . . . . . . . . . . . . . . . . . . . . 31
Possibilités d’utilisation . . . . . . . . . . . . . . . . . . . . . . . . . . . . . . . . . . . . . . . . . . . . . . . . . . . . . . . . . . . 31
Mise en place de la courroie de port et du bouchon de protection d’oculaire . . . . . . . . . . . . . . . . . . 31
Mise en place des couvercles de protection d’objectif . . . . . . . . . . . . . . . . . . . . . . . . . . . . . . . . . . . . 31
Insertion et changement de la pile . . . . . . . . . . . . . . . . . . . . . . . . . . . . . . . . . . . . . . . . . . . . . . . . . . . 32
État de charge de la pile . . . . . . . . . . . . . . . . . . . . . . . . . . . . . . . . . . . . . . . . . . . . . . . . . . . . . . . . . . . 33
Réglage des œillères/Utilisation avec et sans lunettes . . . . . . . . . . . . . . . . . . . . . . . . . . . . . . . . . . . 34
Réglage de la distance interoculaire . . . . . . . . . . . . . . . . . . . . . . . . . . . . . . . . . . . . . . . . . . . . . . . . . . 34
Mise au point/compensation dioptrique . . . . . . . . . . . . . . . . . . . . . . . . . . . . . . . . . . . . . . . . . . . . . . 35
Mesure des distances . . . . . . . . . . . . . . . . . . . . . . . . . . . . . . . . . . . . . . . . . . . . . . . . . . . . . . . . . . . . . 36
Fonction de balayage par scanner . . . . . . . . . . . . . . . . . . . . . . . . . . . . . . . . . . . . . . . . . . . . . . . . . . . 37
Portée de mesure et précision . . . . . . . . . . . . . . . . . . . . . . . . . . . . . . . . . . . . . . . . . . . . . . . . . . . . . . 37
Entretien/nettoyage . . . . . . . . . . . . . . . . . . . . . . . . . . . . . . . . . . . . . . . . . . . . . . . . . . . . . . . . . . . . . 38
Accessoires . . . . . . . . . . . . . . . . . . . . . . . . . . . . . . . . . . . . . . . . . . . . . . . . . . . . . . . . . . . . . . . . . . . . 38
Pièces de rechange . . . . . . . . . . . . . . . . . . . . . . . . . . . . . . . . . . . . . . . . . . . . . . . . . . . . . . . . . . . . . . 38
Que faire quand... . . . . . . . . . . . . . . . . . . . . . . . . . . . . . . . . . . . . . . . . . . . . . . . . . . . . . . . . . . . . . . . . 39
Caractéristiques techniques . . . . . . . . . . . . . . . . . . . . . . . . . . . . . . . . . . . . . . . . . . . . . . . . . . . . . . . . 40
Leica Akademie . . . . . . . . . . . . . . . . . . . . . . . . . . . . . . . . . . . . . . . . . . . . . . . . . . . . . . . . . . . . . . . . . 42
Leica dans l’Internet . . . . . . . . . . . . . . . . . . . . . . . . . . . . . . . . . . . . . . . . . . . . . . . . . . . . . . . . . . . . . . 42
Service d’information Leica . . . . . . . . . . . . . . . . . . . . . . . . . . . . . . . . . . . . . . . . . . . . . . . . . . . . . . . . 42
Service après-vente Leica . . . . . . . . . . . . . . . . . . . . . . . . . . . . . . . . . . . . . . . . . . . . . . . . . . . . . . . . . 42
Avertissement: Comme avec toutes les jumelles, évitez de regarder directement dans des sources de lumière
claires avec les Leica Geovid BRF afin d'écarter tout risque de lésion oculaire.
30
Recyclage des appareils
électriques et électroniques
Possibilités d'utilisation
(valable pour l’UE et les autres pays
européens ayant un système de
collecte sélectif)
Cet appareil contient des composantes électriques et électroniques et ne doit pas être jeté
avec les ordures ménagères! Il doit être déposé
dans la zone de collecte de votre commune.
Cette opération est gratuite pour vous.
Mise en place de la courroie de port et
du bouchon de protection d’oculaire
Prière de retirer au préalable piles et /ou accumulateurs et de déposer ceux-ci dans les points
de collecte prévus à cet effet, en prenant les précautions nécessaires (voir la notice d’utilisation
de cet appareil).
Si vous souhaitez fixer le bouchon de protection
d'oculaire à la courroie de port, vous devez enfiler cette dernière dans l’œillet du couvercle de
protection avant de l’attacher au côté gauche des
jumelles.
Pour plus d’informations, consultez votre commune, votre centre de dépôt des déchets local ou
le magasin où vous avez acheté cet appareil.
Mise en place des couvercles de
protection d'objectif
Pour le montage des deux couvercles de protection d’objectif, les bagues en caoutchouc du couvercle sont tirées depuis le côté de l’objectif sur
les tubes des jumelles, de façon à ce que les couvercles se déplient vers le bas.
31
français
Les jumelles Leica Geovid BRF sont pourvues
d'un boîtier robuste en aluminium permettant
une utilisation même dans des conditions difficiles. Par conséquent, elles ne craignent pas l’humidité. En effet, elles sont totalement étanches
jusqu’à 5 m de profondeur et l’optique intérieure
ne s'embue pas grâce au boîtier rempli d’azote.
Remarques:
• Les piles doivent être stockées dans un endroit
sec et frais.
• Retirez la pile des jumelles si vous prévoyez de
ne pas les utiliser pendant une longue période.
Insertion et changement de la pile
Les jumelles Leica Geovid BRF sont alimentées
par une pile au lithium de 3 volts (p. ex. Duracell
DL CR 2, Ucar CR 2, Varta CR 2, ou d’autres types
CR 2).
1. Ouvrez le couvercle (10) du compartiment piles
(9) en le faisant tourner, par exemple, à l’aide
d'une pièce de monnaie, dans le sens inverse
des aiguilles d'une montre.
Attention:
• Vous ne devez jamais jeter les piles au feu, ni
les chauffer, recharger, démonter ou casser.
• Ne jetez pas les piles usagées avec les ordures
ménagères ordinaires, car elles contiennent
des substances toxiques nuisibles pour l’environnement. Pour permettre un recyclage correct, remettez-les à un commerçant ou éliminez-les avec les déchets spéciaux dans un
collecteur.
2. Introduisez la pile avec la borne positive vers
l’avant (en fonction du marquage dans le compartiment).
3. Refermez le couvercle en le tournant dans le
sens des aiguilles d’une montre.
32
État de charge de la pile
français
Une nouvelle pile permet d'effectuer plus de
1000 mesures à 20° C.
Selon les conditions d’utilisation, la durée de vie
de la pile peut être considérablement prolongée
ou réduite. Les températures basses et l’utilisation fréquente de la fonction du balayage par
scanner (voir p. 37) réduisent la durée de vie de la
pile.
Le clignotement des segments lumineux des
valeurs mesurées et du repère de visée indique
une pile épuisée. Après le premier clignotement,
il est possible de prendre encore quelque 50
mesures, avec une portée néanmoins progressivement réduite.
Attention: Le froid diminue les performances de
la pile. À basses températures, les jumelles Leica
Geovid BRF doivent donc être, si possible, portées près du corps et utilisées avec une pile
neuve.
33
A
B
C
Réglage des œillères /
Utilisation avec et sans lunettes
D
Réglage de la distance interoculaire
Plier les jumelles le long de l’axe de mise au point
(8) permet de régler la distance interoculaire. Les
champs visuels gauche et droit doivent alors se
fondre pour former une image ronde.
Vous pouvez régler et encliqueter aisément les
œillères d’oculaire (1) dans la position choisie en
les faisant tourner. Pour un nettoyage approfondi, vous pouvez également les retirer complètement.
Pour une observation avec des lunettes (figure
A), gardez-les dans la position rentrée. Pour une
observation sans lunettes, sortez-les en les faisant tourner dans le sens inverse des aiguilles
d’une montre. Pour une adaptation optimale,
vous disposez de deux positions (figures B, C).
Si les oculaires sont très sales, il est conseillé de
retirer les œillères pour le nettoyage (figure D).
Pour ce faire, tirez légèrement dessus lorsqu’elles sont entièrement sorties.
34
A
B
2
7
3
3. À l’aide de la touche de mesure (5), activez
alors le repère de visée.
4. Après l’apparition de ce dernier, réglez la
bague de compensation dioptrique de droite
(7, index rouge), tout en observant à l’aide des
deux yeux, de façon à ce que le repère de visée
apparaisse nettement dans l’optique de droite.
5. Ensuite, mettez l’image au point de manière
précise dans le tube de droite à l’aide de la
bague de mise au point centrale, à l’aide du
repère de visée affiché, mais cette fois en ne
regardant qu’avec l’oeil droit.
6. Enfin, effectuez une mise au point optimale de
l’image dans le tube gauche à l’aide de la
bague dioptrique gauche (3).
Mise au point / compensation
dioptrique
La mise au point des jumelles Leica Geovid BRF
sur des objets situés à des distances différentes
s’effectue à l’aide de la bague de mise au point
centrale (2).
Pour la compensation d'une amétropie individuelle
pour une observation sans lunettes et la mise au
point du repère de visée, vous pouvez utiliser les
deux bagues de compensation dioptrique (3/7).
Respectez scrupuleusement les opérations décrites ci-après. Elles sont nécessaires pour pouvoir
utiliser pleinement les capacités de l’optique.
1. Faites tourner les deux bagues de compensation dioptrique sur leur point zéro.
2. Effectuez la mise au point, en observant avec
les deux yeux, sur un objet éloigné à l’aide de
la bague de mise au point centrale.
Vous pouvez alors lire les valeurs réglées sur les
valeur "+" ou "-" de les échelles dioptrique (3a/7a).
35
français
5
En activant à nouveau la touche de mesure, vous
pouvez effectuer à tout moment une nouvelle
mesure tant que le repère de visée reste allumé.
Si la distance par rapport à l’objet est inférieure
à 10 mètres/yards, si la portée est dépassée ou
si l’objet ne réfléchit pas suffisamment, l’indication " - -- " apparaît.
Lorsqu’elle disparaît, la mesure de la distance se
désactive automatiquement.
Remarque: Lorsque vous regardez uniquement à
droite ou à gauche, vous devez fermer l’autre oeil
ou simplement maintenir fermée l’autre moitié
des jumelles au niveau de l’objectif.
Remarques:
• Selon l’angle des systèmes optiques l’un par
rapport à l’autre, c.à.d. selon le réglage de l’écartement pupillaire, les affichages peuvent
aussi être légèrement en oblique.
• Les jumelles Leica Geovid BRF sont disponibles en différentes versions pour l’affichage
des distances en mètres ou yards. Extérieurement, elles sont identifiables par des indications sur le couvercle de la bague de mise au
point centrale.
Mesure des distances
Pour mesurer la distance par rapport à un objet,
vous devez le viser avec précision. Pour ce faire,
activez le repère de visée en appuyant une fois
sur la touche de mesure (5). Une fois la touche
relâchée, le repère de visée reste allumé pendant
environ 4 s. Si vous maintenez la touche enfoncée, le repère de visée reste allumé en permanence. Pendant qu’il est allumé, l’objet est visé
et, lorsque vous réactivez la touche de mesure, la
distance est mesurée et la valeur de mesure s’affiche. Le repère de visée s'éteint peu après la
mesure.
36
Portée de mesure et précision
Les jumelles Leica Geovid BRF permettent également d’effectuer des mesures en permanence. Si
vous maintenez la touche de mesure (5) enfoncée lorsque vous appuyez dessus pour la deuxième fois, l’appareil active, après environ 0,5 s, la
fonction de balayage par scanner et effectue
ainsi des mesures permanentes. Cette fonction
est indiquée par un affichage variable: toutes les
1,5 s environ, une nouvelle valeur de mesure
apparaît.
La fonction de balayage est particulièrement pratique pour la mesure de petits objets.
La précision de mesure des jumelles Leica
Geovid BRF est de ±1 mètre/yard. La portée
maximale est obtenue avec des objets suffisamment réfléchissants et une visibilité de 10 km. La
portée de mesure est influencée par les facteurs
suivants:
Portée
Couleur de l’objet
Angle par rapport à l’objet
Taille de l’objet
Luminosité générale
Conditions
atmosphériques
Structure de l’objet
Remarques:
• Lorsque la fonction de balayage par scanner
est activée, la consommation d’énergie est
plus élevée que lors de mesures ponctuelles
en raison du fonctionnement permanent.
• Après 10s, la fonction de balayage se désactive
automatiquement afin d’économiser les piles en
cas de pression involontaire sur la touche.
supérieure
blanc
droit
grande
Réduite
(nuages)
dégagé
inférieure
noir
aigu
petite
élevée
(soleil de midi)
couvert
homogène
(mur)
non homogène
(buisson, arbre)
Par temps ensoleillé et bonne visibilité, les portées et précisions suivantes sont applicables:
Portée
Précision
37
10m/yds à 1200m/1300yds environ
±1 m / yd à 350 m / 380 yds
± 2 m / yds à 700 m / 763 yds
± 0,5 % sur 700 m / 763 yds
français
Fonction de balayage par scanner
Entretien/nettoyage
Accessoires
Les jumelles Leica Geovid BRF ne nécessitent
pas d’ entretien particulier. Enlevez les particules
grossières, telles que le sable, à l’aide d’un pinceau fin ou en soufflant dessus. Vous pouvez
essuyer les traces de doigts, par exemple, sur la
lentille de l'objectif ou de l’oculaire, à l’aide d’une
peau de chamois douce et propre ou d'un chiffon
non pelucheux. En cas d’encrassement important, p. ex. des œillères pivotantes de l’oculaire,
vous pouvez nettoyer les jumelles en les rinçant
simplement à l’eau courante. Rincez également
l’eau salée.
Adaptateur de trépied avec filetage 1/4" . . 42 220
Courroie insubmersible, orange . . . . . . . 42 163
No. de Code
Pièces de rechange
Si vous avez besoin de pièces de rechange pour
vos jumelles, p. ex. des œillères, un bouchon ou
une courroie, contactez notre service aprèsvente (adresse, voir p. 41) ou votre Représentation
Leica (adresses, voir Carte de Garantie).
Attention: N’exercez pas de forte pression,
même lorsque vous essuyez la surface de lentilles très encrassées. Bien que la couche antireflet soit résistante aux rayures, elle peut être
endommagée par le sable ou les cristaux de sel.
Chaque paire de jumelles Leica Geovid BRF possède un numéro de série unique en plus de son
indication de type. Notez-le bien dans votre documentation.
38
Défaut
Cause
Solution
Lors de l’observation l’image ronde
n'est pas obtenue.
a) Les jumelles ne sont pas
suffisamment adaptées
à la distance interoculaire
personnelle.
a) Corriger simplement, en pliant
plus ou moins les jumelles sur
l'axe de mise au point, la distance
entre les tubes des jumelles.
b) La pupille de l’observateur
ne correspond pas à la
pupille de sortie des jumelles.
b) Corriger la position de la tête,
des yeux ou des jumelles.
c) La position des œillères
pivotantes de l’oculaire ne
correspond pas à l’utilisation
correcte avec et sans lunettes
c) Corriger le réglage :
les porteurs de lunettes rentrent
les œillères; les observateurs
sans lunettes sortent les œillères.
Affichage flou
La compensation dioptrique
n’est pas exacte
Recommencer le réglage de la
compensation dioptrique (voir p. 35)
Lors de la mesure de distance,
l'indication " - - - " apparaît
a) La portée de mesure est
dépassée ou est en-dessous
de la distance minimum
Vérifier les indications sur la portée de
mesure (voir p. 37)
b) Le degré de réflexion de
l’objet est insuffisant
L’affichage clignote ou aucune
mesure n’est possible
Pile épuisée
Remplacer la pile (voir p. 32)
39
français
Que faire quand...
Caractéristiques techniques
LEICA GEOVID 8 x 42 BRF
Grossissement
Diamètre de l’objectif
Pupille de sortie
Indice crépusculaire
Luminosité géométrique
Champ visuel (à 1000 m/yds)
Limite de réglage rapproché (à 0 dioptrie)
Distance longitudinale de la pupille de sortie
Distance pupillaire
Type de prisme
Couche anti-reflet
sur les lentilles
sur les prismes
Compensation dioptrique
Adaptées aux porteurs de lunettes
Température de fonctionnement
Température de stockage
Étanchéité
Matériau du boîtier
Portée maximale
Distance minimale
Précision de mesure
Affichage/
Unité de mesure
Piles
Durée de vie de la pile1
Laser
Divergence faisceau laser
Durée de mesure maximale
Dimensions (L2 x H3 x P2)
Poids (piles comprises)
1
À 20 C et avec un profil d’utilisation moyen
2 Avec
LEICA GEOVID 10 x 42 BRF
8x
10 x
42 mm
5,25 mm
18,33
27,56
125 m/yds / 7,1°
env. 5,6 m/18’4’’
18,5 mm
4,2 mm
20,5
17,64
110 m/yds / 6,3° (grand angle)
env. 5, 6 m/18’4’’
15,6 mm
56–74 mm
en toit
High Durable Coating (HDC™)
Couche de correction de phase P40
env. ± 3,5 dioptries
oui
–25°C/–13°F à +55°C/+131°F
–40 C/–40 F à +85 C/+185 F
0,5 bar (env. 5 m de profondeur)
Aluminium moulé sous pression
env. 1200 m/1300 yds
10 m/yds
±1 m/yd à 350 m/380 yds
± 2 m/yds à 700 m/763 yds
± 0,5 % sur 700 m/763 yds
DEL à 4 chiffres
disponible en mètres ou en yards
1 pile au lithium 3 V type CR 2
≥ 1000 mesures
inoffensif pour les yeux, conforme aux normes EN et FDA classe 1
2,5 x 0,5 mrad
env. 1,4 s
env. 124 x 174 x 65 mm
env. 945 g
distance interoculaire de 65 mm
40
3 Avec
œillères rentrées
Caractéristiques techniques
LEICA GEOVID 8 x 56 BRF
Affichage/
Unité de mesure
Piles
Durée de vie de la pile1
Laser
Divergence faisceau laser
Durée de mesure maximale
Dimensions (L2 x H3 x P2)
Poids (piles comprises)
1
À 20 C et avec un profil d'utilisation moyen
2 Avec
LEICA GEOVID 15 x 56 BRF
8x
15 x
56 mm
7 mm
21,17
49
118 m/yds / 6,8°
env. 5,5 m/18’4’’
18,5 mm
3,7 mm
28,98
13,94
72 m/yds / 4,1°
env. 5, 5 m/18’4’’
15,6 mm
58–74 mm
en toit
High Durable Coating (HDC™)
Couche de correction de phase P40
env. ± 3,5 dioptries
oui
–25°C/–13°F à +55°C/+131°F
–40 C/–40 F à +85 C/+185 F
0,5 bar (env. 5 m de profondeur)
Aluminium moulé sous pression
env. 1200 m/1300 yds
10 m/yds
±1 m/yd à 350 m/380 yds
± 2 m/yds à 700 m/763 yds
± 0,5 % sur 700 m/763 yds
DEL à 4 chiffres
disponible en mètres ou en yards
1 pile au lithium 3 V type CR 2
≥ 1000 mesures
inoffensif pour les yeux, conforme aux normes EN et FDA classe 1
2,5 x 0,5 mrad
env. 1,4 s
env. 135 x 182 x 68 mm
env. 135 x 208 x 68 mm
env. 1100 g
env. 1245 g
distance interoculaire de 65 mm
41
3 Avec
œillères rentrées
français
Grossissement
Diamètre de l’objectif
Pupille de sortie
Indice crépusculaire
Luminosité géométrique
Champ visuel (à 1000 m/yds)
Limite de réglage rapproché (à 0 dioptrie)
Distance longitudinale de la pupille de sortie
Distance pupillaire
Type de prisme
Couche anti-reflet
sur les lentilles
sur les prismes
Compensation dioptrique
Adaptées aux porteurs de lunettes
Température de fonctionnement
Température de stockage
Étanchéité
Matériau du boîtier
Portée maximale
Distance minimale
Précision de mesure
Leica Akademie
Service d’information Leica
Les différents stages proposent aux participants
un programme complet sur la technique photographique et de nombreux conseils sur la pratique du Leica et la fascination à l’utilisation des
produits Leica.
Pour plus de renseignements sur le programme
de formation courant :
Le service Informations Leica répondra volontiers par écrit, par téléphone, fax ou e-mail à vos
questions d'ordre technique se rapportant à la
gamme de produits Leica :
Leica Camera AG
Informations-Service
Postfach 1180
D 35599 Solms
Tél:
+49 (0) 64 42-208-111
Fax: +49 (0) 64 42-208-339
e-mail: [email protected]
Leica Camera AG
Leica Akademie
Oskar-Barnack-Straße 11
D -35606 Solms
Tél.: +49 (0) 64 42-208-421
Fax: +49 (0) 64 42-208-425
E-mail: [email protected]
Service après-vente Leica
Pour l’entretien de votre équipement Leica et en
cas d’endommagement, le Customer Service de
Leica Camera AG ou celui d’une des représentations nationales Leica (liste d’adresses sur la
Carte de Garantie) se tiennent à votre disposition.
Veuillez consultez votre centre-conseil Leica.
Leica dans l’Internet
Des informations d’actualité concernant le
matériel, les nouveautés, les activités et la
société Leica elle-même sont à votre disposition
sur notre Homepage dans l’Internet sous la
référence:
Leica Camera AG
Customer-Service
Solmser Gewerbepark 8
D 35606 Solms
Tél.: +49 (0) 64 42-208-189
Fax: +49 (0) 64 42-208-339
e-mail: [email protected]
http://www.leica-camera.com
42
Benaming van de onderdelen
Voorwoord
1. Oculair-oogschelpen
Stand a: Uitgedraaid voor observatie zonder
bril
Stand b: Ingedraaid voor observatie met bril
2. Ring centrale focussering
3. Dioptrie-compensatiering met
a. Schaal
4. Ogen voor draagriem
5. Bedieningsknop voor de afstandsmeting
6. Laser-zendoptiek
7. Dioptrie-compensatie voor richtpunt compensatiering met
a. Schaal
8. Scharnieras voor instelling van de oogafstand
9. Batterijvak
10. Batterijvakdeksel
Geachte klant,
nederlands
De naam Leica staat voor de hoogste kwaliteit en
fijnmechanische precisie in combinatie met de
grootste betrouwbaarheid en lange levensduur.
Wij wensen u veel succes en plezier met uw nieuwe Leica Geovid BRF verrekijker.
Om deze goed te kunnen gebruiken, adviseren
wij u eerst deze handleiding goed te lezen.
Leveringsomvang
– Verrekijker
– 1 lithium batterij 3 V type CR 2
– Draagriem
– Paraattas
– Oculair-beschermdeksel
– 2 objectief-beschermdeksels
– Garantiekaart
43
Inhoudsopgave
Benaming van de onderdelen . . . . . . . . . . . . . . . . . . . . . . . . . . . . . . . . . . . . . . . . . . . . . . . . . . . . . . . 43
Leveringsomvang . . . . . . . . . . . . . . . . . . . . . . . . . . . . . . . . . . . . . . . . . . . . . . . . . . . . . . . . . . . . . . . . 43
Voorwoord . . . . . . . . . . . . . . . . . . . . . . . . . . . . . . . . . . . . . . . . . . . . . . . . . . . . . . . . . . . . . . . . . . . . . 43
Milieuvriendelijk afvoeren elektrische en elektronische apparatuur . . . . . . . . . . . . . . . . . . . . . . . . . 45
Toepassingsmogelijkheden . . . . . . . . . . . . . . . . . . . . . . . . . . . . . . . . . . . . . . . . . . . . . . . . . . . . . . . . 45
Aanbrengen van de draagriem en het oculair-beschermdeksel . . . . . . . . . . . . . . . . . . . . . . . . . . . . . 45
Aanbrengen van het objectief-beschermdeksel . . . . . . . . . . . . . . . . . . . . . . . . . . . . . . . . . . . . . . . . . 45
Plaatsen en vervangen van de batterij . . . . . . . . . . . . . . . . . . . . . . . . . . . . . . . . . . . . . . . . . . . . . . . . 46
Batterijconditie . . . . . . . . . . . . . . . . . . . . . . . . . . . . . . . . . . . . . . . . . . . . . . . . . . . . . . . . . . . . . . . . . . 47
Instellen van de oogschelpen/Gebruik met en zonder bril . . . . . . . . . . . . . . . . . . . . . . . . . . . . . . . . 48
Instellen van de oogafstand . . . . . . . . . . . . . . . . . . . . . . . . . . . . . . . . . . . . . . . . . . . . . . . . . . . . . . . . 48
Instellen van de scherpte/dioptrie-compensatie . . . . . . . . . . . . . . . . . . . . . . . . . . . . . . . . . . . . . . . . 49
Afstandsmeting . . . . . . . . . . . . . . . . . . . . . . . . . . . . . . . . . . . . . . . . . . . . . . . . . . . . . . . . . . . . . . . . . 50
Scanfunctie . . . . . . . . . . . . . . . . . . . . . . . . . . . . . . . . . . . . . . . . . . . . . . . . . . . . . . . . . . . . . . . . . . . . . 51
Meetbereik en precisie . . . . . . . . . . . . . . . . . . . . . . . . . . . . . . . . . . . . . . . . . . . . . . . . . . . . . . . . . . . . 51
Onderhoud/Reiniging . . . . . . . . . . . . . . . . . . . . . . . . . . . . . . . . . . . . . . . . . . . . . . . . . . . . . . . . . . . . 52
Accessoires . . . . . . . . . . . . . . . . . . . . . . . . . . . . . . . . . . . . . . . . . . . . . . . . . . . . . . . . . . . . . . . . . . . . 52
Reserveonderdelen . . . . . . . . . . . . . . . . . . . . . . . . . . . . . . . . . . . . . . . . . . . . . . . . . . . . . . . . . . . . . . 52
Wat doen, als... . . . . . . . . . . . . . . . . . . . . . . . . . . . . . . . . . . . . . . . . . . . . . . . . . . . . . . . . . . . . . . . . . . 53
Technische gegevens . . . . . . . . . . . . . . . . . . . . . . . . . . . . . . . . . . . . . . . . . . . . . . . . . . . . . . . . . . . . . 54
Leica Akademie . . . . . . . . . . . . . . . . . . . . . . . . . . . . . . . . . . . . . . . . . . . . . . . . . . . . . . . . . . . . . . . . . 56
Leica op internet . . . . . . . . . . . . . . . . . . . . . . . . . . . . . . . . . . . . . . . . . . . . . . . . . . . . . . . . . . . . . . . . 56
Leica Infodienst . . . . . . . . . . . . . . . . . . . . . . . . . . . . . . . . . . . . . . . . . . . . . . . . . . . . . . . . . . . . . . . . . 56
Leica klantenservice . . . . . . . . . . . . . . . . . . . . . . . . . . . . . . . . . . . . . . . . . . . . . . . . . . . . . . . . . . . . . 56
Waarschuwing: Vermijd, zoals bij elke verrekijker, direct met uw Leica Geovid BRF in een heldere lichtbron te
kijken om oogletsel uit te sluiten.
44
Milieuvriendelijk afvoeren
elektrische en elektronische apparatuur
Toepassingsmogelijkheden
De Leica Geovid BRF verrekijker heeft een sterke
aluminium behuizing die zelfs gebruik onder
moeilijke omstandigheden toestaat. Daarbij
hoeft geen rekening te worden gehouden met
water – tot een diepte van 5 m onder water is
deze absoluut dicht en het inwendige optiek
beslaat niet dankzij een stikstofvulling.
(geldt voor de EU en overige Europese landen met gescheiden inzameling)
Dit apparaat bevat elektrische en/of elektronische onderdelen en mag daarom niet met het
normale huisvuil worden meegegeven!
In plaats daarvan moet het voor recycling aan
door de gemeenten beschikbaar gestelde inzamelpunten worden afgegeven. Dit is voor u gratis.
Als u het oculair-beschermdeksel aan de draagriem wilt bevestigen, moet u de laatste door het
oog van het oculair-beschermdeksel steken,
voordat u de draagriem aan de linkerkant van de
verrekijker bevestigt.
Indien het apparaat verwisselbare batterijen of
accu’s bevat, moeten deze eerst worden verwijderd en evt. volgens de voorschriften worden
afgevoerd (zie hiervoor de aanwijzingen in de
handleiding van het apparaat).
Aanbrengen van het
objectief-beschermdeksel
Meer informatie over dit onderwerp ontvangt u
bij uw gemeentelijke instantie, uw afvalverwerkingsbedrijf of de zaak waar u het apparaat hebt
gekocht.
Voor de montage van beide objectief-beschermdeksels worden de rubberringen van de deksels
vanaf de objectiefkant zodanig over de verrekijker
getrokken dat de deksels naar beneden openklappen.
45
nederlands
Aanbrengen van de draagriem en het
oculair-beschermdeksel
Opmerkingen:
• Batterijen moeten koel en droog worden
bewaard.
• Wanneer de verrekijker langere tijd niet wordt
gebruikt, moet de batterij worden verwijderd.
Plaatsen en vervangen van de batterij
De Leica Geovid BRF verrekijker wordt voor de
voeding van een 3 Volt lithium-batterij (bijv. Duracell DL CR 2, Ucar CR 2, Varta CR 2, of andere
CR 2-typen) voorzien.
1. Open het deksel (10) van het batterijvak (9)
door dit bijv. met een munt tegen de uurwijzers
in te draaien.
Let op:
• Batterijen mogen in geen geval in het vuur worden gegooid, verwarmd, opgeladen, gedemonteerd of opengebroken worden.
• Lege batterijen mogen niet met het normale
huisvuil worden meegegeven, want ze bevatten
giftige, milieubelastende stoffen. Voor recycling moet u ze bij de handelaar of een verzamelpunt van chemisch afval afgeven.
2. Leg de batterij met de pluscontact naar voren
(overeenkomstig de markering in het batterijvak)
erin.
3. Sluit het deksel weer door dit met de uurwijzers mee te draaien.
46
Batterijconditie
Een nieuwe batterij is voldoende voor meer dan
1000 metingen bij 20°C.
Afhankelijk van de gebruiksomstandigheden kan
de levensduur van de batterij duidelijk korter of
langer zijn. De levensduur van de batterij wordt
nadelig beïnvloed door lage temperaturen en
veelvuldig gebruik van de scanfunctie (zie pag. 51).
Een lege batterij wordt door een knipperende
meetwaarde- en richtpuntindicatie aangegeven.
Nadat het knipperen is begonnen, zijn nog ca. 50
metingen mogelijk, maar met een steeds kleinere
reikwijdte.
nederlands
Let op: Koude verlaagt de batterijcapaciteit. Bij
lage temperaturen moet de Leica Geovid BRF
daarom liefst dicht op het lichaam worden gedragen en van een nieuwe batterij zijn voorzien.
47
A
B
C
Instellen van de oogschelpen /
Gebruik met en zonder bril
D
Instellen van de oogafstand
Door de scharnieras (8) van de verrekijker te
knikken, wordt de individuele oogafstand ingesteld. Rechter en linker gezichtsveld moeten
daarbij tot een cirkelvormig beeld in elkaar overgaan.
De oculair-oogschelpen (1) zijn door draaien eenvoudig te verstellen en klikken betrouwbaar in de
gekozen posities. Voor grondige reiniging kunnen
ze ook helemaal worden verwijderd.
Voor observatie met bril (figuur A) blijven ze in de
geheel ingedraaide stand. Voor observatie zonder bril worden ze door draaien tegen de uurwijzers in uitgedraaid. Voor een optimale aanpassing zijn twee posities beschikbaar (figuren B, C).
Als de oculairs sterk zijn vervuild, wordt geadviseerd de oogschelpen voor reiniging te verwijderen (figuur D). In de helemaal uitgedraaide positie worden ze door licht trekken verwijderd.
48
A
B
2
7
3
5
4. Na verschijnen van het richtpunt, stelt u – terwijl u met beide ogen blijft observeren – de
rechter dioptrie-compensatiering (7, rode index)
zodanig in, dat u het richtpunt in de rechter
optiek scherp ziet.
De instelling van de scherpte voor verschillende
ver verwijderde objecten vindt bij de Leica Geovid BRF
verrekijker plaats met de ring voor centrale
focussering (2).
Voor het compenseren van een individuele
gezichtsafwijking voor de observatie zonder bril
en voor het scherpstellen van het richtpunt dienen de beide dioptrie-compensatieringen (3/7).
Voer de hierna beschreven stappen zorgvuldig
uit. Alleen dan kunt u de volledige capaciteit van
het optiek benutten.
1. Draai de beide dioptrie-compensatieringen in
de nulstand.
2. Stel – bij observatie met beide ogen – met de
ring voor centrale focussering in op een ver
verwijderd object.
5. Daarna stelt u – bij nog steeds ingeschakeld
richtpunt, maar nu alleen met het rechteroog
kijkend – met de ring voor centrale focussering
het beeld in de rechter kijker precies scherp.
6. Ten slotte stelt u het beeld in de linker kijker
met de linker dioptriering (3) op optimale
scherpte in.
De ingestelde waarden kunt u aan de "+" of "-"
waarden van de dioptrieschaalen (3a/7a) aflezen.
49
nederlands
3. Met de bedieningsknop (5) activeert u nu het
richtpunt.
Instellen van de scherpte /
dioptrie-compensatie
Door opnieuw op de bedieningsknop te drukken,
kan te allen tijde een nieuwe meting worden
gestart zolang het richtpunt nog brandt.
Als de afstand tot het object minder is dan 10
meter/yards of als de reikwijdte wordt overschreden, resp. het object onvoldoende reflecteert, verschijnt de indicatie "- --".
Met het verdwijnen van de indicatie schakelt de
afstandsmeter zichzelf automatisch uit.
Opmerking: Bij het eenzijdig links of rechts
kijken, moet het andere oog worden dichtgeknepen of de betreffende helft van de verrekijker
aan de voorzijde van het objectief worden afgedekt.
Opmerkingen:
• Afhankelijk van de hoek waarin de optische
systemen tegenover elkaar staan, d.w.z. de
ingestelde oogafstand, kan het zijn dat de
indicaties ook lichtjes scheef weergegeven
worden.
• De Leica Geovid BRF verrekijker is in verschillende versies voor de afstandsindicatie in
meters, resp. yards verkrijgbaar. Uiterlijk zijn
de verschillende versies herkenbaar aan de
indicaties op het deksel van de ring voor centrale focussering.
Afstandsmeting
Om de afstand tot het object te meten, moet het
precies worden bepaald. Hiervoor activeert u het
richtpunt door de bedieningsknop (5) eenmaal in
te drukken. Na het loslaten van de knop brandt
het richtpunt nog ongeveer 4 s Bij ingedrukt
gehouden knop brandt het richtpunt permanent.
Terwijl dit brandt, wordt het object bepaald en
door nog een keer op de bedieningsknop te drukken wordt de afstandsmeting uitgevoerd en de
meetwaarde daarna getoond. Het richtpunt gaat
bij de meting even uit.
50
Meetbereik en precisie
Met de Leica Geovid BRF verrekijker kan ook in
continubedrijf worden gemeten. Wanneer de
bedieningsknop (5) bij de tweede bediening ingedrukt wordt gehouden, schakelt het apparaat na
ca. 0,5 s over op scanfunctie en voert dan permanent metingen uit. Dit is te zien aan de wisselende indicatie: na 1,5s wordt telkens een nieuwe
meetwaarde getoond.
De scanfunctie is bijzonder praktisch voor de
meting van kleine objecten.
De meetnauwkeurigheid van de Leica Geovid BRF
verrekijker bedraagt max. ±1 meter/yard. De
maximale reikwijdte wordt bereikt bij goed reflecterende objecten en een visueel zicht van 10 km.
De meetreikwijdte wordt door de volgende
factoren beïnvloed:
Reikwijdte
Kleur van het object
Hoek tot het object
Objectgrootte
Algemene helderheid
Opmerkingen:
• In de scanfunctie is het stroomverbruik door
de permanente metingen hoger dan bij afzonderlijke metingen.
• Na 10 s wordt de scanfunctie automatisch uitgeschakeld, zodat de batterij bij onopzettelijk
indrukken van de knop wordt gespaard.
Atmosferische
omstandigheden
Objectstructuur
groter
wit
loodrecht
groot
lager
(bewolkt)
helder
kleiner
zwart
schuin
klein
hoog
(middagzon)
nevelig
homogeen
(huismuur)
heterogeen
(struik, boom)
Bij zonneschijn en goed zicht gelden de volgende
reikwijdten en nauwkeurigheden:
Reikwijdte
Nauwkeurigheid
51
10m/yds tot ca. 1200m/1300yds
±1 m / yd tot 350 m / 380 yds
± 2 m / yds tot 700 m / 763 yds
± 0,5 % boven 700 m / 763 yds
nederlands
Scanfunctie
Onderhoud/reiniging
Accessoires
Speciaal onderhoud van uw Leica Geovid BRF
verrekijker is niet noodzakelijk. Grove vuildeeltjes
als zand moeten met een kleine kwast worden
verwijderd of weggeblazen. Vingerafdrukken op
o.a. objectief- en oculairlens kunnen met een
zachte, schone zeemlap of stofvrije doek worden
weggeveegd. Bij sterke vervuiling, bijv. van de
oculair-draaimanchetten, kan de verrekijker eenvoudig onder stromend water worden afgespoeld. Zout water moet eveneens worden afgespoeld.
Statiefadapter met 1/4" schroefdraad . . . 42 220
Zwemriem, oranje . . . . . . . . . . . . . . . . . 42 163
Bestelnr.
Reserveonderdelen
Als u eens reserveonderdelen, zoals oogschelpen, deksels of een draagriem, nodig hebt, neem
dan contact op met onze klantenservice (adres
zie pag. 55) of de vertegenwoordiging van Leica
in uw land (zie de Garantiekaart voor adressen).
Let op: Oefen bij het afvegen van een sterk vervuild lensoppervlak geen grote druk uit. De coating is weliswaar zeer krasvast, maar kan door
zand of zoutkristallen toch worden beschadigd.
Elke Leica Geovid BRF verrekijker kent naast de
typeaanduiding een "individueel" productienummer. Noteer dit nummer voor de zekerheid in uw
documentatie.
52
Storing
Oorzaak
Oplossing
Bij de observatie wordt geen
cirkelvormig beeld bereikt.
a) De verrekijker is onvoldoende
aan de persoonlijke oogafstand
aangepast.
a) Door eenvoudig meer of minder
knikken van de scharnieras de
afstand van de beide kijkers
corrigeren.
b) De pupil van de waarnemer
correspondeert niet met de
uittreepupil van de verrekijker.
b) Stand van hoofd, ogen en
verrekijker corrigeren.
c) De stand van de oculairdraaimanchetten correspondeert
niet met het juiste gebruik
met en zonder bril.
c) Aanpassing corrigeren:
brildragers draaien de oculairmanchetten in; bij observatie
zonder bril: oculairmanchetten
uitdraaien.
Weergave onscherp
Dioptrie-compensatie is niet juist
Dioptrie-compensatie opnieuw
uitvoeren (zie pag. 49)
Bij de afstandsmeting verschijnt
de indicatie "- - -"
a) Meetbereik te hoog of te laag
Gegevens van het meetbereik in acht
nemen (zie pag. 51)
b) De reflectie van het object
is onvoldoende
Indicatie knippert of geen meting
mogelijk
Batterij leeg
Batterij vervangen (zie pag. 46)
53
nederlands
Wat doen, als...
Technische gegevens
LEICA GEOVID 8 x 42 BRF
Vergroting
Objectief-diameter
Uittreepupil
Schemeringsgetal
Geometrische lichtsterkte
Gezichtsveld (op 1000 m/yds)
Instelgrens dichtbij (bij 0 dioptr.)
Uittreepupillen lengte-afstand
Pupillenafstand
Prismasoort
Coating
op lenzen
op prisma’s
Dioptrie-compensatie
Brildrager
Bedrijfstemperatuur
Opslagtemperatuur
Waterdichtheid
Materiaal behuizing
Maximale reikwijdte
Minimale afstand
Meetnauwkeurigheid
Bij 20°C en gemiddeld gebruik
2
10 x
42 mm
5,25 mm
18,33
27,56
125 m/yds / 7,1°
ca. 5,6 m/18’4’’
18,5 mm
4,2 mm
20,5
17,64
110 m/yds / 6,3° (groothoek)
ca. 5,6 m/18’4’’
15,6 mm
56–74 mm
dakkant
High Durable Coating (HDC™)
Coating fasecorrectie P40
ca. ± 3,5 dioptr.
ja
–25°C/–13°F tot +55°C/+131°F
–40°C/–40°F tot +85°C/+185°F
0,5 bar (ca. 5 m waterdiepte)
Aluminium spuitgietstuk
ca. 1200 m/1300 yds
10 m/yds
±1 m/yd tot 350 m/380 yds
± 2 m/yds tot 700 m/763 yds
± 0,5 % boven 700 m/763 yds
LED met 4 cijfers
naar keuze verkrijgbaar in meter of yard
1 lithium batterij 3 V type CR 2
≥1000 metingen
oogveilig conform EN en FDA Class 1
2,5 x 0,5 mrad
ca. 1,4 s
ca. 124 x174 x 65 mm
ca. 945 g
Indicatie/
Eenheid
Batterij
Levensduur batterij1
Laser
Laserstraal-divergentie
Maximale meetduur
Afmetingen (B2 x H3 x D2)
Gewicht (met batterij)
1
LEICA GEOVID 10 x 42 BRF
8x
Bij oogafstand 65 mm
3
Bij ingedraaide oogschelpen
54
Technische gegevens
LEICA GEOVID 8 x 56 BRF
Indicatie/
Eenheid
Batterij
Levensduur batterij1
Laser
Laserstraal-divergentie
Maximale meetduur
Afmetingen (B2 x H3 x D2)
Gewicht (met batterij)
1
Bij 20°C en gemiddeld gebruik
2
LEICA GEOVID 15 x 56 BRF
8x
15 x
56 mm
7 mm
21,17
49
118 m/yds / 6,8°
ca. 5,5 m/18’4’’
18,5 mm
3,7 mm
28,98
13,94
72 m/yds / 4,1°
ca. 5,5 m/18’4’’
15,6 mm
58–74 mm
dakkant
High Durable Coating (HDC™)
Coating fasecorrectie P40
ca. ± 3,5 dioptr.
ja
–25°C/–13°F tot +55°C/+131°F
–40°C/–40°F tot +85°C/+185°F
0,5 bar (ca. 5 m waterdiepte)
Aluminium spuitgietstuk
ca. 1200 m/1300 yds
10 m / yds
±1 m/yd tot 350 m/380 yds
± 2 m/yds tot 700 m/763 yds
± 0,5 % boven 700 m/763 yds
LED met 4 cijfers
naar keuze verkrijgbaar in meter of yard
1 lithium batterij 3 V type CR 2
≥ 1000 metingen
oogveilig conform EN en FDA Class 1
2,5 x 0,5 mrad
ca. 1,4 s
ca. 135 x 182 x 68 mm
ca. 135 x 208 x 68 mm
ca. 1100 g
ca. 1245 g
Bij oogafstand 65 mm
3
Bij ingedraaide oogschelpen
55
nederlands
Vergroting
Objectief-diameter
Uittreepupil
Schemeringsgetal
Geometrische lichtsterkte
Gezichtsveld (op 1000 m/yds)
Instelgrens dichtbij (bij 0 dioptr.)
Uittreepupillen lengte-afstand
Pupillenafstand
Prismasoort
Coating
op lenzen
op prisma’s
Dioptrie-compensatie
Brildrager
Bedrijfstemperatuur
Opslagtemperatuur
Waterdichtheid
Materiaal behuizing
Maximale reikwijdte
Minimale afstand
Meetnauwkeurigheid
Leica Academie
Leica informatiedienst
Op de verschillende seminars krijgt de deelnemer in een op de praktijk georiënteerde, moderne vorm informatie over de waardenwereld van
Leica en de fascinatie van de vakkundige omgang
met de Leica producten. De inhoud is op de
gebruik georiënteerd en biedt een massa inspiratie, informatie en advies voor de praktijk.
Nadere inlichtingen en het actuele seminarprogramma zijn verkrijgbaar bij:
Technische vragen over het Leica-programma
worden schriftelijk, telefonisch of per e-mail
beantwoord door Leica Informations-Service.
Leica Camera AG
Informations-Service
Postfach 1180
D 35599 Solms
Tel:
+49 (0)64 42-208 111
Fax: +49 (0)64 42-208 339
E-mail: [email protected]
Leica Camera AG
Leica Akademie
Oskar-Barnack-Str. 11
D- 35606 Solms
Tel.: +49 (0) 64 42-208-421
Fax: +49 (0) 64 42-208-425
e-mail: [email protected]
Leica klantendienst
Voor het onderhoud van uw Leica uitrusting alsmede in geval van schade kunt u gebruik maken
van de Customer Service van Leica Camera AG of
een nationale vertegenwoordiging van Leica
(voor adressenlijst zie Garantiebewijs). Wendt u
zich tot een erkende Leica-speciaalzaak.
Leica op Internet
Actuele informatie over producten, wetenswaardigheden, evenementen en de onderneming
Leica krijgt u op onze homepage op Internet
onder:
Leica Camera AG
Customer-Service
Solmser Gewerbepark 8
D 35606 Solms
Tel:
+49 (0)64 42-208 189
Fax: +49 (0)64 42-208 339
E-mail: [email protected]
http://www.leica-camera.com
56
Denominazione dei componenti
Prefazione
1. Conchiglie dell’oculare
Posizione a: Allentate per l’osservazione senza
occhiali
Posizione b: Avvitate per l’osservazione con
occhiali
2. Anello di messa a fuoco centrale
3. Anello per la correzione diottrica con
a. Scala
4. Occhielli per tracolla
5. Tasto di azionamento per la misurazione
della distanza
6. Ottica di emissione laser
7. Correzione diottrica per il collimatore diottrica con
a. Scala
8. Asse snodato per la regolazione della distanza
oculare
9. Vano batteria
10. Coperchio del vano batteria
Gentile Cliente,
In tutto il mondo il nome Leica è sinonimo di altissima qualità e precisione meccanica unite a un’estrema affidabilità e a una lunga durata di vita.
Le auguriamo di ottenere il massimo piacere e le
migliori soddisfazioni con il suo nuovo binocolo
Leica Geovid BRF.
Per poterlo utilizzare correttamente le consigliamo di leggere attentamente queste istruzioni
prima dell’uso.
Materiale in dotazione
italiano
– Binocolo
– 1 batteria al litio da 3 V tipo CR 2
– tracolla
– borsa multifunzionale
– cappucci di protezione per oculari
– 2 cappucci di protezione per oculari
– Certificato di Garanzia
57
Indice
Denominazione dei componenti . . . . . . . . . . . . . . . . . . . . . . . . . . . . . . . . . . . . . . . . . . . . . . . . . . . . . 57
Materiale in dotazione . . . . . . . . . . . . . . . . . . . . . . . . . . . . . . . . . . . . . . . . . . . . . . . . . . . . . . . . . . . . . 57
Prefazione . . . . . . . . . . . . . . . . . . . . . . . . . . . . . . . . . . . . . . . . . . . . . . . . . . . . . . . . . . . . . . . . . . . . . . 59
Smaltimento dispositivi elettrici ed elettronici . . . . . . . . . . . . . . . . . . . . . . . . . . . . . . . . . . . . . . . . . .59
Possibilità d’impiego . . . . . . . . . . . . . . . . . . . . . . . . . . . . . . . . . . . . . . . . . . . . . . . . . . . . . . . . . . . . . . 59
Montaggio della tracolla e del cappuccio di protezione per oculari . . . . . . . . . . . . . . . . . . . . . . . . . . 59
Montaggio dei cappucci di protezione per oculari. . . . . . . . . . . . . . . . . . . . . . . . . . . . . . . . . . . . . . . . 60
Inserimento e sostituzione della batteria. . . . . . . . . . . . . . . . . . . . . . . . . . . . . . . . . . . . . . . . . . . . . . . 61
Stato di carica della batteria . . . . . . . . . . . . . . . . . . . . . . . . . . . . . . . . . . . . . . . . . . . . . . . . . . . . . . . . 62
Regolazione delle conchiglie oculari/Utilizzo con e senza occhiali . . . . . . . . . . . . . . . . . . . . . . . . . . 62
Regolazione della distanza oculare . . . . . . . . . . . . . . . . . . . . . . . . . . . . . . . . . . . . . . . . . . . . . . . . . . . 63
Regolazione della nitidezza/Compensazione diottrica . . . . . . . . . . . . . . . . . . . . . . . . . . . . . . . . . . . . 64
Misurazione della distanza . . . . . . . . . . . . . . . . . . . . . . . . . . . . . . . . . . . . . . . . . . . . . . . . . . . . . . . . . 65
Modalità Scan . . . . . . . . . . . . . . . . . . . . . . . . . . . . . . . . . . . . . . . . . . . . . . . . . . . . . . . . . . . . . . . . . . . 65
Portata di misura e precisione . . . . . . . . . . . . . . . . . . . . . . . . . . . . . . . . . . . . . . . . . . . . . . . . . . . . . . 66
Cura e manutenzione . . . . . . . . . . . . . . . . . . . . . . . . . . . . . . . . . . . . . . . . . . . . . . . . . . . . . . . . . . . . . 66
Accessori. . . . . . . . . . . . . . . . . . . . . . . . . . . . . . . . . . . . . . . . . . . . . . . . . . . . . . . . . . . . . . . . . . . . . . . 66
Ricambi . . . . . . . . . . . . . . . . . . . . . . . . . . . . . . . . . . . . . . . . . . . . . . . . . . . . . . . . . . . . . . . . . . . . . . . . 66
Che cosa fare se.... . . . . . . . . . . . . . . . . . . . . . . . . . . . . . . . . . . . . . . . . . . . . . . . . . . . . . . . . . . . . . . . 67
Dati tecnici . . . . . . . . . . . . . . . . . . . . . . . . . . . . . . . . . . . . . . . . . . . . . . . . . . . . . . . . . . . . . . . . . . . . . 68
Leica Akademie . . . . . . . . . . . . . . . . . . . . . . . . . . . . . . . . . . . . . . . . . . . . . . . . . . . . . . . . . . . . . . . . . . 70
Leica in Internet . . . . . . . . . . . . . . . . . . . . . . . . . . . . . . . . . . . . . . . . . . . . . . . . . . . . . . . . . . . . . . . . . 70
Servizio informazioni Leica . . . . . . . . . . . . . . . . . . . . . . . . . . . . . . . . . . . . . . . . . . . . . . . . . . . . . . . . . 70
Servizio assistenza clienti Leica . . . . . . . . . . . . . . . . . . . . . . . . . . . . . . . . . . . . . . . . . . . . . . . . . . . . . 70
Avvertenza: Come per ogni binocolo, anche con Leica Geovid BRF evitare l'osservazione diretta delle sorgenti
luminose per evitare lesioni agli occhi.
58
Smaltimento dispositivi
elettrici ed elettronici
Possibilità d’impiego
I binocoli Leica Geovid BRF hanno un robusto
corpo in alluminio che ne consente l’utilizzo
anche in condizioni avverse. Inoltre non è necessario prestare attenzione all’umidità: sono assolutamente impermeabili fino a 5 metri di profondità e, grazie al riempimento in azoto, l’ottica
interna non si appanna.
(Vale per l’UE e per gli altri paesi
europei con sistemi di raccolta differenziata)
Il presente dispositivo contiene componenti elettrici e/o elettronici. Di conseguenza non può
essere smaltito come normale rifiuto domestico;
deve invece essere depositato per essere riciclato negli appositi centri di raccolta allestiti dalle
autorità municipali. Per voi lo smaltimento è gratuito.
Montaggio della tracolla e del
cappuccio di protezione per oculari
Per fissare il cappucci di protezione per oculari
alla tracolla, infilare la tracolla negli occhielli del
cappuccio di protezione prima di fissarla sul lato
sinistro del binocolo.
Qualora il dispositivo contenga batterie sostituibili o ricaricabili, queste devono essere rimosse
ed eventualmente smaltite in conformità alle normative vigenti (ved. a riguardo quanto riportato
nelle Istruzioni per l’uso del dispositivo).
Per montare i due cappucci di protezione per
oculari, tirare gli anelli in gomma dei cappucci dal
lato dell’obiettivo sui tubi del binocolo, in modo
che i cappucci si aprano verso il basso.
Ulteriori informazioni sull’argomento possono
essere ottenute presso l’amministrazione comunale, l’azienda addetta allo smaltimento o il rivenditore del dispositivo.
59
italiano
Montaggio dei cappucci di
protezione per oculari
Note:
• Conservate sempre le batterie in un luogo
fresco e asciutto.
• Rimuovere la batteria se non si utilizza il binocolo per lunghi periodi di tempo.
Inserimento e sostituzione della batteria
Per l'alimentazione dei binocoli Leica Geovid BRF
viene utilizzata una batteria al litio da 3 Volt (ad
es. Duracell DL CR 2, Ucar CR 2, Varta CR 2,
o altri tipi CR 2).
1. Aprire il coperchio (10) del vano batterie (9)
ruotandolo in senso antiorario, utilizzando, ad
esempio, una moneta.
Attenzione:
• Le batterie non devono assolutamente essere
gettate nel fuoco, surriscaldate, ricaricate,
aperte o smontate.
• Non gettare le batterie usate nei normali rifiuti
domestici, contengono sostanze tossiche
inquinanti. Queste devono essere depositate
negli appositi contenitori presso il Vostro rivenditore oppure presso i centri di raccolta rifiuti
speciali.
2. Inserire la batteria con il polo positiva rivolta in
avanti (come indicato nel vano batterie).
3. Chiudere nuovamente il coperchio avvitandolo
in senso orario.
60
Stato di carica della batteria
Una nuova batteria è sufficiente per oltre 1000
misurazioni a 20°C.
A seconda delle condizioni di impiego, la durata
delle batterie può variare notevolmente. La
durata della batteria diminuisce alle basse temperature e con l’utilizzo frequente della funzione
Scan (vedi a pag. 65).
Quando una batteria è scarico, lampeggia l'indicatore dei valori di misurazione e del collimatore.
Da quando l’indicatore inizia a lampeggiare si
possono effettuare ancora circa 50 misurazioni,
ma la portata diminuisce progressivamente.
italiano
Attenzione: Il freddo riduce la potenza delle batterie. Alle basse temperature il Leica Geovid BRF
dovrebbe essere tenuto quanto più possibile vicino al corpo e utilizzato con batteria nuova.
61
A
B
C
Regolazione delle conchiglie oculari /
Utilizzo con e senza occhiali
D
Regolazione della distanza oculare
Per la regolazione personalizzata della distanza
oculare piegare il binocolo lungo l’asse snodato
(8). I campi visivi destro e sinistro dovrebbero
fondersi in un'unica immagine rotonda.
Le conchiglie oculari (1) si regolano facilmente
ruotandole e si arrestano saldamente nelle posizioni scelte. Inoltre possono anche essere completamente smontate per eseguire una pulizia
approfondita.
Per l’osservazione con gli occhiali (figura A)
rimangono in posizione completamente avvitata.
Per l’osservazione senza gli occhiali si svitano
ruotandole in senso antiorario. Per un adattamento ottimale sono disponibili due posizioni
(figure B, C).
Quando gli oculari sono molto sporchi, per pulirli
si consiglia di rimuovere le conchiglie oculari
(figura D). Per rimuovere le conchiglie, svitarle
completamente ed estrarle con delicatezza.
62
A
B
2
7
3
3. Attivare il collimatore con il tasto di azionamento (5).
4. Una volta visualizzato il collimatore, continuando l’osservazione con entrambi gli occhi,
ruotare l’anello per la correzione diottrica di
destra (7, indice rosso), in modo da vedere nitidamente il collimatore nell'ottica destra.
5. Successivamente, con il collimatore sempre
attivato, ma osservando solo con l’occhio
destro, con l’anello di messa a fuoco centrale
mettere a fuoco l’immagine nel tubo destro
fino a quando non sarà completamente nitida.
6. Infine, utilizzando l’anello per la correzione
diottrica di sinistra (3) mettere a fuoco l’immagine nel tubo sinistro fino a ottenere la nitidezza ottimale.
Regolazione della nitidezza /
Compensazione diottrica
Nei binocoli Leica Geovid BRF la regolazione
della nitidezza per oggetti situati a distanze differenti si effettua con l’anello di messa a fuoco centrale (2).
Per la correzione dei disturbi visivi individuali per
l'osservazione senza occhiali e per la messa a
fuoco del collimatore si utilizzano i due anelli per
la correzione diottrica (3/7).
Soltanto eseguendo scrupolosamente i passaggi
descritti di seguito si potranno sfruttare appieno
le potenzialità dell'ottica.
1. Ruotare i due anelli per la correzione diottrica
fino alla posizione zero.
2. In caso di osservazione con entrambi gli occhi,
mettere a fuoco un oggetto situato a grande
distanza, utilizzando l’anello di messa a fuoco
centrale.
I valori impostati possono essere letti nei valori
"+" o "-" delle scale diottriche (3a/7a).
63
italiano
5
Premendo nuovamente il tasto di azionamento si
può avviare in qualsiasi momento una nuova
misurazione fino a quando il collimatore è ancora
illuminato. Se la distanza dell'oggetto è inferiore
a 10 metri/yarde o si supera la portata o se l’oggetto riflette in misura insufficiente viene visualizzato l’indicatore "- --".
Spegnendo l'indicatore, il telemetro si disattiva
automaticamente.
Nota: Guardando solo attraverso il lato sinistro o
destro, chiudere l’altro occhio o tenere semplicemente chiuso l’obiettivo della metà corrispondente del binocolo.
Note:
• A seconda dell’angolo di apertura dei sistemi
ottici, ovvero della distanza interpupillare, il
display può apparire leggermente inclinato.
• I binocoli Leica Geovid BRF sono disponibili in
diverse versioni per la visualizzazione della
distanza in metri o in yarde. Le diverse versioni si riconoscono esternamente grazie all'indicazione sul cappuccio dell'anello di messa a
fuoco centrale.
Misurazione della distanza
Per misurare la distanza di un oggetto, è necessario rilevarne esattamente la posizione. Attivare
il collimatore, premendo una volta il tasto di azionamento (5). Quando si rilascia il tasto, il collimatore rimane illuminato ancora per circa 4 s.
Tenendo premuto il tasto, il collimatore rimane
costantemente illuminato. La rilevazione dell'oggetto avviene mentre il collimatore è illuminato e
la distanza viene misurata premendo nuovamente il tasto di azionamento; successivamente viene
visualizzato il valore misurato. Durante la misurazione il collimatore si spegne brevemente.
64
Modalità Scan
Portata di misura e precisione
Con i binocoli Leica Geovid BRF le misurazioni
possono essere effettuate anche in funzionamento continuo. Premendo due volte il tasto di
azionamento (5) e mantenendolo premuto, dopo
circa 0,5 s l’apparecchio passa alla modalità
Scan ed esegue le misurazioni in modo continuo.
La modalità Scan si riconosce dal cambiamento
dell'indice: ogni 1,5 s circa viene visualizzato un
nuovo valore.
La modalità Scan è particolarmente pratica per la
misurazione di piccoli obiettivi.
La precisione di misura dei binocoli Leica Geovid
BRF arriva fino a ±1 metro/yarde. La portata
massima si ottiene quando l’oggetto osservato
riflette bene e a una distanza visiva di 10 km. La
portata di misura è influenzata dai seguenti
fattori:
Portata
Colore dell'oggetto
Angolo rispetto
all'oggetto
Dimensioni dell'oggetto
Luminosità generale
maggiore minore
bianco
nero
perpendicolare acuto
Con il sole e con una buona visuale valgono i
seguenti valori di portata e precisione:
Portata
Precisione
65
10m/yd fino a circa 1.200m/1.300yd
±1 m / yd fino a circa 350 m / 380 yd
±2 m / yd fino a 700 m / 763 yd
±0,5 % oltre 700 m / 763 yd
italiano
piccole
elevata
(sole di mezzogi
orno)
Condizioni atmosferiche cielo limpido foschia
Struttura dell'oggetto omogenea disomogenea
(parete di una (cespuglio,
casa)
albero)
Note:
• Nella modalità Scan, a causa delle misurazioni
continue il consumo di corrente è superiore
rispetto alle misurazioni singole.
• Dopo 10 s la modalità Scan si disattiva automaticamente per risparmiare la batteria in
caso di pressione involontaria del tasto.
grandi
ridotta
(nuvoloso)
Cura e manutenzione
Accessorio
I binocoli Leica Geovid BRF non necessitano di
particolari cure. Le particelle di sporco più grossolane, come ad esempio la sabbia, devono essere rimosse o soffiate via con un pennello di setole. Per eliminare impronte digitali e macchie simili dalle lenti degli obiettivi e degli oculari si può
utilizzare un panno in pelle pulito o un panno pulito. In caso di sporco ostinato, ad esempio sulle
boccole pivotanti degli oculari, si può pulire il
binocolo semplicemente lavandolo sotto l’acqua
corrente. È consigliabile sciacquare lo strumento
anche dopo il contatto con acqua salata.
Adattatore per cavalletto con
filettatura da 1/4" . . . . . . . . . . . . . . . . . . 42 220
Tracolla galleggiante, arancione . . . . . . . 42 163
N. ord.
Ricambi
Per richiedere i ricambi del binocolo, quali conchiglie oculari, cappucci o tracolle rivolgersi al
nostro Servizio di assistenza (per l'indirizzo vedere a pag. 69) o al Centro di rappresentanza Leica
del proprio paese (per gli indirizzi consultare il
Certificato di Garanzia).
Attenzione: Anche quando si strofinano le
superfici molto sporche delle lenti, evitare di
esercitare una pressione elevata. Il trattamento
antiriflesso possiede un’alta resistenza all’abrasione ma può comunque essere danneggiato
dalla sabbia o dai cristalli di sale.
Su ogni binocolo Leica Geovid BRF oltre alla
denominazione del modello è indicato il numero
di fabbricazione "personale". Per sicurezza
annotare il numero nella documentazione del
binocolo.
66
Che cosa fare se ...
Causa
Rimedio
Nell'osservazione zione non si
ottiene un'immagine rotonda.
a) Il binocolo non è
sufficientemente adattato
alla distanza oculare
personale.
a) Correggere semplicemente
la distanza tra i tubi del binocolo
piegando di più o di meno
l'asse snodato.
b) La pupilla dell'osservatore
risulta fuori dalla pupilla
di uscita del binocolo.
b) Correggere la posizione
della testa, degli occhi e
del binocolo.
c) La posizione delle boccole
pivotanti degli oculari non
corrisponde all'uso corretto
con e senza occhiali.
c) Correggere l'adattamento:
portatori di occhiali avvitano le
boccole pivotanti degli oculari;
per l'osservazione senza occhiali:
svitare le boccole degli oculari.
Indicatore fuori fuoco
La correzione diottrica non è
esatta
Eseguire nuovamente la correzione
diottrica (vedi a pag. 63)
Nella misurazione della distanza
appare l'indicatore "- - -"
a) Distanza superiore o inferiore
al campo di misurazione
Rispettare le indicazioni sul campo
di misurazione (vedi a pag. 65)
italiano
Errore
b) Il livello di riflessione
dell'oggetto è insufficiente
Indicatore lampeggiante o nessuna
misurazione possibile
Batteria scarica
67
Sostituire la batteria (vedi a pag. 60)
Dati tecnici
LEICA GEOVID 8 x 42 BRF
Ingrandimento
Diametro obiettivo
Pupilla di uscita
Valore crepuscolare
Luminosità geometrica
Campo visivo (a 1.000 m/yd)
Distanza minima di messa a fuoco (a 0 diottr.)
Distanza longitudinale tra le pupille di uscita
Distanza pupillare
Tipo di prisma
Trattamento
sulle lenti
sui prismi
Correzione diottrica
Idoneo per portatori di occhiali
Temperatura di funzionamento
Temperatura di stoccaggio
Tenuta stagna
Materiale del corpo
Portata massima
Distanza minima
Precisione di misura
Display/
Unità di misura
Batteria
Duratadelle batterie1
Laser
Divergenza raggio laser
Durata massima di misurazione
Dimensioni (L2 x H3 x P2)
Peso (incl. batteria)
1
A 20°C e profilo di utilizzo medio
2
LEICA GEOVID 10 x 42 BRF
8x
10 x
42 mm
5,25 mm
18,33
27,56
125 m/yd / 7,1°
ca. 5,6 m/18’4’’
18,5 mm
4,2 mm
20,5
17,64
110 m/yd / 6,3° (grandangolare)
ca. 5,6 m/18’4’’
15,6 mm
56–74 mm
a tetto
High Durable Coating (HDC™)
Rivestimento per correzione di fase P40
ca. ± 3,5 diottr.
si
–25°C/5–13°F a +55°C/+131°F
–40°C/–40°F a +85°C/+185°F
0,5 bar (ca. 5 m di profondità)
Alluminio pressofuso
ca. 1.200 m/1.300 yd
10 m/yd
±1 m/yd fino a 350 m/380 yd
±2 m/yd fino a 700 m/763 yd
±0,5 % oltre 700 m/763 yd
LED a 4 cifre
disponibile nella versione in metri o yard
1 batteria al litio da 3 V tipo CR 2
≥ 1000 misurazioni
non dannoso per gli occhi conforme alle norme EN e FDA Class 1
2,5 x 0,5 mrad
ca. 1,4 s
ca. 124 x174 x 65 mm
ca. 945 g
Con distanza oculare 65 mm
68
3
Con conchiglie oculari avvitate
Dati tecnici
LEICA GEOVID 8 x 56 BRF
Display/
Unità di misura
Batteria
Duratadelle batterie1
Laser
Divergenza raggio laser
Durata massima di misurazione
Dimensioni (L2 x H3 x P2)
Peso (incl. batteria)
1
A 20°C e profilo di utilizzo medio
2
LEICA GEOVID 15 x 56 BRF
8x
15 x
56 mm
7 mm
21,17
49
118 m/yd / 6,8°
ca. 5,5 m/18’4’’
18,5 mm
3,7 mm
28,98
13,94
72 m/yd / 4,1°
ca. 5,5 m/18’4’’
15,6 mm
58–74 mm
a tetto
High Durable Coating (HDC™)
Rivestimento per correzione di fase P40
ca. ± 3,5 diottr.
si
–25°C/5–13°F a +55°C/+131°F
–40°C/–40°F a +85°C/+185°F
0,5 bar (ca. 5 m di profondità)
Alluminio pressofuso
ca. 1.200 m/1.300 yd
10 m/yd
±1 m/yd fino a 350 m/380 yd
± 2 m/yd fino a 700 m/763 yd
± 0,5 % oltre 700 m/763 yd
LED an 4 cifre
disponibile nella versione in metri o yard
1 batteria al litio da 3 V tipo CR 2
≥ 1000 misurazioni
non dannoso per gli occhi conforme alle norme EN e FDA Class 1
2,5 x 0,5 mrad
ca. 1,4 s
ca. 135 x182 x 68 mm
ca. 135 x 208 x 68 mm
ca. 1100 g
ca. 1245 g
Con distanza oculare 65 mm
69
3
Con conchiglie oculari avvitate
italiano
Ingrandimento
Diametro obiettivo
Pupilla di uscita
Valore crepuscolare
Luminosità geometrica
Campo visivo (a 1.000 m/yd)
Distanza minima di messa a fuoco (a 0 diottr.)
Distanza longitudinale tra le pupille di uscita
Distanza pupillare
Tipo di prisma
Trattamento
sulle lenti
sui prismi
Correzione diottrica
Idoneo per portatori di occhiali
Temperatura di funzionamento
Temperatura di stoccaggio
Tenuta stagna
Materiale del corpo
Portata massima
Distanza minima
Precisione di misura
Leica Akademie
Servizio informazioni Leica
Nei diversi seminari, al partecipante viene presentato in forma practica e attuale il mondo
Leica, nonché il fascino dell’impiego corretta dei
prodotti Leica. I temi sono orientati a seconda
dell’impiego e offrono molteplici impulsi, informazioni e consigli sull’uso quotidiano dei prodotti. Ulteriori informazioni ed il programma attuale
del seminario, inclusi i viaggi fotografici, sono in
vendita presso:
Il servizo informazioni Leica risponde per iscritto,
telefono o e-mail a domande tecniche riguardanti l’applicazione del programma Leica:
Leica Camera AG
Informations-Service
Postfach 1180
D 35599 Solms
Tel.: +49 (0) 64 42-208-111
Fax: +49 (0) 64 42-208-339
e-mail: [email protected]
Leica Camera AG
Leica Akademie
Oskar-Barnack Str. 11
D- 35 606 Solms
Tel.: +49 (0) 64 42 208 421
Fax: +49 (0) 64 42 208 425
e-mail: [email protected]
Servizio assistenza clienti Leica
Per la manutenzione dei Vostri articoli Leica nonché in caso di danni, è a Vostra disposizione il
Customer Service della Leica Camera AG o il centro riparazioni di una delle rappresentanze nazionali Leica (per indirizzi si veda il certificato di
garanzia). RivolgeteVi al Vostro rivenditore autorizzato Leica.
Leica in Internet
Attuali informazioni sui prodotti, novità, manifestazioni e l’impresa Leica si possono trovare sulla
nostra Home Page in Internet all’indirizzo:
Leica Camera AG
Customer-Service
Solmser Gewerbepark 8
D 35606 Solms
Tel.: +49 (0) 64 42-208-111
Fax: +49 (0) 64 42-208-339
e-mail: [email protected]
http://www.leica-camera.com
70
Designación de los componentes
Prólogo
1. Anteojeras de ocular
Posición a: Desenroscada para la
observa-ción sin gafas
Posición b: Enroscada para la
observación con gafas
2. Anillo de enfoque central
3. Anillo de graduación de dioptrías con
a. Escala
4. Ojales para correa de transporte
5. Tecla de disparo para medición de la distancia
6. Óptica emisora láser
7. Anillo de graduación de dioptrías para punto
de mira con
a. Escala
8. Eje articulado para el ajuste de la distancia
interocular
9. Compartimiento de la pila
10. Tapa del compartimiento de la pila
Estimado cliente:
El nombre de Leica representa a escala mundial
la máxima calidad, una precisión mecánica fina
con una extremada fiabilidad y una larga duración.
Le deseamos que disfrute y tenga mucho éxito
con sus nuevos anteojos Leica Geovid BRF.
Para que pueda utilizarlos correctamente, le
recomendamos que lea en primer lugar estas
instrucciones.
– Anteojos
– 1 pila de litio de 3 V, tipo CR 2
– Correa de transporte
– Funda
– Tapa protectora del ocular
– 2 tapas protectoras de objetivo
– Tarjeta de Garantía
71
español
Volumen de suministro
Índice
Designación de los componentes . . . . . . . . . . . . . . . . . . . . . . . . . . . . . . . . . . . . . . . . . . . . . . . . . . . . 71
Volumen de suministro . . . . . . . . . . . . . . . . . . . . . . . . . . . . . . . . . . . . . . . . . . . . . . . . . . . . . . . . . . . . 71
Prólogo . . . . . . . . . . . . . . . . . . . . . . . . . . . . . . . . . . . . . . . . . . . . . . . . . . . . . . . . . . . . . . . . . . . . . . . . 71
Eliminación de aparatos eléctricos y electrónicos como residuos. . . . . . . . . . . . . . . . . . . . . . . . . . . 73
Posibilidades de aplicación . . . . . . . . . . . . . . . . . . . . . . . . . . . . . . . . . . . . . . . . . . . . . . . . . . . . . . . . 73
Colocar la correa de transporte y la tapa protectora del ocular . . . . . . . . . . . . . . . . . . . . . . . . . . . . 73
Colocar la tapa protectora del objetivo . . . . . . . . . . . . . . . . . . . . . . . . . . . . . . . . . . . . . . . . . . . . . . . 73
Colocación y cambio de la pila . . . . . . . . . . . . . . . . . . . . . . . . . . . . . . . . . . . . . . . . . . . . . . . . . . . . . . 74
Estado de carga de la pila . . . . . . . . . . . . . . . . . . . . . . . . . . . . . . . . . . . . . . . . . . . . . . . . . . . . . . . . . 75
Ajuste de las anteojeras/Utilización con y sin gafas . . . . . . . . . . . . . . . . . . . . . . . . . . . . . . . . . . . . . 76
Ajuste de la distancia interocular . . . . . . . . . . . . . . . . . . . . . . . . . . . . . . . . . . . . . . . . . . . . . . . . . . . . 76
Ajuste de la nitidez/Graduación de dioptrías . . . . . . . . . . . . . . . . . . . . . . . . . . . . . . . . . . . . . . . . . . 77
Medición de la distancia . . . . . . . . . . . . . . . . . . . . . . . . . . . . . . . . . . . . . . . . . . . . . . . . . . . . . . . . . . 78
Modo de funcionamiento de exploración (Scan) . . . . . . . . . . . . . . . . . . . . . . . . . . . . . . . . . . . . . . . . 79
Alcance de medición y precisión . . . . . . . . . . . . . . . . . . . . . . . . . . . . . . . . . . . . . . . . . . . . . . . . . . . . 79
Cuidados/limpieza . . . . . . . . . . . . . . . . . . . . . . . . . . . . . . . . . . . . . . . . . . . . . . . . . . . . . . . . . . . . . . 80
Accesorios . . . . . . . . . . . . . . . . . . . . . . . . . . . . . . . . . . . . . . . . . . . . . . . . . . . . . . . . . . . . . . . . . . . . . 80
Piezas de repuesto . . . . . . . . . . . . . . . . . . . . . . . . . . . . . . . . . . . . . . . . . . . . . . . . . . . . . . . . . . . . . . . 80
Qué hacer cuando ... . . . . . . . . . . . . . . . . . . . . . . . . . . . . . . . . . . . . . . . . . . . . . . . . . . . . . . . . . . . . . 81
Datos téchnicos . . . . . . . . . . . . . . . . . . . . . . . . . . . . . . . . . . . . . . . . . . . . . . . . . . . . . . . . . . . . . . . . . 82
Leica Akademie . . . . . . . . . . . . . . . . . . . . . . . . . . . . . . . . . . . . . . . . . . . . . . . . . . . . . . . . . . . . . . . . . 84
Leica en Internet . . . . . . . . . . . . . . . . . . . . . . . . . . . . . . . . . . . . . . . . . . . . . . . . . . . . . . . . . . . . . . . . 84
Servicio de información Leica . . . . . . . . . . . . . . . . . . . . . . . . . . . . . . . . . . . . . . . . . . . . . . . . . . . . . . 84
Servicio postventa Leica . . . . . . . . . . . . . . . . . . . . . . . . . . . . . . . . . . . . . . . . . . . . . . . . . . . . . . . . . . 84
Advertencia: Evite del mismo modo que en todos los instrumentos ópticos de observación, la mirada directa con
su Leica Geovid BRF hacia fuentes de luz claras con el fin de excluir las lesiones de los ojos.
72
Eliminación de aparatos
eléctricos y electrónicos
como residuos
Posibilidades de aplicación
Los anteojos Leica Geovid BRF están dotados de
una robusta carcasa de aluminio que permite su
aplicación incluso bajo condiciones desfavorables. Para ello tampoco se ha de tener en consideración la humedad – son absolutamente
impermeables hasta una profundidad de 5 m en
el agua y la óptica interior no se cubre de
humedad gracias a un relleno de nitrógeno.
(Es válido para la UE, así como
para otros países europeos con
sistemas de recogida separada de
residuos)
¡Este aparato contiene componentes eléctricos
y/o electrónicos y, por ello, no debe eliminarse
con la basura doméstica normal!
En su lugar se deberá entregar a los centros de
recogida correspondientes puestos a disposición
por las comunidades con fines de reciclaje. Esto
es gratuito para usted.
Colocar la correa de transporte y la
tapa protectora del ocular
Si desea fijar la tapa protectora del ocular en la
correa de transporte, deberá pasar esta última a
través del ojal de la tapa protectora del ocular,
antes de fijar la correa de transporte en el lado
izquierdo de los anteojos.
En el caso de que el aparato incluya pilas o acumuladores recambiables, éstos deberán ser retirados previamente y, si es necesario, eliminarse
por su parte conforme con las disposiciones
(véase al respecto las indicaciones en las instrucciones del aparato).
Colocar la tapa protectora del objetivo
En su administración local, en la empresa de eliminación de residuos, o en el comercio en el que
haya adquirido este aparato recibirá otras informaciones relativas al tema.
73
español
Para el montaje de las dos tapas protectoras de
los objetivos se estiran los anillos de goma de la
tapa desde el lado del objetivo sobre los tubos de
los anteojos de manera que las tapas se abren
hacia abajo.
Notas:
• Guardar la pila en lugar fresco y seco.
• Si los anteojos no se van a utilizar durante un
tiempo prolongado, conviene sacar la pila.
Colocación y cambio de la pila
La energía de los prismáticos Leica Geovid BRF
se suministra mediante una pila de litio de 3 voltios. (p. ej. Duracell DL CR 2, Ucar CR 2, Varta
CR 2, u otros tipos CR 2).
Atención:
• Las pilas no deben tirarse en ningún caso al
fuego, ni tampoco se pueden calentar, recargar, desarmar ni romper.
• Las pilas gastadas no deben tirarse a la basura
doméstica normal ya que contienen sustancias
tóxicas y contaminantes. Entréguelas en las
tiendas o en otros puntos de recogida de residuos especiales para que sean recicladas
reglamentariamente.
1. Abra la tapa (10) del compartimiento de la pila
(9) girando, p. ej. con una moneda, en sentido
contrario al de las agujas del reloj.
2. Coloque la pila con su contacto positivo hacia
delante (conforme a la marca en el compartimiento de la pila).
3. Cierre de nuevo la tapa girándola ahora en el
sentido de las agujas del reloj.
74
Estado de carga de la pila
Una nueva pila es suficiente para más que 1000
mediciones a 20°C.
Dependiendo de las condiciones de aplicación, la
duración de la pila puede ser claramente más
corta o más larga. Las bajas temperaturas y el
uso frecuente del modo scan (ver p. 79) acortan
la vida de la pila.
Una pila gastada se señala mediante la intermitencia del valor de medición y del punto de mira.
Después del primer parpadeo todavía son posibles unas 50 mediciones, sin embargo con un
alcance reducido progresivamente.
75
español
Atención: El frío reduce la potencia o el rendimiento de la pila. Por esta razón, a temperaturas
bajas deberán llevarse el Leica Geovid BRF lo
más arrimado al cuerpo y utilizarse con una pila
nueva.
A
B
C
Ajustes de las anteojeras /
Utilización con y sin gafas
D
Ajuste de la distancia interocular
Doblando los anteojos alrededor del eje articulado (8) se ajusta la distancia interocular individual. El campo visual se han de fundir para ello en
una imagen circular.
Las anteojeras de ocular (1) se pueden ajustar
simplemente girándolas y se encastran de forma
segura en las posiciones elegidas. Para una limpieza a fondo también se pueden retirar por completo.
Para la observación con gafas (figura A) permanecen en la posición totalmente enroscada.
Para la observación sin gafas se desenroscan
girándolas en sentido contrario al de las agujas
del reloj. Hay disponibles dos posiciones para el
ajuste óptimo (figuras B, C).
Si los oculares están muy sucios, se recomienda
retirar las anteojeras para la limpieza (figura D).
Para ello se retiran desde la posición totalmente
desenroscada aplicando una ligera tracción.
76
A
B
2
7
3
5
3. Con la tecla de disparo (5) activa ahora el
punto de mira.
4. Tras aparecer el punto de mira, mientras sigue
observando con los dos ojos, ajuste el anillo
de graduación dióptrica derecho (7) de modo
que el punto de mira se vea nítido en el sistema óptico derecho.
5. A continuación, con el punto de mira siguiendo activado, pero observando ahora sólo con
el ojo derecho, enfocar nítidamente con el
anillo de enfoque central la imagen en el tubo
derecho.
6. Finalmente, ajuste la imagen en el tubo izquierdo
con el anillo dióptrico izquierdo (3) a la nitidez
óptima.
Ajuste de la nitidez / Graduación de
dioptrías
El ajuste de la nitidez a objetos alejados que se
encuentran a distancias distintas se efectúa en
los anteojos Leica Geovid BRF con el anillo de
enfoque central (2).
Para ajustar los defectos de visibilidad individual
para la observación sin gafas y para enfocar el
punto de mira sirven los dos anillos de graduación dióptrica (3/7).
Realice con cuidado los pasos descritos a continuación. Sólo entonces puede aprovechar el
pleno rendimiento del sistema óptico.
1. Gire los dos anillos de graduación dióptrica a
sus posiciones cero.
2. En caso de observación con los dos ojos, enfoque hacia un objeto alejado con el anillo de
enfoque central.
77
español
Los valores ajustados se pueden leer en los valores "+" o "-" de las escalas (3a/7a) de dioptrías.
El punto de mira se apaga brevemente durante la
medición. Pulsando de nuevo sobre la tecla de
disparo se puede iniciar en cualquier momento
una nueva medición mientras el punto de mira
siga encendido.
Si la distancia hasta el objeto es menor que 10
metros/yardas o se supera el alcance, o bien se
refleja insuficientemente el objeto, aparece la
indicación "- --".
Al apagarse la indicación se desconecta automáticamente el telémetro.
Nota: Al mirar unilateralmente con el ojo derecho o izquierdo, deberá cerrarse el otro ojo correspondiente, o simplemente cerrar por delante
en el objetivo la mitad de los anteojos correspondiente.
Notas:
• Dependiendo del ángulo del sistema óptico
entre ellos, por ej. la distancia de la pupila, los
datos en el display pueden también verse ligeramente inclinados
• Los anteojos Leica Geovid BRF se pueden
obtener en distintas versiones para la indicación de la distancia en metros o yardas. Exteriormente se pueden distinguir las diferentes
versiones por los datos de la tapa del anillo de
enfoque central.
Medición de la distancia
Para medir la distancia hasta un objeto, se ha de
localizar exactamente. Para ello, se activa el
punto de mira pulsando una vez la tecla de disparo (5). Después de soltar la tecla se sigue encendiendo todavía el punto de mira durante otros
4 s. Si se mantiene pulsada la tecla, el punto de
mira se enciende de modo permanente. Mientras
esté encendido, se localiza el objeto y pulsando
de nuevo sobre la tecla de disparo se realiza la
medición de la distancia y se muestra seguidamente el valor medido.
78
Modo de funcionamiento de
exploración (Scan)
Alcance de medición y precisión
La precisión de medición de los anteojos Leica
Geovid BRF es de hasta ±1 metro/yarda. El
alcance máximo se consigue en objetos que sean
reflectantes y con un alcance visual de 10 km. El
alcance de medición es influido por los siguientes factores:
Con los anteojos Leica Geovid BRF también se
puede medir en modo de funcionamiento permanente. Si se mantiene pulsada la tecla de disparo
(5) durante la 2ª pulsación, el aparato se conecta al cabo de aprox. 0.5 s en este modo de funcionamiento de exploración (Scan) y entonces
realiza mediciones de modo permanente. Esto se
puede reconocer en la indicación variable: al
cabo de aprox. 1,5 s se emite un nuevo valor de
medición.
El modo de funcionamiento de exploración
(Scan) es especialmente práctico en la medición
a objetivos pequeños.
Alcance
Color del objeto
Ángulo respecto
al objeto
Tamaño del objeto
Luminosidad general
superior
blanco
vertical
inferior
negro
puntiagudo
Grande
baja
(nublado)
despejado
pequeño
alta
(sol de mediodía)
nebuloso
Condiciones
atmosféricas
Estructura del objeto homogénea no homogénea
(pared de (arbusto, árbol)
una casa)
Notas:
• En el modo de funcionamiento Scan, el consumo de corriente es esencialmente superior al
de las mediciones individuales debido a las
mediciones permanentes.
• Tras 10 s se desconecta automáticamente el
modo de funcionamiento Scan para que la pila
sea protegida ente una pulsación involuntaria
de la tecla.
En caso de brillar el sol y buena visibilidad rigen
los siguientes alcances y precisiones:
79
español
Alcance 10 m / yds hasta aprox. 1.200 m /1300 yds
Precisión ±1 m / yd hasta 350 m /380 yds
± 2 m / yds hasta 700 m /763 yds
± 0,5 % más de 700 m /763 yds
Cuidados / limpieza
Accesorios
Para sus anteojos Leica Geovid BRF no son
necesarios unos cuidados especiales. Las partículas de suciedad gruesas como, p. ej. granos de
arena, deberán eliminarse con un pincel suave o
soplando. Las huellas dactilares y similares en
lentes de objetivos y oculares se pueden quitar
con una gamuza suave, limpia o un paño exento
de polvo. Si la suciedad es muy intensa, p. ej. de
los casquillos giratorios del ocular, se puede
efectuar la limpieza de los anteojos enjuagándolo simplemente con agua corriente. También se
deberá enjuagar si estuvo en contacto con agua
salada.
Adaptador para estativo con
rosca de 1/4" . . . . . . . . . . . . . . . . . . . . . . 42 220
Correa de transporte flotante, naranja . . . 42 163
N.º pedido
Piezas de repuesto
En el caso de que alguna vez necesitara piezas de
repuesto para sus anteojos como, p. ej. anteojeras, tapas o corres de transporte, diríjase a
nuestro Servicio de Asistencia al Cliente (dirección, v. pág. 83) o a la representación de Leica
específica de su país (para direcciones, ver la
Tarjeta de Garantía).
Atención: No ejerza demasiado presión al limpiar las superficies de las lentes muy sucias. El
tratamiento antirreflexión es muy resistente a la
abrasión, sin embargo puede resultar dañado
debido a la arena o los cristales de sal.
Cada uno de los anteojos Leica Geovid BRF lleva
además de la designación de modelo su número
de fabricación "personal". Por su seguridad,
anote dicho número en su documentación.
80
Qué hacer cuando ...
Fallo
Causa
Remedio
Durante la observación no se
consigue ninguna consigue ninguna
a) Los anteojos no están
adaptados lo suficiente a la
distancia interocular personal.
a) Corregir doblando más o menos
el eje articulado la distancia de
los dos tubos de anteojos.
b) La pupila del observador
no está en la pupila de
salida de los anteojos.
b) Corregir la posición de
la cabeza, los ojos y de
los tubos de anteojos.
c) La posición de los casquillos
giratorios de ocular no
corresponde al correcto
uso con y sin. gafas
c) Corregir el ajuste: Girar a los
portadores de gafas,
casquillos del ocular dentro.
En caso de observación sin
gafas: desenroscar los casquillos
del ocular.
Indicación no nítida
La graduación dióptrica no
es exacta
Realizar de nuevo la graduación
dióptrica (v. pág. 77)
En la medición de la distancia
aparece la indicación "- - -"
a) Se ha superado o no se
ha alcanzado el rango
de medición
Observar las indicaciones
sobre el rango de medición (v. pág. 79)
b) El grado de reflexión del
objeto es insuficiente
Pila gastada
Cambiar la pila (v. pág. 74)
81
español
La indicación parpadea o
no es posible ninguna medición
Datos téchnicos
LEICA GEOVID 8 x 42 BRF
Factor de aumento
Diámetro del objetivo
Pupila de salida
Factor crepuscular
Intensidad luminosa geométrica
Campo visual (en 1000m/yds)
Límite de enfoque a corta distancia (con 0 dioptr.)
Distancia longitudinal de pupila de salida
Distancia de pupila
Tipo de prisma
Tratamiento antirreflexión
en lentes
en prismas
Graduación de dioptrías
Apto para portadores de gafas
Temperatura de funcionamiento
Temperatura de almacenamiento
Impermeabilidad al vapor de agua
Material del cuerpo
Alcance máximo
Distancia mínima
Precisión de la medición
Indicación/
Unidad de medida
Pila
Duración de la pila1
Láser
Divergencia de rayo láser
Duración máxima de la medición
Medidas (A2 x A3 x P2)
Peso (con pila)
LEICA GEOVID 10 x 42 BRF
8x
10 x
42 mm
5,25 mm
18,33
27,56
125 m/yds / 7,1°
aprox. 5,6 m/18’4’’
18,5 mm
4,2 mm
20,5
17,64
110 m/yds / 6,3° (gran angular)
aprox. 5,6 m/18’4’’
15,6 mm
56–74 mm
prisma de techno
High Durable Coating (HDC™)
Capa de corrección de fase P40
aprox. ± 3,5 dioptr.
sí
–25°C/–13°F hasta +55°C/+131°F
–40°C/–40°F hasta +85°C/+185°F
0,5 bar (aprox. 5 m de profundidad de agua)
Fundición a presión de aluminio
aprox. 1.200 m/1300 yds
10 m/yds
±1 m/yd hasta 350 m/380 yds
±2 m/yds hasta 700 m/763 yds
± 0,5 % más de 700 m/763 yds
LED con 4 cifras
se puede obtener opcionalmente como versión en metros o yardas
1 pilas de litio de 3 V, tipo CR 2
≥ 1000 mediciones
seguro para los ojos según EN y FDA Class 1
2,5 x 0,5 mrad
aprox. 1,4 s
aprox. 124 x 174 x 65 mm
aprox. 945 g
82
Datos téchnicos
LEICA GEOVID 8 x 42 BRF
Indicación/
Unidad de medida
Pila
Duración de la pila1
Láser
Divergencia de rayo láser
Duración máxima de la medición
Medidas (A2 x A3 x P2)
Peso (con pila)
1
A 20°C y perfil de aplicación medio
2
LEICA GEOVID 10 x 42 BRF
8x
15 x
56 mm
7 mm
21,17
49
118 m/yds / 6,8°
aprox. 5,5 m/18’4’’
18,5 mm
3,7 mm
28,98
13,94
72 m/yds / 4,1°
aprox. 5,5 m/18’4’’
15,6 mm
58–74 mm
prisma de techno
High Durable Coating (HDC™)
Capa de corrección de fase P40
aprox. ± 3,5 dioptr.
sí
–25°C/–13°F hasta +55°C/+131°F
–40°C/–40°F hasta +85°C/+185°F
0,5 bar (aprox. 5 m de profundidad de agua)
Fundición a presión de aluminio
aprox. 1.200 m/1300 yds
10 m/yds
±1 m/yd hasta 350 m/380 yds
±2 m/yds hasta 700 m/763 yds
± 0,5 % más de 700 m/763 yds
LED con 4 cifras
se puede obtener opcionalmente como versión en metros o yardas
1 pilas de litio de 3 V, tipo CR 2
≥ 1000 mediciones
seguro para los ojos según EN y FDA Class 1
2,5 x 0,5 mrad
aprox. 1,4 s
aprox. 135 x 182 x 68 mm
aprox. 135 x 208 x 68 mm
aprox. 1100 g
aprox. 1245 g
Con distancia interocular de 65 mm
83
3
Con anteojeras enroscadas
español
Factor de aumento
Diámetro del objetivo
Pupila de salida
Factor crepuscular
Intensidad luminosa geométrica
Campo visual (en 1000m/yds)
Límite de enfoque a corta distancia (con 0 dioptr.)
Distancia longitudinal de pupila de salida
Distancia de pupila
Tipo de prisma
Tratamiento antirreflexión
en lentes
en prismas
Graduación de dioptrías
Apto para portadores de gafas
Temperatura de funcionamiento
Temperatura de almacenamiento
Impermeabilidad al vapor de agua
Material del cuerpo
Alcance máximo
Distancia mínima
Precisión de la medición
Academia Leica
Servicio de información Leica
En los distintos seminarios, el participante aprende, de una forma adecuada y orientada a la práctica, el mundo de valores de la Leica y la fascinación de saber manejar los productos Leica. Los
contenidos se orientan según las aplicaciones,
ofreciendo numerosas iniciativas, informaciones
y consejos para la práctica.
Para informaciones más detalladas y el programa
de seminarios actual, diríjase a:
Obtendrá respuesta a sus preguntas sobre aplicaciones del programa Leica dirigiéndose al
Servicio de Información Leica por escrito, por
teléfono o por correo electrónico:
Leica Camera AG
Informations-Service
Postfach 1180
D 35599 Solms
Tel:
+49-64 42-208 111
Fax: +49-64 42-208 339
e-mail: [email protected]
Leica Camera AG
Leica Akademie
Oskar-Barnack Str. 11
D- 35606 Solms
Tel.: +49 (0) 64 42-208-421
Fax: +49 (0) 64 42-208-425
e-mail: [email protected]
Servicio postventa Leica
Para el mantenimiento de su equipo Leica así como
en caso de desperfectos o averías está a sus disposición el Customer Service de Leica Camera AG
o el Servicio de reparaciones de una representación de Leica (encontrará la lista de direcciones en
la Tarjeta de Garantía). Diríjase por favor a su proveedor autorizado de productos Leica.
Leica en Internet
Puede consultar informaciones actuales sobre
productos, novedades, eventos y sobre la empresa Leica en nuestra portada de Internet:
Leica Camera AG
Customer-Service
Solmser Gewerbepark 8
D 35606 Solms
Tel:
+49-64 42-208 189
Fax: +49-64 42-208 339
e-mail: [email protected]
http://www.leica-camera.com
84
Leica Camera AG / Oskar-Barnack-Straße 11 / D-35606 Solms
www.leica-camera.com / [email protected]
Telephone +49 (0) 64 42-208-0 / Fax +49 (0) 64 42-208-333
93 121 XI/05/AX/B.
my point of view