1
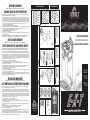
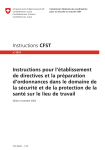
Pump Maintenance Instructions:
English
Thank you for purchasing a Cobalt EXT canister filtration system. The Cobalt Aquatics EXT aquarium canister filter is the most innovative canister available. Its unique inline pump allows complete flexibility
on any aquarium, terrarium or vivarium setup. The innovative valve allows the pump to continue to run and keep vital circulation to your display even while the canister is disconnected for maintenance.
Easy to open and close clips and 4 pre-loaded removable media trays make maintenance a breeze! The Cobalt MICRO-UV clarifier is the perfect compliment to your new EXT filtration system. The MICRO-UV
clarifier removes water born microscopic algae, bacteria and other organisms and keeps water clean and green free.
Always use Cobalt replacement filtration media featuring a variety of replacement chemical and biological media to replace used media or enhance your EXT with specialty media that remove Nitrates or
Phosphates. Whatever your needs, Cobalt Aquatics has you covered!
TECHNICAL SPECIFICATIONS
Model
26000
ASSEMBLY Instructions:
Max. Flow Rate
Wattage
Max. Depth
gph (lph)
W
in (cm)
Max. Aquarium SIze
gal (l)
206 gph (800 lph)
6.5 W
40" (101cm)
55gal (208l)
ASSEMBLY & MAINTENANCE Instructions
The EXT canister filtration system is the most unique and flexible canister available. It can be positioned above or below the aquarium and the pump may be placed inline either inside or outside the
aquarium. Suction cup mounts keep pump in place and vibration to a minimum.
1. Unpack EXT filter and parts. Inspect to be sure all parts are present and in working order. If any parts are missing, contact Cobalt Aquatics at (803)591-9500.
2. Decided what installation style meets your specific needs best (figure 2, 3, 4, or 5). The recommended and easiest installation is with canister below the aquarium and the pump mounted internally.
3. For all installation options, open up canister, remove all media from bags and rinse media and trays until water is debris free and clear. Re-install media per figure #8.
4. Re-install lid and buckle down all for latches, making sure top lip of canister and gasket are clean and free of particles. Note: Lid and media baskets are symmetrical, and can fit in any orientation.
Periodical cleaning of impeller and impeller housing are necessary to keep pump in optimal condition and ensure top performance.
1. Unplug EXT pump and remove input and output lines from aquarium and drain hose lines.
2. Twist impeller housing counter-clockwise to access impeller.
3. Using soft brush or sponge, remove any mineral build up and debris gathering on impeller, impeller housing, and impeller well parts rinse under running water. Soaking parts in distilled vinegar for
15-20mins will help loosen mineral deposits.
4. Once clean reassemble(fig.1) and return to aquarium (see install instructions above) CAUTION! The impeller (part ID#4) and the pump body (part ID#6) must not be disassembled!
Canister maintenance instructions:
Cleaning the filter media is necessary to keep canister running at peak flow rates and to keep tank clean, and water clear, odor and color free. Maintenance should be performed every 3-4 weeks or as
necessary as flow rate decreases as media clogs with dirt and debris. Maintenance is simple for the EXT. No need to un plug pump. Simple steps;
1. Turn valve counter clock ways all the way past “min” mark until the valve stops.
2. At this spot the valve should be in “closed loop” mode and the pump is circulating water through the valve only and back to tank and the valve can be removed from the canister by simply lifting
the valve upward. (fig.#7)
3. Take canister to sink and pour out some liquid trough the top intake and output holes now visible in the lid.
4. Unhook the 4 lid latches and remove the lid.
5. Remove media baskets. Discard and replace top fine white floss, and carbon layers. Be sure to rinse all new media and the baskets before putting back into EXT.
6. Rinse the sponge and ceramic rings in old aquarium or De-chlorinated tap water (using either type of water will protect the good nitrifying bacteria colonies that have developed on the media) to
remove any dirt, debris or excess bio-film.
7. Re-install baskets per figure #8 and latch lid closed, making sure there is no dirt or debris on the top canister lip or the gasket in the lid.
8. For internal pump mount or intake side external mount options, return canister back to aquarium and re-install the valve in reverse order as before (fig. #7). System should start to fill canister, then,
once canister is full, start to push filtered water back to aquarium as before, automatically.
9. For “output side” external mounts, lid should be canister should be refilled with de-chlorinated water, lid re-installed, then more de-chlorinated water poured down 2 top holes until nearly full. Now
return canister back to aquarium and re-install the valve in reverse order as before (fig. #7). System should start to push filtered water back to aquarium as before immediately. If system airlocks,
unplug the pump, and place output U-tube down into a pail and allow siphoning of water through canister to flush any air our of system. Once air is gone, put U-tube back into aquarium as before and
restart pump. System should now function normally.
Internal pump mount option: (recommended for easiest install and maintenance and for low water or filter above tank setups) (fig. #2 and fig. #5)
1. Cut a section of hose approximately 3” long, being careful to make clean flat cuts. Caution! Rough and uneven edges will make tightening and sealing the hose barb connection with the compression
nuts very difficult!
2. Turn compression nuts on hose barbs all the way up next to the pump housing. Push the end of the hose onto the outflow hose barb all the way as far as you can into the compression nut. While
pushing on the hose with one hand to keep hose in position, tighten the compression nut hand tight to lock hose and barbs together (fig. 9). Connect EXT pump intake strainer (part ID# 14) onto
intake side of pump.
3. Connect this other end of the hose to the long end of U-tubes. Connect the remaining length of the hose to the short of the same U-tube and install pump into aquarium in desired location.
4. Place canister under aquarium and bring hose from step 3 to canister. Determine correct hose length to make connection, then add 3” for play which will allow canister and valve movement, but not
enough slack to make hose “kink”. Cut hose to this length and install on intake barb on valve closest to lever (fig. #7).
5. Install elbow onto short side of remaining U-tube. Then connect the diffusor. Connect remaining length of hose to long end of U-tube and install to desired output location of the aquarium.
6. Determine correct hose length to make connection, then add 3” for play which will allow canister and valve movement, but not enough slack to make hose “kink”. Cut hose to this length and install
on output barb on valve farthest from the lever (fig. #7).
7. Plug in EXT pump, be sure to create a drip loop (fig. #10). Because pump in located inside the aquarium, the system is automatically primed and will start and fill canister on its on. Once canister is
full and system is running, check all connections for any leaks. If leaks are present, unplug pump, remove lines from water and drain into a pail or large bowl. Fix leaking connections, re-install pump
and start as before.
Limited 3-Year Warranty
Within three years from the date of original purchase, Cobalt Aquatics will repair or replace, at its option, any EXT Canister Filter which is deemed defective in workmanship or materials.
Please return the unit, together with proof of date of purchase: Call 803-591-9500 for return authorization and shipping address. Damage or injuries resulting from negligence or misuse
are not covered by this warranty. Incidental or consequential damages are specifically excluded. This warranty gives you specific legal rights. You may also have other rights which vary from
state to state.
* Because some states do not allow the exclusion of incidental or consequential damages, this exclusion may not apply to you.
nuts very difficult!
Connect the small section of hose to the long end of one of the U-tubes. Connect U-tube strainer (part id #15) to the now attached short section of hose.
Connect the remaining length of the hose to the short of the same U-tube and install pump into aquarium in desired location.
Confirm filter system input hoses are not full of water and in the aquarium to prevent siphoning and drain the line as best as possible.
Determine desired location of EXT inline pump. Cut the hose in the desired spot, being careful to make clean flat cuts and push on to the hose (fig. 3). Caution! Rough and uneven edges will make
tightening and sealing the hose barb connection with the compression nuts very difficult!
6. Push the ends of each hose onto the hose barbs all the way as far as you can into the compression nuts. While pushing on the hose with one hand to keep hose in position, tighten the compression
nut hand tight to lock hose and barbs together. Be sure to check that pump is installed in correct direction for flow rate per arrow (fig, 6).
7. Place canister under aquarium and bring hose from step 3 to canister. Determine correct hose length to make connection, then add 3” for play which will allow canister and valve movement, but not
enough slack to make hose “kink”. Cut hose to this length and install on intake barb on valve closest to lever (fig. #7).
8. Install elbow onto short side of remaining U-tube. Then connect the diffusor. Connect remaining length of hose to long end of U-tube and install to desired output location of the aquarium.
9. Determine correct hose length to make connection, then add 3” for play which will allow canister and valve movement, but not enough slack to make hose “kink”. Cut hose to this length and install
on output barb on valve farthest from the lever (fig. #7).
10. Because pump in located outside the aquarium, the system is will need to be primed the first time. To prime the filter lines for the first time, simply remove output U-tube from tank and suck on line
briefly to start siphon on pump/intake side. Once siphon has started, plug in EXT pump, be sure to create a drip loop (fig. #10). When canister is full and system is running, check all connections for
any leaks. If leaks are present, unplug pump, remove lines from water and drain into a pail or large bowl. Fix leaking connections, re-install pump and start as before. Once system is primed, there
should be no need to repeat siphon start as the lines will be primed with water and will not need to be redone.
2.
3.
4.
5.
External pump “output side” mount option (fig.#4): (most advanced option)
1. Cut a section of hose approximately 3” long, being careful to make clean flat cuts. Caution! Rough and uneven edges will make tightening and sealing the hose barb connection with the compression
nuts very difficult!
2. Connect the small section of hose to the long end of one of the U-tubes. Connect U-tube strainer (part id #15) to the now attached short section of hose.
3. Connect the remaining length of the hose to the short of the same U-tube and install pump into aquarium in desired location.
4. Place canister under aquarium and bring hose from step 3 to canister. Determine correct hose length to make connection, then add 3” for play which will allow canister and valve movement, but not
enough slack to make hose “kink”. Cut hose to this length and install on intake barb on valve closest to lever (fig. #7).
5. Install elbow onto short side of remaining U-tube. Then connect the diffusor. Connect remaining length of hose to long end of U-tube and install to desired output location of the aquarium.
6. Confirm filter system input hoses are not full of water and in the aquarium to prevent siphoning and drain the line as best as possible.
7. Determine desired location of EXT inline pump. Cut the hose in the desired spot, being careful to make clean flat cuts and push on to the hose (fig. 3). Caution! Rough and uneven edges will make
tightening and sealing the hose barb connection with the compression nuts very difficult! Push the ends of each hose onto the hose barbs all the way as far as you can into the compression nuts.
While pushing on the hose with one hand to keep hose in position, tighten the compression nut hand tight to lock hose and barbs together. Be sure to check that pump is installed in correct direction
for flow rate per arrow (fig, 6).
8. Bring lower end of pump hose to canister and determine correct hose length to make connection, then add 3” for play which will allow canister and valve movement, but not enough slack to make
hose “kink”. Cut hose to this length and install on output barb on valve farthest from the lever (fig. #7).
9. Because pump in located outside the aquarium, the system is will need to be primed the first time. To prime the filter lines for the first time, simply remove output U-tube from tank and suck on line
briefly to start siphon on pump/intake side. Once siphon has started, plug in EXT pump, be sure to create a drip loop (fig. #10). When canister is full and system is running, check all connections for
any leaks. If leaks are present, unplug pump, remove lines from water and drain into a pail or large bowl. Fix leaking connections, re-install pump and start as before. With this installation option, it
is important to be sure the canister is full of water after maintenance is performed to keep system primed. If not, system could airlock and re-priming will be necessary.
Chers clients, nous vous remercions pour l’achat de notre produit. Nous sommes persuadés que vous serez satisfaits de son fonctionnement. Pour éviter un problème quelconque lié à son utilisation nous
vous prions de bien vouloir prendre connaissance de la notice d’emploi ci-dessous.
L’USAGE DU PRODUIT ET SES CARACTÉRISTIQUES
EspaÑol
Estimados Señores, les damos las gracias por la compra de nuestro producto. Estamos seguros que estarán satisfechos con su funcionamiento. Para evitar cualquier problema relacionado con su uso le
pedimos que lean atentamente estas instrucciones de uso.
LA DESTINACIÓN DEL PRODUCTO Y SUS PROPIEDADES
Los filtros EXT sirven para limpiar el agua en los acuarios. Tiene una bomba de absorción de agua exterior, que funciona también en poca profundidad.
LOS DATOS TÉCNICOS
DONNÉES TECHNIQUES
Débit MAX.
Puissance
Profondeur max.
gph (lph)
W
in (cm)
gal (l)
206 gph (800 lph)
6.5 W
40" (101cm)
55gal (208l)
Max. capacité d’aquarium
L’INSTALLATION ET LA MISE EN MARCHE (FIGURE 4)
Le filtre EXT peut être installe de trois manières dépendamment de son usage. Il est conseillé d’installer sur le tuyau d’aspiration un préfiltre sous forme d’une cartouche en mousse (l’index 101235)
(Attention! Le préfiltre ne fait pas partie de l’appareil et peut être acheté indépendamment):
Figure 2 – la pompe d’alimentation est installée à l’intérieur du récipient à sa paroi et fonctionne en tant qu’une pompe qui alimente le filtre en eau. Cette solution est conseillée pour des aquariums
standard avec les poissons.
Figure 3 –la pompe d’alimentation est installée à l’extérieur du récipient, en dessous du niveau d’eau et fonctionne en tant que pompe de refoulement. Cette solution est conseillée pour des aquariums
standard avec les poissons. Dans ce cas il est nécessaire d’amorcer la pompe en aspirant l’eau dans le boyau d’aspiration.
Figure 4 – la pompe d’alimentation est installée à ‘intérieur du récipient au fond et fonctionne en tant qu’une pompe qui alimente le filtre en eau. Cette solution est conseillée pour des aquariums dont
le niveau d’eau est bas.
L’ENTRETIEN
Velocidad de flujo Max.
Potenza
Max. Profundidad
gph (lph)
W
in (cm)
Capacità massima dell’acquario
gal (l)
206 gph (800 lph)
6.5 W
40" (101cm)
55gal (208l)
El filtro EXT puede ser montado de 3 formas dependiendo de su destinación. Sobre la manguera de absorción se aconseja la colocación de un prefiltro – el depósito esponjoso (no. del artículo 101235)
(¡Atención! El prefiltro no es parte del aparato y se puede comprar como una pieza adicional):
El dibujo 2 – la bomba de alimentación instalada dentro del recipiente en su pared cumple la función de la bomba de suministro del agua al filtro. Es el tipo de la instalación aconsejable para los acuarios
estándar para los peces.
El dibujo 3 – la bomba de alimentación instalada fuera por debajo del nivel de agua cumple la función de la bomba de flujo. Este tipo de instalación es aconsejable para los acuarios estándar para los
peces. En este caso antes de la puesta en marcha del filtro es necesario suministrar el agua a la bomba mediante su absorción a través de la manguera.
El dibujo 4 - la bomba de alimentación instalada dentro del recipiente sobre el fondo cumple la función de la bomba de suministro del agua al filtro. Esta solución es aconsejable en los filtros de un bajo
nivel de agua.
EL MANTENIMIENTO
Les filtres EXT servent à épurer l’eau des aquariums. Ils possèdent une pompe extérieure d’aspiration permettant le fonctionnement même dans une eau peu profonde.
26000
CONSERVEZ CES INSTRUCTIONS!
EL MONTAJE Y LA PUESTA EN MARCHA (EL DIBUJO NO. 4)
FranÇais
modèle
*Étant donné que certains États ne permettent pas l’exclusion desdommages accessoires ou indirects, cette exclusion peut ne pas s’appliquer dans votre cas.
26000
SAVE THESE INSTRUCTIONS!
1. Cut a section of hose approximately 3” long, being careful to make clean flat cuts. Caution! Rough and uneven edges will make tightening and sealing the hose barb connection with the compression
GARANTIE LIMITÉE DE 3 ANS
Dans les trois ans à compter de la date d’achat originale. Elle ne peut pas être cédée ni transférée à tout acheteur ou utilisateur subséquent.À tout moment à compter de la date d’achat originale,
Cobalt Aquatics réparera ou remplacera, à son choix, toute chaufferette d’aquarium le filtre EXT qui présente un défaut de fabrication ou de matières premières. Veuillez appeler au (803)
591-9500 pour obtenir l’autorisation de retourner le produit ainsi que l’adresse d’expédition. REMARQUE: S’assurer de bien envelopper la chaufferette pour la protéger pendant le transport. Le
client est responsable des frais d’expédition après la réparation. Si le problème n’est pas couvert en vertu des modalités et conditions de la présente garantie, le client en sera informé et recevra
une estimation des frais de réparation (tous les frais d’expédition étant facturés au client). Si le client refuse l’estimation, le produit sera retourné fret payable à l’arrivée. Les dommages, bris
de verre ou blessures qui résultent d’une négligence ou d’une utilisation abusive ne sont pas couverts par cette garantie. La perte de poissons, les blessures et les pertes et dommages matériels
qui découlent de l’utilisation de cette chaufferette ne sont pas couverts par cette garantie. Les dommages accessoires ou indirects sont expressément exclus*. Cette garantie vous confère des
droits spécifiques. Vous pouvez également jouir d’autres droits qui varient selon votre lieu de résidence.
Modelo
Questions or Missing Parts:
Call Customer Service at 803-591-9500 (M-F 9-5 EST)
External pump “intake side” mount option (fig.#3):
Attention! Affin d’assurer une utilisation de longue durée et fiable il est conseillé de remplacer les trois joints d’étanchéité (pièce numéro 110611): sous le module de commande, sous le couvercle de
l’enveloppe du filtre et sous le couvercle de la pompe d’alimentation (pièce numéro 101477)
La pompe d’alimentation nécessite le nettoyage régulier du rotor (figure 5a) affin d’éliminer les impuretés mécaniques de la chambre du rotor. Pour y procéder, après avoir débranché l’appareil de la
source d’alimentation, il faut deviser le couvercle de la pompe (figure 5b) dans le sens contraire aux aguilles d’une montre, ôter le couvercle, retirer le rotor et le nettoyer et nettoyer la chambre du
rotor à l’aide d’une brosse tendre. Dans le cas où la pompe est installée à l’extérieur de l’aquarium (figure 2) en tant qu’une pompe de refoulement, il est conseillé d’entretenir régulièrement le joint
d’étanchéité qui se trouve sous le couvercle du rotor, en le nettoyant et graissant avec de la vaseline. Le cartouches de filtration doivent être rincées régulièrement avec de l’eau de l’aquarium (non avec
de l’eau du robinet!). Le premier rinçage doit être fait après 2 mois à partir de la première mise en marche du filtre, et les suivants – au besoin signalé par la baisse visible du rendement de l’appareil.
Pour optimaliser le fonctionnement du filtre il est conseillé de remplacer les cartouches de filtration au moins tous les 12 mois. En cas de besoin on peut enlever les algues ou le dépôt calcaire du corps
du filtre à l’aide d’un chiffon doux ou une éponge. Le réglage du rendement du filtre se fait par la rotation du module de commande dans le sens des aiguilles d’une montre (figure 6) dans une plage de
0 à 90 degrés. La rotation de la vanne de 90 degrés coupe l’arrivée d’eau et permet d’enlever le filtre de son logement en sécurité sans la nécessité de débrancher la pompe du réseau électrique (par
exemple pour nettoyer l’intérieur du filtre)
La bomba de alimentación requiere una frecuente limpieza del rodete (el dibujo 5a) para eliminar de la cámara del rodete los posibles residuos mecánicos. Para ello después de desconectar el aparato
de la toma de corriente hay que desenroscar la tapa de la bomba (el dibujo 5b) girando en dirección opuesta a la dirección de las agujas del reloj, quitar la tapa del rodete, sacar el rodete y limpiarlo y
limpiar su cámara con ayuda de un cepillo suave. En el caso de que la bomba trabaje fuera del acuario (el dibujo 2) cumpliendo la función de una bomba de flujo se aconseja un mantenimiento sistemático
de la junta que se encuentra debajo de la tapa del rodete, limpiándola debidamente y untando con vaselina técnica. Los materiales de filtración dentro del filtro se deben enjuagar de forma regular en el
agua que se tira del acuario (¡no bajo el grifo!). La primera limpieza se aconseja realizarla 2 meses después de la primera puesta en marcha del filtro, y las siguientes – en caso de necesidad señalizada
por la caída del rendimiento del aparato. Para obtener un trabajo óptimo del filtro se aconseja el recambio de los medios de filtración al menos una vez cada 12 meses. En caso de necesidad, la caja de
la bomba se puede limpiar de las algas o del sarro usando un trapo suave o esponja. La regulación del rendimiento del trabajo del filtro se hace girando el mando en el sentido de las agujas del reloj (el
dibujo 6) en un campo desde 0 hasta 90 grados. Al girar la válvula exactamente 90 grados cerramos la entrada del agua y podemos sacarlo de la caja de forma segura son necesidad de desconectar la
bomba de la red de corriente eléctrica (por ejemplo para limpiar el interior del filtro).
¡Atención! Para garantizar un funcionamiento duradero y sin avería del filtro se aconseja el recambio regular de las tres juntas (no. del artículo 110611): debajo del mando, debajo del recipiente del filtro
y debajo de la bomba de alimentación. En caso de necesidad también se puede reponer el rodete en la bomba de alimentación (no. del artículo 101477).
GARANTÍA LIMITADA DE 3 AÑOS
Dentro de tres años a partir de la fecha de compra original. La garantía no puede ser asignada ni transferida a ningún otro comprador o usuario posterior. En cualquier momento a partir de la
fecha de compra, Cobalt Aquatics reparará o reemplazará, a su discreción, los calentadores de pecera el filtro EXT con defectos en la fabricación o los materiales. Llamar al (803) 591-9500 para
obtener una autorización de devolución y una dirección para el envío. NOTA: Asegúrese de envolver el calentador con cuidado para protegerlo durante el envío. El consumidor pagará el costo del
envío luego de la reparación. Si el problema no está cubierto por los términos y condiciones de esta garantía, se avisará al consumidor y se le dará un presupuesto de los costos de reparación
(con todos los costos de envío a cargo del consumidor). Si el presupuesto no es aceptado, el producto será devuelto con los costos de tranporte por cobrar. Los daños, la rotura de vidrios y las
lesiones que sean consecuencia de la negligencia o uso incorrecto no están cubiertos por esta garantía. La pérdida de peces, las lesiones personales, la pérdida de bienes o los daños que resulten
del uso de este calentador no están cubiertos por esta garantía. Están específicamente excluidos los daños incidentales o a consecuencia de*. Esta garantía le otorga derechos legales específicos.
Usted también puede tener otros derechos que varían de un estado a otro.
*Debido a que algunos estados no permiten la exclusión de los daños incidentales o consecuenciales, es posible que esta exclusión no se aplique en su caso.
¡CONSERVAR CON CUIDADO ESTAS INSTRUCCIONES!
IMPORTANT SAFEGUARDS
WARNING: To guard against injury, basic safety precautions should be observed, including the following.
READ AND FOLLOW ALL SAFETY INSTRUCTIONS
DANGER: To avoid possible electric shock, special care should be taken since water is employed in the use of aquarium equipment. For each of the following situations, do not attempt repairs by
yourself; return the appliance to an authorized service facility for service or discard the appliance:
1. A. If the appliance shows any signs of abnormal water leakage, immediately unplug from the power source. B. Carefully examine the appliance after installation. It should not be plugged in
if there is water on parts not intended to be wet. C. Do not operate any appliance if it has a damaged cord or plug, or if it is malfunctioning or has been dropped dropped or damaged in any
manner. D. To avoid the possibility of the appliance plug or receptacle getting wet, position aquarium stand and tank to one side of a wall mounted receptacle to prevent water from dripping
onto the receptacle or plug. A “drip loop”(fig. 10) should be arranged by the user for each cord connecting an aquarium appliance to a receptacle. The “drip loop” is that part of the cord below
the level of the receptacle or the connector, if an extension cord is used, to prevent water travelling along the cord and coming in contact with the receptacle. If the plug or receptacle does get
wet, DON’T unplug the cord. Disconnect the fuse or circuit breaker that supplies power to the appliance. Then, unplug and examine for presence of water in the receptacle.
2. Close supervision is necessary when any appliance is used by or near children.
3. To avoid injury, do not contact moving parts or hot parts such as heaters, reflectors, lamp bulbs, and the like.
4. Always unplug an appliance from an outlet when not in use, before putting on or taking off parts, and before cleaning. Never yank cord to pull plug from outlet. Grasp the plug and pull to disconnect.
5. Do not use an appliance for other than intended use. The use of attachments not recommended or sold by the appliance manufacturer may cause an unsafe condition.
6. Do not install or store the appliance where it will be exposed to the weather or to emperatures below freezing.
7. Make sure an appliance mounted on a tank is securely installed before operating it.
8. Read and observe all the important notices on the appliance.
9. If an extension cord is necessary, a cord with a proper rating should be used. A cord rated for less amperes or watts than the appliance rating may overheat. Care should be taken to arrange
the cord so that it will not be tripped over or pulled.
10. This appliance has a polarized plug (one blade is wider than the other) as a safety feature, this plug will fit in a polarized outlet only one way. If the plug does not fit fully in the outlet, reverse
the plug. If it still does not fit, contact a qualified electrician. Never use with an extension cord unless plug can be fully inserted. Do not attempt to defeat this safety feature.
E-X-T Filter SPARE Parts (fig. 1)
ID #
Part #
1
2
3
4
5
6
7
8
26000-1
26000-2
26000-3
26000-4
26000-5
26000-6
26000-7
26000-8
Description
ID #
Part #
EXT filter canister
EXT filter lid
EXT media basket (see fig. #8)
EXT valve block
EXT valve block O-ring
EXT canister gasket
EXT canister latch
EXT 5/8” hose
9
10
11
12
13
14
15
26000-9
30020
P0512
26000-12
26000-13
26000-14
26000-15
4
1
E-X-T PUMP SPARE Parts (fig. 6)
Description
EXT U-tube intake and output tubes
EXT-800 inline pump
Suction cups
EXT elbow
EXT diffusor
EXT pump intake strainer
EXT U-tube intake strainer
ID #
Part #
1
2
3
4
5
6
7
26600-2
30020-2
30020-3
30020-4
30020-5
P0512
2
5
Compression nuts
EXT Impeller housing
EXT Impeller housing O-ring
EXT-800 impeller
EXT impeller shaft
EXT pump housing
Suction cups
2
12
6
7
Description
13
4 Stage Filter with Inline Pump
11
8
1
MISES en garde impotantes
4-Phase Filtre Avec Pompe en Ligne
10
Avertissment: Des précautions de base doivent être prises pour prévenir les blessures, y compris les précautions suivantes.
Lire Et Suivre Toutes Les Consignes de sécurité
9
15
4-Etapa Con Bomba de Filtro en Línea
14
3
DANGER : Pour prévenir les risques de décharge électrique, il faut user de prudence pendant l’utilisation du matériel d’aquarium. Dans chacune des situations
suivantes, ne tentez pas d’effectuer vous-même les réparations. Retournez l’appareil à un atelier de service autorisé pour le faire réparer ou jetez l’appareil.
Above Tank Mount
5
1. A. Si l’appareil montre tout signe de fuite d’eau anormale, débranchez immédiatement l’alimentation électrique. B. Examinez attentivement l’appareil après l’installation. Il ne doit pas être
branché si de l’eau se trouve sur les pièces qui ne doivent pas être mouillées. C. Ne pas utiliser l’appareil si le cordon ou la fiche a été endommagé, si l’appareil fonctionne anormalement ou s’il
a été échappé ou endommagé de quelque façon que ce soit. D. Pour éviter que la fiche de l’appareil ou la prise ne se mouille, placer le support et le réservoir de l’aquarium sur le côté d’une
prise murale afin d’empêcher que de l’eau ne s’écoule sur la prise ou la fiche. Une “boucle d’égouttement” (fig. 10) doit être formée par l’utilisateur sur chaque cordon qui relie un appareil
d’aquariumàune prisemurale. La “boucle d’égouttement” est la partie du cordon qui se trouve sous le niveau de la prise murale ou du connecteur si une rallonge est utilisée, et cette boucle
empêche l’eau de s’écouler le long du cordon et d’atteindre la prise. Si la fiche ou la prise devient mouillée, NE PAS débrancher le cordon. Débrancher le fusible ou le disjoncteur qui alimente
l’appareil. Débrancher ensuite le cordon et vérifier s’il y a de l’eau dans la prise murale.
2. Une supervision étroite est requise lorsque tout appareil est utilisé par ou à proximité des enfants.
3. Pour prévenir les blessures, ne pas toucher aux pièces mobiles ni aux pièces chaudes, comme les chaufferettes, réflecteurs, ampoules, etc.
4. Toujours débrancher l’appareil de la prise murale lorsqu’il n’est pas utilisé et avant d’installer ou de retirer des pièces ou de nettoyer l’appareil. Ne jamais tirer sur le cordon pour sortir la fiche
de la prise murale. Saisir la fiche et la tirer pour la débrancher.
5. Ne pas utiliser un appareil à d’autres fins que l’usage pour lequel il est conçu. L’utilisation d’accessoires non recommandés ou non vendus par le fabricant de l’appareil peut présenter un danger.
6. Ne pas installer ni entreposer l’appareil dans un endroit où il sera exposé aux conditions atmosphériques ou à des températures inférieures au point de congélation.
7. S’assurer que tout appareil monté sur un réservoir est installé solidement avant de l’utiliser.
8. Lire et respecter tous les avis importants qui figurent sur l’appareil.
9. Si une rallonge est requise, utiliser un cordon du calibre approprié. Un cordon d’intensité ou de puissance inférieure aux spécifications de l’appareil peut surchauffer. Prendre soin de positionner
le cordon de façon à ce que personne ne puisse trébucher dessus ni l’arracher du mur.
10. Cet appareil est pourvu d’une fiche polarisée (l’une des tiges est plus large que les autres). Par mesure de précaution, cette fiche ne peut s’insérer que d’une seule façon dans une prise
polarisée. Si la fiche ne s’insère pas complètement dans la prise, tenter de la retourner. Si elle ne convient toujours pas, contacter un électricien. Ne jamais utiliser une rallonge qui ne permet
pas d’insérer complètement la fiche. Ne pas tenter de désactiver ce dispositif de sécurité.
In Tank
Horizontal
Mount
Multiple EXT for
Larger Aquariums
4
6
3
1
1
4
INSTRUCTIONS
AND WARRANTY
6
Water
Direction
2
MODE D’EMPLOI
ET GARANTIE
5
Precauciones importantes
Advertencia: Para evitar lesiones,se deben tomar precauciones básicas de seguridad, incluyendo las siguientes.
Lea Y Cumpla todas las instrucciones de seguridad
PELIGRO: Para evitar una posible descarga eléctrica, se debe tener especial cuidado al usar los equipos de la pecera. En las siguientes situaciones, no intente realizar las reparaciones usted mismo.
Envíe el dispositivo a un centro de servicio autorizado para que realicen el servicio o deséchelo.
1. A. Si el dispositivo muestra alguna señal de pérdida de agua anormal, desconéctelo de inmediato de la corriente eléctrica. B. Examine con cuidado el dispositivo después de la instalación. No
debe enchufarse si hay agua en las partes que no deben mojarse. C. No ponga en funcionamiento ningún dispositivo si el cable o el enchufe están dañados o si no funciona bien o si se cayó
o tiene cualquier otro tipo de daño. D. Para evitar la posibilidad de que el enchufe del dispositivo o el receptáculo se mojen, coloque la base y la pecera a un costado del enchufe en la pared
para evitar que el agua gotee hacia el receptáculo o el enchufe. El usuario debe formar un “bucle de cable” (fig. 10) por debajo del enchufe en todos los cables que conectan un dispositivo de
la pecera con un enchufe. El “bucle de cable” es la parte del cable que queda por debajo del nivel del receptáculo o de la conexión, en caso de que se use un cable de alargue, para evitar que
el agua corra por el cable y entre en contacto con el enchufe. Si el enchufe o el receptáculo se mojan, NO desenchufe el cable. Desconecte el fusible o el interruptor de circuito que suministra
electricidad al dispositivo. Luego desenchufe y examine para controlar que no haya agua en el enchufe.
2. Es necesario vigilar con cuidado cuando los niños utilicen o estén cerca de cualquier dispositivo.
3. Para evitar lesiones, no toque partes en movimiento o calientes como calentadores, reflectores, focos de luz, etc.
4. Siempre desenchufe un dispositivo de la toma de corriente cuando no esté en uso, antes de colocar o quitar alguna parte y antes de limpiarlo. Nunca jale el cable para desconectar de la toma
de corriente. Tome el enchufe y jale para desconectar.
5. No use un dispositivo para un propósito para el que no fue diseñado. El uso de accesorios que no sean los recomendados o vendidos por el fabricante del dispositivo pueden provocar
condiciones inseguras.
6. No instale ni guarde el dispositivo donde esté expuesto a las condiciones climáticas o a temperaturas por debajo del punto de congelación.
7. Asegúrese de que cualquier dispositivo colocado en la pecera esté instalado de manera segura antes de hacerlo funcionar.
8. Lea y cumpla todos los avisos importantes sobre el dispositivo.
9. Si es necesario un cable de alargue, se debe usar un cable con las características adecuadas. Un cable adecuado para una menor cantidad de amperes o vatios que los que el dispositivo necesita
puede recalentarse. Se debe tener cuidado de ubicar el cable de manera que no puedan tropezar con él o jalarlo.
10. Este dispositivo tiene un enchufe polarizado (una clavija es más ancha que la otra). Como medida de seguridad, este enchufe entrará en una toma de corriente polarizada solamente de una
manera. Si el enchufe no entra completamente en la toma de corriente, dé vuelta el enchufe. Si continúa sin entrar, comuníquese con un electricista calificado. Nunca use el dispositivo con un
cable de alargue a menos que el enchufe se pueda insertar completamente. No intente pasar por alto esta medida de seguridad.
INSTRUCCIONES
Y GARANTIA
7
7
Intake
8
3
9
www.CobaltAquatics.com
803.591.9500
10