1
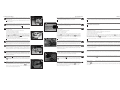
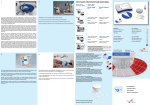
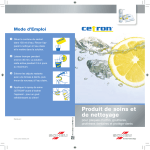
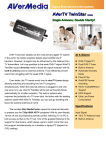
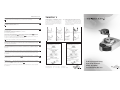
Instrucciones de uso
Posicionar la TWINSTAR V encima de un puesto suficientemente amplio, de tal modo que el emisor de rayos
infrarrojos y el anillo de vacío se puedan mover libremente en todas direcciones hasta el final.
No dejar materiales fácilmente inflamables debajo o cerca del emisor de rayos infrarrojos.
®
El enchufe de corriente con dos fusibles incorporados se encuentra en la parte posterior del aparato; el
cable adjunto se conecta a la corriente eléctrica.
Atención: según red de corriente.
TWINSTAR® V
empfohlene Indikationen / recommended applications:
Die neue TWINSTAR ®-Serie bietet Einsteigern in die
Tiefziehtechnik ein ausgesuchtes Folienprogramm in
den Stärken von 0,1 bis 3,0 mm und Zubehör für viele
nützliche Anwendungsmöglichkeiten in der täglichen
Arbeit in Praxis und Labor.
The new TWINSTAR® machines offer beginners in dental
thermo forming a well selected range of foils and blanks
in thicknesses between 0.1 – 3.0mm and accessories
for a bundle of useful applications for the daily work in
the dental office or laboratory.
La TWINSTAR® V tiene los siguientes elementos de manejo:
Interruptor ON/OFF
Pantalla para el control del tiempo de calentamiento y enfriamiento
Tecla para activar el emisor de rayos infrarrojos
Tecla de interrupción del vacío
Retentionsschienen /
Retainer Splints
Bleichschienen /
Bleaching Tray
Individuelle Löffel /
Individual Tray
Mundschutz /
Mouthguard
Material: DURAN ®
Material: COPYPLAST ® oder / or
BIOPLAST ® bleach
Material: IMPRELON ®, klar oder opak /
clear or opaque
Material: BIOPLAST ® (transparent/farbig) /
(transparent/colour)
Provisorien /
Temporaries
Schienen /
Splints
Invisible Retainer /
Invisible Retainer
Schienenprovisorien /
Temp. Splints
Material: COPYPLAST ®
Material: DURAN ®, DURASOFT ® oder /
or IMPRELON ® S
Material: COPYPLAST ® C
Material: DURAN ®
Activar el aparato con la tecla iluminada ON/OFF. En el modo inicial se visualiza en la pantalla
, para activar
el emisor de rayos infrarrojos pulsar la tecla
. Durante la fase de calentamiento, la pantalla parpadea aproximadamente 1 minuto y señala que está lista para trabajar: indicación
.
Por motivos de seguridad, el emisor se apaga automáticamente después de aproximadamente 3 minutos en el
caso que no se caliente una plancha, deberá ser activado de nuevo.
Atención: peligro de quemaduras, el emisor de rayos infrarrojos y su brazo aumentan de temperatura.
Posicionar solamente planchas redondas con un diámetro de 125 mm y un espesor de 0,1 hasta 3,0 mm en el
anillo de vacío y colocar el anillo de cierre de tal forma que los ganchos de bayoneta encajen en las asas
de anillo de vacío. El anillo de balance en el anillo de vacío debe tener una cierta flexibilidad para poder trabajar
con los distintos grosores de planchas.
Cerrar la taza con la plataforma para modelos sobre la cual se posicionan los modelos cuando utilizamos el
ISOFOLAN® igual que planchas elásticas como BIOPLAST® o COPYPLAST®. Para el uso de planchas rígidas (por
ejemplo DURAN® o IMPRELON®) los modelos se introducen en el granulado . Sacar la plataforma para modelos
en este caso.
Girando el emisor de rayos infrarrojos sobre la plancha se activa el controlador del tiempo de calentamiento
recomendado. Después de haber alcanzado el tiempo requerido, volver el emisor a su posición de reposo y girar
el anillo de vacío 180º a la derecha y presionarlo sobre el anillo. La pantalla indica automaticamente el tiempo
de enfriamiento.
Advertencia: la señal
indica que el emisor de rayos infrarrojos o el anillo de vacío no se encuentran
en su posición de reposo. Si no se interrumpe el vacío después de 180 segundos, el proceso de descarga
comienza automáticamente. La pantalla lo señala a través de
.
Technische Änderungen, die dem Fortschritt dienen, vorbehalten!
Technical Modification, which serve for improvement, are subject to our agreement!
Verificar que la superficie de reflexión debajo del anillo de vacío esté siempre limpia, sino se reduce la capacidad
de calentamiento.
SCHEU-DENTAL GmbH
www.scheu-dental.com
phone +49 23 74 92 88-0
fax
+49 23 74 92 88-90
Am B urgberg 20
58642 Iserlohn . Germany
D/E/F/S 46.01/3.000/12/07 G REF 0154.1
Después de la fase de enfriamiento recomendada (tiempo mínimo 20 seg.) descargar con la tecla
. 3 segundos
después de la descarga de vacío, la pantalla visualiza
. Girar el anillo de cierre hacia la izquierda y abrir
el anillo de vacio .
Bedienungsanleitung
Operation Manual
Mode d’emploi
Instrucciones de uso
Bedienungsanleitung
Operation Manual
Stellen Sie das TWINSTAR® V auf einen ausreichend großen Platz, sodass
Strahler und Vakuumring in alle Richtungen bis zum jeweiligen Anschlag
frei beweglich sind.
Vermeiden Sie brennbare oder leicht entzündliche Materialien im Schwenkbereich des Strahlers.
Place the TWINSTAR® V on a level work surface allowing sufficient space to
operate the heater and vacuumring .
Avoid placing inflammable material close to the heater.
An der Geräterückseite befindet sich die Netzsteckdose mit zwei integrierten
Sicherungen ; das beiliegende Netzkabel verbinden Sie mit der entsprechenden Stromquelle, Netzspannung beachten.
Das TWINSTAR® V hat folgende Bedienelemente:
Ein-/Ausschalter
Display zur Kontrolle von Heizzeiten bzw. Abkühlzeiten
Taster für das Aufheizen des Strahlers
Taster für das Beenden des Vakuums
Das Gerät wird über den beleuchteten Ein-/Ausschalter aktiviert. Im Grundmodus zeigt das Display
, zum Aktivieren des Strahlers drücken Sie den
Taster
. Das Display blinkt während des Aufheizens für ca. 1 min und signalisiert Betriebsbereitschaft durch die Anzeige
. Wird keine Folie beheizt,
schaltet sich der Strahler aus Sicherheitsgründen automatisch nach ca. 3 min.
ab und muss dann wieder neu aktiviert werden.
Achtung Verbrennungsgefahr, Strahler und Strahlerarm werden heiß.
Im Vakuumring werden ausschließlich runde 125 mm Folien in der Stärke 0,1
bis 3,0 mm positioniert und mit dem Bajonett des Verschlussringes festgesetzt.
Verriegeln erfolgt durch Drehung nach links. Der Ausgleichsring im Vakuumring
muss leicht gängig sein, um die unterschiedlichen Folienstärken auszugleichen.
Der Modelltopf wird durch die Modellstützplatte verschlossen. Auf dieser
werden Modelle positioniert bei der Verwendung von ISOFOLAN® sowie weichelastischen Platten wie BIOPLAST® oder COPYPLAST®. Bei allen hartelastischen
Folien (z.B. DURAN ® oder IMPRELON ® ) werden die Modelle direkt in
Granulat eingebettet. In diesem Fall bitte die Modellstützplatte entnehmen.
Das Schwenken des Strahlers über die Folie aktiviert den Timer zur Kontrolle
der empfohlenen Heizzeit. Nach Erreichen der empfohlenen Heizzeit wird der
Strahler zurück in die Ruhestellung bewegt, der Vakuumring um 180° nach
rechts geschwenkt und auf den O-Ring gedrückt. Auf dem Display startet
automatisch die Abkühlzeit.
Mit Hilfe des Tasters
wird das Vakuum nach Ablauf der empfohlenen Abkühlzeit
(Mindestabkühlzeit 20 Sekunden) aufgehoben. Nach 3 Sekunden zeigt das Display
. Der Verschlussring wird nach links geschoben und der Vakuumring kann
geöffnet werden.
Hinweis: Die Anzeige
signalisiert, dass Strahler oder Vakuumring nicht
in der Ruheposition stehen.
Wird das Vakuum nicht innerhalb von 180 Sekunden aufgehoben, erfolgt
der Vorgang automatisch. Dieses wird im Display durch
angezeigt.
Achten Sie bitte auf saubere Reflexionsflächen unter dem Vakuumring, da
ansonsten die Heizleistung beeinträchtigt wird.
ON/OFF switch
Panel indicating heating/cooling time
Button to activate the heater
Button to stop the vacuum
The machine is activated by using the illuminated ON/OFF switch. The initial
mode is
. Push the button
for activating the heater. The display
flashes during heating time for appr. 1 minute. Display
indicates that
the machine is ready to operate. If the heater is not used within 3 minutes,
the heater switches off automatically for safety reasons. Then it has to be
activated again.
Heater and heater arm become very hot; avoid touching them.
Only round foils and plates 125 mm diameter in a thickness of 0,1 – 3,0 mm
can be placed on the vacuum ring and clamped with the bayonet of the
locking ring . Close by turning to the left. The balancing ring in the vacuum
ring has to be flexible to balance the different thicknesses of the foils.
The model cup is closed by the model platform on which models are placed
when using ISOFOLAN ® or soft elastic plates such as BIOPLAST ® and
COPYPLAST ® . When working with hard elastic foils (e.g. DURAN ® or
IMPRELON®), the models are directly embedded in the pellets . In the latter
remove the model platform.
Swivelling the heater over the foil activates the controller for the recommended
heating time. After the end of the heating process, the heater should be turned
to the back. Turn the vacuum ring 180° to the right and press it on the
O-ring. The display indicates the cooling time automatically.
Placer l’appareil TWINSTAR V de façon à ce que la lampe à infrarouge et l’anneau soient bien amovibles
jusqu’en butée ( la résistance ne doit pas taper contre le mur ou un meuble).
Eviter les matériaux combustibles et facilement inflammables dans l’axe de pivotement de la lampe à infrarouge.
Au dos de l’appareil se trouve la prise de courant avec deux fusibles intégrés . Relier le câble électrique joint
avec la source de courant correspondant.
Prêter attention au tension du secteur.
The TWINSTAR® V has the following operating elements:
The plug with two integrated fuses is on the back of the machine.
Connect the enclosed mains cable to the corresponding power supply.
Pay attention for correct current voltage.
Mode d’emploi
®
After the recommended cooling time (Minimum cooling time 20 seconds)
cancel the vacuum with the
button. After 3 seconds the display indicates
. Then turn locking ring to the left and open the vacuum ring .
L’appareil TWINSTAR® V - les éléments de réglage:
Interrupteur marche/arrêt
Afficheur pour le contrôle du temps de chauffage/temps de refroidissement
Touche pour la chauffe de la lampe à infrarouge
Touche pour interrompre le vide
L’appareil est activé par l’interrupteur marche/arrêt. Dans le mode initial l’afficheur indique
, pour activer la
lampe à infrarouge presser la touche
. L’écran clignote pendant la phase de chauffe soit env. 1 min, il signale
qu’il est prêt à être utilisé par l’affichage
. Si aucune plaque n’est chauffée, la lampe à infrarouge s’éteint
automatiquement après env. 3 min. pour des raisons de sécurité.
Attention: risque de brûlures – lampe à infrarouge et bras de la lampe à infrarouge deviennent très chauds.
Positionner dans l’anneau uniquement les plaques rondes d’un diamètre de 125 mm des épaisseurs 0,1-3,00
mm qui seront fixées à l’aide de l’anneau de fermeture . Le verouillage s’effectue en tournant a gauche
L’anneau d’ajustage dans l’anneau de vide doit être libre afin d’équilibrer les épaisseurs différents.
La cuve est fermée par la plateforme à modèle . En utilisant de l’ISOFOLAN® ainsi que des plaques molle-élastiques
comme le BIOPLAST® ou le COPYPLAST® on positionnera les modèles sur cette plateforme. En utilisant toute plaque
dur-élastique comme le DURAN® et l’IMPRELON® on enrobera les modèles directement dans les billes . Dans
ce cas-là, enlever la plateforme.
En pivotant la lampe à infrarouge sur la plaque le timer pour le contrôle du temps de chauffe recommandé est
activé. Le temps de chauffe écoulé, la lampe à infrarouge est pivotée dans la position de repos et l’anneau est
pivotée de 180 ° à droite sur le joint torique. Sur l’écran le temps de refroidissement démarre automatiquement.
Après la phase de refroidissement (minimum 20 sec.) le vide est interrompu a l’aide de la touche
. 3 sec. après
l’évacuation l’affichage indique
et l’anneau peut être ouverte en glissant à gauche l’anneau de fermeture .
Hint: The display
signals that the heater and the vacuum ring are
not in rest position. If the vacuum is not reduced within 180 seconds, the
procedure starts automatically. This is indicated by
in the display.
Take care that the reflectance areas under the vacuum ring are clean
otherwise the heating power is reduced.
Astuce: L’affichage
signale que la lampe à infrarouge ou l’anneau ne se trouvent pas en position de repos.
Si le vide n’est pas interrompu dans les 180 séc., ce processus s’effectue automatiquement, ce qui est indiqué sur
l’écran par
.
Veiller à ce que les surfaces de réflexion dans la cuve soient propres car autrement il y auraient des effets négatifs
sur la chauffe.