1
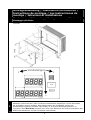
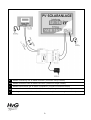
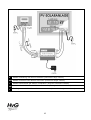
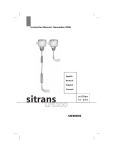
Groß-Displays für Solaranlagen
Large Display Units for Solar Systems
Des grands-displays pour des systèmes solaires
Los Despliegues grandes para Systems Solar
Unità di Display grandi per Sistemi Solari
Ansteuerung durch den SMA Sunny Boy Control oder durch
Elektrizitätszähler mit Impulsausgang
Driven by SMA Sunny Boy Control or by electricity Counters with S0Output
Contrôlé par le SMA Sunny Boy Control ou par des compteurs d’ électricité
avec sortie d’ impulsion
Manejado por SMA Sunny Boy Control o por los Contadores de
electricidades con el S0-rendimiento
Guidato da SMA Sunny Boy Control o da Casse di elettricità con S0produzione
Gebrauchs- und Montageanweisung
Instruction Manual
Mode d’ emploi
El Manual de la instrucción
Manuale di istruzione
Version 01/05
Sicherheitshinweise / Safety Instructions/ Instructions de sécurité
/ Las Instrucciones de Seguridad / Istruzioni di sicurezza
•
•
•
•
•
•
D
•
•
•
•
•
•
•
•
GB
•
•
•
•
•
•
•
•
F
•
•
•
•
•
Beim Betrieb der Anlage steht das Display unter elektrischer Spannung. Es können
Gefährdungen durch elektrische Energie entstehen.
Es ist strikt untersagt, das Display während des Betriebes an Netzspannung zu
öffnen bzw. manuelle Eingriffe vorzunehmen.
Die netzseitige Zuleitung zum Display ist mit einer 16A-Sicherung abzusichern.
Bei Funktionsstörungen bzw. vor Öffnen des Gehäuses, ist das Display von der
Netzspannung zu trennen.
Unsachgemäßer oder nicht bestimmungsgemäßer Gebrauch ist untersagt.
Die Installation und Inbetriebnahme darf nur von Personen mit entsprechender
fachlicher Ausbildung und Kenntnis der einschlägigen Normen vorgenommen
werden.
Bitte beachten Sie bei der Installation eines Displays im Außenbereich mit einem
Gehäuse der Schutzart IP65, daß die Installation nur bei trockenem Wetter
vorgenommen werden darf, da ansonsten bei der Installation Feuchtigkeit in das
Gehäuse gelangt, die zu Korrosionsschäden führen kann.
Ergänzend zu dieser Montageanweisung sind alle allgemeingültigen gesetzlichen und
sonstigen verbindlichen Regelungen zur Unfallverhütung z.B.
Unfallverhütungsvorschriften zu beachten.
Das Display dient ausschließlich zur Anzeige von Daten, die durch das
angeschlossene Sunny Boy Control zur Verfügung gestellt werden.
Für Schäden, die aus einer nicht bestimmungsgemäßen Verwendung herrühren,
haftet der Hersteller nicht.
The display unit will be connected to the mains when in operation. Please be aware
of electrical shocks especially when the front lid is open.
It is not allowed to open the front lid of the display unit whilst in operation.
The mains of the display unit have to be protected by a 16 A fuse.
In case of malfunction, before opening the case the display unit has to be
disconnected from the mains.
Installation and setting to operation must only be done by electrical engineers or
persons with an equal state of knowledge according to the current electrical norms.
Please note that a display unit with an IP65-case which gets installed outside, can
only be installed when the whaether is dry. In any other case humidity will be
enclosed in the case which will lead to corrosion.
The display unit is only built to display the data coming from the Sunny Boy Control
unit or the pulse output of the electricity counter.
The producer will in no case be responsible for any damages resulting from a
misuse of the display unit whatsoever.
Le display est sous potentiel électrique quand l’appareil est en marche. Il se peut
qu’il y ait des dangers à cause d’ énergie électrique.
Il est interdit d’ouvrir le display ou de faire des interventions manuelles pendant que
l’ appareil est en service et sous tension de secteur.
Le câble du branchement sur le secteur doit être protégé par un plomb (16-A).
Au cas de dérangements de fonction ou avant d’ ouvrir l’ appareil, le display doit
être séparé de la tension de secteur.
Il est interdit d’utiliser l’appareil d’ une façon inadéquate et hors de détermination.
L’ installation et la mise en service ne doivent être exécutées que par des personnes
qui ont le savoir et la formation technique.
A part de cette instruction tous les autres règlements d’ éviter des accidents
universellement reconnus et conforme à la loi doivent être respectés.
Le display n’est fait que pour montrer des données qui sont mises à la disposition
du « Sunny Boy Control ».
Le producteur n’ est pas responsable des dommages qui sont produits par un usage
inadéquat.
2
•
•
ES
•
•
•
•
•
•
•
I
•
•
•
La unidad del despliegue se conectará al conductores principales cuando en el
funcionamiento. Por favor sea sobre todo consciente de descargas eléctrica cuando
la tapa delantera está abierta.
No se permitía abrir la tapa delantera de la unidad del despliegue aunque en el
funcionamiento.
El conductores principales de la unidad del despliegue tiene que ser protegido por
un 16 UN fusible.
En el caso de funcionamiento defectuoso, antes de abrir el caso la unidad del
despliegue tiene que ser desconectado del conductores principales.
La instalación sólo debe hacerse por ingenieros eléctricos o personas con un estado
igual de conocimiento según las normas eléctricas actuales.
El productor es en ningún caso sea responsable de cualquier daño y perjuicios que
es el resultado en absoluto de un mal uso de la unidad del despliegue.
L’unità di display grande sarà connessa al collegato alla rete quando in operazione.
Per favore sia consapevole di colpi elettrici specialmente quando il coperchio
anteriore è aperto.
Non è permesso per aprire il coperchio anteriore di display grande mentre in
operazione.
I collegato alla rete di display grande devono essere protegguti entro un 16 Un
fusibile.
In caso di malfunzionamento, prima di aprire il caso l’unità di display grande deve
essere disconnesso dal collegato alla rete.
Installazione e mettendo ad operazione deve essere fatto solamente da ingegneri
elettrici o persone con un stato uguale di conoscenza secondo le norme elettriche e
correnti.
Il produttore è in nessun caso responsabile per alcuni danni che sono il risultato di
qualsiasi un cattivo uso dell'unità di mostra.
3
Montageanweisung / Installation Instructions /
Instructions de montage / Las instrucciones de
montaje / Istruzioni di installazione
Wandmontage / Wallmounting / Montage sur le mur / Montando /
Montaggio parietale
ProLine
D
Zum Öffnen des ProLine Gehäuses müssen zunächst die Eckkappen der Kederleisten durch
Abhebeln entfernt werden. Dann werden die Kederleisten abgezogen und die Schrauben
der Frontplatte werden sichtbar. Nach Abschrauben der Frontplatte, werden die
Wandbefestigungslöcher sichtbar. Das Display ist an diesen Befestigungslöchern zu
montieren. Beim BasicLine Gehäuse kann man nach Entfernen der unteren Schrauben das
Rahmenteil abnehmen und die Frontplatte herausziehen.
4
GB
To open the ProLine case, please first remove the rubber frame which covers the screws.
After unscrewing all screws and removing the front panel the holes in the back, on which
the unit can be mounted to the wall, will come to sight. Please mount the display unit
through these holes. At the BasicLine case the screws must be unscrewed to take of the
frame element and to slide out the front panel.
F
Pour ouvrir l’ appareil ProLine vous devez d’ abord enlever les chapes de coins des
moulures. Si vous enlevez les moulures les vis du plateau du front deviennent visible.
Après avoir dévissé le plateau du front vous voyez les trous qui servent à accrocher l’
appareil sur le mur. Le display doit être monté par ces trous. A l’appareil BasicLine les vis
doivent être dévissées prendre de l'élément du cadre et glisser dehors le tableau frontal.
ES
Para abrir el ProLine caso, agrade primero quite el marco de caucho que cubre los tornillos.
Detrás de destornillar todos los tornillos y quitar la calandra los agujeros en la parte de
atrás ver vendrán. Por favor monte el despliegue a través de estos agujeros. Al despliegue
de BasicLine los tornillos deben destornillarse tomar del elemento del marco y resbalar
fuera la calandra.
I
Aprire il ProLine caso, prima accomodi rimuova la cornice di gomma che copre le viti. Dopo
svitando tutte le viti ed avere rimosso il pannello anteriore i buchi nella schiena sulla quale
l'unità può essere montata al muro, verrà ad avvistare. Per favore monti l’unità di display
grande attraverso questi buchi. Alla mostra di BasicLine le viti devono essere svitate
prendere dell'elemento di cornice e scivolare fuori il pannello anteriore.
BasicLine
Wandbefestigung
Wallmounting
5
Anschlussleitungen / Cable connection / Câbles de branchement /
La conexión del cable / Collegamento del cavo
D
Zur Durchführung der Anschlußleitungen in das Gehäuse müssen je nach baulichen
Gegebenheiten (Anschluß durch die Rückwand oder Seitenwände) ein oder zwei
Durchführungslöcher gebohrt werden. Bei Bedarf können hier handelsübliche PGVerschraubungen eingesetzt werden. ACHTUNG: Beim ProLine-Gehäuse müssen alle
Öffnungen wieder verschlossen werden (z.B. durch Anwendung von Silikon) um den IP65Standard zu gewährleisten!
GB
For connection of the mains and the data cable please drill a hole into the case at the
position required according to your application.
F
Pour que les câbles de branchement puissent être traversés, vous devez perçoir un ou
deux trous dans la boîte (la quantité des trous dépend des conditions de construction:
servitudes par le mur en arrière ou les murs de côté). S’ il en est besoin des vissages
protégeant contre humidité en usage dans le commerce peuvent être utilisés.
ES
Para la conexión del conductores principales y los datos por favor cablegrafie un agujero al
taladro en el caso.
I
Per il collegamento dei collegato alla rete ed i dati per favore provveda di un cavo un buco
trapano nel caso.
Elektrischer Anschluß / Electrical Installation /
Branchement électrique / La Instalación eléctrica
/ Installazione elettrica
Anschluß der Datenleitung / Connection of the data cable /
Branchement des câbles de donées / La conexión del cable del
datos / Il collegamento del cavo di dati
D
Beim Anschluß der Datenleitung gibt es verschiedene Varianten, die im folgenden
beschrieben werden:
GB
For connection of the data cable please find below the different connection-versions:
F
Dans le suivant vous trouvez des descriptions des possibilités différentes pour brancher les
câbles de données:
ES
Para la conexión del cable del datos por favor el hallazgo debajo de las conexión-versiones
diferentes:
I
Al congiungimento della guida di dati, ci sono differenti varianti che sono descritte nel
seguente:
6
57 mm / 100 mm:
20 mm:
7,5 VDC
SteckerNetzteil /
Power-Supply
RS232
GND
Ub+
GND
230VAC
9-Pin Sub-D
3
5
RS 232
Output
230VAC
D
GB
F
ES
I
RS232 Direktverbindung (maximale Länge 12m)
RS232 direct connection (maximum length 12m)
RS 232 branchement direct (longueur maximale 12 m)
RS232 conexión directa (la longitud 12m máxima)
RS232 collegamento diretto (il massimo lunghezza 12m)
7
57 mm / 100 mm:
12.75
Ertrag
9-Pin Sub-D
3
RS 485
Output
8
428765
25 -P in Su b- D
RS485/232-Umsetzer
RS485/232-Converter
TxON
RxON
T-RTS
R-RTS
T-RTS
RxON
DCE
DTE
MONI
(RTS)
4 3 2 1
L1
N
PE
Leistung
230VAC
230VAC
20 mm:
7,5 VDC
SteckerNetzteil /
Power-Supply
RS485-2
RS232
Ub+
GND
230VAC
9-Pin Sub-D
3
8
RS 485
Output
230VAC
D
GB
F
ES
I
RS485 Direktverbindung (maximale Länge 1200m)
RS485 direct connection (maximum length 1200m)
RS485 branchement direct (longueur maximale 1200 m)
RS485 conexión directa (la longitud 1200m máxima)
RS485 collegamento diretto (il massimo lunghezza 1200m)
8
D
GB
F
ES
I
RS485 Verbindung mit IC-485S-Umsetzer (maximale Länge 1200m)
RS485 connection with IC-485S-Converter (maximum length 1200m)
RS485 branchement par IC-485S-compilateur (longueur maximale 1200m)
La conexión de RS485 con el CI-485S-conversor (la longitud 1200m máxima)
Il collegamento di RS485 con IC-485S-convertitore (il massimo lunghezza 1200m)
9
D
GB
F
ES
I
RS485 Verbindung mit Phönix-Umsetzer (maximale Länge 1200m)
RS485 connection with Phönix-Converter (maximum length 1200m)
RS485 branchement par Phönix-compilateur (longueur maximale 1200m)
La conexión de RS485 con el Phönix-conversor (la longitud 1200m máxima)
Il collegamento di RS485 con Phönix-convertitore (il massimo lunghezza 1200m)
10
D
GB
F
ES
I
RS485 Verbindung mit 2 x IC-485S-Umsetzer (maximale Länge 1200m)
RS485 connection with 2 x IC-485S-Converter (maximum length 1200m)
RS485 branchement par 2 x IC-485S-compilateur (longueur maximale 1200m)
La conexión de RS485 con 2 x CI-485S-conversor (la longitud 1200m máxima)
Il collegamento di RS485 con 2 x IC-485S-convertitore (il massimo lunghezza 1200m)
11
57 mm / 100 mm:
20 mm:
7,5 VDC
SteckerNetzteil /
Power-Supply
PE
N
L1
230VAC
Pulse
Output
D
GB
F
ES
I
20
21
Impulseingang (S0-Schnittstelle)
Pulse-input (S0-Interface)
Entrée d’ impulsion (S0-Lieu d’ intersection)
El pulso-entrada (la S0-interfaz)
Pulsare-connetta (S0-connetta)
12
IMP2
Ub+
GND
IMP1
486241
Anschluß der Netzleitung / Connection of mains /
Branchement sur le secteur / La conexión de conductores
principales / Collegamento di collegato alla rete
D
Zum netzseitigen Anschluß müssen L1 (Phase), N (Nulleiter) und PE (Schutzleiter) mit dem
Stromnetz verbunden werden, bzw. bei Displays mit Steckernetzteil das Steckernetzteil
eingesteckt werden.
GB
For mains connection L1 (Phase), N (Neutral) and PE (Protection Earth) have to be
connected to the grid. If the display gets delivered with a plug in power supply, this has to
be plugged in at both sides.
F
Pour le branchement sur le secteur L1 (Phase), N (Terre) et PE (Protection terre) doivent
être raccordés avec le secteur. Si le display est délivrée avec un plug-in-power-supply, cela
doit être branché à les deux côtés.
ES
Para la conexión del conductores principales L1 (la Fase), NO (el Neutral) y PE (la Tierra de
Protección) tiene que ser conectado a la reja. Si el despliegue se entrega con un plug-inpower-supply, esto tiene que ser tapado en a ambos lados.
I
Per il collegamento collegato alla rete L1 (la Fase), N (Neutrale) e PE (Terra di Protezione)
debba essere connesso alla griglia. Se la mostra è consegnata con una plug-in-powersupply, questo deve essere collegato in ad ambo i lati.
Hinweis / Notice / Indication / El aviso / Avviso
D
Beim ersten Einschalten des Displays oder nach einer Unterbrechung der Netzspannung
gehen die Anzeigeelemente in einen undefinierten Zustand. Sobald jedoch die ersten
Daten vom Sunny Boy Control empfangen werden, bzw. der erste Impuls vom
Impulszähler kommt, erfolgt eine korrekte Darstellung auf den Anzeigeelementen. Der
jeweils zuletzt empfangene Wert wird solange auf der Anzeige dargestellt, bis ein neuer
Wert empfangen wird. Beim Display mit 20mm Ziffernhöhe ist jedoch wichtig, dass nach
dem Einschalten zunächst nur Minuszeichen (- - - -) auf allen Anzeigen angezeigt werden.
Falls dies nicht der Fall ist, wiederholen Sie bitte den Einschaltvorgang.
GB
At first initialisation of the display unit or after a breakdown of the power supply, the
digits will show random figures until the first data is received either from the Sunny Boy
Control unit or from the pulse counter. The value received the last will be displayed until a
new value is sent to the unit. For the 20mm display it is very important, that all Displays
show minus (- - - -) when initialised. If this is not the case, please do the initialisation
again.
F
Si vous mettez en marche le display pour la première fois ou si vous interrompez le
voltage du secteur les éléments d’ indication sont dans un état indéfini. Dès que les
premières données du Sunny Boy Control ou la première impulsion du compteur d’
impulsion sont reçues une présentation correcte arrive sur les élements de présentation.
La dernière valeur reçue est indiquée jusqu’ à ce que une nouvelle valeur est reçue. Pour
le 20mm display c'est très important, que toutes les displays montrent moins (- - - -)
quand a initialisé. Si ce n'est pas le cas, s'il vous plaît faites encore l'initialisation.
ES
Al principio initialisation de la unidad del despliegue o después de una avería de la
alimentación eléctrica, los dedos mostrarán las figuras aleatorias hasta que el primer
datos o se reciba del Sunny Boy Control o del contador del pulso. El valor recibido el
última voluntad se despliegue hasta que un nuevo valor se envíe a la unidad. Para el
20mm despliegue es muy importante, que todos los Despliegues muestran menos (- - - -)
cuando inicializó. Si éste no es el caso, por favor haga el initialisation de nuevo.
I
Per prima initialisation di display grande o dopo un guasto dell'alimentazione elettrica, le
cifre mostreranno figure casuali finché il primo dati o è ricevuto dal Sunny Boy Control
l'unità o dal batta cassa. Il valore ricevette gli ultimi saranno esposti finché un valore
nuovo è spedito all'unità. Per la mostra del 20mm è molto importante, che tutte le Mostre
mostrano meno (- - - -) quando inizializzò. Se questo non è il caso, per favore faccia di
nuovo l'initialisation.
13
Konfiguration des Sunny Boy Control /
Sunny Boy Control Configuration / Configuration du Sunny
Boy Control / La Configuración de Sunny Boy Control /
Configurazione dal Sunny Boy Control
Zur Aktivierung der Groß-Display-Ansteuerung durch das "Sunny Boy Control" aktivieren
Sie bitte den Menuepunkt Einstellungen im Hauptmenue des "Sunny Boy Control".
Zur Absicherung vor unbefugtem Zugriff ist der Menuepunkt Einstellungen nicht wie
üblich durch die Entertaste, sondern nur nach Eingabe des folgenden Kennwortes
erreichbar:
ID00(Tag+Monat+Jahr) z.B.: am 17.11.01 ergibt sich: ID0029
D
Gehen Sie nun zum Menuepunkt Anschlüsse und danach zum Menuepunkt Grossdisplay.
Aktivieren Sie nun im Menuepunkt Grossdisplay die Schnittstelle durch die Entertaste und
wählen Sie den Typ HvG aus.
Bei aktivierter Schnittstelle erscheint unterhalb des Parameters !Schnittstelle die
Anzeige COM2:PC.
Umgekehrt bei deaktivierter Schnittstelle steht hier deaktiviert.
Nun sendet das "Sunny Boy Control" seine Daten an das Groß-Display.
To configure the Sunny Boy Control unit for display mode go to the menu Settings in the
main menu of the Sunny Boy Control.
To prevent unauthorised adjustments of important parameters, this area of the Sunny Boy
Control software is protected by the following password:
ID00(Day+Month+Year) for example at the date 17.11.01 the password would
be: ID0029
GB
Go to the menu Interfaces and after that to the menu Ext. Display.
Activate the menu Ext. Display by pressing the Enter button. Choose HvG as the type of
display.
If the interface has been activated properly underneath the parameter Ext. Display you
will find COM2:PC.
On the other hand, if the interface has not been activated you will find deactivated there.
Now the Sunny Boy Control will send its data to the large display unit.
Pour activer le contact entre le grand-display et le Sunny Boy Control activez le point de
menu Ajustements dans le menu principal du « Sunny Boy Control ».
Pour éviter un accès non permis le point de menu « Ajustements » n’est pas accessible par
la touche « enter » mais après avoir mis le mot de passe suivant :
F
ID00 (Jour+Mois+Année) par example le 17 Novembre 01 donne : ID0029
Venez au point de menu Servitudes et après au point de menu grand-display.
Activez le lieu d’ intersection dans le point de menu Grand-display par la touche enter et
choisissez le type HvG.
14
Si le lieu d’intersection est activé vous voyez sous le parameter -> Lieu d’ intersection l’
indication COM2 :PC.
Si le lieu d’ intersection n’est pas activé « déactivé » est indiqué.
Maintenant le Sunny Boy Control envoye ses données au Grand-display.
Configurar la unidad Sunny Boy Control para el modo de visualización van a las Escenas del
menú Settings en el menú principal del Sunny Boy Control.
Prevenir ajustes desautorizado de parámetros importantes, este área del software de
Sunny Boy Control es protegida por lo siguiente contraseña:
ID00(Day+Month+Year) por ejemplo a la fecha 17.11.01 la contraseña sería:
ID0029
ES
Vaya a las menú Interfaces y más atrás eso al menú Ext. Display.
Active el menú Ext. Display apretando el Entre en el botón. Escoja HvG como el tipo de
despliegue.
Si la interfaz ha sido propiamente debajo activada el parámetro Ext. Display que usted
encontrará COM2:PC.
Por otro lado, si la interfaz no ha sido activada que usted encontrará deactivated allí.
Ahora el Sunny Boy Control enviará sus datos a la unidad del despliegue grande.
Configurare il Sunny Boy Control per la modalità visualizzazione vada ai di menu Settings
nel menu principale del Sunny Boy Control.
Prevenire rettifiche non autorizzate di parametri importanti, questa area del software di
Sunny Boy Control è protegguta dalla parola d'ordine seguente:
ID00(Day+Month+Year) per esempio alla data 17.11.01 la parola d'ordine
sarebbe: ID0029
I
Vada alle menu Interfaces e dopo quell'al menu Ext. Display.
Attivi il menu Ext. Display. Scelga HvG come il tipo di display.
Se l'interfaccia propriamente è stata attivata sotto il parametro Ext. Display Lei troverà
COM2:PC.
D'altra parte se l'interfaccia non è stata attivata Lei troverà deactivated là.
Ora il Sunny Boy Control spedirà i suoi dati all'unità di display grande.
15
57/100mm
Display mit S0-Schnittstelle - Reset, Erstinbetriebnahme /
Display with S0-Interface - Reset, Initialisation /
Display avec S0-Lieu d’ intersection – Reset, Première
mise en marche /
Despliegue con la S0-interfaz - Restablezca, Initialisation /
Display con S0-connetta - Azzeramento, Initialisation
D
Bei erster Inbetriebnahme oder zum Rücksetzen des Displays (Achtung: Ertragswert wird
hierbei auf Startwert zurückgesetzt!) drücken Sie bitte die Reset-Taste auf der Rückseite
der oberen Baugruppe (i.d.R. Leistungsanzeige). Die Taste befindet sich bei Draufsicht von
oben unterhalb der ersten Ziffer (also ganz links) im unteren Drittel der Baugruppe.
GB
At initialisation or for resetting the display unit please press the Reset-button on the
backside of the upper electronic print (normally the Power-display). Please note that all
data related to “Total Energy” will be erased.
F
Pour mettre le display en marche pour la première fois ou pour annuler les données du
display (Attention : la valeur du revenu et remise à la valeur du commencement !) pressez
la touche « reset » au revers du groupe de construction (normalement l’ indication du
puissance). La touche se trouve sous le premier chiffre (tout à gauche) dans le bas tiers du
groupe de construction (si vous voyez de haut).
ES
Al initialisation o para el restablecimiento la unidad del despliegue por favor la prensa el
Restablecer-botón en la espalda de la tabla electrónica superior (normalmente el Powerdespliegue). Por favor note que todos los datos relacionaron a “la Energía Total” se borrará.
I
Ad initialisation o per azzeramento l’unità di display grande per favore la stampa
l'Azzerare-bottone sul didietro dell'asse elettronico e superiore (normalmente la Poteremostra). Per favore noti che tutti i dati riferirono “Energia Totale” sarà annullato.
16
Garantie / Warranty / Garantie / La garantía /
Garanzia
D
Der Hersteller gewährt auf dieses Produkt gegenüber Endverbrauchern eine Garantie von 2
Jahren und gegenüber Unternehmen eine Garantie von 1 Jahr ab Auslieferdatum. Diese
Garantie erstreckt sich auf Fehler des Gerätes, die eindeutig auf Produktions- oder
Bauteilfehler zurückzuführen sind. Fehler oder Schäden, die durch unsachgemäße
Benutzung des Gerätes verursacht werden, sind von der Garantie ausgeschlossen. Der
Hersteller übernimmt in keinem Fall irgendwelche Haftung für direkte oder indirekte
Schäden, insbesondere Schadensersatzansprüche aus positiver Vertragsverletzung sind
ausgeschlossen, sofern dies nicht zwingend gesetzlich vorgeschrieben ist.
GB
The producer grants a warranty period of 24 months for end customers and 12 months for
companies from date of purchase. This warranty is limited to failures of the unit which
clearly result from production failures or component failures. Failures or damages which
result from misuse are excluded from this warranty. Further or other claims for direct or
indirect damages, especially including claims from positive contract violation, are excluded
insofar as not otherwise compelling stated by law.
F
Le produit est sous garantie pendant les premiers 12/24 mois après la date de livraison. La
garantie couvre des erreurs de l’ appareil qui se ramènent à des erreurs de production ou
du groupe de construction. Des erreurs ou des dommages qui sont causés par l’utilisation
incorrecte ne font pas partie de la garantie. Dans ce cas le producteur n’ est pas
responsable pour des dommages directs ou indirects ; en particulier des demandes en
dommages-intérêts qui résultent des violations de contrat ne font pas partie de la garantie
si ce n’est pas ordonné exprès par les lois.
ES
El productor concede un periodo de la garantía de 12/24 meses de la fecha de compra.
Esta garantía se limita a los fracasos de la unidad que claramente el resultado de fracasos
de la producción o fracasos del componente. Se excluyen fracasos o daño y perjuicios que
son el resultado del mal uso de esta garantía. Más allá u otras demandas para directo o se
excluyen daños indirectos, sobre todo incluso las demandas de la violación del contrato
positiva, en la medida en que como compeler por otra parte no declaró por la ley.
I
Il produttore accorda un periodo di garanzia di 12/24 mesi da data di acquisto. Questa
garanzia è limitata a fallimenti dell'unità che chiaramente risultato da fallimenti di
produzione o fallimenti di componente. Fallimenti o danni che sono il risultato di cattivo uso
sono esclusi da questa garanzia. Richieste ulteriori o altre per danni diretti o indiretti,
specialmente incluso richieste da violazione di contratto positiva, è escluso pertanto come
costringendo altrimenti non affermò da legge.
17
Fehlerbehebung / Trouble-Shooting / Réparation
d’ erreurs / Problema-disparando / Rimozione di
errore
D
Bei Problemen mit der Installation oder der Inbetriebnahme sehen Sie sich bitte unsere
FAQ’s (Häufig gestellte Fragen) auf unserer Internet-Seite unter www.hvg-engineering.de
an. Die meißten Fragen klären sich hierdurch. Bei weiteren Fragen wenden Sie sich bitte
an:
HvG-Engineering
Tel.: + 49 / 21 51 / 65 99 832
Fax: + 49 / 21 51 / 75 71 01
e-mail: [email protected]
If you should have any problems with the installation or operation of the display unit please
refer to our FAQ’s (Frequently Asked Questions) at our website www.hvg-engineering.de.
Most of the questions will be answered there. If you still need advice please contact:
GB
F
ES
I
HvG-Engineering
Tel.: + 49 / 21 51 / 65 99 832
Fax: + 49 / 21 51 / 75 71 01
e-mail: [email protected]
Au cas des problèmes avec l’ installation ou la mise en marche voyez notre page dans l’
internet contenant les questions souvent posées : www.hvg-engineering.de. La plupart des
questions sont répondues sur cette page. Si vous avez des questions supplémentaires,
adressez-vous à :
HvG-Engineering
Tel.: + 49 / 21 51 / 65 99 832
Fax: + 49 / 21 51 / 75 71 01
e-mail: [email protected]
Si usted por favor debe tener cualquier problema con la instalación o funcionamiento de la
unidad del despliegue refiérase a nuestro FAQ (Frecuentemente Hizo las Preguntas) a
nuestro website www.hvg-engineering.de. La mayoría de las preguntas se contestará allí.
Si usted todavía necesita por favor que los consejos avisan:
HvG-Engineering
Tel.: + 49 / 21 51 / 65 99 832
Fax: + 49 / 21 51 / 75 71 01
e-mail: [email protected]
Se Lei per favore ha alcuni problemi con l'installazione od operazione della mostra assegni
al nostro FAQ (Frequentemente Fece Domande) al nostro website www.hvgengineering.de. La maggior parte delle domande saranno risposte là. Se Lei ancora ha
bisogno per favore di consiglio contatto:
HvG-Engineering
Tel.: + 49 / 21 51 / 65 99 832
Fax: + 49 / 21 51 / 75 71 01
e-mail: [email protected]
18