1
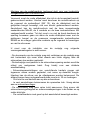
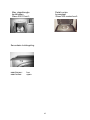
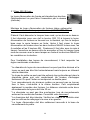
SAEY nv., Industrielaan 4,
8501 Kortrijk-Heule (Belgium)
tel. (56) 36.14.55 - fax (56) 36.15.10
Documentatie gericht aan
de gebruiker en installateur
april 2001
GEBRUIKSAANWIJZING
477.0020.XXX
477.0120.XXX
477.0520.XXX
SAEY 200 HOUT
SAEY 200 S HOUT
SAEY 200 CUCINA HOUT
Afmetingen
Hoogte ..................................................................................…
Breedte ................................................................................….
Diepte ....................................................................................…
Diameter van de uitlaatbuis ......................................................
Hoogte van grond tot onderkant van de uitlaatbuis ..................
67,5
64
52
150
45,6
cm
cm
cm
mm
cm
1. BELANGRIJKE AANWIJZINGEN
OPGELET !
- De gebruiker van een kachel moet de handleiding eerst aandachtig
lezen alvorens het toestel in gebruik te nemen.
- Wanneer uw kachel zich in de woonkamer bevindt moet U er in elk
geval voor zorgen dat er voldoende toevoer van verse lucht is.
- Het toestel enkel met gesloten deuren gebruiken.
- Wanneer de deuren open blijven eens de kachel in werking is, wordt
de luchttoevoer in de kachel niet meer gecontroleerd.
Hierdoor bestaat het gevaar dat de kachel te warm wordt en oververhit;
er worden slakken gevormd en de aan de vlammen blootgestelde
delen ondervinden schade.
Het venster zal vervormen en asdeeltjes zullen inbranden op het
glasoppervlak.
Dergelijke schade valt buiten de garantie.
- Sluit kacheldeuren, zelfs wanneer de kachel niet in werking is.
2. DE AANSLUITING VAN EEN KACHEL
Het is slechts wanneer het toestel aangesloten werd door een erkend
installateur dat U de zekerheid heeft dat de installatie- en
brandbeveiligingsvoorschriften werden nageleefd.
Belangrijkste onderdeel bij de aansluiting is de schoorsteen.
Maak hiervoor een afspraak met een erkend schoorsteenveger zodat
ook hier wordt beantwoord aan de specifieke voorschriften die van
kracht zijn in het land van gebruik.
Let daarbij op het volgende :
2
De kachel is geschikt voor een schoorsteen met meerdere schachten.
Hiertoe dient hij gebruikt te worden met gesloten deuren.
Er moet genoeg luchttoevoer zijn. Goed gesloten deuren en vensters
kunnen hierbij voor problemen zorgen.
Plaats uw kachel bij voorkeur in de nabijheid van de schoorsteen
(haard). Onder de kachel moet een hittebestendige onbrandbare sokkel
(onderplaat) worden geplaatst.
Dergelijke sokkels (uit gietijzer, plaatstaal, ...) zijn verkrijgbaar in de
handel.
Zorg er in elk geval voor dat de bodem brandveilig is.
Brandbare voorwerpen zoals deuren, meubels, houtwerk en dergelijke
moeten zich op een afstand van minstens 60 cm bevinden. Plaats uw
toestel op min. 30 cm van de muur. De muur moet uit onbrandbaar
materiaal bestaan.
3. HET AANSLUITEN VAN DE KACHEL OP DE SCHOORSTEEN
De schoorsteentrek moet boven 0,08 mbar (0,8 mm WK) zijn. De
diameter van de rookpijp moet overeenstemmen met die van het
aansluitstuk (150 mm).
De rookpijp moet bij alle aansluitingspunten afgedicht zijn ! Er wordt
uitdrukkelijk gewezen op het gevaar voor ontsnappende
rookgassen.
Valse lucht zorgt voor een verminderde schoorsteentrek.
Bij te grote schoorsteentrek wordt het aanbevolen een trekregelaar
te laten inbouwen.
3.1
Saey 200 (S) hout :
Bovenuitlaat
Standaard is de rookafvoer achteraan. Optioneel
kan gekozen worden voor een rookafvoer
bovenaan.
3
Montage van de rookafvoerbuis (optioneel stuk) voor een loodrechte
rookgasafvoer (ref. 479.0094.XXX)
Vooreerst moet de ronde afdekplaat, die zich in de bovenplaat bevindt,
gedemonteerd worden. Hiertoe moet doorheen de rookafvoerbuis op
de rugwand de zeskantbout (SW 10), die de afdekplaat met de
gietijzeren beugel bevestigt, met een sleutel gedemonteerd worden.
Aansluitend kan de rookafvoerbuis met de twee meegeleverde
zeskantbouten M6x20, de 4 rondsels en de twee zeskantmoeren M6
vastgeschroefd worden. Tot slot moet u nu met de hand doorheen de
opening bovenaan gaan om aldus de ronde afdekplaat weer met de
gietijzeren beugel en de eveneens meegeleverde zeskantbouten
M6x60 en de vroeger gebruikte rondsels op de rugwand te bevestigen
en vast te schroeven.
U moet voor de installatie van
voorzorgsmaatregelen in acht nemen :
de
rookpijp
nog
volgende
- De doorsnede van de rookpijp mag niet verkleinen en de rookpijp mag
niet horizontaal zijn maar moet steeds een lichte stijging naar de
schoorsteen toe worden geplaatst.
- De kachelpijp moet passen in de schoorsteenopening anders wordt de
uitlaat van rookgassen belet. Zorg hierbij voor een dubbele
wandbekleding.
- Schoorsteenaansluitingen van verschillende kachels mogen niet
tegenover elkaar worden geplaatst, met name op dezelfde hoogte.
Hierdoor kan de afvoer van de uitlaatgassen worden belemmerd. De
afstand tussen twee rookgasafvoerbuizen moet min. 30 cm bedragen.
- Sluit niet te veel kachels aan op één schoorsteen
- te veel aansluitingen belemmeren de opwaartse trek. Vraag advies
aan uw schoorsteenveger.
- De schoorsteen mag geen valse lucht aanvoeren. Zorg ervoor dat
schoorsteenregelkleppen en schoonmaakopeningen in de kelder en op
zolder dicht zijn.
- De rookafvoerbuis moet goed op het aansluitstuk bevestigd worden.
4
3.2
Saey 200 cucina hout
De rookafvoer is achteraan.
4. GESCHIKTE BRANDSTOFFEN
De kachel SAEY 200 is voor volgende brandstoffen geschikt :
* HOUT : houtblokken met kleverige schors, bvb. gekloofde
houtblokken
met een lengte van 45 cm.
Het hout moet ongeveer twee jaar gestockeerd worden en
een
maximum residu-vochtigheidsgraad hebben van 20 %.
Nat hout brandt slecht en rookt, wat leidt tot condensatie en
teerafscheiding wat de kachel bevuilt.
Opgepast : GEEN afval verbranden.
OPGEPAST :
GEEN kolen
GEEN
synthetische
brandstoffen
(bvb.
FUTUREX)
GEEN afval verbranden
5. VOOR DE EERSTE STOOKBEURT
Bij eerste ingebruikname dient de kachel eerst uitgedroogd te worden.
Laat de kachel hiervoor gedurende één uur met een weinig brandstof
stoken.
Wanneer de luchtschuiven open staan wordt het glas “gespoeld” via
een luchtstroom die langs het venster glijdt. Hierdoor blijft uw ruit
langdurig proper (= air-wash systeem). Tevens wordt via deze
openingen verse lucht toegevoegd aan de hete rookgassen. Hierdoor
ontvlammen deze en een tweede verbranding vindt plaats, met een
hoger rendement en properder rookgas emissies tot gevolg (=
naverbranding).
5
Hierbij droogt de beschermingslak op en kan zich een geur verspreiden.
Hou het verbrandingsproces nauwkeurig in het oog. Veeg hierbij
eventuele condensatiedruppels zorgvuldig af, voordat de resten in het
email (bvb. de lak) zouden kunnen inbranden.
6. VOORZORGSMAATREGELEN
Een kachel wordt heet, vooral de dekplaat, de mantel en het venster ! Bij
de Saey 200 cucina hout wordt de gepolierde bovenplaat volledig warm.
Installeer uw kachel op een veilige plaats zodat spelende kinderen die
niet kunnen aanraken.
Ondanks het respecteren van de veiligheidsvoorschriften blijft het risico
op ongevallen bestaan.
KLEINE KINDEREN OP AFSTAND HOUDEN.
7. HET AANSTEKEN VAN DE KACHEL - NORMALE WERKWIJZE
Bij het aansteken de luchtschuiven open zetten (naar buiten toe
schuiven).
Open de deur met venster en leg op de bodem verfrommeld
krantepapier met daarbovenop een handvol splinterig hout (dun hout).
Na het aansteken wordt de deur met venster stevig gesloten.
BELANGRIJK : vensterdeur niet meer openen , behalve voor het
bijvullen.
8. HOUTVERBRANDING
8.1
Het bijvullen
Om te stoken luchtschuif maximaal open zetten.
6
De houtblokken door de deur met venster of de rechter vuldeur (indien
Saey 200 S hout) op de nog voldoende gloeiende ondergrond leggen,
in ten hoogste 2 lagen. Niet overdadig vullen.
8.2
Werkwijze
Verbranden van hout gaat gepaard met hoge vlammen en veel
rookontwikkeling. Hout moet snel en onder voortdurende
zuurstoftoevoer worden opgebrand. De verbranding mag in geen geval
worden afgeremd.
Negatieve gevolgen zouden kunnen zijn :
- smeulend vuur, condensatie en teerafscheiding
- sterke roetontwikkeling
- rookoverlast (uitlaat van schadelijke stoffen)
- verstikkingsgevaar
Met hout verkrijgt men een hevige verbranding van korte duur
Een langdurige verbranding is slechts mogelijk door regelmatig bijvullen;
Dit betekent : pas wanneer het hout bijna is opgebrand en het
ontgassingsproces beëindigd - lange vlammen gaan over in kleine korte
vlammen en hout wordt omgezet in gloeiend houtskool - kan warmteafgifte vertraagd worden door het sluiten van de luchtschuif boven de
deur met venster (zie afbeelding).
Vermijd in elk geval overdreven hoeveelheid brandstof, anders wordt de
“energiestuwing” te groot en zal er teveel warmteverlies zijn.
9. AS VERWIJDEREN
Opgelet, niet poken wanneer het toestel in werking is.
Houtverbranding brengt weinig as mee. Hierdoor smeulen de resten
houtskool verder in de gloeiende as.
De aslade mag maximum tot aan de bovenste rand met as gevuld zijn.
Er mag geen askegel worden gevormd : anders wordt koeling van de
verbrandingsruimte onmogelijk en zouden de gietijzeren delen beginnen
smelten.
7
Wanneer de kachel in werking is moet de asdeur in elk geval dicht zijn.
Zoniet raakt de kachel oververhit en beschadigd.
Verwijder steeds de as wanneer deze afgekoeld is. Gebruik hiervoor
eventueel een asschep (niet bijgeleverd).
Let op :
Afgekoelde assen toch steeds in een ontbrandbare recipiënt
deponeren.
10. ONDERHOUD - BELANGRIJK
Het rookafvoerkanaal (tussen keerplaat en achterwand) moet na elk
stookseizoen - maar minstens 1 x per jaar - worden gereinigd.
Door de regelingsklep eruit te halen kan U het rookafvoerkanaal
bereiken.
Hierdoor kan de vliegas gemakkelijk uit het afvoerkanaal en het
aansluitstuk worden verwijderd. De regelingsklep dient achteraf correct
te worden teruggeplaatst.
Het verdient aanbeveling om na het stookseizoen (m.a.w. tijdens de
zomermaanden) de schouwpijp tussen de kachel en schouw weg te
nemen of af te sluiten, dit om condensatie en/of roestvorming in de
kachel te vermijden. Dit komt de duurzaamheid van uw kachel ten
goede.
11. INSTRUCTIES
Bij de Saey 200 cucina hout mag men pas na 1 maand ingebruikname
op de gepolierde kookplaat waterketels, pannen, enz. plaatsen. Er mag
op de hete platen geen water gemorst worden om het gevaar voor
barsten uit te sluiten.
Bij het gebruik zal de gepolierde plaat vergloeien en blauw worden. Dit
is een normaal verschijnsel.
De gepolierde plaat kan gereinigd worden met staalwol of een speciaal
daartoe bestemd onderhoudsprodukt.
8
12. GARANTIE
DE FABRIKANT STAAT BORG VOOR
a.
Een onberispelijke kwaliteit en verwerking
grondstoffen
volgens de gestelde eisen
b.
een vakkundige montage
van
de
De waarborgen a. en b. houden kosteloze vervanging in van de
afgekeurde onderdelen.
Dergelijke onderdelen worden alleen kosteloos vervangen wanneer kan
worden aangetoond dat er fouten in de grondstoffen zijn of in het
werkstuk.
Verdere aanspraak is uitgesloten.
DE FABRIKANT STAAT GEEN BORG VOOR
Onderdelen die onderhevig zijn aan slijtage, en voor schade en fouten
aan toestellen of onderdelen ervan, die veroorzaakt werden door :
transport, stockage, verkeerde opstelling en gebruik van het toestel
(bvb. oververhitting).
Gebruik van ondergeschikte brandstoffen - verkeerde bediening.
De fabrikant is niet aansprakelijk voor rechtstreeks of onrechtstreekse
schade die door het toestel is veroorzaakt. Er kan geen aanspraak
gemaakt worden op gehele of gedeeltelijke omruiling, tenzij de fabrikant
niet in staat is het gebrek of de schade binnen een bepaalde tijdspanne
te verhelpen.
9
Max. stapelhoogte
houtblokken
(Saey 200 S hout)
Detail cucina
bovenplaat
(Saey 200 cucina hout)
Secundaire luchtregeling
naar binnen :
naar buiten :
toe
open
10
SAEY nv., Industrielaan 4,
l’adresse
8501 Kortrijk-Heule (Belgium)
tél. (56) 36.14.55 - fax (56) 36.15.10
Documentation à
de l’usager et l’installateur
avril 2001
MODE D’EMPLOI
477.0020.XXX
477.0120.XXX
477.0520.XXX
SAEY 200 BOIS
SAEY 200 S BOIS
SAEY 200 CUCINA BOIS
11
Encombrements
Hauteur ...................................................................................... 67,5
Largeur ....................................................................................... 64
Profondeur ..........................................................................….... 52
Diamètre du tuyau d’évacuation ..........................................…..150
Hauteur du sol au dessous du tuyau de départ ..................…....45,6
cm
cm
cm
mm
cm
1. DIRECTIVES IMPORTANTES
ATTENTION !
* L’utilisateur d’un poêle doit impérativement se renseigner sur le
fonctionnement de ce poêle à l’aide du mode d’emploi.
* Si votre poêle prend tout son air de combustion de la chambre dans
laquelle il est installé, veillez toujours à ce qu’il y ait assez de circulation
d’air frais.
* Utilisez toujours votre poêle portes fermées.
* Au cas où la porte vitrée est ouverte, vous aurez une combustion
incontrôlée. Vous risquez de surcharger votre poêle et les parties qui
sont en contact direct avec le feu peuvent être endommagées
(surchauffement).
La vitre déforme et les restes des cendres brûlent dans la surface des
vitres.
Notre garantie ne couvre pas les dégâts causés au foyer à la suite
d’une mauvaise utilisation.
* Même quand votre poêle ne brûle pas, il faut toujours fermer les
portes du foyer.
2. INSTALLATION DU POELE
Seul un poêle installé par un spécialiste offre la garantie que les
prescriptions en matière d’urbanisme et de protection contre l’incendie
sont observées. Cette démarche est absolument indispensable pour le
bon fonctionnement de votre appareil et pour votre sécurité.
La cheminée joue un rôle très important dans le raccordement du poêle.
Il faut donc certainement contacter le ramoneur et se mettre d’accord
12
sur le raccordement, de sorte que les prescriptions en matière
d’urbanisme soient bien respectées.
Il faut tenir compte des points suivants :
Le poêle permet de raccorder plusieurs foyers à la cheminée à
condition qu’il soit utilisé portes fermées
Il est nécessaire qu’il y ait assez d’air de combustion disponible. Des
portes et des fenêtres trop isolées mettent cela en question.
Dans la mesure des possibilités, installez votre poêle le plus près
possible de la cheminée. En dessous du poêle il faut placer une base
ininflammable. Vous avez le choix entre des taques en fonte, en tôle
d’acier ou en pierre.
Elles protègent le sol contre le risque d’incendie. Les objets
inflammables par ex. portes, meubles, menuiserie, ... doivent se trouver
au moins à une distance de 60 cm du poêle.
Placez votre poêle à au moins 30 cm du mur. Le mur doit être composé
de matériel ininflammable.
3. RACCORDEMENT DU POELE A LA CHEMINEE
Quand le tirage de la cheminée est correct, votre poêle peut y être
raccordé directement. Le tirage de la chéminée doit être supérieur à
0,08 mbar (0,8 mm CE) Le diamètre du tuyau de raccordement doit
correspondre au diamètre de la buse de départ du poêle, c’est-àdire 150 mm.
Il est évident que ce tuyau doit être étanche à tous ces
raccordements. Les gaz d’échappement sont extrèmement
dangereux. Les infiltrations d’air parasite réduisent le tirage de la
cheminée.
Quand le tirage de la cheminée est trop élevé, il est recommandé
d’incorporer un régulateur de tirage.
13
3.1 Saey 200 (S) bois :
Le tuyau d’évacuation de fumée est standard par derrière.
Optionnellement on peut faire l’évacuation par le dessus
(verticale).
Montage du tuyau d’évacuation de fumées (pièce optionnelle)
pour une sortie de fumée perpendiculaire (réf. 479.0094.XX)
D’abord il faut démonter le tampon buse rond, qui se trouve au dessus.
Il faut démonter avec une clef le boulon (SW 10) à travers le tuyau
d’évacuation de fumées se trouvant sur le derrière, qui fixe le tampon
buse avec le serre tampon en fonte. Après il faut visser le tuyau
d’évacuation de fumées avec les deux boulons M6x20 livrées avec, les
4 rondelles et les 2 boulons M6. Finalement il faut aller avec la main à
travers l’ouverture au dessus afin de accrocher et fixer le tampon buse
rond de nouveau avec le serre tampon en fonte et les boulons M6x60 et
les rondelles sur le derrière.
Pour l’installation des tuyaux de raccordement, il faut respecter les
régles mentionnés ci-dessous :
* Le diamètre du tuyau de raccordement ne peut pas être diminué et le
tuyau ne peut pas être fixé horizontalement mais toujours en s’élevant
vers la cheminée.
* Le tuyau du poêle ne peut pas être enfoncé trop profondément dans la
cheminée parce que ceci empêcherait les fumées d’échapper
facilement. On peut l’éviter en incorporant un double paroi
* Les raccordements de plusieurs poêles ne peuvent pas se trouver
face à face, c’est-à-dire à la même hauteur. Ceci empêcherait
également la montée des fumées. La distance minimale entre deux
raccordements de tuyaux doit être 30 cm.
* La cheminée ne peut pas être surchargée, trop de raccordements
entravent la montée des fumées. Consultez votre ramoneur !
* La cheminée doit être étanche. Vérifiez les clapets de contrôle ainsi
que les orifices de nettoyage à la cave et au grenier.
* Le tuyau d’évacuation doit être solidement raccordé à la buse de
raccordement du poêle.
14
3.1
Saey 200 cucina bois
L’ évacuation des fumées est par l’ arrière.
4. COMBUSTIBLES APPROPRIES
Le Saey 200 est appropié aux combustibles suivants :
* BOIS :
fendu)
- bois pur, non-mélangé en blocs avec écorce (ex. bois
- longueur des bûches de 45 cm
- le bois doit pouvoir s’assècher pendant 2 ans et ne peut contenir
qu’au maximum 20% de humidité
Des bûches humides brûlent très difficilement et donnent une
mauvaise odeur. En plus, il y a une formation de condensation et
de goudron et votre poêle devient tout sale.
ATTENTION : n’utilisez pas :
* de charbon (houille)
* de combustibles synthétiques (ex.
FUTUREX)
* de déchets.
5. LA PREMIERE UTILISATION DU POELE
Lors de la mise en service du poêle, celui-ci doit d’abord sécher. Nous
vous conseillons de brûler des petites quantités de combustible
(environ 1 heure).
Quand les réglages d’air sont ouverts la vitre est “nettoyée” grâce à un
courant d’air qui glisse par la vitre.Votre vitre reste propre plus
longtemps (= système air wash). Par ces ouvertures de l’air frais est
ajouté aux gaz de fumées très chaudes. Ces gaz prennent feu et une
deuzième combustion a lieu, avec un rendement plus élevé et des
15
émissions de gaz de fumée plus propres comme conséquence
(=poste-combustion)
Le processus de combustion doit être bien suivi. Les condensations qui
apparaissent sur les surfaces émaillées doivent être essuyées
immédiatement pour éviter que ces résidus brûlent dans la surface.
6. MESURES DE PRECAUTION
Un poêle devient très chaud ! Surtout le dessus, le cadre et les pyrex.
En ce qui concerne le Saey 200 cucina bois, la plaque polie devient
complètement chaud.
Veillez d’abord à ce que les enfants ne puissent tomber le poêle en
jouant.
Naturellement, les mesures de sécurité existantes n’excluent pas tous
les accidents possibles.
NE LAISSEZ PAS JOUER VOS ENFANTS AUX ENVIRONS DE
VOTRE POELE.
7. MISE EN SERVICE - PROCEDE NORMAL
A l’allumage, mettez la glissière air secondaire sur la position maximale
(ouvert).
Puis, ouvrez la porte du foyer et mettez des bouts de journal froissés
sur le fond avec deux poignées de bois très fins.
Après l’allumage du poêle, il faut bien fermer la porte vitrée.
IMPORTANT
La porte foyer ne peut plus s’ouvrir pendant l’utilisation du poêle, sauf
pour le charger.
16
8. BRULER DU BOIS
8.1
Remplir le poêle
Mettez la glissière air secondaire sur la position maximale (ouvert). Dès
que le combustible d’allumage a bien pris feu, le poêle peut être rempli
(deux couches au max.).
On peut remplir le poêle par la porte vitrée ou par la porte latérale (Saey
200 S bois).
8.2
Maniément
Le bois est un combustible qui amène de grandes flammes et une
grande formation de gaz. En plus, pendant le processus de combustion,
il faut toujours veiller à ce qu’il y ait de circulation d’air frais. La
combustion ne peut certainement pas être ralentie.
Les conséquences négatives seraient :
* du feu couvant, formation de condensation et de goudron
* une formation de suie très forte
* excès de fumées (gaz nuisibles)
* danger d’explosion
LE BOIS NE PERMET PAS UNE COMBUSTION CONTINUE ET
LENTE
La combustion ne peut être ralentie que d’une seule façon.
Le bois doit être brûlé à tel point que le processus de dégazage soit
terminé (les grandes flammes deviennent des petites flammes et le
bois devient incandescent).
Ce n’est qu’à ce moment-là, en fermant la glissière d’air secondaire en
dessus de la porte vitrée que le processus de combustion peut être
ralenti.
Evitez en tout cas d’utiliser des quantités excessives de combustibles.
Le coup d’énergie serait trop grand et il y aurait une énorme perte de
chaleur.
17
9. DECENDRAGE
ATTENTION, N’ACTIVEZ JAMAIS LES CENDRES PENDANT QUE
VOTRE POELE BRULE.
En outre, les restes du charbon continuent à couver dans les cendres.
Le cendrier ne peut être rempli que jusqu’au bord supérieur. Le tas de
cendres ne peut atteindre la grille sinon elle risque de fondre. Pendant
que le poêle brûle, il faut absolument que la porte cendrier reste
fermée, sinon votre poêle sera surchauffé et endommagé.
Evitez en tout cas d’utiliser des quantités excessives de combustibles.
Le coup d’énergie serait trop grand et il y aurait une énorme perte de
chaleur.
Enléve toujours le cendre si le cendre est refroidi. Eventuellement vous
pouvez utilisé une pelletée de cendre ( ne pas livrée avec).
Attention: vous devez déposer les cendres refroidis dans un recipient
inflammabele.
10. ENTRETIEN - IMPORTANT
Après chaque saison - mais au moins un fois par an - le carneau de
chauffage doit être nettoyé (entre le déflecteur et l’arrière).
En enlevant la glissière de contrôle vous pouvez atteindre le carneau de
chauffage. Les cendres volantes peuvent être retirées facilement du
carneau de chauffage et des buselots. Après, il faut bien remettre la
glissière de contrôle à sa place.
Il est recommandé d’enlever ou de fermer le tuyau de cheminée entre la
poêle et la chéminée après la saison de chauffage (en printemps), ceci
afin d’éviter de la condensation ou de la formation de rouille dans la
poêle. Cela servira à la solidité de votre poêle.
18
11. Instructions
Concernant le Saey cucina 200 bois, la plaque polie ne peut pas être
utilisé pour mettre des bouilloires et des casseroles qu’ après un mois
de fonctionnement. En plus ne faites pas de tâches d’eau sur le poêle
(risque de fêures).
Suite à l’ utilisation, la plaque polie sera ardent et viendra bleu. Ceci est
tout à fait normal.
On peut nettoyer la plaque polie à l’ aide de la paille à fer ou avec un
produit d’ entretien spécial.
12. GARANTIE
LE FABRICANT SE PORTE GARANT
a. d’une qualité et d’un traitement impeccable des matières premières
selon les exigences.
b. d’un montage professionnel.
Les garanties a. et b. impliquent le remplacement gratuit des pièces
refusées à condition qu’on puisse démontrer qu’il s’agit d’un défaut des
matières premières ou de la pièce-même.
Revendication ultérieure est hors de question.
LE FABRICANT NE SE PORTE PAS GARANT DE
Pièces sujets à usure normale, dégâts et défauts de l’appareil ou de
ses pièces détachées, causés par :
Influences chimique et physiques extérieures durant transport,
stockage, mise en place fautive et usage de l’appareil fautif (par
exemple surchauffe).
L’usage de combustibles impropres - usage fautif.
Le fabricant ne se porte pas garant de dégâts directs ou indirects
causés par l’appareil. Le remplacement partiel ou intégral peut être
réclamé quand le fabricant n’est pas en mesure de remédier au défaut
ou dégât dans un délai déterminé.
19
Remplissage max. des
bûches
(Saey 200 S bois)
Plaque polie cucina
(Saey 200 cucina bois)
Réglage d’ air secondaire
Vers l’ intérieur :
Vers l’ extérieur :
fermé
ouvert
20
SAEY nv., Industrielaan 4,
l’adresse
8501 Kortrijk-Heule (Belgium)
tél. (56) 36.14.55 - fax (56) 36.15.10
Documentation à
de l’usager et l’installateur
avril 2001
OPERATING INSTRUCTIONS
477.0020.XXX
477.0120.XXX
477.0520.XXX
SAEY 200 BOIS
SAEY 200 S BOIS
SAEY 200 CUCINA BOIS
21
Dimensions:
Height ..................................................................................…
67,5
Width ................................................................................….
64
Depth ....................................................................................… 52
Diameter of the outlet duct ...................................................... 150
Distance from ground to bottom part of the outlet duct...............
cm
cm
cm
cm
mm
45,6
1. IMPORTANT WARNINGS
WARNING !
- The user of a stove must read the manual attentively before using
the appliance for the first time.
- If your stove has been installed in the living room, you must ensure
a sufficient supply of fresh air in any case.
- The appliance should only be used with closed doors.
- When the doors remain open once the stove is functioning, the
thermostat function is disabled and the inflow of air into the stove
is no longer being controlled.
The danger then arises that the stove will become too hot, so that
slag formation takes place and the parts exposed to the flames
are damaged.
The glass panel will become warped and glowing embers will burn
into the glass surface.
This kind of damage is not covered by the guarantee.
- Shut the stove doors and turn off the thermostat, even when the
stove is not in operation.
2. THE CONNECTION OF A STOVE
It is only when the appliance was connected by an authorised installer
that you can be certain that the installation and fire protection instructions
were observed.
The most important connection component is the chimney.
22
Make an appointment with a recognised chimneysweeper so that the
specific regulations applicable in the country of use in this regard, are
also complied with.
Also pay attention to the following:
The stove is suitable for a chimney with several shafts.
purpose, the stove must be used with closed doors.
For this
The inflow of air must be sufficient in whatever space the appliance has
been installed. Tightly closed doors and windows may cause problems
in this regard.
Preferably place your stove near the chimney (hearth). A heat-resistant,
fireproof base (bottom plate) must be placed underneath the stove.
These bases (made of cast iron, steel sheeting,…) are available
commercially.
In any case, ensure that the base is fireproof.
Flammable objects such as doors, furniture, woodwork etc. must be at a
distance of at least 60 cm.
Thanks to the protective plate at the back of the stove, the appliance
may be placed up to 30 cm from the wall.
3. CONNECTING THE STOVE TO THE CHIMNEY
A strong chimney draught makes it possible to connect the stove
directly to the chimney. The chimney draught must be above 0,08 mbar
(0,8 mm WK). The diameter of the smoke duct must correspond with
that of the connector (150 mm).
The smoke duct must be sealed at all connection points! Attention
is specifically drawn to the danger of escaping fumes.
False air results in a weaker chimney draught.
23
If the chimney draught is too strong, the installation of a draught
regulator is recommended.
3.3
Saey 200 + :
Top outlet
The smoke outlet is standard at the back of the
stove. For a top outlet an additional flue adaptor is
required.
Mounting the outlet tube (optional part) for an upright fumes outlet (ref.
479.0094.XXX)
First you should dismantle the round part you find in the top plate. To do
this you should untighten the hexagon nut (SW10) you find at the back
side of the stove. This nut keeps the cast iron bar in place.
Then you can fasten the outlet tube with the two hexagon nuts (M6 x 20)
as well as the 4 washers and the 2 hexagon nuts M6. Finally you should
go with your hand through the opening in the top plate in order to fasten
the round part again with the cast iron bar on the back side of the stove.
Take note of the following precautionary measures before the smoke
duct is installed :
- The diameter of the smoke duct may not be reduced, the smoke
duct may not be made smaller and it may not be positioned
horizontally, but should rise towards the chimney at a slight angle.
- The stovepipe must fit into the chimney opening to make the
discharge of fumes possible. Make provision for a double lining in
this regard.
- Chimney connections of different stoves may not be so positioned
opposite one other, i.e. at the same height. This may obstruct the
discharge of echaust fumes. The minimum distance between two
outlets for fumes should be at least 30 cm.
- Do not connect too many stoves to one chimney – too many
connections hamper the upward draught. Ask your chimney
sweeper for advice.
- The chimney may not conduct any false air. Ensure that the
chimney control valves as well as the cleaning openings in the
cellar are closed.
- The smoke duct must be securely attached to the connector.
24
3.4
Saey 200 + cucina
The discharge of fumes takes place at the
back of the stove.
4. SUITABLE FUELS
The SAEY 200 + stove makes use of the following fuels :
* WOOD : Logs with sticky bark, e.g. cleaved logs with a length of 1/3
metres.
The wood should be stored for about two years, and should
have a maximum residual humidity level of 20%.
Wet wood does not burn well and produces smoke, resulting
in condensation and a tar discharge, which makes the stove
dirty.
Take care: DO NOT burn waste matter.
TAKE CARE :
NO coals
NO synthetic fuels (e.g. FUTUREX)
DO NOT burn waste matter
5. FOR THE FIRST KINDLING
When used for the first time, the stove must be dried out first. For this
purpose, use a little fuel to keep the fire burning for one hour. Air slider
R + L (at the front, above the glass panel) slide to the outside (standing
open). This causes the protective lacquer to dry up, and a smell may be
given off.
Monitor the protection process carefully. In this regard, carefully wipe
off any condensation drops before the residue gets a chance to burn
into the enamel (e.g. the lacquer).
25
6. PRECAUTIONS
A stove gets hot, especially the covering plate, the casing and the glass
panel! In the case of the Saey Cucina Wood, the entire polished plate
heats up.
Install your stove in a safe place in order to prevent playing children from
touching it.
Even if all the safety regulations are observed, there is still a risk of
accidents occurring.
KEEP SMALL CHILDREN AT A SAFE DISTANCE.
7. LIGHTING THE STOVE – THE STANDARD PROCEDURE
When the stove is lit, the air sliders above the door with the glass panel
should be moved outwards (maximum open position).
Open the door with the glass panel and put crumpled newspapers on
the fire grating, with a handful of splintered wood (thin wood) on top of it.
After the stove has been lit, the door with the glass panel must be firmly
closed.
IMPORTANT : the door with the glass panel should now not be opened
again, except for the purpose of topping up.
8. WOOD COMBUSTION
8.1
Topping up
To stoke the fire, the air sliders above the window should be opened to
the maximum position (moved outwards).
The logs should be inserted through the right-hand filler door or the door
with the glass panel and placed on the still sufficiently glowing base, in
no more than two layers. Do not overfill.
26
8.2
Method
The burning of wood is accompanied by high flames and heavy smoke
production. Wood must be burnt up rapidly and with a constant oxygen
supply. The combustion process may not be slowed down under any
circumstances.
Negative consequences could be :
- smouldering fire, condensation and tar discharge
- excessive production of soot
- inconvenience caused by smoke (emission
substances)
- danger of asphyxiation
of
harmful
Wood provides intense combustion of short duration:
Sustained combustion is only achieved through regular top-ups, which
means: only when the wood has almost been burnt up and the
degassing process completed – high flames are reduced to small, low
flames and wood is converted into glowing embers – can the emission
of heat be slowed down by closing the air slider above the door with the
glass panel (slide inwards).
Avoid an excessive amount of fuel in any case, otherwise the energy
surge becomes too great and too much heat will be lost.
9. ASH REMOVAL
Take note: do not poke the fire when the appliance is in
operation.
Wood combustion produces little ash. Because of this, the remains of
the embers continue to smoulder in the glowing ash.
The ash pan may be maximally filled with ash to the upper edge. No ash
cone may be formed: otherwise cooling of the combustion chamber
becomes impossible and the cast iron parts would begin to melt.
The ash door should always be closed when the stove is in operation. If
this is not done, the stove overheats and is damaged.
27
Always remove the ash when it has cooled down. You could use an ash
scoop for this purpose (not supplied)
Note:
Cooled ashes should nevertheless
deposited in a fireproof container.
10. MAINTENANCE -
always
be
IMPORTANT
The smoke discharge duct (between the checking-plate and the rear
wall) must be cleaned after every heating season – at least 1 x a year.
By removing the control damper, you will be able to reach the smoke
discharge duct.
This makes it easy to remove the fly ash from the discharge duct as well
as the connector. The control damper must be put back correctly
afterwards.
It is recommended that, after the heating season (i.e. during the summer
months) the flue pipe between the stove and chimney should be
removed or sealed in order to prevent condensation and / or corrosion
in the stove. This improves the durability of your stove.
11. INSTRUCTIONS
With regard to the Saey 200+ cucina, you may only place kettles, pans,
etc. on the polished cooking plate after the stove have been used for a
month. No water may be spilled on the hot plates, to prevent cracks
from forming.
When in use, the polished plate will glow and become blue. This is a
normal phenomenon.
The polished plate can be cleaned with steel wool or a special
maintenance product intended for this purpose.
12. GUARANTEE
THE MANUFACTURER GUARANTEES
a.
Impeccable quality and processing of the raw materials
according to the stated requirements
28
b.
assembled by an expert
The guarantees a. and b. provide for free repairs to the appliance, more
specifically to parts declared unfit for use.
Such parts are only replaced free of charge when it can be proven that
there are flaws in the raw materials or in the workmanship.
No further claims may be made.
THE MANUFACTURER DOES NOT GUARANTEE
Parts that are subject to wear and tear, and damage to and defects in
the appliances or their parts, caused by:
Chemical of physical influences from outside with regard to transport,
storage, incorrect installation and use of appliance (e.g. cooling down
with water, overheating).
Use of inferior fuels – incorrect operation.
The manufacturer is not responsible for direct or indirect damage
caused by the appliance. No claim can be laid to a full or partial
exchange, unless the manufacturer is unable to fix the flaw or damage
within a certain time span.
29
Maximum stacking height of
logs
Detail cucina upper plate
(Saey 200 + cucina )
Secondary air regulation
inwards : closed
outwards : open
30