1
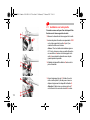
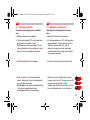
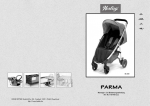
JOCKEY Comfort -F-NL-GB - 01.07.fm Seite 1 Mittwoch, 7. Februar 2007 2:16 14
F
RÖMER JOCKEY Comfort
Mode d’emploi
Nous sommes heureux que notre RÖMER
JOCKEY Comfort puisse accompagner votre
enfant en toute sécurité pendant un nouveau
chapitre de sa vie.
Pour protéger efficacement votre bébé, le RÖMER
JOCKEY Comfort doit impérativement être utilisé et
installé de la manière décrite dans le présent mode
d’emploi.
Pour toute question complémentaire, n’hésitez pas
à nous contacter.
BRITAX RÖMER
Kindersicherheit GmbH
1
JOCKEY Comfort -F-NL-GB - 01.07.fm Seite 2 Mittwoch, 7. Februar 2007 2:16 14
NL
GB
Gebruiksaanwijzing
User instructions
Gefeliciteerd met de aankoop van de RÖMER
JOCKEY Comfort: de juiste keuze om uw kind
veilig door een nieuwe levensfase te begeleiden.
We are pleased that our RÖMER JOCKEY Comfort
may accompany your child safely through a new
stage of his or her life.
De RÖMER JOCKEY Comfort moet voor een juiste
bescherming van uw kind precies zo worden
gebruikt en ingebouwd als in deze
gebruiksaanwijzing beschreven.
In order to protect your child correctly, the RÖMER
JOCKEY Comfort must always be mounted and
used as described in these instructions.
Als u nog vragen hebt over het gebruik, neem dan
contact met ons op.
BRITAX RÖMER
Kindersicherheit GmbH
If you have any further questions regarding its use,
please feel free to contact us.
BRITAX RÖMER
Kindersicherheit GmbH
F
NL
GB
2
JOCKEY Comfort -F-NL-GB - 01.07.fm Seite 3 Mittwoch, 7. Februar 2007 2:16 14
F
Table des matières
1. Habilitation .......................................................... 5
2. Utilisation sur la bicyclette ................................ 7
2.1 Installation sur la bicyclette ......................... 13
3. Utilisation du siège bicyclette ......................... 21
3.1 Adaptation des bretelles ............................. 23
3.2 Adaptation des repose-pieds ...................... 25
3.3 Mise en place de la ceinture de votre
enfant .......................................................... 27
3.4 Réglage du dossier ..................................... 29
3.5 Démontage du siège bicyclette .................. 31
4. Avant chaque trajet .......................................... 31
5. Nettoyage .......................................................... 33
6. Remarques relatives à l’élimination ............... 35
7. 2 ans de garantie .............................................. 37
8. Carte de garantie / Procès-verbal de remise 42
3
JOCKEY Comfort -F-NL-GB - 01.07.fm Seite 4 Mittwoch, 7. Februar 2007 2:16 14
NL
GB
Inhoud
Contents
1. Geschiktheid .......................................................6
2. Gebruik op de fiets ..............................................8
2.1 Montage op de fiets .....................................14
3. Gebruik van het fietskinderzitje .......................22
3.1 De schoudergordels afstellen .....................24
3.2 De voetsteunen afstellen .............................26
3.3 De gordel bij uw kind omdoen .....................28
3.4 Instellen van de rugleuning .........................30
3.5 Verwijderen van het fietskinderzitje .............32
4. Voor elke rit ........................................................32
5. Reiniging ............................................................34
6. Instructies voor de afvoer ................................36
7. 2 jaar garantie ....................................................38
8. Garantiekaart/overdrachtscontrole .................44
1. Suitability ............................................................6
2. Using on the bicycle ...........................................8
2.1 Mounting on the bicycle ..............................14
3. Using your bicycle child seat ..........................22
3.1 Adjusting the shoulder straps .....................24
3.2 Adjusting the footrests ................................26
3.3 Securing your child .....................................28
3.4 Setting the backrest ....................................30
3.5 Dismounting of the bicycle child seat .........32
4. Before each ride ...............................................32
5. Cleaning ............................................................ 34
6. Notes regarding disposal ................................36
7. 2-year warranty ................................................. 38
8. Warranty Card / Transfer Check ......................46
F
NL
GB
4
JOCKEY Comfort -F-NL-GB - 01.07.fm Seite 5 Mittwoch, 7. Februar 2007 2:16 14
F
1.
Habilitation
Veuillez respecter les directives d’élimination en
vigueur dans votre pays.
RÖMER
Siège bicyclette
Vérification selon
EN* 14344:2004
Poids
JOCKEY Comfort
9 - 22 kg
*EN = Norme européenne
• Veuillez respecter les consignes suivantes
indépendamment du poids minimal :
Votre enfant doit pouvoir se tenir bien assis tout
seul afin de pouvoir s'asseoir dans un siège
bicyclette.
• Veuillez vérifier de temps en temps le poids de
votre enfant ne dépasse pas la limite de poids
supérieure.
• Les enfants de moins de 7 ans ne doivent être
transportés sur la bicyclette que par des
personnes âgées de plus de 16 ans.
5
JOCKEY Comfort -F-NL-GB - 01.07.fm Seite 6 Mittwoch, 7. Februar 2007 2:16 14
NL
1.
GB
Geschiktheid
1.
Houd u aan de in uw land geldende wettelijke
voorschriften.
RÖMER
Fietskinderzitje
Controle conform
EN* 14344:2004
Suitability
Please observe the legal regulations in your
country.
RÖMER
Bicycle child seat
Lichaamsgewicht
JOCKEY Comfort
9 - 22 kg
Tested according to
EN* 14344:2004
Body weight
JOCKEY Comfort
9 - 22 kg
*EN = Europese norm
*EN = European Norm
• Houd naast het minimumgewicht rekening met
het volgende:
Uw kind moet goed zelfstandig kunnen zitten om
in een fietskinderzitje geplaatst te mogen
worden.
• Please note the following irregardless of the
minimum weight:
Your child must be able to sit securely on his or
her own to ride in a bicycle child seat.
• Controleer af en toe of uw kind nog voldoet aan
de maximale gewichtsgrens.
• Kinderen onder de 7 jaar mogen alleen op de
fiets worden vervoerd door personen die ouder
zijn dan 16.
• Please check from time to time to see if your
child still falls below the upper weight limit.
• Children under 7 years old may only be
transported on the bicycle by persons older than
16 years old.
F
NL
GB
6
JOCKEY Comfort -F-NL-GB - 01.07.fm Seite 7 Mittwoch, 7. Februar 2007 2:16 14
F
2.
Utilisation sur la bicyclette
L'utilisation de ce siège bicyclette n'est
pas possible...
• si la bicyclette n'est pas conçue pour une telle
charge supplémentaire.
Veuillez demander conseil à votre vendeur de
bicyclette.
• si le diamètre du tube de fixation de la selle est
inférieur à 28 mm.
• si le diamètre du tube de fixation de la selle est
supérieur à 40 mm.
• si le tube de fixation de la selle est ovale.
• si le siège bicyclette penche vers l'avant une fois
installé.
Sinon, votre enfant risque de glisser de la
surface d'assise. Veuillez vérifier la position, elle
dépend de l'angle avec le tube de fixation de la
selle de votre bicyclette.
• si la largeur du porte-bagage est supérieure à
150 mm.
• au dispositif de fixation de la selle.
7
JOCKEY Comfort -F-NL-GB - 01.07.fm Seite 8 Mittwoch, 7. Februar 2007 2:16 14
NL
2.
GB
Gebruik op de fiets
Dit fietskinderzitje kan niet worden
gebruikt...
2.
Using on the bicycle
It is nicht possible to use this bicycle
child seat ...
• als uw fiets niet geschikt is voor een dergelijke
extra belasting.
Vraag uw fietsenmaker hierbij om advies.
• if your bicycle is not designed for an additional
load such as this.
Please consult the bicycle manufacturer.
• wanneer de doorsnede van uw zadelbuis kleiner
is dan 28 mm.
• if the seat tube diameter is less than 28 mm.
• wanneer de doorsnede van uw zadelbuis groter
is dan 40 mm.
• if the seat tube is oval.
• wanneer uw zadelbuis ovaal is.
• wanneer het gemonteerde fietskinderzitje naar
voren hangt.
Uw kind kan dan van de zitting glijden.
Controleer de positionering, die afhankelijk is
van de zadelbuishoek van uw fiets.
• if the seat tube diameter is greater than 40 mm.
• if the mounted bicycle child seat hangs forward.
Otherwise your child seat could slip off the seat
surface. Please check the position, which
depends on the seat tube angle of your bicycle.
• if the luggage carrier is wider than 150 mm.
• on the seat pillar.
• wanneer de bagagedrager breder is dan 150
mm.
F
• aan de zadelsteun.
NL
GB
8
JOCKEY Comfort -F-NL-GB - 01.07.fm Seite 9 Mittwoch, 7. Februar 2007 2:16 14
F
Procédez comme suit pour utiliser le siège
bicyclette :
Taille de la roue de la bicyclette
26“ / 28“
pouces
Diamètre du tube de fixation de
la selle
(impossible sur les tubes ovales)
Ø 28 - 40 mm
• Pièce d'insertion 1 Ø 28 mm
Ø 28 - 30 mm
• Pièce d'insertion 2 Ø 32 mm
Ø 31 - 34 mm
• Pièce d'insertion 3 Ø 36 mm
Ø 35 - 37 mm
• sans pièce d'insertion
Ø 38 - 40 mm
• Patte d'insertion en
caoutchouc 4
pour
l'adaptation
précise du
diamètre
Pour protéger tous les passagers
• AVERTISSEMENT ! Les modifications sur le
siège bicyclette et sur le dispositif de fixation 5
sont strictement réservées au fabricant.
9
• AVERTISSEMENT ! L'installation du siège
bicyclette modifie le comportement de votre
JOCKEY Comfort -F-NL-GB - 01.07.fm Seite 10 Mittwoch, 7. Februar 2007 2:16 14
NL
GB
Het fietskinderzitje kan als volgt worden
gebruikt:
Wieldiameter van de fiets
26“ / 28“
Diameter zadelbuis
(niet mogelijk bij ovale
zadelbuizen)
Ø 28 - 40 mm
• Inlegdeel 1 Ø 28 mm
Ø 28 - 30 mm
• Inlegdeel 2 Ø 32 mm
Ø 31 - 34 mm
• Inlegdeel 3 Ø 36 mm
Ø 35 - 37 mm
• zonder inlegdeel
Ø 38 - 40 mm
• Inlegrubber 4
voor het
precies
aanpassen van
de diameter
Ter bescherming van alle
verkeersdeelnemers
You can use your bicycle child seat as follows:
Wheel size of the bicycle
26“ / 28“
Seat tube diameter
(not possible for oval tubes)
Ø 28 - 40 mm
• Insert 1 Ø 28 mm
Ø 28 - 30 mm
• Insert 2 Ø 32 mm
Ø 31 - 34 mm
• Insert 3 Ø 36 mm
Ø 35 - 37 mm
• Without insert
Ø 38 - 40 mm
• Rubber insert pad 4
to precisely
adapt to the
diameter
For the protection of all road users
• WAARSCHUWING! Wijzigingen aan het
fietskinderzitje en de bevestiging 5 mogen alleen
door de fabrikant worden uitgevoerd.
• WARNING! Changes to the bicycle child seat
and to the mounting bracket 5 may be made
exclusively by the manufacturer.
• WAARSCHUWING! Door het monteren van het
fietskinderzitje verandert het rijgedrag van uw
• WARNING! Mounting the bicycle child seat
changes your bicycle's handling (balance,
F
NL
GB
10
JOCKEY Comfort -F-NL-GB - 01.07.fm Seite 11 Mittwoch, 7. Februar 2007 2:16 14
F
bicyclette (équilibre, guidage et freinage).
Adaptez votre conduite en conséquence.
• Ne transportez jamais deux enfants sur une
bicyclette car cela entraverait considérablement
le comportement en conduite.
• AVERTISSEMENT ! Ne fixez jamais de bagage
sur le siège enfant. Pour le transport de
bagages, utilisez un porte-bagage de roue avant
ou un dispositif similaire.
• Même si vous vous déplacez sans enfant,
vérifiez que le siège enfant est bien fixé et
qu'aucune pièce ne peut se prendre dans les
pièces mobiles de la bicyclette (par ex. la
ceinture dans les rayons).
• Retirez le siège enfant lors du transport sur le
porte-bicyclette de toit de la voiture. La très
haute résistance de l'air peut entraîner des
dommages sur la bicyclette ou sur le siège
enfant, voire provoquer des accidents.
Protection antivol
11
• Vous pouvez protéger le siège bicyclette contre
le vol. Faites passer un cadenas de bicyclette
dans les orifices de poignée du siège enfant et
fixez-le à la structure de la bicyclette.
JOCKEY Comfort -F-NL-GB - 01.07.fm Seite 12 Mittwoch, 7. Februar 2007 2:16 14
NL
GB
fiets (evenwicht, sturing en remmen). Pas uw
fietsgedrag overeenkomstig aan.
steering and braking). Adapt your riding style
accordingly.
• Er mogen nooit twee kinderen op één fiets
worden vervoerd. Dit heeft aanzienlijke invloed
op het fietsgedrag.
• Never transport two children on one bicycle. This
considerably impairs the bicycle's handling.
• WAARSCHUWING! Bevestig nooit bagage aan
het kinderzitje. Gebruik voor het vervoeren van
bagage bijvoorbeeld een bagagedrager op de
voorzijde van de fiets.
• Controleer ook wanneer u zonder kind fietst of
het kinderzitje vastzit en er geen onderdelen van
in de bewegende delen van de fiets terecht
kunnen komen (bijv. gordels tussen de spaken)
• Bij het vervoeren van de fiets op een imperiaal
moet het kinderzitje van de fiets worden gehaald.
De zeer hoge luchtweerstand kan leiden tot
schade aan de fiets en het kinderzitje, en
mogelijk zelfs ongevallen veroorzaken.
• WARNING! Never tie down luggage on the child
seat. Please use a front wheel luggage carrier or
the like to transport luggage.
• Even if you are riding without a child, check that
the child seat is secure and that no parts can
come into contact with moving bicycle parts (the
belts with the spokes, for example).
• When transporting the bicycle on a car's roof
carrier, you must take the child seat off the
bicycle. The very high air resistance can damage
the bicycle and child seat and even cause
accidents.
F
Diefstalbeveiliging
Theft protection
NL
• U kunt het fietskinderzitje tegen diefstal
beveiligen. Haal een fietsslot door de
handgreepgaten van het kinderzitje en maak
deze vast aan het fietsframe.
• You can protect the bicycle child seat against
theft. Put a bicycle lock through the child seat's
grip holes and secure it to the bicycle frame.
GB
12
JOCKEY Comfort -F-NL-GB - 01.07.fm Seite 13 Mittwoch, 7. Februar 2007 2:16 14
F
2.1 Installation sur la bicyclette
Procédez comme suit pour fixer le dispositif de
fixation sur le tube-support de la selle :
Mesurez le diamètre du tube-support de la selle.
Insérez la pièce d'insertion correspondante 1/2/3
sur le tube-support de la selle 6 (voir 2) en
orientant la fente vers l'arrière.
Astuce ! Pour les tailles intermédiaires (par ex.
Ø 31 mm), placez en outre une patte d'insertion
en caoutchouc 4 autour du tube-support de la
selle 6 pour adapter le diamètre avec la plus
grande précision possible.
Rabattez le dispositif de fixation 5 autour de la
pièce d'insertion.
Serrez légèrement les vis 7 à l'aide d'une clé
mâle coudée (taille 5) afin de pouvoir encore
déplacer légèrement le dispositif de fixation 5 .
Attention ! Veillez à ce que le raccord à vis 7
soit à l'avant et le verrou de sécurité 8 en bas.
13
JOCKEY Comfort -F-NL-GB - 01.07.fm Seite 14 Mittwoch, 7. Februar 2007 2:16 14
NL
GB
2.1 Montage op de fiets
2.1 Mounting on the bicycle
Zo maakt u de bevestiging aan de zadelbuis
vast:
Attaching the mounting bracket to the seat
tube:
Meet de diameter van de zadelbuis.
Zet het juiste inlegdeel 1/2/3 met de spleet naar
Measure the diameter of the seat tube.
Put the appropriate insert 1/2/3, with the opening
achteren over de zadelbuis 6 (zie 2.)
Tip! Plaats bij een tussenmaat (bijv. Ø 31 mm)
nog een inlegrubber 4 om de zadelbuis 6, om de
diameter zo precies mogelijk aan te passen.
facing backwards, onto the seat tube 6 (see 2.)
Tip! For in-between sizes (Ø 31 mm, for
example), also place the rubber insert pad 4
around the seat tube 6 to adapt to the diameter
as precisely as possible.
Klap de bevestiging 5 om het inlegdeel.
Fold the mounting bracket 5 around the insert.
Draai de schroeven 7 met een inbussleutel
Tighten the screws 7 slightly using an hollow
(maat 5) lichtjes aan. Zo kunt u de bevestiging 5
nog een beetje verschuiven.
Voorzichtig! Let erop dat de schroefbevestiging
7 zich aan de voorkant bevindt en de
bevestigingsgrendel 8 aan de onderzijde.
hexagon wrench (size 5). This way, you can still
move the mounting bracket 5 a little.
Caution! Pay attention that the screws 7 are in
front and the safety-catch 8 is on the bottom.
F
NL
GB
14
JOCKEY Comfort -F-NL-GB - 01.07.fm Seite 15 Mittwoch, 7. Februar 2007 2:16 14
F
Insérez le siège bicyclette accompagné de l'anse
de maintien 9 dans les orifices d'enclenchement
10 jusqu'a ce qu'il s'enclenche.
Attention ! Vérifiez que le verrou de sécurité 8
est enclenché au niveau des deux extrémités de
l'anse.
Procédez comme suit pour positionner
correctement le dispositif de fixation 9 sur la
bicyclette :
Déplacez le siège bicyclette sur le tube-support de
la selle 6 de manière à ce...
... qu'un écart de 3 cm soit maintenu entre le
porte-bagage et le siège enfant.
... que les câbles de changement de vitesse et
de freinage ne soient gênés.
... le siège bicyclette ne soit pas dans la zone de
pédalage ou des jambes.
15
JOCKEY Comfort -F-NL-GB - 01.07.fm Seite 16 Mittwoch, 7. Februar 2007 2:16 14
NL
Steek het fietskinderzitje met de
bevestigingsbeugels 9 in de klikgaten 10 tot
deze vastklikt.
Voorzichtig! Controleer of de
bevestigingsgrendel 8 over beide
beugeluiteinden is geklikt.
GB
Using the support rods 9 , put the bicycle child
seat into the snap-on holes 10 until it engages.
Caution! Make sure that the safety-catch 8 is
engaged in both rod ends.
Zo plaatst u de bevestiging 9 op de juiste
manier op de fiets:
Positioning the mounting bracket 9 correctly on
the bicycle:
Verschuif het fietskinderzitje langs de zadelbuis 6
tot...
Move the bicycle child seat on the seat tube 6 so
that...
... er tussen de bagagedrager en het kinderzitje
... there is a minimum clearance of 3 cm between
minimaal 3 cm afstand overblijft.
... de versnellings- en remleidingen niet beklemd
zitten,
... het fietskinderzitje zich niet binnen het
trapbereik van de fietspadelen en de benen
bevindt.
the luggage carrier and the child seat.
... the gear-shift and brake cables are not
hindered.
... the bicycle child seat does not get in the way
of the bicycle pedals or your legs.
F
NL
GB
16
JOCKEY Comfort -F-NL-GB - 01.07.fm Seite 17 Mittwoch, 7. Februar 2007 2:16 14
F
Serrez à présent les vis 7 du dispositif de fixation
5 à l'aide d'une clé mâle coudée (taille 5) à un
couple de serrage de 5 Nm.
Attention ! Ne serrez jamais trop les vis 7. Le
tube-support de la selle 6 peut également être
endommagé.
Vérifiez la fente au niveau du raccord à vis 7.
Elle doit être de 8 mm afin que les extrémités de
l'anse s'enclenchent en toute sécurité.
Astuce ! Vous avez la possibilité de compenser
le diamètre à l'aide de la patte d'insertion en
caoutchouc 4 .
17
JOCKEY Comfort -F-NL-GB - 01.07.fm Seite 18 Mittwoch, 7. Februar 2007 2:16 14
NL
Draai nu de schroeven 7 van de bevestiging 5
met een inbussleutel (maat 5) aan met een
aanhaalmoment van 5 Nm.
Voorzichtig! Draai de schroeven 7 nooit te vast
aan. Anders kunt u de zadelbuis 6 beschadigen.
GB
Now tighten the screws 7 of the mounting
bracket 5 using an hollow hexagon wrench
(Größe 5) at a torque of 5 Nm.
Caution! Never tighten the screws 7 too tight.
Otherwise the seat tube 6 could be damaged.
Controleer de spleet bij de schroefbevestiging 7.
Check the opening on the screw connection 7. It
Deze moet 8 mm groot zijn zodat de
beugeleinden goed op hun plaats klikken.
Tip! Met het inlegrubber 4 kunt u de diameter
nog aanpassen.
must be 8 mm for the rod ends to engage
securely.
Tip! You can still adjust the diameter using the
rubber insert pad 4.
F
NL
GB
18
JOCKEY Comfort -F-NL-GB - 01.07.fm Seite 19 Mittwoch, 7. Februar 2007 2:16 14
F
Procédez comme suit pour le centre de gravité :
Vérifiez le centre de gravité du siège bicyclette.
Veillez à ce que la réticule imprimée 11 ne se
trouve pas à plus de 10 cm de l'axe arrière 12.
Repoussez le verrou de sécurité vers l'arrière 8,
retirez le siège bicyclette du dispositif de fixation
5.
Ouvrez le volet du boîtier de rangement du mode
d'emploi 13.
Dévissez la vis 14 d'env. 10 mm à l'aide d'un clé
à fourche (taille 13).
Vous pouvez à présent déplacer l'anse de
maintien 9.
Resserrez les vis 14.
Revérifiez le centre de gravité.
19
JOCKEY Comfort -F-NL-GB - 01.07.fm Seite 20 Mittwoch, 7. Februar 2007 2:16 14
NL
GB
Zo stelt u het zwaartepunt in:
Setting the centre of gravity:
Controleer het zwaartepunt van het
Check the bicycle child seat's centre of gravity.
fiestkinderzitje.
Zorg ervoor dat het op het zitje afgebeelde
draadkruis 11 niet meer dan 10 cm achter de
achteras 12 ligt.
Duw de bevestigingsgrendel 8 naar achteren en
trek het fietskinderzitje uit de bevestiging 5.
Open de klep van het vak voor de
gebruiksaanwijzing 13.
Draai de schroeven 14 met een steeksleutel
(maat 13) circa 10 mm naar buiten.
Nu kunt u de bevestigingsbeugel 9 verschuiven.
Draai de schroeven 14 weer vast.
Controleer het zwaartepunt opnieuw.
Pay attention that the printed crosshairs 11 are
not more than 10 cm behind the rear axle 12.
Press back the safety-catch 8 and take the
bicycle child seat out of the mounting bracket 5.
Open the flap of the user instructions
compartment 13.
Unscrew the screws 14 about 10 mm using an
open-end wrench (size 13).
Now you can move the support rods 9.
Retighten the screws 14.
Check the centre of gravity again.
F
NL
GB
20
JOCKEY Comfort -F-NL-GB - 01.07.fm Seite 21 Mittwoch, 7. Februar 2007 2:16 14
F
Veuillez également vérifier que toutes les
pièces de la bicyclette fonctionnent
correctement lorsque le siège bicyclette
est installé.
3.
Utilisation du siège bicyclette
Pour protéger votre enfant
• Attachez toujours votre enfant dans le siège
bicyclette.
• AVERTISSEMENT ! Ne quittez jamais des yeux
votre enfant installé dans le siège bicyclette
lorsque vous immobilisez la bicyclette.
• En outre, protégez votre enfant avec un casque
pour enfant.
• Utilisez également une protection du ressort de
la selle si votre selle est équipée de ressorts.
Sinon, votre enfant risque de s'y coincer les
doigts. (Demandez conseil dans un magasin
spécialisé.)
21
• Veillez à ce que ni votre enfant ni vos vêtements
ne puissent se prendre dans les pièces mobiles
de la bicyclette. Fixez toujours les attaches de
pieds. Rangez notamment les bandes et
vêtements lâches...
JOCKEY Comfort -F-NL-GB - 01.07.fm Seite 22 Mittwoch, 7. Februar 2007 2:16 14
NL
GB
Controleer of alle onderdelen van de fiets
ook bij een gemonteerd fietskinderzitje
nog goed functioneren.
3.
Gebruik van het fietskinderzitje
Ter bescherming van uw kind
Please check that all the parts on the
bicycle still function correctly when the
bicycle child seat is mounted.
3.
Using your bicycle child seat
For the protection of your child
• Doe altijd de gordel om bij uw kind, als deze in
het fietskinderzitje zit.
• Always secure your child when he or she is in the
bicycle child seat.
• WAARSCHUWING! Houd uw kind in het
fietskinderzitje constant in het oog wanneer u uw
fiets stalt.
• WARNING! Never leave your child unattended in
the bicycle child seat when you park your
bicycle.
• Bescherm uw kind bovendien met een kinderfietshelm.
• Please have your child wear a child's bicycle
helmet as additional protection.
• Gebruik een zadelveerbeschermer wanneer uw
fietszadel een zadelveer heeft. Anders kunnen
de vingers van uw kind ertussen beklemd raken.
(Vraag hiernaar bij de vakhandel)
• Please use a seat cover if your bicycle seat has
seat springs. Otherwise your child could get his
or her fingers stuck there. (Ask your retailer)
• Let erop dat noch uw kind, noch kledingstukken
in de bewegende delen van de fiets terecht
kunnen komen. Maak altijd de voetriempjes vast
om de voeten van het kind. Stop loshangende
bandjes, kledingstukken en dergelijke weg.
• Pay attention that neither your child nor pieces of
clothing can come into contact with moving parts
of the bicycle. Always put on the footstraps. Tuck
away any hanging straps, pieces of clothing...
F
NL
GB
22
JOCKEY Comfort -F-NL-GB - 01.07.fm Seite 23 Mittwoch, 7. Februar 2007 2:16 14
F
• Protégez votre enfant du froid et de la pluie.
Pensez à habiller votre enfant plus chaudement
qu'un cycliste en mouvement.
• Attention ! Les parties en matière plastique du
siège enfant se réchauffent en plein soleil. Votre
enfant risque de se brûler. Protégez votre enfant
et le siège enfant d'un fort rayonnement solaire.
• Astuce ! Les béquilles à double pied assurent
une meilleure stabilité de la bicyclette et facilitent
avant tout l'installation de votre enfant.
(Demandez conseil dans un magasin
spécialisé.)
3.1 Adaptation des bretelles
La bonne adaptation des bretelles assure le
maintien efficace de votre enfant dans le siège
bicyclette.
Les bretelles 15 doivent se trouver à la hauteur des
épaules de votre enfant ou un peu au-dessus.
23
JOCKEY Comfort -F-NL-GB - 01.07.fm Seite 24 Mittwoch, 7. Februar 2007 2:16 14
NL
• Bescherm uw kind tegen kou en regen. Kleed uw
kind warmer aan dan een actieve fietser.
• Voorzichtig! De kunststofdelen van het
kinderzitje worden heet in de zon. Uw kind kan
zich hieraan verbranden. Bescherm uw kind en
het kinderzitje tegen sterke zonnestralen.
• Tip! Met een tweepotige fietsstandaard staat uw
fiets stabieler. Het vergemakkelijkt vooral het
plaatsen van uw kind in het zitje. (Vraag hiernaar
bij de vakhandel)
GB
• Protect your child against the cold and rain.
Please remember that you, an active bicycle
rider, are warmer than your child.
• Caution! The plastic parts of the child safety
seat can heat up in the sun. Your child may get
burnt. Protect your child and the child seat
against intensive solar radiation.
• Tip! A double kickstand will make your bicycle
more stabile. This primarily makes it easier for
you to put your child in the seat. (Ask your
retailer)
3.1 De schoudergordels afstellen
3.1 Adjusting the shoulder straps
Juist afgestelde schoudergordels zorgen voor
een optimale ondersteuning van uw kind in het
fietskinderzitje.
Correctly adjusted shoulder straps ensure
optimal protection for your child in the bicycle
seat.
De schoudergordels 15 moeten op schouderhoogte
van het kind of iets daarboven lopen.
The shoulder straps 15 must lie at your child's
shoulder level or slightly above.
F
NL
GB
24
JOCKEY Comfort -F-NL-GB - 01.07.fm Seite 25 Mittwoch, 7. Februar 2007 2:16 14
F
Procédez comme suit pour adapter la hauteur
des bretelles à la taille de votre enfant :
Basculez le dispositif de réglage des appui-têtes
16 vers le haut.
Placez l'appui-tête 17 à la hauteur de bretelles
appropriée.
Redescendez le dispositif de réglage de l'appuitête 16 pour bloquer l'appui-tête 17.
3.2 Adaptation des repose-pieds
Basculez le dispositif de réglage des reposepieds 18 vers le haut.
Placez les repose-pieds 19 à la hauteur
appropriée.
Redescendez le dispositif de réglage des
repose-pieds 18 pour bloquer le repose-pied 19.
Attention ! Veillez à ce que les repose-pieds 19
ne se trouvent pas dans la zone de pédalage ou
des jambes.
25
JOCKEY Comfort -F-NL-GB - 01.07.fm Seite 26 Mittwoch, 7. Februar 2007 2:16 14
NL
De hoogte van de schoudergordels kan als
volgt aan de lichaamsgrootte van het kind
worden aangepast:
Zwenk de hoofdsteunverstelling 16 naar boven.
Schuif de hoofdsteun 17 op de juiste
schoudergordelhoogte.
Duw de hoofdsteunverstelling 16 weer omlaag
GB
To adjust the height of the shoulder straps to fit
your child:
Pivot the headrest adjuster 16 upwards.
Slide the headrest 17 until the shoulder straps
are at the correct height.
Press the headrest adjuster 16 downwards again
to secure the headrest 17.
om de hoofdsteun 17 vast te zetten.
3.2 De voetsteunen afstellen
Zwenk de voetsteunverstelling 18 naar boven.
Schuif de voetsteunen 19 op de juiste hoogte.
Duw de voetsteunverstelling 18 weer omlaag om
de voetsteunen 19 vast te zetten.
Voorzichtig! Let erop dat de voetsteunen 19
zich niet in het trapbereik van de fietspedalen en
benen bevinden.
3.2 Adjusting the footrests
Pivot the footrest adjuster 18 upwards.
Slide the footrests 19 to the correct height.
Press the footrest adjuster 18 downwards again
to secure the footrest 19.
Caution! Pay attention that the footrests 19 do
not get in the way of the bicycle pedals or your
legs.
F
NL
GB
26
JOCKEY Comfort -F-NL-GB - 01.07.fm Seite 27 Mittwoch, 7. Februar 2007 2:16 14
F
3.3 Mise en place de la ceinture de
votre enfant
Desserrez les bretelles 15. Appuyez à cet effet
sur les dispositifs de réglage de la ceinture 20 et
faites les coulisser vers le haut.
Appuyez sur le bouton du fermoir de la ceinture
21 et retirez-le de la rainure de fixation 22.
Placez votre enfant dans le siège bicyclette.
Passez les bretelles 15 sur les épaules de votre
enfant.
Passez le fermoir 21 dans la rainure de fixation
22.
Tendez les bretelles 15 en tirant sur les
extrémités.
Attention ! Veillez à ce que les deux bretelles 15
soient de longueur identique et tendues de la
même manière.
27
JOCKEY Comfort -F-NL-GB - 01.07.fm Seite 28 Mittwoch, 7. Februar 2007 2:16 14
NL
3.3 De gordel bij uw kind omdoen
Maak de schoudergordels 15 wat losser. Druk
hiervoor op de gordelverstelling 20 en schuif
deze naar boven.
Druk op de drukknop op het slot van de gordel
21 en trek deze uit de bevestigingssleuf 22.
Plaats uw kind in het fietskinderzitje.
Leid de schoudergordels 15 over de schouders
van uw kind.
Steek het slot van de gordel 21 in de
bevestigingssleuf 22.
Trek de schoudergordels 15 aan door aan de
uiteinden te trekken.
Voorzichtig! Let erop dat beide
schoudergordels 15 goed gespannen en even
lang zijn.
GB
3.3 Securing your child
Loosen the shoulder straps 15. To do so, press
the strap adjuster 20 and push it upwards.
Press the button on the harness buckle 21 and
pull out it out of the fastening slot 22.
Place your child in the bicycle child seat.
Put the shoulder straps 15 over the shoulders of
your child.
Put the harness buckle 21 in the fasteining slot
22.
Tighten the shoulder straps 15 by pulling on the
ends.
Caution! Pay attention that both shoulder straps
15 are tight and of equal length.
F
NL
GB
28
JOCKEY Comfort -F-NL-GB - 01.07.fm Seite 29 Mittwoch, 7. Februar 2007 2:16 14
F
Fermez les attaches de pieds 23 et tirez sur
leurs extrémités pour les tendre.
Attention ! Veillez à ce que les attaches de
pieds 23 soient bien tendues tout au long du
trajet. (Risque de blessure)
3.4 Réglage du dossier
Procédez comme suit pour incliner la dossier
25 vers l'arrière :
Tenez le dossier 25 avec une main.
Poussez la poignée de réglage 26 vers le bas.
Basculez le dossier 25 vers l'avant ou vers
l'arrière dans la position souhaitée.
Dès que vous relâchez la poignée de réglage 26,
le dossier 25 se bloque.
Attention ! Vérifiez que le dossier 25 est
enclenché des deux côtés.
29
JOCKEY Comfort -F-NL-GB - 01.07.fm Seite 30 Mittwoch, 7. Februar 2007 2:16 14
NL
Sluit de voetriempjes 23 en trek aan de uiteinden
om ze aan te spannen
Voorzichtig! Zorg dat de voetriemen 23 tijdens
de rit altijd aangespannen zijn. (Letselgevaar)
GB
Close the footstraps 23 and pull them on the
ends to tighten them
Caution! Pay attention that the footstraps 23 are
always tightened during the ride. (to prevent risk
of injury)
3.4 Instellen van de rugleuning
3.4 Setting the backrest
Zo kantelt u de rugleuning 25 naar achteren:
To place the backrest 25 in the reclined
position:
Houd de rugleuning 25 met één hand vast.
Duw de instelhendel 26 omlaag.
Kantel de rugleuning 25 naar voren of naar
achteren tot de gewenste stand.
Zodra u de verstelknop 26 loslaat, klikt de
rugleuning 25 vast.
Voorzichtig! Controleer of de rugleuning 25 aan
beide zijden op zijn plaats is geklikt.
Hold the backrest 25 tightly with one hand.
Press down the adjustment handle 26.
Pivot the backrest 25 forwards or backwards to
the desired position.
As soon as you release the adjustment handle
F
26, the backrest 25 will lock into place.
Caution! Make sure that the backrest 25 is
engaged on both sides.
NL
GB
30
JOCKEY Comfort -F-NL-GB - 01.07.fm Seite 31 Mittwoch, 7. Februar 2007 2:16 14
F
3.5 Démontage du siège bicyclette
Pour l'usage quotidien, le dispositif de fixation 5
peut rester sur la bicyclette. Démontez uniquement
le siège bicyclette.
Repoussez le verrou de sécurité vers l'arrière 8,
retirez le siège bicyclette du dispositif de fixation
5.
Astuce ! Vous pouvez également monter un
dispositif de fixation supplémentaire 5 sur une
deuxième bicyclette. (Demandez conseil dans un
magasin spécialisé.)
4.
Avant chaque trajet
Vérifiez, pour la protection de votre
enfant, que...
• les bretelles 15 et les attaches de pieds 23 sont
tendues.
• aucun corps ou vêtement ne puisse se prendre
dans les pièces mobiles de la bicyclette ou du
siège enfant (par ex. les freins, les rayons, les
ressorts de la selle...).
31
JOCKEY Comfort -F-NL-GB - 01.07.fm Seite 32 Mittwoch, 7. Februar 2007 2:16 14
NL
GB
3.5 Verwijderen van het
fietskinderzitje
3.5 Dismounting of the bicycle child
seat
Bij dagelijks gebruik kunt u de bevestiging 5 op de
fiets laten zitten. Verwijder eenvoudig alleen het
fietskinderzitje.
You can leave the mounting bracket 5 on the
bicycle when you are riding without your child. Just
take off the bicycle child seat.
Duw de bevestigingsgrendel 8 naar achteren en
Press back the safety-catch 8 and take the
trek het fietskinderzitje uit de bevestiging 5.
bicycle child seat out of the mounting bracket 5.
Tip! U kunt ook een extra bevestiging 5 monteren
op een tweede fiets. (Vraag hiernaar bij de
vakhandel)
Tip! You can also attach an additional mounting
bracket 5 to a second bicycle. (Ask your retailer)
4.
4.
Voor elke rit
Controleer voor de veiligheid van uw kind
of...
Before each ride
For the safety of your child, please check
that...
• de schoudergordels 15 en de voetriemen 23
gespannen zijn.
• the shoulder straps 15 and the footstraps 23 are
tight.
• er geen lichaamsdelen of kledingstukken in de
bewegende delen van de fiets of het kinderzitje
terecht kunnen komen (bijv. remmen, spaken,
zadelveren...).
• no body parts or pieces of clothing can come into
contact with moving parts of the bicycle or child
seat (e.g. brakes, spokes, seat springs...).
F
NL
GB
32
JOCKEY Comfort -F-NL-GB - 01.07.fm Seite 33 Mittwoch, 7. Februar 2007 2:16 14
F
• votre enfant installé dans le siège bicyclette ne
puisse pas se blesser à des pièces tranchantes
ou pointues (par ex. des extrémités de câbles
effilochées).
• l'anse de maintien 9 est bloquée des deux côtés.
• toutes les vis 7+14 sont serrées.
• la distance entre le siège bicyclette et le portebagage est suffisante même lorsque l'enfant est
installé.
Astuce ! Si la distance est trop faible, vous
pouvez recouvrir le porte-bagage à l'aide d'une
pièce en caoutchouc et en mousse appropriée.
• AVERTISSEMENT ! Le siège bicyclette ne doit
pas être utilisé si une quelconque pièce est
endommagée.
Attention ! Faites immédiatement remplacer
toutes les pièces défectueuses par votre
revendeur spécialisé.
5.
33
Nettoyage
• La housse peut être enlevée et lavée en
machine à 30° avec une lessive pour linge
délicat. Veuillez respecter exactement les
instructions de lavage sur l’étiquette de la
housse. Si vous lavez la housse à des
températures supérieures à 30°, le tissu risque
JOCKEY Comfort -F-NL-GB - 01.07.fm Seite 34 Mittwoch, 7. Februar 2007 2:16 14
NL
GB
• uw kind zich in het fietskinderzitje niet kan
bezeren aan scherpe of puntige onderdelen (bijv.
gerafelde kabeluiteinden).
• your child cannot injure him- or herself on sharp
or pointed parts (e.g. frayed cable ends).
• de bevestigingsbeugel 9 aan beide zijden op zijn
plaats is geklikt.
• all screws 7+14 are tightened.
• alle schroeven 7+14 zijn aangedraaid.
• het fietskinderzitje ook met het kind erin nog
voldoende afstand heeft tot de bagagedrager of
het achterwiel.
Tip! Wanneer de afstand te klein is, kunt u de
bagagedrager met een op maat gemaakt stuk
rubber of schuimrubber bekleden.
• WAARSCHUWING! Het fietskinderzitje mag niet
worden gebruikt wanneer enig onderdeel ervan
beschadigd is.
Voorzichtig! Laat alle defecte onderdelen direct
door uw vakhandelaar vervangen.
5.
Reiniging
• De bekleding kan worden verwijderd en in de
wasmachine worden gewassen met een
fijnwasprogramma op 30°C en een
fijnwasmiddel. Houd u aan de wasvoorschriften
op het label van de bekleding. Als de bekleding
op meer dan 30 °C wordt gewassen, verkleurt de
• the support rods 9 are engaged on both sides.
• the bicycle child seat has sufficient clearance to
the luggage carrier or back wheel, even if the
child is seated in it.
Tip! If the clearance is too small, you can pad
the luggage carrier using a suitable rubber or
foam part.
• WARNING! The bicycle child seat may not be
used if any part is damaged.
Caution! Have all defective parts replaced
immediately by your retailer.
5.
Cleaning
• The cover can be removed and washed with a
mild detergent using the washing machine's
cycle for delicate items (30 °C). Please observe
the instructions on the washing label of the
cover. The colours of the cover may fade if
F
NL
GB
34
JOCKEY Comfort -F-NL-GB - 01.07.fm Seite 35 Mittwoch, 7. Februar 2007 2:16 14
F
de déteindre. Ne pas essorer la housse et ne la
mettre en aucun cas dans le sèche-linge (le tissu
risque de se décoller du rembourrage).
• Vous pouvez laver les éléments en matière
plastique avec une eau savonneuse. Ne pas
utiliser de détergents ou de produits corrosifs
(solvants par exemple).
• Les sangles peuvent être lavées à l’eau
savonneuse tiède.
6.
Remarques relatives à
l’élimination
Veuillez respecter les directives d’élimination
en vigueur dans votre pays.
Elimination de l’emballage
Conteneur pour le carton
Elimination des pièces détachées
35
Housse
Déchets résiduels, recyclage
thermique
Pièces en matière
plastique
suivant le marquage, dans le
conteneur spécialement prévu
Pièces métalliques
Conteneur pour métaux
Sangle
Conteneur pour polyester
JOCKEY Comfort -F-NL-GB - 01.07.fm Seite 36 Mittwoch, 7. Februar 2007 2:16 14
NL
GB
stof mogelijk. De bekleding mag niet worden
gecentrifugeerd of in een elektrische wasdroger
worden gedroogd (hierdoor kan de stof van de
vulling losraken).
• De kunststofdelen kunnen met een
zeepoplossing worden gereinigd. Gebruik geen
bijtende middelen (als oplosmiddelen).
• De gordels kunnen met een lauwwarme
zeepoplossing worden gereinigd.
losgemaakt.
6.
Instructies voor de afvoer
Houd u aan de in uw land geldende
afvoervoorschriften.
Afvoer van de verpakking
washed at more than 30 °C. Do not spin, and
never tumble dry in an electric clothes dryer (the
fabric may separate from the padding).
• The plastic parts can be cleaned using soapy
water. Do not use harsh cleaning agents (such
as solvents).
• The harness can be removed and washed in
lukewarm soapy water.
6.
Notes regarding disposal
Please observe the disposal regulations in your
country.
disposal of packaging
container for paperboard
Bij het oud papier
Afvoer van de afzonderlijke delen
disposal of components
Bekleding
Huisvuil, thermische verwerking
cover
garbage, thermal utilisation
F
Kunststofdelen
Overeenkomstig de aanduiding
op het deel in de daarvoor
bestemde container
plastic parts
container corresponding to
the label on the part
NL
metal parts
container for metals
Metalen delen
Container voor metaal
GB
webbing
container for Polyester
Gordels
Container voor polyester
36
JOCKEY Comfort -F-NL-GB - 01.07.fm Seite 37 Mittwoch, 7. Februar 2007 2:16 14
F
7.
2 ans de garantie
Pour ce siège auto / bicyclette nous accordons une
garantie de 2 ans pour les défauts de fabrication ou
de matériau. La garantie débute le jour de l’achat.
Pour apporter la preuve de la garantie, veuillez
conserver pendant toute la durée de la garantie la
carte de garantie remplie, le procès-verbal de
remise que vous avez signé ainsi que la facture
d’achat.
Pour toute réclamation, la carte de garantie doit
être jointe au siège pour enfants. La prestation de
garantieest limitée aux sièges auto / bicyclette qui
ont été traités comme il convient et qui sont
renvoyés propres et complets.
La garantie ne couvre pas les défauts suivants :
• usure naturelle et dommages dus à une
sollicitation excessive
• dommages dus à une utilisation inappropriée et
non conforme
37
JOCKEY Comfort -F-NL-GB - 01.07.fm Seite 38 Mittwoch, 7. Februar 2007 2:16 14
NL
7.
GB
2 jaar garantie
Wij geven 2 jaar garantie op fabricage- en
materiaalfouten in deze auto-/fietskinderzitjes. De
garantieperiode gaat in op de datum van aankoop.
Bewaar om aanspraak op de garantie te kunnen
maken de ingevulde garantiekaart, de door u
ondertekende overdrachtscontrole en het
aankoopbewijs gedurende de gehele
garantieperiode.
Bij het indienen van een garantieclaim dient het
garantiebewijs met het kinderzitje te worden
meegestuurd. De garantie is alleen van toepassing
op auto-/fietskinderzitjes waar juist mee is
omgegaan en die schoon en juist worden
teruggezonden.
7.
2-year warranty
For this car/bicycle child seat we provide a 2-year
warranty against manufacturing or material defects.
The warranty period is effective from the day of
purchase. As proof we ask that you fill out the
Warranty Card and retain it for the whole term of
the warranty period, together with the Transfer
Check signed by you and your sales receipt.
In the case of a warranty claim, the Warranty Card
must be returned together with the product. The
Warranty covers only car/bicycle child seats which
have been handled properly and which have been
sent to us in a clean condition.
The Warranty does not cover:
Uitgesloten van garantie zijn:
• natural signs of wear and damage resulting from
excessive stress.
• normale tekenen van slijtage en schade ten
gevolge van overmatige belasting
• damage resulting from inappropriate or improper
use.
• schade ten gevolge van onbedoeld of onjuist
gebruik
F
NL
GB
38
JOCKEY Comfort -F-NL-GB - 01.07.fm Seite 39 Mittwoch, 7. Februar 2007 2:16 14
F
Cas de garantie ou non ?
Tissus : tous nos tissus répondent aux exigences
élevées quant à la résistance des couleurs aux
rayons UV. Malgré tout, les tissus se décolorent
lorsqu’ils sont soumis aux rayons UV. Dans ce cas,
il ne s’agit pas de défaut de matériel mais d’une
usure normale qui n’est pas couverte par la
garantie.
En cas de garantie, veuillez vous adresser
immédiatement à votre revendeur spécialisé. Il
vous assistera volontiers. Lors du traitement des
droits résultant de réclamations, les taux
d’amortissement spécifiques au produit sont
appliqués. Pour cela, veuillez consulter nos
conditions générales de vente disponibles chez le
revendeur.
Utilisation, entretien et maintenance
Le siège auto / bicyclette doit être traité
conformément au mode d’emploi. Nous signalons
expressément que seuls les accessoires et les
pièces de rechange d’origine doivent être utilisés.
39
JOCKEY Comfort -F-NL-GB - 01.07.fm Seite 40 Mittwoch, 7. Februar 2007 2:16 14
NL
GB
Garantie of niet?
What is covered by the Warranty?
Stoffen: Al onze stoffen voldoen aan hoge eisen
wat betreft de kleurbestendigheid tegen UVstraling. Alle stoffen verbleken echter als deze aan
UV-straling worden blootgesteld. Hierbij gaat het
niet om materiaalfouten, maar om normale
slijtageverschijnselen die van garantie zijn
uitgesloten.
Fabric: All of our fabrics meet very high
requirements with regard to colour fastness when
exposed to UV radiation. Nevertheless, all fabrics
fade when exposed to UV radiation. This is not a
material defect, but rather a normal sign of wear
which is not covered by the Warranty.
Neem in het geval garantie noodzakelijk is
onmiddellijk contact op met uw vakhandel. Hier
wordt u met raad en daad terzijde gestaan. Bij de
behandeling van garantieclaims worden
productspecifieke afschrijvingsregels toegepast.
Hiervoor verwijzen wij u naar de bij de vakhandel
verkrijgbare algemene verkoopsvoorwaarden.
Gebruik, onderhoud en verzorging
Het auto-/fietskinderzitje moet overeenkomstig de
gebruiksaanwijzing worden gebruikt en
onderhouden. Wij wijzen er nadrukkelijk op dat
uitsluitend originele accessoires en onderdelen
mogen worden gebruikt.
Please contact your retailer directly in the event of a
warranty claim. He or she will give you the advice
and support you need. When processing claims,
product-specific depreciation rates will be applied.
Please refer to our General Terms and Conditions
which are available from your retailer.
Use, care and maintenance
The car/bicycle child seat must be used in
accordance with the user instructions. We would
like to point out that it is extremely important that
only RÖMER accessories and replacement parts
are used.
F
NL
GB
40
JOCKEY Comfort -F-NL-GB - 01.07.fm Seite 41 Mittwoch, 7. Februar 2007 2:16 14
41
JOCKEY Comfort -F-NL-GB - 01.07.fm Seite 42 Mittwoch, 7. Februar 2007 2:16 14
F
8.
Carte de garantie / Procès-verbal de remise
Nom :
________________________________________________
Adresse :
________________________________________________
Code postal :
________________________________________________
Lieu :
________________________________________________
Téléphone (avec préfixe):
________________________________________________
E-Mail :
________________________________________________
________________________________________________
Siège auto / bicyclette :
________________________________________________
Référence :
________________________________________________
Couleur du tissu (dessin):
________________________________________________
Accessoires :
________________________________________________
F
42
JOCKEY Comfort -F-NL-GB - 01.07.fm Seite 43 Mittwoch, 7. Februar 2007 2:16 14
F
Procès-verbal de remise :
contrôlé / en ordre
1. Intégralité
2. Contrôle fonctionnel
- Mécanisme de réglage siège
contrôlé / en ordre
- Réglage des sangles
contrôlé / en ordre
3. Absence de dommages
43
- Contrôle du siège
contrôlé / en ordre
- Contrôle des éléments textiles
contrôlé / en ordre
- Contrôle des pièces en matière plastique
contrôlé / en ordre
Date de l’achat :
___________________________________
Acheteur (signature)
___________________________________
Revendeur :
___________________________________
J’ai contrôlé le siège auto / bicyclette
et vérifié qu’il a été remis en bon état et
complet, et que toutes les fonctions
sont parfaitement opérationnelles.
J’ai reçu des informations suffisantes
concernant le produit et ses fonctions
avant l’achat, et j’ai pris connaissances
des instructions d’entretien et de
maintenance.
Cachet du revendeur
JOCKEY Comfort -F-NL-GB - 01.07.fm Seite 44 Mittwoch, 7. Februar 2007 2:16 14
NL
8.
Garantiekaart/overdrachtscontrole
Naam:
________________________________________________
Adres:
________________________________________________
Postcode:
________________________________________________
Plaats:
________________________________________________
Telefoon (incl.
netnummer):
________________________________________________
E-mail:
________________________________________________
________________________________________________
Auto-/fietskinderzitje:
________________________________________________
Artikelnummer:
________________________________________________
Kleur stof (dessin):
________________________________________________
Accessoires:
________________________________________________
NL
44
JOCKEY Comfort -F-NL-GB - 01.07.fm Seite 45 Mittwoch, 7. Februar 2007 2:16 14
NL
Overdrachtscontrole:
gecontroleerd / in orde
1. Volledigheid
2. Controle van de werking
- Verstelmechanisme zitje
gecontroleerd / in orde
- Verstelling gordel
gecontroleerd / in orde
3. Controleren op beschadigingen
45
- Zitje
gecontroleerd / in orde
- Stoffen delen
gecontroleerd / in orde
- Kunststofdelen
gecontroleerd / in orde
Datum van aankoop:
___________________________________
Klant
(handtekening):
___________________________________
Verkoper:
___________________________________
Jeg har afprøvet barnestolen til bilen/
cyklen og forvisset mig om, at jeg har
fået udleveret samtlige dele og at
stolen er fuldt funktionsdygtig.
Jeg har modtaget omfattende
informationer om produktet og dets
funktioner inden købet og taget plejeog vedligeholdelsesanvisningerne til
efterretning.
Stempel vakhandel
JOCKEY Comfort -F-NL-GB - 01.07.fm Seite 46 Mittwoch, 7. Februar 2007 2:16 14
GB
1.
Warranty Card / Transfer Check
Name:
________________________________________________
Address:
________________________________________________
Post Code:
________________________________________________
City/Town:
________________________________________________
Telephone No. (including
area code):
________________________________________________
e-mail address:
________________________________________________
________________________________________________
Car/bicycle child seat:
________________________________________________
Article No.:
________________________________________________
Fabric colour (design):
________________________________________________
Accessories:
________________________________________________
GB
46
JOCKEY Comfort -F-NL-GB - 01.07.fm Seite 47 Mittwoch, 7. Februar 2007 2:16 14
GB
Transfer Check:
examined / OK
1. Completeness
2. Function test
- Seat adjustment mechanism
examined / OK
- Belt adjustment
examined / OK
3. Intactness
47
- Seat
examined / OK
- Fabrics
examined / OK
- Plastic parts
examined / OK
Date of purchase:
___________________________________
Buyer (signature):
___________________________________
Retailer:
___________________________________
I have examined the car/bicycle child
seat and ensured that the seat has been
sold to the above customer in a complete
and fully functional condition.
I have received sufficient information on
the above product and its functions
before purchase and noted the
manufacturer's user instructions supplied
with the product.
Retailer's stamp