1
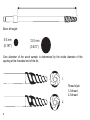
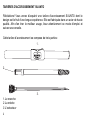
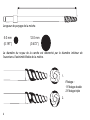
EN | FR | DE | ES | FI | SV
Increment Borers
CUSTOMER SERVICE CONTACTS
Suunto Oy
Phone +358 9 875870
Suunto USA
Phone 1 (800) 543-9124
Fax
Canada
EN
+358 9 87587301
Phone 1 (800) 776-7770
European Call Center Phone +358 2 284 11 60
Suunto Website
www.suunto.com
1
SUUNTO INCREMENT BORERS
Congratulations on your purchase of a Suunto increment borer. The borer design is
the result of years of experience and it has been made of the finest steel. If handled
and maintained properly it will remain in good shape for many years.
This increment borer consists of three parts:
1.
2.
3.
1. The handle
2. The bit
3. The extractor
2
Locking mechanism
3
Borer bit length.
5.0 mm
(0.197”)
12.0 mm
(0.472”)
Core diameter of the wood sample is determined by the inside diameter of the
opening at the threaded end of the bit.
1.
Thread style:
1.2-thread
2.3-thread
2.
4
Increment borers are used for
• determining the age of standing trees
• measuring the growth rate of a tree
• checking for defects inside a tree
• checking chemical penetration for quality control of treated wood products
• testing the condition of wooden structures in buildings, bridges, etc... (see
Important, number 3)
OPERATING INSTRUCTIONS
1. Open the end cap at the end of the handle. Remove the extractor and the bit from
the handle.
2. Open the locking mechanism. Insert the bit into the handle and close the locking
mechanism.
3. Push the bit threads against the tree at a 90° angle and start turning the handle
while at the same time exerting moderate forward pressure on the handle. This can
best be done by "leaning" against the handle while turning it. The bit threads should
be kept steady to prevent sway. After about a 2-3 cm (1 inch) penetration of the
threads, you can stop the forward "leaning" pressure. Continue turning the handle,
with palms open, until the threads reach the desired depth. Avoid applying
pressure to the handle up, down or laterally as this may result in bit breakage.
4. If the bit does not start to penetrate the wood after a few turns, move the bit to
another spot and try again. Continue to apply "leaning" pressure while turning.
Placing the bit in the deeper bark fissures will aid in starting the bit. (NOTE: The
threads on the bit do not extend to the cutting edge of the bit to allow good
centering and resharpening of the bit.)
5
After the desired depth is reached, insert the extractor into the bit "upside down"
i.e., with the edges turned down (∩), at a slight angle, applying upward pressure.
Push the extractor in the full length. Turn the handle a half turn backwards to break
the core loose from inside the tree. The edge of the extractor should now be
pointed upwards (∪). Remove the extractor from the bit by pulling the end cap. The
core sample should be in the extractor, held in place by the serrated tip.
Note! If the wood is very hard, it is possible that the core does not break loose
properly. In this case, move the bit to another spot, start again, and when the
desired depth is reached, turn the handle one and a half turns backwards to make
sure the core breaks loose from inside the tree.
5. Remove the bit immediately from the tree. This should be done before analyzing
the core sample. If left in the tree, even for a short period of time, the bit might
become "locked" in the tree.
6. Clean the bit and extractor at the end of each day with light machine oil. Never
store a dirty or wet borer. It is recommended that beeswax be applied before each
use.
7. Put the plastic cap on the tip of the bit to protect the threads, and store the bit and
extractor inside the handle.
6
IMPORTANT
1. Never bore a tree with the extractor inserted in the bit. The extractor should be
inserted only after you have finished the drilling and are ready to extract the core.
The extractor will twist if inside the bit while drilling, resulting in damage.
2. Never extend the handle length by attaching a pipe or similar apparatus to it, nor
use a power drill. The bit has been designed for manual use only. Applying larger
forces may cause failure of the bit or possible injury.
3. Never bore any object which may contain metal objects such as nails of fencing, as
this will cause severe damage to the bit's cutting edge.
4. Always transport and store the bit and extractor inside the handle with the plastic
protection cap in place.
5. Always keep the cutting edges of the bit sharp. Contact your dealer for this service
or to obtain the sharpening stones and accessories.
6. Avoid boring trees which are leaning or suspected to be hollow or decayed.
REMEMBER: The increment borer you purchased is a high quality, precision made
tool. By following these few basic guidelines for its care and use, you should enjoy
many years of quality service from your increment borer.
7
COORDONNÉES DU SERVICE CLIENTÈLE
Suunto Oy
Tél. +358 9 875870
Suunto USA
Tél. 1 (800) 543-9124
FR
Fax +358 9 87587301
Canada
Tél. 1 (800) 776-7770
Centre d'appels pour l'Europe Tél. +358 2 284 11 60
Site Web Suunto
www.suunto.com
1
TARIERES D'ACCROISSEMENT SUUNTO
Félicitations! Vous venez d'acquérir une tarière d'accroissement SUUNTO dont le
design est le fruit d'une longue expérience. Elle est fabriquée dans un acier de haute
qualité. Afin d'en tirer le meilleur usage, lisez attentivement ce mode d'emploi et
suivez ses conseils.
Cette tarière d'accroissement se compose de trois parties :
1.
2.
3.
1. Le manche
2. La mèche
3. L'extracteur
2
Le système de blocage
3
Longueur de perçage de la mèche.
5.0 mm
(0.197”)
12.0 mm
(0.472”)
Le diamètre du noyau de la carotte est déterminé par le diamètre intérieur de
l'ouverture à l'extrémité filetée de la mèche.
1.
Filetage :
1.Filetage double
2.Filetage triple
2.
4
Les tarières d'accroissement sont utilisées pour :
• déterminer l'âge des arbres
• mesurer la croissance des arbres
• vérifier les dommages dans les arbres
• contrôler la pénétration des produits chimiques dans le bois traité
• tester l'état des structures en bois (bâtiments, ponts, etc.) (Voir remarque n° 3)
NOTICE D'UTILISATION
1. Enlever l'extracteur et la mèche du manche.
2. Adapter l'embout carré de la mèche dans l'ouverture carrée située au milieu du
manche, et fermer le système de blocage.
3. Placer la mèche perpendiculairement à l'arbre, et commencer à tourner le manche
en exerçant une pression constante ; vous pouvez pour cela vous appuyer sur le
manche. Lorsque la mèche a pénétré de 2 à 3 cm, il n'est plus nécessaire de
s'appuyer. Continuez alors de tourner le manche avec les mains, paumes
ouvertes, pour éviter tout effort latéral qui pourrait briser la mèche. Changer
d'emplacement si la mèche n'arrive pas à pénétrer dans l'arbre. En choisissant une
fissure de l'écorce, on peut faciliter la pénétration.
4. Après avoir atteint la profondeur voulue, insérer l'extracteur dans la totalité de la
mèche de façon à ce que la cuillère regarde vers le bas (∩).
Pour casser la carotte de bois, il faut faire un demi tour de manivelle dans le sens
contraire de la pénétration. L'extracteur regardera donc vers le haut (∪).
Pour sortir la carotte, il suffit de retirer l'extracteur en tirant doucement, de façon à
ne pas briser l'échantillon.
5
Remarque: Si le bois est bien dur, il est possible que la carotte de bois ne se
détache pas proprement. Dans ce cas, recommencer à forer à un autre endroit et
lorsque la profondeur désirée est atteinte, tourner le manche d'un tour et demi en
arrière pour être certain que la carotte de bois se détache bien du reste du tronc.
5. Retirer immédiatement la mèche de l'arbre avant de commencer l'analyse de
l'échantillon. En effet, la mèche peut rester bloquée si on la laisse, même que très
peu de temps dans l'arbre.
6. Nettoyer, après chaque jour d'utilisation, la mèche et l'extracteur avec un chiffon
huilé. Ne jamais laisser une tarière sale ou humide sans l'essuyer. Il est
recommandé d'étendre de la cire d'abeille avant chaque usage.
7. Bien remettre le capuchon en plastique pour protéger le filetage, et replacer
toujours la mèche et l'extracteur dans le manche.
REMARQUES IMPORTANTES
1. Ne jamais percer un arbre en laissant l'extracteur à l'intérieur de la mèche, cela
pourrait l'endommager.
2. Ne pas allonger la longueur du manche, en y ajoutant quelques rallonges, ni
adapter une perceuse électrique. La tarière n'est conçue que pour un usage
manuel.
3. Ne pas percer un objet pouvant contenir du métal, par ex. des clous, car cela peut
gravement endommager le filetage.
4. La tarière doit toujours être transportée ou entreposée avec la mèche et
l'extracteur logés dans le manche, avec sa protection plastique.
5. Les lames du filetage de la mèche doivent être régulièrement aiguisées. Adressezvous à votre fournisseur pour cela.
6
6. Eviter de percer des arbres qui sont penchés ou que vous supposez être creux ou
pourris.
N'OUBLIEZ PAS : La tarière d'accroissement que vous venez d'acheter est un
instrument de précision de haute qualité. En suivant ces instructions élémentaires
vous assurez un long usage de votre tarière.
7