1
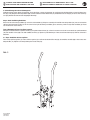
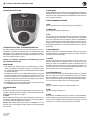
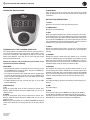
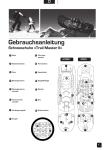
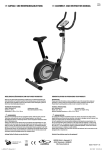
Crosstrainer
HD 66
DE
AUFBAU- UND GEBRAUCHSANLEITUNG
EN
INSTRUCTIONS ON ASSEMBLY AND USE
IT
FR
ISTRUZIONI PER IL MONTAGGIO E PER L´USO
INSTRUCTIONS DE MONTAGE ET MODE D’EMPLOI
HUDORA | Jägerwald 13 | 42897 Remscheid | Germany
www.hudora.de
Art.-Nr. 65308
Stand 04/11
Seite 1/28
DE
EN
AUFBAU- UND GEBRAUCHSANLEITUNG
INSTRUCTIONS ON ASSEMBLY AND USE
IT
FR
ISTRUZIONI PER IL MONTAGGIO E PER L´USO
INSTRUCTIONS DE MONTAGE ET MODE D’EMPLOI
INHALT / CONTENT / CONTENUTO / PIECES CONTENUES:
SICHERHEITSHINWEISE / SAFETY INSTRUCTIONS / NOTE DI SICUREZZA / CONSIGNES DE SECURITE
(3-6)
SCHRAUBENSET / SCREW SET / SET VITI / DESCRIPTION KIT DE VIS (3-6)
ZUBEHÖRLISTE / CHECK LIST / ELENCO ACCESSORI / LISTE DES ACCESSOIRES (7-9)
MONTAGE / ASSEMBLY INSTRUCTIONS / MONTAGGIO / MONTAGE
(10-17)
COMPUTERANLEITUNG & TRAININGSANLEITUNG
COMPUTER INSTRUCTIONS & TRAINING INSTRUCTIONS
ISTRUZIONI COMPUTER E ALLENAMENTO
UTILISATION DE L’ORDINATEUR & CONSIGNE POUR L’ENTRAINEMENT
(18-25)
Art.-Nr. 65308
Stand 04/11
Seite 2/28
DE
AUFBAU- UND GEBRAUCHSANLEITUNG
HERZLICHEN GLÜCKWUNSCH
ZUM KAUF IHRES PRODUKTES!
Bitte lesen Sie diese Bedienungsanleitung sorgfältig durch. Die Bedienungsanleitung ist fester Bestandteil des Produktes. Bewahren Sie sie
deshalb genauso wie die Verpackung für spätere Fragen sorgfältig auf.
Wenn Sie das Produkt an Dritte weitergeben, geben Sie bitte immer
diese Bedienungsanleitung mit. Dieses Produkt ist nicht für den gewerblichen Gebrauch konstruiert.
TECHNISCHE SPEZIFIKATIONEN
Artikel: Crosstrainer HD 66
Artikelnummer: 65308
Gewicht: ca. 40 kg
Maximale Belastbarkeit: 120 kg
Aufbaumaße: ca. 136 x 67 x 173 cm
Wenn Sie Probleme beim Aufbau haben oder weitere Produktinformationen wünschen finden Sie alles Wissenswerte unter http://hudora.
de/artnr/65308/
WARNHINWEISE
Benutzen Sie das Produkt nur für den vorgesehenen Zweck. Stellen Sie
sicher, dass alle Teile sicher verschraubt sind, bevor Sie Ihre Übungen
beginnen. Lose Teile oder Beschädigungen können zu Verletzungen
führen. Auch bei untypischen Geräuschen sollten Sie Ihr Training abbrechen. Stellen Sie das Gerät an einen ebenen Platz auf und gleichen
Sie Unebenheiten aus. Dazu empfiehlt es sich eine Decke oder einen
alten Teppich unter das Gerät zu stellen, um Ihren Boden zu schonen.
Das Gerät wurde gemäß EN 957, Klasse H.C. für häuslichen Gebrauch getestet. Es ist nicht für medizinischen oder professionellen Einsatz ausgelegt.
Es darf nicht für kommerzielle Zwecke, zur Vermietung oder in öffentlichen
Einrichtungen benutzt werden. Stehen Sie immer gerade auf dem Crosstrainer, und lehnen Sie sich niemals zurück, da der Crosstrainer hierdurch
beschädigt werden oder umkippen könnte (s. auch Ausgangsposition und
Pedaleinstellung auf Seite 15). Achten Sie beim Training darauf, dass Sie
genügend Freiraum rund um das Gerät haben. Ein Mindestabstand von
1 m in jede Richtung ist angeraten! Nach oben sollten Sie auch sicher
stellen, dass es genügend Freiraum zur Decke gibt. Bedenken Sie, dass
Sie erhöht stehen und durch die Bewegung noch weiter nach oben
kommen. Sie sollten 40 cm Luft nach oben haben, wenn die Pedale in
höchster Position steht.
Achtung! Halten Sie Kinder von dem Gerät fern!
SCHRAUBENSET
Nr.
Bezeichnung
Menge
17
selbstsichernde Mutter M8
4
19
Rundkopfschraube M4×10
8
24
Rundkopfschraube M4×25
4
25
Flachkopfschraube M5×15
6
26
Schlossschraube M8×40
4
27
Inbusschraube
2
30
Schlossschraube M8×75
4
31
Schlossschraube M6×42
4
34
Hutmutter M8
4
35
Hutmutter M6
4
39
Federunterlegscheibe M8
6
40
Gebogene Unterlegscheibe M8, 19×8.4×1
8
41
Federunterlegscheibe M6
4
43
Unterlegscheibe M6
4
44
Unterlegscheibe M8
2
94
Abdeckkappen M10
4
#
Inbusschlüssel
1
#
Schraubenschlüssel 10×13×15
1
#
Schraubenschlüssel 13×15
1
Zeichnung
Art.-Nr. 65308
Stand 04/11
Seite 3/28
EN
INSTRUCTIONS ON ASSEMBLY AND USE
CONGRATULATIONS ON
PURCHASING YOUR PRODUCT!
Please read these instructions carefully. The instructions are an integral
part of the product. Therefore, please store them and the packaging carefully in case questions arise in the future. Please always include these
instructions when you are handing on the product to a third-party. This
product is not suitable for industrial use.
TECHNISCHE SPEZIFIKATIONEN
TECHNICAL SPECIFICATIONS
Item:
Cross trainer HD 66
Item number:
65308
Weight:
about 40 kg
Maximum carrying capacity: 120 kg
Dimensions when assembled: ca. 136 x 67 x 173 cm
If you have assembly problems or would like further information on the product, we have all you need and more at http://hudora.de/artnr/65308/.
WARNING NOTICES
Use and apply the product for its intended purpose only. Ensure, that all
parts are safely screwed together before you will start with your exercises. Loose parts or damages can lead to injuries. Even if there are untypical noises you should interrupt your training. Set up the equipment in/on
an even position/underground and equate any unevenness(es). For this
it is recommended to place a blanket or an old carpet under the equipment, in order to treat your flooring with care. The equipment has been
tested for domestic application according to EN 957, class H.C.. It is not
designed for medical or professional application. It must not be used for
commercial purposes, for leasing or in public facilities. Always stand up
straight on the cross trainer and never lean backward, as the cross trainer can be damaged by this or may keel over (see also Basic Position and
Pedal Settings on page 17). When you exercise, make absolutely certain
that you have plenty of clearance all around the equipment. A minimum
distance of 1 m in all directions is recommended! However, you should
also ensure that you have enough clearance at the top toward the ceiling.
Please keep in mind that you will be standing in an elevated position and
that motion will take you up even higher. You should have at least 40 cm
clearance from the ceiling when the pedals are in their highest position.
Attention! Keep children away from the equipment!
SCREW SET
No.
Description
17
Nylon locknut M8
4
19
Round head screw M4×10
8
24
Round head screw M4×25
4
25
Flat pan head screw M5×15
6
26
Carriage bolt M8×40
4
27
Allen head bolt
2
30
Carriage bolt M8×75
4
31
Carriage bolt M6×42
4
34
Cap nut M8
4
35
Cap nut M6
4
39
Spring washer M8
6
40
Curved washer M8, 19×8.4×1
8
41
Spring washer M6
4
43
Flat washer M6
4
44
Flat washer M8
2
94
Decoration cover M10
4
#
Sleeve wrench 6 mm
1
#
Spanner 10×13×15
1
#
Spanner 13×15
1
Art.-Nr. 65308
Stand 04/11
Seite 4/28
Q’ty
Sketch
IT
ISTRUZIONI PER IL MONTAGGIO E PER L´USO
CONGRATULAZIONI PER AVER
ACQUISTATO QUESTO PRODOTTO!
La preghiamo di leggere molto attentamente questo manuale. Il manuale
fa parte del prodotto. Quindi va conservato come tutto l’imballaggio per
eventuali domande in futuro. Dando il prodotto a terzi per cortesia allegare sempre il manuale. Questo prodotto non è adatto per uso commerciale.
SPECIFICHE TECNICHE
Articolo:
Articolo n°:
Peso:
Massima capacità portante:
Misure per il montaggio: Cyclette ellittica HD 66
65308
ca. 40 kg
120 kg
ca. 136 x 67 x 173 cm
Se avete problemi con l‘assemblea o richiedete più informazioni, visiti
prego il nostro website http://hudora.de/artnr/65308/.
NOTE DI SICUREZZA
Utilizzare il prodotto solo per lo scopo previsto. Assicurarsi che tutte le
parti siano ben avvitate prima di iniziare gli esercizi. Parti allentate o
danneggiate possono causare lesioni. Anche in presenza di rumori insoliti, interrompere l‘allenamento. Collocare l‘apparecchio su una superficie piana ed eliminare le irregolarità. Si consiglia di collocare sotto
l‘apparecchio una coperta o un vecchio tappeto, per proteggere il pavimento. L‘apparecchio è stato testato per l‘uso domestico secondo la
norma EN 957, Classe H.C. Non è progettato per uso medico o professionale. Non può essere utilizzato per scopi commerciali, noleggio o in
luoghi pubblici. Stare sempre dritti sulla cyclette ellittica, e non sporgersi
mai all‘indietro, perché l‘apparecchio potrebbe venirne danneggiato o
ribaltarsi (si veda anche la posizione di partenza e la regolazione dei pedali a pagina 15). Durante l‘allenamento assicurarsi di avere sufficiente
spazio libero intorno al dispositivo. Si consiglia una distanza minima di 1
m in ogni direzione! Bisognerebbe anche assicurarsi di avere sufficiente
spazio sopra la testa. Ricordare che si sta in una posizione elevata e con
il movimento ci si solleva ancora di più. Si dovrebbero avere 40 cm di
spazio sopra la testa quando il pedale è nella posizione più alta.
ATTENZIONE! Tenere i bambini lontani dal dispositivo!
SET VITI
N.
Descrizione
Quantità
17
Dado autobloccante M8
4
19
Vite a testa rotonda M4x10
8
24
Vite a testa rotonda M4x25
4
25
Vite a testa piatta M5x15
6
26
Vite a testa tonda con quadro sottotesta M8x40
4
27
Vite a brugola
2
30
Vite a testa tonda con quadro sottotesta M8x75
4
31
Vite a testa tonda con quadro sottotesta M6x42
4
34
Dado con calotta M8
4
35
Dado con calotta M6
4
39
Rondella elastica M8
6
40
Rondella ricurva M8, 19×8,4×1
8
41
Rondella elastica M6
4
43
Rondella M6
4
44
Rondella M8
2
94
Tappi di copertura M10
4
#
Chiave a brugola 6 mm
1
#
Chiave 10×13×15
1
#
Chiave 13×15
1
Immagine
Art.-Nr. 65308
Stand 04/11
Seite 5/28
FR
INSTRUCTIONS DE MONTAGE ET MODE D’EMPLOI
MERCI D’AVOIR ACHETÉ NOTRE ÉQUIPEMENT!
Merci de lire attentivement cette notice d’utilisation qui fait partie intégrante du produit. Nous vous conseillons de la conserver bien précieusement, tout comme l’emballage, afin de pouvoir vous y référer ultérieurement en cas de question. Si vous offrez ce produit à une autre personne,
n’oubliez pas d’y joindre cette notice d’utilisation. Ce produit n’a pas été
conçu pour être utilisé à des fins industrielles.
CARACTÉRISTIQUES TECHNIQUES
Article:
Crosstrainer HD 66
Article numéro:
65308
Poids:
env. 40 kg
Capacité de charge max.: 120 kg
Dimensions: ca. 136 x 67 x 173 cm
Si vous avez des problèmes lors de l’installation ou souhaitez plus
d’informations sur le produit, rendez-vous à l’adresser suivante: http://
hudora.de/artnr/65308/.
AVERTISSEMENTS
Merci d’utiliser cet article aux finalités prévues. Vérifier que toutes les
pièces sont fixées avant de commencer votre entraînement. Les pièces
desserrées ou les dommages risqueraient d’engendrer des blessures. En
cas de bruits anormaux, merci d’arrêter immédiatement l’entrainement.
Installer l’appareil sur une surface plane et retirer immédiatement tous les
éléments qui pourraient provoquer des écarts de niveau. Nous vous recommandons également de prévoir une protection ou d’utiliser un vieux
tapis sous votre appareil pour éviter d’endommager votre sol. Cet appareil
a été testé conformément à EN 957, classe H.C. pour une utilisation privée.
Il n’a pas été conçu à des fins professionnelles ou médicales. Il ne doit être
en aucun cas utilisé pour la commercialisation, la location ou dans des
salles publiques. Toujours se tenir droit sur le Crosstrainer et éviter de se
pencher de manière excessive car cela pourrait engendrer des dommages
sur votre équipement ou provoquer des risques de chute (cf. position de
départ et réglage des pédales, page 19). Lors des entraînements, s’assurer
que l’espace est suffisant autour de l’appareil. Nous vous conseillons de
prévoir une distance d’1 mètre de chaque côté ! Au-dessus, vérifier également que l’espace est suffisant entre votre tête et le plafond. Penser que
la position d’utilisation habituelle est légèrement surélevée et qu’avec les
mouvements, vous serez encore plus en hauteur. Vous devez avoir un espace minimum d’au-moins 40 cm au-dessus de vous, lorsque les pédales
sont en position haute.
Attention, tenir hors de portée des enfants!
DESCRIPTION DU KIT DES VIS
N°
Désignation
17
Ecrou autobloquant M8
4
19
Vis à tête ronde M4×10
8
24
Vis à tête ronde M4×25
4
25
Vis à tête plate M5×15
6
26
Boulon M8×40
4
27
Vis à six pans creux
2
30
Boulon M8x75
4
31
Boulon M6×42
4
34
Ecrou borgne M8
4
35
Ecrou borgne M6
4
39
Rondelle à ressort M8
6
40
Rondelle courbée M8, 19×8.4×1
8
41
Rondelle à ressort M6
4
43
Rondelle M6
4
44
Rondelle M8
2
94
Bouchon de fermeture M10
4
#
Clef mâle à six pans
1
#
Clef 10×13×15
1
#
Clef 13×15
1
Art.-Nr. 65308
Stand 04/11
Seite 6/28
Quantité
Représentation
DE
EN
AUFBAU- UND GEBRAUCHSANLEITUNG
INSTRUCTIONS ON ASSEMBLY AND USE
IT
FR
ISTRUZIONI PER IL MONTAGGIO E PER L´USO
INSTRUCTIONS DE MONTAGE ET MODE D’EMPLOI
Abb. 1
Art.-Nr. 65308
Stand 04/11
Seite 7/28
DE
EN
AUFBAU- UND GEBRAUCHSANLEITUNG
INSTRUCTIONS ON ASSEMBLY AND USE
IT
FR
ISTRUZIONI PER IL MONTAGGIO E PER L´USO
INSTRUCTIONS DE MONTAGE ET MODE D’EMPLOI
ZUBEHÖRLISTE
Nr.
Bezeichnung
Menge
1/59/60
Hauptrahmen mit Gehäuse/Unterteil des Geräts mit Steckerdose für Widerstandsreglerkabel/
Computerkabel
1 Satz
2/85
Hinterfuß mit Höhenverstellung
1 Satz
3/84
Vorderfuß mit Transportrollen
1 Satz
4/8/9/10(R/L)/58/61
Griffstangensäule/Schwungarm rechts/Schwungarm links/Pedalstangen(R/L)/Widerstandsregler mit
Kabel/mittleres Computerkabel
1 Satz
5/6
Beweglicher Schwungarm mit Schaumstoffgriffen und Abschlußkappen
1 Satz
12/62
Ovale Griffstange mit Pulssensoren
1 Satz
63
Computer
80
Abdeckkappe
2 Paar
82
Abdeckkappe
1 Paar
83
Abdeckkappe
2 Paar
86(R/L)
Pedal(R/L)
1 Paar
97
Wasserflasche mit Halterung
1
1
PARTLIST
Part
Description
Q’ty
1/59/60
Main frame with chain cover/Bottom section tension cable with bracket/Sensor with wire
1 set
2/85
Rear stabilizer with two adjustable caps
1 set
3/84
Front stabilizer with two transportation caps
1 set
4/8/9/10(R/L)/58/61
Front post/Handlebar(L)/Handlebar(R)/Pedalbar(R/L)/Tension controller with cable/
Middlesection sensor wire
1 set
5/6
Moving handlebar with foam grips and two decoration cover(L/R)
1 set
12/62
Small handlebar with hand pulse sensor
1 set
63
Monitor
80
Decoration cover
2 pair
82
Decoration cover
1 pair
83
Decoration cover
2 pair
86(R/L)
Foot pedal(R/L)
1 pair
97
Water jug with bracket
Art.-Nr. 65308
Stand 04/11
Seite 8/28
1
1
DE
EN
AUFBAU- UND GEBRAUCHSANLEITUNG
INSTRUCTIONS ON ASSEMBLY AND USE
IT
FR
ISTRUZIONI PER IL MONTAGGIO E PER L´USO
INSTRUCTIONS DE MONTAGE ET MODE D’EMPLOI
ELENCO ACCESSORI
N.
Descrizione
Quantità
1/59/60
Telaio principale con alloggiamento/parte inferiore dell‘apparecchio con spina per cavo regolatore di
resistenza/cavo computer
1 set
2/85
Piede posteriore con regolazione di altezza
1 set
3/84
Piede anteriore con rotelle per il trasporto
1 set
4/8/9/10(R/L)/58/61
Colonna manubrio/braccio oscillante destro/braccio oscillante sinistro/barre pedali(R/L)/regolatore di
resistenza con cavo/cavo intermedio computer
1 set
5/6
Braccio oscillante mobile con impugnatura in schiuma e tappi di copertura
1 set
12/62
Manubrio ellittico con sensori per pulsazioni
1 set
63
Computer
80
Tappo di copertura
2 paia
82
Tappo di copertura
1 paio
83
Tappo di copertura
2 paia
86(R/L)
Pedale(R/L)
1 paio
97
Bottiglia per acqua con supporto
1
1
ACCESSOIRES
N°
Désignation
Quantité
1/59/60
Cadre principal avec bôitier/Piece inférieure de l‘equipement/cable informatique avec
tendeurs et attaches
1 unité
2/85
Pied arrière avec système de réglage de la hauteur
1 unité
3/84
Pied avant avec roulettes de transport
1 unité
4/8/9/10(R/L)/58/61
Système de colonne/Bras gauche/Bras droit/Pédalier(G/D)/Système de réglage manuel du niveau de
difficulté avec câble informatique/Câble informatique supérieur
1 unité
5/6
Bras mobile avec poignée en mousse et renforts
1 unité
12/62
Barre d’appui ovale avec capteurs de pulsation
1 unité
63
Ordinateur
80
Bouchon de fermeture
2 paire
82
Bouchon de fermeture
1 paire
83
Bouchon de fermeture
2 paire
86(R/L)
Pédale(G/D)
1 paire
97
Bouteille avec support
1
1
Art.-Nr. 65308
Stand 04/11
Seite 9/28
DE
EN
AUFBAU- UND GEBRAUCHSANLEITUNG
INSTRUCTIONS ON ASSEMBLY AND USE
IT
FR
ISTRUZIONI PER IL MONTAGGIO E PER L´USO
INSTRUCTIONS DE MONTAGE ET MODE D’EMPLOI
MONTAGEANLEITUNG
1. Schritt: Montage der Standfüße
Befestigen Sie den vorderen und hinteren Fuß (3/2) mit vier Schlossschrauben (30), vier gebogenen Unterlegscheiben (40), vier Federunterlegscheiben
(39) und mit vier Muttern (34) an dem Hauptrahmen (1). Benutzen Sie dafür bitte den Schraubenschlüssel 10 x 13 x 15 oder 13 x 15. Über die beiden
verstellbaren Endkappen (85) lässt sich die Höhe des Crosstrainers variieren.
ASSEMBLY INSTRUCTIONS
Step 1: Attach the Stabilizers
Attach the front and the rear stabilizer (3/2) to main frame (1) using four carriage bolts (30), four curved washers (40), four spring washers (39), and
four cap nuts (34). For fixing the screws use the spanner 10×13×15 or the spanner 13x15. You can level the crosstrainer using the two adjustable caps
(85). Make sure you fasten the bolts securely to avoid shaking and discomfort when cycling.
ISTRUZIONI DI MONTAGGIO
Fase 1: Montaggio dei cavalletti
Fissare il piede anteriore e posteriore (3/2) con quattro viti a testa tonda con quadro sottotesta (30), quattro rondelle ricurve (40), quattro rondelle
elastiche (39) e quattro dadi (34) al telaio principale (1). Utilizzare la chiave 10x13x15 o quella 13x15. Attraverso i due piedini regolabili (85) si può
modificare l‘altezza della cyclette ellittica.
INSTRUCTION DE MONTAGE
1ère étape: Installation des pieds
Montez le pied avant et le pied arrière (3/2) à l’aide des 4 boulons (30), des 4 rondelles courbées (40), des 4 rondelles à ressort (39) et des 4 écrous
borgnes (34) sur le cadre principal (1). Merci d‘utiliser la clef 10x13x15 ou la clef 13x15. Le système de réglage de la hauteur (85) permettra de modifier
le niveau de l’appareil. Ne jamais oublier de serrer correctement les vis pour éviter que le Crosstrainer bascule et se désintègre.
Abb. 2
Art.-Nr. 65308
Stand 04/11
Seite 10/28
DE
EN
AUFBAU- UND GEBRAUCHSANLEITUNG
INSTRUCTIONS ON ASSEMBLY AND USE
IT
FR
ISTRUZIONI PER IL MONTAGGIO E PER L´USO
INSTRUCTIONS DE MONTAGE ET MODE D’EMPLOI
2. Schritt: Montage der Griffstangensäule
Lösen Sie zuerst die sechs vormontierten Schrauben (15), gebogenen Unterlegscheiben (40) und Federunterlegscheiben (39) aus dem Hauptrahmen
(1). Verbinden Sie nun die beiden Enden (58/59) der manuellen Schwierigkeitsverstellung (siehe Zeichnung). Stecken Sie das obere Computerkabel
(61) in das untere Computerkabel (60). Vergewissern Sie sich, dass die Verbindung korrekt hergestellt wurde, damit das Signal an den Computer
übertragen werden kann. Achten Sie darauf, dass das Kabel innerhalb des Rahmens verläuft, um Beschädigungen zu vermeiden. Schieben Sie die
Griffstangensäule (4) in den Hauptrahmen (1) und sichern Sie diese mit den sechs vorher abmontierten Schrauben (15), gebogenen Unterlegscheiben
(40) und Federunterlegscheiben (39). Benutzen Sie bitte den Inbusschlüssel.
Step 2: Attach the Front Post
First, remove the pre-assembled six allen head bolts (15), six spring washers (39), and six curved washers (40) from main frame (1). Connect the
tension controller with cable (58) to the bracket of the bottom section tension cable (59) (see figure A1-A3). Next connect the socket of middle section
sensor wire (61) to the plug of sensor wire (60). Also, make sure that the connection has been established properly so that the signal can actually
be transmitted to the computer. Guide the cord through the frame to prevent damages. Put the front post (4) into the main frame (1) and secure this
assembly with the six curved washers (40), six spring washers (39), and six allen head bolts (15), you removed from main frame (1) in the beginning.
For fixing the screws use the tool 6 mm sleeve wrench. Make sure you fasten the bolts securely to avoid shaking and discomfort while exercising.
Fase 2: Montaggio della colonna del manubrio
Togliere prima di tutto i sei bulloni premontati (15), le rondelle ricurve (40) e le rondelle elastiche (39) dal telaio principale (1). Collegare ora le due
estremità (58/59) alla regolazione di difficoltà manuale (vedi disegno). Inserire il cavo superiore del computer (61) nel cavo del computer inferiore (60).
Assicurarsi che il collegamento sia avvenuto correttamente, affinché il segnale possa essere trasmesso al computer. Assicurarsi che il cavo passi
all‘interno del telaio, al fine di evitare danni. Inserire la colonna del manubrio (4) nel telaio principale (1) e fissarla con le sei viti precedentemente
smontate (15), le rondelle ricurve (40) e le rondelle elastiche (39). Utilizzare la chiave a brugola.
2ème étape: Installation de la colonne
Dévisser, dans un premier temps, les 6 vis pré-montées (15), les 6 rondelles à ressort pré-montées (39) et les 6 rondelles courbées pré-montées (40)
du cadre principal (1). Relier les deux extrémités (58/59) du système de réglage manuel du niveau de difficulté (cf. schéma A1-A3). Brancher le câble
informatique supérieur (61) au câble inférieur (60). Attention: le branchement doit être correct pour qu’un signal puisse être transmis à l’ordinateur.
Vérifier que le câble se trouve bien dans le cadre pour éviter les dommages éventuels. Pousser la colonne (4) dans le cadre principal (1) et fixer
l’ensemble à l’aide des 6 rondelles courbées dévissées précédemment (40), des 6 rondelles à ressort dévissées précédemment (39) et des 6 vis
dévissées précédemment (15). Merci d‘utiliser la clef mâle a six pans. Ne jamais oublier de serrer correctement les vis pour éviter que le Crosstrainer
bascule et se désintègre.
Abb. 3
Art.-Nr. 65308
Stand 04/11
Seite 11/28
DE
EN
AUFBAU- UND GEBRAUCHSANLEITUNG
INSTRUCTIONS ON ASSEMBLY AND USE
IT
FR
ISTRUZIONI PER IL MONTAGGIO E PER L´USO
INSTRUCTIONS DE MONTAGE ET MODE D’EMPLOI
3. Schritt: Montage der Pedalstangen, der Pedale und der Kunststoffabdeckungen
Verbinden Sie die Kurbel (71L) der linken Pedalstange (10) mit dem Antriebsrad, indem Sie die Kurbel mit dem beigefügtem Schraubenschlüssel 13 x
15 gegen den Uhrzeigersinn festziehen. Auf die gleiche Art befestigen Sie bitte im Uhrzeigersinn die rechte Kurbel (71R) und die rechte Pedalstange (10)
am Schwungrad. Befestigen Sie jetzt das rechte Pedal (86R) mithilfe von zwei Schlossschrauben (31), zwei Unterlegscheiben (43), zwei Federunterlegscheiben (41) und zwei Muttern (35) an der rechten Pedalstange (10). Sie haben die Möglichkeit zwischen zwei verschiedenen Positionen zu wählen.
Wiederholen Sie diese Schritte, um das linke Pedal (86L) mit der linken Pedalstange (10) zu verbinden. Befestigen Sie beide Pedale auf gleicher Höhe.
Die genaue Einstellung werden Sie am fertig eingestellten Crosstrainer vornehmen. Im Anschluss befestigen Sie die Gelenkabdeckungen (80R/L) der
Pedalstangen (10) mit den vier Flachkopfschrauben (25) mit Hilfe des mitgelieferten Werkzeugs. Zuletzt befestigen Sie die Abdeckkappen (94) auf den
Muttern der Pedalstangen (10).
Step 3. Attach the Pedal Bar, the Foot Pedal and the Decoration Covers
Attach the crank arm (71L) of the left side pedal bar (10) to the welded tube for turnplate (14) using the tool 13×15 spanner counterclockwise to tighten
it. Fix the other side corresponding, but tighten the crank arm (71R) clockwise. For fixing the left side foot pedal (86L) to its pedal bar (10) please use
the two M6×42 carriage bolts (31), two M6 flat washers (43), two M6 spring washers (41) and two M6 cap nuts (35). Do the same to install the right
side foot pedal (86R). Use both times the tool 10×13×15 spanner. There are two options to fasten the pedals. Please make sure that in the end the
two pedals are fixed at the same position in corresponding holes. The fine tuning will be done as soon as the assembly is completed. Fix the two pairs
of decoration covers (80R/L) to the left and right pedal bars (10) using the four flat pan head screws M5×15 (25). Please use the tool 6 mm sleeve
wrench. After that attach the four plastic caps (94) to the pedal bars (10). Make sure you fasten the bolts securely to avoid shaking and discomfort
while exercising.
Fase 3: Montaggio delle barre dei pedali, dei pedali e dei rivestimenti in plastica
Collegare la pedivella (71L) della barra del pedale sinistro (10) con la ruota motrice, avvitando in senso antiorario la pedivella con la chiave a brugola
13x15 in dotazione. Allo stesso modo fissare in senso orario la pedivella destra (71R) e la barra del pedale destro (10) al volano. Fissare ora il pedale
destro (86R) con due viti a testa tonda con quadro sottotesta (31), due rondelle (43), due rondelle elastiche (41) e due dadi (35) alla barra del pedale
destro (10). Si può scegliere tra due diverse posizioni. Ripetere questi passaggi per collegare il pedale sinistro (86L) con la barra del pedale sinistro (10).
Fissare entrambi i pedali alla stessa altezza. La regolazione esatta verrà effettuata a montaggio concluso. Contestualmente fissare le coperture degli
snodi (80R/L) alle barre dei pedali (10) con le quattro viti a testa piatta (25) utilizzando lo strumento in dotazione. Infine montare i tappi di copertura
(94) sui dadi delle barre dei pedali (10).
3ème étape: Montage du pédalier, des pédales et des protections en plastique
Fixer la manivelle (71L) du pédalier gauche (10) au guidon à l’aide de l’outil livré. Faire de même avec la manivelle droite (71R) et le pédalier droit (10).
Fixer la pédale droite (86R) à l’aide de deux écrous (31), de deux rondelles (43), de deux rondelles à ressort (41) et de deux boulons (35) sur le pédalier
droit (10). Vous avez la possibilité de choisir entre deux positions. Recommencer cette étape pour fi xer la pédale gauche (86L) au niveau du pédalier
gauche (10). Attacher les systèmes de pédales à la même hauteur. Vous effectuerez les derniers réglages directement sur le Crosstrainer une fois qu’il
sera entièrement monté. Puis, fixez la protection (80R/L) du pédalier (10) à l’aide de 12 vis à tête plate (25) en utilisant le tournevis cruciforme fourni.
Enfi n, fixer les attaches (94) sur les boulons du pédalier (10)
Art.-Nr. 65308
Stand 04/11
Seite 12/28
DE
EN
AUFBAU- UND GEBRAUCHSANLEITUNG
INSTRUCTIONS ON ASSEMBLY AND USE
IT
FR
ISTRUZIONI PER IL MONTAGGIO E PER L´USO
INSTRUCTIONS DE MONTAGE ET MODE D’EMPLOI
linksdrehendes
Gewinde
rechtsdrehendes
Gewinde
Verstellbare Trittpedale
Art.-Nr. 65308
Stand 04/11
Seite 13/28
DE
EN
AUFBAU- UND GEBRAUCHSANLEITUNG
INSTRUCTIONS ON ASSEMBLY AND USE
IT
FR
ISTRUZIONI PER IL MONTAGGIO E PER L´USO
INSTRUCTIONS DE MONTAGE ET MODE D’EMPLOI
4. Schritt: Montage der oberen Schwungarme
Verbinden Sie den linken, oberen Schwungarm (5) mit dem linken, unteren Schwungarm (9), und fixieren Sie die Konstruktion mit zwei Schlossschrauben (26), zwei gebogenen Unterlegscheiben (40) und zwei selbstsichernden Muttern M8 (17). Wiederholen Sie den Vorgang für den rechten Schwungarm (6/8). Arbeiten Sie bitte mit dem beigelegten Werkzeug.
Step 4. Attach the Moving Handlebars
Attach the left side moving handlebar (5) to the left side handlebar (9) fixing the assembly with two M8×40 carriage bolts (26), two curved washers
(40), and two nylon locknuts M8 (17). Do the same for the right side moving handlebar (6) for connecting it with the right side handlebar (8). Please
use the tool 6 mm sleeve wrench.
Fase 4: Montaggio dei bracci oscillanti superiori
Collegare il braccio oscillante superiore sinistro (5) col quello inferiore sinistro (9), e fissare la struttura con due viti a testa tonda con quadro sottotesta
(26), due rondelle ricurve (40) e due dadi autobloccanti M8 (17). Ripetere il procedimento per il braccio oscillante destro (6/8). Utilizzare l‘attrezzo in
dotazione.
4ème étape: Installation du bras supérieur
Fixer le bras supérieur gauche (5) au bras inférieur gauche (9) en utilisant des boulons M8 x 40 (26), des rondelles courbées (40) et des ecrous autobloquants M8 (17). Répéter cette manipulation pour le bras droit (6/8).
Abb. 5
Art.-Nr. 65308
Stand 04/11
Seite 14/28
DE
EN
AUFBAU- UND GEBRAUCHSANLEITUNG
INSTRUCTIONS ON ASSEMBLY AND USE
IT
FR
ISTRUZIONI PER IL MONTAGGIO E PER L´USO
INSTRUCTIONS DE MONTAGE ET MODE D’EMPLOI
5. Schritt: Montage der ovalen Griffstange
Befestigen Sie die ovale Griffstange (12) an der Griffstangensäule (4) mithilfe der zwei Inbusschrauben (27), zwei Federunterlegscheiben (39) und zwei
Unterlegscheiben (44). Benutzen Sie hierfür bitte den Inbusschlüssel.
Step 5: Attach the Small Handlebar
Put the small handlebar (12) to the welded handlebar bracket of the front post (4) and secure it using two M8×30 allen head bolts (27), two M8 spring
washers (39) and two M8 flat washers (44). Please use the tool sleeve wrench 6 mm.
Fase 5: Montaggio del manubrio ellittico
Fissare il manubrio ellittico (12) alla colonna del manubrio (4) con le due viti a brugola (27), le due rondelle elastiche (39) e le due rondelle (44). Utilizzare la chiave a brugola.
5ème étape: Installation de la barre d’appui ovale
Fixer la barre d’appui ovale (12) sur la colonne (4) en utilisant 2 vis à six pans creux (27), deux rondelles à ressort (39) et 2 rondelles (44). Merci
d‘utiliser la clef mâle a six pans.
Abb. 6
Art.-Nr. 65308
Stand 04/11
Seite 15/28
DE
EN
AUFBAU- UND GEBRAUCHSANLEITUNG
INSTRUCTIONS ON ASSEMBLY AND USE
IT
FR
ISTRUZIONI PER IL MONTAGGIO E PER L´USO
INSTRUCTIONS DE MONTAGE ET MODE D’EMPLOI
6. Schritt: Montage des Computers
Verbinden Sie den Stecker des oberen Computerkabels (61) mit der Rückseite des Computers (63). Im Anschluss verbinden Sie noch die zwei Kabel der
Pulssensoren (62), die von der ovalen Griffstange (12) ausgehen, mit den Kabelenden (63) des Computers. Entfernen Sie die vormontierten Kreuzschrauben (99) aus dem Computer, setzen Sie nun den Computer (63) in die Computerhalterung ein, indem Sie ihn von oben auf die Halterung schieben.
Fixieren Sie Ihn jetzt mit den zuvor entnommenen Kreuzschrauben (99). Benutzen Sie dafür bitte das beiliegende Werkzeug.
Step 6: Attach the Monitor
Connect the plug of the middle section sensor wire (61) to the socket of top section sensor wire coming from the monitor (63). Insert the two plugs
coming from the monitor (63) to the two sockets of the hand pulse wire (62) coming from the small handlebar (12). Now remove the pre-assembled
round head bolts (99) from the monitor (63). After that slide the monitor (63) to the bracket of the front post (4), and secure it with the round head bolts
(99) you have taken off before, using the tool 6 mm sleeve wrench.
Fase 6: Montaggio del computer
Collegare la spina del cavo superiore del computer (61) con la parte posteriore del computer (63). Contestualmente collegare anche i due cavi dei sensori delle pulsazioni (62), che fuoriescono dal manubrio ellittico (12), con le estremità dei cavi (63) del computer. Rimuovere le viti a croce premontate
(99) dal computer, inserire adesso il computer (63) nell‘apposito supporto, spingendolo da sopra. Fissatelo adesso con le viti a croce precedentemente
rimosse (99). Utilizzare l‘attrezzo in dotazione.
6ème étape: Installation de l’ordinateur
Brancher la prise du câble informatique supérieur (61) à l’arrière de l’ordinateur (63). Puis, raccorder les deux câbles des capteurs de pulsation (62)
aux extrémités des câbles (63) de l’ordinateur. Retirez les vis en crois pré-montées (99) de l’ordinateur. Positionnez ensuite l’ordinateur (63) sur son
support en le tirant vers le haut. Fixez-le intégralement à l’aide des vis en crois (99) précédemment retirées. Merci d‘utiliser la clef mâle a six pans.
Abb. 7
Art.-Nr. 65308
Stand 04/11
Seite 16/28
DE
EN
AUFBAU- UND GEBRAUCHSANLEITUNG
INSTRUCTIONS ON ASSEMBLY AND USE
IT
FR
ISTRUZIONI PER IL MONTAGGIO E PER L´USO
INSTRUCTIONS DE MONTAGE ET MODE D’EMPLOI
7. Schritt: Montage des Flaschenhalters und der Kunststoffabdeckungen
Bitte entnehmen Sie die Flasche (97) aus der Halterung, und verschrauben Sie letztere mit der Griffstängensäule (4) mit zwei Flachkopfschrauben (25).
Jetzt können Sie die Trinkflasche wieder in die Halterung stecken. Setzen Sie nun die Abdeckkappen (83L/R) auf die Gelenke der Schwungarme (9/8),
und fixieren Sie diese mit den beigelieferten acht Rundkopfschrauben (19). Das gleiche machen Sie jetzt mit den Abdeckkappen (82) der Griffstangensäule (4), nutzen Sie dafür die vorgesehenen vier Rundkopfschrauben (24).
Step 7: Attach the Water Jug and Decoration Covers
First, please take out the water jug (97) from the bracket. Using the tool 6 mm sleeve wrench, firmly tighten the water jug bracket to the front post (4) using
two M5×15 flat pan head screws (25). Next, you can put the water jug back into the bracket. Attach the two decoration covers (83L/R) to the left side and
right side handlebar (9/8) using the eight round head screws M4×10 (19) for fixing these assemblies. At last fix the decoration covers (82) to the front post
(4) using the four round head screws M4×25 (24). Please use the tool 6 mm sleeve wrench both times for fixing the screws.
Fase 7: Montaggio del supporto per la bottiglia e delle coperture in plastica
Rimuovere la bottiglia (97) dal supporto, e avvitare quest‘ultimo alla colonna del manubrio (4) con due viti a testa piatta (25). Adesso è possibile rimettere la
bottiglia nel supporto. Posizionare i tappi di copertura (83L/R) sugli snodi dei bracci oscillanti (9/8), e fissarli con le otto viti a testa tonda fornite in dotazione
(19). Fare adesso la stessa cosa con i tappi di copertura (82) della colonna del manubrio (4), usando le quattro viti a testa tonda previste (24).
7ème étape: Installation du porte-bouteille et montage des protections en plastique
Retirer la bouteille de son support (97) et visser le porte-bouteille à la colonne (4) en utilisant le tournevis cruciforme. Vous pouvez ensuite replacer votre
bouteille dans son support. Positionner la protection (83L/R) sur le cadre du bras mobile (9/8) et fi xer l’ensemble à l’aide des 8 vis à tête ronde fournies
(19). Refaire ces manipulations avec les bouchons de fermetre (82) de la colonne, et utiliser, pour ce faire, les 4 vis à tête ronde fournies (24).
Abb. 8
Art.-Nr. 65308
Stand 04/11
Seite 17/28
DE
AUFBAU- UND GEBRAUCHSANLEITUNG
COMPUTERANLEITUNG
3. ENTER/RESET:
Mit der ENTER/RESET Taste können Sie die eingestellten Trainingswerte
bestätigen. Zudem kann, wenn der Geschwindigkeitsmodus deaktiviert
wurde, durch zwei-sekündiges Halten der ENTER/RESET Taste der Computer neu gestartet werden.
FUNKTIONSBESCHREIBUNG
1. UHR:
Zeigt die momentane Zeit in Stunden, Minuten und Sekunden an.
2. TEMPERATUR:
Zeigt die momentane Raumtemperatur an.
TRAINIEREN MIT DEM TRAININGSCOMPUTER
Der Trainingscomputer bietet Ihnen die ideale Hilfestellung, um Ihr Training effektiv zu gestalten. Wir empfehlen Ihnen, mit einem Experten (Arzt,
Übungsleiter) einen Trainingsplan aufzustellen. Ihr Computer hilft Ihnen,
die Vorgaben zu kontrollieren und einzuhalten. So stellen Sie sicher, dass
Sie Ihr Trainingsziel effizient erreichen.
Achtung: der Computer, insbesondere die Pulsmessung, ersetzt
keine medizinische Messung.
UHRZEITMODUS
• Nach Einlegen der Batterien blinkt die Stundenanzeige im Uhrzeit modus auf. Stellen Sie die Stunden mit Hilfe der Up und Down Tasten
ein, und bestätigen Sie diese mit Enter. Wiederholen Sie diesen Vorgang
für die Minutenanzeige.
• Der Computer schaltet sich in den Uhrzeitmodus sobald er kein Signal
erhält oder länger als vier Minuten keine Taste gedrückt wurde. Durch
Drücken von ENTER kann im Uhrzeitmodus zwischen der Zeit- und
Temperaturanzeige gewechselt werden. Das Betätigen jeder anderen
Taste führt zum Verlassen des Uhrzeitmodus.
• Wird ENTER länger als zwei Sekunden gedrückt, kann über die Tasten
UP und DOWN die Uhrzeit eingestellt werden.
TASTENFUNKTIONEN
1. UP:
Mit der UP Taste können Sie die Trainingseingaben für Zeit, Distanz, Trittfrequenz und Kalorienverbrauch erhöhen. Im Uhrzeitmodus können Sie
die Zeit mit Hilfe der UP Taste einstellen.
2. DOWN:
Mit der DOWN Taste können Sie die Trainingseingaben für Zeit, Distanz,
Trittfrequenz und Kalorienverbrauch verringern. Im Uhrzeitmodus können
Sie die Zeit mit Hilfe der DOWN Taste einstellen.
Hinweis: Gleichzeitiges Drücken der Tasten UP und DOWN für ca. zwei
Sekunden setzt alle eingegebenen Werte wieder auf den Ausgangswert
bzw. auf Null.
Art.-Nr. 65308
Stand 04/11
Seite 18/28
3. ZEIT:
Zeigt die Dauer der aktuellen Übungseinheit in Minuten und Sekunden
an. Der Computer zählt automatisch in Sekundenschritten von 0:00 bis
99:59 hoch. Ergänzend lässt sich mittels der Tasten UP und DOWN von
einem frei wählbaren Wert ein Countdown einstellen. Am Ende der Trainingszeit gibt der Computer ein akustisches Signal, dass der eingestellte Countdown abgelaufen ist, und wechselt wieder zurück in den Ausgangsmodus.
4. GESCHWINDIGKEIT:
Zeigt die momentane Trainingsgeschwindigkeit in Kilometer pro Stunde
im Balkendiagramm an. Empfängt der Computer kein Signal, wechselt er
automatisch in den Uhrzeitmodus.
5. DISTANZ:
Zeigt bis zu einem Maximum von 99.9 km die Stecke an, welche in der
aktuellen Übungseinheit zurückgelegt worden ist. Ergänzend lässt sich
mittels der Tasten UP und DOWN von einem frei wählbaren Wert ein
Countdown einstellen. Am Ende der Trainingszeit gibt der Computer ein
akustisches Signal, dass der eingestellte Countdown abgelaufen ist, und
wechselt wieder zurück in den Ausgangsmodus.
6. KALORIENVERBRAUCH:
Zeigt den Kalorienverbrauch der aktuellen Übungseinheit an. Ergänzend
lässt sich mittels der Tasten UP und DOWN von einem frei wählbaren
Wert ein Countdown einstellen. Am Ende der Trainingszeit gibt der Computer ein akustisches Signal, dass der eingestellte Countdown abgelaufen ist, und wechselt wieder zurück in den Ausgangsmodus.
7. PULS:
Zeigt Ihre aktuelle Herzfrequenz in Schlägen pro Minute an.
8. RPM:
Zeigt Ihre aktuelle Trittfrequenz an.
9. SCAN:
Durch Drücken von MODE wechselt der Computer in den SCAN-Modus.
In dieser Funktion wechselt das Display alle 6 Sekunden die Anzeige zwischen Zeit, Geschwindigkeit, Distanz, Kalorien, RPM und Puls. Um diese
Funktion aus zu schalten, drücken Sie bitte die Taste ENTER.
TRAINIEREN AUF EINEM CROSSTRAINER
VORSICHT! Nehmen Sie sich für die Eingewöhnungsphase Zeit, und
achten Sie auf eine gute Körperhaltung. Bei falscher Anwendung der
Trainingsprinzipien und der Angaben aus der Übungsanleitung können
gesundheitliche Schäden auftreten!
1. Aufwärmen:
Wärmen Sie sich unbedingt vor jedem Training auf. Gehen oder Laufen
auf der Stelle aktiviert das Herz-Kreislaufsystem und bereitet Sie auf die
anstehende körperliche Belastung vor. Steigen Sie mit reduzierter Geschwindigkeit in Ihr Trainingsprogramm ein, und erhöhen Sie erst das
Tempo, wenn Ihre Muskeln optimal erwärmt sind. Stimmen Sie auch Ihr
Aufwärmprogramm immer auf Ihren Leistungsstand ab.
2. Atmung:
Die richtige Atmung spielt beim Training eine große Rolle. Atmen Sie ruhig und gleichmäßig. Halten Sie während des Trainings nie den Atem an.
3. Kleidung und Platz:
Ziehen Sie zum Training angemessene Sportkleidung an, und achten Sie
darauf, dass Sie zur Durchführung der Übungen genügend Platz (Mindestabstand von 1 m) um sich herum haben. Ziehen Sie immer Sportschuhe
an; trainieren Sie nie mit nackten Füßen, in Sandalen, auf Strümpfen oder
in Strumpfhosen.
4. Trainingstaktik:
Überfordern Sie sich nicht, und passen Sie die Übungen und den Übungsumfang immer Ihrem Leistungsstand an. Beginnen Sie zunächst mit nur
einigen Minuten, und steigern Sie sich langsam von Woche zu Woche.
Legen Sie zwischen zwei Trainingseinheiten mindestens einen Tag Pause ein. Beraten Sie sich grundsätzlich vor Aufnahme eines Übungsprogramms mit Ihrem Arzt.
5. Abwärmen:
Beenden Sie das Training nie abrupt, sondern reduzieren Sie bevor Sie
das Gerät verlassen fließend Ihr Trainingstempo. Führen Sie anschließend leichte Dehnübungen durch. So kann der Puls langsam sinken und
der Körper regeneriert sich schneller für die nächste Belastung, da die
Stoffwechselabfälle (Laktate) durch die abschließende Bewegung besser
abgebaut werden können.
6. Gesundheit:
Brechen sie Ihr Übungsprogramm sofort ab, wenn Sie bei der Durchführung der Übungen ein Ziehen in den Muskeln oder allgemeine Schmerzen
verspüren. Kontaktieren Sie in einem solchen Fall zu Ihrer Sicherheit bitte
einen Arzt.
AUSGANGSPOSITION
Stellen Sie sich vorsichtig auf die jeweiligen Pedale. Nehmen Sie gleichzeitig die jeweiligen Pedalstangen in Ihre Hände. Prüfen Sie nun, ob Sie
sicher auf dem Crosstrainer stehen. Dazu führen Sie bitte mit Armen und
Beinen behutsam langsame und rhythmische Gleitbewegungen (ähnlich
wie beim Skilanglauf) aus. Achten Sie darauf, dass Sie aufrecht stehen.
Während des Trainings dürfen Sie sich locker aus der Hüfter heraus drehen, und die Schultern dürfen sich leicht nach vorne bewegen. In dieser
Position sollte der Arm, wenn die Pedalstange am weitesten von Ihrem
Körper entfernt ist, immer noch leicht gebeugt sein. Wenn die Pedalstange Ihrem Körper am nächsten ist, sollte der Ellenbogen nie hinter
die Körpermitte gelangen. Sollte einer der beiden Fälle eintreten, sollten
Sie die Trittflächen nach vorne oder hinten verstellen. Gewöhnen Sie sich
langsam an die Bewegungen des Crosstrainers. Achten Sie darauf, dass
Sie sowohl Arme als auch Beine einsetzen. Um Ihren Puls zu messen,
müssen Sie die Handpulsmesssensoren auf der ovalen Lenkstange umgreifen. Die Beine können während der Pulsmessung allein den Antrieb
übernehmen. Üben Sie auch dies zunächst nur bei geringen Trainingsgeschwindigkeiten. Einstellungen am Computer sollten Sie nur vornehmen,
wenn das Gerät still steht.
HERZFREQUENZTRAINING
Beginnen Sie Ihr Training mit einem angenehmen Tempo, und steigern
Sie es schrittweise, bis Sie die angestrebte Herzfrequenz erreicht haben.
Wo diese liegt, kann Ihnen Ihr Hausarzt oder Fitnesstrainer sagen. Messen Sie Ihren Herzschlag während des Trainings so oft wie möglich, um
sicher zu gehen, dass Sie in Ihrer optimalen Herzfrequenz trainieren.
STUFENREGELUNG
Mit dem Widerstandsregler lässt sich der Pedalwiderstand einstellen. Ein
hoher Widerstand erschwert das Treten, während es ein niedriger Widerstand leichter macht. Die beste Einstellung findet sich, wenn man den
Widerstand einstellt, während der Crosstrainer in Betrieb ist.
PEDALEINSTELLUNG (AUF- UND ABSTIEG)
Sie können die Pedale in verschiedenen Positionen festschrauben. Für
eine korrekte Körperhaltung sollten Ihre Hände die beweglichen Griffe
so fassen können, dass Ihr Oberkörper nie in Vor- oder Rücklage gerät, sie also eine aufrechte, gerade Trainingsposition einnehmen. Wenn
die Pedale derart festgeschraubt sind, sollten Sie immer zuerst auf das
Pedal steigen, das in unterster Stellung steht. Greifen Sie erst dann die
Schwungarme an den Schaumgriffen, und platzieren Sie zuletzt den
anderen Fuß auf dem erhöht stehenden Pedal. Bedenken Sie, dass bei
der Belastung der Pedale in erhöhter Position die Bewegung des Gerätes
beginnt und sich die Schwungarme auf Sie zubewegen können. In umgekehrter Reihenfolge können Sie das Gerät sicher verlassen.
WARTUNG UND LAGERUNG
Reinigen Sie das Produkt nur mit einem Tuch oder feuchten Lappen und
nicht mit speziellen Reinigungsmitteln! Überprüfen Sie das Produkt vor und
nach Gebrauch auf Schäden und Verschleissspuren. Nehmen Sie keine
baulichen Veränderungen vor! Verwenden Sie zu Ihrer eigenen Sicherheit
nur Original-Ersatzteile. Diese können Sie bei HUDORA beziehen. Sollten
Teile beschädigt sein oder scharfe Ecken und Kanten entstanden sein,
darf das Produkt nicht mehr verwendet werden! Nehmen Sie im Zweifel
mit unserem Service Kontakt auf (http://www.hudora.de/service/).
Lagern Sie das Produkt an einem sicheren, witterungsgeschützten Ort,
so dass es nicht beschädigt werden kann oder Personen verletzen kann.
ENTSORGUNGSHINWEIS
Bitte führen Sie das Produkt am Ende seiner Lebensdauer den zur Verfügung stehenden Rückgabe- und Sammelsystemen zu. Fragen beantworten die Entsorgungsunternehmen vor Ort.
SERVICE
Wir sind bemüht, einwandfreie Produkte auszuliefern. Sollten trotzdem
Fehler auftreten, sind wir genauso bemüht, diese zu beheben. Deswegen erhalten Sie zahlreiche Informationen zum Produkt, zu Ersatzteilen,
Problemlösungen und verloren gegangene Aufbauanleitungen im Internet
unter http://hudora.de/artnr/65308/ oder unter der Telefonnummer +49
2191/60912-8800.
Art.-Nr. 65308
Stand 04/11
Seite 19/28
EN
INSTRUCTIONS ON ASSEMBLY AND USE
COMPUTER INSTRUCTIONS
3. ENTER/RESET:
Press the key to accept the current data entry. During the no speed
mode, by holding this key for over two seconds then the computer will
re-power-on.
INSTRUCTION DESCRIPTION
1. CLOCK:
Display the current clock in hour and minute and second.
2. TEMPERATURE:
Display the current temperature.
3. TIME:
Shows your elapsed workout time in minutes and seconds. Your computer will automatically count up from 0:00 to 99:59 in one second interval.
You may also program your computer to count down from a setting value
by using the UP and DOWN keys. If you continue exercising once the time
has reached 0:00, the computer will begin beeping, and reset itself to the
original time set, letting you know your workout is done.
TRAINING WITH THE TRAINING COMPUTER
The training computer is the ideal aid for effectively setting up your training. We would recommend you speak with an expert (doctor, trainer)
and set out a training plan. Your computer will help you to check and
adhere to the guidelines. In this way you can ensure that your training
goals are being met efficiently.
Caution: the computer, and particularly the pulse monitor, are no
replacement for medical monitoring.
4. SPEED:
Displays your workout speed value in km per hour. If no speed signal
input or no keys be pressed then the computer enter clock mode automatically.
5. DISTANCE:
Displays the distance traveled during your workout up to a maximum
of 99.9 km. Additionally you may also program your computer to count
down from a setting value by using the UP and DOWN keys. If you continue exercising once the setting value has reached 00.0, the computer
will begin beeping, letting you know your workout is done.
CLOCK MODE
• Once batteries are placed in the monitor, the clock can be set. Use the
UP and DOWN keys for setting the hours, and press the ENTER key.
The minutes can be set accordingly.
• The computer will enter the clock mode when there is no signal input
or no keys be pressed after 4 minutes. You can press ENTER key to
switch the clock and temperature at the clock mode or press other
keys to quit the clock mode.
• By holding ENTER key for over 2 seconds then you can set up TIME
by UP or DOWN keys.
6. CALORIES:
Your computer will estimate the cumulative calories burned at any given time during your workout. Additionally you may also program your
computer to count down from a setting value by using the UP and DOWN
keys. If you continue exercising once the setting value has reached 0, the
computer will begin beeping, letting you know your workout is done.
OPERATING KEYS
1. UP:
During the setting mode, press the key to increase the value of Time,
Distance, RPM and Calories. During the CLOCK mode, you can set up
clock by this key.
2. DOWN:
During the setting mode, press the key to decrease the value of Time,
Distance, RPM and Calories. During the CLOCK mode, you can set up
clock by this key.
Note: During the setting mode, you can hold UP and DOWN keys together
for over two seconds then the setting value will reset to zero or default
value.
8. RPM:
Your pedal cadence.
Art.-Nr. 65308
Stand 04/11
Seite 20/28
7. PULSE:
Your computer displays your pulse rate in beats per minute during your
workout.
9. SCAN:
At the exercise mode, press the MODE key until appears the SCAN on
the LCD. Monitor will display the following function and each function
will keep 6 seconds on the main screen: TIME-SPEED-DISTANCECALORIE-RPM-PULSE. For quitting this mode press the ENTER key.
TRAINING ON A CROSS TRAINER
CAUTION! Take time for the initial period of familiarisation and pay attention to an excellent posture. In case that the principles of training and
instructions of exercise will be wrongly used risks for your health may
occur!
1.Warm Up:
Warming up before each exercise session is essential. Walking or running
on the spot activates the cardiovascular system and prepares you for the
physical exertion to come. Start your exercise programme at a reduced
speed and only increase it when your muscles are properly warmed
up. Always match your warm-up programme to your performance level
also.
2. Breathing:
The right breathing plays an essential role during the training. Breathe
calm and constant. Never stop breathing during the training.
3.Clothes and Space:
Drag on suitable sportswear for training and take into consideration
that there is enough space (minimum clearance of 1m) around you, while performing the exercises. Always wear sports shoes, never train bare-footed or while wearing sandals, stockings or panty-hoses.
4. Training Tactic:
Avoid overstraining and adapt the exercises and the scope of exercises
always to your level of proficiency. At first you should start with some
minutes only and increase your level slowlyfrom week to week. Have a
rest of minimum 1 day between two training units. In general you should
consult your (family) doctor before starting a training programme.
5. Cool Down:
Never stop exercising abruptly. Instead, gradually reduce your speed before leaving the machine. Carry out some light stretching exercises afterwards. This allows your pulse to drop slowly and your body to recover
more quickly for the next session, as the decomposition of metabolic
wastes (lactates) is better achieved by carrying out these movements at
the end.
6. Health: In case that you will feel any acheing or dragging in your muscles
during the exercises, or if general pains might occur you should
immediately stop with the training programme. You should better contact
a doctor for your safety.
BASIC POSITION
Stand on the respective pedals with caution. Take the respective pedal
rods in your hands at the same time. At first please check if you are
standing in a safe manner on the cross trainer. Then cautiously start
with slow, rhythmic sliding movements (similar to cross-country skiing)
with arms and legs. Pay attention that you are standing upright. During
the training you may turn yourself laxly from the hip and the shoulders
can be slightly turned forward. In this position the arm should be still
slightly bent if and when the pedal rod will be most far away from your
body. If the pedal rod is nearest your body the elbow should never arrive
behind the middle of the body. Should one of these cases occur you will
have to adjust the tread to the front or behind. Slowly accustom yourself
to the movement of the cross trainer. Take care that you will use as well
arms as legs. In order to measure your pulse you must encompass onto
the oval steering rod to the hand pulse measuring sensors. The legs can
now solely adopt the drive. Exercise this at first by means of low training
speeds only. You should arrange for adjustments at the computer only if
and when the equipment stands still.
HEART RATE TRAINING
Start your training with an acceptable rate (tempo) and increase it stepby-step until you have reached the desired heart rate. Where there is the
special point (limit) for you, that can be determined by your family doctor
or the fitness trainer might inform you, too. Measure your heartbeat during the exercise as often as possible in order to assure that you will train
at your optimum heart rate.
RESISTANCE CONTROL
With the resistance control (tension controller) the pedal resistance can
be adjusted. A high resistance impedes pedalling, while a low resistance
will make it easier. The best adjustment is found if you adjust the resistance while the cross trainer is in operation.
PEDAL SETTINGS (MOUNTING AND GETTING OFF)
You have the option to screw the pedals into place in two positions. To
ensure that your physical stance is perfect, your hands should be able
to grab the moving handles in such a manner that your upper body is
neither leaning forward nor backward at any time. In other words, you
exercise position should be straight and upright at all times. Once you
have screwed your pedals in place as described above, always mount the
pedal that is in the lowest position first. Do not grab the pivoting arms
at the foam handles until you have placed your foot firmly on this pedal.
Next, and as a final step, place your other foot on the pedal that is in the
elevated position. Please remember that once you place weight on the
pedal in the higher position, the equipment will begin to move and the
pivoting arms can start moving toward you. To safely get off your device,
simply follow the above steps in reverse order.
MAINTENANCE AND STORAGE
Use a dry or damp cloth only to clean the product; do not use special
cleaning agents! Check the product for damage or traces of wear and
tear before and after each use. Do not make any structural changes.
For your own safety, please use original spare parts only. These can be
sourced from HUDORA. If parts become damaged or if sharp edges or
corners should develop, the product may not be used any more. If in
any doubt, please contact our service team (http://www.hudora.de/).
Store the product in a safe place where it is protected from the elements,
cannot be damaged, and cannot injure anyone.
INSTRUCTION FOR DISPOSAL
At the end of its durability would you please dispose of the product at the
return-/collecting and recycling systems which are at disposal. In case
you may have any questions the local waste management enterprises
will answer them.
SERVICE
We exert ourselves for delivering faultless products. In case that - but
for all that - faults will occur we are as well exerted to eliminate these.
Because of this you might obtain several information concerning the
product, spare parts, problem solving(s) and assembly instructions which
have been lost, under http://hudora.de/artnr/65308/. You may also call
us: +49 2191/60921-8800.
Art.-Nr. 65308
Stand 04/11
Seite 21/28
IT
ISTRUZIONI PER IL MONTAGGIO E PER L´USO
ISTRUZIONI COMPUTER
3. ENTER/RESET:
Con il tasto ENTER/RESET è possibile confermare i valori impostati. Inoltre, se la modalità velocità è stata disattivata, premendo per due secondi
il tasto ENTER/RESET il computer può essere nuovamente riavviato.
DESCRIZIONE DELLE FUNZIONI
1. ORA:
Visualizza l‘orario attuale in ore, minuti e secondi.
2. TEMPERATURA:
Indica la temperatura attuale.
3. TEMPO:
Visualizza la durata della sessione di esercizi in corso in minuti e secondi.
Il computer conta automaticamente a intervalli di un secondo da 0:00 a
99:59. Inoltre con i pulsanti UP e DOWN si può impostare un conto alla
rovescia a partire da un valore a scelta. Alla fine del tempo di allenamento
il computer emette un segnale acustico che segna la scadenza del conto
alla rovescia impostato, e ritorna di nuovo nella modalità iniziale.
ALLENARSI CON IL COMPUTER
Il computer da allenamento offre lo strumento ideale per rendere il vostro
allenamento efficace. Si consiglia di stabilire insieme a un esperto (medico, istruttore) un piano di allenamento. Il computer aiuta a controllare e
a rispettare le direttive. In modo da essere sicuri di raggiungere efficacemente l‘obiettivo dell‘allenamento.
Attenzione: il computer, in particolare la misurazione delle pulsazioni, non sostituisce le apparecchiature mediche.
MODALITÀ OROLOGIO
• Dopo l‘inserimento delle batterie l‘ora lampeggia in modalità orologio.
Regolare le ore con i tasti Up e Down, e confermare con Enter. Ripetere
questo procedimento per i minuti.
• Il computer passa in modalità orologio quando non riceve alcun
segnale o non viene premuto alcun tasto per più di quattro minuti.
Premendo ENTER in modalità orologio si può scegliere se visualizzare
l‘ora o la temperatura. Premere un tasto qualsiasi per uscire dalla
modalità orologio.
• Premendo ENTER per più di due secondi, si può impostare l‘ora con i
tasti UP e DOWN.
FUNZIONI DEI TASTI
1. UP:
Col tasto UP è possibile aumentare i valori di tempo, distanza, cadenza
della pedalata e calorie bruciate. In modalità orologio si può regolare l‘ora
con il tasto UP.
2. DOWN:
Col tasto DOWN è possibile diminuire i valori di tempo, distanza, cadenza
della pedalata e calorie bruciate. In modalità orologio si può regolare l‘ora
con il tasto DOWN.
Avvertenze: Premendo contemporaneamente i tasti UP e DOWN per circa due secondi tutti i valori inseriti ritornano al valore di partenza ovvero
a zero.
Art.-Nr. 65308
Stand 04/11
Seite 22/28
4. VELOCITÀ:
Visualizza la velocità attuale di allenamento in km orari nel grafico a barre. Se il computer non riceve alcun segnale passa automaticamente alla
modalità orologio.
5. DISTANZA:
Visualizza fino a un massimo di 99,9 km la distanza che è stata percorsa
nell‘attuale sessione di esercizi. Inoltre con i pulsanti UP e DOWN si può
impostare un conto alla rovescia a partire da un valore a scelta. Alla fine
del tempo di allenamento il computer emette un segnale acustico che
segna la scadenza del conto alla rovescia impostato, e ritorna di nuovo
nella modalità iniziale.
6. CONSUMO DI CALORIE:
Visualizza il consumo di calorie della sessione di esercizi in corso. Inoltre
con i pulsanti UP e DOWN si può impostare un conto alla rovescia a partire da un valore a scelta. Alla fine del tempo di allenamento il computer
emette un segnale acustico che segna la scadenza del conto alla rovescia
impostato, e ritorna di nuovo nella modalità iniziale.
7. PULSAZIONI:
Visualizza l‘attuale frequenza cardiaca in battiti al minuto.
8. RPM:
Visualizza l‘attuale cadenza della pedalata.
9. SCAN:
Premendo MODE il computer passa in modalità SCAN. In questa funzione il display cambia ogni 6 secondi la visualizzazione fra tempo, velocità,
distanza, calorie, RPM e pulsazioni. Per disabilitare questa funzione, premere il tasto ENTER.
ALLENAMENTO SULLA CYCLETTE ELLITTICA
ATTENZIONE! Prendersi del tempo per la fase di acclimatazione e assumere una corretta postura. Un uso improprio delle basi dell‘allenamento
e delle istruzioni per gli esercizi può causare danni alla salute! Si prega di
notare che la cyclette non è adatta per scopi terapeutici. ATTENZIONE!
La misurazione del polso può fornire anche risultati inesatti. Uno sforzo
eccessivo può portare a lesioni gravi o alla morte. Interrompere immediatamente l‘allenamento, se ci si sente stanchi e deboli.
1. Riscaldamento:
Riscaldarsi assolutamente prima di ogni allenamento. Camminare o correre sul posto attiva il sistema cardiovascolare e prepara al successivo
stress fisico. Cominciare il programma di allenamento a velocità ridotta,
e aumentare il ritmo solo quando i muscoli sono ben riscaldati. Stabilire
sempre il programma di riscaldamento anche in base al livello di prestazione.
2. Respirazione:
La corretta respirazione durante l‘allenamento gioca un ruolo importante.
Respirare con calma e in modo uniforme. Non trattenere mai il respiro
durante l‘esercizio fisico.
3. Abbigliamento e posto:
Per l‘allenamento indossare indumenti sportivi adeguati, e assicurarsi di
avere spazio sufficiente intorno a sé per svolgere gli esercizi (distanza
minima di 1 m). Indossare sempre scarpe sportive; non allenarsi mai a
piedi nudi, con sandali, calze o collant.
4. Metodo di allenamento:
Non sovraffaticarsi e adeguare sempre gli esercizi e la loro mole al livello
di prestazione. Iniziare intanto solo con pochi minuti e lentamente aumentare di settimana in settimana. Inserire fra due sessioni di allenamento almeno un giorno di pausa. Prima di iniziare il programma di esercizi è fondamentale chiedere consiglio a un medico.
5. Raffreddamento:
Non interrompere mai bruscamente l‘allenamento, ma ridurre gradatamente il ritmo prima di lasciare la macchina. Eseguire infine leggeri
esercizi di stretching. In questo modo le pulsazioni diminuiscono lentamente e il corpo recupera rapidamente per lo sforzo successivo, dato
che i rifiuti metabolici (lattato) con il movimento finale possono essere
eliminati meglio.
6. Salute:
Interrompere immediatamente il programma di allenamento se durante
gli esercizi si avverte un irrigidimento dei muscoli o dolori in generale.
Contattare in tal caso per sicurezza un medico.
POSITIONE DI PARTENZA
Posizionarsi con cautela sui rispettivi pedali. Prendere in mano contemporaneamente le relative barre dei pedali. Controllare ora se si è ben
posizionati sulla cyclette ellittica. Per fare questo eseguire delicatamente con braccia e gambe un lento movimento ritmico di scivolamento
(simile a quello dello sci di fondo). Assicurarsi di stare eretti. Durante
l‘allenamento è possibile girarsi morbidamente sul fianco, e spostare
leggermente in avanti le spalle. In questa posizione, quando la barra del
pedale è il più lontano possibile dal corpo, le braccia dovrebbero essere
sempre leggermente piegate. Quando la barra del pedale è il più vicino
possibile al corpo, i gomiti non dovrebbero mai andare oltre la vita. Se
si dovesse presentare uno qualsiasi dei due casi, è necessario spostare
avanti o indietro i piedi. Abituarsi lentamente ai movimenti lenti della
cyclette. Assicurarsi di utilizzare sia le braccia che le gambe. Per misurare il polso, è necessario afferrare i sensori di misurazione palmare sul
manubrio ellittico. Durante la misurazione delle pulsazioni le gambe possono dare la spinta da sole. Eseguire questa operazione inizialmente solo
a bassa velocità. Le regolazioni sul computer dovrebbero essere eseguite
solo quando l‘apparecchio è fermo.
ALLENAMENTO DELLA FREQUENZA CARDIACA
Iniziare l‘allenamento con un ritmo tranquillo e aumentarlo gradualmente
fino a raggiungere la frequenza cardiaca prevista. Quale sia può dirlo un
medico o un preparatore atletico. Misurare la frequenza cardiaca durante
l‘esercizio fisico il più spesso possibile, al fine di assicurarsi che sia quella ottimale.
REGOLAZIONE DEL LIVELLO
Con il regolatore di resistenza si può regolare la resistenza del pedale.
Una resistenza elevata rende difficile la pedalata, mentre una bassa resistenza la rende più facile. L‘impostazione ottimale si trova regolando la
resistenza quando la cyclette ellittica è in funzione.
REGOLAZIONE PEDALE (SALITA E DISCESA)
È possibile avvitare i pedali in posizioni diverse. Per una corretta postura
le mani dovrebbero poter afferrare le maniglie in movimento in modo che
la parte superiore del corpo non si trovi mai piegata in avanti o indietro,
assumere quindi una posizione dritta, eretta. Una volta che i pedali sono
avvitati, salire sempre prima sul pedale che si trova in posizione più bassa.
Afferrare i bracci oscillanti solo dalle maniglie in schiuma, e posizionare
infine l‘altro piede sul pedale che si trova in alto. Ricordare che una volta
caricato il pedale in posizione elevata il movimento dell‘apparecchio inizia
ed i bracci oscillanti possono cominciare a muoversi verso di voi. Seguendo l‘ordine inverso è possibile lasciare il dispositivo in modo sicuro.
MANUTENZIONE E CONSERVAZIONE
Pulire il prodotto solo con un panno oppure con un panno inumidito senza usare speciali detergenti. Verificate che il prodotto non abbia subito
danno e non presenti tracce di usura prima e dopo l’uso. Non apportate
alcuna modifica al prodotto. Utilizzate per la vostra sicurezza solo ricambi
originali. Essi si possono acquistare presso la ditta HUDORA. Se le parti dovessero essere danneggiate oppure dovessero evidenziare angoli e
spigoli, il prodotto non potrà essere più utilizzato. Nel dubbio contattate
il nostro centro di assistenza tecnica (http://www.hudora.de/). Stoccate
il prodotto in un luogo sicuro, protetto dalle intemperie, in modo che non
possa essere danneggiato o ferire delle persone.
INSTRUZIONI PER LO SMALTIMENTO
Siete pregati di portare l’apparecchio, al termine della propria durata
utile, presso un apposito punto di raccolta e di restituzione disponibile.
L’impresa di smaltimento locale sarà a vostra disposizione per rispondere
ad eventuali domande.
ASSISTENZA TECNICA
Ci sforziamo a fornire dei prodotti perfettamente funzionali. Se comunque
doveste riconoscere eventuali difetti, ci impegneremo subito a rimuoverli.
A tale proposito riceverete tante informazioni sul prodotto, sui pezzi di
ricambio, sulle soluzioni ai problemi e sulle istruzioni per il montaggio
andate perse sul sito web all’indirizzo http://hudora.de/artnr/65308/ o
contattate il nostro centro di assistenza tecnica (+49 2191/60912-8800).
Art.-Nr. 65308
Stand 04/11
Seite 23/28
FR
INSTRUCTIONS DE MONTAGE ET MODE D’EMPLOI
UTILISATION DE L’ORDINATEUR
3. ENTER/RESET:
Avec la touche ENTER/RESET, vous pouvez confirmer les valeurs relatives à votre entraînement. Pendant votre entraînement, vous pourrez
aussi désactiver la fonction SCAN à l’aide de la touche ENTER/RESET.
Enfin, vous aurez la possibilité de définir les valeurs sur « 0 » en activant de manière continue la touche ENTER/REST pendant environ 2
secondes.
DESCRIPTION DES FONCTIONS
1. HEURE:
Permet d’afficher l’heure exacte – heures, minutes et secondes.
2. TEMPÉRATURE:
Affiche la température réelle de la pièce.
S’ENTRAINER AVEC L’ORDINATEUR
Grâce à l’ordinateur, vous pourrez concevoir de manière efficace votre entraînement. Nous vous conseillons d’élaborer un programme
d’entraînement spécifique avec un spécialiste (médecin ou coach). Cet
ordinateur vous permettra de vérifier, contrôler et maîtriser les informations reçues, et de vous assurer d’atteindre votre objectif sportif.
Attention: l’ordinateur et le pulsomètre ne remplacent pas les contrôles médicaux.
MODE HEURE
• Après avoir installé les piles, les heures clignotent sur la fonction Heure.
Pour définir les heures, utiliser les touches Up et Down, puis confirmez
avec Enter. Renouvelez cette même opération pour les minutes.
• L’ordinateur passe en mode Heure dès lors qu’il ne reçoit plus aucun
signal ou qu’aucune touche n’est actionnée pendant 4 minutes. En
appuyant sur ENTER, en mode Heure, vous passez de l’affichage des
heures à celui des températures. Vous quittez le mode Heure en appu yant les autres touches.
• Si la touche ENTER est pas activée pendant plus de 2 secondes, vous
pourrez utiliser les fonctions UP et DOWN pour régler l’heure.
FONCTIONS DISPONIBLES
1. UP:
Avec la touche UP, vous pourrez augmenter les valeurs de votre entraînement (temps, distance, RPM (cadence) et calories brûlées). En mode
‘Heure’, vous pourrez également régler l’heure à l’aide des touches UP/
DOWN.
2. DOWN:
Avec la touche DOWN, vous pourrez réduire les valeurs de votre entraînement (temps, distance, RPM (cadence) et calories brûlées). En mode
‘Heure’, vous pourrez également régler l’heure à l’aide des touches UP/
DOWN.
Art.-Nr. 65308
Stand 04/11
Seite 24/28
3. TEMPS:
Dès vous commencerez votre entraînment, la durée totale de votre exercice s‘affichera à l‘écran. L‘affichage va de 00:00 à 99:59. Vous pouvez
également régler cette durée en utilisant les touches « UP » et « DOWN »
et en appuyant ensuite sur « ENTER ». Lorsque vous avez atteint la durée
définie, vous serez immédiatement prévenu par un signal sonore.
4. VITESSE:
Affiche la vitesse actuelle sur un diagramme à barres.
5. DISTANCE:
Permet d’afficher une distance pouvant aller jusqu’à 99,9 km en fonction
des exercices en cours. En utilisant les touches UP et DOWN, vous pourrez
également paramétrer le décompte. A la fin de la période d’entraînement,
l’ordinateur émettra un signal sonore indiquant la fin du décompte avant
de passer en mode Sortie.
6. CALORIES CONSOMMÉES:
Permet d’afficher la consommation en calories pour les exercices en
cours. En utilisant les touches UP et DOWN, vous pourrez également paramétrer le décompte. A la fin de la période d’entraînement, l’ordinateur
émettra un signal sonore indiquant la fin du décompte avant de passer
en mode Sortie.
7. POULS:
Indique votre rythme cardiaque actuel.
8. RPM:
Affiche votre cadence actuelle (nombre de tours par minute).
9. SCAN:
Cette fonction permet de changer d’affichage toutes les 6 secondes entre
Temps, Vitesse, Distance, RPM (cadence), Calories et Rythme cardiaque. Pour désactiver la fonction « SCAN », merci d’appuyer sur la touche
« ENTER ».
S’ENTRAINER SUR UN CROSSTRAINER
ATTENTION! Prendre suffisamment de temps pour s’habituer à l’appareil
et faire attention à sa position. En cas de mauvaise utilisation des principes
d’entraînement et de non-respect des présentes consignes, vous risquez
de vous blesser!
1. Echauffement:
N’oubliez jamais de vous échauffer avant de vous entraîner. En marchant
et courant sur l’installation, vous activez votre circulation et préparez votre
corps à l’entraînement. Commencez votre programme à une vitesse plutôt
réduite, puis augmentez le rythme uniquement lorsque vos muscles sont
échauffés et prêts à l’effort. Merci de toujours définir votre programme
d’échauffement en fonction de votre forme et des performances que vous
souhaitez réaliser.
2. Respiration:
Le fait d’avoir la bonne respiration adaptée à l’exercice joue un rôle très
important lors de l’entraînement sportif. Respirer calmement et de manière
régulière. Ne jamais couper sa respiration pendant les activités!
3. Vêtement et espace:
Opter pour des vêtements de sport adaptés et confortables, et vérifier qu’il
y a suffisamment d’espace autour de vous avant de commencer à vous
entraîner. Toujours porter des chaussures de sport. Ne jamais s’entraîner
les pieds nus, en sandalettes, en chaussettes ou en collants.
4. Technique d’entraînement:
Ne pas dépasser vos capacités. Adapter vos exercices et le niveau de difficulté à votre condition physique. Commencer par quelques minutes seulement, puis augmenter progressivement la durée de semaine en semaine.
Laisser au moins une journée de pause entre deux entraînements. Consulter votre docteur avant de commencer à utiliser votre machine.
5. Etirements:
Ne jamais arrêter l’entraînement de manière abrupte. Optez pour une réduction du rythme, de la vitesse et de la difficulté de l’entrainement. Pensez ensuite à effectuer quelques étirements pour que votre pouls diminue
petit à petit et que votre corps récupère plus vite pour être en forme pour
l’exercice suivant, car la reconstruction des matières et des cellules sera
meilleure en adaptant le rythme de vos mouvements.
6. Santé:
Arrêter immédiatement les exercices si vous sentez qu’un muscle vous tire
ou en cas de douleurs spécifiques. Consulter ensuite votre médecin par
précaution.
POSITION DE DÉPART
S’installer avec précaution sur les pédales. Poser en même temps ses
mains sur le guidon. Vérifier ensuite que vous pouvez vous mettre debout
sur le Crosstrainer sans aucun risque. Commencer ensuite lentement par
un exercice assez rythmé (opter, par exemple, pour le mode ski de fond)
en utilisant vos jambes et vos bras. Vérifier que vous êtes bien installé.
Pendant l’exercice, vous pourrez vous pencher, sur vos hanches, et vous
avancer légèrement. Dans cette position, vos bras – lorsque les supports
pour bras sont au plus loin de vous – seront très peu pliés. Lorsque votre
corps est proche du guidon, les coudes se trouveront derrière la moitié du
corps. Si vous rencontrez l’un des cas, ne pas oublier de régler, vers l’avant
ou vers l’arrière, votre surface d’engagement. S’habituer doucement aux
mouvements et exercices du Crosstrainer. Faire attention à la position de
vos bras ainsi que de vos jambes. Pour mesurer votre rythme cardiaque,
attraper la barre d’appui ovale avec vos mains. Seules les jambes pourront
donner l’impulsion, par la suite. Puis passer à une cadence peu élevée.
Pour les réglages de l’ordinateur, s’assurer que votre équipement n’est plus
sous tension.
TROUVER SON RYTHME D’ENTRAÎNEMENT
Commencer l’entraînement à un rythme agréable et adapté, et augmenter
la cadence de manière progressive jusqu’à ce que le rythme de croisière
soit atteint. Pour le définir, merci de consulter votre médecin ou un coach
sportif. Mesure aussi souvent que possible votre fréquence cardiaque pendant toute la durée de l’exercice afin de s’assurer que vous vous entraînez
dans des conditions optimales!
RÉGLER LE NIVEAU DE DIFFICULTÉ
Grâce au réglage du niveau de résistance, vous pourrez paramétrer la difficulté et la résistance des pédales, indépendamment de la vitesse de votre
équipement. Un niveau de résistance supérieur augmente la difficulté de
l’entrainement et des déplacements, alors qu’un niveau inférieur facilite
le déroulement des exercices. Pour trouver le meilleur réglage, nous vous
conseillons de paramétrer le niveau de difficulté pendant que votre machine est en cours de fonctionnement.
RÉGLAGE DES PÉDALES (EN HAUT ET EN BAS)
Vous pouvez fixer les pédales dans différentes positions. Pour être à
l’aise, vos mains devront pouvoir toucher le guidon, permettant ainsi au
haut de votre corps de se déplacer vers l’avant et vers l’arrière, d’être à
la verticale, à l’horizontale ou dans une autre position d’entraînement.
Lorsque les pédales sont fixées, commencer toujours par placer votre pied
sur la pédale qui se trouve dans la position la plus basse. Attraper ensuite
le cadre avec les mains et placer l’autre pied sur la pédale la plus haute.
Attention : lorsque vous portez du poids sur la pédale supérieure, l’appareil
commencera à se déplacer et les bras pourront alors être tirés vers vous
puis repoussés vers l’extérieur. Pour quitter votre équipement en toute
sécurité, merci de suivre les étapes indiquées dans l’ordre inverse.
ENTRETIEN ET STOCKAGE
Nettoyez le produit uniquement avec un tissu ou chiffon humide et non avec
un produit de nettoyage spécial! Avant et après utilisation, vérifiez le produit afin de détecter tout signe d’endommagement ou d’usure. N’apportez
aucune modification conceptuelle. Pour votre propre sécurité, n’utilisez
que des pièces de rechange d’origine. Vous pouvez les acquérir auprès de
HUDORA. Le produit ne doit plus être utilisé en cas d’endommagement de
certaines parties ou d’apparition de coins saillants ou d’arêtes vives. En
cas de doute, prenez contact avec notre service après-vente (http://www.
hudora.de/). Stockez le produit dans un endroit sûr et à l’abri des intempéries de manière à ce qu’il ne puisse pas être endommagé et qu’il ne puisse
blesser personne.
CONSIGNE POUR LA MISE AU REBUT
Merci d’utiliser les dispositifs de collecte existants lorsque votre unité arrive en fin de vie. N’hésitez pas à contacter les entreprises locales chargées
du recyclage en cas de question.
SERVICE
Nous faisons tout notre possible pour proposer des produits sans défaut.
Si des problèmes devaient, malgré tout, survenir, nous nous engageons à
mettre tout en oeuvre pour y remédier. Pour obtenir plus d’informations sur
le produit, les solutions aux problèmes et consulter les notices d’utilisation
en cas de perte, rendez-vous sur: http://hudora.de/artnr/65308/. Ou prenez
contact avec notre service après-vente (Hotline: +49 2191/60921-8800).
Art.-Nr. 65308
Stand 04/11
Seite 25/28
DE
EN
NOTIZEN
NOTES
Art.-Nr. 65308
Stand 04/11
Seite 26/28
IT
FR
NOTE
NOTES
Art.-Nr. 65308
Stand 04/11
Seite 27/28
HUDORA | Jägerwald 13 | 42897 Remscheid | Germany
www.hudora.de
Art.-Nr. 65308
Stand 04/11
Seite 28/28