1
1054030
JAW 10/23/09
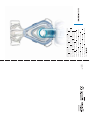
BRUKSANVISNING
INSTRUKCJE UŻYTKOWANIA
NÁVOD
ΟΔΗΓΙΕΣ ΧΡΗΣΗΣ
BRUKSANVISNING
INSTRUÇÕES DE USO
GEBRUIKSAANWIJZING
UPUTE ZA UPORABU
ቂངಖ
ИНСТРУКЦИИ ПО ЭКСПЛУАТАЦИИ
ИНСТРУКЦИИ ЗА РАБОТА
NAUDOJIMO INSTRUKCIJOS
INSTRUCŢIUNI DE UTILIZARE
LIETOŠANAS INSTRUKCIJA
KASUTUSJUHEND
ZA UPORABO
.328æ,7Ì HASZNÁLATI UTASÍTÁS 1É92'1$328æ,7,( NAVODILA
KÄYTTÖOHJEET
BRUGSVEJLEDNING
ISTRUZIONI
INSTRUCCIONES DE USO
INSTRUCTIONS D’UTILISATION
ANWENDUNGSHINWEISE
INSTRUÇÕES DE UTILIZAÇÃO
PER L’USO
INSTRUCTIONS FOR USE
4
5
10
15
20
25
30
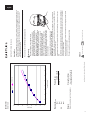
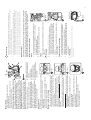
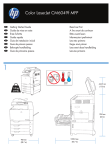
50 LPM 100 LPM
All sizes 0.2
0.7
35
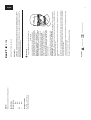
-4º to +140º F (-20º to +60º C)
15% to 95% RH, non-condensing
Dispose of in accordance with local regulations.
5HVSLURQLFV,QFDQGLWVDIÀOLDWHV$OO5LJKWV5HVHUYHG
Storage Conditions
Disposal
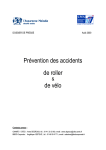
58 ml
65 ml
81 ml
83 ml
S
M
MW
L
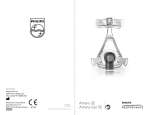
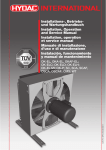
Pressure (cm H2O)
PRESSURE DROP
0.00
10.00
20.00
30.00
40.00
Caution or Warning
Symbols
Consult instructions for use
r This mask is not suitable for providing life support ventilation.
r Some users may experience skin redness, irritation and/or discomfort. If this happens, discontinue use and
contact your health care professional.
r $WDÀ[HGÁRZUDWHRIVXSSOHPHQWDOR[\JHQÁRZWKHLQKDOHGR[\JHQFRQFHQWUDWLRQZLOOYDU\GHSHQGLQJRQ
the pressure settings, patient breathing pattern, nasal mask selection, and the leak rate. This warning applies
to most types of CPAP machines.
r Oxygen supports combustion. Oxygen should not be used while smoking or in the presence of an open
ÁDPH
r ,IR[\JHQLVXVHGZLWKWKHGHYLFHWKHR[\JHQÁRZPXVWEH
turned off when the device is not operating. Explanation
of the Warning::KHQWKHGHYLFHLVQRWLQRSHUDWLRQDQGWKHR[\JHQÁRZLVOHIWRQR[\JHQGHOLYHUHG
into the ventilator tubing may accumulate within the device enclosure. Oxygen accumulated in the device
HQFORVXUHZLOOFUHDWHDULVNRIÀUH
r This mask is designed for use with CPAP or bi-level
systems recommended by your health care professional
or respiratory therapist. Do not wear this mask unless the
CPAP or bi-level system is turned on and operating properly.
Do not block or try to seal the exhalation port.
Explanation of the Warning: CPAP systems are intended
to be used with special masks with connectors which have
YHQWKROHVWRDOORZFRQWLQXRXVÁRZRIDLURXWRIWKHPDVN
When the CPAP machine is turned on and functioning
SURSHUO\QHZDLUIURPWKH&3$3PDFKLQHÁXVKHVWKH
exhaled air out through the attached mask exhalation port.
However, when the CPAP machine is not operating, enough
fresh air will not be provided through the mask, and exhaled
air may be rebreathed.
Warnings
This mask is latex free and DEHP [Di(2-ethylhexyl)phthalate] free.
Important: Exhalation vents are built into this mask so a separate exhalation device is not required.
50.00
Intended Use
INSTRUCTIONS FOR USE
The EASYLIFE Nasal Mask is an accessory to a non-continuous ventilator (respirator), intended for use
by patients >66 lbs (30 kg) prescribed continuous positive airway pressure (CPAP) or bi-level therapy.
The mask is intended for single patient use in the home environment or multi-patient reuse in the
hospital/institutional environment.
0
WHISPER SWIVEL 2
60.00
70.00
EASYLIFE
DEADSPACE VOLUME
Flow (slpm)
Intentional Leak
6SHFLÀFDWLRQV
1
English
2
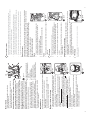
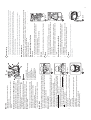
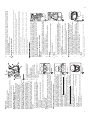
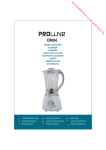
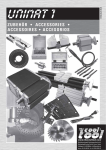
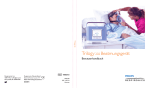
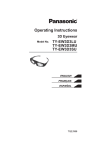
C = Forehead pad
D = Attachment tabs
E = Outer support cushion
F = Headgear stop
G = Exhalation (Do not block or remove)
C
8.
7.
5.
6.
4.
3.
2.
1.
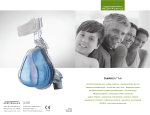
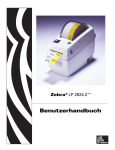
Have the patient hold the mask with the inner cushion over their nose
and pull the headgear on over their head. The headgear is preset to a
large setting to go on easily right out of the package.
Have the patient evenly adjust the upper straps (Figure 3) to a
comfortable position by using the tabs on both sides of the headgear.
Do not pull
p the straps
p tight.
g . The cushion should lightly touch the face
and the upper strap will rest above the ears.
Evenly adjust the lower straps (Figure 4) to a comfortable position by
using the tabs on both sides of the headgear. Do not pull
p the straps
p
tight.
g The lower strap will sit below the ears and the headgear will
cross at the base of the head (Figure 5).
Connect the tubing (included with the CPAP or bi-level device) to the
tubing swivel.
7XUQRQWKHDLUÁRZ
Have the patient lie down and breathe normally through the nose,
keeping lips closed.
Adjust the headgear evenly to reduce leaks or pressure points at the
bridge of the nose or above the lip.
Reseat the mask, if necessary.
Achieving the Right Fit
cushion is not designed to provide seal.
The inner cushion provides a comfortable and automatically adjusting seal.
The outer cushion provides stability and support to the mask. The outer
The EasyLife Mask is designed with two mask cushions that work together.
EasyLife Mask
detergent. Do not use bleach, alcohol, or cleaning solutions
containing alcohol. Do not use cleaners containing
conditioners or moisturizers.
Rinse thoroughly. Air dry completely before use.
Inspect all parts for damage or wear; replace if necessary.
Hand wash in warm water with a mild liquid dish washing
Figure 5
Figure 4
Figure 3
For multi-patient, multi-use in the hospital/institutional
environment, visit us on-line at www.sleepapnea.com or contact
Customer Service at 1-724-387-4000 or Respironics Deutschland
at +49 8152 93060 to obtain mask disinfecting instructions.
For single patient reuse in the home, the mask and CPAP
tubing should be cleaned daily. The headgear should be cleaned
Figure 2
weekly, or as needed. The headgear does not need to be removed
for daily cleaning. Inspect the headgear for wear and tear, replace A = Forehead pad slot
B = Inner sealing cushion with blue flap
as needed.
Cleaning Instructions for the Mask and Headgear
necessary.
Read and understand the instructions completely.
Hand wash the mask.
Inspect the mask components for damage or wear; replace if
Before Use
5HVHDWWKHPDVNE\SXOOLQJWKHVLGHVRIWKHIDFHSODWHGLUHFWO\DZD\IURPWKHIDFHWKHQ
JHQWO\VHWLWEDFNLQWRSODFH7KLVDOORZVWKHFXVKLRQWRFUHDWHDQHZVHDORQWKHIDFH'2
127SXOOWKHPDVNE\WKHHOERZ
$GMXVWWKHXSSHUKHDGJHDUVWUDSVWRHOLPLQDWHOHDNVDURXQGWKHIRUHKHDGDQGWHPSOHV
$GMXVWWKHORZHUKHDGJHDUVWUDSVWRHOLPLQDWHOHDNVDURXQGWKHFKHHNVDQGFKLQ
Pull outward on the three attachment tabs on each side of the outer
support cushion until this cushion separates from the mask frame.
Remove the outer support cushion.
5HPRYHWKHLQQHUVHDOLQJFXVKLRQZLWKWKHEOXHÁDS
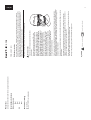
Place the smaller inner sealing cushion on the mask frame (Figure 6).
Note
Note
To reattach the headgear, thread the upper headgear straps into the
slots in the top of the mask frame. Fold the tabs back to catch the
headgear straps.
Thread the lower headgear straps into the slots in the bottom of the
mask frame. Fold the tabs back to catch the headgear straps.
The upper headgear straps are longer and the lower headgear straps are
shorter (Figure 8).
2.
1.
Attaching the Headgear to the Mask
7KHEOXHÁDSPXVWFRYHUWKHOLSRQWKHPDVN
2. Slide the larger outer support cushion with tabs facing downward
around the inner sealing cushion until all three sides click into the mask
frame (Figure 7).
3. Gently tug on the cushions to make sure they are securely in place.
4. Gently press the forehead pad into the forehead pad slot in the mask
frame.
1.
To Attach
2.
1.
To Remove
Removing and Attaching the Cushions
Figure 8
Figure 7
Figure 6
Quickly and easily remove the mask by grabbing the back headgear strap and sliding the entire assembly
forward over your head. If needed, undo the lower headgear straps.The headgear stop prevents the
headgear from slipping out of the frame.You do not need to pull the headgear straps beyond the stops
for daily cleaning or adjustments.
Removing the Mask
7KHKHDGJHDUVKRXOGÀWORRVHDQGFRPIRUWDEOH,I\RXUVNLQEXOJHVDURXQGWKHPDVNORRVHQ
WKHKHDGJHDU2YHUWLJKWHQLQJWKHKHDGJHDUFDQKLQGHUWKHPDVN·VSHUIRUPDQFHDQGVHDO
Comfort Tips
3
8
0,00
10,00
20,00
30,00
40,00
50,00
0
10
20
25
30
35
100 L/Min
0,7
© 2009 Respironics, Inc. et sociétés apparentées. Tous droits réservés.
-20 °C à +60 °C
HR entre 15 et 95 %, sans condensation
50 L/Min
0,2
Conditions de stockage
Toutes tailles
CHUTE DE PRESSION
Pression (cm H 2O)
Le masque doit être éliminé conformément aux
réglementations locales.
58 ml
65 ml
81 ml
83 ml
15
Mise au rebut
S
M
MW
G
5
Attention ou avertissement
Symboles
Consulter le mode d'emploi
r Ce masque n’est pas conçu pour procurer une ventilation de support vital.
r Certains utilisateurs peuvent noter l’apparition de rougeurs sur la peau, d’irritation ou de gêne. En tel cas,
cessez d’utiliser le masque et consultez votre professionnel de santé.
r XQGpELWÀ[HG·R[\JqQHVXSSOpPHQWDLUHODFRQFHQWUDWLRQG·R[\JqQHLQKDOpHYDULHHQIRQFWLRQGHV
UpJODJHVGHSUHVVLRQGXSURÀOUHVSLUDWRLUHGXSDWLHQWGXFKRL[GXPDVTXHQDVDOHWGXWDX[GHIXLWH&HW
avertissement s’applique à la plupart des types d’appareils PPC.
r /·R[\JqQHIDYRULVHODFRPEXVWLRQ/·R[\JqQHQHGRLWSDVrWUHXWLOLVpHQSUpVHQFHG·XQHÁDPPHQXHRXG·XQH
cigarette allumée.
r Si de l’oxygène est utilisé avec le dispositif, il est nécessaire
G·DUUrWHUOHÁX[G·R[\JqQHTXDQGOHGLVSRVLWLIQ·HVWSDVHQVHUYLFHExplication de l’Avertissement :
quand l’appareil n’est pas en marche et que le débit d’oxygène fonctionne, l’oxygène acheminé dans la
tubulure du ventilateur peut s’accumuler dans l’appareil, ce qui peut provoquer un risque d’incendie.
r Ce masque est prévu pour les systèmes PPC ou à deux
niveaux de pression recommandés par votre médecin ou
votre thérapeute respiratoire. Ne portez ce masque que
lorsque le système PPC/à deux niveaux de pression est
allumé et qu’il fonctionne correctement. N’obstruez pas
O·RULÀFHG·H[SLUDWLRQ([SOLFDWLRQGHO·DYHUWLVVHPHQW les systèmes PPC sont prévus pour être utilisés avec des
masques spéciaux pourvus de connecteurs avec évents
G·DpUDWLRQDÀQGHSHUPHWWUHODFLUFXODWLRQFRQWLQXHG·DLU
hors du masque. Lorsque l’appareil PPC est allumé et qu’il
IRQFWLRQQHFRUUHFWHPHQWO·DLUIUDLVVRXIÁpSDUO·DSSDUHLO
chasse l’air expiré vers l’extérieur par la valve d’expiration
du masque attaché. En cas d’arrêt de l’appareil PPC, l’air frais
FLUFXODQWGDQVOHPDVTXHQ·HVWHQUHYDQFKHSOXVVXIÀVDQWHW
l’air expiré peut être inhalé à nouveau.
Avertissements
Ce masque ne contient pas de latex ni de DEHP [di-(2-éthylhexyl)phtalate].
Important : des évents d’expiration étant intégrés à ce masque, un dispositif expiratoire n’est pas nécessaire.
Le masque nasal EASYLIFE est un accessoire d’un ventilateur non continu (appareil respiratoire) conçu
pour une utilisation par des patients > 30 kg auxquels a été prescrite une thérapie par pression positive
continue (PPC) ou une thérapie à deux niveaux. Ce masque est prévu pour une utilisation sur un seul
patient à domicile ou pour une réutilisation sur plusieurs patients en milieu hospitalier/médicalisé.
INSTRUCTIONS D’UTILISATION
A
60,00
WHISPER SWIVEL 2
Utilisation préconisée
EASYLIFE
70,00
CHUTE DE PRESSION
Flux (slpm)
Fuite intentionnelle
Caractéristiques techniques
5
Français
6
C
8.
7.
5.
6.
4.
3.
2.
1.
Faites en sorte que le patient maintienne le masque avec le coussinet
intérieur au-dessus de son nez et tirez le harnais par dessus sa tête.
Le harnais est préréglé sur une grande taille pour une adaptation facile
dès sa sortie de l’emballage.
)DLWHVUpJOHUXQLIRUPpPHQWOHVVDQJOHVVXSpULHXUHVSDUOHSDWLHQWÀJXUH VXUXQHSRVLWLRQFRQIRUWDEOHjO·DLGHGHVODQJXHWWHVVXUOHVGHX[F{WpV
du harnais. Ne serrez pas
p tropp les sangles.
g . Le coussinet doit légèrement
toucher le visage et la sangle supérieure repose au-dessus des oreilles.
5pJOH]XQLIRUPpPHQWOHVVDQJOHVLQIpULHXUHVÀJXUHVXUXQHSRVLWLRQ
FRQIRUWDEOHjO·DLGHGHVODQJXHWWHVVXUOHVGHX[F{WpVGXKDUQDLVNe
serrez pas
p tropp les sangles.
g . La sangle inférieure se trouve en dessous
GHVRUHLOOHVHWOHKDUQDLVFURLVHjODEDVHGHODWrWHÀJXUH
Branchez le tuyau (fourni avec l’appareil PPC ou à deux niveaux de
pression) au raccord pivotant de tubulure.
Activez la circulation d’air.
Faites allonger le patient et demandez-lui de respirer normalement par
le nez, en fermant la bouche.
Ajustez le harnais pour éliminer les fuites ou les points de pression au
niveau de la voûte nasale ou au-dessus des lèvres.
Si nécessaire, réinstallez le masque.
Réglage et ajustement du masque
Le masque EASYLIFE est conçu avec deux coussinets qui fonctionnent ensemble.
Le coussinet intérieur fournit une étanchéité confortable et à
réglage automatique.
Le coussinet extérieur assure la stabilité et le soutien du masque. Le
coussinet extérieur n’est pas conçu pour l’étanchéité.
Masque EASYLIFE
à un remplacement si nécessaire.
9pULÀH]TX·DXFXQHSLqFHQ·HVWHQGRPPDJpHRXXVpHSURFpGH]
Lavez à la main à l’eau chaude et avec un liquide vaisselle
Figure 5
Figure 4
Figure 3
rabat bleu
C = Intercalaire frontal
D = Languettes de fixation
doux. N’utilisez pas d’eau de javel, d’alcool ou de solution
E = Coussinet extérieur de soutien
détergente contenant de l’alcool. N’utilisez pas de produits
F = Dispositif de blocage du harnais
contenant des baumes ou des substances hydratantes.
Rincez abondamment. Faites sécher à l’air libre avant utilisation. G = Expiration (ne pas bloquer ou retirer)
En cas d’utilisation répétée sur plusieurs patients en milieu
hospitalier/médicalisé, consultez le site www.sleepapnea.com
(éventuellement en anglais) ou contactez le service clientèle au
+1-724-387-4000 ou Respironics Deutschland au +49 8152 93060
pour obtenir des instructions de désinfection du masque. En cas
de réutilisation sur un seul patient à domicile, le masque et
Figure 2
le tube PPC doivent être lavés tous les jours. Nettoyez le harnais
une fois par semaine ou plus souvent si nécessaire. Il est inutile
GHGpWDFKHUOHKDUQDLVSRXUOHQHWWR\DJHTXRWLGLHQ9pULÀH]TXHOH A = Emplacement d’intercalaire frontal
B = Coussinet intérieur d’étanchéité avec
harnais n’est pas usé et remplacez-le si nécessaire.
Instructions de nettoyage pour le masque et le harnais
endommagés ; remplacez-les si nécessaire.
Lisez et comprenez l’intégralité du mode d’emploi.
Lavez le masque à la main.
9pULÀH]TXHOHVFRPSRVDQWVGXPDVTXHQHVRQWSDVXVpVRX
Avant utilisation
5HPHWWH]OHPDVTXHHQSODFHHQWLUDQWOHVF{WpVGHODSODTXHIDFLDOHGLUHFWHPHQWHQ
O·pORLJQDQWGXYLVDJHSXLVHQOHODLVVDQWUHYHQLUGRXFHPHQWHQSODFH&HFLSHUPHWDX
FRXVVLQHWGHFUpHUXQHQRXYHOOHpWDQFKpLWpVXUOHYLVDJH1(WLUH]3$6OHPDVTXHSDUOHFRXGH
(QFDVGHIXLWHDXWRXUGXIURQWHWGHVWHPSHVDMXVWH]OHVVDQJOHVVXSpULHXUHVGXKDUQDLV
(QFDVGHIXLWHDXWRXUGHVMRXHVHWGXPHQWRQDMXVWH]OHVVDQJOHVLQIpULHXUHVGXKDUQDLV
7LUH]YHUVO·H[WpULHXUOHVWURLVODQJXHWWHVGHÀ[DWLRQGHFKDTXHF{Wp
du coussinet extérieur de soutien, jusqu’à ce que ce coussinet se
désolidarise du cadre du masque.
Retirez le coussinet extérieur de soutien.
Retirez le coussinet intérieur d’étanchéité avec le rabat bleu.
Remarque
Placez le petit coussinet intérieur d’étanchéité sur le cadre du masque
ÀJXUH
Enfoncez doucement l’intercalaire frontal dans son emplacement dans
le cadre du masque.
4.
Figure 7
Figure 6
Remarque
Figure 8
3RXUÀ[HUjQRXYHDXOHKDUQDLVIDLWHVSDVVHUOHVVDQJOHVVXSpULHXUHVGX
harnais dans les fentes en haut du cadre du masque. Repliez les languettes pour les accrocher sur
les sangles du harnais.
Faites passer les sangles inférieures du harnais dans les fentes en bas
du cadre du masque. Repliez les languettes pour les accrocher sur les
sangles du harnais.
Les sangles supérieures du harnais sont plus longues que les sangles
LQIpULHXUHVÀJXUH
2.
Fixation du harnais sur le masque
Tirez doucement sur les coussinets pour vous assurer qu’ils sont bien
en place.
3.
Le rabat bleu doit couvrir la lèvre sur le masque.
2. Faites coulisser le grand coussinet extérieur de soutien avec les
languettes vers le bas autour du coussinet intérieur d’étanchéité jusqu’à
FHTXHOHVWURLVF{WpVV·HPERvWHQWGDQVOHFDGUHGXPDVTXHÀJXUH
1.
Fixation
2.
3.
Dépose
'pSRVHHWÀ[DWLRQGHVFRXVVLQHWV
Retirez rapidement et facilement le masque en saisissant la sangle arrière du harnais et en faisant glisser
tout l’ensemble vers l’avant, par dessus la tête. S’il le faut, défaites les sangles inférieures du harnais. Le
dispositif de blocage du harnais l’empêche de glisser hors du cadre. Il n’est
pas nécessaire de tirer les sangles du harnais au-delà du dispositif de blocage
pour le nettoyage ou les réglages quotidiens.
Retrait du masque
$MXVWH]OHKDUQDLVGHPDQLqUHFRQIRUWDEOHHWVDQVVHUUHU6LODSHDXHVWFRPSULPpHDX
QLYHDXGXFRQWDFWDYHFOHPDVTXHGHVVHUUH]OHKDUQDLV8QVHUUDJHH[FHVVLIGXKDUQDLVSHXW
UpGXLUHOHVSHUIRUPDQFHVHWO·pWDQFKpLWpGXPDVTXH
Conseils de confort
7
12
0,00
10,00
20,00
30,00
40,00
50,00
60,00
70,00
0
5
20
25
30
50 l/min
0,2
35
100 l/min
0,7
5HVSLURQLFV,QFHVXHDIÀOLDWH7XWWLLGLULWWLULVHUYDWL
da -20 a +60°C
da 15 a 95% di umidità relativa, senza condensa
Tutte le dimensioni
CADUTA DI PRESSIONE
Pressione (cm H2O)
Condizioni di immagazzinaggio
15
WHISPER SWIVEL 2
Smaltire il dispositivo in modo conforme alle
normative locali.
58 ml
65 ml
81 ml
83 ml
10
EASYLIFE
Smaltimento
S
M
MW
L
VOLUME SPAZIO MORTO
Flusso (ls/min)
Perdita volontaria
6SHFLÀFKH
Attenzione o Avvertenza
Simboli
Consultare le istruzioni per l'uso.
r Questa maschera non è adatta a fornire una ventilazione per il supporto vitale.
r ,QDOFXQLSD]LHQWLSRVVRQRPDQLIHVWDUVLIHQRPHQLGLDUURVVDPHQWRGHOODSHOOHLUULWD]LRQHHRGLVDJLRÀVLFR,Q
WDOFDVRVRVSHQGHUHO·XWLOL]]RHFRQVXOWDUHO·RSHUDWRUHVDQLWDULRGLÀGXFLD
r $XQDSRUWDWDÀVVDGHOÁXVVRGLRVVLJHQRVXSSOHPHQWDUHODFRQFHQWUD]LRQHGLRVVLJHQRLQDODWRYDULDD
seconda delle impostazioni della pressione, del pattern respiratorio del paziente, della maschera nasale in
uso e dell’entità delle perdite. Questa avvertenza è valida per la maggior parte dei dispositivi CPAP.
r /·RVVLJHQRDOLPHQWDODFRPEXVWLRQHHQRQGHYHHVVHUHXVDWRPHQWUHVLIXPDQpLQSUHVHQ]DGLÀDPPHOLEHUH
r 6HVLXWLOL]]DRVVLJHQRFRQLOGLVSRVLWLYRLOÁXVVRGHYHHVVHUHGLVDWWLYDWRTXDQGRLOGLVSRVLWLYRQRQqLQ
funzione. Spiegazione dell’avvertenza: TXDQGRLOGLVSRVLWLYRQRQqLQIXQ]LRQHHLOÁXVVRGLRVVLJHQR
viene lasciato attivo, l’ossigeno alimentato nel tubo del ventilatore può accumularsi all’interno del corpo del
dispositivo. L’ossigeno accumulato nel corpo del dispositivo potrebbe generare un incendio.
r La maschera è stata progettata per essere utilizzata con i
sistemi CPAP o bi-level raccomandati dal proprio operatore
sanitario o terapeuta della respirazione. Indossare la
maschera solo quando il sistema CPAP o bi-level è attivato
e regolarmente funzionante. Non ostruire o sigillare
la valvola espiratoria. Spiegazione dell’avvertenza:
i sistemi CPAP sono progettati per essere utilizzati con
maschere speciali provviste di connettori dotati di fori di
VÀDWRFKHFRQVHQWRQRODIXRULXVFLWDGLXQÁXVVRGLDULD
continuo dalla maschera. Quando il sistema CPAP è attivato
e funziona regolarmente, l’aria nuova aspirata dal sistema
spinge via l’aria espirata dalla valvola della maschera. Tuttavia,
quando il sistema CPAP non è in funzione, l’aria fresca
IRUQLWDDWWUDYHUVRODPDVFKHUDQRQqVXIÀFLHQWHHGqTXLQGL
possibile che l’aria espirata venga inspirata nuovamente.
Avvertenze
Questa maschera non contiene lattice né DEHP (di-etilesilftalato).
Importante: poiché la maschera è già dotata di valvole espiratorie, non è necessario avvalersi di un
dispositivo apposito ausiliario.
La maschera nasale EASYLIFE è un accessorio applicabile a un ventilatore (respiratore) non continuo,
studiata per pazienti con massa corporea superiore ai 30 kg ai quali è stata prescritta una terapia basata
su pressione positiva continua delle vie aeree (CPAP) o di tipo bi-level. Può essere utilizzata per un singolo
paziente in ambiente domestico o più volte per più pazienti in ambito ospedaliero/sanitario.
Finalità d’uso
ISTRUZIONI PER L’USO
9
Italiano
10
C
8.
7.
4.
5.
6.
3.
2.
1.
Invitare il paziente a tenere il cuscinetto interno della maschera sopra il
QDVRHTXLQGLDLQGRVVDUHLOGLVSRVLWLYRGLÀVVDJJLRVXOFDSRLQÀODQGROR
dalla testa. Per agevolarne l’estrazione dalla confezione, il dispositivo di
ÀVVDJJLRVXOFDSRqSUHLPSRVWDWRVXXQDODUJKH]]DSLXWWRVWRQRWHYROH
Chiedere al paziente di avvalersi delle linguette poste su entrambi i lati
GHOGLVSRVLWLYRSHUUHJRODUHOHFLQJKLHVXSHULRULÀJXUDLQPRGRFKH
risultino uniformi e comode. Non tirare eccessivamente le cinghie.
g . Il
cuscinetto deve toccare leggermente il viso e la cinghia superiore deve
rimanere sopra le orecchie.
Servendosi delle linguette poste su entrambi i lati del dispositivo,
UHJRODUHOHFLQJKLHLQIHULRULÀJXUDLQPRGRFKHULVXOWLQRXQLIRUPL
e comode. Non tirare eccessivamente le cinghie.
g . La cinghia inferiore
GHYHULPDQHUHVRWWROHRUHFFKLHHLOGLVSRVLWLYRGHYHHVVHUHÀVVDWRDOOD
EDVHGHOODWHVWDFRQOHFLQJKLHLQFURFLDWHÀJXUD
Collegare il tubo (incluso con il dispositivo CPAP o bi-level) al relativo snodo.
$WWLYDUHLOÁXVVRG·DULD
Far sdraiare il paziente e invitarlo a respirare normalmente con il naso,
tenendo chiusa la bocca.
5HJRODUHLOGLVSRVLWLYRGLÀVVDJJLRVXOFDSRLQPRGRFKHULPDQJD
disposto senza creare dislivelli, così da ridurre eventuali perdite o
formazione di punti di pressione in corrispondenza del dorso del naso
o sopra il labbro.
Se necessario, risistemare la maschera.
Adattamento e regolazione della maschera
Nella maschera EASY
E LIFEE sono presenti due cuscinetti che operano
congiuntamente.
Quello più interno fornisce un appoggio comodo a regolazione automatica,
mentre quello più esterno aumenta la stabilità della maschera fungendo da
supporto, senza tuttavia garantire la tenuta dell’apparecchio.
Maschera EASYLIFE
Figura 5
Figura 4
Figura 3
Per informazioni sull’utilizzo multiuso e multipaziente
in ambito ospedaliero/sanitario, è possibile visitare il sito
www.sleepapnea.com o contattare l’Assistenza clienti al
numero +1-724-387-4000. In alternativa, rivolgersi a Respironics
Deutschland al numero +49 8152 93060 per ricevere istruzioni
su come disinfettare la maschera. Se la maschera viene utilizzata
Figura 2
più volte su un singolo paziente in ambito domestico, deve
essere pulita ogni giorno, congiuntamente al tubo del dispositivo A = Fessura dell’imbottitura per la fronte
&3$3,OGLVSRVLWLYRGLÀVVDJJLRVXOFDSRGHYHHVVHUHSXOLWR
B = Cuscinetto di tenuta interno con
ogni settimana, o quando necessario. Per la pulizia quotidiana
falda blu
QRQqQHFHVVDULRULPXRYHUHLOGLVSRVLWLYRGLÀVVDJJLRVXOFDSR
C = Imbottitura per la fronte
(VDPLQDUQHORVWDWRSHUYHULÀFDUHFKHQRQYLVLDQRVHJQLGLXVXUD D = Linguette di montaggio
o strappi e, all’occorrenza, procedere alla sostituzione.
E = Cuscinetto di supporto esterno
Lavare a mano in acqua calda con sapone liquido delicato
F = Fermo del dispositivo di fissaggio
per piatti. Non usare candeggina, alcol o soluzioni detergenti
sul capo
a base di alcol, né detersivi contenenti ammorbidenti o
G = Espirazione (non bloccare né rimuovere)
sostanze idratanti.
Sciacquare a fondo. Lasciare asciugare completamente all’aria prima dell’utilizzo.
,VSH]LRQDUHRJQLFRPSRQHQWHSHUYHULÀFDUHODSUHVHQ]DGLGDQQLRXVXUD
sostituire se necessario.
Istruzioni p
per la p
pulizia della maschera e del
GLVSRVLWLYRGLÀVVDJJLRVXOFDSR
presenza di danni o usura; sostituire se necessario.
Leggere attentamente tutte le istruzioni.
Lavare manualmente la maschera.
,VSH]LRQDUHRJQLFRPSRQHQWHGHOODPDVFKHUDSHUYHULÀFDUHOD
Prima dell’uso
5HJRODUHOHFLQJKLHVXSHULRULGHOGLVSRVLWLYRGLÀVVDJJLRVXOFDSRSHUHOLPLQDUHOHSHUGLWH
LQWRUQRDOODIURQWHHDOOHWHPSLH
5HJRODUHOHFLQJKLHLQIHULRULGHOGLVSRVLWLYRGLÀVVDJJLRVXOFDSRSHUHOLPLQDUHOHSHUGLWH
LQWRUQRDOOHJXDQFHHDOPHQWR
,OGLVSRVLWLYRGLÀVVDJJLRVXOFDSRGHYHDGDWWDUVLVHQ]DFUHDUHSUHVVLRQLHLQPRGRFRQIRUWHYROH
6HODSHOOHDWWRUQRDOODPDVFKHUDVLJRQÀDDOOHQWDUHOHFLQJKLH6HUUDUHHFFHVVLYDPHQWHLO
GLVSRVLWLYRSRWUHEEHFRPSURPHWWHUQHODIXQ]LRQDOLWjHODFDSDFLWjGLWHQXWD
5LVLVWHPDUHODPDVFKHUDWLUDQGRGLUHWWDPHQWHLODWLGHOODIDOGDORQWDQRGDOYLVRTXLQGL
ULSRVL]LRQDUODGHOLFDWDPHQWH,QTXHVWRPRGRLOFXVFLQHWWRDGHULUjSHUIHWWDPHQWHVXOYLVR
121WLUDUHODPDVFKHUDGDOJRPLWR
Suggerimenti per il comfort
Nota
3HUULPRQWDUHLOGLVSRVLWLYRGLÀVVDJJLRVXOFDSRLQÀODUQHOHFLQJKLH
superiori nelle fessure presenti sulla struttura di sostegno della
maschera. Piegare le linguette all’indietro in modo da riuscire a
SUHQGHUHOHFLQJKLHGHOGLVSRVLWLYRGLÀVVDJJLRVXOFDSR
,QÀODUHOHFLQJKLHLQIHULRULGHOGLVSRVLWLYRGLÀVVDJJLRVXOFDSRQHOOH
fessure presenti nella parte più bassa della struttura di sostegno
della maschera. Piegare le linguette all’indietro in modo da riuscire a
SUHQGHUHOHFLQJKLHGHOGLVSRVLWLYRGLÀVVDJJLRVXOFDSR
/HFLQJKLHVXSHULRULGHOGLVSRVLWLYRGLÀVVDJJLRVXOFDSRVRQRGLOXQJKH]]D
PDJJLRUHULVSHWWRDTXHOOHLQIHULRULÀJXUD
0RQWDJJLRGHOGLVSRVLWLYRGLÀVVDJJLRVXOFDSRVXOODPDVFKHUD
La falda blu deve coprire il bordo della maschera.
2. Far scivolare il cuscinetto di supporto esterno tenendo le linguette
ULYROWHYHUVRLOEDVVRDWWRUQRDOFXVFLQHWWRGLWHQXWDLQWHUQRÀQFKpWXWWL
e tre i lati non scattano in posizione sulla struttura di sostegno della
PDVFKHUDÀJXUD
7LUDUHGHOLFDWDPHQWHLFXVFLQHWWLSHUYHULÀFDUHFKHVLDQR
posizionati saldamente.
4. Senza forzare, premere il cuscinetto per la fronte nell’apposita fessura
disponibile sulla struttura di sostegno della maschera.
Nota
Tirare verso l’esterno le tre linguette di montaggio che si trovano su
FLDVFXQODWRGHOFXVFLQHWWRGLVXSSRUWRHVWHUQRÀQFKpTXHVWRQRQVL
stacca dalla struttura di sostegno della maschera.
2. Rimuovere il cuscinetto di supporto esterno.
3. Rimuovere il cuscinetto di tenuta interno utilizzando la falda blu.
Montaggio
1. Posizionare il cuscinetto di tenuta interno sulla struttura di sostegno
GHOODPDVFKHUDÀJXUD
1.
Rimozione
Rimozione e montaggio dei cuscinetti
Figura 8
Figura 7
Figura 6
Per rimuovere la maschera in modo semplice e immediato, prendere la cinghia posteriore del dispositivo
GLÀVVDJJLRVXOFDSRHVÀODUHO·LQWHURDSSDUHFFKLRGDOODWHVWD6HQHFHVVDULRVODFFLDUHOHFLQJKLHLQIHULRUL
,OIHUPRGHOGLVSRVLWLYRGLÀVVDJJLRLPSHGLUjFKHSRVVDVFLYRODUHGDOODVWUXWWXUDGLVRVWHJQR3HUODSXOL]LD
quotidiana o per eventuali regolazioni, non è necessario tirare le cinghie del
GLVSRVLWLYRGLÀVVDJJLRROWUHLIHUPLGLEORFFR
11
16
10
15
20
Druck (cm H 2O)
25
30
Lagerung
100 l/min
0,7
35
© 2009 Respironics Inc. und angeschlossene Unternehmen. Alle Rechte vorbehalten.
Den örtlichen Vorschriften entsprechend entsorgen. -20 °C bis +60 °C
15 % bis 95 % rel. LF, nichtkondensierend
Entsorgung
58 ml
65 ml
81 ml
83 ml
50 l/min
Alle Größen 0,2
5
S
M
MW
L
0
WHISPER SWIVEL 2
DRUCKABFALL
0,00
10,00
20,00
30,00
40,00
50,00
60,00
70,00
EASYLIFE
TOTRAUMVOLUMEN
Flow (sl/min)
Beabsichtigtes Leck
Technische Daten
Vorsichts- und Warnhinweise
Symbole
Beiliegende Gebrauchsanweisung lesen
r Diese Maske eignet sich nicht für lebenserhaltende Beatmungsmaßnahmen.
r Bei manchen Benutzern kann es zu Hautrötungen bzw. –reizungen und/oder anderweitigen Beschwerden
kommen. In diesem Fall die Maske nicht weiter benutzen und den medizintechnischen Betreuer kontaktieren.
r Bei Zuführung einer festgelegten Menge zusätzlichen Sauerstoffs variiert die eingeatmete
Sauerstoffkonzentration je nach Druckeinstellung, Atemmuster des jeweiligen Patienten, Typ der Nasenmaske
und Leckrate. Dieser Warnhinweis gilt für die meisten CPAP-Systeme.
r Sauerstoff fördert die Verbrennung. In der Nähe offener Flammen oder brennender Zigaretten keinen
Sauerstoff verwenden.
r Falls das Gerät mit Sauerstoff verwendet wird, muss die Sauerstoffzufuhr abgeschaltet werden, wenn das
Gerät nicht in Betrieb ist. Erläuterung zum Warnhinweis: Wenn das Gerät nicht in Betrieb ist und die
Sauerstoffzufuhr eingeschaltet bleibt, kann sich der dem Schlauchsystem zugeführte Sauerstoff im Innern des
Gerätegehäuses sammeln. Sauerstoffansammlungen innerhalb des Gehäuses stellen ein Brandrisiko dar.
r Diese Maske wurde für die Verwendung mit von
medizinischem Fachpersonal oder Atemtherapeuten
empfohlenen CPAP- und Bi-Level-Beatmungssystemen
konzipiert. Sie darf nur getragen werden, wenn das CPAPoder Bi-Level-System eingeschaltet ist und ordnungsgemäß
funktioniert. Das Ausatemventil nicht blockieren
oder luftdicht verschließen. Erläuterung zum
Warnhinweis: CPAP-Systeme sind für die Verwendung
mit speziellen Masken mit Verbindungsstücken vorgesehen,
deren Luftöffnungen für einen kontinuierlichen Luftaustritt
aus der Maske sorgen. Wenn das CPAP-Gerät eingeschaltet
ist und vorschriftsmäßig funktioniert, wird die ausgeatmete
Luft mithilfe der Frischluftzufuhr aus dem CPAP-System aus
dem integrierten Ausatemventil der Maske gedrückt. Bei
DEJHVFKDOWHWHP&3$3*HUlWÁLHWQLFKWDXVUHLFKHQG)ULVFKOXIWGXUFKGLH0DVNHXQGGLHDXVJHDWPHWH/XIW
kann erneut eingeatmet werden.
Warnhinweise
Die Maske ist latexfrei und enthält kein DEHP [Di(2-ethylhexyl)phthalat].
Wichtig: Diese Maske ist mit Ausatemöffnungen ausgestattet, daher ist kein separates
Ausatemventil erforderlich.
Die EASYLIFE-Nasenmaske ist ein Zubehörteil für diskontinuierliche Beatmungsgeräte (Respiratoren),
und zum Gebrauch für Patienten mit einem Gewicht von über 30 kg konzipiert, denen Atemtherapie mit
kontinuierlichem positivem Atemwegsdruck (CPAP) oder Bi-Level-Therapie verschrieben wurde. Die
Maske ist zum Gebrauch durch einen einzelnen Patienten zu Hause oder den mehrmaligen Gebrauch
GXUFKPHKUHUH3DWLHQWHQLQ.UDQNHQKlXVHUQXQG3ÁHJHHLQULFKWXQJHQYRUJHVHKHQ
Vorgesehener Verwendungszweck
ANWENDUNGSHINWEISE
13
Deutsch
14
8.
7.
5.
6.
4.
3.
2.
1.
Bitten Sie den Patienten, das Maskenpolster über die Nase zu halten
und die Maskenhalterung über den Kopf ziehen. Die Maskenhalterung
auf eine große Einstellung eingestellt, damit sie sich gleich nach dem
Auspacken einfach aufsetzen lässt.
Bitten Sie den Patienten, die oberen Riemen mit Hilfe der Laschen an beiden
Seiten der Maskenhalterung auf eine komfortable Stellung zu justieren
(Abbildung 3). Die Riemen nicht festziehen.. Das Polster sollte das Gesicht
leicht berühren, und der obere Riemen sollte über den Ohren anliegen.
Bitten Sie den Patienten, die unteren Riemen mit Hilfe der Laschen
an beiden Seiten der Maskenhalterung auf eine komfortable Stellung
zu justieren (Abbildung 4). Die Riemen nicht festziehen.. Der untere
Riemen sollte unter den Ohren, und der Stirnarm quer über Nacken
am Unterkopf anliegen (Abbildung 5).
Den Schlauch (gehört zum Lieferumfang des CPAP- bzw. Bi-LevelGeräts) an das Drehgelenk anschließen.
Den Luftstrom einschalten.
Bitten Sie den Patienten, sich hinzulegen und mit geschlossenen Lippen
normal durch die Nase zu atmen.
Die Maskenhalterung gleichmäßig justieren, um Lecks oder
Druckstellen auf dem Nasenrücken oder oberhalb der Lippe zu
vermindern.
Die Maske, falls notwendig, neu aufsetzen.
Richtige Passform
Die EASYLIFE-Maske ist mit zwei Polstern ausgestattet, die sich ergänzen.
Das innere Polster sorgt dafür, dass die Maske komfortabel und
automatisch luftdicht am Gesicht anliegt.
Das äußere Polster stabilisiert und stützt die Maske. Das äußere Polster
ist kein Dichtungspolster.
EASYLIFE-Maske
Abbildung 5
Abbildung 4
Abbildung 3
Hinweise zum mehrmaligem Gebrauch an mehreren
Patienten LQ.UDQNHQKlXVHUQRGHU3ÁHJHHLQULFKWXQJHQÀQGHQ6LH
unter www.sleepapnea.com. Sie können auch unseren Kundendienst
unter der Nummer +1-724-387-4000 bzw. Respironics Deutschland
Abbildung 2
unter +49 8152 93060 anrufen, um eine Anleitung zur Desinfektion
der Maske anzufordern. Bei wiederholtem Gebrauch für einen
einzelnen Patienten zu Hause sollten die Maske und der Schlauch A = Stirnpolsteröffnung
B = inneres Dichtungspolster mit
täglich gesäubert werden. Die Maskenhalterung sollte einmal
blauem Wulst
wöchentlich oder bei Bedarf gesäubert werden. Die Maskenhalterung
C = Stirnpolster
muss bei der täglichen Reinigung nicht abgenommen werden. Die
Maskenhalterung auf Beschädigungen und Verschleiß überprüfen und, D = Befestigungslaschen
E = Äußeres Stützpolster
falls notwendig, auswechseln.
F = Maskenhalterungssperre
Von Hand mit einem milden Geschirrspülmittel in warmem G = Ausatmung (Nicht blockieren
Wasser reinigen. Keinen Alkohol oder alkoholhaltige
oder entfernen)
Reinigungsmittel oder Bleichmittel verwenden. Keine Reiniger
YHUZHQGHQGLH3ÁHJHRGHU)HXFKWLJNHLWV]XVlW]HHQWKDOWHQ
Gründlich abspülen.Vor dem nächsten Gebrauch an der Luft trocknen lassen.
Alle Teile auf Beschädigungen oder Verschleiß überprüfen und, falls
notwendig, auswechseln.
Reinigungshinweise für die Maske
und die Maskenhalterung
Verschleiß überprüfen und, falls notwendig, auswechseln.
Die Anweisungen vollständig durchlesen.
Die Maske vor der Verwendung von Hand waschen.
Die einzelnen Teile der Maske auf Beschädigungen oder
Vor dem Gebrauch
C
'LHREHUHQ5LHPHQGHU+DOWHUXQJVRMXVWLHUHQGDVVNHLQH/XIWDQGHU6WLUQXQGDQGHQ
6FKOlIHQHQWZHLFKW
'LHXQWHUHQ5LHPHQGHU+DOWHUXQJVRMXVWLHUHQGDVVNHLQH/XIWDQGHQ:DQJHQXQGDP
.LQQHQWZHLFKW
'LH0DVNHQKDOWHUXQJVROOWHORVHXQGEHTXHPVLW]HQ)DOOVGLH0DVNHGLH+DXWHLQGUFNWGLH
.RSIKDOWHUXQJORFNHUQ=XIHVWHV$Q]LHKHQGHU0DVNHQKDOWHUXQJGLH/HLVWXQJGHU0DVNH
XQGGHQOXIWGLFKWHQ9HUVFKOXVVEHHLQWUlFKWLJHQ
'LH0DVNHDQGHU*HVLFKWVSODWWHPLWEHLGHQ+lQGHQYRP*HVLFKWZHJ]LHKHQXQG
GDQQYRUVLFKWLJZLHGHUDXIVHW]HQ'DGXUFKZLUGZLHGHUHLQHOXIWGLFKWH9HUELQGXQJ]XU
*HVLFKWVKDXWKHUJHVWHOOW'LH0DVNH1,&+7DP.QLHVWFN]LHKHQ
Tipps für Ihren Komfort
Die drei Laschen an beiden Seiten des äußeren Stützpolsters nach
außen ziehen, bis sich das Polster vom Maskenrahmen löst.
Das äußere Stützpolster entfernen.
Hinweis
Zur Wiederanbringung der Maskenhalterung die oberen Riemen der
Halterung durch die oberen Schlitze des Maskenrahmens ziehen. Die
Laschen zurückfalten, um die Riemen festzuhaken.
Die unteren Riemen der Halterung entsprechend durch die unteren
Schlitze des Maskenrahmens ziehen. Die Laschen zurückfalten, um die
Riemen festzuhaken.
Die oberen Riemen der Maskenhalterung sind länger als die unteren Riemen
(Abbildung 8).
2.
1.
Befestigen der Maskenhalterung an der Maske
Der blaue Wulst muss den Rand der Maskenöffnung rundherum abdecken.
2. Das größere Stützpolster mit den Laschen nach unten rundherum
auf das innere Dichtungspolster aufsetzen, bis alle drei Seiten in den
Maskenrahmen einrasten (Abbildung 7).
3. Leicht an den Polstern ziehen um zu prüfen, dass sie fest im Rahmen sitzen.
4. Das Stirnpolster mit leichtem Druck in die Stirnpolsteröffnung im
Maskenrahmen drücken.
Hinweis
3. Das innere Dichtungspolster mit dem blauen Wulst aus dem Rahmen ziehen.
Einsetzen
1. Das kleinere, innere Dichtungspolster auf den Rahmen der Maske
setzen (Abbildung 6).
2.
1.
Entfernen
Entfernen und Einsetzen der Polster
Abbildung 8
Abbildung 7
Abbildung 6
Die Maske kann rasch und einfach abgenommen werden. Dazu den hinteren Riemen der
Maskenhalterung greifen und die gesamte Halterung nach vorn über den Kopf abziehen. Lösen Sie, falls
notwendig, vorher die unteren Riemen der Halterung. Die Halterungssperre
verhindert, dass die Maskenhalterung aus dem Rahmen rutscht. Für die
tägliche Reinigung oder Justierungen der Maskenhalterung ist es nicht
notwendig, die Riemen über die Sperren hinaus zu ziehen.
15
1054032
JAW 10/23/09
BRUKSANVISNING
ΟΔΗΓΙΕΣ ΧΡΗΣΗΣ
INSTRUKCJE UŻYTKOWANIA
BRUKSANVISNING
INSTRUÇÕES DE USO
GEBRUIKSAANWIJZING
TALİMATLARI
ቂངಖ
UPUTSTVA ZA UPOTREBU
UPUTE ZA UPORABU
ИНСТРУКЦИИ ПО ЭКСПЛУАТАЦИИ
NAUDOJIMO
KULLANIM
INSTRUCŢIUNI DE UTILIZARE
LIETOŠANAS INSTRUKCIJA
KASUTUSJUHEND
ИНСТРУКЦИИ ЗА РАБОТА
INSTRUKCIJOS
NAVODILA ZA UPORABO
1É92'.328æ,7Ì HASZNÁLATI UTASÍTÁS 1É92'1$328æ,7,(
KÄYTTÖOHJEET
BRUGSVEJLEDNING
ISTRUZIONI
INSTRUCCIONES DE USO
INSTRUCTIONS D’UTILISATION
ANWENDUNGSHINWEISE
INSTRUÇÕES DE UTILIZAÇÃO
PER L’USO
INSTRUCTIONS FOR USE
4
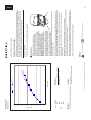
58 ml
65 ml
81 ml
83 ml
-4º to +140º F (-20º to +60º C)
15% to 95% RH, non-condensing
Storage Conditions
S
M
MW
L
Deadspace Volume
6SHFLÀFDWLRQV
Dispose of in accordance with local regulations.
Disposal
Symbols
Caution or Warning
Consult instructions for use
r This mask is not suitable for providing life support ventilation.
r Some users may experience skin redness, irritation and/or discomfort. If this happens, discontinue use and
contact your health care professional.
r $WDÀ[HGÁRZUDWHRIVXSSOHPHQWDOR[\JHQÁRZWKHLQKDOHGR[\JHQFRQFHQWUDWLRQZLOOYDU\GHSHQGLQJRQ
the pressure settings, patient breathing pattern, nasal mask selection, and the leak rate. This warning applies
to most types of CPA
P P machines.
r Oxygen supports combustion. Oxygen should not be used while smoking or in the presence of an open
ÁDPH
r ,IR[\JHQLVXVHGZLWKWKHGHYLFHWKHR[\JHQÁRZPXVWEH
turned off when the device is not operating. Explanation
of the Warning::KHQWKHGHYLFHLVQRWLQRSHUDWLRQDQGWKHR[\JHQÁRZLVOHIWRQR[\JHQGHOLYHUHG
into the ventilator tubing may accumulate within the device enclosure. Oxygen accumulated in the device
HQFORVXUHZLOOFUHDWHDULVNRIÀUH
r This mask is designed for use with CPA
P P or bi-level
systems recommended by your health care professional
or respiratory therapist. Do not wear this mask unless the
CPA
P P or bi-level system is turned on and operating properly.
Do not block or try to seal the exhalation port.
Explanation of the Warning: CPA
P P systems are intended
to be used with special masks with connectors which have
YHQWKROHVWRDOORZFRQWLQXRXVÁRZRIDLURXWRIWKHPDVN
When the CPA
P P machine is turned on and functioning
SURSHUO\QHZDLUIURPWKH&3$3PDFKLQHÁXVKHVWKH
exhaled air out through the attached mask exhalation port.
However, when the CPA
P P machine is not operating, enough
fresh air will not be provided through the mask, and exhaled
air may be rebreathed.
r A separate exhalation device must be used with this mask.
Warnings
This mask is latex free and DEHP [Di(2-ethylhexyl)phthalate] free.
The EASYLIFE SE Nasal Mask is intended to provide an interface for application of CPA
P P or Bi-level
therapy to patients. The mask is for single patient use in the home and multi-patient reuse in the
hospital/institutional environment. It is intended for use on patients (>66lbs/30kg) for whom CPA
P P or
bi-level therapy has been prescribed.
Intended Use
INSTRUCTIONS FOR USE
1
English
2
$GMXVWWKHORZHUKHDGJHDUVWUDSVWRHOLPLQDWHOHDNVDURXQGWKHFKHHNVDQGFKLQ
9.
8.
6.
7.
5.
4.
3.
2.
1.
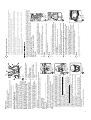
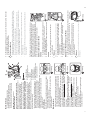
Have the patient hold the mask with the inner cushion over their nose
and pull the headgear on over their head. The headgear is preset to a
large setting to go on easily right out of the package.
Have the patient evenly adjust the upper straps (Figure 3) to a
comfortable position by using the tabs on both sides of the headgear.
Do not pull
p the straps
p tight.
g . The cushion should lightly touch the face
and the upper strap will rest above the ears.
Evenly adjust the lower straps (Figure 4) to a comfortable position by
using the tabs on both sides of the headgear. Do not pull
p the straps
p
tight.
g The lower strap will sit below the ears and the headgear will cross
at the base of the head (Figure 5).
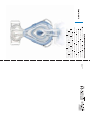
Attach the separate exhalation device (e.g.: Whisper Swivel) to the blue
standard elbow (SE).
Connect the tubing (included with the CPA
P P or bi-level device) to the
standaard elbow.
7XUQRQWKHDLUÁRZ
Have the patient lie down and breathe normally through the nose,
keeping lips closed.
Adjust the headgear evenly to reduce leaks or pressure points at the
bridge of the nose or above the lip.
Reseat the mask, if necessary.
Achieving the Right Fit
The EasyLife Mask is designed with two mask cushions that work together.
The inner cushion provides a comfortable and automatically adjusting seal.
The outer cushion provides stability and support to the mask. The outer
cushion is not designed to provide seal.
EasyLife Mask
detergent. Do not use bleach, alcohol, or cleaning solutions
containing alcohol. Do not use cleaners containing
conditioners or moisturizers.
Rinse thoroughly. Air dry completely before use.
Inspect all parts for damage or wear; replace if necessary.
Figure 5
Figure 4
Figure 3
Pull outward on the three attachment tabs on each side of the outer
support cushion until this cushion separates from the mask frame.
Remove the outer support cushion.
5HPRYHWKHLQQHUVHDOLQJFXVKLRQZLWKWKHEOXHÁDS
Place the smaller inner sealing cushion on the mask frame (Figure 6).
Note
Note
To reattach the headgear, thread the upper headgear straps into the
slots in the top of the mask frame. Fold the tabs back to catch the
headgear straps.
Thread the lower headgear straps into the slots in the bottom of the
mask frame. Fold the tabs back to catch the headgear straps.
The upper headgear straps are longer and the lower headgear straps are
shorter (Figure 8).
2.
1.
Attaching the Headgear to the Mask
7KHEOXHÁDSPXVWFRYHUWKHOLSRQWKHPDVN
2. Slide the larger outer support cushion with tabs facing downward
around the inner sealing cushion until all three sides click into the mask
frame (Figure 7).
3. Gently tug on the cushions to make sure they are securely in place.
4. Gently press the forehead pad into the forehead pad slot in the mask
frame.
1.
To Attach
2.
3.
1.
To Remove
Removing the Mask
Figure 8
Figure 7
Figure 6
Removing and Attaching the Cushions
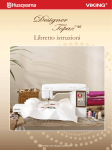
C = Forehead pad
D = Attachment tabs
E = Outer support cushion
F = Headgear stop
G = Blue SE Standard Elbow
no built-in exhalation)
$GMXVWWKHXSSHUKHDGJHDUVWUDSVWRHOLPLQDWHOHDNVDURXQGWKHIRUHKHDGDQGWHPSOHV
Hand wash in warm water with a mild liquid dish washing
5HVHDWWKHPDVNE\SXOOLQJWKHVLGHVRIWKHIDFHSODWHGLUHFWO\DZD\IURPWKHIDFHWKHQ
JHQWO\VHWLWEDFNLQWRSODFH7KLVDOORZVWKHFXVKLRQWRFUHDWHDQHZVHDORQWKHIDFH'2
127SXOOWKHPDVNE\WKHHOERZ
Quickly and easily remove the mask by grabbing the back headgear strap and sliding the entire assembly
forward over your head. If needed, undo the lower headgear straps.The headgear stop prevents the
headgear from slipping out of the frame.Y
You do not need to pull the headgear straps beyond the stops
for daily cleaning or adjustments.
7KHKHDGJHDUVKRXOGÀWORRVHDQGFRPIRUWDEOH,I\RXUVNLQEXOJHVDURXQGWKHPDVNORRVHQ
WKHKHDGJHDU2YHUWLJKWHQLQJWKHKHDGJHDUFDQKLQGHUWKHPDVN·VSHUIRUPDQFHDQGVHDO
Comfort Tips
For multi-patient, multi-use in the hospital/institutional
environment, visit us on-line at www.sleepapnea.com or contact
Customer Service at 1-724-387-4000 or Respironics Deutschland
at +49 8152 93060 to obtain mask disinfecting instructions.
For single patient reuse in the home, the mask and CPA
P P
tubing should be cleaned daily. The headgear should be cleaned
weekly, or as needed. The headgear does not need to be
A = Forehead pad slot
removed for daily cleaning. Inspect the headgear for wear and
B = Inner sealing cushion with blue flap
tear, replace as needed.
Cleaning Instructions for the Mask and Headgear
necessary.
Read and understand the instructions completely.
Hand wash the mask.
Inspect the mask components for damage or wear; replace if
Before Use
3
8
58 ml
65 ml
81 ml
83 ml
-20 °C à +60 °C
HR entre 15 et 95 %, sans condensation
Conditions de stockage
S
M
MW
G
Volume d’espace mort
Caractéristiques techniques
Le masque doit être éliminé conformément aux réglementations locales.
Mise au rebut
Symboles
Attention ou avertissement
Consulter le mode d'emploi
r Ce masque n’est pas conçu pour procurer une ventilation de support vital.
r Certains utilisateurs peuvent noter l’apparition de rougeurs sur la peau, d’irritation ou de gêne. En tel cas,
cessez d’utiliser le masque et consultez votre professionnel de santé.
r XQGpELWÀ[HG·R[\JqQHVXSSOpPHQWDLUHODFRQFHQWUDWLRQG·R[\JqQHLQKDOpHYDULHHQIRQFWLRQGHV
UpJODJHVGHSUHVVLRQGXSURÀOUHVSLUDWRLUHGXSDWLHQWGXFKRL[GXPDVTXHQDVDOHWGXWDX[GHIXLWH&HW
avertissement s’applique à la plupart des types d’appareils PPC.
r /·R[\JqQHIDYRULVHODFRPEXVWLRQ/·R[\JqQHQHGRLWSDVrWUHXWLOLVpHQSUpVHQFHG·XQHÁDPPHQXHRXG·XQH
cigarette allumée.
r 6LGHO·R[\JqQHHVWXWLOLVpDYHFO·DSSDUHLOLOHVWQpFHVVDLUHG·DUUrWHUOHÁX[G·R[\JqQHTXDQGO·DSSDUHLOQ·HVW
pas en service. Explication de l’avertissement : quand l’appareil n’est pas en marche et que le débit d’oxygène
fonctionne, l’oxygène acheminé dans la tubulure du ventilateur peut s’accumuler dans l’appareil, ce qui peut
provoquer un risque d’incendie.
r Ce masque est prévu pour les systèmes PPC ou à deux
niveaux de pression recommandés par votre médecin ou
votre thérapeute respiratoire. Ne portez ce masque que
lorsque le système PPC/à deux niveaux de pression est
allumé et qu’il fonctionne correctement. N’obstruez pas
O·RULÀFHG·H[SLUDWLRQ([SOLFDWLRQGHO·DYHUWLVVHPHQW les systèmes PPC sont prévus pour être utilisés avec des
masques spéciaux pourvus de connecteurs avec évents
G·DpUDWLRQDÀQGHSHUPHWWUHODFLUFXODWLRQFRQWLQXHG·DLU
hors du masque. Lorsque l’appareil PPC est allumé et qu’il
IRQFWLRQQHFRUUHFWHPHQWO·DLUIUDLVVRXIÁpSDUO·DSSDUHLO
chasse l’air expiré vers l’extérieur par la valve d’expiration
du masque attaché. En cas d’arrêt de l’appareil PPC, l’air frais
FLUFXODQWGDQVOHPDVTXHQ·HVWHQUHYDQFKHSOXVVXIÀVDQWHW
l’air expiré peut être inhalé à nouveau.
r Important : une valve d’expiration séparée doit être utilisée
avec ce masque.
Avertissements
Ce masque ne contient pas de latex ni de DEHP [di-(2-éthylhexyl)phtalate].
Le masque nasal EASYLIFE SE est destiné à servir d’interface dans l’administration d’un traitement
respiratoire à pression positive continue (PPC) ou à deux niveaux de pression. Ce masque est prévu
pour une utilisation sur un seul patient à domicile ou pour une réutilisation sur plusieurs patients en
milieu hospitalier/médicalisé. Il doit être utilisé sur des patients de plus de 30 kg pour lesquels un
traitement PCC ou à deux niveaux de pression a été prescrit.
Utilisation préconisée
MODE D’EMPLOI
5
Français
6
A = Emplacement de l’intercalaire frontal
B = Coussinet intérieur d’étanchéité avec
rabat bleu
C = Intercalaire frontal
D = Languettes de fixation
E = Coussinet extérieur de soutien
F = Dispositif de blocage du harnais
G = Coude standard bleu SE (non intégré
dans l’expiration)
9.
8.
6.
7.
5.
4.
3.
2.
1.
Faites en sorte que le patient maintienne le masque avec le coussinet
intérieur au-dessus de son nez et tirez le harnais par dessus sa tête.
Le harnais est préréglé sur une grande taille pour une adaptation facile
dès sa sortie de l’emballage.
Faites régler uniformément les sangles supérieures par le patient
ÀJXUH VXUXQHSRVLWLRQFRQIRUWDEOHjO·DLGHGHVODQJXHWWHVVXUOHV
GHX[F{WpVGXKDUQDLVNe serrez pas
p tropp les sangles.
g . Le coussinet doit
légèrement toucher le visage et la sangle supérieure repose au-dessus
des oreilles.
5pJOH]XQLIRUPpPHQWOHVVDQJOHVLQIpULHXUHVÀJXUHVXUXQHSRVLWLRQ
FRQIRUWDEOHjO·DLGHGHVODQJXHWWHVVXUOHVGHX[F{WpVGXKDUQDLV
Ne serrez pas
p tropp les sangles.
g . La sangle inférieure se trouve en
GHVVRXVGHVRUHLOOHVHWOHKDUQDLVFURLVHjODEDVHGHODWrWHÀJXUH
Fixez le dispositif expiratoire séparé (par exemple : Whisper Swivel) sur le
coude standard bleu (Se).
Branchez le tuyau (fourni avec l’appareil PPC ou à deux niveaux de
pression) au coude standard.
Activez la circulation d’air.
Faites allonger le patient et demandez-lui de respirer normalement par
le nez, en fermant la bouche.
Ajustez le harnais pour éliminer les fuites ou les points de pression au
A
niveau de la voûte nasale ou au-dessus des lèvres.
Si nécessaire, réinstallez le masque.
Réglage et ajustement du masque
Le masque EASYLIFE est conçu avec deux coussinets qui fonctionnent ensemble.
Le coussinet intérieur fournit une étanchéité confortable et à
réglage automatique.
Le coussinet extérieur assure la stabilité et le soutien du masque. Le
coussinet extérieur n’est pas conçu pour l’étanchéité.
Masque EASYLIFE
Figure 5
Figure 4
Figure 3
En cas d’utilisation répétée sur plusieurs patients en milieu
hospitalier/médicalisé, consultez le site www.sleepapnea.com
(éventuellement en anglais) ou contactez le service clientèle au
+1-724-387-4000 ou Respironics Deutschland au +49 8152 93060
pour obtenir des instructions de désinfection du masque. En cas
de réutilisation sur un seul patient à domicile, le masque et le
tube PPC doivent être lavés tous les jours. Nettoyez le harnais
une fois par semaine ou plus souvent si nécessaire. Il est inutile
GHGpWDFKHUOHKDUQDLVSRXUOHQHWWR\DJHTXRWLGLHQ9pULÀH]TXHOH
harnais n’est pas usé et remplacez-le si nécessaire.
Lavez à la main à l’eau chaude et avec un liquide vaisselle
doux. N’utilisez pas d’eau de javel, d’alcool ou de solution
détergente contenant de l’alcool. N’utilisez pas de produits
contenant des baumes ou des substances hydratantes.
Rincez abondamment. Faites sécher à l’air libre avant utilisation.
9pULÀH]TX·DXFXQHSLqFHQ·HVWHQGRPPDJpHRXXVpH
procédez à un remplacement si nécessaire.
Remarque
3RXUÀ[HUjQRXYHDXOHKDUQDLVIDLWHVSDVVHUOHVVDQJOHVVXSpULHXUHV
du harnais dans les fentes en haut du cadre du masque. Repliez les
languettes pour les accrocher sur les sangles du harnais.
Faites passer les sangles inférieures du harnais dans les fentes en bas
du cadre du masque. Repliez les languettes pour les accrocher sur les
sangles du harnais.
Les sangles supérieures du harnais sont plus longues que les sangles
LQIpULHXUHVÀJXUH
2.
1.
Fixation du harnais sur le masque
Le rabat bleu doit couvrir la lèvre sur le masque.
2. Faites coulisser le grand coussinet extérieur de soutien avec les
languettes vers le bas autour du coussinet intérieur d’étanchéité jusqu’à
FHTXHOHVWURLVF{WpVV·HPERvWHQWGDQVOHFDGUHGXPDVTXHÀJXUH
3. Tirez doucement sur les coussinets pour vous assurer qu’ils sont bien
en place.
4. Enfoncez doucement l’intercalaire frontal dans son emplacement dans
le cadre du masque.
Remarque
Dépose
1. 7LUH]YHUVO·H[WpULHXUOHVWURLVODQJXHWWHVGHÀ[DWLRQGHFKDTXHF{Wp
du coussinet extérieur de soutien, jusqu’à ce que ce coussinet se
désolidarise du cadre du masque.
2. Retirez le coussinet extérieur de soutien.
3. Retirez le coussinet intérieur d’étanchéité avec le rabat bleu.
Fixation
1. Placez le petit coussinet intérieur d’étanchéité sur le cadre du masque
ÀJXUH
'pSRVHHWÀ[DWLRQGHVFRXVVLQHWV
Figure 8
Figure 7
Figure 6
Retirez rapidement et facilement le masque en saisissant la sangle arrière du harnais et en faisant glisser
tout l’ensemble vers l’avant, par dessus la tête. S’il le faut, défaites les sangles inférieures du harnais. Le
dispositif de blocage du harnais l’empêche de glisser hors du cadre. Il n’est pas nécessaire de tirer les
sangles du harnais au-delà du dispositif de blocage pour le nettoyage ou les réglages quotidiens.
Retrait du masque
(QFDVGHIXLWHDXWRXUGXIURQWHWGHVWHPSHVDMXVWH]OHVVDQJOHVVXSpULHXUHVGXKDUQDLV
(QFDVGHIXLWHDXWRXUGHVMRXHVHWGXPHQWRQDMXVWH]OHVVDQJOHVLQIpULHXUHVGXKDUQDLV
Instructions de nettoyage pour le masque et le harnais
endommagés ; remplacez-les si nécessaire.
$MXVWH]OHKDUQDLVGHPDQLqUHFRQIRUWDEOHHWVDQVVHUUHU6LODSHDXHVWFRPSULPpHDX
QLYHDXGXFRQWDFWDYHFOHPDVTXHGHVVHUUH]OHKDUQDLV8QVHUUDJHH[FHVVLIGXKDUQDLVSHXW
UpGXLUHOHVSHUIRUPDQFHVHWO·pWDQFKpLWpGXPDVTXH
5HPHWWH]OHPDVTXHHQSODFHHQWLUDQWVXUOHVF{WpVGHODSODTXHIDFLDOHG·DERUGSRXUOH
GpJDJHUGLUHFWHPHQWGXYLVDJHSXLVSRXUOHODLVVHUUHYHQLUGRXFHPHQWHQSODFH&HFLSHUPHWDX
FRXVVLQHWGHFUpHUXQHQRXYHOOHpWDQFKpLWpVXUOHYLVDJH1(WLUH]3$6OHPDVTXHSDUOHFRXGH
Comfort Tips
Lisez et comprenez l’intégralité du mode d’emploi.
Lavez le masque à la main.
9pULÀH]TXHOHVFRPSRVDQWVGXPDVTXHQHVRQWSDVXVpVRX
Avant utilisation
7
12
58 ml
65 ml
81 ml
83 ml
da -20 a +60°C
da 15 a 95% di umidità relativa, senza condensa
Condizioni di immagazzinaggio
S
M
MW
L
Volume spazio morto
6SHFLÀFKH
Smaltire il dispositivo in modo conforme alle normative locali.
Smaltimento
Simboli
Attenzione o Avvertenza
Consultare le istruzioni per l'uso.
r Questa maschera non è adatta a fornire una ventilazione per il supporto vitale.
r ,QDOFXQLSD]LHQWLSRVVRQRPDQLIHVWDUVLIHQRPHQLGLDUURVVDPHQWRGHOODSHOOHLUULWD]LRQHHRGLVDJLRÀVLFR,Q
WDOFDVRVRVSHQGHUHO·XWLOL]]RHFRQVXOWDUHO·RSHUDWRUHVDQLWDULRGLÀGXFLD
r $XQDSRUWDWDÀVVDGHOÁXVVRGLRVVLJHQRVXSSOHPHQWDUHODFRQFHQWUD]LRQHGLRVVLJHQRLQDODWRYDULDD
seconda delle impostazioni della pressione, del pattern respiratorio del paziente, della maschera nasale in
uso e dell’entità delle perdite. Questa avvertenza è valida per la maggior parte dei dispositivi CPA
P P.
r /·RVVLJHQRDOLPHQWDODFRPEXVWLRQHHQRQGHYHHVVHUHXVDWRPHQWUHVLIXPDQpLQSUHVHQ]DGLÀDPPHOLEHUH
r 6HVLXWLOL]]DRVVLJHQRFRQLOGLVSRVLWLYRLOÁXVVRGHYHHVVHUHGLVDWWLYDWRTXDQGRLOGLVSRVLWLYRQRQqLQ
funzione. Spiegazione dell’avvertenza: TXDQGRLOGLVSRVLWLYRQRQqLQIXQ]LRQHHLOÁXVVRGLRVVLJHQR
viene lasciato attivo, l’ossigeno alimentato nel tubo del ventilatore può accumularsi all’interno del corpo del
dispositivo. L’ossigeno accumulato nel corpo del dispositivo potrebbe generare un incendio.
r La maschera è stata progettata per essere utilizzata con i
sistemi CPA
P P o bi-level raccomandati dal proprio operatore
sanitario o terapeuta della respirazione. Indossare la
maschera solo quando il sistema CPA
P P o bi-level è attivato
e regolarmente funzionante. Non ostruire o sigillare
la valvola espiratoria. Spiegazione dell’avvertenza:
i sistemi CPA
P P sono progettati per essere utilizzati con
maschere speciali provviste di connettori dotati di fori di
VÀDWRFKHFRQVHQWRQRODIXRULXVFLWDGLXQÁXVVRGLDULD
continuo dalla maschera. Quando il sistema CPA
P P è attivato
e funziona regolarmente, l’aria nuova aspirata dal sistema
spinge via l’aria espirata dalla valvola della maschera. Tuttavia,
quando il sistema CPA
P P non è in funzione, l’aria fresca
IRUQLWDDWWUDYHUVRODPDVFKHUDQRQqVXIÀFLHQWHHGqTXLQGL
possibile che l’aria espirata venga inspirata nuovamente.
r Importante: la maschera richiede l’uso di un dispositivo
espiratorio separato.
Avvertenze
Questa maschera non contiene lattice né DEHP (di-etilesilftalato).
La maschera nasale EASYLIFE SE è un accessorio applicabile a un ventilatore (respiratore) non continuo,
studiata per pazienti con massa corporea superiore ai 30 kg ai quali è stata prescritta una terapia
basata su pressione positiva continua delle vie aeree (CPA
P P) o di tipo bi-level. Deve essere utilizzata
con ventilatori dotati di allarmi e sistemi di sicurezza adeguati per i guasti. Può essere utilizzata per un
singolo paziente in ambiente domestico o più volte per più pazienti in ambito ospedaliero/sanitario.
Finalità d’uso
ISTRUZIONI PER L’USO
9
Italiano
10
6.
7.
5.
4.
3.
2.
1.
Invitare il paziente a tenere il cuscinetto interno della maschera sopra
LOQDVRTXLQGLLQGRVVDUHLOGLVSRVLWLYRGLÀVVDJJLRVXOFDSRLQÀODQGROR
dalla testa. Per agevolarne l’estrazione dalla confezione, il dispositivo di
ÀVVDJJLRVXOFDSRqSUHLPSRVWDWRVXXQDODUJKH]]DSLXWWRVWRQRWHYROH
Chiedere al paziente di avvalersi delle linguette poste su entrambi i lati
GHOGLVSRVLWLYRSHUUHJRODUHOHFLQJKLHVXSHULRULÀJXUDLQPRGRFKH
risultino uniformi e comode. Non tirare eccessivamente le cinghie.
g Il
cuscinetto deve toccare leggermente il viso e la cinghia superiore deve
rimanere sopra le orecchie.
Servendosi delle linguette poste su entrambi i lati del dispositivo,
UHJRODUHOHFLQJKLHLQIHULRULÀJXUDLQPRGRFKHULVXOWLQRXQLIRUPLH
g . La cinghia inferiore deve
comode. Non tirare eccessivamente le cinghie.
ULPDQHUHVRWWROHRUHFFKLHHLOGLVSRVLWLYRGHYHHVVHUHÀVVDWRDOODEDVH
GHOODWHVWDFRQOHFLQJKLHLQFURFLDWHÀJXUD
Montare il dispositivo espiratorio separato (ad es. Whisper Swivel) sul
gomito standard blu (SE).
Collegare il tubo (incluso con il dispositivo CPA
P P o bi-level) al gomito
standard.
$WWLYDUHLOÁXVVRG·DULD
Far sdraiare il paziente e invitarlo a respirare normalmente con il naso,
tenendo chiusa la bocca.
Adattamento e regolazione della maschera
The EASYLIFE Mask is designed with two mask cushions that work together.
Quello più interno fornisce un appoggio comodo a regolazione automatica,
mentre quello più esterno aumenta la stabilità della maschera fungendo da
supporto, senza tuttavia garantire la tenuta dell’apparecchio.
Maschera EASYLIFE
Figura 5
Figura 4
Per informazioni sull’utilizzo multiuso e multipaziente
in ambito ospedaliero/sanitario, è possibile visitare il sito
www.sleepapnea.com o contattare l’Assistenza clienti
al numero +1-724-387-4000. In alternativa, rivolgersi a
Respironics Deutschland al numero +49 8152 93060 per ricevere
istruzioni su come disinfettare la maschera. Se la maschera
viene utilizzata più volte su un singolo paziente in ambito
domestico, deve essere pulita ogni giorno, congiuntamente al
A = Fessura del cuscinetto per la fronte
WXERGHOGLVSRVLWLYR&3$3,OGLVSRVLWLYRGLÀVVDJJLRVXOFDSR
B = Cuscinetto di tenuta interno con
deve essere pulito ogni settimana, o quando necessario. Per la
falda blu
pulizia quotidiana non è necessario rimuovere il dispositivo di
ÀVVDJJLRVXOFDSR(VDPLQDUQHORVWDWRSHUYHULÀFDUHFKHQRQYL C = Imbottitura per la fronte
D = Linguette di montaggio
siano segni di usura o strappi e, all’occorrenza, procedere alla
E = Cuscinetto di supporto esterno
sostituzione.
F = Fermo del dispositivo di fissaggio
Lavare a mano in acqua calda con sapone liquido delicato
sul capo
per piatti. Non usare candeggina, alcol o soluzioni detergenti G = Gomito standard SE blu (esalatore
a base di alcol, né detersivi contenenti ammorbidenti o
non incorporato)
sostanze idratanti.
Sciacquare a fondo. Lasciare asciugare completamente all’aria
prima dell’utilizzo.
,VSH]LRQDUHRJQLFRPSRQHQWHSHUYHULÀFDUHODSUHVHQ]DGLGDQQLRXVXUD
sostituire se necessario.
Istruzioni p
per la p
pulizia della maschera e del
GLVSRVLWLYRGLÀVVDJJLRVXOFDSR
presenza di danni o usura; sostituire se necessario.
Leggere attentamente tutte le istruzioni.
Lavare manualmente la maschera.
,VSH]LRQDUHRJQLFRPSRQHQWHGHOODPDVFKHUDSHUYHULÀFDUHOD
Prima dell’uso
Nota
3HUULPRQWDUHLOGLVSRVLWLYRGLÀVVDJJLRVXOFDSRLQÀODUQHOHFLQJKLH
superiori nelle fessure presenti sulla struttura di sostegno della
maschera. Piegare le linguette all’indietro in modo da riuscire a prendere
OHFLQJKLHGHOGLVSRVLWLYRGLÀVVDJJLRVXOFDSR
,QÀODUHOHFLQJKLHLQIHULRULGHOGLVSRVLWLYRGLÀVVDJJLRVXOFDSRQHOOH
fessure presenti nella parte più bassa della struttura di sostegno della
maschera. Piegare le linguette all’indietro in modo da riuscire a prendere
OHFLQJKLHGHOGLVSRVLWLYRGLÀVVDJJLRVXOFDSR
/HFLQJKLHVXSHULRULGHOGLVSRVLWLYRGLÀVVDJJLRVXOFDSRVRQRGLOXQJKH]]D
PDJJLRUHULVSHWWRDTXHOOHLQIHULRULÀJXUD
2.
1.
0RQWDJJLRGHOGLVSRVLWLYRGLÀVVDJJLRVXOFDSRVXOODPDVFKHUD
La falda blu deve coprire il bordo della maschera.
2. Far scivolare il cuscinetto di supporto esterno tenendo le linguette
ULYROWHYHUVRLOEDVVRDWWRUQRDOFXVFLQHWWRGLWHQXWDLQWHUQRÀQFKpWXWWL
e tre i lati non scattano in posizione sulla struttura di sostegno della
PDVFKHUDÀJXUD
7LUDUHGHOLFDWDPHQWHLFXVFLQHWWLSHUYHULÀFDUHFKHVLDQRSRVL]LRQDWL
saldamente.
4.. Senza forzare, premere il cuscinetto per la fronte nell’apposita fessura
disponibile sulla struttura di sostegno della maschera.
Nota
Rimozione
1. Tirare verso l’esterno le linguette di montaggio che si trovano su ciascun
ODWRGHOFXVFLQHWWRGLVXSSRUWRHVWHUQRÀQFKpTXHVWRQRQVLVWDFFDGDOOD
struttura di sostegno della maschera.
2. Rimuovere il cuscinetto di supporto esterno.
3. Rimuovere il cuscinetto di tenuta interno utilizzando la falda blu.
Montaggio
1. Posizionare il cuscinetto di tenuta interno sulla struttura di sostegno
GHOODPDVFKHUDÀJXUD
Rimozione e montaggio dei cuscinetti
Per rimuovere la maschera in modo semplice e immediato, prendere la cinghia
SRVWHULRUHGHOGLVSRVLWLYRGLÀVVDJJLRVXOFDSRHVÀODUHO·LQWHURDSSDUHFFKLR
dalla testa. Se necessario, slacciare le cinghie inferiori. Il fermo del dispositivo di
ÀVVDJJLRLPSHGLUjFKHSRVVDVFLYRODUHGDOODVWUXWWXUDGLVRVWHJQR3HUODSXOL]LD
quotidiana o per eventuali regolazioni, non è necessario tirare le cinghie del
GLVSRVLWLYRGLÀVVDJJLRROWUHLIHUPLGLEORFFR
Figura 8
Figura 7
Figura 6
5LVLVWHPDUHODPDVFKHUDWLUDQGRGLUHWWDPHQWHLODWLGHOODIDOGDORQWDQRGDOYLVRTXLQGL
ULSRVL]LRQDUODGHOLFDWDPHQWH,QTXHVWRPRGRLOFXVFLQHWWRDGHULUjSHUIHWWDPHQWHVXOYLVR
121WLUDUHODPDVFKHUDGDOJRPLWR
5HJRODUHOHFLQJKLHVXSHULRULGHOGLVSRVLWLYRGLÀVVDJJLRVXOFDSRSHUHOLPLQDUHOHSHUGLWH
LQWRUQRDOODIURQWHHDOOHWHPSLH
5HJRODUHOHFLQJKLHLQIHULRULGHOGLVSRVLWLYRGLÀVVDJJLRVXOFDSRSHUHOLPLQDUHOHSHUGLWH
LQWRUQRDOOHJXDQFHHDOPHQWR
,OGLVSRVLWLYRGLÀVVDJJLRVXOFDSRGHYHDGDWWDUVLVHQ]DFUHDUHSUHVVLRQLHLQPRGRFRQIRUWHYROH
6HODSHOOHDWWRUQRDOODPDVFKHUDVLJRQÀDDOOHQWDUHOHFLQJKLH6HUUDUHHFFHVVLYDPHQWHLO
GLVSRVLWLYRSRWUHEEHFRPSURPHWWHUQHODIXQ]LRQDOLWjHODFDSDFLWjGLWHQXWD
Suggerimenti per il comfort
5HJRODUHLOGLVSRVLWLYRGLÀVVDJJLRVXOFDSRLQPRGRFKHULPDQJDGLVSRVWRVHQ]DFUHDUHGLVOLYHOOL
così da ridurre eventuali perdite o formazione di punti di pressione in corrispondenza del dorso
del naso o sopra il labbro.
Se necessario, risistemare la maschera.
9.
8.
11
16
58 ml
65 ml
81 ml
83 ml
-20 °C bis +60 °C
15 % bis 95 % rel. LF,F nichtkondensierend
Lagerung
S
M
MW
L
Totraumvolumen
Technische Daten
Den örtlichen Vorschriften entsprechend entsorgen.
Entsorgung
Symbole
Vorsichts- und Warnhinweise
Beiliegende Gebrauchsanweisung lesen
r Wichtig: Diese Maske erfordert eine separate
Ausatemvorrichtung.
r Diese Maske wurde für die Verwendung mit von
medizinischem Fachpersonal oder Atemtherapeuten
A
empfohlenen CPA
P P- und Bi-Level-Beatmungssystemen
konzipiert. Sie darf nur getragen werden, wenn das CPA
P Poder Bi-Level-System eingeschaltet ist und ordnungsgemäß
funktioniert. Das Ausatemventil nicht blockieren
oder luftdicht verschließen. Erläuterung zum
Warnhinweis: CPA
P P-Systeme sind für die Verwendung mit
speziellen Masken mit Verbindungsstücken vorgesehen, deren
Luftöffnungen für einen kontinuierlichen Luftaustritt aus der
Maske sorgen.Wenn das CPA
P P-Gerät eingeschaltet ist und
vorschriftsmäßig funktioniert, wird die ausgeatmete Luft
mithilfe der Frischluftzufuhr aus dem CPA
P P-System aus dem
Ausatemventil der Maske gedrückt. Bei abgeschaltetem CPA
P P*HUlWÁLHWQLFKWDXVUHLFKHQG)ULVFKOXIWGXUFKGLH0DVNHXQGGLHDXVJHDWPHWH/XIWNDQQHUQHXWHLQJHDWPHW
werden.
r Falls das Gerät mit Sauerstoff verwendet wird, muss die Sauerstoffzufuhr abgeschaltet werden, wenn das
Gerät nicht in Betrieb ist. Erläuterung zum Warnhinweis: Wenn das Gerät nicht in Betrieb ist und die
Sauerstoffzufuhr eingeschaltet bleibt, kann sich der dem Schlauchsystem zugeführte Sauerstoff im Innern des
Gerätegehäuses sammeln. Sauerstoffansammlungen innerhalb des Gehäuses stellen ein Brandrisiko dar.
r Sauerstoff fördert die Verbrennung. In der Nähe offener Flammen oder brennender Zigaretten keinen
Sauerstoff verwenden.
r Bei Zuführung einer festgelegten Menge zusätzlichen Sauerstoffs variiert die eingeatmete
Sauerstoffkonzentration je nach Druckeinstellung, Atemmuster des jeweiligen Patienten, Typ der
Nasenmaske und Leckrate. Dieser Warnhinweis gilt für die meisten CPA
P P-Systeme.
r Bei manchen Benutzern kann es zu Hautrötungen, Reizungen und/oder anderweitigen Beschwerden
kommen. In diesem Fall die Maske nicht weiter benutzen und den medizintechnischen Betreuer kontaktieren.
r Diese Maske eignet sich nicht für lebenserhaltende Beatmungsmaßnahmen.
Warnhinweise
Die Maske ist frei von Latex und DEHP [Di(2-ethylhexyl)phthalat].
Die EASYLIFE SE-Nasenmaske ist als Patientenanschluss bei der CPA
P P- oder Bi-Level-Therapie vorgesehen.
Sie ist zum Gebrauch für Patienten mit einem Gewicht von über 30 kg konzipiert, denen Atemtherapie
A
mit kontinuierlichem positivem A
Atemwegsdruck (CPPAP) oder Bi-Level-Therapie verschrieben wurde. Die
Maske ist zum Gebrauch durch einen einzelnen Patienten zu Hause oder den mehrmaligen Gebrauch
GXUFKPHKUHUH3DWLHQWHQLQ.UDQNHQKlXVHUQXQG3ÁHJHHLQULFKWXQJHQYRUJHVHKHQ
Vorgesehener Verwendungszweck
GEBRAUCHSANWEISUNG
13
Deutsch
14
6.
7.
5.
4.
3.
2.
1.
Bitten Sie den Patienten, die Maske mit dem inneren Maskenpolster
über die Nase zu halten und die Maskenhalterung über den Kopf zu
ziehen. Die Maskenhalterung ist lose eingestellt, damit sie sich gleich
nach dem Auspacken einfach anlegen lässt.
Bitten Sie den Patienten, die oberen Riemen mit Hilfe der Laschen an
beiden Seiten der Maskenhalterung auf eine komfortable Stellung zu
justieren (Abbildung 3). Die Riemen nicht festziehen.. Das Polster sollte
das Gesicht leicht berühren, und der obere Riemen sollte über den
Ohren anliegen.
Bitten Sie den Patienten, die unteren Riemen mit Hilfe der Laschen an
beiden Seiten der Maskenhalterung auf eine komfortable Stellung zu
justieren (Abbildung 4). Die Riemen nicht festziehen.. Der untere
Riemen sollte unter den Ohren, und die Halterung quer über dem
Nacken am Unterkopf anliegen (Abbildung 5).
Die separate Ausatemvorrichtung (z. B.:Whisper Swivel) an das blaue
Standardkniestück (SE) anschließen.
Den Schlauch (gehört zum Lieferumfang des CPA
P P- bzw. Bi-LevelGeräts) an das Standardkniestück anschließen.
Den Luftstrom einschalten.
Bitten Sie den Patienten, sich hinzulegen und mit geschlossenen Lippen
normal durch die Nase zu atmen.
Richtige Passform
Die EASYLIFE-Maske ist mit zwei Polstern ausgestattet, die sich ergänzen.
Das innere Polster sorgt dafür, dass die Maske komfortabel und
automatisch luftdicht am Gesicht anliegt.
Das äußere Polster stabilisiert und stützt die Maske. Das äußere Polster
ist kein Dichtungspolster.
EASYLIFE-Maske
notwendig, auswechseln.
Gründlich abspülen.Vor dem nächsten Gebrauch an der Luft trocknen lassen.
Alle Teile auf Beschädigungen oder Verschleiß überprüfen und, falls
YHUZHQGHQGLH3ÁHJHRGHU)HXFKWLJNHLWV]XVlW]HHQWKDOWHQ
Abbildung 5
Abbildung 4
Abbildung 3
A = Stirnpolsteröffnung
B = Inneres Dichtungspolster mit
blauem Wulst
C = Stirnpolster
D = Befestigungslaschen
E = Äußeres Stützpolster
Von Hand mit einem milden Geschirrspülmittel in warmem F = Maskenhalterungssperre
G = Blaues SE-Standardkniestück ohne
Wasser reinigen. Keinen Alkohol und keine alkoholhaltigen
integriertes Ausatemventil
Reinigungsmittel oder Bleichmittel verwenden. Keine Reiniger
Hinweise zum mehrmaligem Gebrauch an mehreren
Patienten LQ.UDQNHQKlXVHUQRGHU3ÁHJHHLQULFKWXQJHQÀQGHQ
Sie unter www.sleepapnea.com. Sie können auch unseren
Kundendienst unter der Nummer +1-724-387-4000 bzw.
Respironics Deutschland unter +49 8152 93060 anrufen, um
eine Anleitung zur Desinfektion der Maske anzufordern. Bei
wiederholtem Gebrauch für einen einzelnen Patienten
zu Hause sollten die Maske und der Schlauch täglich gesäubert
werden. Die Maskenhalterung sollte einmal wöchentlich oder
bei Bedarf gesäubert werden. Die Maskenhalterung muss
bei der täglichen Reinigung nicht abgenommen werden. Die
Maskenhalterung auf Beschädigungen und Verschleiß überprüfen
und, falls notwendig, auswechseln.
Reinigungshinweise
g g
für die Maske
und die Maskenhalterung
Verschleiß überprüfen und, falls notwendig, auswechseln.
Die Anweisungen vollständig durchlesen.
Die Maske vor der Verwendung von Hand waschen.
Die einzelnen Teile der Maske auf Beschädigungen oder
Vor dem Gebrauch
Hinweis
Das kleinere, innere Dichtungspolster auf den Rahmen der Maske
setzen (Abbildung 6).
Abbildung 7
Hinweis
Abbildung 8
Zur Wiederanbringung der Maskenhalterung die oberen Riemen der Halterung durch die oberen
Schlitze des Maskenrahmens ziehen. Die Laschen zurückfalten, um die
Riemen zu arretieren.
Die unteren Riemen der Halterung entsprechend durch die unteren
Schlitze des Maskenrahmens ziehen. Die Laschen zurückfalten, um die
Riemen zu arretieren.
Die oberen Riemen der Maskenhalterung sind länger als die unteren Riemen
(Abbildung 8).
2.
1.
Befestigen der Maskenhalterung an der Maske
Der blaue Wulst muss den Rand der Maskenöffnung rundherum abdecken.
2. Das größere Stützpolster mit den Laschen nach unten auf das innere
Dichtungspolster aufsetzen, bis alle drei Seiten in den Maskenrahmen
einrasten (Abbildung 7).
3. Leicht an den Polstern ziehen um zu prüfen, dass sie fest im Rahmen sitzen.
4. Das Stirnpolster mit leichtem Druck in die Stirnpolsteröffnung im
Maskenrahmen drücken.
1.
Entfernen
1. Die drei Befestigungslaschen an beiden Seiten des äußeren Stützpolsters
nach außen ziehen, bis sich das Polster vom Maskenrahmen löst.
2. Das äußere Stützpolster entfernen.
3. Das innere Dichtungspolster mit dem blauen Wulst aus dem Rahmen ziehen.
Einsetzen
Entfernen und Einsetzen der Polster
Abbildung 6
'LH0DVNHDQGHU*HVLFKWVSODWWHPLWEHLGHQ+lQGHQYRP*HVLFKWZHJ]LHKHQXQGGDQQ
YRUVLFKWLJZLHGHUDXIVHW]HQ'DGXUFKZLUGZLHGHUHLQHOXIWGLFKWH9HUELQGXQJ]XP*HVLFKW
KHUJHVWHOOW'LH0DVNH1,&+7DP.QLHVWFN]LHKHQ
'LHREHUHQ5LHPHQGHU+DOWHUXQJVRMXVWLHUHQGDVVNHLQH/XIWDQGHU6WLUQXQGDQGHQ
6FKOlIHQHQWZHLFKW
'LHXQWHUHQ5LHPHQGHU+DOWHUXQJVRMXVWLHUHQGDVVNHLQH/XIWDQGHQ:DQJHQXQGDP
.LQQHQWZHLFKW
'LH0DVNHQKDOWHUXQJVROOWHORVHXQGEHTXHPVLW]HQ)DOOVGLH0DVNHGLH+DXWHLQGUFNW
GLH.RSIKDOWHUXQJORFNHUQ=XIHVWHV$Q]LHKHQGHU0DVNHQKDOWHUXQJNDQQGLH/HLVWXQJGHU
0DVNHXQGGHQOXIWGLFKWHQ9HUVFKOXVVEHHLQWUlFKWLJHQ
Für höheren Komfort
Die Maskenhalterung gleichförmig justieren, um Lecks oder Druckstellen auf dem Nasenrücken
oder oberhalb der Lippe zu vermindern.
Die Maske, falls notwendig, neu aufsetzen.
Die Maske kann rasch und einfach abgenommen werden. Dazu den hinteren
Riemen der Maskenhalterung greifen und die gesamte Halterung nach vorn
über den Kopf abstreifen. Die unteren Riemen, falls notwendig, lösen. Die
Halterungssperre verhindert, dass die Maskenhalterung aus dem Rahmen
rutscht. Für die tägliche Reinigung oder Justierungen der Maskenhalterung ist
es nicht notwendig, die Riemen über die Sperren hinaus zu ziehen.
9.
8.
15