1
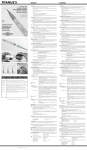
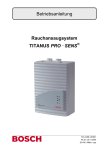
TITANUS E
®
Ultrasonic scaler
Ablatore a ultrasuoni
Ultraschall-Zahnsteinentferner
Détartreur à ultrasons
Detartrador ultrasónico
REF 400.00.01
ENGLISH
ITALIANO
DESCRIPTION
DESCRIZIONE
Ultrasonic piezo-electric scaler for professional dental use.
The scaler can be used for prophylaxis procedures employing the TKD inserts listed below or
the EMS® inserts.
This medical device meets the requirements of the European Directives 93/42/EEC
(Class IIa) and 2007/47/EC.
The scaler:
- must be used only by trained and qualified personnel;
- is meant for intermittent use and the working times are shown in the technical specifications;
- does not produce electromagnetic interference;
- is not suitable for use with in the presence of a fiammable anaesthetic mixture with air or
with oxygen or nitrous oxide.
CONTENTS
TITANUS®E scaler, a spare O-ring for the handpiece connector, a 24-month guarantee.
CONNECTION OF THE HANDPIECE
After positioning the socket, the handpiece can be fitted to the original EMS® hose by means
of a simple snap connection. Do not attempt to screw.
The scaler must be connected to a power supply unit delivering maximum output voltage of
125 Vrms. Additionally, the power supply unit must meet the requirements of the CEI EN
60601-1 standard.
g
0051
COOLING
Operating instructions
Istruzioni per l’uso
Betriebsanleitungen
Mode d’emploi
Modo de empleo
Operating water pressure for cooling spray can be 0.6 ÷ 2.5 bar. Spray flow rate is higher
than 50 ml/min. Cooling spray must be well-filtered.
As inserts heat up when used dry causing heat damage on the teeth, avoid to work dry or,
in any case, use inserts without cooling for a few seconds only.
DESCRIPTION OF VIBRATIONS
All ultrasonic vibrations generated by the TITANUS®E transducer move longitudinally along
the axis of the insert. Inserts therefore vibrate on a single plane and lateral vibrations, usually
common to other instruments, do not exist.
For this reason, during procedure, always hold the insert tangentially to the tooth surface.
Do not direct the insert frontally to the enamel.
Never direct the tip of the insert vertically to the tooth.
FITTING OF INSERTS
Fig. 1
Select the right shape of insert according to the treatment to be performed and screw it manually on to the handpiece (Fig.1) by means of the dynamometric wrench.
Do not fit inserts while the scaler is on.
MAINTENANCE OF THE INSERTS
The shape and weight of each insert are the result of an exact design and manufacturing so
as to obtain maximum performance from the ultra-sonic transducer. Therefore any alteration
due to fitting, twisting or wearing of the insert can cause anomalous operation: in such case
inserts must be systematically replaced.
After every procedure, unscrew the insert by means of the dynamometric wrench and sterilise.
USE OF SUPPLIED AND OPTIONAL INSERTS (Fig.2/3)
INSERT # AX
INSERT # BX
Fig. 2
INSERT # CX
INSERT # PX
INSERT # PSX
INSERT # DX
INSERT # EX
AX
BX
Fig. 3
CX
PX
PSX
DX
Fig. 4
Use: removal of supragingival tartar deposits on all tooth surfaces. For hard
deposits, it is possible to set high power.
Power setting (min.÷max):
3 ÷ 10
Use: removal of supragingival tartar, coatings and stains on all tooth surfaces.
Power setting (min.÷max):
3 ÷ 10
Use: removal of heavy supragingival deposits of tartar.
3 ÷ 10
Power setting (min. ÷ max):
Use: removal of subgingival tartar deposits on all tooth surfaces, including
interproximal and sulcus areas.
1÷5
Power setting (min.÷max):
Use: removal of subgingival tartar on all root surfaces, supragingival
maintenance therapy. Do not set high power.
Power setting (min. ÷ max):
1÷4
Use: removal of crowns, bridges and pivots.
Power setting (min. ÷ max):
3÷8
Special 120° ENDO chuck for use with ultrasonic files with 0.8 mm
shank diameter.
2÷5
Power setting (min. ÷ max):
The listed power values refer to settings which can be read on the potentiometer dial or
LCD display of the power supply unit.
Suggested power settings are mean values given as a guide only.
REPLACEMENT OF O-RING
Should water leakage occur, replacement of the O-Ring (REF 001.22.03) on the handpiece
connector is recommended.
With the aid of a pin (Fig. 4), pull out the old O-ring and insert the new one on the corresponding groove.
STERILIZATION
EX
ACCESSORIES AND SPARE PARTS / ACCESSORI E RICAMBI / ZUBEHÖR UND
ERSATZTEILE / ACCESSOIRES ET RÉCHANGES / ACCESORIOS Y RECAMBIOS
REF 001.22.03 O-rings / Guarnizioni / O-Ringe / Joints toriques / Guarniciones
REF 430.01
Insert # AX / Inserto # AX / Einsatz # AX / Insert # AX / Inserto # AX
REF 430.02
Insert # BX / Inserto # BX / Einsatz # BX / Insert # BX / Inserto # BX
REF 430.03
Insert # CX / Inserto # CX / Einsatz # CX / Insert # CX / Inserto # CX
REF 430.04
Insert # PX / Inserto # PX / Einsatz # PX / Insert # PX / Inserto # PX
REF 430.05
Insert # PSX / Inserto # PSX / Einsatz # PSX / Insert # PSX / Inserto # PSX
REF 430.07
Insert # DX / Inserto # DX / Einsatz # DX / Insert # DX / Inserto # DX
REF 430.08
Insert # EX / Inserto # EX / Einsatz # EX / Insert # EX / Inserto # EX
REF 109.00
DYNO Dynamometric wrench / Chiavetta dinamometrica / Drehmomentschlüssel
/ Clavette dynamométrique / Chaveta dinamométrica
EMS® is a registered trademark of Electron Medical System SA, Switzerland.
TeKne Dental s.r.l.
Via del Pescinale, 77 - 50041 Calenzano (FI) - Italy
[email protected] www.teknedental.com
Handpiece, wrench and inserts can be sterilised in a steam autoclave up to 135 °C / 2 bar
(275 °F / 29 psi).
Use of a chemiclave sterilizer is prohibited.
The handpiece must always be sterilised without the insert on. Use a sterilization bag.
The insert instead can be fit in and and sterilized together with the dynamometric wrench: this
operation avoids any injury or contamination as it is not necessary to touch the insert.
Before sterilisation, remove residues and clean the instrument carefully.
The device is supplied “not sterile”.
CLEANING AND DISINFECTION
Handpiece and wrench can be externally disinfected with a non-chlorinated germicidal
cleanser as long as the cleanser does not contain any gluteraldehydes, acid or solvent.
Handpiece and wrench cannot be immersed in any kind of disinfectant liquid.
For a thorough cleaning of the handpiece, it is possible to unscrew its front cap:
this operation allows to disinfect the inner parts, where various residues can build up.
Inserts can be cleaned in a ultrasonic tank or with a germicidal cleanser.
The screw thread can be properly cleaned with a cotton bud soacked in alcohol.
SERVICE
In case of malfunction of the device and for any overhaul and repair work, please contact
your usual supplier or apply directly to TKD.
TECHNICAL SPECIFICATIONS
Standard conformity:
Operating frequency:
Classification:
Protection against electrical shock:
ISO 22374, CEI EN 60601-1, CEI EN 60601-1-2
28000 ÷ 31000 Hz.
class 1 according to CEI EN 60601-1
type B applied part according to CEI EN 60601-1
standard.
Weight without insert:
45 g.
Working temperature:
0 ÷ 40 °C (32 ÷ 104 °F)
Working humidity:
30 ÷ 90 %
Storage temperature:
–20 ÷ 100 °C (– 4 ÷ 212 °F)
Storage humidity:
10 ÷ 90 %
Working time with active cooling spray and at minimum power:
maximum 30 min. ON, minimum 10 min. OFF
Working time with active cooling spray and at maximum power:
maximum 8 min. ON, minimum 10 min. OFF
Working time without active cooling spray and at minimum power:
maximum 6 min. ON, minimum 10 min. OFF
Working time without active cooling spray and at maximum power:
maximum 2 min. ON, minimum 10 min. OFF
Ablatore piezo-elettrico a ultrasuoni per uso odontoiatrico professionale.
L’ablatore può essere usato per interventi di detartrasi utilizzando gli inserti TKD
elencati sotto oppure gli inserti EMS®.
Questo dispositivo medico è conforme ai requisiti delle Direttive Europee 93/42/CEE (Classe
IIa) e 2007/47/CE
Lo strumento:
- deve essere utilizzato esclusivamente da personale qualificato e abilitato;
- è destinato ad un uso intermittente e i tempi di utilzzo sono indicati nelle specifiche tecniche;
- non produce interferenze elettromagnetiche;
- non è adatto all’uso in presenza di anestetici infiammabili miscelati con aria, ossigeno o
protossido di azoto.
CONTENUTO DELLA CONFEZIONE
Un ablatore TITANUS®E, una guarnizione O.R. di ricambio per il connettore del manipolo,
una garanzia di 24 mesi.
CONNESSIONE DEL MANIPOLO
La connessione del manipolo al tubo originale EMS® si effettua a spinta dopo aver posizionato lo spinotto. Non effettuare movimenti di avvitamento.
L’ablatore deve essere connesso a una unità di alimentazione con tensione di uscita massima
di 125 Vrms. Inoltre tale unità di alimentazione deve essere conforme ai requisiti della norma
CEI EN 60601-1.
RAFFREDDAMENTO
La pressione del liquido per lo spray di raffreddamento deve essere 0,6 ÷ 2,5 bar.
La portata dello spray è superiore a 50 ml/min. Il liquido di raffreddamento deve essere ben
filtrato.
Dato che a secco gli inserti si surriscaldano provocando possibili danni termici ai denti,
evitare di lavorare a secco e, comunque, usare gli inserti senza raffreddamento soltanto per
pochi secondi.
DESCRIZIONE DELLE VIBRAZIONI
Le vibrazioni generate dall’ablatore TITANUS®E hanno moto longitudinale all’asse della
punta. Gli inserti quindi vibrano su un piano unico e le vibrazioni laterali, spesso presenti su
altri strumenti, sono inesistenti.
Per tale motivo, durante il trattamento, tenere sempre l’inserto posizionato tangenzialmente
alla superficie del dente.
Non dirigere l’inserto frontalmente contro lo smalto dentale.
Non dirigere la punta dell’inserto perpendicolarmente al dente.
MONTAGGIO DEGLI INSERTI
Selezionare l’inserto in funzione dell’intervento da eseguire ed avvitarlo manualmente sul manipolo (Fig.1) con l’ausilio della chiavetta dinamometrica.
Non inserire gli inserti con l’ablatore attivato.
MANUTENZIONE DEGLI INSERTI
La forma e il peso di ogni inserto sono il risultato di uno studio per ottenere la massima resa.
Pertanto ogni modifica, rottura o consumo dell’inserto provoca anomalie di funzionamento;
in tal caso procedere alla sostituzione immediatamente.
Dopo ogni intervento, svitare l’inserto con la chiavetta dinamometrica e sterilizzare.
UTILIZZAZIONE DEGLI INSERTI IN DOTAZIONE E OPZIONALI (Fig.2/3)
INSERTO # AX
Uso: rimozione del tartaro sopragengivale su tutte le superfici del dente.
Per depositi duri è possibile impostare alta potenza.
3 ÷ 10
Potenza (min.÷max):
INSERTO # BX Uso: rimozione di tartaro, rivestimenti e macchie sopragengivali su tutte le
superfici del dente.
3 ÷ 10
Potenza (min.÷max):
INSERTO # CX Uso: rimozione di grossi depositi di tartaro sopragengivale.
3 ÷ 10
Potenza (min. ÷ max):
INSERTO # PX Uso: rimozione del tartaro sottogengivale su tutte le superfici del dente,
comprendendo anche solchi e cavità interprossimali.
1÷5
Potenza (min.÷max):
INSERTO # PSX Uso: rimozione di tartaro sottogengivale su tutte le superfici radicolari,
terapia di mantenimento sopragengivale. Non impostare alta potenza.
Potenza (min. ÷ max):
1÷4
INSERTO # DX Uso: rimozione di corone, ponti e perni metallici.
Potenza (min. ÷ max):
3÷8
INSERTO # EX Speciale pinza ENDO a 120° per l’uso con le lime ultrasoniche con
diametro del gambo di 0,8 mm.
2÷5
Potenza (min. ÷ max):
I valori di potenza indicati si riferiscono alle impostazioni leggibili sul quadrante del potenziometro o sul display LCD presente sul sistema o unità di alimentazione del manipolo. Le potenze consigliate hanno un valore puramente indicativo.
SOSTITUZIONE DELLA GUARNIZIONE DEL CONNETTORE
Se si verificano delle perdite di acqua, occorre sostituire la guarnizione O.R.
(REF 001.22.03) nel connettore del manipolo. Estrarre la vecchia guarnizione aiutandosi
con uno spillo (Fig. 4) e alloggiare quella nuova nell’apposita gola.
STERILIZZAZIONE
Il manipolo, la chiavetta e gli inserti possono essere sterilizzati in autoclave a vapore d’acqua
a 135 °C / 2 bar.
L’uso di una chemiclave è proibito.
Il manipolo deve essere sterilizzato senza alcun inserto montato. Utilizzare una busta di sterilizzazione.
L’inserto può essere invece inserito e sterilizzato insieme alla chiavetta dinamometrica: questa
operazione evita infortuni e contaminazioni in quanto non è necessario toccare l’inserto.
Prima di sterilizzare, rimuovere i residui e pulire accuratamente lo strumento.
Il dispositivo è fornito “non sterile”.
PULIZIA E DISINFEZIONE
Il manipolo e la chiavetta possono essere disinfettati esternamente con sostanze chimiche germicide purché non contengano cloro, gluteraldeide, acidi o solventi. È assolutamente vietato
immergerli in qualsiasi tipo di liquido disinfettante.
Per una migliore pulizia dell’ablatore è possibile svitare il beccuccio anteriore del manipolo:
questa operazione permette di disinfettare le parti interne, dove possono addensarsi sporcizia
e residui vari.
Gli inserti possono essere puliti in una vasca ad ultrasuoni o con sostanze chimiche germicide.
Usare un bastoncino di cotone imbevuto di alcol etilico per pulire la sede filettata degli inserti.
ASSISTENZA TECNICA
In caso di funzionamento anomalo del dispositivo, e per qualunque revisione o riparazione,
rivolgersi al Vostro rivenditore di fiducia o direttamente a TKD.
SPECIFICHE TECNICHE
Conformità:
Frequenza operativa:
Classificazione:
Protezione contro la scossa elettrica:
ISO 22374, CEI EN 60601-1, CEI EN 60601-1-2
28000 ÷ 31000 Hz
classe 1 secondo la norma CEI EN 60601-1
parte applicata di tipo B secondo la norma
CEI EN 60601-1
Peso senza inserto:
45 g.
Temperatura di lavoro:
0 ÷ 40 °C
Umidità di lavoro:
30 ÷ 90 %
Temperatura di Immagazzinamento: -20 ÷ 100 °C
Umidità di Immagazzinamento:
10 ÷ 90 %
Tempo di utilizzo con raffreddamento spray attivo alla minima potenza:
massimo 30 min. ON, minimo 10 min OFF
Tempo di utilizzo con raffreddamento spray attivo alla massima potenza:
massimo 8 min. ON, minimo 10 min OFF
Tempo di utilizzo senza raffreddamento spray attivo alla minima potenza:
massimo 6 min. ON, minimo 10 min OFF
Tempo di utilizzo senza raffreddamento spray attivo alla massima potenza:
massimo 2 min. ON, minimo 10 min OFF
DEUTSCH
FRANÇAIS
ESPAÑOL
BESCHREIBUNG
DESCRIPTION
DESCRIPCIÓN
Piezoelektrischer Ultraschall-Zahnsteinentferner für den professionellen zahnmedizinischen Gebrauch, konform mit der Norm ISO 22374.
Durch Gebrauch der Einsätze TKD oder der Einsätze EMS® kann der Zahnsteinentferner für Eingriffe
zur Zahnsteinentfernung verwendet werden.
Dieses medizintechnische Produkt ist konform mit den Anforderungen den Europäischen Richtlinien
93/42/EWG (Klasse IIa) und 2007/47/EG.
Das Instrument:
- darf ausschließlich von befugten Fachkräften verwendet werden;
- ist für den intermittierenden Betrieb bestimmt; die Zeiten sind unter den technischen Daten angegeben;
- erzeugt keine elektromagnetischen Störungen;
- ist nicht für den Einsatz in Präsenz von entflammbaren, mit Luft, Sauerstoff oder Stickstoffmonoxid
vermischten Anästhetika geeignet.
Détartreur piézoélectrique à ultrasons pour un usage dentaire professionnel.
Le détartreur peut être utilisé pour des interventions de détartrage en utilisant les inserts TKD indiqués
ensuite ou les inserts EMS®.
Ce dispositif médical est conforme aux qualités requises par les Directives Européennes
93/42/CEE (Classe IIa) et 2007/47/CE.
Le dispositif:
– doit être utilisé exclusivement par du personnel qualifié et qui a obtenu un certificat d’aptitude;
– est destiné à un usage intermittent et les temps d’emploi sont indiqués dans les spécifications
techniques;
– ne produit pas d’interférences électromagnétiques;
– ne convient pas à une utilisation en présence d’un mélange anesthésique inflammable avec de
l’air ou avec oxygène ou protoxyde d’azote.
CONTENU DE LA BOÎTE
PACKUNGSINHALT
Ein Zahnsteinentferner TITANUS®E, ein Einsatz #AX, eine OR-Ersatzdichtung für den Steckverbinder
des Handstücks, eine Garantie von 24 Monaten.
Détartreur TITANUS®E, un insert #AX, un joint O.R. de rechange pour le connecteur de la pièce à
main, un certificat de garantie de 24 mois.
CONNEXION DE LA PIÈCE À MAIN
ANSCHUSS DES HANDSTÜCKS
Der Anschluss des Handstück an den Originalschlauch EMS® erfolgt durch Druck (einrastend),
nachdem der Stecker positioniert worden ist.
Keine Schraubbewegungen ausführen.
Der Zahnsteinentferner muss an eine Versorgungseinheit mit max. Ausgangsspannung von 125
Vrms angeschlossen werden. Darüber hinaus muss die Versorgungseinheit die Anforderungen der
Norm CEI EN 60601-1 erfüllen.
KÜHLUNG
Der Druck der Sprayflüssigkeit zur Kühlung muss 0,6 ÷ 2,5 bar betragen.
Mindestdurchsatz des Sprays: 50 ml/min. Die Kühlflüssigkeit muss gut gefiltert sein.
Da sich die Einsätze im Trockenlauf überhitzen und mögliche thermische Schäden an den Zähnen
verursachen, ist ein Arbeiten im Trockenlauf zu vermeiden. Die Einsätze ohne Kühlung grundsätzlich
nur für einige Minuten verwenden.
BESCHREIBUNG DER SCHWINGUNGEN
La connexion de la pièce à main au cordon original EMS® s’effectue par poussée après avoir positionné le connecteur. Ne pas effectuer des mouvements de rotation.
Le détartreur doit être connecté à une unité d’alimentation ayant une tension de sortie maximum de
125 Vrms. En outre, cette unité d’alimentation doit être conforme aux qualités requises par la norme
CEI EN 60601-1.
REFROIDISSEMENT
La pression du liquide pour le spray de refroidissement doit être de 0,6 ÷ 2,5 bar. Le flux minimum
est 50 ml/min. Le liquide de refroidissement doit être bien filtré.
Étant donné qu’à sec les inserts se surchauffent en provoquant de possibles dommages thermiques
aux dents, éviter de travailler à sec et, de toute façon, utiliser des inserts sans refroidissement seulement pour quelques secondes.
DESCRIPTION DES VIBRATIONS
Die vom Zahnsteinentferner TITANUS®E erzeugten Schwingungen haben eine Längsbewegung zur
Achse des Einsatzes.
Die Einsätze vibrieren folglich in einer einzigen Ebene. Es existieren keine seitlichen Vibrationen,
wie sie häufig an anderen Instrumenten vorhanden sind. Aus diesem Grund muss während der Behandlung der Einsatz immer tangential zur Zahnoberfläche gehalten werden.
Les vibrations générées par le détartreur TITANUS®E ont un mouvement longitudinal par rapport à
l’axe de la pointe. Les inserts vibrent ainsi sur un plan unique et les vibrations latérales, souvent présentes sur les autres instruments, sont inexistantes.
Pour cette raison, pendant le traitement, tenir toujours l’insert positionné tangentiellement à la surface
de la dent.
Den Einsatz nicht frontal auf den Zahnschmelz richten.
Die Spitze des Einsatzes nicht rechtwinkelig zum Zahn richten (falls nicht spezifisch angegeben).
Ne pas orienter l’insert de front contre l’émail dentaire.
Ne pas orienter la pointe de l’insert perpendiculairement à la dent.
MONTAGE DES INSERTS
MONTAGE DER EINSÄTZE
Den Einsatz aufgrund des auszuführenden Eingriffs auswählen und von Hand am Handstück aufschrauben (Abb. 1). Dazu einen Drehmomentschlüssel verwenden.
Keine Einsätze bei aktiviertem Zahnsteinentferner einsetzen.
ENTRETIEN DES INSERTS
INSTANDHALTUNG DER EINSÄTZE
Form und Gewicht eines jeden Einsatzes sind das Ergebnis einer Studie zur Erzielung maximaler
Leistungen.
Aus diesem Grund verursacht jegliche Änderung durch Einsetzen, Drehen oder Abnutzung des Einsatzes Betriebsstörungen. In diesem Fall ist der Einsatz sofort auszutauschen.
Nach einem jeden Eingriff den Einsatz mit dem Drehmomentschlüssel lösen und desinfizieren.
GEBRAUCH DER MITGELIEFERTEN UND OPTIONALEN EINSÄTZE (ABB.2/3)
EINSATZ #AX Gebrauch: Entfernen von supragingivalem Zahnstein auf allen Zahnoberflächen
Leistung (min.÷max.): 3 ÷ 10
EINSATZ #BX Gebrauch: Entfernen von Zahnstein, Belägen und supragingivalen Verfärbungen
auf allen Zahnoberflächen
Leistung (min.÷max.): 3 ÷ 10
EINSATZ #CX Gebrauch: Entfernen von großen supragingivalem Zahnsteinablagerungen an den
Vorderzähnen, Entfernen von Zahnzementen; die flache Spitze des Einsatzes kann
an den labialen Oberflächen verwendet werden.
Leistung (min.÷max.): 3 ÷ 10
EINSATZ #PX Gebrauch: Entfernen von supragingivalem oder subgingivalem Zahnstein auf allen
Zahnoberflächen, insbesondere in den interproximalen Kavitäten und Furchen.
Leistung (min.÷max.): 1 ÷ 5
EINSATZ #PSX Gebrauch: Entfernen von subgingivalem Zahnstein auf den Wurzeloberflächen,
Wurzelkürettage, supragingivale Behandlungen zur Zahnerhaltung.
Keine hohe Leistung einstellen.
Keine hohe Leistung einstellen. Leistung (min.÷max.): 1 ÷ 4
EINSATZ #DX Gebrauch: Entfernen von Kronen und Brücken, Abschleifen von Befestigungszement
auf harten Materialien.
Leistung (min.÷max.): 3 ÷ 8
EINSATZ #EX 120° Spezialzange ENDO für die Verwendung von Ultraschallfeilen mit Schaftdurchmesser 0,8 mm.
Leistung (min.÷max.): 2 ÷ 5
Die angegebenen Leistungswerte beziehen sich auf die auf der Skala des Potentiometers oder
auf dem an der Versorgungseinheit des Handstücks vorhandenen LCD-Display ablesbaren Einstellungen.
Bei den empfohlenen Leistungen handelt es sich um reine Richtwerte.
AUSTAUSCH DER DICHTUNG DES STECKVERBINDERS
Falls Wasser ausläuft, muss die OR-Dichtung (REF 001.22.03) im Steckverbinder des Handstücks
ausgetauscht werden.
Die alte Dichtung mit Hilfe einer Nadel (Abb. 4) herausziehen und die neue in der dafür vorgesehenen Rille einlegen.
STERILISATION
Das Handstück, der Schlüssel und die Einsätze können im Autoklav bei einer Wasserdampftemperatur von 135 °C / 2 bar (275 °F / 29 psi) sterilisiert werden.
Der Gebrauch eines Chemiklaven ist verboten.
Das Handstück muss immer ohne montierten Einsatz sterilisiert werden.
Einen Sterilisationsbeutel verwenden.
Der Einsatz kann hingegen zusammen mit dem Drehmomentschlüssel eingelegt und sterilisiert werden: Dadurch werden Verletzungen und Kontamination vermieden, da der Einsatz nicht berührt
werden muss.
Vor der Sterilisation die Rückstände beseitigen und das Instrument gründlich reinigen.
Die Vorrichtung wird „nicht steril“ geliefert.
REINIGUNG UND DESINFEKTION
Das Handstück und der Schlüssel können außen mit keimtötenden chemischen Substanzen desinfiziert werden, vorausgesetzt, dass sie kein Chlor, Glutaraldehyd, Säuren oder Lösemittel enthalten.
Es ist absolut verboten, sie in irgendeine desinfizierende Flüssigkeit zu tauchen.
Für eine gründliche Reinigung des Handstücks kann die vordere Kanüle abgeschraubt werden: Auf
diese Weise können die internen Teile desinfiziert werden, an denen sich verschiedene Rückstände
ansammeln können.
Die Einsätze können im Ultraschallbad oder mit keimtötenden chemischen Substanzen gereinigt
werden.
Ein mit Äthylalkohol getränktes Wattestäbchen für die Reinigung der Gewindeaufnahme der Einsätze verwenden.
TECHNISCHER KUNDENDIENST
TECHNISCHE DATEN
ISO 22374, CEI EN 60601-1, CEI EN 60601-1-2
28000 ÷ 31000 Hz
Klasse 1 gemäß CEI EN 60601-1
Anwendungsteil vom Typ B gemäß CEI EN 60601-1
Gewicht ohne Einsatz:
45 g
Betriebstemperatur:
0 ÷ 40 °C
Betriebsfeuchtigkeit:
30 ÷ 90 %
Lagertemperatur:
-20 ÷ 100 °C
Lagerfeuchtigkeit:
10 ÷ 90 %
Betriebszeit mit aktiver Spraykühlung bei Mindestleistung:
Betriebszeit mit aktiver Spraykühlung bei Höchstleistung:
Betriebszeit ohne aktive Spraykühlung bei Mindestleistung:
Betriebszeit ohne aktive Spraykühlung bei Höchstleistung:
La forme et le poids de chaque insert sont le résultat d’une étude pour obtenir le meilleur rendement.
Par conséquent, chaque modification, cassure ou usure de l’insert provoque des anomalies sur le
bon fonctionnement; dans ce cas, procéder au changement de l’insert immédiatement.
Après chaque intervention, dévisser l’insert avec une clavette dynamométrique et stériliser.
max. 30 min ON, min. 10 min OFF
max. 8 min ON, min. 10 min OFF
max. 6 min ON, min. 10 min OFF
max. 2 min ON, min. 10 min OFF
DOTACIÓN
Un detartrador TITANUS®E, un inserto #AX, una guarnición O.R. de recambio para el conector
de la pieza de mano, un certificado de garantía para 24 meses.
CONEXIÓN DE LA PIEZA DE MANO
La conexión de la pieza de mano a la manguera original EMS® se efectúa a presión después de
haber posicionado la espiga. No efectuar movimientos de rotación.
El detartrador tiene que ser conectado a una unidad de alimentación que tenga una tensión de
salida máxima de 125 Vrms. Además, dicha unidad de alimentación debe cumplir con los requisitos de la norma CEI EN 60601-1.
ENFRIAMIENTO
La presión del líquido para el spray de enfriamiento debe ser 0,6 ÷ 2,5 bar. El flujo minimo es
50 ml/min. El líquido de enfriamiento debe ser bien filtrado.
Dado que en seco los insertos se recalientan provocando posibles daños térmicos a los dientes,
evitar trabajar en seco y, de todas formas, usar los insertos sin enfriamiento sólo por unos segundos.
DESCRIPCIÓN DE LAS VIBRACIONES
Las vibraciones generadas por el detartrador TITANUS®E tienen un movimiento longitudinal al eje
de la punta. Los insertos, por consiguiente, vibran sobre un plano único y las vibraciones laterales,
a menudo presentes en otros instrumentos, son inexistentes. Por eso, durante el tratamiento, tener
siempre el inserto posicionado tangencialmente a la superficie del diente.
No orientar el inserto de frente contra el esmalte dental.
No orientar la punta del inserto perpendicularmente al diente.
MONTAJE DE LOS INSERTOS
Seleccionar el inserto en función de la intervención por efectuar y atornillarlo manualmente a la
pieza de mano (Fig.1) mediante la chaveta dinamométrica.
No introducir los insertos con el detartrador activado.
MANTENIMIENTO DE LOS INSERTOS
La forma y el peso de cada uno de los insertos son el resultado de un estudio para obtener el máximo rendimiento. Por lo tanto, cualquier modificación, rotura o desgaste de los insertos provoca
anomalías del funcionamiento: en estos casos proceder a la sustitución inmediatamente.
Después de cada intervención, destornillar el inserto con la chaveta dinamométrica y esterilizar.
USO DE LOS INSERTOS EN DOTACIÓN Y OPCIONALES (Fig.2/3)
INSERTO #AX
UTILISATION DES INSERTS FOURNIS ET OPTIONNELS (Fig.2/3)
INSERT #AX
Usage: détartrage supra-gingival sur toutes les surfaces de la dent. Pour les dépôts
durs il est possible de sélectionner haute puissance.
Puissance (min.÷ max): 3 ÷ 10
INSERT #BX
Usage: élimination du tartre, des revêtements et des taches supra-gingivaux sur
toutes les surfaces de la dent.
Puissance (min.÷ max): 3 ÷ 10
INSERT #CX
Usage: élimination de dépôts supra gingivaux importants sur les dents antérieures.
Il peut être utilisé pour enlever les ciments orthodontiques.
Puissance (min.÷ max): 3 ÷ 10
INSERT #PX
Usage: élimination de dépôts supra ou sous-gingivaux dans touts les quadrants,
particulièrement dans les espaces interproximaux et le sulcus.
Puissance (min.÷ max): 1 ÷ 5
INSERT #PSX
Usage: détartrage fin sous gingival et pour le debridement des racines, traitement
d’entrentient supragingival.
N’utiliser pas à haute puissance.
Puissance (min.÷ max): 1 ÷ 4
INSERT #DX
Usage: élimination de couronnes et ponts, démolition de cémentation sur materiaux durs.
Puissance (min.÷ max): 3 ÷ 8
INSERT #EX
Pince endo spéciales pour une utilisation avec des fichiers à ultrasons avec
0,8 mm diamètre de la tige.
Puissance (min.÷ max): 2 ÷ 5
Les valeurs de puissance indiquées se réfèrent aux réglages lisibles sur le cadran du potentiometer
ou sur l’afficheur LCD présent sur le système ou sur l’unité d’alimentation de la pièce à main.
Les puissances conseillés ont une valeur purement indicative.
REMPLACEMENT DU JOINT DU CONNECTEUR
S’il y a des pertes d’eau, il faut remplacer le joint O.R. (REF 001.22.03) sur le connecteur de la
pièce à main à l’aide d’une petite aiguille. Extraire le vieux joint à l’aide d’une épingle (Fig. 4) et
enfiler le nouveau joint dans la gorge appropriée.
STÉRILISATION
La pièce à main, la clavette et les inserts peuvent être stérilisés à l’autoclave à vapeur d’eau à
135 °C / 2 bar.
L’utilisation d’une chemiclave est interdite.
La pièce à main doit être stérilisé monté sans aucun insert monté. Utiliser un sac de stérilisation.
L’insert, au contraire, peut être sterilisé monté dans la clavette dynamométrique: cette opération évite
des accidents et des contaminations étant donné qu’il n’est pas nécessaire de toucher l’insert.
Avant la stérilisation, enlever les résidus et nettoyer soigneusement l’instrument.
Le dispositif est fourni “non stérile”.
NETTOYAGE ET DÉSINFECTION
La pièce à main et la clavette peuvent être désinfectées extérieurement à l’aide de composants chimiques germicides à l’exception des produits contenant du chlore, gluteraldéhydes, acides ou solvants. Il est strictement défendu de les tremper dans un quelconque type de liquide désinfectant.
Pour un meilleur nettoyage du détartreur il est possible de dévisser le bec antérieur de la pièce à
main: cette opération permet de désinfecter les parties antérieures, où peuvent se déposer de la
saleté ou des divers résidus.
Les inserts peuvent être nettoyés dans un bac à ultrasons ou avec des composants chimiques germicides. Employer un coton-tige imbibé d’alcool éthylique pour nettoyer le siège fileté des inserts.
INSERTO #BX
INSERTO #CX
INSERTO #PX
INSERTO #PSX
INSERTO #DX
INSERTO #EX
Uso: remoción del sarro supragingival en todas las superficies del diente.
Para depósitos duros es posible seleccionar alta potencia
Potencia (min.÷max): 3 ÷ 10
Uso: remoción del sarro, rivestimientos y manchas supragingivales en todas
las sperficies del diente.
Potencia (min.÷max): 3 ÷ 10
Uso: remoción de los depósitos supragingivales importantes de los dientes
anteriores. Puede emplearse para la remoción de los cementos ortodonticos.
Potencia (min.÷max): 3 ÷ 10
Uso: remoción del sarro subgingival en todas las superficies del diente, comprendiendo tambien los surcos y cavidades interproximales.
Potencia (min.÷max): 1 ÷ 5
Uso: remoción fine del sarro subgingival de la superficie de las raízes dentales, terapia de mantenimento supragingival.
No seleccionar alta potencia
Potencia (min.÷max): 1 ÷ 4
Uso: remoción de coronas y puentes, demolición de cementación sobre materiales duros.
Potencia (min.÷max): 3 ÷ 8
Pinza especial ENDO destinada a uso con limas ultrasonica con 0,8 mm
de diàmetro.
Potencia (min.÷max): 2 ÷ 5
Los valores de potencia indicados se refieren a los aduste legibles en el cuadrante del potenciómetro o en el display LCD presente en el sistema o unidad de alimentación de la pieza de
mano.
Las potenzia aconsejada ti
SUSTITUCIÓN DE LA GUARNICIÓN DEL CONECTOR
Si se verifican unas pérdidas de agua, hay que sustituir la guarnición O.R. (REF 001.22.03) en
el conector de la pieza de mano. Extraer la vieja guarnición ayudándose de una aguja (Fig.4) y
colocar la nueva en la ranura correspondiente.
ESTERILIZACIÓN
La pieza de mano, la chaveta y los insertos pueden ser esterilizados en autoclave de vapor de
agua a 135 °C / 2 bar.
El uso de chemiclave está prohibido.
La pieza de mano se debe esterilizar siempre sin algún inserto montado. Utilizar una bolsa de esterilización. El inserto, al contrario, se puede introducir y esterilizar con la chaveta dinamométrica:
esta operación evita accidentes y contaminaciones ya que no es necesario tocar el inserto.
Antes de esterilizar, remover los residuos y limpiar cuidadosamente el instrumento.
El dispositivo se suministra “no estéril”.
LIMPIEZA Y DESINFECCIÓN
La pieza de mano y la chaveta pueden ser desinfectadas externamente con sustancias químicas
germicidas a condición de que no contengan cloro, gluteraldehidos, ácidos o disolventes. Está
absolutamente prohibido sumergirlas en cualquier tipo de desinfectante.
Para una mejor limpieza del detartrador es posible destornillar el pico anterior de la pieza de
mano: esta operación permite desinfectar las partes interiores, donde pueden concentrarse suciedad y residuos varios.
Los insertos se pueden limpiar dentro de una cubeta de ultrasonidos o con sustancias químicas
germicidas. Usar un bastoncillo de algodón impregnado de alcohol etílico para limpiar el alojamiento roscado de los insertos.
ASISTENCIA TÉCNICA
En caso de funcionamento anómalo del dispositivo o para cualquier revisión o reparación, dirigirse
a su distribuidor o directamente a TKD.
DATOS TÉCNICOS
ASSISTANCE TECHNIQUE
En cas de mauvais fonctionnement du dispositif et pour toutes révisions et réparations, s’adresser
à votre fournisseur habituel ou directement à TKD.
FICHE TECHNIQUE
Bei Störungen der Vorrichtung sowie für jeden beliebigen Eingriff zur Überholung oder Reparatur
wenden Sie sich bitte an Ihren Vertrauenshändler oder direkt an TKD.
Konformität:
Betriebsfrequenz:
Klassifizierung:
Schutz gegen Stromschlag:
Sélectionner l’insert selon l’opération envisagée et le visser manuellement sur la pièce à main (Fig.1)
à l’aide d’une clavette dynamométrique.
Ne pas insérer les inserts avec le détartreur activé.
Detartrador piezo-eléctrico ultrasónico para un uso odontológico profesional.
El detartrador se puede usar para intervenciones de detartraje utilizando los insertos TKD enumerados a continuación o los insertos EMS®.
Este dispositivo médico cumple con los requisitos de las Directivas Europeas 93/42/CEE (Clase
IIa) y 2007/47/CE.
El dispositivo:
- debe ser utilizado exclusivamente por personal cualificado e idóneo;
- está destinado para un uso intermitente y los tiempos de utilización están indicados en las especificaciones técnicas;
- no produce interferencias electromagnéticas;
- no es conveniente su uso en presencia de anestésicos inflamables mezclados con aire, oxígeno
o protóxido de nitrógeno;
Conformité:
Fréquence de vibration:
Classification:
Protection contre la décharge électrique:
ISO 22374, CEI EN 60601-1, CEI EN 60601-1-2
28000 ÷ 31000 Hz
classe 1 selon la norme CEI EN 60601-1
partie appliquée de type B selon la norme CEI EN 60601-1
Poids sans insert:
Température de fonctionnement:
Humidité de fonctionnement:
Température de stockage:
Humidité de stockage:
45 g.
0 ÷ 40 °C
30 ÷ 90 %
-20 ÷ 100 °C
10 ÷ 90 %
Temp d’utilisation à refroidissement spray à la puissance minimum:
maximum 30 min. ON, minimum 10 min. OFF
Temp d’utilisation à refroidissement spray actif à la puissance maximum:
maximum 8 min.ON, minimum 10 min. OFF
Temp d’utilisation sans refroidissement spray à la puissance minimum:
maximum 6 min. ON, minimum 10 min. OFF
Temp d’utilisation sans refroidissement spray à la puissance maximum:
maximum 2 min.ON, minimum 10 min.OFF
Conformidad:
Frecuencia de vibración:
Clasificación:
Protección contra la descarga eléctrica:
Peso sin inserto:
Temperatura de empleo:
Humedad de empleo:
Temperatura de almacenamiento:
Humedad de almacenamiento:
ISO 22374, CEI EN 60601-1, CEI EN 60601-1-2
28000 ÷ 31000 Hz
clase 1 según la norma CEI EN 60601-1
parte aplicada de tipo B según la norma CEI EN
60601-1
45 g.
0 ÷ 40 °C
30 ÷ 90 %
-20 ÷ 100 °C
10 ÷ 90 %
Tiempo de utilización con enfriamiento spray activo a la mínima potencia:
máximo 30 minutos encendido y mínimo 10 minutos apagado.
Tiempo de utilización con enfriamiento spray activo a la máxima potencia:
máximo 8 minutos encendido y mínimo 10 minutos apagado.
Tiempo de utilización sin enfriamiento spray a la mínima potencia:
máximo 6 minutos encendido y mínimo 10 minutos apagado.
Tiempo de utilización sin enfriamiento spray a la máxima potencia:
máximo 2 minutos encendido y mínimo 10 minutos apagado.
TITANUS-E/TKD400.00.01/2011