1
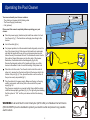
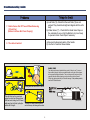
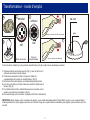
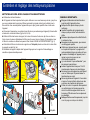
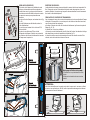
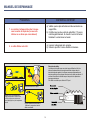
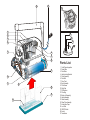
BK 0000412
For Technical Service call 1-800-457-7642
www.glipoolproducts.com
Pour le service technique appeler le 1-800-457-7642
www.glipoolproducts.com
ENGLISH
Thank you for choosing the Dirt Devil Catalyst robotic cleaner to
clean your pool. You have made a terrific decision and will enjoy its
use for years to come. Before you begin using your cleaner, please
take a few minutes to carefully read these operating instructions - it
will make life easy!
Again, thank you for choosing Dirt Devil.
IMPORTANT
CAUTION: Do not switch the pool cleaner “ON” if it is not fully
immersed in water. Operating the cleaner out of water will
cause severe damage immediately and will result in loss of
warranty.
Allow the cleaner to remain in the pool for 15 to 20 minutes
following the end of its cleaning cycle. This will allow the
motors to cool adequately. Do not leave the cleaner in the
pool all the time. Always remember to turn the power supply
“OFF” and unplug it from the power outlet before removing
the cleaner from the pool.
WARNING: Your Cleaner should not be used while people
are swimming in the pool.
Safety Note
- The unit must be supplied through a residual current device
(RCD) having a rated residual operating current not
exceeding 30 mA
- The connection to the branch circuit should be consistent
with the local and national wiring rules (electrical code).
- Mishandling of the unit can result in leakage of lubricants.
- If the supply cord is damaged, it must be replaced by the
manufacturer’s service agent or a qualified and trained
person in order to avoid hazards.
1
Operating the Pool Cleaner
Your new automatic pool cleaner contains:
- The robotic pool cleaner with its floating cable.
- The Power Supply (transformer).
- Cart (optional)
Please read this manual completely before operating your pool
cleaner.
Place the power supply (transformer) at least three meters / ten feet
from the pool.(fig.1). The transformer will supply low voltage to the
cleaner.
1
Uncoil the cable.(fig.1a)
For proper operation, lock the moveable handle diagonally across the
top of the cleaner's body. Push down on the handle lock mechanism
and slide the handle all the way to the end (recommended one slot
before the end), then release the lock. The handle will remain fixed in
this position. Repeat this process on the other side of the cleaner.
Remember, the handle must be fixed diagonally (fig.2a, 2b)
Reverse the diagonal position of the handle each time you put the
cleaner in the water in order to avoid the twisting of the power cord
1a
Place the unit in the water. Turn the unit side to side in the water to
allow air to escape from the body and then let the cleaner sink to the
bottom of the pool (fig.3). Then, spread the cable over the surface of
the pool as evenly as possible (fig.1).
Plug the cable into the power supply. Make sure the key on the plug
exactly corresponds with the key slot on the socket of the power
supply (fig.1b).
Plug the power supply into a grounded outlet. Ensure that the electric
outlet has been properly grounded (fig.1c). The light will glow indicating
that the system is “ ON “ and the pool cleaner will start the cleaning
cycle.
2b
3
2a
1b
WARNING: A Ground Fault Current Interrupter (GFCI-USA) or a Residual Current Device
(RCD-EUROPE) must be installed to protect your electric outlet and prevent any possible
electric shock.
1c
2
Power Supply - Operating Instructions
A
C
slot
D
E
ON / OFF
slot
socket
Push and rotate right to lock
B
F
key
key
Cable
plug
Transformer
socket
Rotate left and pull to unlock
To plug the cable (Fig A) into the socket on the power supply (Fig B), please do the following:
1.
2.
3.
4.
5.
6.
Prepare the plug as seen in (Fig. C) with the key and 3 outside slots exactly as shown.
Fit exactly the key and the slots from cable plug with the corresponding key and slots from the transformer socket. (Fig. D)
Push the plug into the socket of the transformer all the way in.
Once the plug is in, rotate the plug to the right to lock it into place (Fig. E).
To remove the plug, first rotate the plug to the left to unlock it, then pull it out (Fig. F).
Red push button turns the machine “ON / OFF”.
IMPORTANT- After every cycle the pool cleaner will turn off automatically . In case you want to turn the machine off during the working
cycle, push the red button once and the indicator light will turn off, indicating that the machine has stopped running.
3
Maintenance and adjustment
CLEAN THE FILTER BAG AFTER EVERY CLEANING CYCLE
IMPORTANT TIPS:
a. Unplug the power supply. (Please keep the plug away from contact with water)
Shut off and unplug the power supply every
b. If the unit is in the pool, gently pull the cleaner toward you using the cable until the handle is within
time you remove the cleaner from the water.
reach. Use the handle (not the cable) to pull the cleaner out of the pool after allowing most of the water
Clean the filter bag after every cycle.
to drain from the unit.
Reverse
the handle after every cleaning cycle to
c. Lay the unit on its back on a smooth surface (in order to prevent scratches on the machine body),
avoid tangling the cable.
release the lock tabs and remove the bottom lid assembly. (fig.4a, 4b, 4c, 4d)
Periodically straighten out the floating cable.
d. Remove the filter bag from the support bars, turn it inside out and wash off all the dirt with a garden
Replace worn brushes to ensure maximum
hose or in a sink. Squeeze the bag gently until the rinse water is clear. If necessary, machine wash the
cleaning performance
bag using only cold water with NO DETERGENT! (fig.5)
Make sure that your pool cleaner positions itself
e. Re-install the bag on the support bars with the label in the center of one of the long sides of the
properly on the wall. The machine handle must
bottom lid (5a)
rest parallel to the water line upon reaching the
surface of the water.
f. Re-install the bottom lid assembly in the body. Push down on it until lock tabs will snap into place
Save your cleaner's packaging for off-season
properly.
storage or for shipping the unit to your dealer if
service is required.
Leave your pool cleaner in the water for 15 to 20
lock tab
minutes after every cleaning cycle.
Do not leave your cleaner in direct sunlight
when not in use.
Never leave the power supply in direct
sunlight and avoid leaving it in the rain.
Occasionally, you should rinse your cleaner in
clean,
fresh water. This will lengthen the service
smooth
smooth
surface
surface
life of the drive belts, drive tracks and scrubbing
brushes.
Sometimes, if the unit was not used for a while,
the brushes may become rigid. Once immersed
in water the PVA regains the softness and
elasticity
Clean the propeller once a month
(see next page for details)
label
4
6
Wheel tube
PVA brush
end hub
CHANGING BRUSHES
Depending upon how frequently you use the
cleaner pool cleaner, it will be necessary to
replace the brushes when they are worn out.
Worn out brushes will impede cleaner’s
scrubbing, climbing the walls or general
performance.
a. Detach one of the side plates, unscrewing the
four screws (see fig.7a ).
b. With side plate detached, take out the wheel
tube from the machine.
c. Open the end hub and pull out the worn PVA
brush.(see fig.6)
d. Place the new PVA brush on to the hexagonal
tube and close it with the end hub.
e. Reinstall the wheel tube in place and place
back the side plate screwing back the four screws.
PVA BRUSHES CARE:
This special brush material is most efficient when wet. Any discoloration is normal in the
drying process when exposed to open air. Please allow brushes to absorb pool water for
about 20 minutes before initial use or at first use of every season. You will notice that as the
brushes absorb the water and start scrubbing your pool, the discoloration will disappear.
CHANGING THE DRIVE BELTS
Depending on usage, the drive belts (located behind the side plate) will stretch.
When this happens, in order to maintain the optimum performance of the unit, these drive
belts have to be changed.
a) Turn the robot upside down and remove the bottom lid assembly (fig. 4a,4b,4c,4d).
b)Inside, locate 4 screws on drive motor side, which hold the side plate in place (fig. 7a, 7b).
c)Take out these screws and remove the side plate
d)Remove the drive track. Before removing the drive track, notice carefully how the drive
belts are positioned for re-assembly (fig. 7c).
e)Take out the old drive belts and replace them with new ones.
To re-assemble, reverse steps d to a.
7a
outlet top
propeller
Cleaning the pump propeller:
1) Take out the 2 (4) screws from the outlet top
2) Take out the outlet top and remove hair and
other debris around propeller
7b
CAUTION:
To avoid scratches and other blemishes appearing on your robot, simply find a smooth
surface for it to rest on when cleaning the debris bag or performing minor adjustments.
These scratches could produce changes in the robots soft and smooth edges resulting in
potential damage to some flexible pool surfaces.
7c
smooth
surface
5
smooth
surface
PLEASE CHECK THE FOLLOWING BEFORE CALLING YOUR SERVICE CENTER
Before troubleshooting, the pool cleaner must be disconnected from the power supply and the power supply must be unplugged from the
electrical outlet to prevent damage to the unit and possible personal injury.
For reference numbers, consult the parts list diagram located on the last page of the instructions.
1. Unit does not pump water or move:
a) Check to see if electric outlet (22) has power.
b) Check if transformer (21) is plugged into a grounded outlet
and the blue cable assembly is plugged into the
transformer.*
c) Switch the power supply “OFF” and “ON” button(19) a few
times. Allow 45 seconds between “ON” and “OFF”.
d) Check for and remove any debris such as hair, string, or
leaves that may be obstructing the free movement of the
Drive Pulley (5), Drive Belts (6) , or Drive Tracks (7) .
e) Check that the Drive Belts (6) and Drive Tracks (7) are
properly aligned and are taut. Adjust or replace if
necessary.
2. Unit does not pump water at all, or pumps slowly
but moves:
a) Check to see if propeller (1) is seized due to accumulation
of hair or debris on the propellers. Remove the top screws on
each outlet top (1) and clean the propeller. When
reassembling the top cover, do not overtighten the screws.
b) Check to see if the filter bag (12) is thoroughly clean.
Clean as necessary.
c) If a and b are negative, check the pump motors (2). If
they are not functioning send the unit to your service
center.
*The transformer cord can only be replaced with the aid of special purpose tools normally available only to authorized dealers, distributors and service centers.
6
a) Check to see if forward/reverse motion is obstructed by
foreign matter; hair, debris, etc. on drive belts (6) or drive
tracks (7) or there is an entanglement with the power cord.
Clean as necessary.
b) Check if drive belts (6) have slipped out of place. Also
check for proper tension of drive belts (6). If necessary
replace belts.
c) Check for loose drive motor (3) connections.
d) If a, b, and c are negative, check the Master and Slave
motors. If one or the other is not functioning, send the unit
to your service center.
3. Unit does not move but does pump water:
a) Check 2a and 2b of this guide.
b) Check the Intake Valve Flaps (17) on the underside of your
unit. The Flaps should move freely to open and close.
Clean and free the Valve Flaps (17) if necessary.
4. Unit does not pick up dirt and debris:
a) Most likely a thorough cleaning of the filter bag (12) is
needed.
b) Check to see that the blue cable (15) is properly spread
out and is untangled.
c) Allow the unit to run in the pool for the entire cleaning
cycle.
d) Make sure that the Floating Handle (14) is locked
diagonally across the top of your unit's body.
e) Check that the Pump Motor (2) is operating. Please refer
to the Troubleshooting section titled “Moves But Does
Not Pick Up Dirt And Debris”
f) After following all of the above, if there is still a problem,
call your dealer for specific additional assistance.
5. Unit does not seem to cover the entire pool:
7
7. Debris Comes Out Of The unit When Removing
It From Pool
(Bottom Lid Does Not Close Properly)
a) Lock Tabs (18) -Check that the Lock Tabs (18) are not
warped. They should be straight and aligned with the unit's
body.
b) Intake Valves (17) - Check that the Intake Valve Flaps on
the underside of your unit (in the Bottom Lid ) move freely
to open and close. Clean Flaps if necessary.
8. The cable is twisted:
a) Reverse the diagonal position of the handle.
b) Use the E-Z swivel as shown bellow.
CABLE CARE
The cable may become twisted after a period of time in use. To correct
this condition, simply lock the moveable handle on the top of the cleaner
in the opposite diagonal direction. The pool cleaner will now travel in the
opposite direction while cleaning your pool and the cable will uncoil.
Check the cable periodically for external damage. If the problem persists,
use the E-Z Swivel device.
Holding with one hand the E-Z Swivel.
Place the Robot on the ground and
unplug the cable from the transformer.
With one hand, holding the E-Z Swivel,
walk away from the Robot, pulling the The core will rotate inside the cover
cable to its full length.
and in this way will untangle the cable.
patent pending
8
FRANÇAIS
Merci d’avoir choisi le robot nettoyeur Dirt Devil Catalyst pour
nettoyer votre piscine. Vous avez pris une très bonne decision et
vous allez apprécier de l’utiliser pour les années à venir. Avant
d’utiliser votre robot, prenez quelques minutes pour lire
attentivement la notice d’utilisation, cela rendra votre vie plus facile
!Encore une fois, merci d’avoir choisi Dirt Devil.
IMPORTANT
ATTENTION: Ne mettez pas le nettoyeur de piscine en
position «ON» s'il n'est pas complètement immergé dans
l'eau. La mise en marche du nettoyeur hors de l'eau,
provoquerait instantanément de sévères dommages et
entraîneraient l'annulation de la garantie.
Laissez le nettoyeur dans l'eau pendant 15 à 20 minutes à la
fin de chaque cycle de nettoyage. Ceci permettrait aux
moteurs de se refroidir adéquatement. Ne laissez pas le
nettoyeur en permanence dans la piscine. N'oubliez pas de
mettre l'interrupteur en position « off/arrêt » et de débrancher
le transformateur avant de sortir l'appareil de l'eau.
ATTENTION! Votre nettoyeur ne doit jamais être utilisé
lorsqu'il y a des personnes qui se baignent dans la
piscine.
Note De Sûreté
-L'unité doit être obligatoirement alimenté via un appareil
muni d'un disjoncteur différentiel courant (RCD), ayant une
cadence limitée à 30mA.
-La connexion à la prise de courant doit être compatible aux
règlements d'installation d'électricité locale et nationale (le
code de l'électricité).
-Une mauvaise utilisation de l'appareil, risque a entraîné la
fuite de lubrifiant.
-Si le câble d'alimentation est endommager, il est
indispensable de le remplacer par le service du fabricant ou
par une personne former et qualifié afin d'éviter quelconque
risque.
9
Instructions de fonctionnement des nettoyeurs de piscine
Le nouveau nettoyeur vous est livré avec :
- Un câble électrique flottant.
- Un transformateur. L'appareil fonctionne à basse tension.
- Chariot (optionnel).
Veuillez lire entièrement ce manuel avant la mise en marche:
Placer le transformateur au moins à 3 m (10 pieds) de la piscine
(fig.1).
Dérouler le câble (fig.1a).
1
Pour un fonctionnement normal, la poignée mobile dóit être bloquée en diagonale en haut de l'appareil. Pour celà, appuyer sur le
mécanisme de verrouillage et glisser la poignée jusqu'à ce qu'elle
s'encastre dans I'avant dernier cran . Deverouiller ensuite. Répéter ce
processus de l'autre côté de l'appareil. Ne pas oublier que la poignée
dóit être fixée en diagonale (fig. 2a, 2b).
Inverser la position diagonale de la poignée chaque fois que vous
mettez le robot dans l’eau afin d’éviter que la câble ne s’entortille.
1a
Placer l'appareil dans l'eau en le portant par la poignée. Balancer
l'appareil d'un côté à l'autre afin de permettre à l'air de s'en échapper ,
puis laisser l'appareil descendre au fond de la piscine. Déployer
ensuite le câble sur la surface de la piscine, d'une manière aussi
régulière que possible (fig. 3).
Brancher le câble sur le transformateur. Vérifier que la prise du câble
s'emboîte parfaitement dans la prise du transformateur (fig. 1b).
Brancher le transformateur .
Vérifier que la prise soit mise à la terre (fig. 1c). Le voyant lumineux
indique que le system est en MARCHE et que le nettoyeur de piscine
déclenche un cycle de nettoyage.
2b
3
2a
1b
ATTENTION: Votre installation électrique doît être équipée d'un disjoncteur automatique
(GFCI-USA) ou (RCD-Europe), pour prévenir tout danger de chocs électriques.
1c
10
Transformateur - mode d’emploi
A
C
embout
D
E
ON / OFF
embout
pousser et tourner a droite pour bloquer
B
clef
Prise de courant
prise
F
clef
Prise du
transformateur
tourne a gauche pour debloquer
Pour brancher le câble (Fig. A) à la prise du transformateur (Fig .B) veuillez suivre les étapes suivantes:
1. Préparez la fiche comme figuré sur la (Fig. C) avec la clef et les 3
embouts exactement comme indiqué.
2. Positionnez exactement la clef et la prise du câble à la
correspondante clef et prise du transformateur. (Fig .D)
3. Enfoncez la fiche dans la prise du transformateur jusqu’au bout.
4. Une fois que la fiche est entrée, faites une rotation à droite pour la
bloquer. (Fig .E)
5. Pour débrancher la fiche, d’abord débloquer la en tournant vers la
gauche et en suite tirer à l‘extérieur (Fig .F) .
6. Le bouton Rouge met la machine, en position OFF/arrêt - ON/marche.
IMPORTANT- Après chaque cycle, le nettoyeur de piscine, va se mettre automatiquement à l’arrêt. Dans le cas où vous voulez arrêter la
machine pendant son cycle; appuyez une fois sur le bouton Rouge et le voyant lumineux s’éteindra pour signaler que la machine c’est mis
en arrêt.
11
Entretien et réglage des nettoyeurs piscine
NETTOYER LE FILTRE APRÈS CHAQUE CYCLE DE NETTOYAGE
a. Débranchez le transformateur.
b. Si l’appareil est dans la piscine tirer-le par le câble vers vous avec beaucoup de soin, jusqu’à ce
que vous puissiez saisir la poignée. Utiliser seulement la poignée (surtout pas le câble) pour le
faire sortir de l’eau ensuite pauser l’appareil afin que la plus grosse quantité d’eau s’évacue de
l’appareil.
c. Renversez l’appareil sur une surface lisse (afin de ne pas endommager l’appareil), Déverrouillez
et enlevez le couvercle inférieur (fig.4a, 4b, 4c, 4d).
d. Retirez le filtre des barres de support, le tourner à l’envers et le laver au jet d’eau ou dans un
l’évier. Lavez et essorer délicatement le filtre jusqu’à ce que l’eau soit propre. Si nécessaire, laver
le filtre à la machine en utilisant uniquement l’eau froide et SANS AUCUN DETERGENT (fig. 5).
e. Réinstaller le filtre sur les barres de support avec l’étiquette placée au milieu de l’un des côtés
du support complet (fig. 5a).
f. Réinstallez le support complet dans l’appareil. Appuyez sur le support et l’assemblage se
remettra en place automatiquement.
lock tab
surface
lisse
surface
lisse
l’étiquette
12
CONSEILS IMPORTANTS:
Eteignez et débranchez le transformateur
avant de sortir I'appareil de I'eau.
Nettoyez le filtre après chaque cycle de
nettoyage.
Inversez la position de la poignée après
chaque cycle pour éviter I'enroulement du
câble.
Redressez périodiquement le câble flottant à
la surface de I'eau.
Remplacez les brosses usées, pour assurer
un nettoyage de qualité.
Vérifiez que I'appareil se pose correcte-ment
sur la paroi de la piscine. La poignée doît
rester parallèle à la ligne de surface de I'eau.
Conservez I'emballage de I'appareil pour le
ranger ou pour le renvoyer en cas
d'éventuelles réparations.
Il y a des brosses " super-adhérentes " pour
les piscines à parois lisses .
Laissez I'appareil dans I'eau pour 15 à 20
minutes après chaque cycle de nettoyage.
Ne laissez pas votre appareil au soleil quand
vous ne I'utilisez pas. Ne jamais laisser le
transformateur au soleil.
Rincez régulièrement l'appareil à I'eau claire
et propre. Ceci accroîtra la durée de vie des
courroies, des chenilles et des brosses.
Parfois, si le robot n’a pas été utilisé pendant
un certain temps, les brosses peuvent se
durcir. Une fois immergées dans l’eau ces
brosses en PVA retrouvent leur souplesse et
leur élasticité.
Nettoyez l'hélice une fois par mois (reportez
vous à la page suivante pour les détails)
6
tube de la roue
brosse
en PVA
moyeu
REMPLACER LES BROSSES
En fonction de Ia fréquence de l'utilisation de votre
nettoyeur, les brosses devront être remplacées à
cause de leur usure. Le nettoyeur dont les brosses
sont usées aura des difficultés à nettoyer et a monter
les parois, de meme que sa performance sera
diminuée.
a) enlever I'une des flasques, en devissant les vis (fig.
7a, 7b)
b) quand Ia flasque aura été détachée, enlever Ia
roue d'entraînement
c) ouvrir le moyeu terminal et tirer Ia brosse PVA
usée en dehors
d) placer Ia nouvelle brosse PVA sur Ie tube
héxagonale et la bloquer à l'aide du moyeu terminal.
e) remettre en état Ia roue d'entraînement et remonter
la flasque avec les quatre vis.
ENTRETIEN DES BROSSES :
La décoloration des brosses est normale à partir du moment où elles sont exposées à l'air
libre. Trempez les environ 20 minutes dans la piscine avant chaque saison ou pour une
première utilisation. Vous noterez que lorsque les brosses absorbent l'eau et commencent
leur travail, la décoloration disparaît.
REMPLACER LES COURROIES DE TRANSMISSION
Avec le passage du temps, les courroies de transmission qui se trouvent derriére la flasque
s'allongent. A ce moment-Ià, si vous voulez que le robot continue à travailler à son mieux,
ces courroies doivent être remplacées:
a) localiser à l'interieur les vis du côté du moteur d'entraînement, qui tiennnent en place Ia
flasque (fig. 7a, 7b).
b) devisser les vis et enlever la flasque
c) enlever Ia courroie d'entraînement (chenille). Avant de l'enlever, faire attention à Ia façon
dans laquelle les courroies de transmission sont placées (fig. 7c).
d) enlever les vieilles courroies de transmission et monter les nouvelles courroies.Pour
remonter, suivre les instructions ci-dessus à l'envers.
7a
cache turbine
hélice
Nettoyage de l'hélice de la pompe :
1)Dévissez les vis qui maintiennent le cache
turbine.
2)Nettoyez les éventuels cheveux ou autres
saletés.
7b
ATTENTION :
Afin d'éviter les éraflures sur la coque de votre robot, lorsque vous le renversez , veillez à
le poser sur une surface douce. En effet, celles-ci pourraient endommager le revêtement
de votre piscine à force de frottement.
7c
textile
doux
13
textile
doux
MANUEL DE DEPANNAGE
MERCI DE VERIFIER LES POINTS SUIVANTS AVANT DE FAIRE APPEL A VOTRE SAV
Avant tout le robot doit être déconnecté du transformateur qui doit aussi être débranché afin d' empêcher des dommages mécaniques et
corporels.
Pour les No. de référence, consultez le diagramme de liste des pièces situé sur la dernière page des instructions.
Problèmes
Eléments à contrôler
a) Vérifiez que la sortie électrique est correcte,
b) Vérifiez que le transformateur est bien branché à une prise de
terre et que la connexion transformateur/câble flotteur* soit
bonne,
c) Appuyez plusieurs fois sur le bouton « OFF et « ON » (19) du
transformateur et attendez environ 45 secondes entre les deux
étapes.
d) Enlevez les débris possibles tels que des feuilles, des cheveux
ou des fibres qui pourraient obstruer la bonne marche des
courroies d'entraînement ou des chenilles.
e) Contrôlez que les courroies d'entraînement (6) et les chenilles
soient bien alignées et tendues. Régler ou remplacer si
nécessaire.
1. Le robot ne pompe pas l'eau mais bouge :
a) Vérifiez que l'hélice (1) n'est pas obstruée par un amas de
cheveux ou autres. Enlevez chacune des vis du cache turbine et
nettoyez si nécessaire. Faites attention de ne pas trop serrer les
vis en refermant.
b) Vérifiez si le sac filtrant (12) est propre, le nettoyer au besoin.
c) Si les étapes précédentes sont correctes, alors vérifiez la
pompe moteur(2). Si ça ne fonctionne pas, envoyez le robot au
centre SAV.
2. Le robot ne pompe pas d'eau du tout, ou pompe
lentement mais bouge :
*le câble du transformateur ne peut être remplacé qu'avec l'aide d'outils spéciaux disponibles uniquement chez nos distributeurs, revendeurs et les centres SAV autorisés.
14
MANUEL DE DEPANNAGE
Problèmes
Eléments à contrôler
3. Le robot ne bouge pas mais la pompe aspire :
a) Renversez le robot et vérifiez qu'il n'y ait pas de corps
étranger qui obstrue : cheveux, débris, etc. sur les
courroies d'entraînement (6) ou les chenilles (7) ou bien le
câble flotteur enroulé. Nettoyez si nécessaire.
b) Contrôlez que les courroies d'entraînement soient bien en
place et vérifiez leur tension, les replacer si nécessaire.
c) Vérifiez le raccordement du moteur (3)
d) Si les étapes précédentes sont correctes, alors vérifiez la
pompe moteur(2). Si ça ne fonctionne pas, envoyez le
robot au centre SAV.
4. Le robot ne prend pas la saleté et les débris :
a) Vérifiez le 2a et le 2b sur le guide.
b) Contrôlez que les deux volets du porte-filtre (17) sous le
robot bougent librement. Ils doivent s'ouvrir et se fermer
sans entrave. Les décoincer au besoin.
a) Il faut probablement procéder à un nettoyage du sac
filtrant.
b) Vérifiez que le câble flotteur est correctement déroulé.
c) Vérifiez qu'aucun obstacle n'entrave la progression du
robot dans la piscine et n'arrêtez pas le robot avant la fin
de son cycle.
d) Assurez vous que la poignée supérieure du robot soit
correctement positionnée en diagonale.
e) Vérifiez que le moteur pompe fonctionne (2), dans le cas
contraire, référez vous au paragraphe 4.
f) Si après avoir suivi ces instructions, le problème persiste,
veuillez contacter votre revendeur.
5. Le robot ne semble pas couvrir toute la piscine :
15
MANUEL DE DEPANNAGE
Problèmes
Eléments à contrôler
7. Les saletés s’échappent du robot lorsque
vous le sortez de la piscine (le couvercle
inférieur ne se ferme pas correctement)
a) Vérifiez que les clips de fixation sont bien enclencher au
support filtre.
b) Contrôlez que les deux volets du porte-filtre (17) sous le
robot bougent librement. Ils doivent s’ouvrir et se fermer
facilement. Les décoincer au besoin.
8. Le câble flotteur est vrillé :
a) Inversez la diagonale de la poignée.
b) Utilisez le pivot E-Z comme démontré ci-dessous.
Entretien du câble
Le câble peut s'entortiller apres un certain temps d'utilisation. Afin de le
délacer, simplement bloquez Ia poignée mobile du nettoyeur dans Ia
direction diagonale opposée. Le nettoyeur avancera maintenant dans Ia
direction opposée tout en nettoyant votre piscine et le câble sera déroulé. Il
est bien de contrôller le câble de temps en temps, afin de dépister des
dommages extérieures.
Si le câble ne se délace pas, utilisez le E-Z pivot.
Tenez d’une main le E-Z pivot.
Mettez le robot sur le sol et débranchez le
câble du transformateur. En tenant à la main
le E-Z pivot, éloignez-vous du robot tout en
tirant le câble jusqu’à ce qu’il soit complètement
déroulé.
La pièce centrale se fera tourner à
l’intérieur du couvercle et ainsi le
câble sera démêlé.
patent pending
16
14
15
18
1
19
2
20
3
21
4
5
8
9
10
Parts List
11
6
7
16
12
13
17
1. Outlet Top and propeller
2. Pump Motor
3. Drive Motor
4. Handle Locking Bracket
5. Pulley Assembly
6. Drive Belt
7. Drive Track
8. Body Assembly
9. Filter Screen
10. Side Plate
11. PVA Brushes
12. Filter Bag
13. Bottom Lid Assembly
14. Handle Assembly
15. Cable Assembly
16. Wheel Tube Assembly
17. Intake Valve Flaps.
18. Lock Tabs
19. ON/OFF button
20. Socket
21. Transformer