1
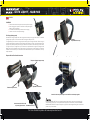
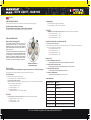
13.89
1
3.89
.89
18.5
- DIVE LIGHT - SUB M3
0.39
67
67
ENGLISH
DIVE LIGHT SPECIFICATION
To change mode
The Sub M3 design is depth rated to 200m
This light has been pressure tested to 100m/10 Bar for 30 minutes
There are 2 modes: 1 = Low mode (18 hours) 2 = High mode (2 hours)
To turn OFF
An instructional video can be found at www.use1.com/exposure-marine/diving-lights
DIVE LIGHT INSTRUCTIONS
Motion Control Technology (MCT)
This patented technology allows the light to be
controlled without the use of a mechanical switch,
eliminating the risk of water ingress and mechanical
failure. When attached to the wrist mount it allows for
hands free control.
Clockwise and Anti-clockwise circular motions are used
to change mode. A circular motion of diameter less than
5cm and roughly 2 per second will adjust mode most
effectively. It is advised to familiarise yourself with the
motion through entering and exiting travel lock mode
as it allows you to see when a rotation is recognised.
• From ON 1 point the light towards the ground and continuously rotate anti-clockwise
• Anti-clockwise rotation 1 = OFF 1
• Anti-clockwise rotation 2 = OFF 2
• Anti-clockwise rotation 3 = OFF
To enter Travel Lock (LOC) - the light must be OFF
• Point the light towards the ground
• Make 3 anti-clockwise continuous circular motions with your arm. The indicator LOC will appear as
each of the 3 rotations are recognised
• Anti-clockwise rotation 0 = OFF
• Anti-clockwise rotation 1 = L
• Anti-clockwise rotation 2 = LO
• Anti-clockwise rotation 3 = LOC
Flash or S.O.S
Rotate in a clockwise or
anti-clockwise motion
Travel Lock (LOC)
Travel Lock will be entered automatically if the light is not turned on for 1 hour and after charging
Travel lock prevents the light from being turned on accidentally during travel.
To exit Travel Lock
• It is advised to exit travel lock before Diving
• Tap or shake the light - the display will show LOC
• Point the light towards the ground
• Make 3 clockwise continuous circular motions with your arm. The indicator LOC will disappear as
each of the rotations are recognised;
• Clockwise Rotation 0 = LOC
• Clockwise Rotation 1 = LO
• Clockwise Rotation 2 = L
• Clockwise Rotation 3 = OFF = (Standby Mode)
To turn ON
• To increase power to ON 2 rotate clockwise
• To decrease power to ON 1 rotate anti-clockwise
• Point the light in any direction other than down and continuously rotate clockwise
• Clockwise rotation 0 = OFF / CH%%
• Clockwise rotation 1 = OFF 1
• Clockwise rotation 2 = ON 1
• To turn on Flash from ON 1 or ON 2
• Point the light upwards and tap sharply until FLASH mode is activated
• To turn on S.O.S from ON 1 or ON 2
• Point the light downwards, and tap sharply until SOS mode is activated
• To turn either Flash or S.O.S off
• Point the light downwards and rotate anti-clockwise
• To return to constant mode
• Point the torch in any direction and rotate clockwise
REAR INDICATION
4 digit display (xxxx)
Indicates
LOC
Travel Lock
OFF
Standby Mode
CHXX
The battery percentage remaining
CHXX (flashing)
The battery percentage whilst charging
ON 1
Low mode
ON 2
High Mode
Only numbers e.g. 12 04
Estimated remaining battery life in hours and minutes
For more information please visit www.exposuremarine.com
0.39
13.89
1
3.89
.89
13.89
1
3.89
.89
18.5
18.5
- DIVE LIGHT - SUB M3
0.39
67
67
67
67
ENGLISH
CHARGING
• Please ensure both terminals are clean and dry before charging
• When charging the symbol ‘CH’ will flash and the percentage of
battery charge is indicated
• Travel lock will automatically be entered when charging
• It takes 12 hours for a complete recharge
Fuel Gauge (battery power)
All batteries will charge rapidly from a low charge state and slowly as they get closer to full. The first 35%
of charge may only take 1 hour but the last 10% of charge can take up to 2 hrs.
The digital display on the rear of the light will provide two types of charge information. When the light is
charging it will provide an indication of the percentage (%) of power in the cells, this % will also show when
the light is OFF (standby mode). When the light is turned on it will show the time remaining on either mode.
The light can be put on charge from any fuel level and it is preferable for the light to be charged to full
(99%), then the fuel information is at its most accurate. If the light is given a partial charge, for example up
to 65% or 75% the accuracy of the information will be reduced. Do not rely on this information; it is only a
helpful indication.
Exposure Marine Dive Handle Instructions
Adjustable Velcro strap
Insert the bolt through the front hole securing your light at your desired angle
Neoprene adjustable support strap
Reinforced Nylon mount
Adjustable wrist mount
Secure the wrist strap around your arm via the Velcro wrist strap supplied
Stainless steel bolt will be held
in place by Nylon washer
EXPOSURE MARINE LIGHTS are a very powerful lighting system. Always use care when operating. Do
not look directly into the light. This may cause serious injury. Do not shine directly at others. EXPOSURE
MARINE LIGHTS/USE Ltd. accepts no liability for any injuries or other damages arising from the use of this
product in any circumstances.
For more information please visit www.exposuremarine.com
0.39
13.89
1
3.89
.89
18.5
67
67
GUIDE DE
DEMARRAGE SUB M3
FRANÇAIS
Caractéristiques de la lampe de plongée
Une vidéo d’instruction peut être trouvé à www.use1.com/exposure-marine/diving-lights
Le Sous M3 a une profondeur nominale de 200m
Cette lampe a été testée sous pression à 10 bar pendant 30 minutes = 100m/328ft
Il y a 2 modes : 1 = mode faible intensité (18 heures) 2 = mode forte intensité (2 heures)
INSTRUCTIONS POUR UTILISATION DE LA LAMPE DE PLONGÉE
Motion Control Technology (MCT)
Cette technologie brevetée permet à la lampe d’être
contrôlée sans l’utilisation d’un interrupteur mécanique, ce
qui élimine le risque d’infiltration d’eau et d’une
défaillance mécanique. Lorsqu’il est fixé au poignet
ce système permet un contrôle d’accès mains
libres. Des mouvements circulaires dans le sens
horaire et antihoraire sont utilisés pour changer
de mode. Un mouvement circulaire d’un diamètre
inférieur à 5 cm activé 2 fois par seconde permet
d’ajuste le mode plus efficacement. Il est conseillé
de vous familiariser avec le mouvement de
l’activation et de la désactivation du mode de
travel lock car il vous permet de voir quand
une rotation est reconnue.
Tourner dans le dans le sens horaire ou
sens antihoraire mouvement
Travel Lock (LOC)
Le Travel Lock s’active automatiquement si la lampe n’est pas allumée pendant 1 heure et après le
chargement. LOC permet d’éviter l’activation accidentelle de la lampe durant tout voyage.
Quitter le mode LOC vers le mode Eteindre
• Il est recommandé de quitter le mode LOC avant de plonger.
• Tapotez ou secouez la lampe – le menu affichera le mode LOC
• Pointez la lampe vers le sol
• Faire 3 mouvements circulaires continus dans le sens horaire avec votre bras. L’indicateur LOC
Disparaîtra car chacune des rotations est reconnue;
• Rotation dans le sens horaire 0 = LOC
• Rotation dans le sens horaire 1 = LO
• Rotation dans le sens horaire 2 = L
• Rotation dans le sens horaire 3 = OFF = (Standby Mode)
Pour allumer la lampe
• Dirigez la lampe dans une direction autre que vers le bas et tourner dans le sens horaire
• Rotation dans le sens horaire 0 = OFF / CH%%
• Rotation dans le sens horaire 1 = OFF 1
• Rotation dans le sens horaire 2 = ON 1
Pour changer de mode
• Pour augmenter la puissance de ON Tournez 2 fois dans le sens horaire
• Pour diminuer la puissance de ON Tournez 1 fois dans le sens antihoraire
Pour éteindre la lampe
• A partir du mode ON 1 dirigez la lampe vers le sol et tournez dans le sens antihoraire
• Rotation dans le sens antihoraire 1 = OFF 1
• Rotation dans le sens antihoraire 2 = OFF 2
• Rotation dans le sens antihoraire 3 = OFF
Pour activer LOC - la lampe doit être éteinte
• Dirigez la lampe vers le sol
• Faire 3 mouvements circulaires continus dans le sens antihoraire avec votre bras. L’indicateur LOC
apparaîtra car chacune des rotations est reconnue;
• Rotation dans le sens antihoraire 0 = OFF
• Rotation dans le sens antihoraire 1 = L
• Rotation dans le sens antihoraire 2 = LO
• Rotation dans le sens antihoraire 3 = LOC
Flash ou signal S.O.S
• Pour activer le mode flash à partir de ON 1 ou ON 2
• Dirigez la lampe vers le haut et tapotez fortement jusqu’à ce que le mode flash se déclenche
• Pour activer le mode S.O.S à partir de ON1 ou ON2
• Dirigez la lampe vers le bas et tapotez fortement jusqu’à ce que le mode flash se déclenche
• Pour éteindre le mode flash ou le mode S.O.S
• Dirigez la lampe vers le bas et effectuez une rotation dans le sens antihoraire
• Pour revenir au mode constant
• Dirigez la lampe vers n’importe quelle direction et effectuez une rotation dans le sens horaire
PRECISIONS
4 affichages numérique (xxxx)
Indiqués
LOC
Verrouillage Voyage
OFF
Mode Veille
CHXX
Pourcentage de la batterie restante
CHXX (clignotant)
Pourcentage de la batterie durant le chargement
ON 1
Mode faible intensité
ON 2
Mode forte intensité
Numéros seuls par exemple 12 04 Estimation de la durée de vie restante de la batterie en heures et minutes
Pour plus d’informations s’il vous plaît visitez www.exposuremarine.com
GUIDE DE
DEMARRAGE SUB M3
0.39
18.5
13.89
1
3.89
.89
67
67
FRANÇAIS
CHARGEMENT
• Merci de vous assurer que les deux terminaux sont bien secs
avant de procéder au chargement
• Les aimants sont utilisés à la fois dans le connecteur de charge et
dans la ampe afin d’assurer une bonne connexion
• Durant le chargement, le symbole «CH» clignote et le pourcentage de
charge de la batterie est indiqué
• Le LOC est activé automatiquement durant le chargement
• Il faut compter 16 heures pour une recharge complet
Niveau de Puissance de la Batterie
Toutes les batteries chargeront rapidement d’un faible niveau de charge et de plus en plus lentement en se
rapprochant d’un niveau de charge complet. Les premiers 35% de la charge peuvent prendre seulement
1 heure mais les deniers 10% peuvent prendre jusqu’à 2 heures.
L’affichage numérique sur l’arrière de la lampe va fournir deux types d’informations de charge. Lorsque la
lumière est en charge il fournira une indication du pourcentage (%) de la puissance dans les cellules, ce
% sera également visible lorsque le témoin est éteint (mode veille).
Lorsque le voyant est allumé, il indique le temps restant sur l’un ou l’autre mode. La lumière peut être mise
en charge à partir de tout niveau de charge restant, mais il est préférable que la lumière soit chargée à 99%
pour que l’information sur le niveau de charge soit le plus efficace. Si la lumière est donnée une charge
partielle, par exemple à 65% ou 75%, la précision de l’information sera réduite. Ne pas se fier à cette
information, c’est seulement une indication utile.
Exposure Marine Dive Poignée - mode d’emploi
Velcro réglable
Insérez le boulon dans le trou de fixation avant votre lumière à l’angle désiré
Courroie Néoprène de support réglable
Montage poignet ajustable
Support en Nylon renforcée
Fixez la dragonne autour de votre bras par l’intermédiaire du bracelet velcro fourni
Ecrou en Acier inoxydable sera
fixée par la rondelle en Nylon
ATTENTION!
Les lampes EXPOSURE MARINE sont très puissantes. Utilisez-les avec prudence. Ne regardez pas
directement le faisceau de la lampe ou ne dirigez pas le faisceau vers les yeux d’une personne située
à proximité. Cela peut la blesser. EXPOSURE MARINE LIGHTS/USE Ltd et son distributeur ne sont
responsables en aucun cas pour tout dommage ou blessure relatifs à l’utilisation d’une lampe.
Pour plus d’informations s’il vous plaît visitez www.exposuremarine.com