1
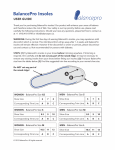
MODE D’EMPLOI / FRANÇAIS
Nous vous félicitons pour l‘achat d’une paire de
semelles ThermicSoles TrimFit.
PRODUIT
1 paire d’éléments de chauffe avec cordon
d’alimentation
1 paire de revêtement Cambrelle® autocollants et
attache
IMPORTANT: Les semelles ThermicSoles TrimFit ne
peuvent être utilisées avec des Therm-ic blocs battterie.
Votre revendeur vous conseillera volontiers.
FONCTIONNEMENT
Par l‘installation des éléments de chauffe de Therm-ic,
une semelle peut être rendue chauffant pour la saison
froide. Pour une chaleur agréable choisissez unes de
Therm-ic Powerpacks.
ThermicSole
TrimFit
CONSEILS DE SÈCURITÈ
•
•
•
Le cordon de l’élément chauffant a été spécialement mis au point pour de fortes sollicitations et
est donc très résistant. Fixez le cordon de manière
à ce qu’il reste collé à la chaussure ou au corps
afin qu’il ne puisse pas s’accrocher à d’autres
objets (par ex. au télésiège).
Évitez toute usure inutile et excessive du cordon
d’alimentation (en tirant dessus, en le tendant trop
lorsque vous placez la semelle), car vous risquez
d’arracher le cordon de l’élément chauffant et donc
de couper l’arrivée d’énergie.
Évitez de solliciter le cordon d’alimentation en le
manipulant mal (en le pliant trop, en le mettant en
contact avec des objets coupants, etc.). Risque de
courts-circuits lorsque le cordon d’alimentation est
endommagé!
INSTALLATION DE L’ÈLÈMENT CHAUFFANT
•
•
•
•
•
Déterminez tout d’abord l’endroit où vous désirez
placer l’élément chauffant (les 3 Microchips à
l‘élément de chauffe montrent vers le bas) dans la
zone des orteils de la semelle. Si vous le désirez,
faites un logement pour les puces en réalisant trois
petits renfoncements légers de 4 mm de diamètre.
Faites ensuite une fente ou une mince ouverture
rectangulaire dans la semelle avec un couteau bien
coupant ou un outil approprié pour faire passer le
cordon d’alimentation. (figure 1) Plus le matériau
de la semelle est dur, plus l’ouverture prévue
pour faire passer la prise doit être grande. Si vous
assouplissez d’abord le matériau de la semelle au
sèche-cheveux, une mince ouverture suffit.
Introduisez le cordon d‘alimentation dans
l’ouverture jusqu’à ce que l’élément chauffant soit
bien à plat à sa place. (figure 2) Pour qu’il tienne
bien, étalez une colle adéquate entre la semelle sur
mesure et l’élément chauffant.
Appliquez avec soin la doublure Cambrelle® autocollante sur la semelle conformément à la forme du
pied (figure 3) et enlevez le matériau superflu avec
un couteau bien coupant ou des ciseaux. (figure 4)
Si vous le désirez, vous pouvez également étaler
entre la semelle et la doublure Cambrelle® une
colle qui reste souple et résiste à la chaleur.
Pour finir, collez le cordon d’alimentation sous la
semelle avec l’attache Cambrelle® pour bien le
fixer.
UTILISATION
•
•
•
Placez la semelle dans la chaussure. (figure 5)
Le mieux est de faire remonter le cordon
d’alimentation au niveau du talon, le long du
mollet. IMPORTANT: Il est recommandé, pour
les chaussures comportant des chaussons, de
réaliser une fente au niveau du talon de la semelle
intérieure, de faire passer le cordon dans la fente
afin qu’il ressorte à l’extérieur le long du chaussons
(entre le chausson et la coque en PVC).
Raccordez le cordon d’alimentation aux Therm-ic
blocs batterie. (figure 6)
MISE AU REBUT
Lorsque les semelles sont arrivé en fin de cycle de vie,
mettez-le au rebut avec son emballage dans le respect
des règles de protection de l‘environnement.
Ne jetez pas les semelles dans les ordures ménagères
mais déposez-les dans un point de collecte des déchets.
Les matériaux d‘emballage sont des matières premières
recyclables. Confiez-les à un centre de recyclage.
Les piles doivent être déposées dans un point de collecte. Pour plus de précisions, consultez votre administration locale.
THERM-IC International - STC Distribution GmbH
Triester Strasse 179 | 8073 Feldkirchen bei Graz
Austria | Europe | Tel: +43 316 243793 0
Fax: +43 316 243793 10 | [email protected]
www.therm-ic.com
www.therm-ic.com
1
2
GEBRAUCHSANWEISUNG / DEUTSCH
INSTRUCTIONS FOR USE / ENGLISH
Wir gratulieren Ihnen zum Kauf der
ThermicSole TrimFit.
Congratulations for having bought a pair of
ThermicSole TrimFit.
PACKUNGSINHALT
CONTENT
1 Paar Therm-ic Heizelemente mit Anschlusskabel
1 Paar selbstklebende Cambrelle® Stoffüberzüge und
Streifen
Hinweis:
Die ThermicSole TrimFit kann ausschließlich mit Thermic Akkupacks verwendet werden. Ihr Fachhändler berät
Sie gerne.
1 pair of heating elements with power lead
1 pair of self-adhesive Cambrelle® covers and stripes
IMPORTANT:
The ThermicSole TrimFit can only be used together with
Therm-ic battery packs.
Your dealer will be happy to advise you.
FUNKTION
Durch den Einbau der Therm-ic Heizelemente kann eine
Einlegesohle für die kalte Jahreszeit beheizbar gemacht
werden. Für lang anhaltende Wärme benötigen Sie dann
nur mehr eines der Therm-ic Powerpacks.
SICHERHEITSHINWEISE
•
•
3
•
Das Kabel des Heizelementes wurde speziell für
hohe Beanspruchungen entwickelt und ist somit
sehr reißfest. Fixieren Sie das Kabel eng anliegend
am Schuh bzw. Körper, damit es sich nicht mit
anderen Gegenständen verhängen kann (z.B.
Sessellift).
Jede unnötige oder übermäßige Abnützung des
Anschlusskabels (anreißen, starke Anspannung
beim Einlegen) vermeiden, da sonst die Gefahr des
Ausreißens des Kabels am Heizelement und damit
die Unterbrechung der Energiezufuhr besteht.
Unsachgemäße Beanspruchungen des Anschlusskabels (starkes Knicken, berühren mit
scharfkantigen Gegenständen, etc.) vermeiden.
Bei Beschädigung des Anschlusskabels besteht
Kurzschlussgefahr!
HOW IT WORKS
By integrating Therm-ic heating elements, insoles can be
made heatable for the winter season.
For longtime warmth just add one of the Therm-ic
Powerpacks.
SAFETY INSTRUCTIONS
•
•
•
INSTALLATION OF THE THERM-IC
HEATING ELEMENTS
•
EINBAU DER THERM-IC HEIZELEMENTE
•
•
4
•
•
5
•
Zuerst die gewünschte Position des Therm-ic
Heizelements (die drei Microchips am Heizelement
zeigen nach unten) im Zehenbereich der Spezialeinlegesohle bestimmen und markieren. Falls gewünscht, drei kleine, seichte Bohrungen mit 4 mm
Durchmesser durchführen, um so Aussparungen
für die Microchips zu schaffen.
Mit einem scharfen Messer oder einem geeigneten
Schneidewerkzeug einen Schlitz oder eine schmale
rechteckige Öffnung als Durchgang für das An schlusskabel in die Einlegesohle schneiden. (Bild
1) Je härter das Material der Einlegesohle, umso
größer muss die Öffnung für den Stecker sein.
Nach vorheriger Erweichung des Einlagenmaterials
mit Hilfe eines Föns, genügt eine schmale Öffnung.
Das Anschlusskabel durch die Öffnung hindurch führen bis das Heizelement flach in der richtigen
Lage aufliegt. (Bild 2) Für einen guten Halt einen
geeigneten Klebstoff zwischen der Einlegesohle
und dem Heizelement auftragen.
Den selbstklebenden Cambrelle®-Überzug sorgfäl tig auf die Einlegesohle aufdrücken (Bild 3) und mit
einer Schere entsprechend zuschneiden. (Bild 4)
Falls erwünscht, kann zusätzlich noch ein tempe raturbeständiger dauerflexibler Klebstoff zwischen
der Einlegesohle und dem Cambrelle®-Überzug
aufgetragen werden.
Zum Schluss das Anschlusskabel auf der Untersei te der Einlegesohle mit dem Cambrelle®-Streifen
fixieren.
•
•
•
•
•
6
•
Die beheizbare Einlegesohle in den Schuh legen.
(Bild 5)
Das Anschlusskabel liegt flach an der Unterseite
der Sohle auf und wird über die Ferse entlang der
Wade hochgeführt. HINWEIS: Bei Schuhen mit
Innenschuhen empfiehlt es sich, einen Schlitz im
Fersenbereich des Innenschuhs anzubringen, das
Kabel durch den Schlitz durchzuführen und außen
am Innenschuh entlang (zwischen Innenschuh und
Kunststoffschale) hochzuführen.
Um die Einlegesohle zu beheizen, das Anschlusskabel an eines der Therm-ic Akkupacks anschlie ßen. (Bild 6)
ENTSORGUNG
Wenn die ThermicSole Trim Fit einmal ausgedient hat,
dann entsorgen Sie sie samt Verpackung im Interesse
des Umweltschutzes ordnungsgemäß.
Werfen Sie die ThermicSole Trim Fit nicht in den Hausmüll, sondern geben Sie die Teile an einer Sammelstelle
ab. Verpackungsmaterialien sind Rohstoffe und können
wieder verwendet werden. Führen Sie diese deshalb
dem Recycling zu. Nähere Auskunft erteilt Ihnen Ihre
zuständige örtliche Verwaltung.
First of all find the required position for the heating
element (the three microchips point downwards)
in the toe region of the insoles and mark it. If re quired, make three small, shallow holes of diameter
4 mm (about 1/6 inch), to create a recess for the
microchips.
Then using a sharp knife or suitable cutting tool,
cut a slit or a narrow rectangular opening into the
insoles for the power lead to pass through. (figure
1) The harder the foot cushion material, the larger
the opening must be for the connector. A smaller
hole will suffice if the inlay material is softened first
with a hair-dryer.
Feed the power lead through the opening until the
heating element lies flat in the correct position.
(figure 2) To achieve a secure hold, apply a suitable
adhesive between the insole and the heating
element.
Press the self-adhesive, foot-shaped Cambrelle®
cover carefully down onto the foot cushion (figure
3), and remove any overhanging material with a
sharp knife or scissors. (figure 4) If required, a
heat-proof, permanently flexible adhesive can
also be applied between the foot cushion and the
Cambrelle® cover.
Finally, use the Cambrelle® stripes to stick the
power cable firmly underneath the insoles.
HOW TO USE
•
•
ANWENDUNG
•
The heating element lead has been specially developed for demanding conditions and is thus very
strong. Fix the lead closely to the boot or body,
so that it cannot get caught on other objects (e.g.
chair lift).
Avoid any unnecessary or excessive wear of the
power lead (yanking, straining on insertion), otherwise the lead might get ripped out of the heating
element, breaking the supply of power to it.
Avoid improper use of the power lead (sharp
bending, contact with sharp-edged objects etc.).
If the power lead is damaged there is the risk of
short circuit.
•
Place the heatable insoles in the boot. (figure 5)
It is best to take the power lead behind the heel
and up the calf. IMPORTANT: For shoes with a
liner, we recommend making a cut in the heel area
of the inner boot, feeding the lead through the cut
and taking it upwards along the outside of the liner
(between liner and plastic surround).
Connect the power lead to one of the Therm-ic
battery packs. (figure 6)
DISPOSAL
If the ThermicSoles can no longer be used, please dis pose of it and its packaging in an environmentally-friendly
way that is in accordance with current regulations.
Do not throw the ThermicSoles away with normal household trash. Instead, dispose of the parts at a collection
site for waste.
Packaging materials are raw materials and can be recycled. For this reason, please recycle the packaging.
Please contact your local public authorities for more
information.