1
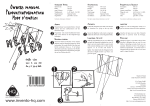
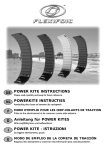
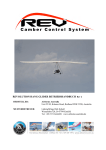
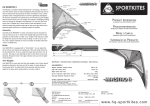
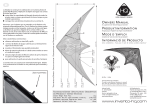
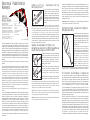
Owners manual · Produktinformation
Mode d' emploi
Specifikation
Technische Daten
Description du Prodouct
Wingspan/Spannweite/Envergure:
Height/Standhöhe/Taille:
Weight/Gewicht/Poids:
Rec. line/empf. Schnur/Lignes conseillées:
Wind range/Windbereich/Plage de vent:
Sail fabric/Segelmaterial/Voilure:
Leading Edge/Leitkante/Bord d'attaque:
Top spreader/obere Spreize/Traverse avant:
Bot. spreader/unt. Spreize/Traverse arrière:
keel/Kielstab/Barre de quiell:
The right to make technical alterations is reserved!
Technische Änderungen vorbehalten!
Tous droits de modifications techniques réservés
224 cm
123 cm
300 g
20-40 m, 30-100 kp
2-5 Bft.
TM
VENTEX
G-Force Super Duper Skinny
6mm Avia carbon
G-Force UL
6mm Avia carbon
Design: Christoph Fokken
The new Tramontana 2001 is the logical follow-up to HQ’s classic. You have
acquired a top-class kite that leaves nothing to be desired. The successful
competitive pilot André Babik played a substantial role in the development of
the 2001. The kite owes much of its balanced flight behavior, tracking, precision,
moderate speed and last but not least unlimited tricks to his experience. These
make this kite a competition kite for single pilots as well as for pairs and teams.
But even the ambitious hobby flyer will enjoy this kite. It flies over a wide
wind range and thus can be used many different ways. The Tramontana 2001
loves when you play with it and forgives many steering errors and rough
landings.
You can find more information on this product on our support site on the
Internet!
Der neue Tramontana 2001 ist die konsequente Weiterentwicklung des Klassikers
aus dem Hause HQ. Mit ihm haben sie ein Sportgerät der Extraklasse erworben,
das keine Wünsche offen läßt. Der erfolgreiche Wettbewerbspilot André Babik
war massgeblich an der Entwicklung des 2001 beteidigt. Seiner Erfahrung
verdankt der Drachen sein ausgewogenes Flugverhalten, seine Spurtreue,
seine Präzision, seine moderate Geschwindigkeit und nicht zuletzt seine
uneingeschränkte Trickfähigkeit. Das macht den Drachen zu einem Wettkampfdrachen für den Einzelpiloten ebenso wie für Pairs und Teams. Aber auch der
ambitionierte Freizeitflieger wird an diesem Drachen seine Freude haben,
fliegt er doch über einen weiten Windbereich und ist damit vielseitig einsetzbar.
Der Tramontana 2001 liebt es, wenn man mit ihm spielt, er verzeiht so manchen
Lenkfehler und unsanfte Landungen.
Weitere Daten zu diesem Produkt finden Sie auf unseren Supportseiten im
Internet!
Le nouveau Tramontana 2001 représente une évolution conséquente du classique
de la maison HQ. En achetant ce cerf-volant, vous avez choisi un modèle hors
normes qui répondra à toutes vos attentes. André Babik, le champion de
réputation mondiale, a activement participé à la conception du 2001, l'excellent
comportement en vol du cerf-volant, sa stabilité, sa précision, sa vitesse
modérée, sans oublier sa capacité illimitée à exécuter des figures sont dus à
son expérience de la compétition. Toutes ces qualités font du Tramontana un
cerf-volant de compétition idéal, tant pour le vol en individuel qu'en paire ou
en team. Les amateurs avertis apprécieront énormément sa grande fenêtre de
vol et son caractère polyvalent. Le Tramontana 2001 adore que l'on joue avec
lui et pardonne les erreurs de pilotage et les atterrissages rudes.
Vous trouverez de plus amples informations concernant cet article sur notre
site Internet !
Assembly and flying · Zusammenbau und Flug
Montage et premier vol
If your kite is folded, i.e. the rod in the leading
edge is in two pieces, assemble it like this:
Unfold the kite so that the leading edge is
straight. Now carefully insert the bottom rod
in the leading edge into the bushing of the top
leading edge rod. Figure A shows this using
an outer bushing, figure B shows this an inner
bushing.
Ist Ihr Drachen gefaltet, d.h. der Stab in der
Leitkante ist geteilt, verfahren Sie wie folgt: Falten Sie den Drachen auseinander.
Die Leitkante liegt nun gerade. Schieben Sie den unteren Stab in der Leitkante
vorsichtig in die Muffe des oberen Leitkantenstabes. Die Abb. A zeigt die Verwendung
einer Außenmuffe, die Abb. B zeigt das Schema einer Innenmuffe.
Si votre cerf-volant est plié, cela signifie que la barre du bord d'attaque est en deux
parties, procédez comme suit: dépliez le cerf-volant. Le bord d'attaque est désormais
droit. Placez prudemment la barre inférieure dans le manchon de la barre supérieure
du bord d'attaque. Le croquis A montre l'utilisation d'un raccord externe, le croquis
B indique le schéma d'un raccord interne.
Spreading the leading edge with the HQ split cap
Das Spannen der Leitkante mit der HQ-Splittkappe Mise sous
tension du bord d'attaque avec l'embout fendu HQ
The HQ split cap makes it easier to spread the leading
edge using a tensioning cord. After assembly, the
knots and cord ends are tucked away inside recesses
specially provided for this purpose, so that you
achieve a clean finish. There's also a neat way of
attaching a trick cord here.
Step 1: Pull the short tensioning cord through the
hole in the cap so that knot 1 disappears inside the
recess. Now put the other end through the knot on
the leading edge, as shown in the drawing.
Step 2: Stretch the leading edge with the tensioning
cord so that knot 2 locks into the bottom of the slot.
Die HQ-Splittkappe erleichtert das Spannen der Leitkante mittels Spannschnur.
Knoten und überstehende Schnurenden verschwinden nach der Montage in speziell
angebrachten Vertiefungen, so daß ein sauberes Finish entsteht. Auch das
Anbringen einer Trickschnur findet eine saubere Lösung.
Schritt 1: Ziehen Sie die kurze Spannschnur so durch das Loch in der Kappe,
daß der Knoten 1 in der Vertiefung verschwindet. Das andere Ende fädeln Sie
wie gezeigt, durch die Schlaufe an der Leitkante.
Schritt 2: Spannen Sie die Leitkante so mit der Spannschnur, daß sich der Knoten
2 in der Vertiefung des Schlitzes festsetzen kann.
L'embout fendu HQ facilite la mise sous tension du bord d'attaque avec le fil
de jonglage. Les nœuds et les bouts de ligne disparaissent après l'assemblage
dans les creux prévus à cet effet, ce qui améliore considérablement la finition
du travail. Il en est de même pour la fixation du fil de jonglage.
1ère étape: Faites ensuite passer la ligne de jonglage courte dans l'embout à
travers le trou de manière à ce que le nœud 1 disparaisse dans le creux. Passez
l'autre extrémité de la ligne à travers la boucle du bord d'attaque comme
l'indique l'illustration.
2ème étape: tendez le bord d'attaque avec la ligne de jonglage de manière à
ce que le nœud 2 se fixe dans le creux de la fente.
Extending the wingtips · Aufspannen der Flügelspitze
Montage des bouts d'ailes
Simply bend the spars on the wingtips into
the small pockets on the winglets. (See
illustration) When the kite is not in use, the
one end of the thin spar stays in the opening
on the wing pocket (leading edge). This
makes it practically impossible to lose the
thin little rod!
Die Segellatten an an den Flügelspitzen
werden einfach in die kleinen Taschen
an den Winglets gebogen. (Abbildung) Wenn
der Drachen nicht gebraucht wird, verbleibt
das eine Ende der dünnen Segellatten in
der Öffnung an der Flügeltasche
(Leitkante). So können Sie die dünnen
Stäbchen praktisch nicht verlieren!
Enfoncez les whiskers des bouts d'ailes
dans les fourreaux en dacron (voir
illustration). Lorsque vous n'utilisez pas le
cerf-volant, l'une des extrémités du whiskers reste dans le fourreau du bord
d'attaque. Ainsi, il est pratiquement impossible de perdre le whiskers !
The turbo bridle · Die Turbo-Waage · Le bridage turbo
The turbo bridle is a dynamic bridle system that permits additional settings
beyond those possible with a standard bridle. It allows you to modify the setting
angle of the kite in a loop and - within certain limits - adapt to different wind
speeds. The kite has a flatter setting angle when you fly it straight than when
you fly curving flight paths. This makes it possible to fly loops very tightly,
which is important especially at the edge of the wind window.
As with a standard bridle, you can adjust the setting angle of the kite to trim
it to various wind conditions. To do this loosen the knot A on the outer,
uninterrupted bridle line and in light winds slide it towards the nose. (This
makes the setting angle flatter). In strong winds slide it towards the wing tip
(making the setting angle steeper).
If the kite "overpowers" in strong wind, i.e. if it flies with a jerky motion and
the wing tips flap, you can reduce the pressure on the kite by shortening the
upper bridle leg again - in other words, slide the knot A towards the nose. But
remember to note the wind range specified for the kite! Adjusting the connection
loops (knot B) mainly changes the turning behaviour of the kite. If you move
them outwards you achieve larger and slower spins, while if you move them
inwards the spins become smaller and faster. If your kite does not stop turning
soon enough, you can counteract this by shifting the connection point (knot
B) outwards or by shifting the knot A towards the kite nose.
The additional, middle bridle line adds extra stabilization to the leading edge.
Be sure that this line sags slightly. When adjusting the bridle, this line may
have to be lengthened or shortened. Simply move the knob in the desired
direction. It will block itself under load.
Die Turbowaage ist ein dynamisches Waagesystem und bietet gegenüber der
Standardwaage zusätzliche Einstellmöglichkeiten. Sie ermöglicht es den
Anstellwinkel des Drachens im Loop zu verändern, und paßt sich – innerhalb
bestimmter Grenzen – unterschiedlichen Windgeschwindigkeiten an. Der
Drachen hat im Geradeausflug einen flacheren Anstellwinkel als im Kurvenflug.
Loops können dadurch sehr eng geflogen werden, was besonders am
Windfensterrand wichtig ist.
Wie bei einer Standardwaage auch, kann man den Anstellwinkel des Drachens
einstellen, um ihn auf verschiedene Windverhältnisse zu trimmen. Dazu lösen Sie
den Knoten A auf der äußeren durchgehenden Waageleine und schieben ihn bei
wenig Wind in Richtung Nase (der Anstellwinkel wird flacher) oder bei viel Wind
in Richtung Flügelspitze (der Anstellwinkel wird steiler).
Sollte der Drachen bei viel Wind "überpowern", d.h. er neigt zum Ruckeln und
die Flügelspitzen schlagen, können Sie den Druck des Drachens reduzieren,
indem Sie den oberen Waageschenkel wieder verkürzen – also den Knoten A
in Richtung Nase schieben. Beachten Sie dennoch den für den Drachen
angegebenen Windbereich!
Eine Verstellung des Anknüpfschlaufe (Knoten B) verändert in erster Linie
das Drehverhalten. Weiter nach außen: größere und langsamere Spins; weiter
nach innen: kleinere und schnellere Spins. Sollte Ihr Drachen zu stark
nachdrehen, können Sie diesem durch das Verschieben des Anknüpfpunktes
(Knoten B) nach außen oder durch Verschieben des Knotens A in Richtung
Drachennase entgegenwirken.
Der zusätzliche, mittlere Waageschenkel dient der zusätzlichen Stabilisierung
der Leitkante. Bitte achten Sie darauf, dass dieser Schenkel leicht durchhängt.
Bei Verstellung der Waage kann es passieren, dass diese Schnur verlängert
oder verkürzt werden muß. Dazu verschieben Sie einfach den Knoten
entsprechend, er wird sich unter Last blockieren.
Le bridage turbo est un système de bridage dynamique permettant des réglages
supplémentaires par rapport au bridage classique. Il permet entre autre de
modifier l'angle d'incidence dans le virage et s'adapte dans une certaine limite
à différentes forces de vent. Le cerf-volant a un angle d'incidence plus plat en
vol droit que dans les virages. Ceci permet de prendre les virages plus serrés,
ce qui est particulièrement important sur les bords de la fenêtre de vol.
Tout comme dans le cas d'un bridage classique, il est également possible de
modifier l'angle d'incidence du cerf-volant pour l'adapter aux différentes forces
de vent. Desserrez le nœud central (A) sur la bride externe et remontez-le (max.
1,5 cm) vers le nez si le vent est faible (vous réduisez l'angle d'attaque) ou vers
le bout de l'aile si le vent est fort (vous augmentez l'angle d'attaque).
Si le cerf-volant a trop de traction par vent fort, c-a-d qu'il tend à vibrer et que
les pointes des ailes battent, réduisez la traction en remontant le nœud central
vers le nez. N'oubliez pas de tenir compte de la plage de vent recommandée
pour le cerf-volant.
Le réglage des points d'attache (B) permet de modifier le comportement dans les
virages. Déplacez le nœud vers l'extérieur pour décrire des virages plus lents et
plus grands; déplacez-le vers l'intérieur pour décrire des virages plus rapides et
plus petits. Si votre cerf-volant a trop tendance à survirer, déplacez les deux points
d'attache (B) vers l'extérieur ou remontez le nœud A vers le nez.
Le 3ème noeud de bride central assure la stabilisation supplémentaire du bord
d'attaque. Assurez-vous que ce nœud de bride n'est pas tendu. Lorsque vous
réglez le bridage, il peut s'avérer nécessaire de rallonger ou de raccourcir ce
fil. Pour ce faire, déplacez simplement le noeud selon vos besoins, il se bloquera
automatiquement lorsqu'il sera sollicité.
A
B
Owners manual
Produktinformation
Mode d ' emploi
Made in Poland
under license by InVento
© In Vento GmbH
D-26180 Rastede
Germany
Service: (04402) 926244
e-mail: [email protected]
http://www.invento-hq.com
US Distribution by:
Nova Design Group
West Hurley, NY 12491
Phone: (914)3310977
http://www.novadesigngroup.com
High Performance
InVento GmbH
D 26180 Rastede
Germany
www.invento-hq.com