1
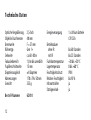
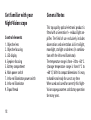
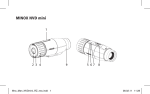
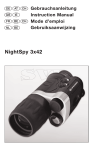
MINOX NV 351 Bedienungsanleitung Instruction manual Mode d'emploi MINOX NV 351 •Deutsch •English •Français MINOX NV 351 6 7 5 8 9 4 3 2 1 Inhaltsverzeichnis Einleitung Lernen Sie Ihr Nachtsichtgerät kennen Bedienelemente Allgemeine Hinweise Bedienhinweise Einsatz bei Tageslicht - Einlegen der Batterie - Anschalten des Gerätes - Ausschalten des Gerätes 2 Seite 3 Seite 4 4 4 5 5 5 5 5 Seite Seite Seite Seite Seite Seite Seite Einsatz bei Nacht - Anschalten des Gerätes - Justierung - Infrarotstrahler - Ausschalten des Gerätes Aufbewahrung Wichtige Informationen Pflegetipps Fehlerbeseitigung Technische Daten Kundendienst Gewährleistungsbestimmungen Seite Seite Seite Seite Seite Seite Seite Seite Seite Seite Seite Seite 6 6 6 6 7 7 8 9 10 12 13 14 Einleitung Sehr geehrter MINOX Kunde, herzlichen Glückwunsch zum Kauf dieses MINOX Nachtsichtgerätes. Mit diesem Gerät haben Sie sich für ein Produkt von höchster optischer und feinmechanischer Qualität entschieden. Wir wünschen Ihnen mit Ihrem MINOX Nachtsichtgerät viel Freude und mit Sicherheit den perfekten Durchblick! Diese Anleitung soll Ihnen ein Berater sein, um das Leistungsspektrum Ihres MINOX Nachtsichtgerätes optimal zu nutzen. 3 Lernen Sie Ihr Nachtsichtgerät kennen Bedienelemente 1. Objektiv 2. Objektiv Fokussierung 3. Bereitschafts-LED 4. Okular-Fokussierung 5. Batteriefachdeckel 6. Ein/Aus-Hauptschalter (ON) 7. Schalter für Infrarot-Strahler (IR) 8. Infrarot-Strahler 9. Stativgewinde 4 Allgemeine Hinweise Dieses hochwertige, optisch-elektronische Produkt ist ausgestattet mit einem Restlichtverstärker der Generation 1+. Das Einsatzgebiet umfasst ausschließlich die Beobachtung und Orientierung bei Dämmerung, Mondschein, Sternenlicht oder Dunkelheit (in Verbindung mit dem Infrarot-Strahler). Der Temperaturbereich reicht von –30 bis +50 °C. (Lagertemperaturbereich von 0 bis +60 °C) Durch seine kompakten Abmessungen ist es einfach zu bedienen und jederzeit einsetzbar. Bei ordnungsgemäßer Benutzung und Pflege gewährleistet dieses Nachtsichtgerät einwandfreie Funktion über viele Jahre. Bedienhinweise Einsatz bei Tageslicht ( Nur zum Testen der Batterie ) Einlegen der Batterie Bitte stellen Sie sicher, dass das Objektiv Ihres Nachtsichtgerätes mit dem Objektivschutzdeckel verschlossen ist. Entfernen Sie dann den Batteriefachdeckel und legen Sie die Batterie (1 x CR 123A) ein. Beachten Sie dabei die korrekte Polarität: – Pol auf der Batteriedeckelseite. Schliessen Sie das Batteriefach vollständig. Anschalten des Gerätes ACHTUNG: Um die empfindliche Bildröhre vor irreparablen Schäden zu schützen, entfernen Sie bitte bei Tageslicht niemals den Objektivschutzdeckel. Betätigen Sie den Hauptschalter (ON). Die grüne LED zwischen Schalter (IR) und Hauptschalter (ON) leuchtet. Wenn Sie durch das Okular schauen, sehen Sie eine helle, grüne, fluoreszierende Abbildung. Ausschalten des Gerätes Betätigen Sie den Hauptschalter (ON), die grüne LED geht aus. Wenn Sie durch das Okular schauen, sehen Sie das grüne Bild noch für 5 einige Minuten, bevor es verschwindet. Diese Funktion ist normal und kein Grund zur Beanstandung, weil das Nachtsichtgerät sich allmählich abschaltet. Einsatz bei Nacht Anschalten des Gerätes Entfernen Sie den Objektivschutzdeckel. Betätigen Sie den Hauptschalter (ON). Die grüne LED zwischen Schalter (IR) und Hauptschalter (ON) leuchtet. Wenn Sie durch das Okular schauen, erscheint ein grünes, fluoreszierendes Bild. 6 Justierung Visieren Sie ein Objekt an, welches sich in einer Entfernung von 20 - 30 m (22 - 33 yds) befindet. Drehen Sie den Justierring am Okular, bis Sie eine scharfe Abbildung erhalten. Danach drehen Sie bei der weiteren Beobachtung den Objektivring, um die Schärfe der Abbildung anzupassen. Falls nötig, wiederholen Sie diesen Vorgang. Infrarotstrahler Mit dem Infrarotstrahler lässt sich unter unzureichenden Lichtverhältnissen ein besseres Abbildungsergebnis erzielen. Nach zusätzlichem Betätigen des Schalters (IR) leuchtet die rote LED zwischen Schalter (IR) und Haupt- schalter (ON), der Infrarotstrahler ist nun angeschaltet und das Bild ist heller. Ausschalten des Gerätes Betätigen Sie den Hauptschalter (ON), die grüne und rote LED gehen aus. Wenn Sie durch das Okular schauen, sehen Sie das grüne Bild noch für einige Minuten, bevor es verschwindet. Diese Funktion ist normal und kein Grund zur Beanstandung, weil das Nachtsichtgerät sich allmählich abschaltet. Hinweis: Zur Verlängerung der Batterielebensdauer empfehlen wir, das Nachtsichtgerät nicht im Dauerbetrieb zu verwenden, sondern von Zeit zu Zeit auszuschalten. Aufbewahrung Zum Schutz des Objektives bedecken Sie es mit dem Objektivschutzdeckel, bevor Sie das Nachtsichtgerät in der Bereitschaftstasche verwahren. 7 Wichtige Informationen Um irreparable Schäden an Ihrem Nachtsichtgerät zu vermeiden, beachten Sie bitte folgende Hinweise: - Wenn Sie das Gerät bei Tageslicht benutzen wollen, entfernen Sie bitte niemals den Objektivschutzdeckel. -Demontieren Sie das Gerät niemals. -Setzen Sie die Batterien immer vorschriftsmäßig ein und beachten Sie die Polarität. -Verwenden Sie keine externe Energieversorgung. -Bei längerer Nichtbenutzung nehmen Sie die Batterien aus dem Batteriefach. 8 -Bedecken Sie das Objektiv immer mit dem Objektivschutzdeckel, wenn es nicht in Benutzung ist. -Setzen Sie das Gerät keinem direktem Sonnenlicht aus. -Bewahren Sie das Gerät nicht unter extrem niedrigen oder hohen Temperaturen auf. -Bewahren Sie das Gerät nicht in feuchter, staubiger oder schmutziger Umgebung auf. -Setzen Sie das Gerät keinerlei Fremdeinwirkungen aus. -Setzen Sie das Gerät keinerlei Schlägen oder Stößen aus. -Montieren Sie niemals das Gerät auf eine Schusswaffe, da der Rückschlag der Schuss waffe das Gerät beschädigen könnte. Pflegetipps Schützen Sie das Nachtsichtgerät vor Stürzen, Feuchtigkeit, Schmutz und extremen Temperaturen. Schützen Sie alle optischen Oberflächen vor Feuchtigkeit und Schleifmitteln. Diese können die Anti-Reflexions-Beschichtung beschädigen. Verunreinigungen wie Staub, Salz und Fettspuren von Fingerabdrücken beeinträchtigen die Abbildungsqualität (Bildschärfe und Kontrast) Ihres MINOX Nachtsichtgeräts. Außerdem können dadurch Beschädigungen an der Vergütung entstehen. Deshalb sollten die Linsenflächen stets sauber gehalten werden. Loser Staub und Fremdkörper sollten mit Hilfe eines weichen Haarpinsels entfernt werden. Hartnäckigere Verunreinigungen oder Fingerabdrücke auf den Linsen lassen sich mit einem Optikputztuch und Linsenreiniger entfernen. Wir empfehlen hierzu das MINOX Reinigungsset (Art-Nr. 69731). Bitte folgen Sie dazu den Anweisungen auf dem Optikputztuch und Linsenreiniger. Spezielle Reinigungsmittel erhalten Sie im Fachhandel. 9 Fehlerbeseitigung Das Nachtsichtgerät lässt sich nicht anschalten Prüfen Sie, ob die Batterien ordnungsgemäß eingelegt sind. Prüfen Sie die Leistungsfähigkeit der Batterien. Es erscheint keine Abbildung Visieren Sie ein Objekt an. Drehen Sie die Okulareinstellung, bis Sie eine scharfe Abbildung erhalten. Danach drehen Sie den Objektivring, um die Schärfe der Abbildung weiter zu verbessern. Falls nötig, wiederholen Sie diesen Vorgang. 10 Das Gerät beschlägt mit Feuchtigkeit Wenn das Gerät bei geringer Temperatur benutzt und dann plötzlich einer wärmeren Umgebungstemperatur ausgesetzt wird, kann sich auf der kalten Geräteoberfläche Kondensat bilden. Es kann längere Zeit dauern, bis sich das Gerät seiner Umgebungstemperatur angepasst hat. Die Abbildung verringert sich oder verschwindet Durch zu viel Lichteinwirkung (Mondlicht, Scheinwerfer oder Projektoren) kann es zu Störungen bei der Abbildung kommen. Entfernen Sie das Gerät sofort von der Lichtquelle. Innerhalb von 2 Minuten wird sich das Bild wiederherstellen. Auch bei starkem Nebel, Dunst oder extrem dunkler Umgebung ist eine Abbildung nur bei geringerer Entfernung möglich. Schwarze Punkte im Sehfeld Wenn Sie durch das Okular das Bild Ihres Nachtsichtgerätes betrachten, können Sie gegebenenfalls sehr kleine schwarze Punkte bemerken. Dies ist kein Qualitätsmangel, sondern ein typisches Merkmal für Nachtsichtgeräte dieses Typs. 11 Technische Daten Optische Vergrößerung Objektiv-Durchmesser Brennweite Röhrentyp Sehweite Fokussierbereich Pupillenschnittweite Dioptrienausgleich Abmessungen Gewicht 2,5-fach 40 mm F = 57 mm Gen 1+ ca. 60 - 80 m 1,0 m bis unendlich 15 mm ±4 Dioptrien 170 x 79 x 50 mm 335 g Bestell-Nummer 62410 12 Energieversorgung1 x Lithium Batterie CR 123A Betriebsdauer ohne IR bis 60 Stunden mit IR bis 25 Stunden Funktionstemperatur –30 bis +50 °C Lagertemperatur 0 bis +60 °C Feuchtigkeitsschutz IPX4 Relative Feuchtigkeit bis 93 % Infrarotstrahler ja Stativgewinde ja Kundendienst Für Ihre Notizen Unser Kundendienst steht Ihnen unter folgender Adresse zur Verfügung: MINOX GmbH Walter-Zapp-Str. 4 D-35578 Wetzlar / Germany Tel.: +49 (0) 6441 / 917-0 Fax: +49 (0) 6441 / 917-612 [email protected] www.minox.com 13 Gewährleistungsbestimmungen Mit dem Kauf dieses MINOX Nachtsichtgerätes haben Sie ein Produkt erworben, das nach besonders strengen Qualitätsrichtlinien hergestellt und geprüft wurde. Die für dieses Produkt geltende gesetzliche Gewährleistung von 2 Jahren wird von uns ab dem Tag des Verkaufs durch einen autorisierten Händler unter folgenden Bedingungen übernommen: 1)In der Gewährleistungszeit werden Beanstandungen, die auf Fabrikationsfehlern beruhen, kostenlos und nach eigenem Ermessen durch Instandsetzung, Austausch defekter Teile oder Umtausch in ein gleichartiges einwandfreies Erzeugnis behoben. Weitergehende Ansprüche, gleich welcher Art und gleich aus welchem Rechtsgrund im Zusammenhang mit dieser Gewährleistung, sind ausgeschlossen. 2)Gewährleistungsansprüche entfallen, wenn der betreffende Mangel auf unsachgemäße Behandlung – wozu auch die Verwendung von Fremdzubehör zählen kann – zurückzuführen ist, ein Eingriff von nicht autorisierten Personen und Werkstätten durchgeführt oder die Fabrikationsnummer unkenntlich gemacht wurde. 14 3)Gewährleistungsansprüche können nur bei Vorlage eines maschinengeschriebenen Kaufbelegs eines autorisierten Händlers geltend gemacht werden. 4)Bei Inanspruchnahme der Gewährleistung leiten Sie bitte das MINOX Nachtsichtgerät zusammen mit dem Original des maschinengeschriebenen Kaufbelegs und einer Schilderung der Beanstandung dem Kundendienst der MINOX GmbH oder einer Landesvertretung zu. 5)Touristen steht im Bedarfsfalle unter Vorlage des maschinengeschriebenen Kaufbelegs die Vertretung des jeweiligen Reiselandes gemäß den Regelungen zur Gewährleistung der MINOX GmbH zur Verfügung. MINOX GmbH, Walter-Zapp-Str. 4, D-35578 Wetzlar, Germany www.minox.com 15 Contents Introduction Get familiar with your Night-Vision scope Control elements General information Operating instructions Use in daylight - Inserting batteries - Switching on - Switching off 16 Page 17 Page 18 18 18 19 19 19 19 19 Page Page Page Page Page Page Page Use at night - Switching on - Adjusting - Infra-red illuminator - Switching off Safe keeping Important information Advice on care Troubleshooting Technical Data Customer Service Conditions of warranty Page Page Page Page Page Page Page Page Page Page Page Page 20 20 20 20 20 21 22 23 24 26 27 28 Introduction Dear MINOX Customer, Congratulations on your purchase of this MINOX Night-Vision scope. You have chosen a product that boasts highest optical quality and precision mechanics. This User’s Manual will advise you on how to obtain the best performance results from your MINOX Night-Vision scope. We hope this MINOX Night-Vision scope will give you a great deal of pleasure and always keep you perfectly in the picture! 17 Get familiar with your Night-Vision scope Control elements 1. Objective lens 2. Objective focusing 3. LED display 4. Eyepiece focusing 5. Battery compartment 6. Main power switch 7. Infra-red illuminator power switch 8. Infra-red illuminator 9. Tripod thread 18 General Notes This top quality optical-electronic product is fitted with a Generation 1+ residual light amplifier. The field of use exclusively includes observation and orientation aid in twilight, moonlight, starlight or darkness (in combination with the infra-red illuminator). The temperature range is from –30 to +50 °C. (storage temperature range is from 0 °C to +60 °C). With its compact dimensions it is easy to handle and ready for use at any time. When used and cared for correctly this NightVision scope guarantees satisfactory operation for many years. Operating instructions For use in daylight Inserting the battery Please ensure that the lens of your Night-Vision scope is covered by the lens cap. Remove the battery compartment lid and insert the battery (1 x CR 123A). Always observe correct poling. Fully close the battery compartment again. Switching on Attention: To protect the sensitive image tube against irreparable damage, never remove the lens cap in daylight. Actuate the main switch (ON). The green LED display lights up. When you look through the eyepiece you will see a bright, green, fluorescing image. Switching off Actuate the main switch (ON). When you look through the eyepiece you will still see the green image for a few minutes, before it disappears. This is normal and not a fault, because the Night-Vision scope always switches off gradually. 19 For use at night Switching on Remove the lens cap. Actuate the main switch (ON). The green LED lights up. When you look through the eyepiece you will see a green, fluorescing image. Adjustment Aim at an object situated at a distance of 22 - 33 yards (20 - 30 meters). Turn the focusing ring on the eyepiece to get a sharp image. Then turn the front focusing ring to make the image sharper still. Repeat this procedure if necessary. 20 Infrared illuminator The infra-red illuminator provides you with an improved imaging result under inadequate light conditions. After actuating the infra-red illuminator switch the image appears brighter. Switching off Actuate the main switch. When you look through the eyepiece the green image remains visible for a few more minutes, before it disappears. This is normal and not a fault, because the Night-Vision scope always switches off gradually. Important note: For longer battery service life we recommend you not to leave the Night-Vision scope switched on continuously. It is better to switch it off every now and again. Safe keeping To protect the lens always fit the lens cap before putting the Night-Vision scope away in the every-ready case. 21 Important information To avoid irreparable damage to your NightVision scope, please always observe the following instructions: -If you wish to use the device in daylight, never remove the lens cap. The small opening in the center of the cap is adequately dimensioned for using the device in daylight. -Never disassemble the scope. -Always insert the batteries as specified and observe correct poling. -Do not use an external power supply. 22 -Remove the batteries from the battery compartment if the device is not being used for a prolonged period. -Always cover the lens with the lens cap when not in use. -Do not expose the device to direct sunlight. -Do not keep the device under extremely low or high temperatures. -Do not keep the device in damp, dusty or dirty areas. -Keep the device safe from any external influence. -Never subject the device to knocks or impact. - Never mount the NV 351 to a gun, as the recoil of the gun may damage the NV 351. Advice on care Protect the Night-Vision scope against falling, damp, dirt and extreme temperatures. Protect all optical surfaces against damp and abrasive agents. These may otherwise damage the antireflection coating. Only remove dust and dirt from the lens using a soft, dry cloth. For safety reasons please remove the batteries! Always transport the scope in the provided ever-ready case. Lens and eyepiece cleaning Dust, salt and the oil left from fingerprint smudges impairs your binoculars’ picture sharpness and contrast and should never be allowed to remain on the lenses because they can harm the multi-coating applied to the lens surfaces. Loose dust and debris should be removed by blowing the debris off, using an optical lens cleaning bush or compressed air. If fingerprints or smudges remain on the lens, use optical lens tissue and lens cleaner solution to clean the lenses. We therefore would like to recommend our MINOX Cleaning Set (Art. no. 69731). Follow the instructions on the lens cleaning tissue and cleaner. Lens cleaning supplies are also available from sporting goods or all camera or optical stores. 23 Troubleshooting The Night-Vision scope does not switch on Check that the batteries are correctly installed. Check the performance of the batteries. No image appears Aim at an object. Turn the eyepiece adjustment until you get a sharp image. Then turn the lens focusing ring to improve the sharpness further. Repeat this procedure if necessary. 24 Flashes During the first two minutes after switching on the scope, flashes may occur. If this flashing continues the surrounding area may be too bright. This can occur even with mounted lens cap. In darker surroundings the flash occurrence will become less or cease completely. The device fogs up If the device is used at low temperatures and is then suddenly exposed to a warmer ambient temperature, condensation may develop on the cold surface of the device. It can take a while before the scope has acclimatized to the ambient temperature. The image diminishes or disappears Excessive light (moonlight, spotlights or projectors) can lead to faulty imaging. Move the scope away from the light source immediately. The image will be restored within a period of two minutes. Imaging results can also only be achieved at short distances if there is severe fog, haze or under extremely dark conditions. Black dots in the visual field When you view the image of your Night-Vision scope through the eyepiece you may perceive small black dots. This is not a quality fault but a typical feature of night-vision equipment of this type. 25 Technical Data Optical magnification 2.5 x Lens diameter 1.57 inch / 40 mm Focus range F 1.2 Tube type Gen 1+ Field of view 197 - 262 ft / 60 - 80 m Focus range 3.28 ft / 1m to infinity Eye relief 0.6 inch / 15 mm Diopter compensation ±4 dpt Dimensions6.68 x 3.11 x 1.97 inch 170 x 79 x 50 mm Order number 26 62410 Weight 11.8 oz / 335 g Battery 1x lithium CR 123A Operating time without IR up to 60 hours with IR up to 25 hours Functional temperature–22 to +122 °F –30 to +50 °C Storage temperature32 to 140 °F 0 to 60 °C Moisture proof IPX4 Relative humidity up to 93 % Infrared illuminator yes Tripod thread yes Customer Service For your notes You can reach our Customer Service under the following address, where they will be pleased to help you: MINOX GmbH Walter-Zapp-Str. 4 D-35578 Wetzlar / Germany Tel.: +49 (0) 6441 / 917-0 Fax: +49 (0) 6441 / 917-612 [email protected] www.minox.com 27 Conditions of warranty With the purchase of this MINOX night vision device you have acquired a product which has been manufactured and checked to special quality standards. For this product the MINOX GmbH provides warranty of 2 years. The period commences on the date of purchase from an authorized dealer and the warranty is subject to the following conditions: 1)During the warranty period we shall deal with complaints based on faulty manufacture (free of charge) by repair, replacement of defective parts or replacement by an identical flawless product at our own discretion. Consequential claims, no matter what kind of what legal argument in connection with this warranty, cannot be accepted. 2)Claims under warranty are null and void, if the defect has been caused by improper handling which also can include the use of non-MINOX accessories – if the MINOX product is serviced by unauthorized persons or workshops, or if the serial number has been obliterated. 3)Warranty claims can only be made by submission of the typewritten sales slip of an authorized dealer. 28 4)When submitting claims under warranty please return the MINOX product together with the typewritten sales slip and a description of the claim to the MINOX GmbH or MINOX agency. 5)Tourists may, if required, make use of the Agency of the country in which they are travelling (within the terms of the Warranty of the MINOX GmbH) by presenting the typewritten sales slip. MINOX GmbH, Walter-Zapp-Str. 4, D-35578 Wetzlar, Germany www.minox.com 29 Table des matières Introduction Familiarisez-vous avec votre lunette de vision nocturne Elémements de commande Informations générales Mode d'emploi Mode de fonctionnement - Installation de l'accu - Mise en marche de l’appareil - Arrêt de l’appareil 30 Page 31 Page 32 32 32 33 33 33 33 33 Page Page Page Page Page Page Page Utilisation nocturne Page - Mise en marche de l’appareil Page - Mise au point Page - Emetteur de rayons infrarouges Page Page - Arrêt de l’appareil Page Rangement de l’appareil Page Informations importantes Conseils d’entretien Page Solution de problèmes éventuels Page Informations techniques Page Service après-vente Page Clauses de la garantie Page 34 34 34 34 35 35 36 37 38 40 41 42 Introduction Cher client MINOX, Nous vous remercions et vous félicitons pour l’acquisition de cette lunette pour vision nocturne MINOX. Avec celle-ci, vous avez opté pour un produit d’une qualité optique et mécanique de précision hors pair. Ce mode d’emploi vous aidera á exploiter au maximum l’éventail des performances que recèle ce produit MINOX. Nous vous souhaitons de connaître avec cette lunette de nombreux moments d’observation agréables, toujours confortés par le bénéfice d’une vision parfaite. 31 Familiarisez-vous avec votre lunette de vision nocturne Eléments de commande 1. Objectif 2. Mise au point de l’objectif 3. Diode indicatrice de disponibilité (DEL) 4. Mise au point de l’oculaire 5. Couvercle du compartiment de l’accu 6. Interrupteur principal (ON) 7. Interrupteur de l’émetteur infrarouge (IR) 8. Émetteur de rayons infrarouges 9. Filetage du trépied 32 Informations générales Cet appareil optoélectronique haut de gamme est équipé d’un amplificateur de lumière résiduelle de la génération 1+. Il ne peut être utilisé que pour l’observation ou l’orientation au crépuscule, au clair de lune, par nuit étoilée ou dans l’obscurité (en combinaison avec l’émetteur de rayons infrarouges) et ce, par une température allant de –30 á +50 °C (Température de stockage: de 0 á +60 °C). En raison de ses dimensions compactes, cet appareil est á la fois simple á manipuler et utilisable á tout moment. Utilisé et entretenu correctement, il fonctionnera de façon irréprochable pendant de nombreuses années. Mode d'emploi Utilisation á la lumière du jour (Seulement pour vérifier le bon fonctionnement de l’accu) Installation de l’accu Assurez-vous que l’objectif de votre lunette pour vision de nuit est protégé par son couvercle. Enlevez ensuite le couvercle du compartiment de pile et insérez la ou es piles(1 x CR 123A). Veillez á respecter la polarité. Refermez complètement le compartiment de pile. Mise en marche de l’appareil Attention: Afin de ne pas causer de dommages irréparables au tube cathodique, très sensible, n’ôtez jamais le couvercle d’obturation de l’objectif en plein jour. Actionnez l’interrupteur principal (ON) La diode lumineuse verte (DEL) située entre l’interrupteur (IR) et l’interrupteur principal (ON) s’allume. Si vous regardez maintenant dans l’oculaire, vous pourrez y voir une image claire, de couleur vert-fluorescent. Arrêt de l’appareil Actionnez l’interrupteur principal (ON), la diode lumineuse verte s’éteint. Si vous regardez main33 Utilisation nocturne Mise au point Visez un objet situé á une distance de 20 á 30 m (22 á 33 yds) puis, tournez la bague de mise au point de l’oculaire pour obtenir une image nette. Procédez de même pour les observations suivantes afin d’adapter la netteté en fonction de l’image observée. Répétez ce processus, si nécessaire. Mise en marche de l’appareil Ôtez le couvercle de l’objectif. Actionnez l’interrupteur principal (ON). Le témoin vert lumineux – situé entre l’interrupteur (IR) et l’interrupteur principal – s’allume. Si vous regardez maintenant dans l’oculaire, vous verrez une image de couleur vert-fluorescent. Emetteur de rayons infrarouges Lors de conditions d’éclairages insuffisantes, on peut obtenir une vision améliorée grâce á l’émetteur de rayons infrarouges. Après avoir de nouveau actionné l’interrupteur de l’émetteur de rayons infrarouges (IR), le témoin lumineux rouge – situé entre l’interrupteur (IR) et l’inter- tenant dans l’oculaire, vous pourrez encore y voir l’image verte quelques minutes, avant sa disparition. Ceci est normal et ne devrait pas vous inquiéter. En effet, la lunette de vision nocturne ne s’éteint que progressivement. 34 rupteur principal (ON) – s’allume, indiquant que l’émetteur infrarouge est désormais actif. L’image devient plus claire. Arrêt de l’appareil Actionnez l’interrupteur principal (ON). Les témoins luminescents de couleur verte et rouge s’éteignent. Si vous regardez maintenant dans l’oculaire, vous pourrez encore y voir l’image verte quelques minutes, avant sa disparition. Ceci est normal et ne devrait pas vous inquiéter. En effet, la lunette de vision nocturne ne s’éteint que progressivement. Conseil d’utilisation Pour accroître la durée d’utilisation de l’accu, nous conseillons de ne pas utiliser la lunette pour vision de nuit en continu, mais plutôt de l’arrêter de temps en temps. Rangement de l'appareil Pour protéger l’objectif, remettez toujours son couvercle d’obturation avant de ranger la lunette pour vision de nuit dans le sac tout-prêt. 35 Informations importantes Afin d’éviter d’éventuels dommages irréparables á votre lunette pour vision de nuit, veuillez respecter les indications suivantes: -En cas d’utilisation diurne de la lunette, n’enlevez jamais le couvercle de l’objectif. -Ne démontez jamais cet appareil. -Insérez toujours les piles conformément aux instructions et en veillant á respecter la polarité. -N’utilisez aucune alimentation énergétique externe. -En cas de longue inutilisation de la lunette, ôtez les piles de leur compartiment. -En cas d’inutilisation de cette lunette, veillez 36 toujours á ce que le couvercle d’obturation de son objectif soit adéquatement installé. -N’exposez jamais directement cet appareil á la lumière du soleil. -Ne laissez pas cet appareil dans des endroits où peuvent régner des températures extrêmement hautes ou basses. -Ne laissez pas cet appareil dans des endroits humides, poussiéreux ou sales. -Ne soumettez cet appareil á aucune influence extérieure nocive. -Veillez á ce que cette lunette ne soit pas soumise á des coups ou á des chocs. -Ne montez jamais la lunette sur une arme á feu: le contrecoup de celle-ci pourrait l’endommager! Conseils d’entretien Protégez cette lunette pour vision nocturne contre l’humidité, la saleté, les températures extrêmes ou les chutes. Protégez également ses surfaces optiques contre l’humidité et les substances abrasives qui pourraient endommager leur traitement antireflet. Par ailleurs, les impuretés telles que la poussière, le sel ou les traces de doigts peuvent influer sur la qualité d’observation (netteté et contraste) et pourraient aussi endommager le traitement des surfaces optiques. Il est donc important de conserver les surfaces de lentilles toujours propres. La poussière ou les corps étrangers devraient être éloignés avec un pinceau doux. Quant aux souillures tenaces ou les traces d’empreintes digitales, on peut les éliminer á l’aide d’un chiffon optique ou d’un produit spécial pour le nettoyage des lentilles. Dans ce but, nous conseillons le set de nettoyage MINOX (Code N° 69731). En tout cas, suivez toujours les indications portées sur les chiffons ou les produits spécialement prévus pour le nettoyage des surfaces optique, en vente dans le commerce spécialisé. 37 Solution de problèmes éventuels La lunette pour vision de nuit ne se met pas en marche Vérifiez si l’accu est bien installé. Vérifiez aussi l’état de son chargement. Aucune image n’apparaît Visez un objet. Tournez la bague de mise au point de l’oculaire pour obtenir une image nette. Tournez ensuite la bague de l’objectif afin d’améliorer la netteté de l’image obtenue. Répétez l’opération si nécessaire. 38 La lunette est embuée Si la lunette a été soumise á une basse température et qu’on passe brusquement dans un environnement plus chaud, il est possible qu’une condensation se produise sur les surfaces optiques. Après quelque temps, la lunette s’étant adaptée á la température ambiante, la buée s’estompe peu á peu. L’image rétrécit ou disparaît Une trop forte exposition á la lumière (lumière de la lune, phares de voiture, projecteurs) peut provoquer des troubles de l’image. En ce cas, éloignez tout de suite l’appareil de cette source de lumière. L’image se rétablira en deux minutes. En cas de brouillard épais, de brume ou d’obscurité prononcée, on n’obtiendra une image qu’en se rapprochant suffisamment de l’objet. Des points noirs apparaissent dans le champ de vision Si on observe l’image produite par la lunette pour vision de nuit á travers l’oculaire, on peut éventuellement apercevoir des petits points noirs. Il ne s’agit pas lá d’un défaut de qualité mais d’une caractéristique typique de ce type d’appareil. 39 Données techniques Grossissement optique Diamètre de l’objectif Objectif Modèle tubulaire Portée visuelle (env.) Domaine de mise au point Pupille de Distance Compensation dioptrique Dimensions Poids (env.) 2,5 x 40 mm F = 57 mm Gen 1+ de 60 á 80 m de 1,0 m á l'infini 15 mm ±4 dioptries 170 x 79 x 50 mm 335 g Numéro de code 62410 40 Alimentation énergétique Autonomie d'utilisation sans IR avec IR Température de fonctionnement Temperature de stockage Protection contre l'humidité Humidité relative Émetteur infrarouge Filetage pour trépied Accu 1x CR 123A jusqu'á 60 heures jusqu'á 25 heures de –30 á +50 °C de 0 á 60 °C IPX4 jusqu'á 93 % oui oui Service après-vente Pour des notes Notre service après-vente se tient á votre disposition á l’adresse suivante: MINOX GmbH Walter-Zapp-Str. 4 D-35578 Wetzlar / Germany Tel.: +49 (0) 6441 / 917-0 Fax: +49 (0) 6441 / 917-612 [email protected] www.minox.com 41 Clauses de validité de la garantie Avec l’acquisition de cette lunette pour vision nocturne MINOX, vous avez acquis un produit qui a été fabriqué, puis inspecté, suivant des normes de qualité particulièrement strictes. Les conditions de la garantie légale de 2 ans valable pour ce produit seront assumées par nos soins á compter du jour de sa vente par un revendeur agréé et ce, aux conditions suivantes: 1)Pendant la période de garantie, il sera remédié gratuitement aux réclamations ayant pour origine un défaut de fabrication et ce, suivant notre propre appréciation, par le biais d'une remise en état, d'un changement des pièces défectueuses ou d'un remplacement par un produit similaire, en parfait état. Toute autre demande qui sortirait de ce cadre - quelle qu’en soit la nature et quel qu’en soit le motif juridique - en rapport avec la présente prestation de garantie, est exclue. 2)Tout droit de recours á la garantie est caduc si l’objet de la réclamation a pour origine une manipulation incorrecte – y inclus l'utilisation d'accessoires étrangers – ou si une intervention a été effectuée par des personnes et des ateliers non autorisés, ou si le numéro de fabrication a été rendu méconnaissable. 42 3)Les droits á la garantie ne peuvent être invoqués que sur présentation d'un justificatif d'achat imprimé, émanant d'un revendeur autorisé. 4) En cas de recours á la garantie, veuillez faire parvenir le produit MINOX concerné, accompagné de l'original du justificatif d'achat imprimé et d'une description de la réclamation, au service clients de la société MINOX GmbH ou á une de ses succursales régionales. 5)Pour les touristes: En cas de besoin, la représentation du pays visité se tient á leur disposition et ce, conformément aux conditions qui régissent le recours aux prestations de garantie, comme définies par la société MINOX GmbH, sur présentation du justificatif d'achat imprimé. MINOX GmbH, Walter-Zapp-Str. 4, D-35578 Wetzlar, Germany www.minox.com 43 Änderungen in Konstruktion und Ausführung vorbehalten. Die Marke MINOX ist eine eingetragene Marke der MINOX GmbH, Wetzlar. Design subject to alterations without notice. MINOX is a registered trademark of MINOX GmbH, Wetzlar. Sous réserve de modifications. MINOX est une marque déposée par MINOX GmbH, Wetzlar. MINOX GmbH Walter-Zapp-Str. 4 D - 35578 Wetzlar, Germany Tel.: +49 (0) 6441 / 917-0 Fax: +49 (0) 6441 / 917-612 e-mail: [email protected] www.minox.com 99480 03/11/FLW/S