1
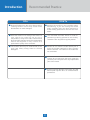
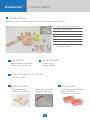
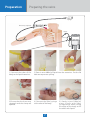
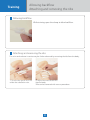
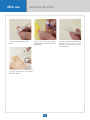
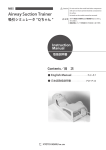
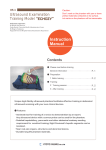
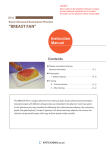
MW18 11398-000
モデル表面に印刷物などが直接触れないようにしてください。
樹脂表面にインクが吸収されて消えなくなります。
Ultrasound-Guided PICC Training Simulator
末梢挿入中心静脈カテーテル PICC
Caution Do not mark on the model and its components with
a pen or leave printed materials in contact with the
model surface. Ink marks on the model are not
removable.
シミュレータ
Instruction
Manual
取扱説明書
Table of Contents もくじ
● English
P.1
● 日本語
P.11
English
Instruction
Manual
Table of Contents
● Introduction
Introduction
Recommended Practice
Product details
P.2
P.3
P.4
Set includes
● Preparation
P.5-7
Opening the puncturepad
P.5
Warning
P.5
Setting up the puncture pad
Preparing the veins
P.6
P.7
● Training
Allowing backflow
P.8
Attaching and removing the ribs
P.8
● After use
Draining the veins
1
P.9
Introduction
● Before use
MW18 Ultrasound-Guided PICC Training Simulator is designed for medical education
training. Please do not use the product for other purposes. Any other use not in accordance with the enclosed guidelines is strongly discouraged.The manufacturer holds no no
responsibility for any accidents or damages resulting from such use.
For questions regarding this simulator, please contact our distributor in your area or
KYOTO KAGAKU. Our contact information can be found on the back cover of this manual.
● Features
・ Back-flow confirmation of successful venous access
・Movable sholder provides the training of the positioning
・Anatomically correct bifurcation of the vein
・Provides in procedures from needle insertion to catheter tip placement
・Ultrasound compatible pad
2
Introduction
Recommended Practice
DON’Ts
DOs
● Drain all liquids from the veins after training.
● Storage the manikin in the container when
Leaving fluids in tubes may cause mold,
discoloration or other damages.
transferring. If you are moving the model
itself, carefully lift by the body and arm to
avoid adding pressure to the arm and vein
tubes.
● Store the manikin in its storage case when not
● The movable shoulder which is used for
use. Store the training set at room
temperature, away from heat, moisture and
direct sunlight. Storage under the temperature
above 50 degrees C may reduce the
performance quality of the simulator.
● The manikin skin may be cleaned with a wet
positioning training; please do not forcibly
extend the arm beyond its regular position.
● Please do not mark the model with a pen or
leave the printed materials in direct contact
with the surface. Ink marks on the model are
not removable.
cloth and mildly soapy water or diluted
detergent.
● Please do not puncture the body exept the
puncture pad. The pad is the only replaceable
part of the model.
● Prevent general damage to the tube, as it will
affect liquid injection and / or catheterization
procedures.
3
Introduction
Product Details
Included Parts
Before your first use, ensure all components listed below are included in the unit.
A. 1 Male upper torso with right arm
B. 2 PICC puncture pads
A
E
F
C. 1 50ml syringe
D
D. 10 Simulated blood sticks
E. 1 Container for liquids
F. 1 Stand for container
G
G. 1 Plastic jar
1 Model container
C
B
1 Instruction manual
Manikin Size
Manikin Weight
approx. W40×D15×H60cm
approx. 15.7×5.9×23.7 (in)
approx. 4.5 kg
approx. 9.92 (Ib)
Recommended size of catheter
4 Fr. 50 ∼ 60cm
Replaceable parts
PICC puncture pads
11398-010 (a set of 2)
Optional parts
10 Simulated blood sticks
11388-400 (swab type)
4
Introductory ultrasound training
block “Real Vessel”
11347-210 (a set of 2)
Preparation
Opening the puncture pad
Opening the puncture pad
1) Turn the film of the pad.
2)Flip the puncture pad
upside down and push down
on the corners to empty
onto a tray.
Do not attempt to pull the
pad directly out of the plastic
container.
!
"
#
$
#
%
#
&
#
'
&
'
'
'
'
!
$
*
"
#
period of time.
5
Preparation
Setting up the puncture pad
Pad
1) Connect the four tubes on the
torso model to the puncture pad.
The tip of tube
Tube
2)Tightly insert the tube up to the red line.
3) Secure the puncture pad into the
arm by pressing down on the edges.
※ Do not press down the gel.
6
Preparation
Preparing the veins
Syringe
Three-way stopcock
Clamp
Connector
1) Connect the tubes of the
body to the liquid container.
2) Pour in over 600ml of liquid into the container. Put the lid
back on to prevent spilling.
3)Ensure that the three-way
stopcock and the clamp are
opened.
4) Connect the 50ml syringe
to the tube of the body.
7
5) Slowly inject 100ml of
water (inject with 50ml
syringe twice) while raising
the edge of the body to fill
the tubes with liquid.
Training
Allowing backflow
Attaching and removing the ribs
Allowing backflow
While training, open the clamp to allow backflow.
Attaching and removing the ribs
The veins and catheter insertion may be further observed by removing the ribs from the body.
1) Insert the tip of first rib
under the subclavian vein.
2) Adjust the rest of the ribs
into the body.
*Ribs can be removed with reverse procedure.
8
After use
Draining the veins
1) Close the clamp on the
tube.
2) Disconnect the tubes
between the liquid container
and body.
4) Slowly push air through the
syringe and drain the water
from the tubes.
9
3) Open the clamp. Hold the
body end of the tube
upwards to prevent water
from spilling.
10
MW18 11398-000
Ultrasound-Guided PICC Training Simulator
モデル表面に印刷物などが直接触れないようにしてください。
樹脂表面にインクが吸収されて消えなくなります。
末梢挿入中心静脈カテーテル
PICC シミュレータ
Caution
Do not mark on the model and its components
with a pen or leave printed materials in contact
with the model surface. Ink marks on the model are
not removable.
The contents of the instruction manual are subject to change without prior notice.
No part of this instruction manual may be reproduced or transmitted in any form without permission from the manufacturer.
Please contact manufacturer for extra copies of this manual which may contain important updates and revisions.
Please contact manufacturer with any discrepancies, typos, or mistakes in this manual or product feedback. Your cooperation
is greatly appreciated.
故障・ご不明点に関するお問い合わせは、販売店もしくは株式会社 京都科学までご連絡ください
http://www.kyotokagaku.com
2014/04/18