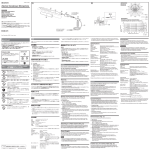
1
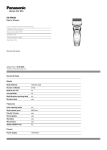
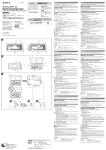
OWNER’S MANUAL
取扱説明書
MODE D’EMPLOI
BEDIENUNGSANLEITUNG
MAMUALE DI ISTRUZIONI
MANUAL DEL USUARIO
用户手册
安全上のご注意
PRODUCT SPECIFICATIONS
ご使用の前にこの「安全上の注意」をよくお読みのうえ、正しくお使いください。
お使いになる方がお読みになった後は紛失しないよう、必ず保管してください。
表示について
製品を安全に正しくお使いいただき、あなたや他の人への危害や財産への損害
を未然に防止するために、重要な内容を表示しています。その表示と意味は次
のようになっています。
警告
この表示を無視して、誤った取り扱いをすると、人が死亡ま
たは重傷を負う可能性が想定される内容が記載されています。
注意
この表示を無視して、誤った取り扱いをすると、人が傷害を負っ
たり、物的損害の発生が想定される内容が記載されています。
絵表示の例
記号は禁止(行ってはいけない)の行為であることを告げるもの
です。図の中や近くに具体的な禁止事項(左図の場合は分解禁止)が
描かれています。
● 記号は強制(必ず実行して欲しい)したり指示する内容があるこ
とを告げるものです。図の中や近くに具体的な行為(左図の場合は差
込みプラグをコンセントから抜いてください)が描かれています。
ー 以下の指示を必ず守って下さい。ー
警告
この機器を分解・修理・改造しない。故障・ショートの原因になります。
水滴のついた手で、操作をしない。ショート・感電の恐れがあります。
電池を火の中に入れない。破裂・発熱・発火の恐れがあります。
注意
電池を正しく装着しないと故障の原因になります。
次のような場所での使用や保存はしない。故障の原因になります。
・温度が極端に高い場所(直射日光の当たる場所、暖房機器の近く、
発熱する機器の上など)
・水気の近く(風呂場、洗面台、濡れた床など)や湿度の高い場所・
振動の多い場所
電池は長時間使用しないときは外す。漏液等で故障の原因になります。
Power supply
Tempo range
2 x AAA battery
= 30 ~ 250/minute
Tempo precision±0.2%
0, 1, 2, 3, 4, 5, 6, 7, 8, 9
Beats
LCD (TEMPO, RHYTHM, SOUND, BEAT)
Displays
Tempo LED x 2
×1
Speaker
, , ,
,
,
Controls
TEMPO dial, RHYTHM, SOUND, BEAT, TAP
tempo, START/STOP
Size (W × H × D) 61 x 21 x 118 mm (2.4” x 1” x 4.7”)
90g (3.2oz) including battery
Weight
Instruction manual, 2 x AAA battery
Accessories
*Specifications and external appearance are subject to change without
notice due to improvements.
*仕様および外観は、改良のため予告なく変更することがあります。
*Les spécifications ainsi que la comception de l’appareil peuvent être
modifiées pour amélioration sans avis préalable.
*Die Technischen Daten und das Design können sich aufgrund des technischen Forischritts jederzeit ohne Ankündigung ändern.
*Le specifiche tecniche e l’aspetto esteriore sono soggetti a variazioni
senza alcun preavviso.
*Las especificaciones y la apariencia externa de este aparato podrán ser
modificadas sin previo aviso, con objeto de mejorar el producto.
*因产品改进,规格或外观可能有所变更,敬请留意。
本体に無理な力を加えたり、落としたり、強くぶつけたりしない。
故障・けがの原因になります。
お手入れにはシンナー・アルコール類は使用しない。
故障の原因になります。
Thank you for purchasing the Rhythm
Watch Mini RW30. Please read this manual carefully before using your product,
in order to take full advantage of its many
features and functions, and be sure to store
the manual in a safe place for future reference.
FEATURES
The Rhythm Watch Mini RW30 is a
simplified version of TAMA’s best selling
metronome, Rhythm Watch, but designed
to be smaller, lighter, and more portable.
The built-in belt clip on the back enables
the user to clip the unit to music stands etc.
PRECAUTIONS
*Avoid subjecting the RW30 to impact,
such as dropping it or handling it roughly.
*Turn off the power before storing the
RW30.
*Storage or use of RW30 that subjects the
unit to direct sunlight, high temperature,
or humidity can cause the RW30 to malfunction or fail permanently.
*Do not use thinners, benzene, or other
similar solvents to clean the RW30.
*Two AAA batteries (2 x DC1.5V) can be
used as the power supply. Do not use any
other type of power supply.
この度は Rhythm Watch Mini RW30
をお買い上げ頂き、誠にありがとうござ
います。製品の機能を十分に発揮して頂
くために、ご使用前に必ず本説明書をお
読み下さい。また、本書は大切に保管し
て下さい。
特徴
Rhythm Watch Mini RW30 は、ベスト
セラーモデルの TAMA”リズム・ウォッ
チ”の機能を、よりシンプルにまとめ、
軽量・コンパクトな設計で携帯に優れた
メトロノームです。裏面に搭載されたク
リップによって、譜面台等に挟んでお使
い頂けます。
使用上のご注意
※ 落下等の衝撃を与えたり、乱暴な取扱
いをしたりしないようご注意ください。
※ご使用にならないときは、電源をオフに
して保管して下さい。
※ 直射日光の当たる場所、温度や湿度の
高い場所、ほこりの多い場所での使用
や保管は、故障やトラブルの原因となり
ますので避けて下さい。
※クリーニングの際は、シンナーやベンジ
ン等を使用しないで下さい。
※ 電源には、単4電池 (DC1.5V)2本を
使用します。これ以外の電池は使用し
ないで下さい。
REPLACING THE BATTERY
電池交換
When the battery begins to run down, the
LCD and the LED darkens, sound weakens
and performance will rapidly deteriorate.
Replace battery promptly.
電池が消耗してくると、液晶ディスプレ
イやテンポ LED が暗くなったり、音が
小さくなったりと性能が著しく低下しま
す。早めの電池交換をおすすめします。
Battery replacement procedure
電池交換の手順
1. Slide the battery cover on the back of
the RW30 in the direction indicated by
the arrow in the diagram, and take off
the battery cover.
2. Take out the old battery and insert the
new one, being careful that the polarity
is matched correctly.
3. Slide the cover in the opposite direction
from that indicated by the arrow, attaching the cover in its original position.
*Always check to make sure the power is
turned off before replacing the battery.
*After replacing the battery, turn the power on and check to make sure the RW30
functions properly.
1. 本体の裏面にある電池カバーを図の矢
印の方向へスライドし、電池カバーを取
り外します。
2. 古い電池を取り外し、極性を間違えな
いように新しい電池と取り替えます。
3. 図の矢印と逆方向にスライドし、電池カ
バーを取り付けます。
※ 電池交換は、必ず電源がオフになって
いることを確認してから行って下さい。
※ 電池交換後は電源を入れ、動作の確認
をして下さい。
TAMA vous remercie d’avoir porté votre
choix sur le métronome Rhythm Watch
Mini RW30. Veuillez lire attentivement ce
mode d’emploi avant d’utiliser l’appareil;
ceci vous permettra de tirer le meilleur
parti de ses nombreuses caractéristiques
et fonctions. Veillez à conserver ce mode
d’emploi, il pourra vous être très utile pour
toute vérification ultérieure.
Vielen Dank für den Kauf der Rhythm
Watch Mini RW30. Bitte lesen Sie diese
Anleitung sorgfältig, bevor Sie die Rhythm
Watch benutzen, so dass Sie alle Fähigkeiten und Funktionen voll ausnutzen können,
und bewahren Sie die Anleitung zum späteren Nachschlagen an einem sicheren Ort
auf.
Vi ringraziamo per aver acquistato il Tama
Rhythm Watch Mini RW30. Vi raccomandiamo di leggere attentamente questo manuale prima di usare il prodotto, per essere
sicuri di sfruttare appieno le sue caratteristiche e le sue funzioni. Questo manuale
dovrebbe essere conservato in un luogo
sicuro per eventuali future consultazioni.
Gracias por adquirir el metrónomo
Rhythm Watch Mini RW30. Por favor, lea
el presente manual muy detenidamente antes de utilizar el producto para poder sacar
el mayor provecho de todas las características y funciones que le ofrece. Guarde
el manual en un lugar seguro para poder
consultarlo cada vez que lo necesite.
感 谢 您 购 买 Rhythm Watch Mini
RW30。在使用产品前,请仔细阅读
本手册以充分利用其各种特性及功能,
并妥善保存本手册以备日后参考。
CARACTÉRISTIQUES
EIGENSCHAFTEN
CARATTERISTICHE
CARACTERÍSTICAS
特性
Conçu dans le souci de proposer un modèle plus petit, plus léger et plus portable,
le Rhythm Watch Mini RW30 est une
version simplifiée du métronome à succès
de TAMA, Rhythm Watch. La pince de
ceinture intégrée, située à l’arrière de
l’appareil, permet à l’utilisateur de fixer le
métronome, par exemple à un pupitre.
Die Rhythm Watch Mini RW30 ist eine vereinfachte Version des meistverkauften Metronoms, der Rhythm Watch von TAMA.
Sie ist jedoch kleiner, leichter und somit
einfacher zu transportieren. Dank dem eingebauten Gürtelclip auf der Rückseite, kann
der Benutzer das Gerät beispielsweise an
einen Notenständer befestigen.
Il Rhythm Watch Mini RW30 è una versione semplificata del più venduto fra i metronomi TAMA, il Rhythm Watch, progettata
per avere dimensioni ridotte, peso minore e
maggiore portabilità. Il gancio integrato sul
retro consente di fissare l’unità dove serve,
ad esempio a un leggio.
El Rhythm Watch Mini RW30 es una versión simplificada del metrónomo de TAMA
más vendido, Rhythm Watch, pero que
presenta un diseño más compacto, ligero y
fácil de transportar. La pinza que lleva en
la parte trasera permite colocar y sujetar la
unidad en un cinturón, en un atril, etc.
Rhythm Watch Mini RW30 是 TAMA
最畅销的节拍器 - Rhythm Watch 的
简化版,其设计更加小巧、轻盈、便携。
节拍器背面有一个背夹,用户可将本设
备夹在乐谱架等物品上使用。
PRÉCAUTIONS
VORSICHTSMAßNAHMEN
PRECAUZIONI
PRECAUCIONES
注意事项
*Un choc risquerait d’endommager le
RW30. Le manier avec soin et ne pas le
laisser tomber.
*Mettre le RW30 hors tension avant de le
ranger.
*Le rangement ou l’utilisation du RW30
dans des endroits où il serait exposé à la
lumière directe du soleil, à une température élevée ou à de l’humidité pourraient
entraîner une défaillance ou une panne
du RW30.
*Ne pas utiliser de solvants tels que du
benzène ou du diluant pour nettoyer le
RW30.
*L’appareil peut être alimenté à l’aide de
deux piles AAA (2 × 1,5 V c.c.). N’utiliser aucun autre type d’alimentation.
*Setzen Sie die RW30 keinen Stößen
aus,z. B. durch Fallenlassen oder unvorsichtige Behandlung.
*Schalten Sie die Stromversorgung aus,
bevor Sie die RW30 verstauen.
*Die Aufbewahrung oder der Gebrauch
der RW30, welche direktem Sonnenlicht,
hohen Temperaturen oder Luftfeuchtigkeit
ausgesetzt ist, kann zu Fehlfunktionen oder
dauerhaftem Ausfall der RW30 führen.
*Verwenden Sie keine Verdünnung, kein
Benzin oder ähnliche Lösungsmittel für
die Reinigung der RW30.
*Als Stromversorgung können zwei
AAA-Batterien (2 x DC1.5V) verwendet
werden. Benutzen Sie keine andere Spannungsquelle.
*Evitate che l’RW30 subisca urti, cadute o
un trattamento troppo brusco.
*Spegnete l’alimentazione prima di riporre
l’RW30.
*Se l’RW30 viene conservato o usato
in condizioni di luce solare diretta, alta
temperatura o umidità, si può verificare
un cattivo funzionamento o un guasto
permanente dell’RW30.
*Non usate diluenti, benzene o altri solventi di questo tipo per pulire l’RW30.
*Per alimentare lo strumento è possibile
usare due batterie AAA (2 x 1,5 V CC).
Non usate altri tipi di alimentazione.
*Evite que el RW30 reciba cualquier tipo
de impacto, no permita que se caiga y
manipúlelo con cuidado.
*Apague el RW30 antes de guardarlo.
*Guardar o utilizar el RW30 bajo la luz
directa del sol, a altas temperaturas o
con niveles de humedad elevados puede
provocar errores de funcionamiento en el
RW30 o incluso averiarlo.
*No utilice diluyentes, benceno ni otros
disolventes para limpiar el RW30.
*La fuente de alimentación son dos pilas
AAA (2 x DC 1,5 V). No utilice otro tipo
de fuente de alimentación.
*避免使 RW30 受到撞击,请勿跌落
或粗暴对待本设备。
*在存放 RW30 之前,请关闭电源。
*请勿在阳光直射、高温或潮湿的环境
中使用或存放 RW30,这可能导致
RW30 发生故障或是永久性损坏。
*请勿使用稀释剂、苯或其他类似溶剂
进行清洁 RW30。
*可使用两节 AAA 电池 (2 x DC1.5V)
作为本设备的电源。请勿使用任何其
他类型的电源。
REMPLACER LA PILE
AUSTAUSCHEN DER BATTERIE
SOSTITUZUONE DELLA BATTERIA
SUSTITUCIÓN DE LA PILA
更换电池
Lorsque les piles commencent à être déchargées, l’affichage à cristaux liquides
et les témoins DEL perdent de leur luminosité, le son perd de sa puissance et les
performances se dégradent rapidement. Il
convient de remplacer les piles sans tarder.
Wenn die Batterie fast entladen ist, verdunkelt das LC-Display und die LEDs, der
Klang wird leiser und die Leistung nimmt
schnell ab. Die Batterie sollte sofort ausgetauscht werden.
Quando le batterie cominciano ad esaurirsi,
il display LCD e i LED diventano più scuri, il suono diventa più debole e le prestazioni diventano rapidamente inaccettabili.
Sostituite prontamente le batterie.
Cuando las pilas empiezan a agotarse, el
LCD y los indicadores LED pierden intensidad, el sonido se atenúa y el aparato deja
de funcionar correctamente. Sustituya las
pilas de inmediato.
当 LCD 显 示 屏 和 LED 指 示 灯 变 暗、
声音变小时,意味着电池即将耗尽,设
备的性能表现将迅速下降。请立即更
换电池。
Procedura di sostituzione batteria
Procedimiento de sustitución de
la pila
Comment remplacer la pile
1. Glisser le couvercle du compartiment à
piles au dos du RW30 dans la direction
indiquée par la flèche (se reporter à
l’illustration) ; ôter le couvercle.
2. Retirer les piles déchargées et installer
les piles neuves. Veiller à respecter la
polarité.
3. Glisser le couvercle du compartiment
à piles jusqu’en bout de course dans la
direction opposée à celle indiquée par
la flèche.
*Toujours s’assurer que l’appareil est hors
tension avant de remplacer les piles.
*Après avoir remplacé les piles, mettre
le RW30 sous tension et s’assurer qu’il
fonctionne correctement.
Fonction de mise hors tension
automatique
Automatic power-off function
The RW30 has an automatic power-off
function to avoid unnecessary battery
power drainage. If the RW30 is powered
without being operated for approximately
one hour, the power will automatically turn
off. This auto-off feature can be disabled
by doing the following: Turn the POWER
on while simultaneously pushing START/
STOP key. LCD will first display “OFF.”
Continue to hold buttons until normal display screen appears. The auto-off feature
is now disabled, until the unit’s POWER
is shut off. Once you turn the POWER off,
this default auto-off feature becomes effective again.
Memory backup
RW30 stores your settings as long the
battery powers it. Please note that once
battery power is lost settings are reset to
the factory default setting.
LCD backlight
The backlight will be turned on when you
operate the POWER switch, control knobs/
switches, or the TEMPO dial, and stay on
for approximately 10 seconds after the last
operation.
Le RW30 est doté d’une fonction de mise
hors tension automatique, qui permet
RW30 は電源スイッチの切り忘れによ d’éviter tout déchargement inutile des
る電池消費を防ぐため、オート電源オフ piles. Le RW30 s’éteint automatiquement
機能を搭載しています。電源を入れた状 s’il est inutilisé pendant environ une heure.
態で、最後の操作から約1時間経つと、 La procédure ci-dessous permet de désac自動的に電源がオフになります。
tiver temporairement la fonction de mise
この機能を無効にしたい時は、START/ hors tension automatique : mettre l’appareil
STOP スイッチを押しながら、POWER sous tension en appuyant simultanément
をオンに (POWER/TAP スイッチ長押 sur la touche START/STOP. L’affichage à
し ) してください。ディスプレイ上に cristaux liquides indique d’abord « OFF ».
“OFF” と表示され、オート電源オフ機 Maintenir les boutons enfoncés jusqu’à
能が無効となります。一度手動で電源を l’affichage de l’écran normal. La fonction
オフにするとオート電源オフ機能が再び de mise hors tension automatique est
有効になりますので、この機能を無効に désactivée jusqu’à la prochaine mise hors
したい時は毎回この操作を行ってくださ tension de l’appareil. Une fois l’appareil
い。
mis hors tension, cette fonction de mise
hors tension automatique par défaut redevient opérationnelle.
オート電源オフ機能
メモリーのバックアップ
RW30 は残量に問題の無い電池が接続
されている時は、電源をオフにしても直
前までに設定していたリズム・テンポ・
ビート ( 拍子 ) が保存されています。一
度電池を外すと、工場出荷時のセッティ
ングに戻りますのでご注意ください。
LCD バックライト
バックライトは電源 ON 時、プッシュス
イッチや TEMPO ダイヤルを操作した
ときから約 10 秒間点灯します。
Sauvegarde de la mémoire
Le RW30 stocke les paramètres de l’utilisateur tant que les piles en assurent l’alimentation électrique. Noter que, une fois
les piles déchargées, les paramètres sont
réinitialisés à leurs valeurs par défaut.
Rétroéclairage de l’affichage à
cristaux liquides
Le rétroéclairage s’allume lorsqu’on actionne le commutateur POWER, l’un des
boutons ou commutateurs de commande
ou la commande TEMPO, et il reste allumé
pendant environ 10 secondes (à compter de
la dernière opération).
Vorgehensweise
1. Schieben Sie die Abdeckung des Batteriefachs der RW30 in Pfeilrichtung
(siehe Abbildung), und nehmen Sie die
Abdeckung ab.
2. Nehmen Sie die entladene Batterie heraus und setzen eine frische ein, wobei
Sie sorgfältig auf die Polaritätskennung
achten.
3. Schieben Sie die Abdeckung entgegen
der Pfeilrichtung, und befestigen Sie
die Abdeckung an ihrer ursprünglichen
Position.
*Achten Sie vor dem Austauschen der
Batterie immer darauf, dass das Gerät
ausgeschaltet ist.
*Sobald Sie die neue bzw. aufgeladene
Batterie eingesetzt haben, schalten Sie
die RW30 ein und prüfen Sie, ob sie einwandfrei funktioniert.
1. Fate scorrere all’indietro il coperchio
della batteria dell’RW30 nella direzione
indicata dalla freccia sul diagramma, ed
estraetelo.
2. Estraete la vecchia batteria ed inseritene
una nuova, stando attenti a rispettare la
polarità indicata.
3. Fate scorrere il coperchio in direzione
opposta a quella indicata dalla freccia e
rimettetelo nella sua posizione originale.
*Controllate sempre che lo strumento sia
spento, prima di sostituire le batterie.
*Dopo aver sostituito le batterie, riaccendete l’RW30 ed accertatevi che funzioni
correttamente.
Automatische Abschaltfunktion
Funzione di spegnimento
automatico
Die RW30 verfügt über eine automatische
Abschaltfunktion, um unnötige Batterieentladung zu vermeiden. Wenn Sie die RW30
einschalten ohne sie etwa eine Stunde zu
betreiben, wird die Stromversorgung automatisch abgeschaltet. Diese automatische Abschaltung können Sie wie folgt deaktivieren:
Schalten Sie die STROMVERSORGUNG
ein, während Sie gleichzeitig die Taste
START/STOP drücken. Das LC-Display
zeigt zunächst “OFF” an. Halten Sie die
Taste gedrückt, bis der normale Anzeigebildschirm eingeblendet wird. Die automatische
Abschaltfunktion ist nun deaktiviert, bis die
STROMVERSORGUNG des Geräts abgeschaltet wird. Sobald Sie die STROMVERSORGUNG abschalten, wird die standardmäßige Abschaltfunktion wieder aktiviert.
Datensicherung
RW30 speichert Ihre Einstellungen solange
die Batterieleistung vorhanden ist. Beachten Sie bitte, dass bei nicht vorhandener
Batterieleistung die Einstellungen auf die
werkseite Standardeinstellung zurückgestellt werden.
LCD-Hintergrundbeleuchtung
Die Hintergrundbeleuchtung wird eingeschaltet, wenn Sie den Schalter POWER,
die Reglerknöpfe/-schalter oder den TEMPO-Regler betätigen, und leuchtet etwa 10
Sekunden lang nach der letzten Betätigung.
L’RW30 è dotato di una funzione di
spegnimento automatico per evitare un
consumo non necessario delle batterie.
Se l’RW30 resta acceso ma non utilizzato
per circa un’ora, l’alimentazione viene
automaticamente interrotta. È possibile disattivare tale funzione nel modo seguente.
Accendete il dispositivo tenendo premuto
il tasto START/STOP; sul display LCD
apparirà “OFF”. Tenete premuti i pulsanti
finché non appare la normale schermata
del display. A questo punto, la funzione di
spegnimento automatico resta disattivata
fino allo spegnimento dell’unità. Dopo lo
spegnimento, la funzione si attiva nuovamente.
Memoria di backup
L’RW30 mantiene le impostazioni dell’utente finché è alimentato dalle batterie. In
assenza di alimentazione da batterie, le
impostazioni vengono riportate a quelle
predefinite in fabbrica.
Retroilluminazione del display
LCD
La retroilluminazione si accende quando
si usano l’interruttore POWER, i controlli/
interruttori o il controllo rotativo TEMPO
e rimane accesa per circa 10 secondi dopo
l’ultima operazione eseguita.
1. Deslice la cubierta del alojamiento de
la pila situada en la parte trasera del
RW30 en la dirección indicada por la
flecha en la ilustración y retire la cubierta del alojamiento.
2. Retire la pila usada y coloque una
nueva en su lugar sin olvidar respetar la
polaridad.
3. Deslice la cubierta en la dirección
contraria a la indicada por la flecha y
colóquela en su posición original.
*Compruebe siempre que ha apagado el
metrónomo antes de sustituir las pilas.
*Después de sustituir las pilas, encienda el
metrónomo y compruebe que el RW30
funciona correctamente.
Función de apagado automático
El RW30 dispone de una función de apagado automático para evitar que las pilas
se gasten innecesariamente. Si el RW30
está encendido y no es utilizado durante
una hora aproximadamente, el metrónomo
se apagará automáticamente. Esta función
de apagado automático puede desactivarse
de la siguiente manera: encienda el aparato
mientras pulsa la tecla START/STOP. En
el LCD aparecerá primero “OFF.” Siga
apretando los botones hasta que aparezca
la pantalla normal. La función de apagado
automático estará desactivada hasta que
se apague el metrónomo. Al apagarlo, la
función de apagado automático por defecto
vuelve a activarse.
Conservación de la memoria
El RW30 guarda los ajustes que haya seleccionado siempre que las pilas no se agoten. Tenga en cuenta que cuando se agotan
las pilas, los ajustes vuelven a los valores
predeterminados de fábrica.
Luz de fondo del LCD
La luz de fondo se activará cuando accione
el interruptor POWER, las ruedas/interruptores de control o el cuadrante TEMPO,
y permanecerá encendida durante aproximadamente 10 segundos tras la última
operación.
电池更换步骤
1. 按图中箭头所示的方向滑动 RW30
背面的电池盖,取下电池盖。
2. 取出旧电池并放入新电池,注意电
池正负两极的朝向是否正确。
3. 按所示箭头的相反方向滑动电池盖,
将电池盖装回原位。
*在更换电池前,请务必确保已关闭电
源。
*更换电池后,请打开电源进行检查以
确保 RW30 工作正常。
自动关机功能
RW30 具有自动关机功能,以避免不
必 要 的 电 量 消 耗。RW30 在 开 机 后,
如果一个小时之内无任何操作,将自动
关机。自动关机功能将在下列情况下
禁用 :打开电源的同时按下 START/
STOP 键。LCD 屏幕将首先显示
“OFF”
。
继续按住该键,直至出现正常的显示屏
幕。自动关机功能现在处于禁用状态,
直至关闭本设备的电源。关闭电源后,
默认的自动关机功能将重新生效。
内存备份
只要电池有电,RW30 就会存储您的
设置。请注意,一旦电池断电,设备将
重置为默认的出厂设置。
LCD 背光
当您操作 POWER 开关、控制旋钮 /
开关或 TEMPO 拨盘时,将打开背光,
其亮起时间将在最后一次操作后持续
约 10 秒钟。
NAMES AND FUNCTIONS
OF PARTS
各部の名称
DESCRIPTION DES
FONCTIONS
aTouche POWER/TAP
aPOWER/TAP key
This key is assigned power-on/off and tap
tempo function. When you turn the power
on/off, press this key for approximately 2
seconds. TAP function starts working and
measuring tempo automatically when this
key is pressed at least 5 times.
bRHYTHM key
RW30 has 6 kinds of rhythm. Rhythm
selection is shown on LCD.
cSOUND key
This selects a sound, TYPE 1 or TYPE 2.
dBEAT key
The beat can be set within a range from 0
to 9 beats. The number of beats shift by an
increment of one each time the BEAT key
is pressed.
eLCD (liquid crystal display)
This displays the values set for the
“RHYTHM,” “SOUND,” “BEAT,” and
“TEMPO” parameters.
fTEMPO LEDs
The left LED flashes red in time with the
initial beat. The right LED flashes green
in time with the second and after beats. If
the beat setting is 0, the right LED flashes
green also in time with the initial beat.
If the beat setting is 1, only the left LED
flashes red.
gTEMPO dial
This is used to control the tempo between
=30 ~ 250/minute.
hSTART/STOP key
This key starts and stops the metronome.
iVOLUME control
This is used to control the overall volume.
jPHONES jack
This is the stereo mini jack for headphones.
When connected, no sound is produced
from the RW30’s speaker.
aPOWER/TAP スイッチ
電源のオン / オフと、TAP ボタンとし
て機能します。電源をオン / オフする際
は、約2秒間長押ししてください。
bRHYTHM スイッチ
発音させたいリズム ( 音符 ) を、6種類
搭載しています。画面に表示される音符
から 1 つを選んでください。
cSOUND スイッチ
TYPE1 もしくは TYPE2 のどちらかの
音色を選択します。
dBEAT スイッチ
0拍子から9拍子の範囲で拍子を設定し
ます。BEAT スイッチを押すと、ビート
(拍子)が1つずつ増えます。
eLCD(液晶ディスプレイ)
RHYTHM/SOUND/ BEAT/TEMPO
の設定値を表示します。
fテンポ LED
左側は常に1拍目のみで赤色に、右側は
2拍目以降に合わせて緑色に点滅しま
す。(0 拍子に設定すると、1拍目も右
側が緑色に点滅します。1 拍子に設定す
ると、左側のみが赤色に点滅します)
gTEMPO ダイヤル
テンポの速さを = 30 ~ 250/ 分の
範囲でコントロールします。
hSTART/STOP スイッチ
メトロノームをスタート / ストップさせ
ます。
iVOLUME コントロール
音量をコントロールします。
jPHONES ジャック
ヘッドフォンを接続するステレオミニ
ジャックです。
(接続時、RW30 のスピー
カから音は出ません。)
kベルトクリップ
ベルトなどへの取り付けに便利なベルト
クリップが付いています。譜面台にセッ
トすることも可能です。
kBelt Clip
a Taste POWER/TAP
Cette touche est associée à la mise sous
ou hors tension et à la fonction TAP. Pour
allumer ou éteindre l’appareil, appuyer sur
cette touche pendant environ 2 secondes.
La fonction TAP commence la mesure du
tempo automatique lorsque l’utilisateur
appuie sur cette touche au moins 5 fois.
Diese Taste ist mit der Funktion Ein-/Ausschalten und Tap-Tempo belegt. Wenn Sie
ein- oder ausschalten möchten, drücken
Sie diese Taste etwa 2 Sekunden lang. Die
TAP-Funktion nimmt ihren Betrieb auf
und misst das Tempo automatisch, sobald
Sie diese Taste mindestens 5 Mal drücken.
bTouche RHYTHM
b Taste RHYTHM
Le RW30 comporte 6 rythmes différents.
La sélection du rythme est indiquée sur
l’affichage à cristaux liquides.
cTouche SOUND
Cette touche permet de sélectionner le son
TYPE 1 ou TYPE 2.
dTouche BEAT
Le battement de la mesure peut être défini dans une plage comprise entre 0 et 9
temps. Le nombre de battements augmente
par palier de un temps à chaque pression
de la touche BEAT.”
eAffichage à cristaux liquide
Cet affichage indique les valeurs sélectionnées pour les paramètres “RHYTHM,”,
“SOUND,”, “BEAT,”, et “TEMPO”.
fTémoins DEL de tempo
Le témoin DEL gauche émet un clignotement rouge sur le temps initial. Le témoin
DEL droit émet un clignotement vert sur le
deuxième temps et les suivants. Si la valeur
sélectionnée pour le temps correspond à 0,
le témoin DEL droit émet un clignotement
vert sur le temps initial également. Si la
valeur sélectionnée correspond à 1, seul le
témoin DEL gauche émet un clignotement
rouge.
gCommande de tempo TEMPO
Cette commande permet de sélectionner
une valeur de tempo entre =30 ~ 250/
minute.
hTouche START/STOP
Cette touche allume et éteint le métronome.
This is used to control the overall volume.
iCommande VOLUME
Cette commande permet de régler le volume général.
jBorne pour casque d’écoute
PHONES
Cette borne stéréo permet de connecter un
casque d’écoute. Lorsqu’un un casque y
est connecté, aucun son n’est produit par le
haut-parleur intégré du RW30.
This offers you to clip RW30 to belt. Also
can set it on music stand etc.
DIE
BEDIENUNGSELEMENTE
Die RW30 verfügt über 6 unterschiedliche
Rhythmen. Die Auswahl der Rhythmen
wird am LCD eingeblendet.
c Taste SOUND
Mit dieser Taste wählen Sie einen Ton aus,
TYPE 1 oder TYPE 2.
d Taste BEAT
Der Takt kann in einem Bereich von 0 bis
9 Taktschlägen festgelegt werden. Die Anzahl der Taktschläge wechselt mit jedem
Druck auf die Taste BEAT anhand einer
Schrittgröße von eins.
e LCD (Flüssigkristallanzeige)
Auf dieser Anzeige können Sie die Werte
der ParameterRHYTHM,, SOUND,,
“BEAT,, und TEMPO ablesen.
f LED-Anzeigen TEMPO
Die linke LED blinkt rot im Takt mit dem
ersten Taktschlag. Die rechte LED blinkt
grün im Takt mit dem zweiten und dem
darauffolgenden Taktschlag. Wenn die
Einstellung des Taktschlages 0 ist, dannn
blinkt die rechte LED ebenfalls grün im
Takt mit dem ersten Taktschlag. Beträgt
die Einstellung des Taktschlages 1, blinkt
nur die linke LED rot.
g Datenrad TEMPO
Hier kann das Tempo zwischen
250 BPM eingestellt werden.
NOMI E FUNZIONI DEI
COMPONENTI
NOMBRES Y DESCRIPCIÓN
DE LOS COMPONENTES
aTecla POWER/TAP
该键用于打开 / 关闭电源及打拍定速。
当您需要打开 / 关闭电源时,请按住此
键约 2 秒钟。当按下此键至少 5 次后,
将开启打拍定速功能并自动测量拍速。
bTasto RHYTHM
Con esta tecla se apaga/enciende el aparato
y se controla la función de marcado del
tempo. Al encender/apagar el aparato,
pulse esta tecla durante 2 segundos aproximadamente. La función TAP se activa y
empieza a medir el tempo automáticamente cuando se pulsa esta tecla cinco veces
como mínimo.
bTecla RHYTHM
该键用于选择声音,声音可为 TYPE 1
或 TYPE 2。
Questo tasto ha funzione di accensione/
spegnimento e funzione di tap tempo. Al
momento dell’accensione/spegnimento,
premete questo tasto per circa 2 secondi.
La funzione TAP inizia a funzionare e
misura automaticamente il tempo quando
questo tasto viene premuto almeno 5 volte.
L’RW30 ha 6 tipi di ritmo. Il ritmo scelto
viene mostrato sul display LCD.
cTasto SOUND
Consente di scegliere un suono fra TYPE 1
e TYPE 2.
dTasto BEAT
Il beat può essere impostato in un intervallo da 0 a 9. Il numero di beat aumenta di
uno ogni volta che viene premuto il tasto
BEAT.
eDisplay LCD (a cristalli liquidi)
Serve a mostrare i valori impostati per
i parametri “RHYTHM,”, “SOUND,”,
“BEAT,” e “TEMPO”.
fLED del TEMPO
Il LED sinistro lampeggia in rosso a tempo
con il beat iniziale. Il LED destro lampeggia in verde a tempo con il secondo beat
e i successivi. Se il beat è impostato su 0,
anche il LED destro lampeggia a tempo
con il beat iniziale, in verde. Se il beat è
impostato su 1, lampeggia solo il LED
sinistro, in rosso.
gControllo rotativo TEMPO
Viene usato per controllare la velocità del
tempo fra = 30~250/minuto
hTasto START/STOP
El RW30 tiene 6 tipos de ritmos. La selección de ritmo aparece en el LCD.
cTecla SOUND
Con esta tecla se selecciona un sonido,
TYPE 1 o TYPE 2.
hTecla START/STOP
Diese Taste startet und stoppt das Metronom.
Viene usato per controllare il volume generale.
i Regler VOLUME
jPresa PHONES
Se utiliza para modificar el volumen general.
Das ist die Stereo-Minibuchse für die
Kopfhörer. Wenn diese in die Buchse
eingesteckt sind, ist der Lautsprecher der
RW30 abgeschaltet.
È la presa mini stereo per la cuffia. Quando la cuffia è inserita, dall’altoparlante
dell’RW30 non viene emesso alcun suono.
kClip per cintura
Consente di fissare l’RW30 a una cintura, a
un leggio, ecc.
k Gürtelclip
Damit können Sie die RW30 am Gürtel
befestigen. Sie können Sie ebenfalls am
Notenständer usw. befestigen.
cSOUND 键
dBEAT 键
该键可在 0 到 9 拍的范围内设置节拍。
每按一次 BEAT 键就将增加一拍。
eLCD 显示屏(液晶显示屏)
显示屏将显示所设置的“RHYTHM”
、
Se puede ajustar el compás entre 0 y 9 “SOUND”
、
“BEAT”以及“TEMPO”
tiempos. El número de tiempos aumenta 参数。
uno cada vez que se pulsa la tecla BEAT.
fTEMPO LED 指示灯
eLCD (pantalla de cristal líquido)
左侧 LED 指示灯将在首个节拍时闪烁
En este visualizador se muestran los va- 红色。从第二个节拍起,右侧 LED 指
lores especificados para los parámetros 示灯将闪烁绿色。如果节拍设置为 0,
“RHYTHM,”, “SOUND,”, “BEAT,” y 则右侧 LED 指示灯也将在首个节拍时
“TEMPO”.
闪烁绿色。如果节拍设置为 1,则只有
fIndicadores LED del TEMPO
左侧 LED 指示灯闪烁红色。
El LED izquierdo parpadea en color rojo gTEMPO 拨盘
a la vez que el tiempo inicial. El LED de- 该 拨 盘 用 于 将 拍 速 控 制 在 =30 ~
recho parpadea en color verde a la vez que 250/ 分钟。
el segundo tiempo y siguientes. Si el ajuste hSTART/STOP 键
del compás es 0, el LED derecho parpa- 该键用于启动和停止节拍器。
dea en color verde a la vez que el tiempo iVOLUME 控键
inicial. Si el ajuste del compás es 1, solo el 该控键用于控制整体音量。
LED izquierdo parpadea en color rojo.
jPHONES 插孔
gCuadrante TEMPO
此为立体声迷你耳机插孔。当连接耳
Se utiliza para controlar el tempo entre = 机时,RW30 的扬声器将不会发出声
30 ~ 250/minuto.
音。
iControllo VOLUME
j Buchse PHONES
bRHYTHM 键
RW30 具有 6 种节奏。选择的节奏将
显示在 LCD 显示屏上。
dTecla BEAT
Esta tecla pone en marcha y detiene el metrónomo.
Hier wird die Gesamtlautstärke eingestellt.
aPOWER/TAP 键
aTasto POWER/TAP
= 30 und Consente di avviare e arrestare il metronomo.
h Taste START/STOP
各部件的名称和功能
k背夹
您可以使用背夹将 RW30 夹在腰带
上,也可以夹在乐谱架等其他物品上。
iControl VOLUME
jToma PHONES
Es la toma mini estéreo para auriculares.
Cuando se utiliza esta toma, el altavoz del
RW30 no emite sonidos.
kPinza
Con esta pinza puede colocarse y sujetar el
RW30 al cinturón. También puede sujetarlo a un atril, etc.
kPince de ceinture
Cette pince permet de fixer le RW30 à une
ceinture. Elle permet également de fixer
l’appareil, par exemple à un pupitre.
OPERATION
Metronome Operation
1. Press the RHYTHM key and select a
rhythm.
2. Press the SOUND key and select either
TYPE 1 or TYPE 2. The TYPE 1 and
TYPE 2 have different voicings, so select whichever mode is appropriate for
the usage conditions.
3. Set the tempo using the TEMPO dial,
and the beat using the BEAT key.
4. Pressing the START/STOP key starts
the metronome. Sound is produced
from the speaker, and the LEDs begin
flashing.
5. While listening to the sound produced,
adjust the overall volume by using side
VOLUME control.
6. Pressing the START/STOP key again to
stops the metronome.
Operating the tap function
The tap function lets you measure any
desired tapped tempo and applies to the
tempo of metronome.
1. Enter the tempo by pressing the TAP
key with following rhythm. At the
moment you tap 5 times, the measured
tempo is displayed.
2. When you tap 6 times or more, it displays average tempo of the last 4 taps.
3. If you don’t push the TAP key for
approximately 2.5 seconds, tempo measurement will finish and tempo value
on the LCD display flashes.
4. If the measured tempo exceeds the
range of = 30 ~ 250/minute, error
messages are displayed. If the tempo
is lower than 30, message “Lo” will be
displayed and tempo is set 30 automatically. If the tempo is higher than 250,
message “Hi” will be displayed and
tempo is set 250 automatically.
操作方法
メトロノームの操作方法
1. RHYTHM スイッチで、リズムを選択し
ます。
2. SOUND スイッチで TYPE1 または
TYPE2 を選択します。使用する状況
に適した音を選択してください。
3. TEMPO ダイヤルでテンポを設定し、
BEAT スイッチでビート(拍子)を設定
します。
4. START/STOP スイッチを押すとメト
ロノームがスタートし、音が出力され
LED が点滅を始めます。
5. 音を聞きながら側面の VOLUME コン
トロールで音量を調節して下さい。
6. 再度、START/STOP スイッチを押す
とメトロノームが止まります。
タップ機能の操作方法
タップされたテンポを計測し、自動的に
メトロノームのテンポに適用する機能で
す。
1. 任意のテンポでリズムを取りながら、
TAP スイッチを続けて押します。5 回
押した時点で、ディスプレイに計測した
テンポを表示します。
2. 6 回以上押すと、最後の4回の平均テ
ンポを表示します。
3. 約 2.5 秒間 TAP TEMPO スイッチを
押さないと、ディスプレイ上のテンポ値
が点滅し、テンポの計測を終了します。
計測したテンポが
= 30 ~ 250/ 分
4.
の範囲を超えた場合はエラーメッセー
ジが表示されます。29 以下の場合
“Lo”
と表示された後、自動的に 30 になり
ます。251 以上の場合“Hi”と表示さ
れた後、自動的に 250 になります。
FEDERAL COMMUNICATIONS COMMISSIONRADIO FREQUENCY INTERFERENCE
STATEMENT
This equipment has been tested and found to comply with the limits for a Class B digital
device, pursuant to part 15 of the FCC Rules. These limits are designed to provide reasonable
protection against harmful interference in a residential installation. This equipment generates,
uses and can radiate radio frequency energy and, if not installed and used in accordance with
the instructions, may cause harmful interference to radio communications. However, there is
no guarantee that interference will not occur in a particular installation. If this equipment does
cause harmful interference to radio or television reception, which can be determined by turning the equipment off and on, the user is encouraged to try to correct the interference by one or
more of the following measures:
• Reorient or relocate the receiving antenna.
• Increase the separation between the equipment and receiver.
• Connect the equipment into an outlet on a circuit different from that to which the receiver is
connected.
• Consult the dealer or an experienced radio/TV technician for help.
This device complies with Part 15 of the FCC Rules. Operation is subject to the following two
conditions:
(1) This device may not cause harmful interference, and
(2) This device must accept any interference received, including interference that may cause
undesired operation.
Unauthorized changes or modification to this system can void the users authority to operate
this equipment.
This equipment requires shielded interface cables in order to meet FCC class B Limit.
FONCTIONNEMENT
Fonctionnement du métronome
BEDIENUNG
Bedienung des Metronoms
FUNZIONAMENTO
Funzionamento del metronomo
1. Appuyer sur le touche RHYTHM et
sélectionner un rythme.
2. Appuyer sur la touche SOUND et
sélectionner TYPE 1 ou TYPE 2. Les
modes TYPE 1 et TYPE 2 diffèrent par
le son ; il convient donc de sélectionner
le mode adapté à l’utilisation.
3. Définir le tempo à l’aide de la commande TEMPO et la mesure à l’aide de
la touche BEAT.
4. Appuyer sur la touche START/STOP
pour activer le métronome. Le son
sera reproduit via le haut-parleur et les
témoins DELs’illumineront alternativement.”
5. Tout en écoutant le son produit, régler
le volume général au moyen de la commande VOLUME, située sur le côté.
6. Appuyer à nouveau sur la touche
START/STOP pour désactiver le métronome.
1. Drücken Sie die Taste RHYTHM, und
wählen Sie einen Rhythmus aus.
2. Drücken Sie die Taste SOUND, und
wählen Sie entweder TYPE 1 oder
TYPE 2 aus. Die Modi TYPE 1 und
TYPE 2 unterscheiden sich durch unterschiedlichen Sound, wählen Sie also
die Betriebsart, die Ihrem Geschmack
oder Ihren Erfordernissen am besten
entspricht.
3. Stellen Sie das Tempo mit dem Datenrad TEMPO und das Taktmaß mit der
Taste BEAT ein.
4. Mit der Taste START/STOP wird das
Metronom gestartet. Sie hören den
Klang aus dem Lautsprecher, und die
LEDs blinken.
5. Stellen Sie, während Sie auf den Klang
hören, die Gesamtlautstärke mithilfe
des Reglers VOLUME ein.
6. Durch erneutes Drücken der Taste
START/STOP stoppt das Metronom.
1. Premete il tasto RHYTHM e selezionate un ritmo.
2. Premete il tasto SOUND e selezionate
TYPE 1 o TYPE 2. I modi TYPE 1 e
TYPE 2 hanno suoni differenti, pertanto
selezionate quello più appropriato alle
condizioni di impiego che prevedete.
3. Impostate la velocità del tempo usando
il controllo rotativo TEMPO, e il movimento utilizzando il tasto BEAT.
4. Premendo il tasto START/STOP si mette in funzione il metronomo. Il suono
viene prodotto dall’altoparlante e i LED
cominciano a lampeggiare.
5. Ascoltando il suono prodotto, regolate
il volume generale usando il controllo
laterale VOLUME.
6. Ripremendo il tasto START/STOP, il
metronomo si ferma.
Utilisation de la fonction TAP
Bedienung der Tap-Funktion
Per usare la funzione Tap
La fonction TAP permet d’entrer un tempo
manuellement, et s’applique au tempo du
métronome.
Mit der Tap-Funktion können Sie jedes beliebig gewünschte Tempo messen und dem
Tempo des Metronoms anpassen.
1. Définir le tempo en appuyant sur la
touche TAP selon le rythme suivant.
Taper 5 fois pour afficher le tempo mesuré.
2. Si l’utilisateur tape 6 fois ou plus,
l’appareil affiche le tempo moyen des
4 dernières pressions.
3. Si l’utilisateur n’appuie pas sur la
touche TAP pendant environ 2,5 secondes, la mesure du tempo s’arrête et
la valeur du tempo clignote sur l’affichage à cristaux liquides.
4. Si le tempo mesuré dépasse la limite
de = 30 ~ 250/minute, plusieurs messages d’erreur s’affichent. Si le tempo
est inférieur à 30, l’appareil affichera le
message « Lo » et le tempo se définit
automatiquement sur 30. Si le tempo
est supérieur à 250, l’appareil affiche
le message « Hi » et le tempo se définit
automatiquement sur 250.
1. Geben Sie das Tempo ein, indem Sie
die Taste TAP anhand des folgenden
Rhythmus drücken. Das gemessene
Tempo wird in dem Moment angezeigt,
wenn Sie 5 Mal schlagen.
2. Wenn Sie mehr als 6 Mal schlagen,
wird das durchschnittliche Tempo der
letzten 4 Schläge angezeigt.
3. Wenn Sie die Taste TAP etwa 2,5 Sekunden lang nicht drücken, wird die
Tempomessung beendet. Der Tempowert an der LCD-Anzeige blinkt.
4. Falls das gemessene Tempo den Bereich von = 30-250 BPM unter- oder
überschreitet, wird eine Fehlermeldung
angezeigt. Wenn das Tempo unter 30
ist, wird die Meldung “Lo” angezeigt,
und das Tempo wird automatisch auf 30
festgelegt. Wenn das Tempo über 250
ist, wird die Meldung “Hi” angezeigt,
und das Tempo wird automatisch auf
250 festgelegt.
La funzione Tap vi permette di misurare
qualsiasi tap tempo e si applica al tempo
del metronomo.
1. Premete il tasto TAP a tempo con il
beat. Una volta premuto il tasto 5 volte,
il tempo misurato verrà visualizzato.
2. Premendo il tasto 6 o più volte, viene
mostrato il tempo medio degli ultimi 4
tap.
3. Se il tasto TAP non viene premuto per
circa 2,5 secondi, la misurazione del
tempo si conclude e il valore del tempo
lampeggia sul display LCD.
4. Se il tempo misurato eccede la gammadi nota di = 30 ~ 250/minuto, verrà
visualizzato un messaggio di errore. Se
il tempo è impostato su un valore inferiore a 30, apparirà il messaggio “Lo”
e il tempo verrà automaticamente impostato su 30. Se il tempo è impostato
su un valore superiore a 250, apparirà il
messaggio “Hi” e il tempo verrà automaticamente impostato su 250.
操作
FUNCIONAMIENTO
Funcionamiento del metrónomo
1. Pulse la tecla RHYTHM y elija un ritmo.
2. Pulse la tecla SOUND y elija entre
TYPE 1 o TYPE 2. TYPE 1 y TYPE 2
ofrecen armonías distintas. Elija el modo
más adecuado según las circunstancias.
3. Ajuste el tempo con el cuadrante TEMPO y el compás con la tecla BEAT.
4. Ponga en marcha el metrónomo pulsando la tecla START/STOP. El sonido
sale del altavoz y los indicadores LED
empiezan a parpadear.
5. Mientras escucha el sonido producido y
ajuste el volumen general con el control
VOLUME lateral.
6. Detenga el metrónomo pulsando otra
vez la tecla START/STOP.
Funcionamiento de la función
TAP
La función tap le permite medir cualquier
tempo marcado y aplicarlo al tempo del
metrónomo
1. Introduzca el tempo pulsando la tecla
TAP seguido del ritmo. Cuando haya
marcado cinco veces, se mostrará el
tempo medido.
2. Al marcar 6 veces o más, se muestra
una media del tempo de los últimos
cuatro.
3. Si no pulsa la tecla TAP durante unos
2,5 segundos, terminará la medición del
tempo y el valor de tempo en el LCD
parpadeará.
4. Si el tempo medido está fuera del intervalo = 30 ~ 250/minuto, aparecerán
mensajes de error. Si el tempo es inferior a 30, aparecerá el mensaje “Lo” y
el tempo se establecerá en 30 automáticamente. Si el tempo es superior a 250,
aparecerá el mensaje “Hi” y el tempo se
establecerá en 250 automáticamente.
节拍器操作
1. 按下 RHYTHM 键,选择一种节奏。
2. 按下 SOUND 键,然后选择 TYPE 1
或 TYPE 2。TYPE 1 与 TYPE 2
具有不同的声音,因此请根据使用
环境来选择合适的模式。
3. 使用 TEMPO 拨盘设置拍速,以及
使用 BEAT 键设置节拍。
4. 按下 START/STOP 键,
启动节拍器。
启动后扬声器会传出声音,LED 指
示灯开始闪烁。
5. 听到扬声器传出的声音后,可通过
侧面的 VOLUME 控键来调节整体
音量。
6. 再次按下 START/STOP 键,停止节
拍器。
打拍定速功能的操作
打拍定速功能够测量任何所需的拍速,
并将此拍速应用到节拍器。
1. 使用以下节奏按下 TAP 键,输入拍
速。在拍打了 5 次时,将显示测量
出的拍速。
2. 当您拍打 6 次及以上次数时,设备
将显示最后 4 次拍打的平均拍速。
3. 如果您持续约 2.5 秒未按下 TAP
键,则将结束拍速测量,拍速值将
在 LCD 显示屏上闪烁。
4. 果 测 量 出 的 拍 速 超 出 了 =30 ~
250/ 分钟的范围,则将显示错误消
息。如果拍速低于 30,则将显示消
息 "Lo",且拍速会自动设置为 30。
如果拍速高于 250,则将显示消息
"Hi",且拍速会自动设置为 250。