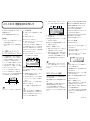
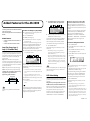
1
5. SELECT ダイヤルを回し、クロスフェード タイム
AR-3000 機能追加のお知らせ
(0ms ∼ 1000ms)を選択してダイヤルを押します。
fig.Loop_Fade
本機からの MTC に外部 MIDI 機器を同期させる時の設定
本機から MTC を外部機器に送信して動作させるとき、
任意の時間に外部機器を再生させることができます。
たとえば、本機のフレーズを再生させてから、
"00h00m10s00f" 後に外部 MIDI 機器を
AR-3000 をさらに快適にお使いいただくために、以下
の機能を追加しました。
AR-3000 の取扱説明書と併せてお読みください。
1. SELECT ダイヤルで、設定変更するフレーズを選
択します。
2. MODE ボタンを押します。
追加機能
MODE インジケーターが点灯します。
• 1.5 ループ サイセイの設定にクロスフェード タイ
ムの項目が追加になりました。
• 6.9 MTC の設定に、オフセットの項目が追加にな
りました。
ループ再生(ループ、ループ 1、
ループ 2、クロスフェード タイム)
3. SELECT ダイヤルで「1.5 ループ サイセイ」を選
択して、ダイヤルを押します。
4. SELECT ダイヤルを回し、ループ(オフ/オン/ 1
fig.11-g05-j
ループ1:ループの戻り先ポイントを指定します。
ループ2:ループの繰り返しポイントを指定します。
が「sf」の位置でダイヤルを押すと、ループ 2 の位置
設定に移動します。
クロスフェード タイム:ループ再生時の繋ぎ目を調整
します。時間が大きいほど滑らかに繋がります。
※ 設定時間は、再生ポイントのスタート・ポイント
を 0 とした相対時間で表示されます。
※ BACK ボタンを押すごとに、カーソル(反転表示)
が sf → f → s → m → h クロスフェードの順に移
動します。
SELECT ダイヤルを回し、ループ 2 の位置(時間)を
ループ2
1. MODE ボタンを押します。
2. SELECT ダイヤルで「6.9 MTC」を選択して、ダ
イヤルを押します。
※ 設定中、PAUSE(BACK)ボタンで一つ前の入力
位置(反転表示)にもどることができます。
「オフセット」まで入力
3. SELECT ダイヤルを押し、
※ 設定中に MODE ボタンを押すと、設定を中止する
かどうかの確認の画面が出ます。「ハイ」を選択し
4. SELECT ダイヤルを回し、オフセット(時刻)を
て ENTER ボタンを押すと通常画面にもどり、そ
れまでの設定は無効になりますのでご注意くださ
ループ区間内に再生ポイントのスタートあるいはエン
ド・ポイントを設定した場合、スタート・ポイントが
SELECT ダイヤルを回し、ループ 1 の位置(時間)を
設定してダイヤルを押します。カーソル(反転表示)
ループ1
MTC オフセット設定手順
設定が完了すると、設定項目選択の画面にもどります。
位置(反転表示)を進めます。
設定して、ダイヤルを押します。
fig.MTC_Offset
い。
ループ再生されます)。ループ回数を「オン」に設定し
たときは、エンドレスにループします。
フレーズ
"24h00m00s00f" を加算してください。
し、ENTER ボタンを押します。
設定を終了し、通常画面にもどります。
ヤルを回してカード A/B、およびフレーズ番号を再選
択し、ダイヤルを押してください。
計算した時間がマイナスになる場合は、
中止する場合は SELECT ダイヤルで「イイエ」を選択
レーズを再選択することができます。入力位置(反転
表示)がフレーズ選択に移りますので、SELECT ダイ
ループ:「ループする回数」を設定します(たとえば、
ループを「5 回」に設定した場合、トータル 6 回、
ループ区間
ボタンを押します。
PAUSE(BACK)ボタンを押すと、設定変更するフ
ト)から始まり、指定回数のループ終了後エンド・ポ
イント(再生ポイント)まで再生し終了します。
fig.11-05-j(ループ再生)
"00h00m00s00f"-"00h00m10s00f"="23h59m50s00f"
6. 確認の画面が出ますので、実行する場合は ENTER
7. MODE ボタンを押します。
∼ 99)を選択してダイヤルを押します。
フレーズの任意の区間をループ再生させる設定をしま
す。ループ再生は、スタート・ポイント(再生ポイン
"00h00m00s00f" から再生させたいときは、オフセッ
トを "23h59m50s00f" に設定します。
ループ再生設定手順
設定してダイヤルを押します。
※ ループ区間は、10 f 未満の値に設定できません。
デュアル・モノ・モード時は、ループ再生できません。
SCRUB(スクラブ)再生モード(取扱説明書 P.54)
を使うと、音声を聞きながらポイントを設定すること
ループ 1、エンド・ポイントがループ 2 にそれぞれ設
定されます。
BACK ボタンを押すごとにカーソル(反転表示)が、f
→ s → m → h の順に移動します。
5. 確認の画面が出ますので、実行する場合は ENTER
ボタンを押します。
MTC オフセットの設定
中止する場合は SELECT ダイヤルで「イイエ」を選択
し、ENTER ボタンを押します。
本機と外部 MIDI 機器とを MTC で同期運転する際のタ
イミングを合わせます。
設定が完了すると、設定項目選択の画面にもどります。
外部 MIDI 機器からの MTC に本機を同期運転する時の
設定
設定を終了し、通常画面にもどります。
外部 MIDI 機器から MTC を受信して動作するときに、
任意の時間に本機を再生させることができます。
6. MODE ボタンを押します。
※ 設定中、PAUSE(BACK) ボタンで一つ前の入力位
置 ( 反転表示 ) にもどることができます。
たとえば、外部 MIDI 機器からの MTC 時刻が
"01h00m00s00f" になったときに、フレーズを再生さ
※ 設定中に MODE ボタンを押すと、設定を中止する
どうかの確認の画面が出ます。
せたいときは、オフセットを "01h00m00s00f" に設定
します。
「ハイ」を選択して ENTER ボタンを押すと通常画
面にもどり、それまでの設定は無効になりますの
でご注意ください。
ができます。PREVIEW 再生モードを使うとループ 2
とループ 1 のつなぎ目の確認ができます。
40453678 1*PD
Added Features for the AR-3000
The following features have been added to the AR-3000 to
make it even easier to use.
Please read this together with the owner's manual for the
AR-3000.
Procedure for Making Loop Play Settings
1. Use the SELECT dial to choose the phrase whose
setting you want to change.
2. Press the MODE button.
The MODE indicator lights up.
Added Features
•
An item for Crossfade Time has been added to “1.5
Loop Play.”
•
An item for Offset has been added to “6.9 MTC.”
Loop Play (Loop, Loop 1,
Loop 2, Crossfade Time)
This makes the setting for loop playback of the desired
passage of a phrase. Loop Playback starts at the start
point (playback point), then after looping the specified
number of times, playback ends at the end point
(playback point).
Loop: This sets the number of times playback is
looped. (For example, when the number of loops is set
to five times, the looped phrase is played back a total of
six times.) When the number of loops is set to Endless,
playback loops endlessly.
Loop 1: This specifies the return point for looping.
Loop 2: This specifies the repeat point for looping.
Crossfade Time: This adjusts the junction during
loop playback. Longer times make for
progressively greater smoothness.
fig.11-05e
Loop passage
Phrase
3. Use the SELECT dial to choose “1.5 Loop Play,”
then press the dial.
You can reselect a phrase whose setting you want to
change by pressing the PAUSE (BACK) button. The
entry position (highlighted) moves to the phrase
selection, so turn the SELECT dial to reselect card A or
B and the phrase number, then press the dial.
4. Turn the SELECT dial to choose Loop (OFF/ON/1
to 99), then press the dial.
fig.11-g05e
Turn the SELECT dial to set the Loop 1 position (time),
then press the dial. Pressing the dial while the cursor
(highlighting) is at the “sf” position moves the Loop 2
position setting.
* The time that is set is shown as a relative amount of
time, with the start position of the playback point taken
to be 0.
* Each press of the BACK button moves the cursor
(highlighted) in the sequence of sf → f → s → m → h.
Turn the SELECT dial to set the Loop 2 position (time),
then press the dial.
* The looped region cannot be set to value less than 10
frames.
Loop 1
Loop 2
Loop Play is not possible when in the Dual Mono
mode.
5. Turn the SELECT dial, select the Crossfade
Time (0 ms to 1000 ms), then press the dial.
You can set the points while listening to the audio by
using the SCRUB playback mode (Owner’s Manual p.
54). You can check the Loop 1 and Loop 2 junctures
using the Preview playback mode.
6. When the prompt appears on the screen, press the
ENTER button to enable the settings.
Settings When Synchronizing an External MIDI
Instrument to the MIDI Time Code from the Unit
When you're operating an external instrument on
receiving the MIDI Time Code from the unit, you can
effect playback on the external instrument at any time
you want.
For instance, if you want to play back a phrase on the
unit, then after the elapse of “00h00m10s00f” effect
playback on the external MIDI instrument at
“00h00m00s00f,” set the offset to “23h59m50s00f.”
“00h00m00s00f” - “00h00m10s00f” = “23h59m50s00f”
To quit without making the settings, use the SELECT
dial to choose “NO,” then press the ENTER button.
When the calculated time value is negative, add
“24h00m00s00f.”
Once the settings have been successfully modified,
you’re returned to the setting item selection screen.
Procedure for Setting the MTC Offset
7. Press the MODE button.
This ends the setting process and returns you to the
usual screen.
* While making the settings, you can go back to the
previous entry location (highlighted) by pressing the
PAUSE (BACK) button.
* If you press the MODE button while making settings, a
message asking you to confirm that you want to exit the
setting process appears. Note that if you choose “YES,”
then press the ENTER button, you are returned to the
usual screen, and all setting changes you’ve made up to
that point will be discarded.
1. Press the MODE button.
2. Use the SELECT dial to choose “6.9 MTC,” then
press the dial.
3. Press the SELECT dial and advance the entry
location (highlighted) to “Offset.”
4. Turn the SELECT dial to set the offset (time), then
press the dial.
Each press of the BACK button moves the cursor (highlighted)
in the sequence of f → s → m → h.
If a start or end playback point is set within the looped
interval, the start point is set to Loop 1 and the end
point is set to Loop 2.
5. When the prompt appears on the screen, press the
ENTER button to enable the settings.
MTC Offset Setting
Once the settings have been successfully modified,
you’re returned to the setting item selection screen.
This adjusts the timing when you are using MTC to
synchronize operation of the unit and an external MIDI
instrument.
6. Press the MODE button.
Settings When Synchronizing Operation of the Unit to
the MIDI Time Code from an External MIDI Instrument
When you're operating the unit on receiving the MIDI
Time Code from an external MIDI instrument, you can
effect playback on the unit at any time you want.
For instance, if you want to play back a phrase when
the MTC time on the external MIDI instrument is
“01h00m00s00f,” set the offset to “01h00m00s00f.”
To quit without making the settings, use the SELECT
dial to choose “NO,” then press the ENTER button.
This ends the setting process and returns you to the
usual screen.
* While making the settings, you can go back to the
previous entry location (highlighted) by pressing the
PAUSE (BACK) button.
* If you press the MODE button while making settings, a
message asking you to confirm that you want to exit the
setting process appears. Note that if you choose “YES,”
then press the ENTER button, you are returned to the
usual screen, and all setting changes you’ve made up to
that point will be discarded.
40453678 1*PD
![DTF-7500S 機能追加のお知らせ [PDF:76.1KB]](http://vs1.manualzilla.com/store/data/006673767_2-d94886004dd4730bddb55701cf046dda-150x150.png)