1
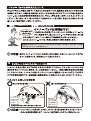
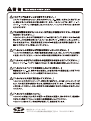
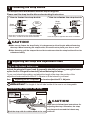
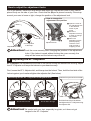
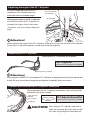
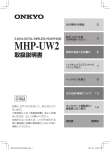
ご注意:ご使用前に必ずお読みください。
■AERO-K1シリーズをご使用のかたへ
AERO-K1ヘルメットは、タイムトライアル系の競技においてのみ
使用できるものであり、練習時および公道上において、
絶対に使用しないでください。
株式会社 オージーケーカブト
〒577-0016 大阪府東大阪市長田西6丁目3-4 TEL: 06-6747-8031 FAX: 06-6747-8023
検索
ホームページ: KABUTO
No.JAERO-K1-12JL/KIZHK
2011年05月版
AERO-K1・取扱説明書
保存用
AERO-K1をご使用のかたへ
このヘルメットは、
タイムトライアル系の競技において
のみ使用できるものであり、練習時および公道上にお
いて、絶対に使用しないでください。
●このヘルメットは「自転車専用」です。
オートバイやその他の用途には絶対に使用しないでください。
●国で定められている交通規則に必ず従ってください。
当製品のストラップには、ナノテク技術を利用した従来とは全く異なる新しい消臭方
法を採用した素材「MOFF」を使用しています。
「MOFF」は瞬間消臭効果・安全性に加
え、環境への影響もない次世代の消臭繊維です。
[MOFF素材のお手入れについて]
汗などで汚れた場合のお手入れは、水もしくはぬるま湯(35℃以下)のみで軽くすす
いで汚れを落とし、
しっかり水気を拭き取ってから、陰干しするとMOFF本来の効果が
持続できます。なお洗浄剤を使用する場合は、中性の洗たく用洗剤を使用してくださ
い。
(アルカリ性洗剤はMOFFの効果が減少しますので使用しないでください)
イヤーフラップパッド
テールプロテクターパッド
1 ストラップホルダーの取扱方法
2 ストラップおよびアジャストロックの調整
アジャスター
ダイヤル
3 XF-1アジャスターの調整
4 シールドについて
5 イヤーフラップについて
6 ラチェットキャップについて
7 インナーパッドの交換方法
8 正しい位置でヘルメットを装着する
イヤーフラップパッド
1
ストラップホルダーの取扱方法
このヘルメットにはマグネット式ストラップホルダーが採用されています。
ご使用前にストラップホルダーの構造をよく理解したうえでご使用ください。
●ストラップホルダーのとめ方
ストラップ
ホルダー
●ストラップホルダーの外し方
ストラップ
ホルダー
パチン、
という音
双方を近づけるとマグネットによりホルダーが固定されます。
双方を反対方向に押すとホルダーが外れます。
●ストラップは正しくしっかり締めてください。締めないままの走行は、万一転倒した際に大変危
険ですので、絶対におやめください。またお肌を挟まないようご注意ください。
●ストラップホルダーをとめた後はストラップを左右に引っぱって容易に外れないか必ず確認し
てください。
2
ストラップおよびアジャストロックの調整
①アジャストロックの
カバーを矢印の方向
に開きます。
②アジャストロックを
正しい高さに調整し
ます。
③高さが決まったら、
アジャストロックの
カバーを「パチン」と
元通りに閉じたら完
了です。
3
XF-1アジャスターの調整
「XF-1アジャスター」をご使用の際は、アジャスターダイヤル操作時に毛髪が
引っかからないようにご注意のうえ、調整してください。
補修用・XF-1アジャスター
※詳しくは、ホームページをご覧ください。
※詳しくは、ホームページをご覧ください。
6
シールドラチェット
ラチェットキャップ
6
ラチェットキャップ
取付ビス
シールドワッシャー
4
4
5
シールド※
シールドについて
イヤーフラップ
5
イヤーフラップ
※シールドレスモデルをご購入の場合シールドは付属されておりません。
シールドがご必要の場合は、別途専用シールドをお買い求めください。
このヘルメットはシールドを着脱してお使いいただけます。シールドをご使用の場合は、シールドラ
チェット、シールドワッシャー、取付ビスをご使用のうえ取り付けます。シールドを使用しない場合は、
シールドの取付部にラチェットキャップを取り付けてご使用ください。
補修用シールド・シールド関連パーツ
※詳しくは、ホームページをご覧ください。
シールドをご使用の場合、取り付けた後は必ず開閉動作を2∼3回行い、正しく取付られているか確
認してください。またキズの付いたシールドは視界を妨げますので速やかに交換してください。
5
イヤーフラップについて
●イヤーフラップの脱着方法
取り付け穴
このヘルメットはお好みによりイヤーフラッ
プを取り付けできます。イヤーフラップを取
り着ける場合は、
( 図1)のように①イヤーフ
ラップのフックを取り付け穴へ差し込み、②
前方向へ引くと取り付けできます。取り外す
場合はこの逆の手順で取り外してください。
補修用・イヤーフラップ
※詳しくは、ホームページをご覧ください。
図1
イヤーフラップ
ヘルメット装着時、イヤーフラップを横に広げ過ぎるとイヤーフラップが外れかかるおそれがあり
ます。ヘルメットを装着の際はイヤーフラップが外れていないか必ずご確認ください。
6
ラチェットキャップについて
シールドをご使用にならない場合は、付属のラチ
ェットキャップを使い、
シールド取付穴をふさいで
ください。キャップの方向についてはキャップ裏
側にL/Rの表示があります。
ラチェットキャップを取り外す場合は、
(図2)のようにマイナスドライバーを差し込ん
で、すくい上げるように取り外してください。
補修用・ラチェットキャップ
※詳しくは、ホームページをご覧ください。
図2
7
インナーパッドの交換方法
インナーパッドは、2種類の厚みのパッドを付属し
ています。フィッティングに合わせて、厚みを変更
してください。
それぞれのインナーパッドをヘルメット内部にあ
るマジックテープに押しつけて貼り付けます。
前
インナーパッド
(トップ)
インナーパッド
(前)
ストラップ
ストラップ
厚み:5mm/10mm
AERO-K1
補修用・AERO-K1インナーパッドセット(5mm厚、10mm厚)※ともに全サイズ共通
※詳しくは、ホームページをご覧ください。
8
ヘ ル メット
の先がまゆ
毛のすぐ上
にある
ヘルメットの
先が上を向
き、前頭部が
見えている
株式会社 オージーケーカブト
〒577-0016 大阪府東大阪市長田西6丁目3-4 TEL:
06-6747-8031
AERO-K1
INSTRUCTION MANUAL
NOTES BEFORE USE
BE SURE TO READ THIS MANUAL BEFORE
USING THE HELMET.
KEEP THE MANUAL IN A SAFE PLACE FOR
FUTURE REFERENCE.
NOTES BEFORE USE
Thank you for purchasing a KABUTO helmet. This manual explains how to use your
KABUTO helmet correctly. Please take time to read this instruction manual before
using the helmet, and keep the manual in a safe place for future reference. No helmet
can protect the user 100% in any case of accidents, but it can reduce the risk of injury.
Please make sure you understand the following cautions and enjoy riding your bicycle
safely.
CAUTION!
●This helmet is for bicycle use only.
Do not use this helmet for motorcycle riding or any other activities.
●Please obey all traffic rules.
Features of materials
■ Carbon composite
The AERO-K1’s role cage (core material for reinforcement) uses carbon
composite (made from carbon fiber and resin). The finished surface of carbon
composite tends to vary in terms of smoothness due to its material characteristics.
■ MOFF instant deodorizing fiber
The AERO-K1’s strap uses a new deodorant fiber called MOFF, developed with
nanotechnology, which employs a new odor elimination method never done
before.
MOFF is the next-generation deodorizing fiber with an environment-friendly nature
as well as instant odor elimination and safety characteristics.
[How to clean the MOFF materia]
To keep the effectiveness of MOFF material, gently wash the chin strap with cool
or warm water (below 35°C, 95°
F.) Towel dry and place it in a shaded and
ventilated area.
When using a cleanser, use mild soap.
(Do not use alkaline or similar detergent.)
■ COOLMAX® for quick perspiration evaporation and constant dry
comfort
When you perspire, COOLMAX® wicks the moisture and takes in outside air to
cool and dry your skin to control your body temperature.
COOLMAX® is a naturally soft-textured, lightweight, and breathable material.
*COOLMAX® is a registered trademark of Invista.
Part Names
Shell
SIDE
Liner
Shell
REAR
Ear flap pad
Adjustment lock
Strap buckle
Tail protecting pad
Strap
1 Fastening the strap buckle
2 Adjusting the strap and
Adjuster dial
adjustment locks
3 Adjusting the XF-1 Adjuster
4 Shiled
5 Ear flap
6 Ratchet cover
7 Changing Inner pads
8 Wearing the helmet properly
XF-1 Adjuster
Ear flap pad
1
Fastening the strap buckle
The strap buckles are fastened with the help of magnets.
Please use this strap buckle after understanding its structure.
●How to fasten the strap buckle
snap
sound
Strap
buckle
Make the two magnets on the strap ends attract to
each other, so that the buckle will be fastened.
●How to unfasten the strap buckle
Strap
buckle
Push each part in opposite directions to unfasten
CAUTION!
●Make sure to fasten the strap firmly. It is dangerous to ride a bicycle without fastening
the strap. When fastening the strap buckle, be careful not to pinch your face or neck.
●After fastening, pull the straps side to side to make sure that the strap buckle will not be
unfastened easily.
2
Adjusting the strap and adjustment locks
Try on the helmet before use
Adjust the strap to fit your head. It generally should be just long enough to leave
space for 2 to 3 fingers horizontally when fastening the strap.
Try on your helmet before riding, and adjust the length of the strap, the position of the
adjustment locks and the fit of the XF-1 Adjuster to fit the helmet to your head.
See: 3 Adjusting the XF-1 Adjuster for how to adjust the XF-1 Adjuster
Attention! The length of the left side buckle of the user is not changeable.
Adjusting the length of the strap
Shorten
Lengthen
Side view
Strap buckle
Strap
CAUTION!
Make sure to follow these instructions for
adjusting the strap. Otherwise, the strap
may become loose and the helmet may
Bind the strap with the rubber band at the end. come off.
How to adjust the adjustment locks
Put on the helmet, fasten the strap buckle and adjust the adjustment locks so they can be
placed firmly on the side of your face.
Check that the A part is placed correctly. If the strap
A
around your ears is loose or tight, change the position of the adjustment lock.
How to change the
adjustment lock position
Strap
2
Adjustment lock
Adjustment lock
Correct position
of the strap
1 Open the cover of
the adjustment lock
in the direction
shown by the
arrow.
2 Move the
adjustment lock up
or down to change
Cover
the position.
3 When the
adjustment lock is
13
placed properly,
close the cover
until you hear a
snapping sound.
Attention! Lock the cover securely after changing the position of the adjustment
locks. If the helmet is used without locking the cover securely, the
strap will be loose and the helmet may come off.
3
Adjusting the XF-1 Adjuster
XF-1 Adjuster is a mechanism at the rear of the helmet to keep the helmet from moving. Adjust
the XF-1 Adjuster so it keeps the helmet on your head securely.
First, loosen the XF-1 Adjuster dial, and then put on the helmet. Then, hold the front side of the
helmet against your head and tighten the adjuster dial. (See below)
How to adjust the XF-1 Adjuster/the adjuster dial
Loosen
Turn the dial to the left
Tighten
Turn the dial to the right
Hold the front part and turn the dial.
Hold the front side of the helmet
and tighten the XF-1 Adjuster using
the adjuster dial.
Attention! Be careful with your hair, especially long hair, so it does not get
tangled in the XF-1 Adjuster.
Adjusting the angle of the XF-1 Adjuster
You can change the angle of the XF-1
Adjuster to one of three positions to
select the most comfortable angle.
<Changing the angle of the XF-1 Adjuster>
Hold near the base
of the adjuster
XF-1 Adjuster
Hold near the base of the XF-1 Adjuster as
indicated in the figure. Move it up or down
(3 positions – low, mid or high) to adjust the
angle.
Attention!
When adjusting the angle of the XF-1 Adjuster, make sure to hold near the base of the adjuster.
Do not force or twist the adjuster, as that may break the adjuster.
Replacement XF-1 Adjuster
Replacement XF-1 Adjusters are available.
XF-1 Adjuster
*Please check our website for the details.
Replacement XF-1 Adjuster
Attention!
Every adjuster of KABUTO, including the XF-1 Adjuster, is designed exclusively for a particular
model. Be sure to purchase a replacement adjuster compatible with your helmet.
To attach and remove the XF-1 Adjuster sweat pad
The sweat pad of the XF-1 Adjuster is washable. Remove the pad as
indicated in the figure to wash.
Hook-and-loop
fastener
XF-1 Adjuster
Sweat pad
Top
Bottom
CAUTION!
XF-1 Adjuster Sweat Pad
*Please check our website for the details.
When using the XF-1 Adjuster, make sure to
attach the sweat pad. Be careful with your hair
so it does not get tangled in the adjuster dial.
6
Shield ratchet
Ratchet cover
6
Ratchet cover
Shield ratchet
screw
Shield washer
4
4
Shield
Shield *
5
Ear flap
5
Ear flap
*Shield is not packaged for the shield-less model.
AERO-K1 shield is available as an optional parts.
The shield is detachable. When attaching the shield, use the Shield ratchets, the Shield
washers, and the Shield ratchet screws.
When using the helmet without the shield, attach the Ratchet covers on the shield ports.
Shield and shield relating parts *Please check our website for the details.
Attention!
After attaching the shields, please make sure to check that it has been securely attached by
opening and closing it several times. If the shield surface is damaged, replace it with a new
one, otherwise those damages may hinder your vision, thereby causing a great risk.
5
Ear flap
To attach the Ear flap, 1 insert the hooks
into the holes, 2 slide the Ear flap to the
front side. Follow the reverse order to
detach.
EAR FLAPS ARE DETACHABLE.
hole
Ear flap
*Please check our website for the details.
Attention!
Do not put pressure upon the Ear flap
when wearing, or the Ear flap may be
detached. Make sure that the both sides of the Ear
flaps are attached securely after you wear the helmet.
Ear flap
Fig.1
6
Ratchet cover
When using the helmet without the shield, use
the Ratchet covers.
Each cover has a mark L or R on the back to
identify the side.
To detach the Ratchet cover, use the flathead
screwdriver to scoop the covers up (Fig.2).
Ratchet cover
*Please check our website for the details.
Fig.2
7
Changing Inner pads
Two different thickness inner pads are
packaged.
Attach the inner pads on the inside of the
helmet where the image indicates.
Front
Inner Pad
(top)
Inner Pad
(front)
Strap
Strap
Thickness 5mm/10mm
Cleaning the linings
Linings are removable and washable. Keep linings clean by washing them periodically.
Use warm water (35°C or cooler) with small amount of hair shampoo or ph-neutral
detergent. Hand wash them gently and rinse thoroughly. Dry linings with a dry cloth after
washing, and leave them in a shaded and well-ventilated place. Avoid direct sunlight.
Replacement AERO-K1 linings
Remember!
Linings wear out over time!
Linings used every day will wear out over time. Continuing
to use worn linings may lead to them breaking and causing
poor fit. Old linings should be replaced at an early stage.
AERO-K1 Inner Pads Set (thickness: 5mm)
AERO-K1 Inner Pads Set (thickness: 10mm)
(One size fits all)
*Please check our website for the details.
Attention! Please check the model of your helmet before purchasing a lining set.
5
Wearing the helmet properly
Wear the helmet so it is level from front to back. Make sure the front of the helmet is just
above your eyebrows (check with a mirror).
It is important that the length of the chin strap and adjustable lock be adjusted for correct fitting.
Please make sure to read these instructions thoroughly before use.
Wearing your helmet properly:
RIGHT
WRONG
Make sure the front
edge of the helmet
is just above your
eyebrows
Wear helmet level from front to back.
The front of the
helmet is too far
up, and your
forehead is not
properly
covered.
Attention! Your helmet is only effective as protection in case of an accident if it is
positioned correctly on your head and the strap is fastened correctly.
Be sure you are wearing the helmet correctly before riding.
WARNING:
Be sure to read these instructions.
● This helmet is designed for bicycle use only. Never use the helmet for purposes or
activities other than bicycle riding.
● The helmet should be worn in a way that it protects your forehead, with the edge
just above your eyebrows, and never pushed far over the back of your head.
Wear the helmet so it is level from front to back.
● No helmet can protect the wearer against all injuries or foreseeable impacts.
● Before riding a bicycle, make sure to adjust the helmet so it fits your head correctly.
The strap should be positioned not to cover the ears, the buckle positioned away
from the jawbone, and the strap and buckle adjusted to be both comfortable and
secure.
● Your helmet is effective as protection only when it is worn properly. You should try
different sizes to choose the size which feels secure and comfortable on your head
at time of purchase.
● Please handle the helmet with care. The helmet is designed to absorb shock by
partial destruction of the liner and its damage may not be visible. DO NOT sit on it,
drop it on the floor or otherwise cause impact.
● If subjected to a severe impact, the helmet should be discarded and destroyed.
● Wipe the helmet with common ph-neutral detergent diluted with clear water.
Never use any petroleum, thinner, benzine, hot water above 50°C or saline water.
● Do not leave the helmet in the direct sunlight or where the temperature may
surpass 50°C, e.g. in a car or near a heater.
Doing so will affect the materials and the performance of the helmet will diminish.
● Do not paint the helmet. Paints may reduce the original protective performance of
the helmet considerably.
● Do not modify the helmet. In order to fully maintain the performance of the helmet,
do not attempt to take it apart or change it in any manner that involves making
holes in it or cutting it (or any of its parts) other than as recommended by the
manufacturer.
● This helmet should not be used by children while climbing or doing other activities
when there is a risk of strangulation/hanging if the child gets trapped with the helmet.
Products of OGK KABUTO CO., LTD.
6-3-4, NAGATANISHI, HIGASHIOSAKA, OSAKA, 577-0016, JAPAN.
TEL:+81-6-6748-7806 FAX:+81-6-6747-8023